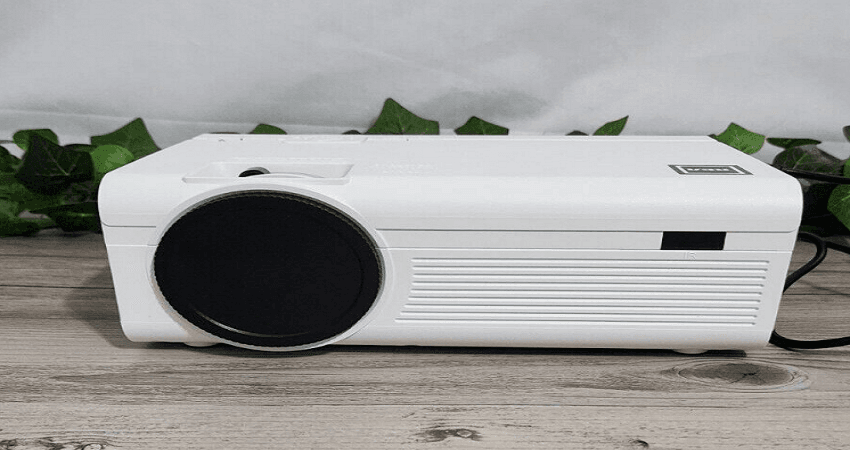
RCA RPJ136 Multimedia Projector
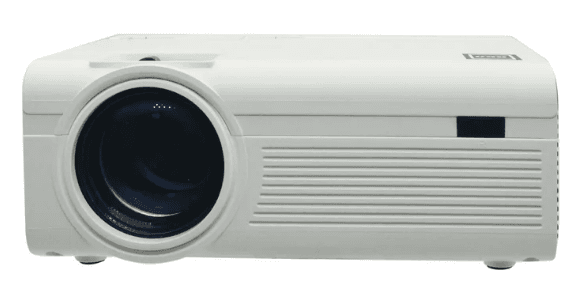
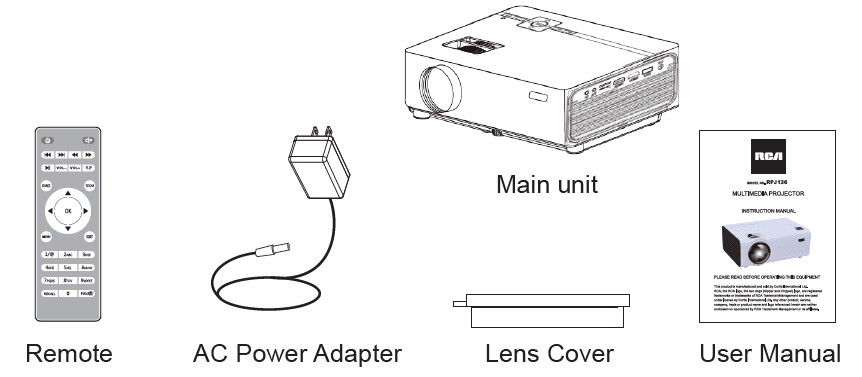
In The Box
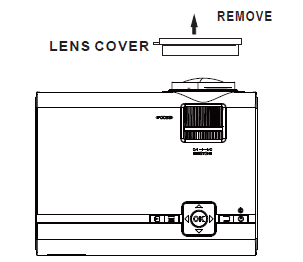
Remove & Close The Lens Cover
Remove the lens cover before using
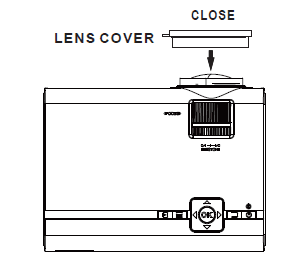
Close the lens cover when unit not using
Placing Your Projector
Your projector can be installed in four different configurations ( see picture below):
Front Table
Select this location with the projector placed near the floor in front of the screen. This is the most common way to position the projector for quick setup and portability.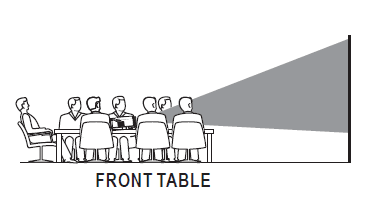
Front Ceiling
Select this location with the projector suspended upside-down from the ceiling in front of the screen.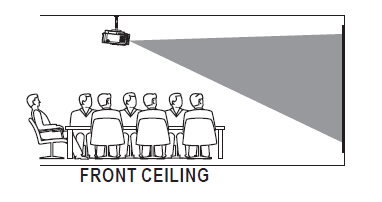
Rear Table
Select this location with the projector placed near the floor behind the screen.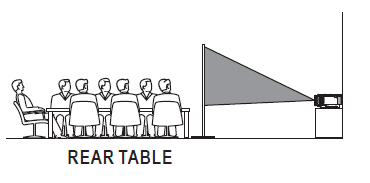
To Reduce Image Distortion
It is recommended to move the projector as close to center of screen.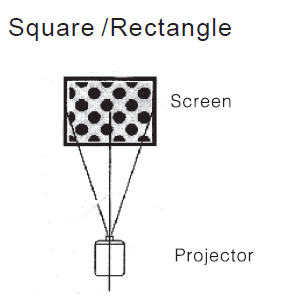
Distance Between The Projector And Screen
Measure the distance between the projector and where you want to position the screen. This is the projection distance.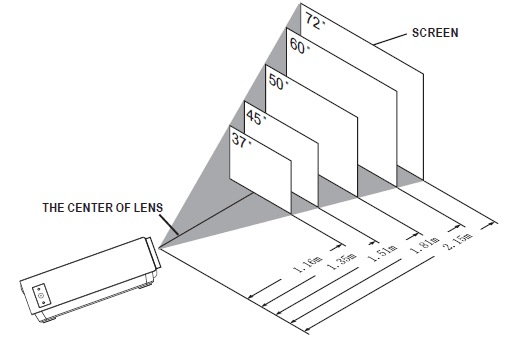
Placing Your Projector On Ceiling
When installing the projector in the ceiling, please purchase a projector mount recommended by an installation professional and follow the instructions that come with the mount. Before installing the projector in the ceiling, please check to make sure the ceiling structure can support the weight of the projector and the mount. If in doubt, please ask the advice from an installation professorial.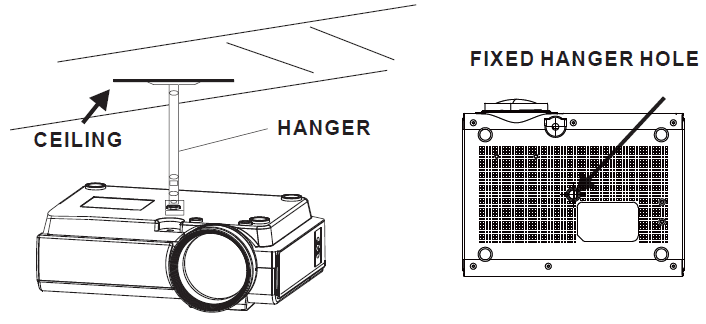
Adjust The Vertical Location
Follow below picture to adjust the vertical location.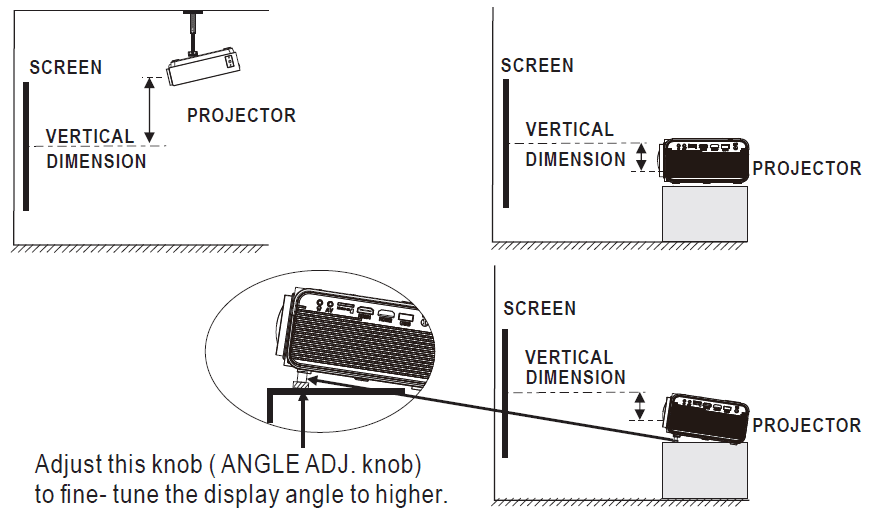
Adjust The Focus And Keystone
Follow below picture to adjust the focus and trapezoidal screen.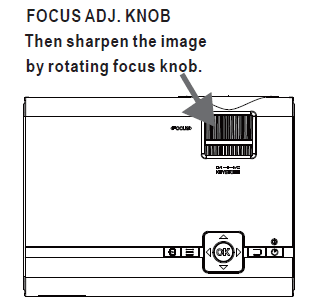
Adjust the focus by turning the knob while observing the image pixels near the center of the screen. Optimal focus is obtained when the pixels are clearly visible. Depending on the projected screen size, the focus near the screen edges may be less sharp than the screen center.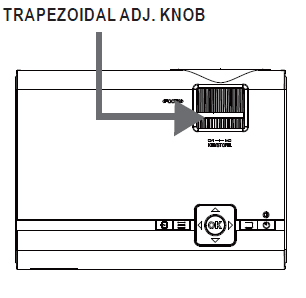
Keystone image is created when the projector beam is projected to the screen in an angle. Keystone correction will restore the distorted image to a rectangular or square shape.
Controls Of Remote
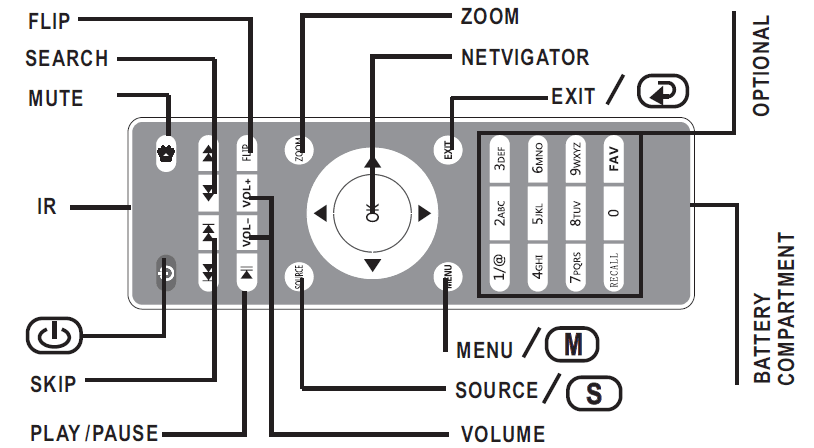
Install / Remove Battery Of Remote
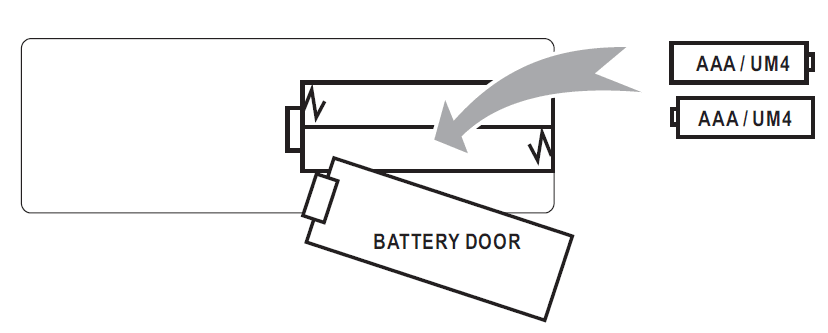
Remove the battery compartment cover on the back of your remote by carefully sliding to open. The battery cover can then be lifted away. Fit the correct batteries (not included), referring to the polarity markings. Finally, replace the cover.
Controls Of Projector
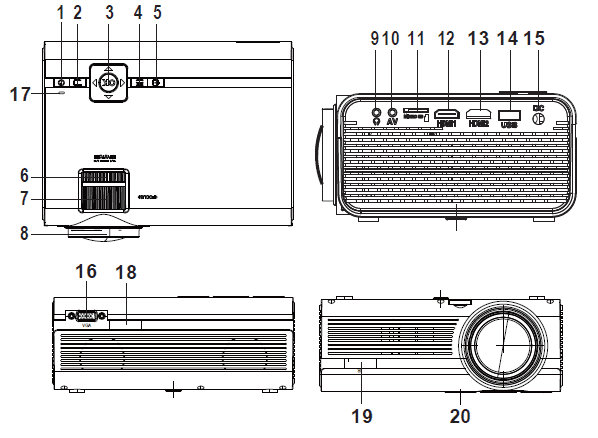
- POWER Button
- RETURN Button
- NETVIGATOR Button
- MENU Button
- SOURCE Button
- TRAPEZOIDAL ADJ. Knob
- FOCUS ADJ. Knob
- LENS
- EAR PHONE Jack
- AV OUT Jack
- Micro SD Card
- HDMI Port 1
- HDMI Port 2
- USB Port
- DC IN jack
- VGA Port
- POWER on Indicator
- IR Window ( Rear Side)
- IR Window ( Front Side)
- ANGEL ADJ. Knob
Install Power Adapter
Follow below picture to connect power adapter Connect small end of adapter FIRST. Plug the adapter body to power outlet.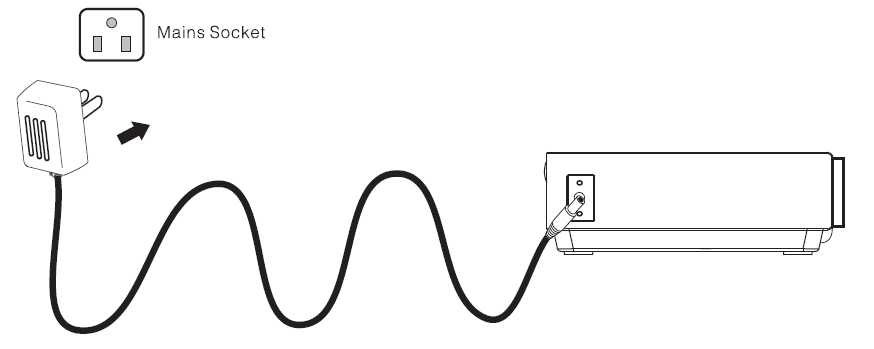
Main Operation
- POWER BUTTON: Press the button to turn on unit, press again to turn off.
- SOURCE : Press the button to select input source.
- MENU: Press the button to enter projector menu.
- NETVIGATOR Button: Press the buttons to select screen item of projector menu.
- EXIT: Press the button to exit the projector menu.
 Press the buttons to fast search forward and rewind on USB / TF.
 Press the buttons to search next or previous file on USB / TF.
- VOL+ / VOL: Press the buttons to select correct sound.
 Press the button to play/pause the connect USB / TF card.
- FLIP: Press the button to rotate / mirror projector screen
- ZOOM: Press the button to select image scale.
- Audio Button: Press to muting the audio sound of your projector. Press again to resume.
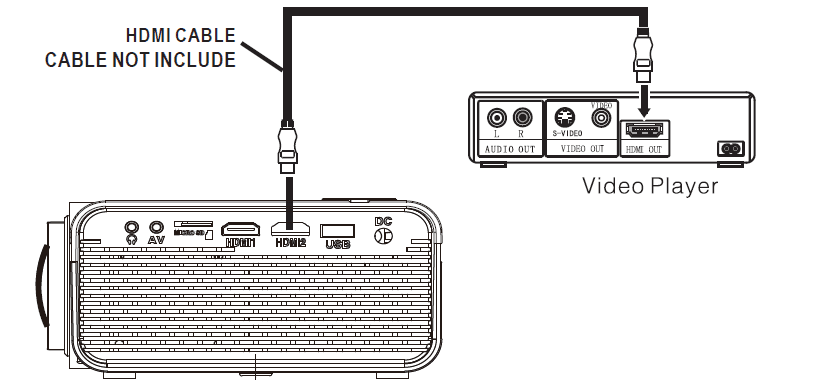
Connect HDMI Show The Image On Projector Screen
Follow below picture to connect HDMI cable and device.
- Turn off the unit before connect HDMI cable.
- After connect, press the Power Button button to turn on unit and power indicator will light GREEN
- Press the SOURCE button to HDMI mode and the video of HDMI device will show on projector screen. There are 2 HDMI input, HDMII interface corresponds to HDMI 1 in SOURCE mode , and HDM12 interface corresponds to HDMI 2 in SOURCE mode.
- Press the Power Button to turn off unit power.
HDMI HD signal input : this interface can be input with HD player HDMI output at the connection
In rare cases, if the projector’s speaker has no sound when playing a DVD movie in a player connecting to the HDMI input, please check the player’s digital audio settings and make sure it is set to “Auto” mode or “PCM” mode.
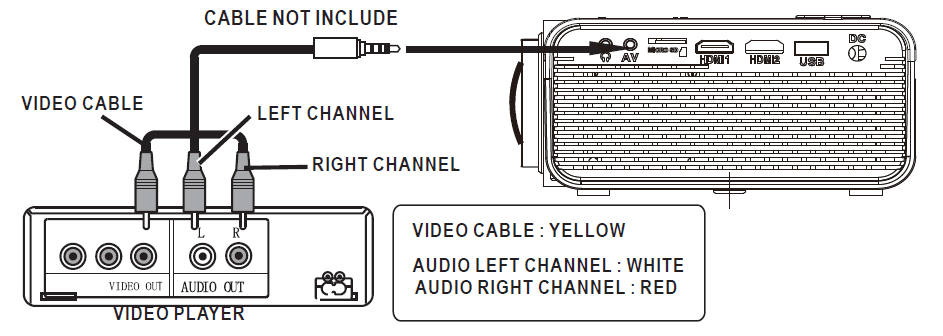
Connect AV Show The Image On Projector Screen
Follow below picture to connect AV cable and device.
- Turn off the unit before connect AV cable.
- Use AV cable to connect follow below figure
- After connect, press the Power button to turn on unit and power indicator will light GREEN
- Press the SOURCE button to AV mode and the video of AV device will show on projector screen
- Press the Power button to turn off unit power.

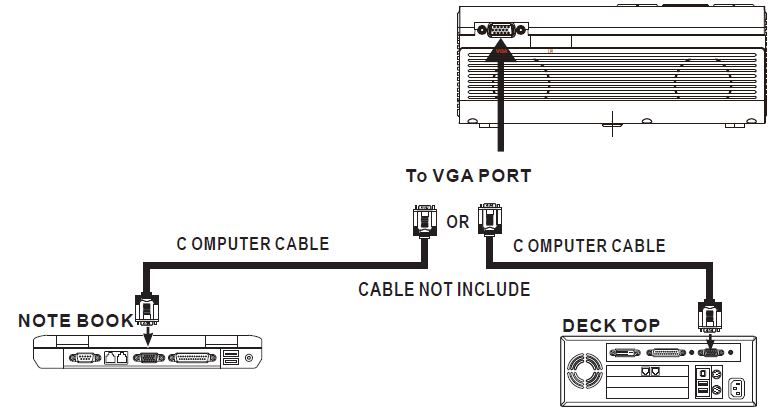
Connect VGA Show The Image On Projector Screen
Follow below picture to connect HDMI cable and device.
- Turn off the unit before connect VGA cable.
- Press the Power button to turn off power of your projector before connection.
- After connect, press the Power button to turn on unit and power indicator will light GREEN
- Press the SOURCE button to VGA mode and the video of VGA device will show on projector screen.
- Press the Power button to turn off unit power.

Please refer to the following table to adjust the output signal from computer
|
PC |
VGA |
640×480 | 31.5 | 60 |
| 34.7 | 70 | |||
| 37.9 | 72 | |||
| 37.5 | 75 | |||
|
SVGA |
800×600 | 31.4 | 50 | |
| 35.1 | 56 | |||
| 37.9 | 60 | |||
| 46.6 | 70 | |||
| 48.1 | 72 | |||
| 46.9 | 75 | |||
| XGA | 1024×768 | 40.3 | 50 | |
| 48.4 | 60 | |||
| 56.5 | 70 | |||
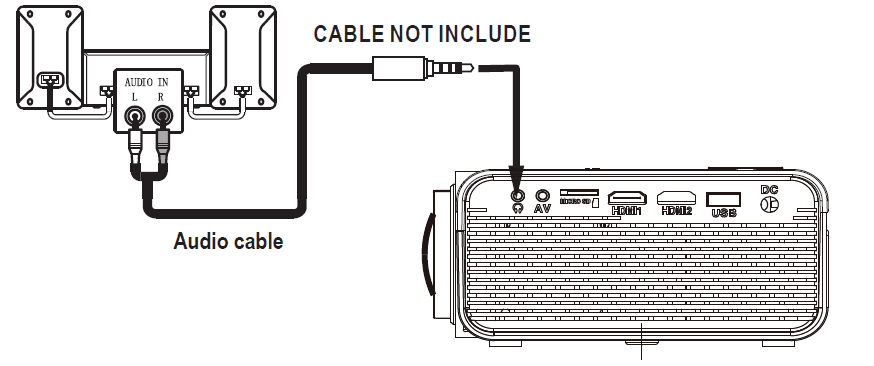
Connect Audio Output ( Aux Out / Line Out / Earphones)
Follow below picture to connect audio cable and device.
- Press the button to turn off power of your projector before connection.
- Use audio cable to connect follow below figure.
- After connect and turn on both units. Your projector sound from external device now.
- After using , turn off both unit
Station Amplifier
Install USB Device And Micro SD Card “TF”
Follow below picture to install USB and TF card .Turn off the unit before install USB / TF card.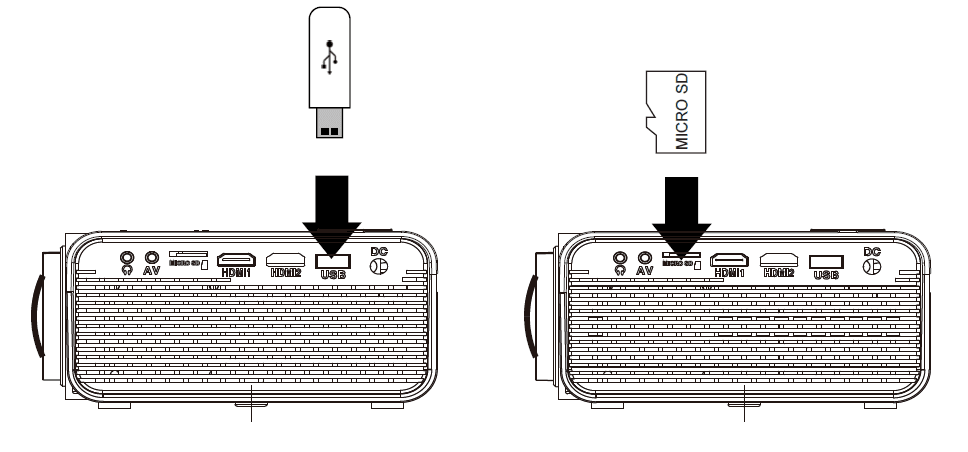
Using TF Card And USB Playback (Media Player)
Install USB / TF device:
- Turn off the unit before install USB / TF card.
- Install the USB device into USB port.
- After connect, press the Power button to turn on unit and the power indicator light GREEN.
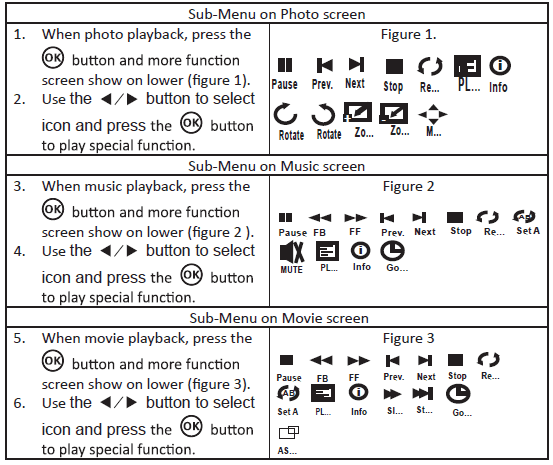
- Press the SOURCE button to enter and use NETVIGATOR buttons to search the MEDIAPLAYER mode.
buttons to search the MUSIC / PHOTO / MOVIE - After selection, use NETVIGATOR icon and press the button to enter. If necessary, use the < / > button to select TF card or USB and press the press the @ button to enter.
- Use NETVIGATOR buttons to search the correct file and press the Return button to preview playback file and press the Power button of unit or
 button of remote to start playback.
 - Press
 button to fast search forward and rewind.
 - Press
 button to search next or previous file.
 - During playback, press the
 button to pause and press again to resume.
Using Projector Menu 1.0
Press Menu button to enter projector menu. Press again to previous status.
- Picture Mode: Standard
- Contrast: 50
- Brightness: 50
- Color: 50
- Sharpness: 50
- Tint: 50
- Color Temperature: Medium
- Aspect Ratio: Auto
- Noise Reduction Screen :Middle
Use NETVIGATOR buttons to select manual page. This manual showed on right upper of view screen
Specifications
| Light Source Type | LED |
| Display Native Resolution | 800 x 480 |
| HDMI Input Supported
Video Resolution. | 1080p , 1080i , 720p, 576i , 480p, and 480i |
| Power Consumption | Operating 36W; Standby 0.8W |
| Power Input
Connect Included Adapter | DC 12V , 3.5A |
| Included Adapter
Connect DC input of unit | Input AC100-240V,50/60Hz
Output DC12V , 3.5 A |
| Display Color | 16.7K |
| Projection Size | 30-100 inch |
| Signal Port | Video / VGA / HDMI |
| USB Port | Support USB device up to 32GB
Support format mpeg1, Mpeg2 ,mpeg4, mp3 , Jpeg |
| SD Card | Support SD card up to 32GB
Support format mpeg1, Mpeg2 ,mpeg4, mp3 , Jpeg |
| Weight | 0.9 KG |
| Dimension | 203 x 150 x 82 mm |
TROUBLESHOOTING
Before resorting the maintenance service, please kindly check by yourself with the following chart.
|
No Image is Projected or a “No Signal” message is displayed | 1. Power light is on. If it is not on, check the projector is plugged into the mains, that the socket is switched on, and then press the power button on the projector. 2. Check the lens cover has been removed. 3.Check the cables are securely attached and installed as per the User Manual. 4. The image source may not be set correctly. Press the Source button on the Control Panel or the Remote, to select the correct setting. 5. Check in the Menu section under Video input signal to make sure that has been set correctly. |
|
The Lamp (Bulb) switches off after a period of time | Is the warning light indicator red? If so, the projector is overheating which turns the light off automatically. 1.Leave the projector to cool for a few moments. 2.Once cooled, check nothing is blocking the ventilation vents. 3. Check the air filter is clean and clean if necessary. 4. Turn on the projector. If the issue persists please contact your support provider for further assistance. |
| The Image is wider at the top/bottom of the screen | This is called keystone and is due to the projection angle not being perpendicular to the screen. To correct use the projectors inbuilt keystone function to adjust the image. |
| Spots on the screen | Using a vacuum cleaner to clean the lens. If cleaning doesn’t resolve things, please contact your support provider for further assistance. |
| The image brightness has faded | This could possible be caused by the ambient light in the room. If not ,the chances are that you need to replace the lamp (bulb). |
For more manuals by RCA visit, ManualsLibraryy
RCA RPJ136 Multimedia Projector-FAQs
Why does my RCA projector keep shutting off?
This could be due to overheating. Most projectors have thermal protection systems to prevent damage when the internal temperature gets too high.
How can I connect my phone to the RCA RPJ136 projector?
Follow these steps:
1. Ensure your phone and the projector support HDMI connections. Most phones require an HDMI adapter.
2. Use an HDMI cable and adapter to connect your phone to the projector’s HDMI input.
3. Set the projector’s input source to HDMI.
How do I set up the RCA RPJ136 multimedia projector?
To set it up:
1. Power on the projector and connect it to a power source.
2. Use HDMI, VGA, or other cables to connect your video source (smartphone, laptop, DVD player).
3. Choose built-in speakers or connect external audio devices.
Why does my projector turn on and off randomly?
This may be caused by overheating, a faulty power supply, or internal component issues. Check for clogged vents, a malfunctioning fan, or a failing lamp or bulb.
Why is my RCA projector flashing on and off?
Flickering may result from connection issues, power problems, overheating, or a bulb nearing the end of its lifespan.
Does the RCA RPJ136 projector support Wi-Fi?
Yes, the RCA projector includes Wi-Fi connectivity and features like video streaming, an Android platform, and a powerful CPU.
Why won’t my RCA projector stay on?
Check these:
1. Ensure it’s securely plugged into a functional outlet.
2. Verify the temperature lights to rule out overheating.
3. If using a remote, replace the batteries.
How can I connect my phone to the projector without Wi-Fi?
Use these options:
1. For iOS: Connect a Lightning-to-HDMI adapter to your phone, then plug the HDMI end into the projector.
2. For Android: Use a USB-C-to-HDMI adapter if your phone supports USB-C, and connect it to the projector’s HDMI input.

