
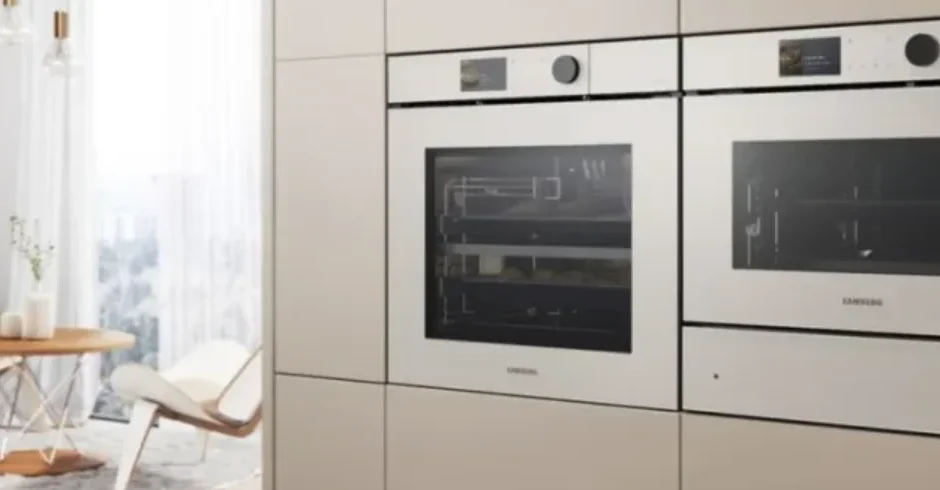

Samsung Bespoke AI Oven
Important safety instructions
Read and follow all instructions before using your oven to prevent the risk of fire, electric shock, personal injury, or damage when using the oven. This guide does not cover all possible conditions that may occur. Always contact your service agent or the manufacturer about problems that you do not understand.
- Always disconnect the power to the appliance before servicing by removing the fuse or switching off the circuit breaker.
- Do not enter the oven.
- Do not leave children alone. Never leave children alone or unattended in an area where this appliance is in use. They should never be allowed to sit or stand on any part of the appliance.
- Never use your appliance for warming or heating the room.
- Do not use water on grease fires. Turn off the oven to avoid spreading the flames. Smother the fire or flames by closing the door or using a dry chemical, baking soda, or foam-type extinguisher.
- Avoid scratching or striking the glass doors and the control panel. Doing so may lead to glass breakage. Do not cook on a product with broken glass. Shock, fire, or cuts may occur.
- If there is a fire in the oven during self-cleaning, turn the oven off and wait for the fire to go out. Do not force the door open. The introduction of fresh air at self-cleaning temperatures may lead to a burst of flame from the oven. Failure to follow these instructions may result in severe burns.
- If the oven is heavily soiled with oil, self-clean the oven before using it again. Leaving the oil in place creates a risk of fire.
- Wipe up heavy soil on the oven bottom with a paper towel or rag before self-cleaning. Self-cleaning the oven when there is heavy soil on the oven bottom requires longer cleaning cycles and produces more smoke.
- Storage in or on the appliance. Do not store flammable materials in the oven or near the surface units. Be sure all packing materials are removed from the appliance before operating it. Keep plastics, clothes, and paper away from parts of the appliance that may become hot.
- Wear proper apparel. Never wear loose-fitting or hanging garments while using the appliance.
ELECTRICAL SAFETY
- Use only the factory-installed flexible power cord to connect to the power supply. Do not use a 3rd party power supply cord kit.
- The appliance should be serviced only by qualified service personnel. Repairs carried out by unqualified individuals may cause injury or a serious malfunction. If your appliance is in need of repair, contact a Samsung authorized service center. Failure to follow these instructions may result in damage and void the warranty.
- Flush – mounted appliances may be operated only after they have been installed in cabinets and workplaces that conform to the relevant standards. This ensures that the appliances are installed in compliance with the appropriate safety standards.
- If your appliance malfunctions or if cracks, fractures, or splits appear:
- Switch off the oven.
- Unplug the oven from the AC wall outlet.
- Contact your local Samsung service center.
USAGE CAUTIONS
CAUTION
- If the surface is cracked, turn the appliance off.
- Failing to do so may result in electric shock.
- Dishes and containers can become hot. Handle with care.
- Hot foods and steam can cause burns. Carefully remove container coverings, directing the steam away from your hands and face.
- Remove lids from baby food jars before heating. After heating baby food, stir well to distribute the heat evenly. Always test the temperature by tasting before feeding the baby. The glass jar or the surface of the food may appear to be cooler than the interior, which can be hot enough to burn an infant’s mouth.
- Beverages or food may be very hot after heating.
- Especially when feeding a child, make sure the food or beverage has cooled sufficiently.
READ AND SAVE THESE INSTRUCTIONS
IC Notice
This device contains licence-exempt transmitter(s)/ receiver(s) that comply with Innovation, Science and Economic Development Canada’s licence-exempt RSS(s). Operation is subject to the following two conditions:
- This device may not cause interference.
- This device must accept any interference, including interference that may cause undesired operation of the device.
- CAN ICES(B)/NMB(B)
IC RADIATION EXPOSURE STATEMENT: This equipment complies with IC RSS-102 radiation exposure limits set forth for an uncontrolled environment. This equipment should be installed and operated so that there is at least 8 inches (20 cm) between the radiator and your body. This device and its antenna(s) must not be co-located or operated in conjunction with any other antenna or transmitter.
Introducing your new oven
Overview
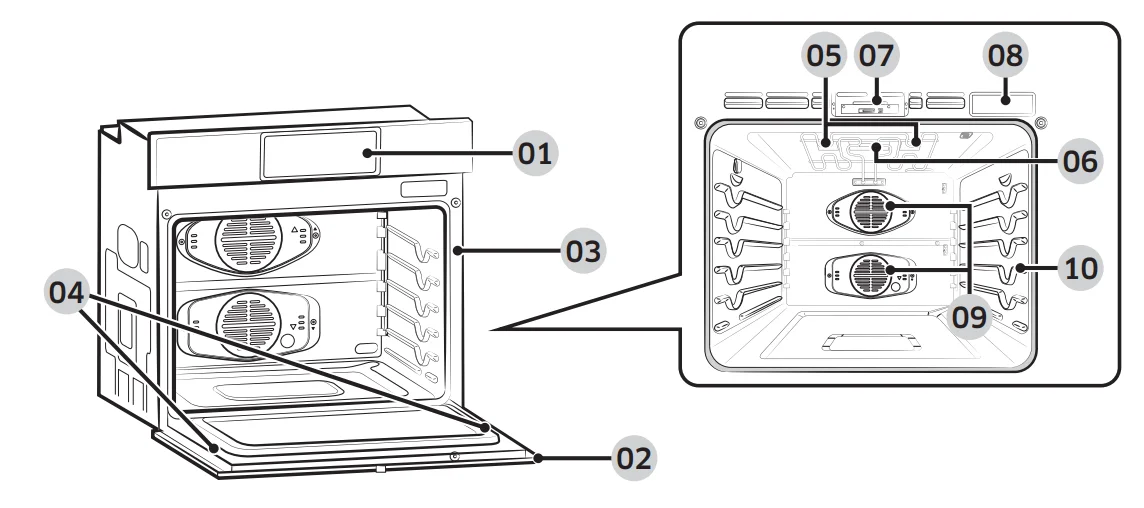
- Oven control panel
- Oven door
- Oven gasket
- Door LED light
- LED lamp
- Camera
- Door latch
- Water reservoir
- Convection fan
- Rack position
What’s included with your oven
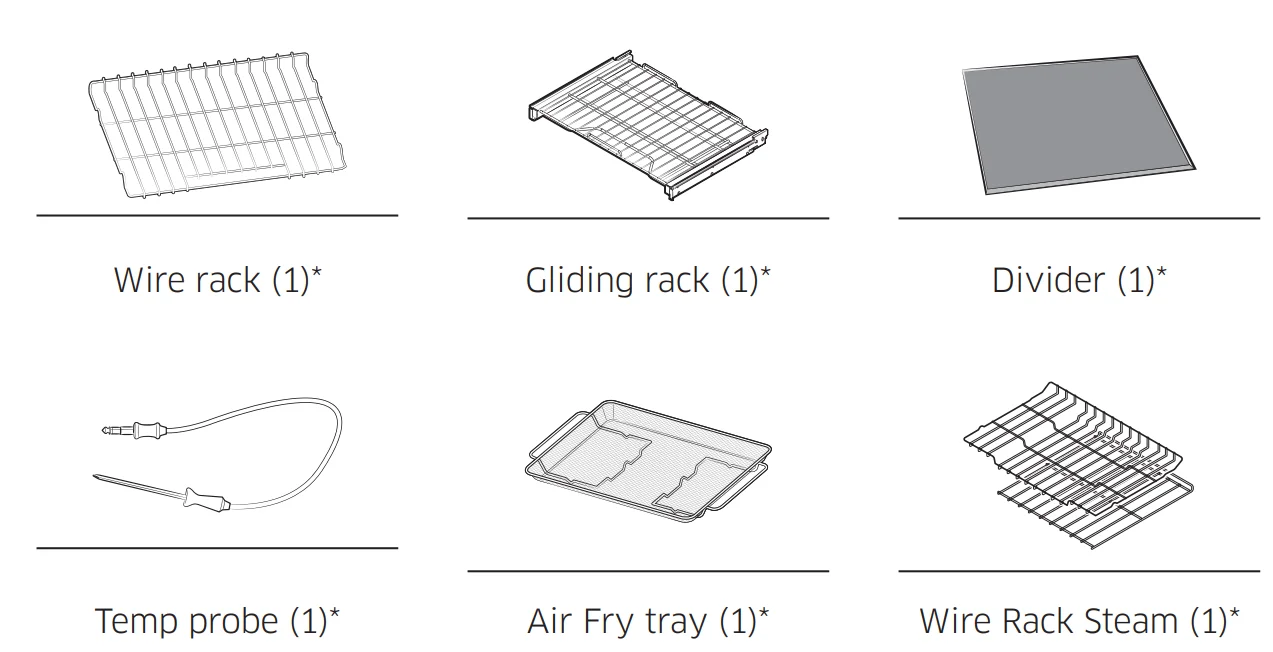
NOTE: If you need an accessory marked with a *, you can purchase it by calling the Samsung Contact Center (1-800-726-7864 or www.samsung.com/us/support).
Assembling the steam container (applicable models only)
The Steam container and glass lid are only for the full steam cook function. Use the Steam container on the Wire rack, steam only, and make sure to insert it fully into the compartment so the container touches the rear wall. The steam container has 4 separate parts: the glass lid, the metal pan, the steam tray, and the steam nozzle.
WARNING: Do not use a glass lid for broiling or baking. Use the Steam cook mode only.
CAUTION
- Always wear oven mitts when handling the steam container and be careful not to drop the steam container.
- Sudden temperature changes could cause glass parts to break or shatter.
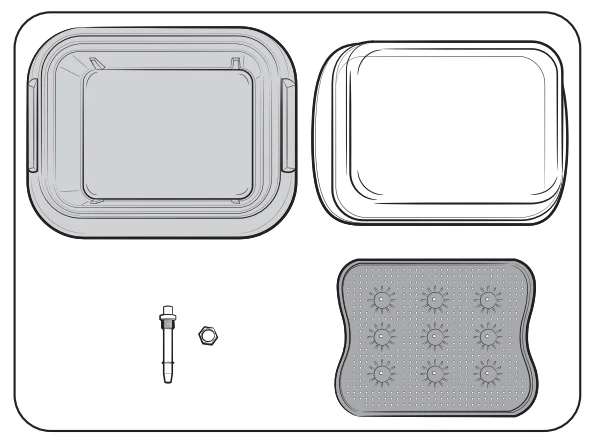
- Check and make sure you have all the parts for the steam container.
- Parts include a glass lid, metal pan, steam tray, and steam nozzle.

- Parts include a glass lid, metal pan, steam tray, and steam nozzle.
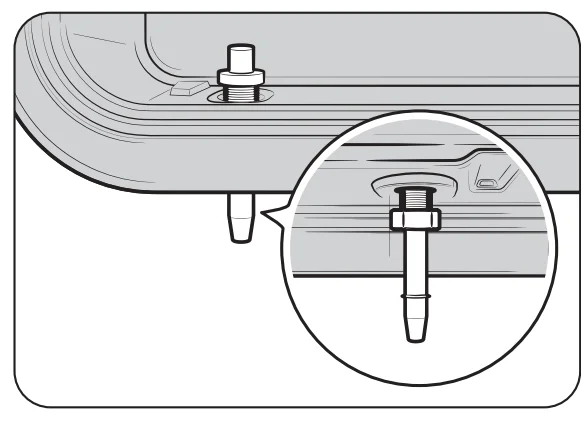
- Insert the steam nozzle into the hole on the right-rear side of the metal pan, and then tighten the provided nut.

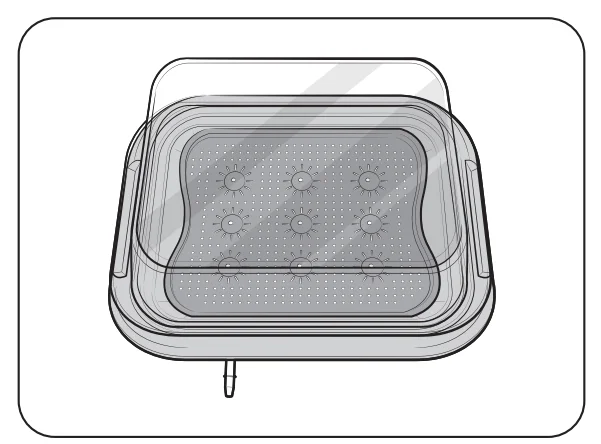
- Put the steam tray in the metal pan, and then close the glass lid to use it in the oven.
Before you begin
Clean the oven thoroughly before using it for the first time. Then, remove the accessories, set the oven to Bake, and then run the oven at 400 °F for 1 hour. There will be a distinctive odor. This is normal. Ensure your kitchen is well ventilated during this conditioning period.
Energy saving tips
- During cooking, the oven door should remain closed except when you turn food over. Do not open the door frequently during cooking to maintain the oven temperature and to save energy.
- If cooking time is more than 30 minutes, you can switch the oven off 5 – 10 minutes before the end of the cooking time to save energy. The residual heat will complete the cooking process.
- To save energy and reduce the time needed for re-heating the oven, plan oven use to avoid turning the oven off between cooking one item and the next.
- Whenever possible, cook more than one item at a time.
Water reservoir
The water reservoir is used for the Steam Bake, Steam Roast, Steam Cook, and Steam Proof functions and also to remove water scale that may form on the oven walls, especially after Steam Baking, Steam Roasting, Steam Cooking, and Steam Proofing. Fill it with water before steam cooking or descaling.
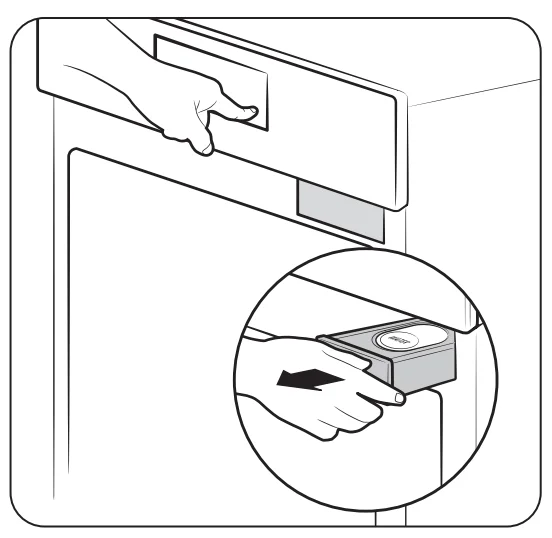
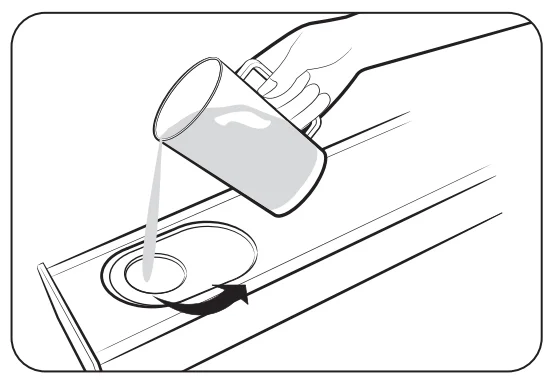
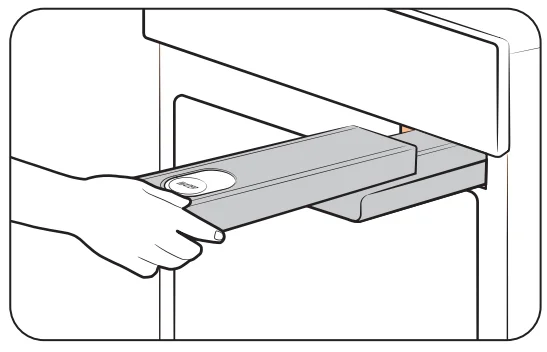
- Locate the water reservoir. The water reservoir is on the right side of the oven, just above the oven opening. Touch Open/Close Reservoir on the control panel to eject the water reservoir. Grab the front of the reservoir, and then slide it out to remove.

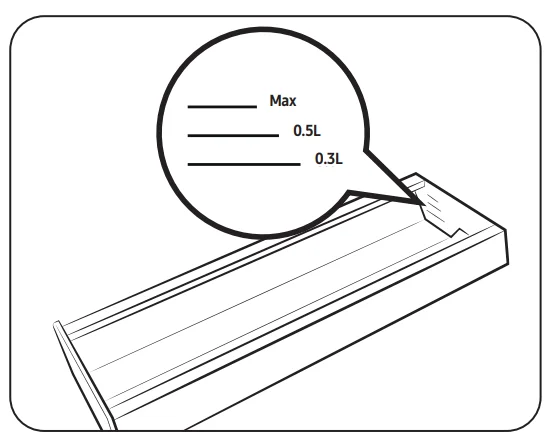
- Open the reservoir cap, and then fill the reservoir with 22 oz (650ml) of drinkable water.
NOTE: You can open the reservoir by removing the rubber cap or by removing the clear plastic top.
- Replace the cap or the clear plastic top, and then slide the water reservoir back into the reservoir slot.

- Push the reservoir in. There will be a soft click when it is in place correctly. Touch Open/Close Reservoir: The oven retracts the water reservoir.

- Close the oven door.
NOTE: Do not exceed the max line.
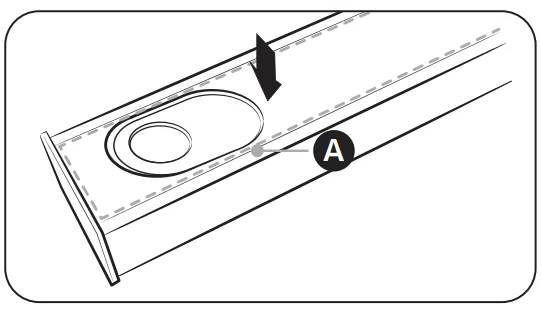
NOTE: Make sure the cap and the upper portion of the water reservoir (labeled A) are closed before using the oven.
CAUTION: The water reservoir becomes hot during cooking. Make sure you wear oven gloves to remove or refill the water reservoir.
Push to open the door
The push-to-open door can be opened and closed by simply pressing it.
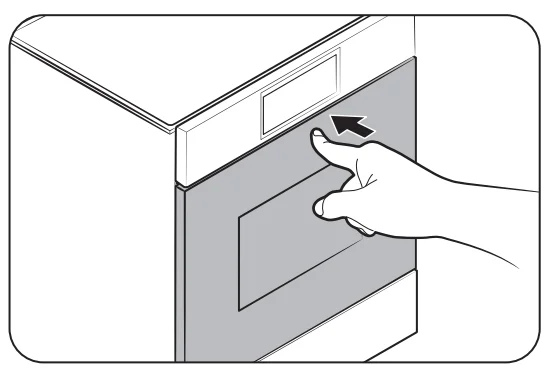
- Press the upper side of the door.

- The door slowly opens.

- To close the door, press the upper side of the door again.
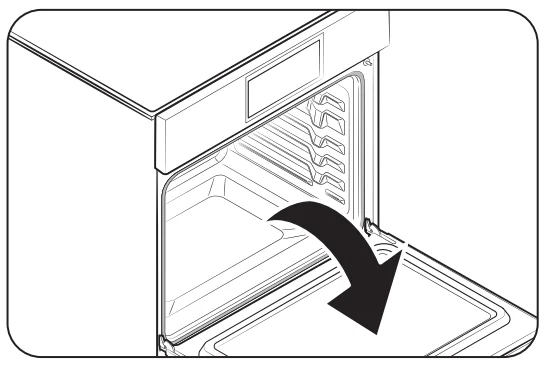
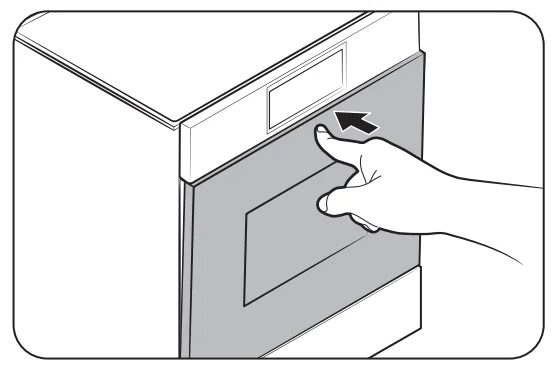
CAUTION: You can get hurt when the door opens and closes. Make sure you keep your distance from it.
Camera In Oven (applicable models only)
Camera in Oven
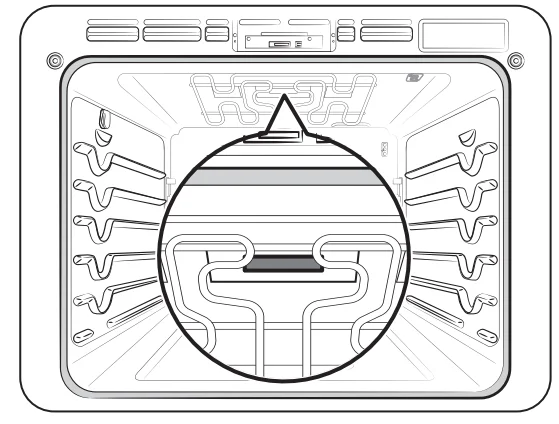
WARNING: Clean the transparent cover of the camera after the product cools down.
- You may get a burn due to the heat.
CAUTION: Do not wipe too hard when cleaning the transparent cover of the camera that has the camera functions.
- It could be damaged as it is made of glass.
The built-in camera not only enables you to monitor the cooking process using the SmartThings app, but it also provides Food Recognition, Food Recommendation, Doneness Guide, and Burn Prevention functions for certain food items. Check the Camera Vision settings in Settings – Oven. It is only available if the product is connected to Wi-Fi through Easy Connection. For supported recipes, see the Auto Cook Programmes table.
- Live Streaming: Monitors the cooking status in the oven with the SmartThings app.
- Food Recognition: When the door is closed, it recommends the most appropriate recipe from Guided Cook Programmes by recognizing the food item and its serving size.
- Doneness Guide: After connecting the temperature probe, the cooking is completed with the recommended or desired doneness. (Requires temperature probe connection, see Using the Temp probe section on page.27)
- Burn Notification: Provides a notification when the food seems to start burning.
However, the camera does not operate during certain modes, such as the Cleaning and lower setting in twin cooking mode. The upper LED light is turned on while the camera is in operation. (The camera will turn off if you turn off the Light switch.)
NOTE
- The camera may not recognize the food depending on the dish. In this case, use the Guided Cook functions.
- For optimal camera recognition, clean the transparent cover of the camera and the upper LED light on the ceiling inside the oven on a regular basis.
- Clean the inside of the oven after it has completely cooled down.
- Do not wipe too hard when cleaning the transparent cover of the camera. It may cause scratches or other damage.
- Do not disassemble the transparent cover of the camera for cleaning purposes. It may cause the camera to malfunction.
- While the Live Streaming feature is on, the food image from the camera image may be steamed or fogged up, depending on the food.
Control panel
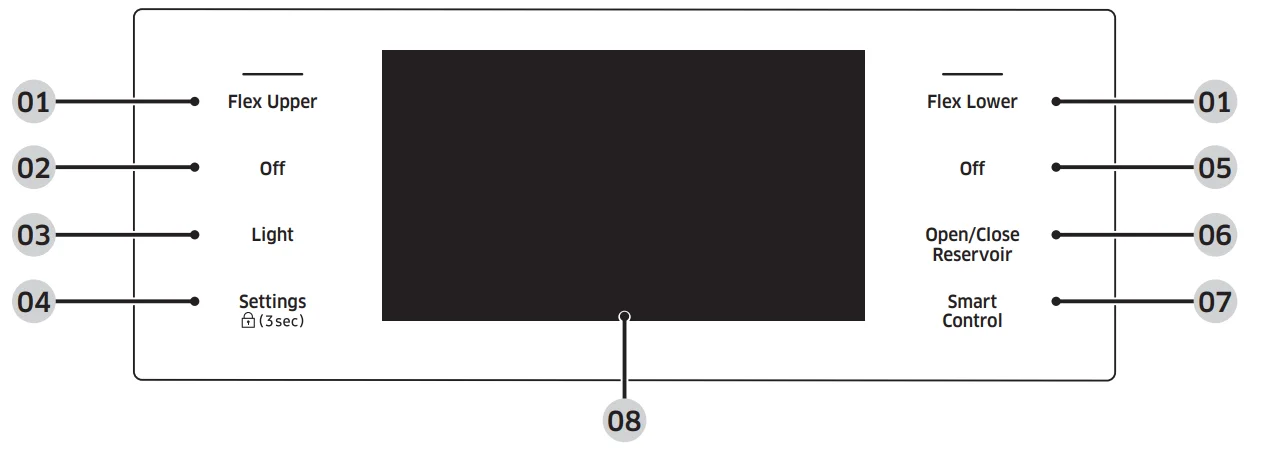
- Flex Upper, Flex Lower: Use to display the upper oven or lower oven mode screen on the display. Touching here does not turn the ovens on or off. It only displays their current status.
- Off: Use to cancel when the upper oven is cooking.
- Light: Use to turn the oven light on or off.
- Settings: Used to display the Settings screen. If you touch and hold this key for 3 seconds, all oven functions will be disabled.
- Off: Use to cancel when the lower oven is cooking.
- Open/Close Reservoir: Touch to open or close the water reservoir.
- Smart Control: Use to select the smart control feature.
- Display: Swipe to navigate through the menus and tap to select a desired setting.
NOTE
If you tap or touch the display while wearing plastic gloves or oven mitts, the display will not operate properly. Take the gloves/mitts off first, and then tap with a bare finger.
Display
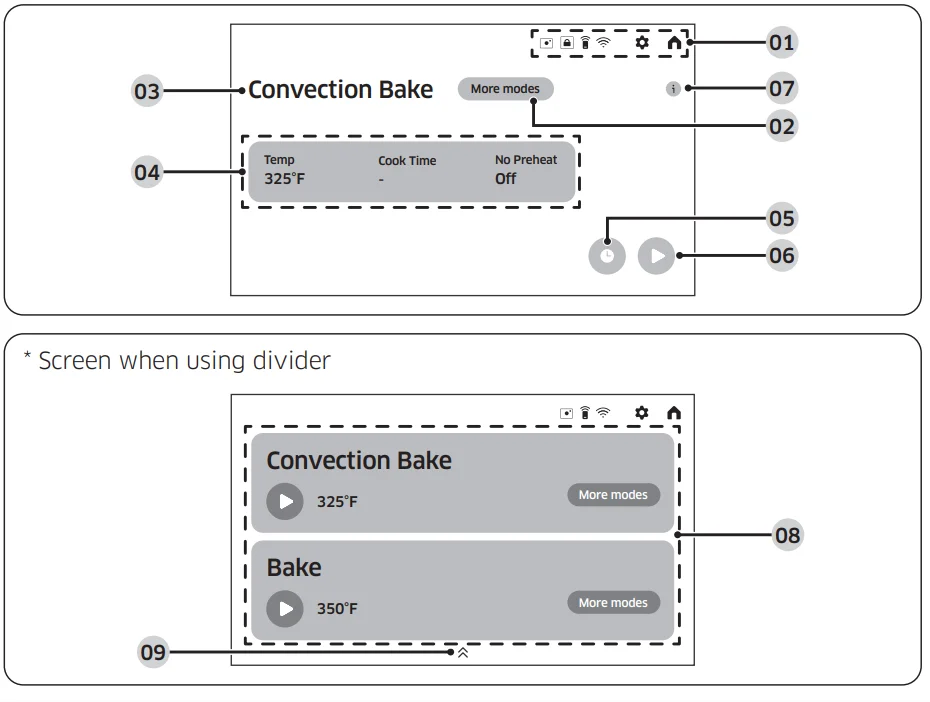
- Indicator area: When the feature is activated as Smart control, Lock, Wi-Fi, Camera Vision, etc., the icon will appear in the indicator area.
- More modes: When you tap this, you can select a mode.
- Mode: The current or selected mode is displayed.
- Information area
- Temp: The current or selected temperature is displayed. When you tap this area, the Temperature adjustment screen is displayed.
- Temp Probe: When you insert the temp probe, the set temperature of the probe is displayed.
- Cook Time: The cooking time is displayed. When you tap this area, the cooking time screen is displayed.
- No Preheat: Indicates if the No Preheat feature is on or off. (Only displayed when you are using the Convection bake or Convection roast.)
- Steam: The steam level is displayed. When you tap this area, the Steam level screen is displayed. (Only displayed when you are using the Steam mode.)
- Delay Start: The delay start time is displayed. When you tap this area, the Delay Start screen is displayed.
- Start: Tap to start the oven using the displayed settings.
- TIP: Tap to show the pop-up guide about temp. (Only displayed when you are using the Convection bake or Convection roast.)
- Oven selection: You can select between flex upper and flex lower when using the divider.
- App menu: Swipe to use the app. The app will appear on the screen.
Air Fry
NOTE
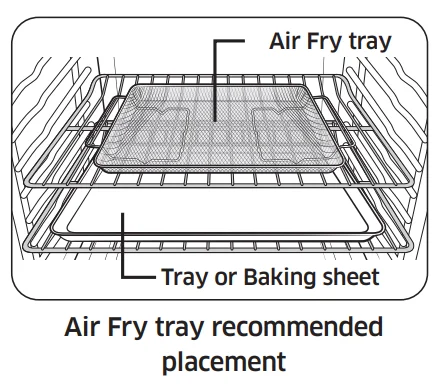
- Place a baking sheet or tray on the rack below the Air Fry tray for getting any drippings. This will help to reduce splatter and smoke for high-fat foods, such as chicken wings.
- Air Fry is designed for baking on a single oven rack. Place food on rack position 3 for best results. (Rack position number counts from the bottom.)
- Before using a baking ware, check the maximum allowable temperature of the baking sheet.
- Place under a few sheets of paper, like parchment paper, to absorb the fat for reducing splatter and smoke during the Air Fry.
- For cooking fresh or homemade foods, spread the oil over a larger area more evenly, crisping up the food more effectively.
- Wet or thick coating will not crisp or set to use with the Air Fry.
CAUTION
- Foods that are high in fat will smoke when using the Air Fry model, such as chicken wings, bacon, sausage, and turkey legs.
- Before you start Air Fry, turn on an exhaust hood at a high-level fan setting.
- Open a window in your kitchen if it is possible to make sure the kitchen is well-ventilated.
- Once the oven has cooled, wipe down the interior of the oven before and after Air Fry cooking.
- Regularly, clean the grease filters of the exhaust hood to prevent smoke during cooking.
- Avoid opening the oven door, or else it is difficult to maintain the oven temperature, prevent heat loss, and save energy.
NOTE
- Preheating is not necessary.
- Place the Air Fry tray in position 3.
- It is recommended to use avocado oil.
- Place a baking sheet or tray on the rack below the Air Fry tray to catch any drippings. This will help to reduce splatter and smoke.
Maintaining your appliance
Care and cleaning of the oven
Cleaning painted parts and decorative trim
- For general cleaning, use a cloth with hot, soapy water.
- For more difficult residue and built-up grease, apply a liquid detergent directly onto the area and leave for 30 to 60 minutes. Wipe with a damp cloth and dry. Do not use abrasive cleaners on any oven surface. They can be scratched.
Cleaning stainless steel surfaces
- Shake a bottle of Stainless Steel Appliance Cleaner or Polish well.
- Place a small amount of stainless steel appliance cleaner or polish on a damp cloth or damp paper towel.
- Clean a small area, rubbing with the grain of the stainless steel if applicable.
- Dry and buff with a clean, dry paper towel or soft cloth.
- Repeat as necessary.
NOTE
- Do not use a steel-wool pad. It will scratch the surface.
- If a mineral oil-based stainless steel appliance cleaner has been used before to clean the appliance, wash the surface with dishwashing liquid and water prior to using the Stainless Steel Appliance Cleaner or Polish.
Air Fry tray
To keep the Air Fry tray clean, remove it from the cavity, and soak it in Lukewarm soapy water. Then, scour the soil off the Air Fry tray using a plastic scouring pad.
NOTE: The Air Fry tray is dishwasher-safe.
CAUTION: Do not leave the Air Fry tray in the oven during the self-cleaning cycle. The extreme heat generated in this cycle can permanently peel off the air fry coating, their color will turn slightly blue, and the finish will be dull.
To lubricate the slides of the gliding rack
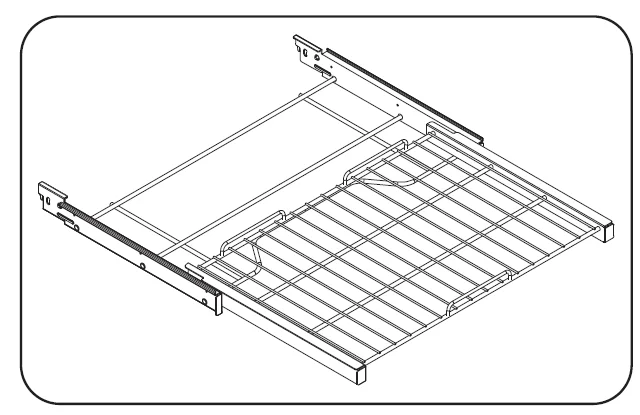
- Remove the rack from the oven. See removing the gliding rack in the Using the gliding rack section on page 49.

- Fully extend the rack on a table or countertop. The newspaper may be placed underneath the rack for easy cleanup.

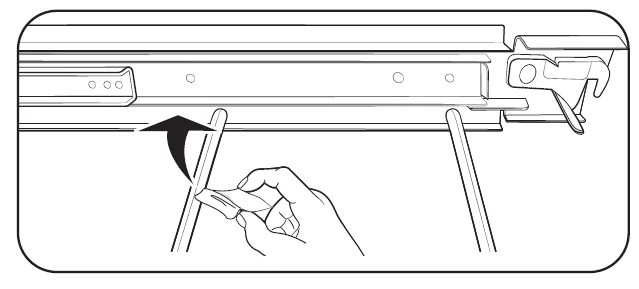
- If there is debris in the slide tracks, wipe it away using a paper towel. (Any graphite lubricant wiped away must be replaced – See steps 4 through 7).

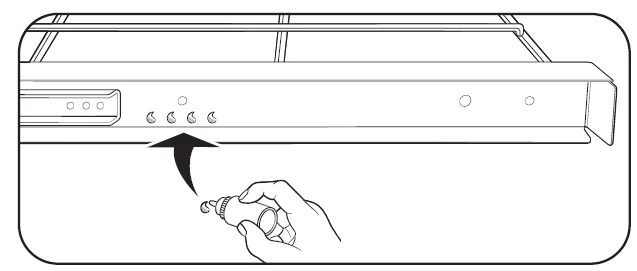
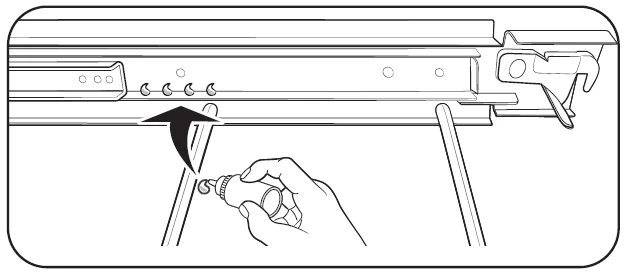
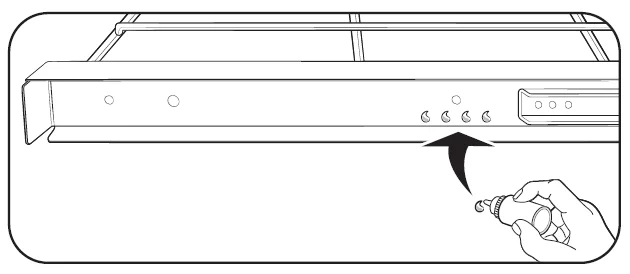
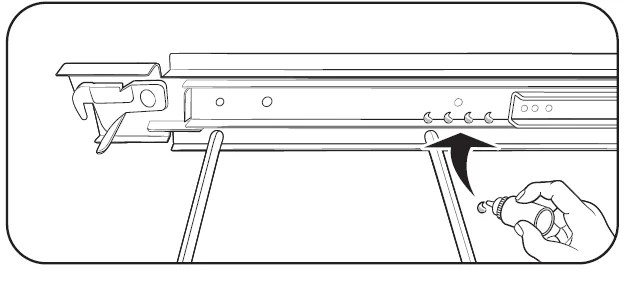
- Shake the graphite lubricant before opening it. Starting with the left (front and back) slide mechanism of the rack, place four (4) small drops of lubricant on the two (2) bottom tracks of the slide close to the bearing carriers.

- Repeat for the right (front and back) slide mechanism of the rack.

- Open and close the rack several times to distribute the lubricant.
- Replace the cap on the lubricant and shake it again. Turn the rack over and repeat steps 3, 4, 5, and 6.

- Close the rack, turn the rack right-side up, and then place it in the oven. See Installing the Gliding Rack on page 49.
NOTE
Do not spray the gliding rack with cooking spray or other lubricant sprays.
Oven door
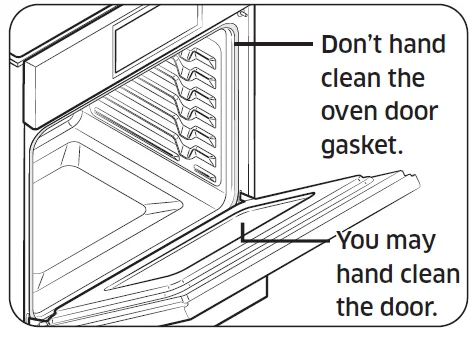
- Use soap and water to thoroughly clean the top, sides, and front of the oven door. Rinse well. You may use a glass cleaner on the outside glass of the oven door. DO NOT immerse the door in water. DO NOT spray or allow water or the glass cleaner to enter the door vents. DO NOT use oven cleaners, cleaning powders, or any harsh abrasive cleaning materials on the
outside of the oven door. - DO NOT clean the oven door gasket. The oven door gasket is made of a woven material, which is essential for a good seal. Care should be taken not to rub, damage, or remove this gasket.
Troubleshooting
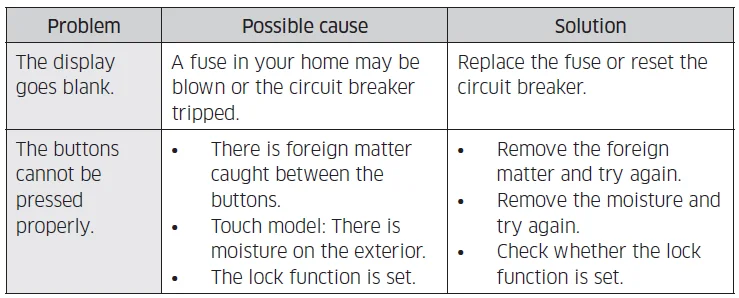
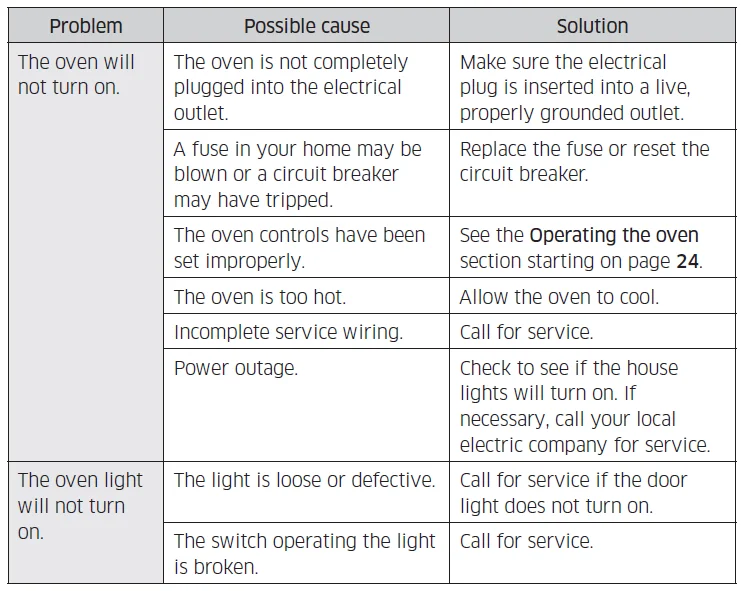
At Samsung, we want to ensure that you don’t have problems with your new electric oven. If you run into unexpected trouble, look first for a solution in the tables below. If you’re still having trouble after trying the suggested solution, call Samsung at 1-800-SAMSUNG (1-800-726-7864).
Control display
Oven
For more manuals by Samsung, visit ManualsLibraryy
Samsung Bespoke AI Oven-FAQs
How do I enable Smart Control on the Samsung Bespoke AI Oven?
To use Smart Control, close the oven door and tap the Smart Control option on the display panel. Once activated, you can monitor and control the oven remotely using the SmartThings app. Remote access turns off automatically if the door is opened or cooking is canceled.
What do the symbols on a Samsung oven mean?
Samsung ovens use symbols to represent different cooking functions such as convection baking, grill mode, preheating, timer, and air fry. The fan symbol usually indicates convection mode, while heating line icons show top or bottom heat settings.
What should I do before using the oven for the first time?
Before first use, remove all packaging materials, protective film, and zip ties from the oven racks. Run the oven at a high temperature for about one hour to eliminate factory odors and ensure proper ventilation during this process.
How do I use the Air Fry feature on the Samsung Bespoke AI Oven?
Place food on the Air Fry tray and position it on the recommended rack level. Select Air Fry mode from the control panel, adjust the temperature if needed, and start cooking. For easier cleanup, place a baking tray underneath to catch drippings.
What is the difference between an air fryer and an oven air fryer?
A countertop air fryer is compact and cooks small portions quickly, while an oven air fryer offers larger cooking space and multiple cooking functions. Oven air fryers are better for families and larger meals, while traditional air fryers are ideal for fast snacks and reheating.
Can aluminum foil be used in Air Fry mode?
It is generally not recommended to fully line the Air Fry tray with foil because it may block airflow and affect cooking performance. However, small pieces of foil can sometimes be used carefully for specific foods.
How do I preheat the Samsung Bespoke AI Oven?
Select your desired cooking mode, set the temperature, and press Start. The oven will begin heating automatically and signal when the preheating process is complete.
Does the Samsung convection oven adjust temperature automatically?
Yes, many Samsung convection ovens automatically reduce the temperature slightly during convection cooking. This helps recipes cook evenly without requiring manual adjustments.
Which oven mode should I use for baking cakes?
For cakes and desserts, the standard Bake mode or Convection Bake mode usually works best. These settings provide even heat distribution for consistent baking results.
Can I bake and roast with the Samsung Bespoke AI Oven?
Yes, the oven supports multiple cooking modes including baking, roasting, broiling, air frying, and convection cooking, making it suitable for a wide variety of recipes.