
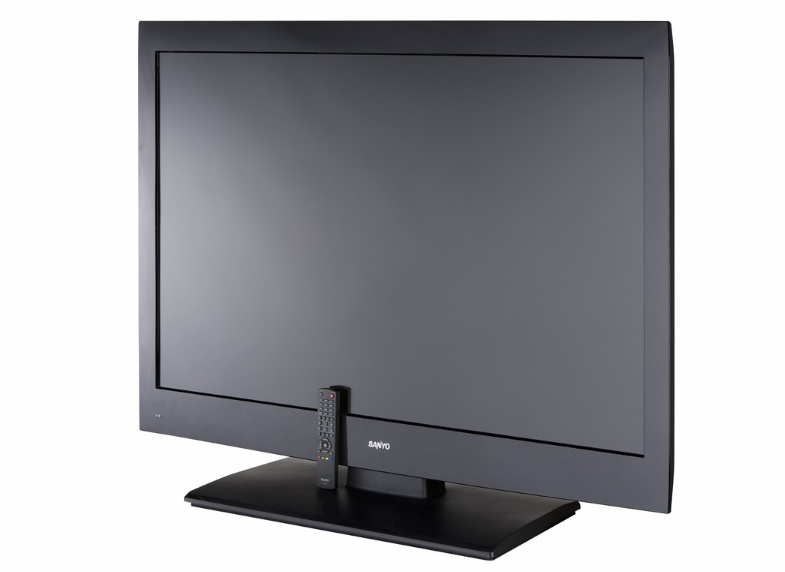
Sanyo DP55441 LCD TV
IMPORTANT SAFETY INSTRUCTIONS
- Read these instructions.
- Keep these instructions.
- Heed all warnings.
- Follow all instructions.
- Do not use this apparatus near water.
- Clean only with a dry cloth.
- Do not block any ventilation openings. Install in accordance with the manufacturer’s instructions.
- Do not install near any heat sources such as radiators, heat registers, stoves or other apparatus (including amplifiers) that produce heat.
- Do not defeat the safety purpose of the polarized or grounding- type plug. A polarized plug has two blades with one wider than the other. A grounding type plug has two blades and a third grounding prong. The wide blade or the third prong are provided for your safety. If the provided plug does not fit into your outlet, consult an electrician for replacement of the obsolete outlet.
- Protect the power cord from being walked on or pinched, particularly at plugs, convenience receptacles, and at the point where they exit from the apparatus.
- Only use the attachments/accessories specified by the manufacturer.
- Use only with the cart, stand, tripod, bracket or table specified by the manufacturer or sold with the apparatus. When a cart is used, use caution when moving the cart/ appliance combination to avoid injury from tip-over.
- Unplug this apparatus during lightning storms or when unused for long periods of time.
- Refer all servicing to qualified service personnel. Servicing is required when the appliance has been damaged in any way, such as when a power-supply cord or plug is damaged, liquid has been spilled or objects have fallen into apparatus, the apparatus has been exposed to rain or moisture, does not operate normally or has been dropped.
- If an outside antenna is connected to the television equipment, be sure the antenna system is grounded so as to provide some protection against voltage surges and built up static charges. In the U.S. Selection 810-21 of the
National Electrical Code provides information with respect to proper grounding of the mast and supporting structure, grounding of the lead-in wire to an antenna discharge unit, size of grounding conductors, location of antenna discharge unit, connection to grounding electrodes, and requirementsfor the grounding electrodes. - An outside antenna system should not be located in the vicinity of overhead power lines or other electrical light or power circuits or where it can fall into such power lines or circuits. When installing an outside antenna system, extreme care should be taken to keep from touching such power lines or circuits as contact with them might be fatal.
EXAMPLE OF ANTENNA GROUNDING ACCORDING TO NATIONAL ELECTRICAL CODE, ANSI/NFPA 70
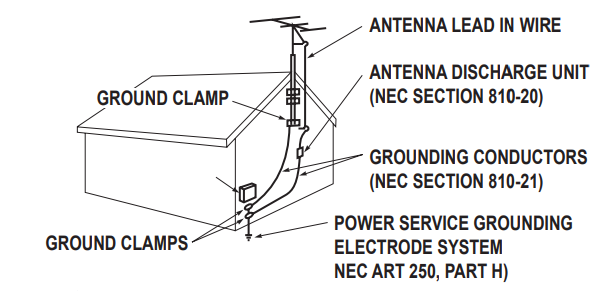
Note to CATV system installer: This reminder is provided to call the CATV system installer’s attention to Article 820-40 of the NEC that provides guidelines for proper grounding and, in particular, specifies that the cable ground shall be connected to the grounding system of the building, as close to the point of cable entry as practical.
- Wall or Ceiling Mounting – The product should be mounted to a wall or ceiling only as recommended by the manufacturer and listed by an independent laboratory (such as UL).
- Apparatus shall not be exposed to dripping or splashing and no objects filled with liquides, such as vases, shall
be placed on the apparatus. - When the MAINS plug is used as the disconnect device, the disconnect device shall remain readily operable.
- Install the LCD TV in a proper position. If not, it may result in a fire hazard.
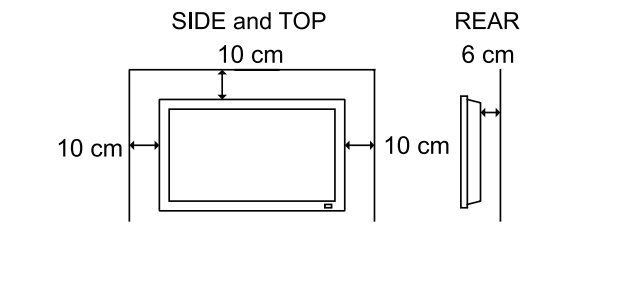
- Provide appropriate space on the top, sides and rear of the LCD TV cabinet for allowing air circulation and
cooling the LCD TV. - Minimum clearance must be maintained. If the LCD TV is to be built into a compartment or similarly enclosed,
the minimum distances must be maintained. Do not cover the ventilation slot on the LCD TV. Heat build-up can reduce the service life of your LCD TV, and can also be dangerous.
ENERGY STAR USER INFORMATION
ENERGY STAR User Information Statement: the factory default settings of this television meet ENERGY STAR requirements. Changing Picture Settings may increase energy consumption, possibly beyond the limits required for ENERGY STAR qualification. To ensure your television is operating at an optimal energy efficiency, select default picture mode.
TRADEMARKS
 Manufactured under license from Dolby Laboratories. “Dolby“ and the double-D symbol are trademarks of Dolby Laboratories
 HDMI, the HDMI logo and High-Definition Multimedia Interface are trademarks or registered trademarks of HDMI Licensing LLC in the United States and other countries
 “As an Energy Star Partner, Sanyo Electric co., Ltd. has determined that this product meets the Energy Star guidelines for energy efficiency.”
 This symbol on the nameplate means the product is Listed by Intertek Testing Services Taiwan Ltd. It is designed and manufactured to meet rigid U.L. safety standards against risk of fire, casualty and electrical hazards.
INSTALLING AND UNINSTALLING STAND
![]() CAUTION INSTALLING STAND
CAUTION INSTALLING STAND
- When holding (moving or lifting) the LCD Display, hold the display’s body. Do not handle the LCD TV by holding the attached accessory parts (speakers), otherwise it may result in damage.
- Before installing, provide a desk (or a part of it) which is strong enough to support the weight of the LCD TV and its stand. The desk must be larger than the LCD Display’s screen size. The desk’s surface must be flat and covered with soft material (such as a blanket) for protecting the screen surface.
- Before putting the LCD Display on the desk, make sure there is no object on it. Leaving any object under the screen may cause damage on the screen.
- The LCD TV with this stand should be installed on a flat and level place. Do not place it on non flat, unlevel or unstable cart or stand. The display may fall, causing not only serious damage to the products but serious injury to a person
![]() SAFETY NOTE
SAFETY NOTE
For correct installing, mounting and uninstalling of the LCD TV Stand, it is strongly recommended to use a trained, authorized dealer. Failure to follow correct procedures could result in damage to the equipment or injury to the installer
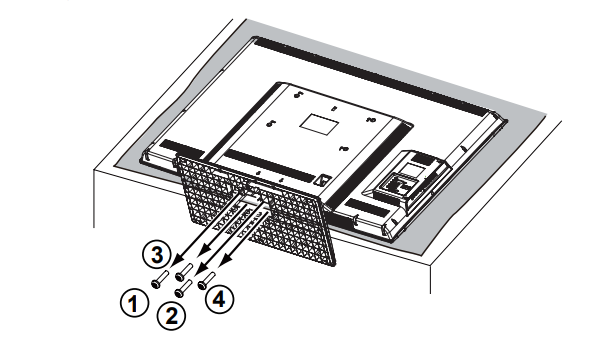
Installing Stand (55″)
- Place the LCD TV on a flat surface place where maintained with soft materials (such as a blanket) for protecting the display screen.
- Secure the stand to the TV with 4 screws.
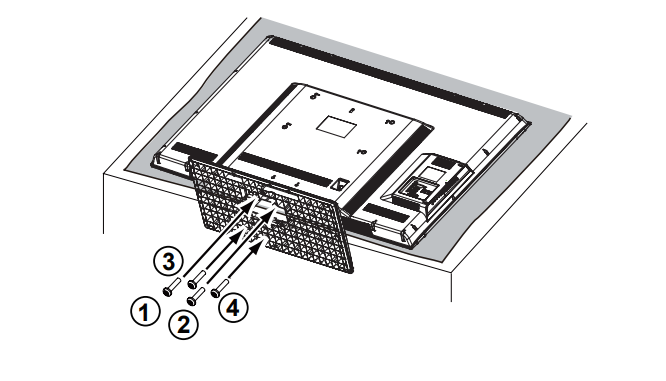
Uninstalling Stand (55″)
- Place the LCD TV screen facing down on a flat surface with soft materials (such as a blanket) for protecting the display screen.
- Remove screws in 4 holes with screw driver

INSTALLATION
POSITIONING THE LCD HDTV
Always use a firm-flat surface when positioning your HDTV. Do not position the unit in a confined area. Allow adequate space for proper ventilation.
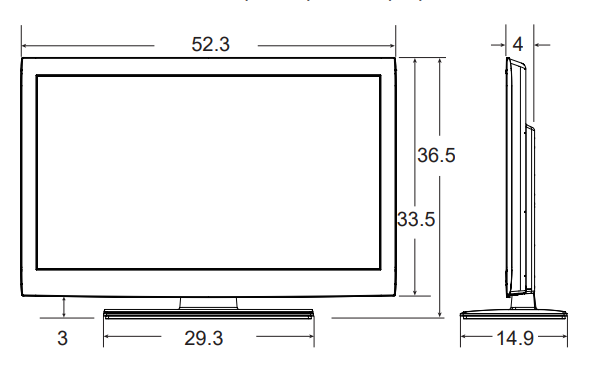
NOTE: All dimensions are in inches.
Diagonal screen: 54.6 inches
WALL MOUNTING (OPTIONAL)
Use the screws that are threaded into the standmounting inserts on the back of your HDTV to secure it to a wall mounting kit.
- NOTE: Wall Mounting kit is not supplied.
- Wall mounting kit shall be able to sustain at least 3 times of set weight.
VESA standard interface:
TV 200 x 400mm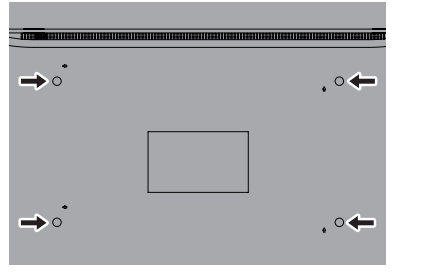
Wall Mounting Inserts
Mounting screws measurements: 55” TV
M8 Diameter, Length – 13mm (min.); 16mm (max.)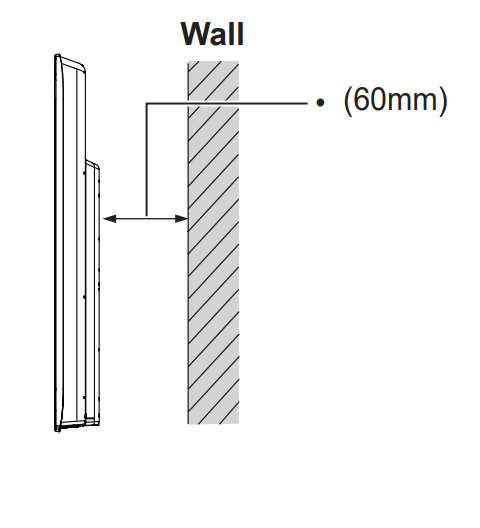
GETTING STARTED-CONTROLS AND JACKS
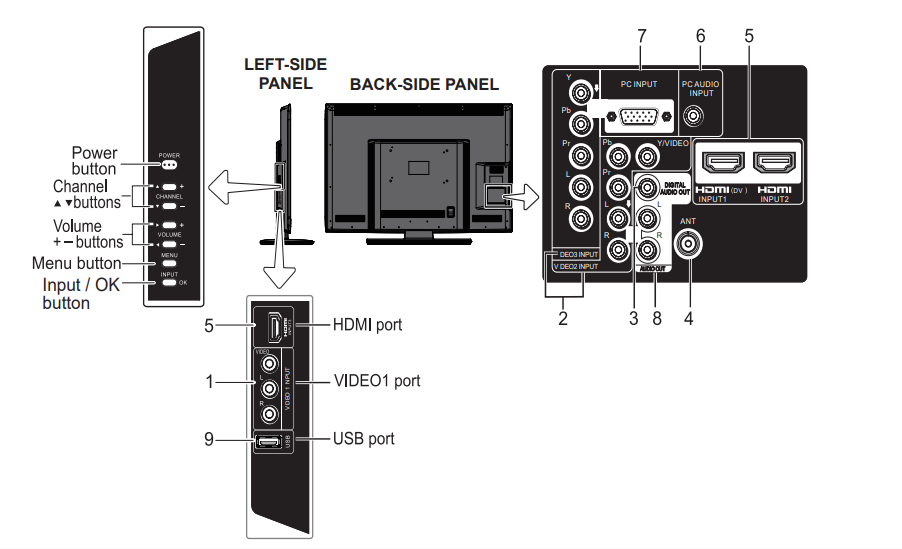
- COMPOSITE VIDEO INPUT VIDEO1, PAGE 10 Standard (composite) video and audio inputs while using video devices with analog audio and composite video output.Connect digital video equipment to the Video Yellow jack, and matching Audio White (L) and Red (R) jacks.
- COMPONENT VIDEO INPUT VIDEO2 or VIDEO3(YPbPr), PAGE 10 Connect digital video equipment to the Video Green (Y), Blue (Pb), Red (Pr) jacks, and matching Audio White (L) and Red (R) jacks. These jacks will automatically detect the received signal type.
- DIGITAL AUDIO OUT (Coaxial), PAGE 12 Use a Phono-Type (Coaxial) Digital Audio Out Cable to connect Digital Audio Output to an advanced stereo home theater system equipped with Dolby Digital.
- ANALOG / DIGITAL ANTENNA INPUT, PAGE 7 Connect a RF antenna or Analog Cable system to this jack.
- HDMI INPUT (INPUT1, INPUT2 or INPUT3), PAGE 12 A digital AV interface that accepts uncompressed video signals for the best picture. This HDMI input supports HDCP copy protection and allows transmission of copy-protected digital contents.
- PC AUDIO INPUT, PAGE 12, 20 This terminal is not only using for PC audio input but also sharing the HDMI audio input for DVI signal connecting.
- PC INPUT (RGB connector of 15 pin D-SUB), PAGE 13 Connect computer to this terminal. Audio is separated from another Stereo Mini Jack (PC AUDIO INPUT).
- STEREO AUDIO OUT (L/R) JACKS, PAGE 12 Connect stereo audio equipment to these jacks.
- USB PORT, PAGE 25 Use for updating the television’s firmware and accessing JPEG files
REMOTE CONTROL OPERATION
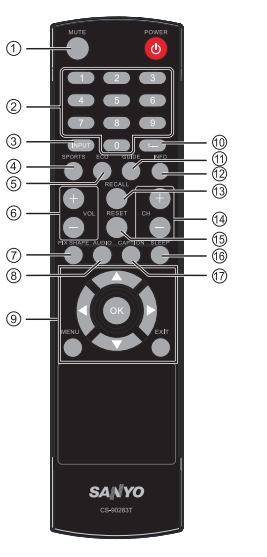
- MUTE Button Press to mute or restore the sound.
- Numeric Buttons Press numeric buttons to select a channel. Example: Press 6 then OK button to select analog channel A6. Press 6 then 1– button to select digital channel D6.
- INPUT Button Press to select the source to view: TV, VIDEO1, VIDEO2, VIDEO3, HDMI1, HDMI2, HDMI3,
PC or USB Input. - SPORTS Button Press to choose options Football, Winter Sports, Marine Sports, Indoor Sports, and Off in turn.
- ECO Button Press to select Energy saving mode options Off, ECO1, ECO2, and ECO3 in turn.
- Volume Up / Down (VOL+ / – )Buttons Press to decrease or increase the audio volume.
- PIX SHAPE Button Press to choose options Standard, WaterGlass, Zoom1, Full and Zoom2. Available options depend on the signal and the aspect ratio of the broadcast.
- AUDIO Button Press to select the desired audio mode, if available.
- MENU Press to display on-screen menu
- .CURSOR ▲ (up) ▼ (down) Buttons Press these buttons to move the cursor up and down.
- CURSOR ◄ (left) ► (right) Buttons Press hese buttons to move the cursor left and right
- .OK Button Press to select an option from the menu, when required.
- EXIT Button Press to exit from the menu.
- 1- Button Press numeric button then press this button to select digital channel.
- GUIDE Button Press to show the information window about the current channel on your HDTV screen.( only
for digital channels). - INFO Button Press to display channel information banner. Digital Banner may contain: Channel Number, CC
State, Channel Title, Video Resolution, Video Ratio, Signal Strength, Digital Sound information and Program Rating. Analog Banner may contain: Channel Number, CC State, Channel Title, Video Resolution, Analog Sound
information, and Program Rating. - RECALL Button Press to switch to the last channel or input source.
- Channel Up / Down (CH+ / – ) Buttons Press to switch to the last or next channel.
- RESET Button Press this button to display RESET menu. If you execute RESET function, the TV will
clear all customized settings.- NOTE : The Channel Scan Memory database will be reset to default (all analog channel enabled). You will need to execute Channel Scan after RESET.
- SLEEP Button Press this button to set Off Timer function among Off, 30 min, 60 min, 90 min, 120 min, 150 min and 180 min.
- NOTE : The Off Timer will be canceled when the TV is turned off or when a power failure occurs.
- CAPTION Button Press this button to switch CC mode among “Off“, “CC Display“ and “Muted=On“. Digital Captions can be changed through the SYSTEM CC Stytle Settings from menu.
GETTING STARTED-CONNECTIONS
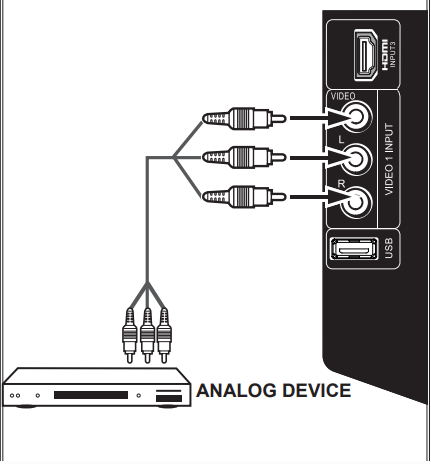
3 Analog Signal Connections – VIDEO1 or VIDEO2 (Shared with Component-Y).
Connect an analog device such as an Analog Cable Box, Satellite Receiver or VCR.
Composite connectors are included on your HDTV to provide continued compatibility with older analog devices such as a VCR. (Cables are not supplied)
- Connect an AV cable to the VIDEO1 or VIDEO2 jack on the HDTV and to your analog AV equipment as shown. Match the connector colors to jack colors.
- Press the INPUT button to step through the signal inputs to select Video1 or Video2
4 Component Signal Connections – VIDEO2 or VIDEO3 (YPbPr)
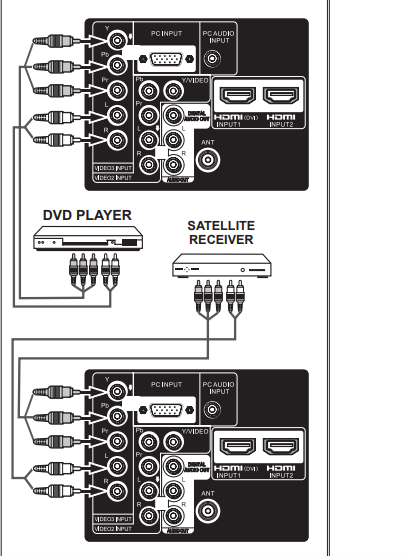
Connect Digital devices such as a HD Cable Box, HD Satellite Receiver, DVD Player, and Game System.
The Component jacks on this HDTV will accept HDTV, EDTV, and SDTV video signals and make a great choice for Component when connecting your compatible external devices.
- Connect a COMPONENT cable to set Green, Blue, and Red video jacks asVIDEO2 or VIDEO3(YPbPr) on the HDTV andto your digital device as shown. (Cable is not supplied)
- Connect an AUDIO cable to the matching White and Red audio jacks as shown. (Cable is not supplied))
- Press the INPUT button to select the input signal as VIDEO2 or VIDEO3(YPbPr).
NOTES
- The VIDEO2 with Green video jack, White and Red audio jacks can be used as Composite connectors like VIDEO1 (Shared with Component-Y).
- You may follow the VIDEO2 OPERATION to choose suitable function (Video or YPbPr) for external devices.
ON-SCREEN MENU OPERATION
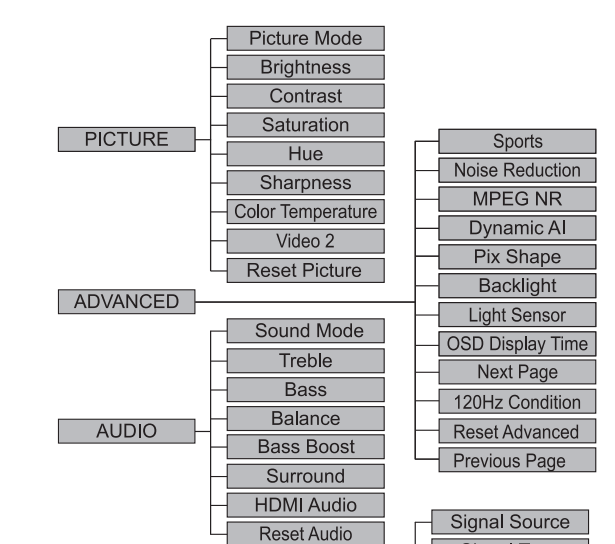
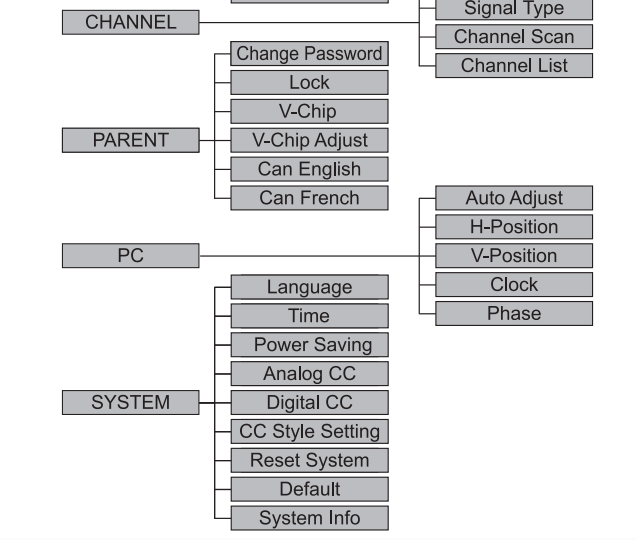
MENU NAVIGATION MAP
MAIN MENU SUB-MENU OPTIONS
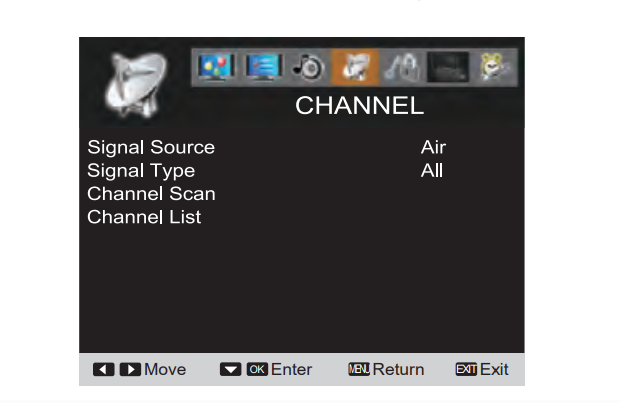
CHANNEL ADJUSTMENT
SIGNAL SOURCE OPERATION
There are two categories: ● Air ● Cable
AIR(Antenna) Search: It will search for analog and digital channels that are broadcasted over-the-air.
Cable Search: It looks for analog cable channels and unscrambled (Clear QAM) digital cable channels.
- Press the MENU button on the remote control to display the Main menu. Use the CURSOR ◄ and ► buttons to highlight CHANNEL. Press the OK button.
- Highlight Air or Cable. Press the OK button.
- Use the CURSOR ▲ and ▼ buttons to highlight All. Press the OK button. (A red hook will appear beside the selected item).
- Use the CURSOR ▲ and ▼ buttons to highlight Channel Scan. Press the OK button. Choose the Scan to start the channel scanning.

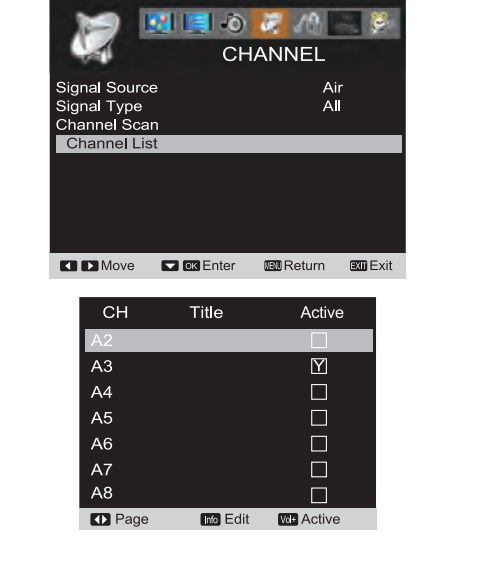
The Channel List is a database of active channels you can scan through using the CURSOR ▲ and ▼ buttons. Customize it by deleting or adding channels.
- Press the MENU button on the remote control to display the Main menu.
- Use the CURSOR ◄ and ► buttons to highlight CHANNEL mode. Press the OK button.
- Use the CURSOR ▲ and ▼ buttons to highlight Channel Scan. Press the OK button. Make the channel scan process completely, then press OK or Menu to exit.
ADDING CHANNELS TO CHANNEL LIST
- Use the CURSOR ▲ and ▼ buttons to highlight the Channel List. Press the OK button.
- Use the CURSOR ◄ and ► buttons to change pages.
- Use the CURSOR ▲ and ▼buttons to select and highlight the channel you want to add.
- Press the VOL+ to add the channel to the Channel List. (A white Y will appear in the squared region. This means the channel is added to the Channel List.)
 DELETING CHANNELS FROM THE CHANNEL LIST
- Use the CURSOR ▲ and ▼ buttons to highlight the Channel List. Press the OK button.
- Use the CURSOR ◄ and ► buttons to change pages.
- Use the CURSOR ▲ and ▼ buttons to select and highlight the channel you want to delete.
- Press the VOL+ button to delete the channel from the Channel List. (A white Y will disappear in the squared region. This means the channel has been deleted from the Channel List.)
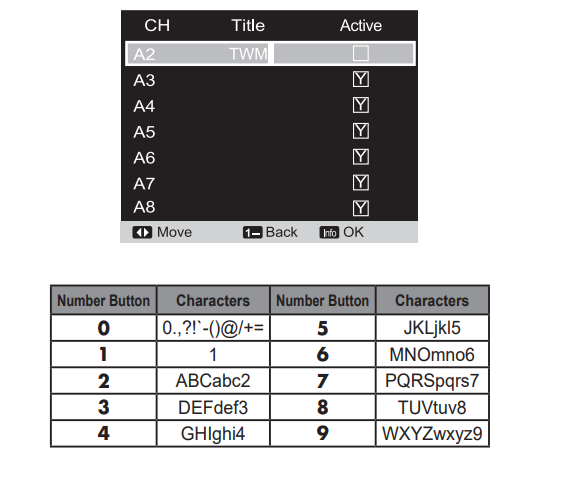
RENAMING CHANNELS FROM THE CHANNEL LIST
You can rename each channel of the Channel List with following operation:
- Use the CURSOR ▲ and ▼ buttons to highlight the Channel List. Press the OK button.
- Use the CURSOR ◄ and ► buttons to show more unshowed channels.
- Use the CURSOR ▲ and ▼ buttons to select and highlight the channel you want to rename.
- Press the INFO button.
- Use 0 ~ 9 buttons to type the channel renaming with each appointed English word, numbers, and symbols by continuously pressing. (HINT: Use CURSOR ◄ and ► buttons to move forward or backward. Use 1-button to delete.)
Press the INFO button to confirm. PARENT ADJUSTMENT
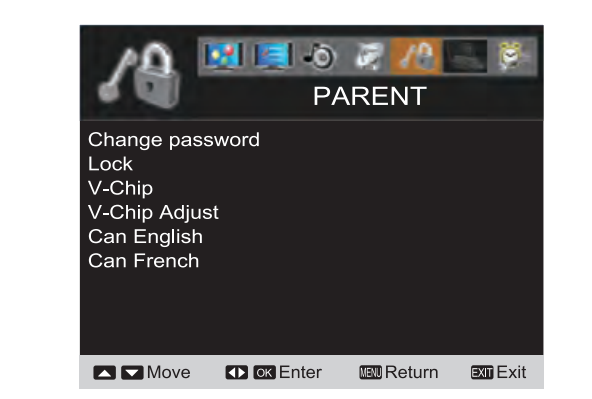
This SANYO television is equipped with an electronic V-Chip to interpret MPAA (Motion Picture Association of America) and TV Parental Guidelines rating codes. When these codes are detected, the HDTV will automatically display or block the program, depending upon choices you make when setting up the PARENT menu. Use this feature to automatically block programs with content you deem as inappropriate for your children to view.
MORE INFORMATION
Additional information about MPAA and V-Chip rating can be found at: www.mpaa.org and www.v-chip.org, respectively.
PASSWORD SETTING
You will need to set a passowrd when using this TV and entering the PARENT menu for the first time. Enter this password to access the PARENT menu from the second time.
- Press the MENU button and then use the CURSOR ◄ and ► buttons to highlight PARENT menu. Press the OK button.
- Use the 0 – 9 buttons to enter “NEW PIN“ (the new password you want to assign). Press the OK button.
- Use the 0 – 9 buttons to enter “Confirm“ numbers. Press the OK button.
NOTE : Please carefully remember new password. If you forget the former password, press 1– button 4 times
to reset password.
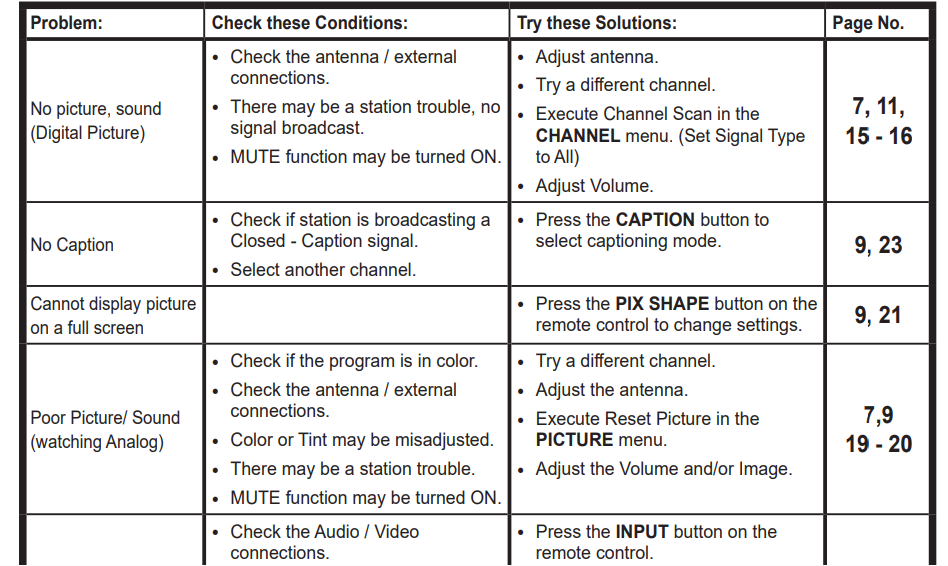
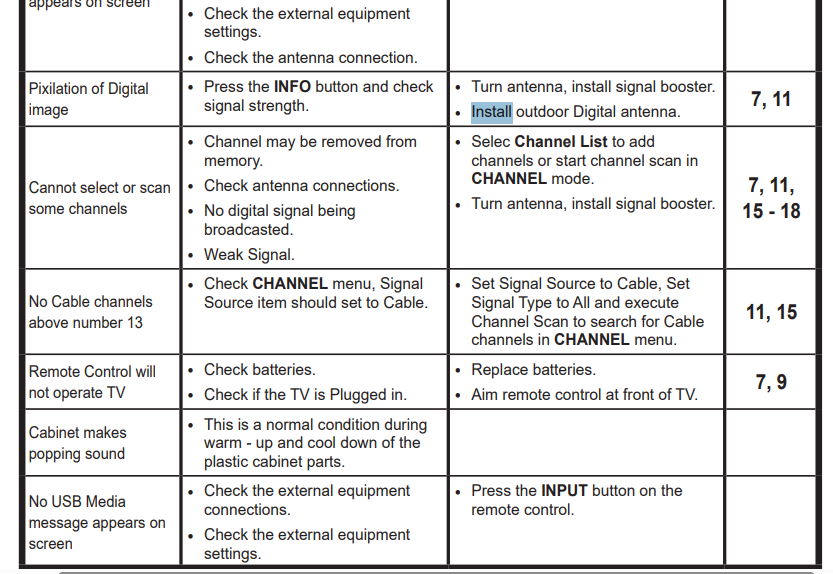
HELPFUL HINTS – Problems / Solutions
For more manuals by Sanyo, visit ManualsLibraryy
Sanyo DP55441 LCD TV-FAQs
Is Sanyo a good TV brand?
Sanyo offers budget-friendly TVs with decent performance for basic viewing. While they may lack advanced features compared to premium brands like Samsung or LG, they provide reliable picture quality for everyday use.
Where can I find my Sanyo TV model number?
The model number is usually located on the back of the TV, on the lower left side.
Is the Sanyo DP55441 a Smart TV?
No, the Sanyo DP55441 is an LCD TV and does not have built-in smart features. For streaming, you can use an external device like a Fire Stick, Roku, or Chromecast.
What are the dimensions and weight of a 55-inch Sanyo TV?
With stand: ~48.7″ (W) × 30.4″ (H) × 7.9″ (D) | Weight: ~24.5 lbs
Without stand: ~48.7″ (W) × 28.7″ (H) × 3.5″ (D) | Weight: ~24 lbs
Who manufactures Sanyo TVs?
Sanyo was acquired by Panasonic in 2011, but the brand is now licensed to Funai (sold mainly at Walmart).
Does the Sanyo DP55441 have Bluetooth?
Most older Sanyo TVs, including this model, do not support Bluetooth. For wireless audio, use an optical/aux connection or a Bluetooth adapter.
Is the Sanyo DP55441 a 4K TV?
No, this is an LCD TV (not 4K). For 4K models, look for Sanyo’s Roku Smart TV series (e.g., FW55R70F).
Why won’t my Sanyo TV turn on?
Try these fixes:
✔ Check the power cord & outlet.
✔ Look for blown fuses or damaged capacitors.
✔ Unplug for 10 minutes (hard reset).
✔ Disconnect all external devices.
How do I reset my Sanyo TV?
Go to:
Settings → System → Factory Reset → Confirm
(Back up settings first!)
What’s the difference between LCD and LED TVs?
LCD: Uses fluorescent backlighting (older tech).
LED: Uses brighter, more efficient LED backlighting.
Smart TV: Adds internet/apps (not available on this model).

 PARENT ADJUSTMENT