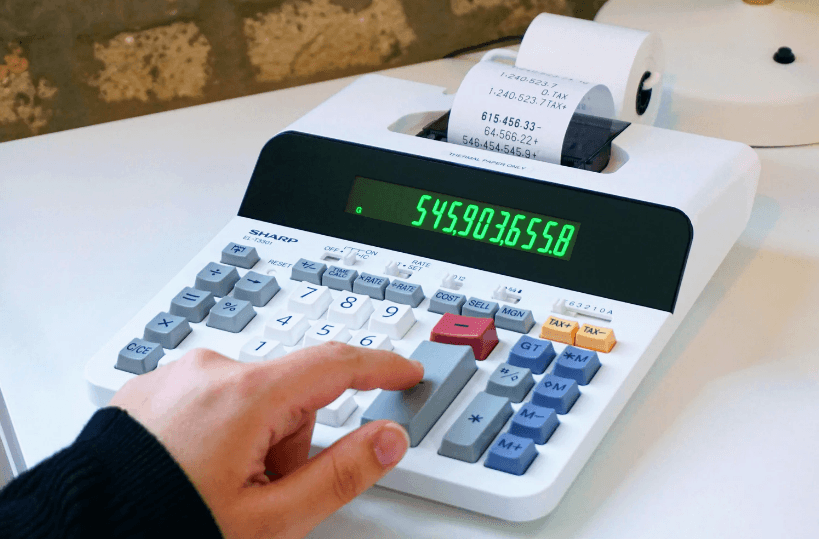
Sharp EL 1750V Printing Calculator
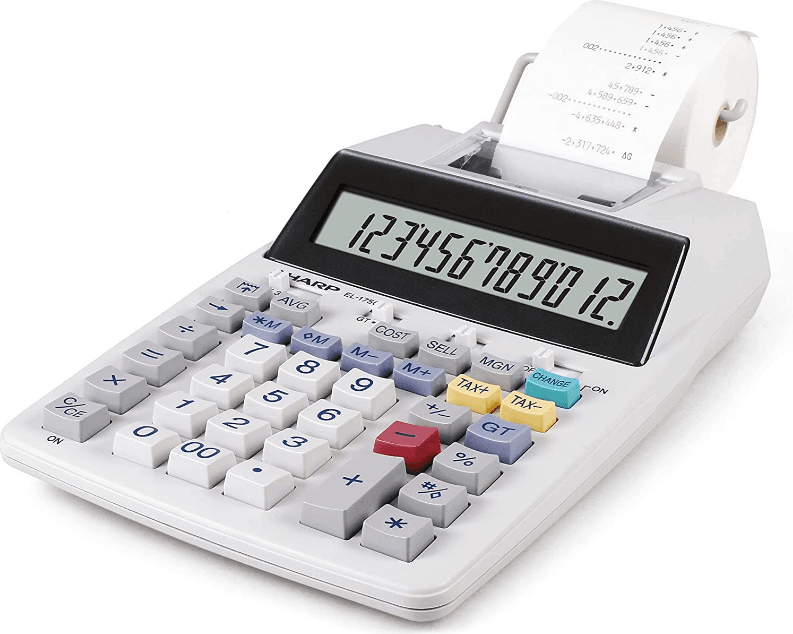
Operational Notes
To ensure trouble-free operation of your SHARP calculator, we recommend the following:
- The calculator should be kept in areas free from extreme temperature changes, moisture, and dust.
- A soft, dry cloth should be used to clean the calculator. Do not use solvents or a wet cloth.
- Since this product is not waterproof, do not use it or store it where fluids, for example, water, can splash onto it. Raindrops, water spray, juice, coffee, steam, perspiration, etc., will also cause malfunction.
- If service is required, use only a SHARP servicing dealer, a SHARP-approved service facility, or SHARP repair service.
Using the Calculator for the first time
First, pull out the insulation sheet for the memory protection battery (installed for retaining the date/time/tax rate information). Reset the calculator to initialize the unit’s state, then adjust the date and time before using the calculator.
Removing the insulation sheet and resetting
- Pull out the insulation sheet for the memory protection battery.
- Press the RESET switch located on the back of the unit. (See RESETTING THE UNIT.)
The clock starts, indicating the current date and time as January 1, 2008, 12:00:00 a.m.
Adjusting date and time
Example: When the date is September 15, 2007, and the time is 3:38 p.m.
When the adjustment is complete, the clock starts at 3:38:00 p.m.
Operating Control
POWER SWITCH; PRINT / ITEM COUNT MODE SELECTOR:
- Power Off
- Power ON. Set to the non-print mode.
- Power ON. Set to the print mode.
- Power ON. Set to the print and item count mode.
For addition or subtraction, each time the (+) is pressed, 1 is added to the item counter, and each time the (-) is pressed, 1 is subtracted.
- The count is printed when the calculated result is obtained.
- Pressing of (×), (C/CE) (C/CE) clears the counter.
When the grand total/rate setting mode selector is in the ON position (GT), the counter will count the number of times that the calculation results have been stored in the grand total memory. To print and clear the count, press the (GT) key.
The memory item counter will count the number of times that the (M+) key has been pressed in the addition.
Note:
- Each time the (M-) key is used in the subtraction, 1 will be subtracted from the count.
- The count is printed when the memory is recalled.
- Pressing the (*M) key clears the counter.
ROUNDING SELECTOR:
Example: Set Decimal Selector to 2.
4 ÷ 9 = 0.444 …, 5 ÷ 9 = 0.555…
Note: The decimal point floats during successive calculations by the use of (×) or (÷).
If the decimal selector is set to “F,” then the answer is always rounded down.
DECIMAL / ADD MODE SELECTOR:
- “3 2 0”: Presets the number of decimal places in the answer.
- “F”: The answer is displayed in the floating decimal system.
- “A”: The decimal point in addition and subtraction entries is automatically positioned to the 2nd digit from the lowest digit of the entry number. Use of the add mode permits addition and subtraction of numbers without entry of the decimal point.
Use of (•), (×), and (÷) will automatically override the add mode, and decimal correct answers will be printed.
Overview of Keys
CLOCK / CALENDAR KEY:
- Each time this key is pressed, the mode switches.
Calculation mode→Date display mode→Clock display mode→Calculation mode
- Use this key also to adjust date and time (see “GRAND TOTAL / RATE SETTING MODE SELECTOR”).
NON-ADD / SUBTOTAL KEY:
Non-add
When this key is pressed right after an entry of a number in the Print mode, the entry is printed on the left-hand side with the symbol “#”. This key is used to print out numbers not subject to calculation, such as code, date, etc.
Subtotal
Used to get the subtotal(s) of additions and/or subtractions. When pressed following the (+) or (-) key, the subtotal is printed with the symbol “◊” and the calculation may be continued.
By pressing this key even in the Non-print mode, the displayed number is printed without any symbol.
CLEAR / CLEAR ENTRY KEY
Press this key twice, followed by (TAX+), to print the set tax rate.
CHANGE SIGN KEY:
Changes the algebraic sign of a number (i.e., positive to negative or negative to positive).
COST PRICE ENTRY KEY:
Press this key to enter the cost price.
SELLING PRICE ENTRY KEY:
Press this key to enter the selling price.
MARGIN ENTRY KEY:
Press this key to enter the margin.
CHANGE CALCULATION KEY:
- To see how much change to return, have the price amount displayed, then enter the pay amount, followed by this key. The change is calculated in accordance with the DECIMAL / ADD MODE SELECTOR setup as well as the ROUNDING SELECTOR Setup.
- The intermediate result of an addition or subtraction in the Change calculation is retained.
- While the POWER SWITCH / PRINT / ITEM COUNT MODE SELECTOR is placed in “P” or “P•IC”, the pay amount is printed after “• • • • • • • • • • • • •” and the change is printed with “CG”.
Note: The displayed change value will not be added to the grand total memory.
INK ROLLER REPLACEMENT
If printing is blurry even when the ink roller is in the proper position, replace the roller.
Ink roller: IR40T
WARNING: APPLYING INK TO A WORN INK ROLLER OR USE OF UNAPPROVED INK ROLLER MAY CAUSE SERIOUS DAMAGE TO THE PRINTER.
- Set the power switch to OFF.
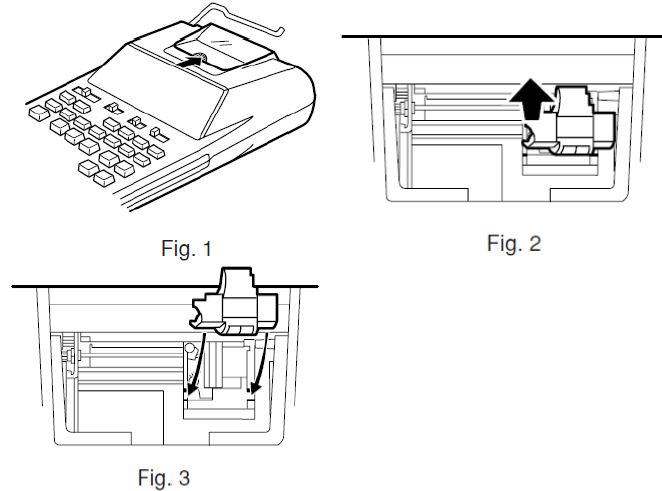
- Remove the printer cover. (Fig. 1)
- Hold the top of the ink roller and remove the roller by pulling it toward you and then upward. (Fig. 2)
- Install the new ink roller in the correct position. Make sure that the roller is securely in place. (Fig. 3)
- Put back the printer cover.

Cleaning the printing mechanism:
If the print becomes dull after long-term usage, clean the printing wheel according to the following procedures:
- Remove the printer cover and the ink roller.
- Install the paper roll and feed it until it comes out of the front of the printing mechanism.
- Hold a small brush (like a toothbrush) lightly to the printing wheel and clean it by pressing (Paper feed key).
- Put back the ink roller and the printer cover.
Note: Do not rotate the printing mechanism manually; this may damage the printer.
PAPER ROLLER REPLACEMENT
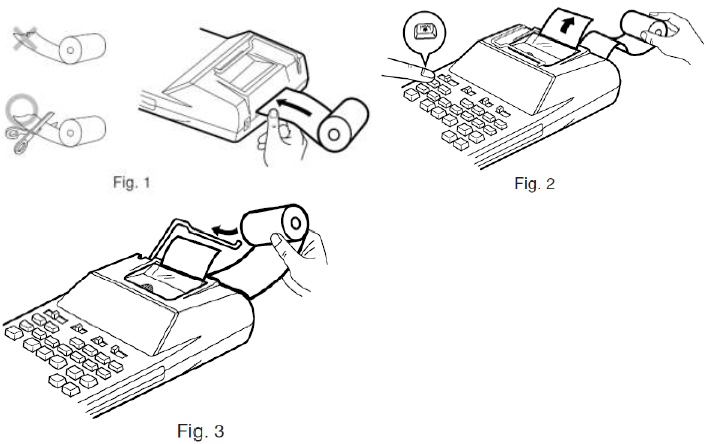
Never insert a paper roll if torn. Doing so will cause the paper to jam.
Always cut the leading edge with scissors first.
- Insert the leading edge of the paper roll into the opening. (Fig. 1)
- Turn the power on and feed the paper by pressing. (Fig. 2)
- Lift the attached metal paper holder up and insert the paper roll into the paper holder. (Fig. 3)

DO NOT PULL PAPER BACKWARDS AS THIS MAY CAUSE DAMAGE TO THE PRINTING MECHANISM.
HOW TO CONNECT THE AC ADAPTOR
This machine can also be operated on AC power by use of the AC Adaptor. When the AC adaptor is connected to the calculator, the power source is automatically switched over from dry batteries to AC power source.
AC adaptor: Model EA-65A, EA-28A
Make sure that you turn the calculator’s power off when connecting or disconnecting the AC adaptor.
To connect the AC adaptor, follow steps 1 and 2.
To disconnect the AC adaptor, simply reverse the procedure.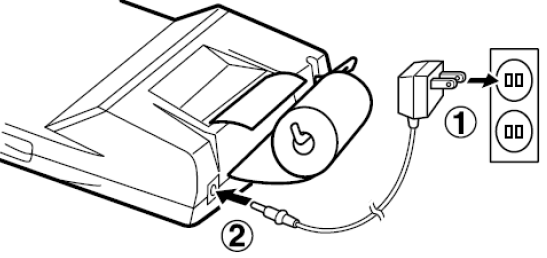
CAUTION: Use other than the AC adaptor EA-65A/28A may apply improper voltage to your SHARP calculator and will cause damage.
BATTERY REPLACEMENT (OPTIONAL)
To Install or Replace Batteries
When the battery power becomes weak, printing may be halted, and displayed images may disappear. If such symptoms are observed, replace the batteries with new ones.
- Set the power switch to OFF.
- Remove the battery cover by sliding it in the direction of the arrow on the cover.
- Replace the batteries. Be sure that the “+” and “–” marks on the battery correspond to the “+” and “–” marks in the calculator. Always put back the 4 batteries at the same time.
- Put back the battery cover.
Battery: Manganese dry battery, size AA (or R6) . 4
- If the leaked electrolyte gets into your eyes, wash them off with clean water, and consult your doctor immediately.
- If the leaked electrolyte gets on your skin or clothes, wash them off thoroughly with water.
- Remove batteries if not used for prolonged periods of time.
- Do not leave dead batteries in the unit.
- Do not mix new and used batteries and/or battery types.
REPLACEMENT OF BATTERY FOR MEMORY PROTECTION
Time for battery replacement
The life of the memory protection battery is approximately 2,500 hours at 25°C (77°F) with no operation battery installed, and the AC adaptor not connected.
- When the memory protection battery is weak, the date/time setting is initialized (1/1/2008, 12:00:00 a.m.).
Verify the date/time setting in the date/clock display mode after replacing the operation battery or when connecting the AC adaptor with no operation battery installed.
If the date/time setting is modified or incorrect, promptly replace the memory protection battery with new one. (The life of the pre-installed battery may be shorter than expected because of the time the calculator spends during shipment.)
How to change the battery
Use one lithium battery (CR2032).
Caution: Replacing the battery will clear the date and time settings and the stored tax rate.
- Set the power switch to the “OFF” position, and disconnect the AC adaptor.
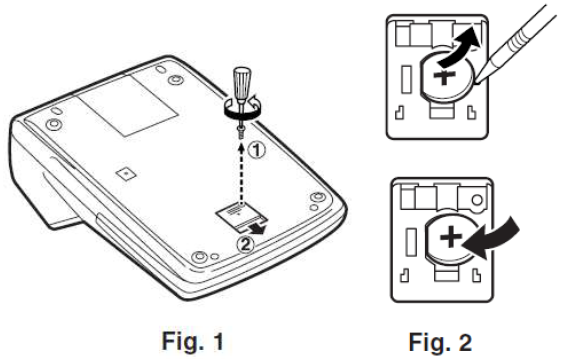
- Remove the battery cover on the back of the unit. (Fig. 1)
- Remove the exhausted battery and install a new lithium battery. Wipe the battery well with a dry cloth and place the plus “+” side upward. (Fig. 2)
- Replace the battery cover by reversing the removal procedure.
- Press the RESET switch on the back of the unit (See “RESETTING THE UNIT”).

After battery replacement
- Connect the AC adaptor, and set the power switch to the “ON” position.
- Check that “0.” is displayed. If “0.” is not displayed, remove the battery, reinstall it, and check the display again.
- Readjust date, time, and tax rate settings.
- In the box below, fill in the month/year that you changed the battery, as a reminder of when to change it again.
Precautions on battery use
- Do not leave an exhausted battery in the equipment.
- Do not expose the battery to water or fire, and do not take it apart.
- Store batteries out of the reach of small children.
Notes for handling Lithium batteries:
CAUTION: Danger of explosion if battery is incorrectly replaced.
Replace only with the same or equivalent type recommended by the manufacturer.
Dispose of used batteries according to the manufacturer’s instructions.
RESETTING THE UNIT
Strong impacts, exposure to electrical fields, or other unusual conditions may render the unit inoperative, and pressing the keys will have no effect. If this occurs, you will have to press the RESET switch on the bottom of the unit. The RESET switch should be pressed only when:
An abnormal event occurs, and all keys are disabled.
Notes:
- Pressing the RESET switch will clear the date and time settings, the tax rate setting, and the memory contents.
- Use only a ballpoint pen to press the RESET switch. Do not use anything breakable or anything with a sharp tip, such as a needle.
- After the RESET switch is pressed, connect the AC adaptor. Turn the power switch “ON” and check that “0.” is displayed.
WARRANTY
VICTOR TECHNOLOGY LLC warrants to the first consumer purchaser that this Sharp brand product (the “Product”), when shipped in its original container, will be free from defective workmanship and materials, and agrees that it will, at its option, either repair the defect or replace the defective Product or part thereof with a new or remanufactured equivalent at no charge to the purchaser for parts or labor for the period(s) set forth below.
This warranty does not apply to any appearance items of the Product or the additional excluded items(s) set forth below nor to any Product the exterior of which has been damaged or defaced, which has been subjected to improper voltage or other misuse, abnormal service or handling, or which has been altered or modified in design or construction. In order to enforce the rights under this limited warranty, the purchaser should follow the steps set forth below and provide proof of purchase to the servicer.
The limited warranty described herein is in addition to whatever implied warranties may be granted to purchasers by law. ALL IMPLIED WARRANTIES, INCLUDING THE WARRANTIES OF MERCHANTABILITY AND FITNESS FOR USE, ARE LIMITED TO THE PERIOD(S) FROM THE DATE OF PURCHASE SET FORTH BELOW. Some states do not allow limitations on how long an implied warranty lasts, so the above limitation may not apply to you.
CALCULATOR SERVICE
TO OBTAIN SUPPLY, ACCESSORY, OR PRODUCT INFORMATION, CALL 1-844-578-1637.
Sharp Calculator Service by Victor Technology LLC www.SharpCalculators.com
For more Manuals by Sharp, visit ManualsLibraryy
Sharp EL 1750V Printing Calculator-FAQs
How do I turn on the Sharp EL 1750V?
Press the ON/C button to power on the calculator.
How do I print a calculation?
Press the PRINT button to print the current calculation on the paper roll.
How do I clear the calculator?
CE (Clear Entry): Clears the last entered number.
C (Clear All): Resets the entire calculation.
How do I use the memory function?
M+ (Memory Add): Adds a value to memory.
M− (Memory Subtract): Subtracts a value from memory.
MRC (Memory Recall/Clear):
Press once to recall the stored value.
Press twice to clear the memory.
How do I print the memory total?
Press MRC followed by PRINT to display and print the stored memory value.
How do I print a running total?
Perform calculations as usual.
Press GT (Grand Total) to print the cumulative total.
How do I replace the paper roll?
Open the paper compartment at the back.
Insert a new 57mm thermal paper roll.
Feed the paper through the slot and close the compartment.
Why is my printer not working?
Ensure the paper roll is properly loaded.
Check if the printer is jammed (clear any stuck paper).
Replace the batteries if the printer is weak.
How do I switch between decimal modes?
F (Floating Decimal): Displays full decimal places.
0-2-4 (Fixed Decimal): Sets decimal places to 0, 2, or 4.
How do I set the tax rate?
Enter the tax rate (e.g., 5 for 5%).
Press TAX+ or TAX− to store the rate.
How do I calculate tax?
TAX+: Adds tax to a displayed amount.
TAX−: Subtracts tax from a displayed amount.

