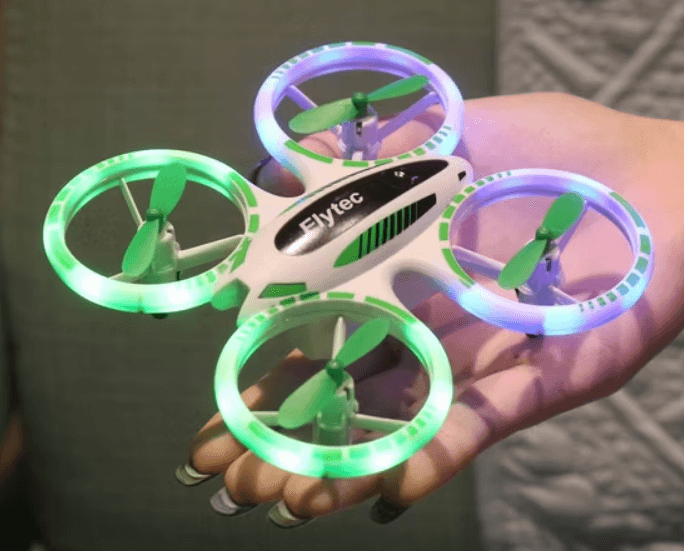
SHARPER IMAGE RC Glow Up Stunt Drone
INTRODUCTION
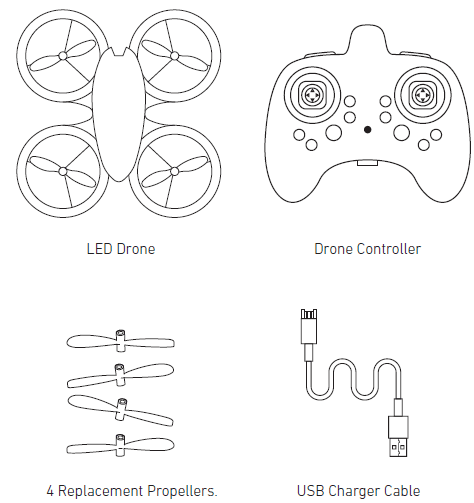
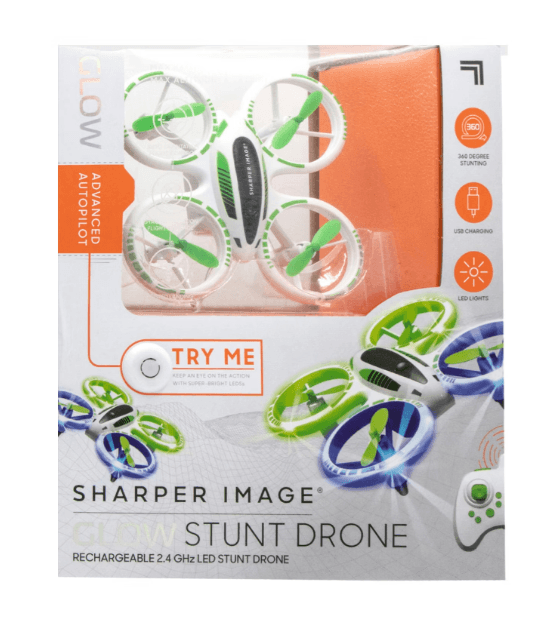
Congratulations on your purchase of the LED Stunt Drone. It’s time for some fun. This drone is capable of total controlled flight, fly up/down, left/right, and pitch forward or backward, on 6 axis gyro stabilization with a control range of 150 feet. Includes USB charging cable, replacement blades and for auto orientation, auto take-off and auto landing control.
Included is a 380 mAh Li-ion drone battery. The remote controller requires 3 AAA 1.5V batteries (not included). Alkaline batteries are recommended.
Please read all instructions and warnings in this manual prior to using your LED Stunt Drone, and keep this instruction manual as it contains important information for future reference. An adult assembly and a Phillips screwdriver will be required for battery installation.
Prepare for flight
- The drone must be charged before each use (Cable included).
- The indicator light on the USB plug will turn off when fully charged.
- Install batteries in the remote.
Pair your drone
Before each flight, pair the remote with the drone:
- Turn your drone on and place it on a flat, level surface.
- Turn on the remote.
- Push the left stick up and then down.
- Repeat steps 1 and 2 if necessary.
Calibrate
Move both joysticks diagonally in toward the middle of the remote. At the same time, position both control sticks at a 45-degree angle as shown in the image below.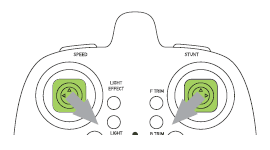
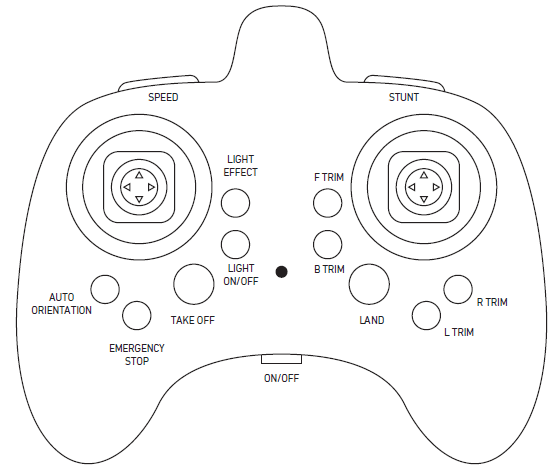
Remote Control Overview
Practice flying your drone below 10 feet and at low speeds until comfortable with all controls to avoid unnecessary damage or injury.
- Left joystick: Up/Down controls elevation.
- Right joystick: controls flight direction.
- Direction Trim: Use to eliminate drift.
To cut power to the drone, move the left joystick to the down position.
GENERAL WARNINGS
SAFETY WARNINGS
- Not recommended for children under 14 years of age. As with all electrical products, precautions should be observed during handling and use to reduce the risk of electrical shock.
- Adult supervision is required at all times.
- Never fly drones above or near people; sudden changes in wind or other conditions could lead to unexpected crashes.
- Always use caution when flying drone vehicles, obey relevant laws, and respect the privacy and property rights of others.
- The drone shall never be modified or used for anything except its intended purpose.
- Before each use, an adult should review the product and battery to determine that no damage or hazards exist.
- DO NOT TOUCH SPINNING PROPELLERS.
- Do not allow anything to intentionally make contact in any way with spinning propellers or prevent contact with spinning blades by turning offthe remote prior to handling drone.
- Use caution and pay attention to your surroundings while operating a drone.
- Do not fly a drone into animals, people, or inanimate objects.
- Keep the drone away from power lines, buildings, trees, public areas, and any other potentially hazardous areas.
- Do not operate in rain, heavy wind, or any type of severe weather.
- Do not land the drone on wet surfaces.
- Never touch or allow others to touch the drone while it is flying.
- Always turn the drone off when it is not in use.
- Always fly the drone in large, open areas.
CONTENTS
REMOTE BATTERY INSTALLATION
BATTERY WARNING:
There is a risk of fire and personal injury if the Li-ion battery is punctured, damaged, or misused.
- Never expose the battery to extreme temperatures or moisture.
- Do not subject the battery to strong impacts.
- Always keep the battery away from flammable materials.
- Only use manufacturer-specified battery(ies), charger(s), and/or adapter, if applicable, specified by the manufacturer.
- The battery is not serviceable.
- Let the battery cool to room temperature before charging.
- While charging, never leave the battery unattended.
- Recycle or dispose of the battery according to federal, state, and local laws.
KEEP THIS PACKAGING FOR REFERENCE, AS IT CONTAINS IMPORTANT INFORMATION.
- Slide open the remote’s battery compartment.
- Install 3 “AAA” batteries as shown in the diagram above.
- Replace and close the battery compartment.
WARNING:
- Do not mix old and new batteries.
- Do not mix alkaline, standard (carbon-zinc), or rechargeable batteries.
- Insert batteries using the correct polarity. Do not short-circuit the supply terminal.
- Remove batteries when not in use. Recycle or dispose of exhausted batteries according to federal, state, and local laws. Do not dispose of batteries in a fire – they may leak or explode.
- Only use manufacturer-specified battery(ies), charger(s), and/or adapter, if applicable, specified by the manufacturer.
- Always use, replace, and recharge (if applicable) batteries under adult supervision.
KEEP THIS PACKAGING FOR REFERENCE AS IT CONTAINS IMPORTANT INFORMATION.
Charging Battery
- Turn off the drone before charging.
- Connect the battery charger cable to the charging port on the drone.
- Connect the USB connector to the power source.
Note: The Battery Charger will light up when it is charging the battery and turn off when the battery is fully charged.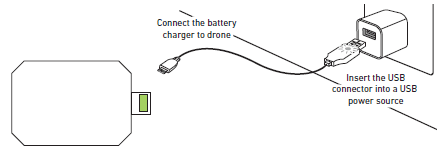
REPLACING PROPELLERS
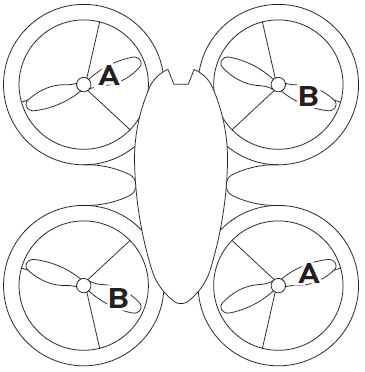
Only an adult should replace blades. To remove, pull up the blades directly.
- Replace the propellers by following the diagram.
- Each blade spins differently. Blade B spins counter-clockwise, and Blade A 1 spins clockwise.
REMOTE OVERVIEW
Step 1 – Pre-Flight Checklist.
- Read all warnings and instructions.
- Install remote batteries.
- Charge batteries.
- Make sure that the drone and remote are powered off.
Step 2 – Choosing a location.
- The drone is designed to be flown indoors and outdoors.
- Always make sure you have enough space to fly the drone.
- Always follow warnings.
Step 3 – Pre-Flight
- Make sure your remote is on.
- Push the power button on top of the drone and hold for 1- 2 seconds until the LED lights on.
- Place the drone on a flat, even surface. For ease of control, the blue lights should be toward you.
- Turn on the Remote controller. Push the left stick up and then down.
- The drone’s lights will flicker during the pairing process and then remain on once it has paired.
Step 4 – Lift Off.
- Press the Auto Take off Button.
- Slowly and carefully press the Throttle stick. The drone will begin to elevate.
Step 5 – Operating Drone in Flight.
- Follow this step if your drone begins to drift during take off or during flight.
- Use the Throttle Joystick to increase or decrease your elevation.
- Use the Multi-Directional Joystick to move forwards, backwards, or side to side.
- Stunts – Press the Stunt Button, then press the Multi-Directional Joystick in the direction you want to complete a stunt.
- Drone drifts backwards: Press the Forward Trim Button.
- Drone drifts forwards: Press the Backwards Trim Button.
- Drone drift right: Press the Left Trim Button.
- Drone drift left: Press the Right Trim Button.
Note:
The stunt function may be disabled if the drone’s battery power is low.
Hover the drone at or above 10 feet before attempting a stunt.
Step 6 – Landing Drone
- Lower drone to 20 feet or less then press the Auto Land button. Use the Multi Directional Joystick to maneuver drone. Or Push the left joystick down until the drone landing.
- In the event the blades will not stop spinning, you can perform an emergency stop.
Step 7 – Retrieving Drone
- Turn off your remote by pressing the Power Button. This will stop you from accidentally turning the propellers on.
- Make sure the propellers have stopped spinning, then pick up your drone.
Note: You will need to pair your drone again before your next flight (part 1 of step 4).
OTHER FEATURES
Auto Orientation
Press the Auto Orientation Button to turn the mode ON and then again to turn off.
- In this mode, the drone will always move in the direction you press the Multi Directional Button, no matter which way the drone faces.
- To stop the blades in case of an emergency.
When the drone is in auto orientation mode, the drone will orient to the user (remote), no matter what direction the drone is facing.
- Press the Orientation button. The remote will beep every 6 seconds to indicate it is in Auto Orientation mode.
- Push the right stick up will send the drone away from the user, push left will move left, etc.
- Press the Auto Orientation button to exit mode.
Tips
- Do not crash the drone into sand or dirt. Drone gears may become clogged.
- When first learning to fly, practice lifting off and hovering.
- Stay several feet from walls and buildings.
For more Manuals by Sharper Image, visit ManualsLibraryy
SHARPER IMAGE RC Glow Up Stunt Drone-FAQs
How do I charge the Glow Up Stunt Drone?
Turn off the drone before charging. Connect the battery charger to the charge port and a power source. A red light on the drone will turn on while charging and turn off when the battery is fully charged.
How can I tell when the drone is fully charged?
The red charging light on the drone will turn off once the battery is fully charged. Charging typically takes about 30 minutes.
How do I control the stunt drone during flight?
1. Use the left joystick to move the drone up or down.
2. Use the right joystick to move it left, right, forward, or backward.
How do I reset the drone’s gyroscope?
If the drone becomes unstable after a crash, reset the gyroscope by pushing the left joystick to the bottom-left and the right joystick to the bottom-right at the same time.
What does Auto Orientation mode do?
In Auto Orientation mode, the drone moves relative to your controls, not its own direction. Press the Auto Orientation button to enable or disable this feature.
How do I launch or land the drone?
Place the drone on a flat surface and power it on. After pairing with the controller, hold the Stunt and Flight Mode buttons for 2 seconds. Two beeps will confirm sensor calibration.
How do I check the battery charge cycles?
Access your battery settings (if supported) to see details like cycle count, voltage, temperature, and battery health. This helps monitor battery wear over time.
How do I know if my Sharper Image drone is charging?
When plugged in, the charging LED indicator turns red. It turns off once charging is complete.

