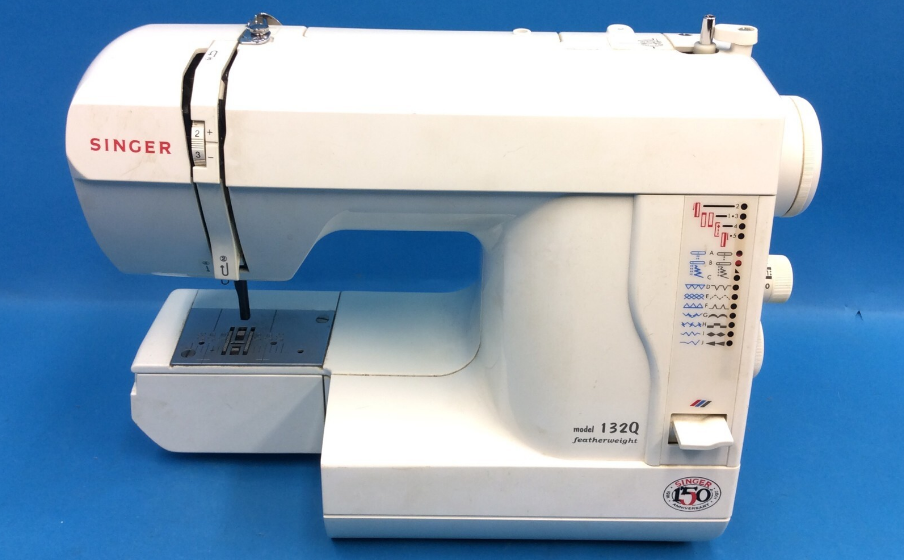
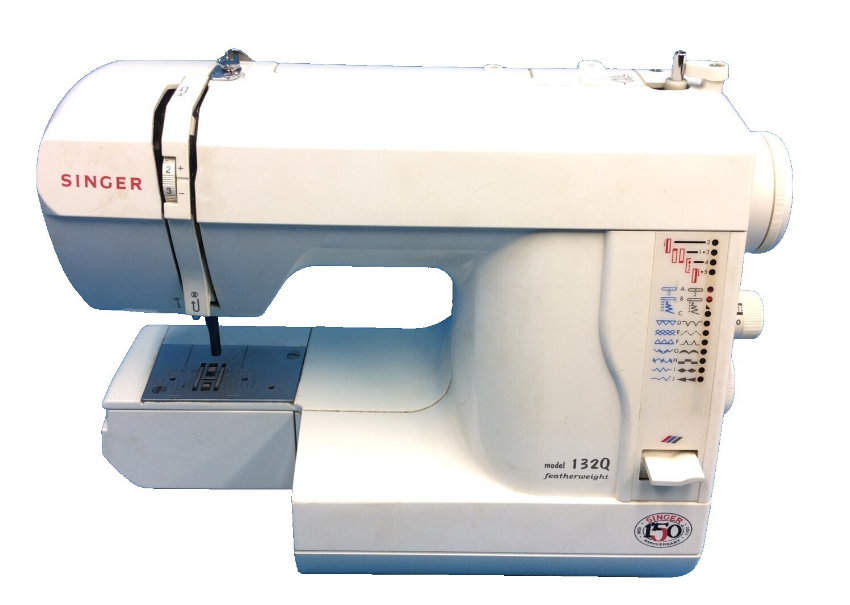
Singer 132 Featherweight Sewing Machine
IMPORTANT SAFETY INSTRUCTIONS
When using an electrical appliance, basic safety precautions should always be followed, including the following. Read all instructions before using this sewing machine.
DANGER– To reduce the risk of electric shock:
- This sewing machine should never be left unattended when plugged in. Always unplug this sewing machine from the electric outlet immediately after using and before cleaning.
- Always unplug before replacing a light bulb. Replace the bulb with a same type rated 15 watts.
WARNING– To reduce the risk of burns, fire, electric shock, or injury to persons:
- Do not allow it to be used as a toy. Close attention is necessary when this sewing machine is used by or near children.
- Use this sewing machine only for its intended use as described in this manual. Use only attachments recommended by the manufacturer as contained in this manual.
- Never operate this sewing machine if it has a damaged cord or plug, if it is not working properly, if it has been dropped or damaged, or if it has been dropped into water. Return the sewing machine to the nearest authorized dealer or service center for examination, repair, or electrical or mechanical adjustment.
- Never operate the sewing machine with any air openings blocked. Keep the ventilation openings of the sewing machine and the foot control free from the accumulation of lint, dust, and loose cloth.
- Never drop or insert any object into any opening.
- Do not use outdoors.
- Do not operate where aerosol (spray) products are being used or where oxygen is being administered.
- To disconnect, turn the switch to the off (“O”) position, then remove the plug from the outlet.
- Do not unplug by pulling on the cord. To unplug, grasp the plug, not the cord.
- Keep fingers away from all moving parts. Special care is required around the sewing machine needle.
- Never sew with a damaged needle plate as this can cause the needle to break.
- Do not use bent needles.
- Do not pull or push fabric while stitching. It may deflect the needle, causing it to break.
- Switch the sewing machine off (“O”) when making any adjustments in the needle area, such as threading the needle, changing the needle, threading the bobbin, or changing the presser foot, etc.
- Always unplug the sewing machine from the electrical outlet when removing covers, lubricating, or making any other user servicing adjustments mentioned in the instruction manual.
SAVE THESE INSTRUCTIONS
MACHINE IDENTIFICATION
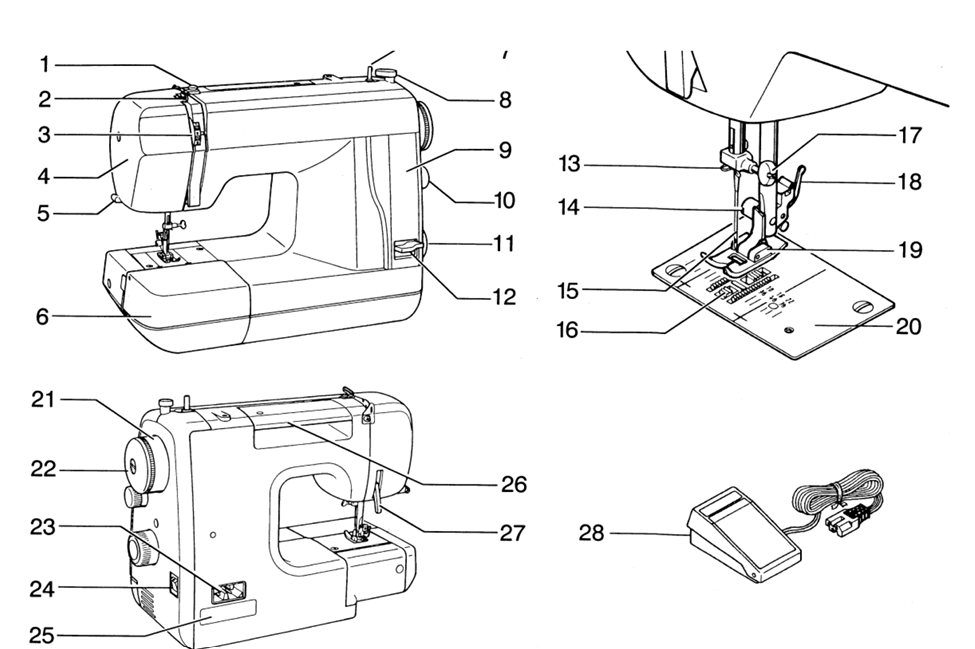
- Bobbin winder tension disc
- Thread take-up
- Thread tension control
- Face cover
- Thread cutter/holder
- Extension table
- Bobbin winder shaft
- Bobbin winder stop
- Stitch indicator
- Stitch length control
- Stitch selector
- Reverse stitch lever
- Thread guide
- Presser foot screw
- Needle
- Feed dogs
- Needle clamp screw
- Foot release lever
- Presser foot
- Needle plate
- Hand wheel
- Clutch knob
- Foot control socket
- Power/light switch
- Identification plate
- Carrying handle
- Presser foot lever
- Foot control
ACCESSORIES
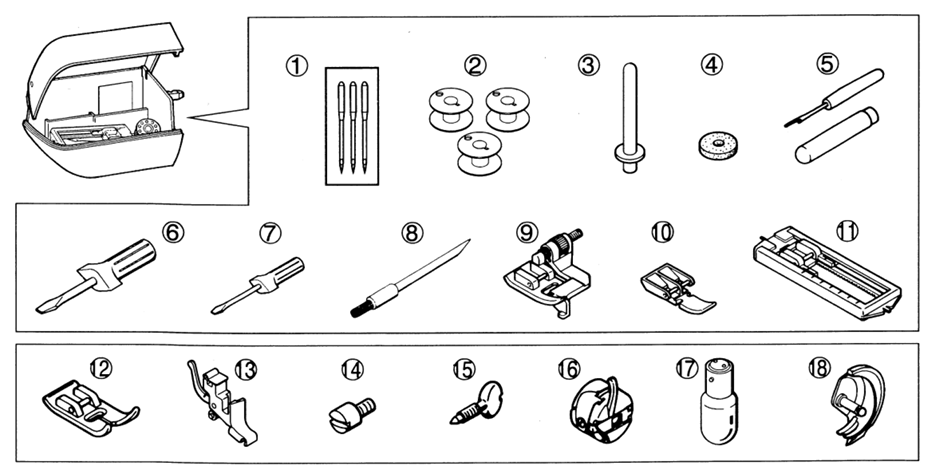
In the accessory box
- Needles
- Bobbins
- Spool pin
- Spool pin disc
- Buttonhole opener
- Screwdriver (large)
- Screwdriver (small)
- Brush
- Blind stitch foot
- Zipper foot
- Buttonhole foot
Fitted on the machine - Zig-zag foot
- Presser foot holder
- Presser foot screw
- Needle clamp screw
- Bobbin case
- Light bulb
- Shuttle
SETTING UP YOUR MACHINE
Be sure to wipe off any surplus oil from the needle plate area before using your machine for the first time.
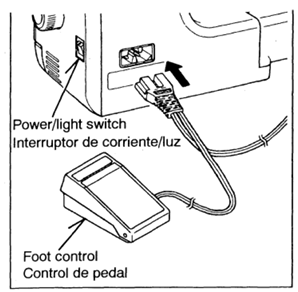
FOOT CONTROL
Push the foot control plug into the connector socket on the back of the machine.
POWER/LIGHT SWITCH
Your machine will not operate until the power/ light switch is turned on. The same switch controls both the power and the light. When servicing the machine, or changing needles or lamps, etc., the machine must be disconnected from the main supply.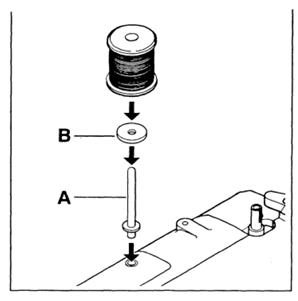
SPOOL PIN
Attach the spool pin (A) and place a felt disc (B) over it. Place a spool of thread on the spool pin.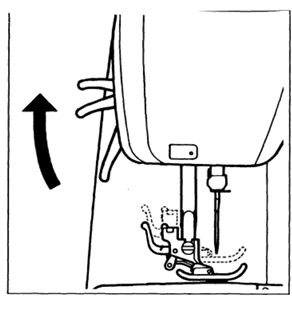
PRESSER FOOT LEVER
There are three positions for your presser foot.
- Lower the presser foot to sew.
- Raise the lifter to the middle position to insert or remove fabric.
- Lift it to its highest position to change the presser foot or to remove thick fabric.
WINDING BOBBIN
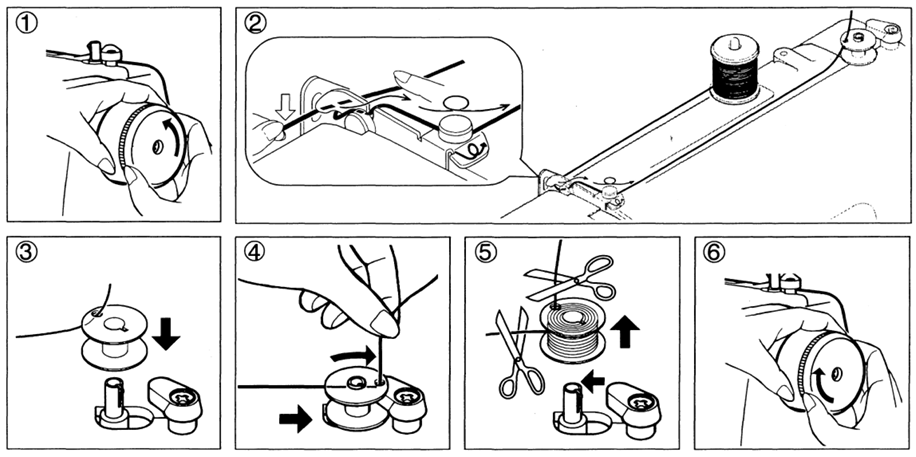
- Release the clutch, holding the hand wheel and turning the clutch knob towards you.
- Pass the thread from the spool through the thread guides as shown.
- Pull the end of the thread through the hole in the bobbin as shown.
- Push the bobbin winder shaft to the far left position, if it is not already there. Place the bobbin onto the shaft with the end of the thread coming from the top of the bobbin. Push the bobbin winder shaft to the right until it clicks. Hold onto the end of the thread.
- Start the machine. The thread that is held will snap. Bobbin will cease turning when completely filled. Push the shaft to the left to remove the bobbin.
- Tighten the clutch knob and remove the bobbin.
REMOVING BOBBIN CASE FROM SHUTTLE
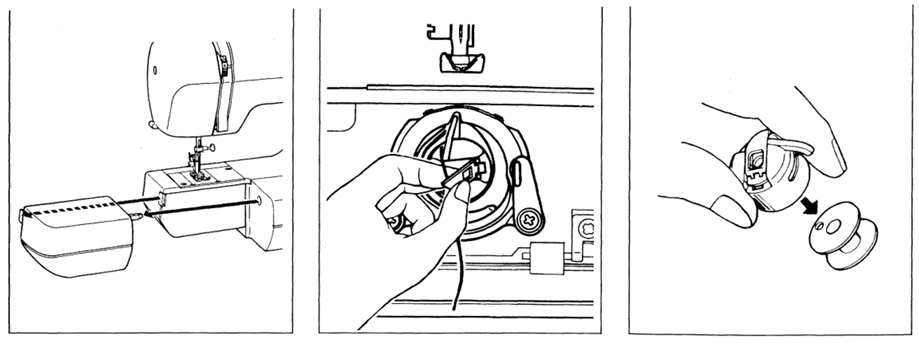
- Remove the extension table from the machine. Raise the needle to its highest position by turning the handwheel manually towards you.
- Open the bobbin access cover by pulling it down. With your fingers, pull open the bobbin case latch as shown, and take out the bobbin case from the shuttle.
- Release the latch, and the bobbin will drop out of the case.
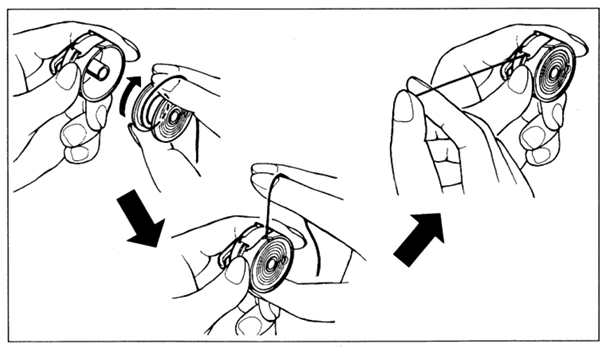
INSERTING BOBBIN INTO BOBBIN CASE
- Hold the bobbin in your right hand with the thread running clockwise.
- Insert the bobbin into the case with about 4″ (10 cm) of thread showing outside the case.
- Pull the thread through the slit in the case and then underneath the flat tension spring. It will click when ii is in place.
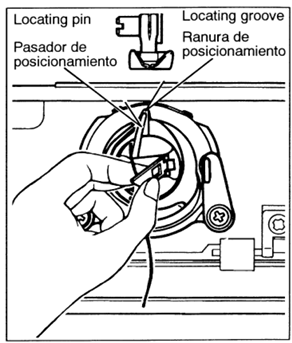
INSERTING BOBBIN CASE INTO SHUTTLE
- Hold the latch open, with the locating pin straight up.
- Slide the bobbin case onto the center spindle of the shuttle, keeping the thread toward you.
NOTE: Be sure the locating pin fits into the locating groove at the top of the shuttle. - Release the latch to lock the bobbin case in place.
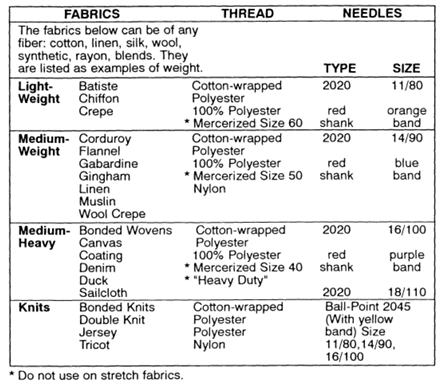
Needle, thread, and fabric chart
Your fabric will determine the choice of a needle and thread. The following table is a practical guide to needle and thread selection. Always refer to it before a new sewing project. And be sure to use the same size and type of thread in the bobbin as in the top thread supply.
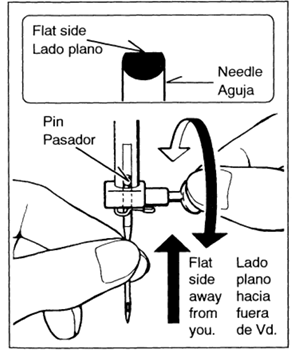
Changing the needle
- Raise the needle bar to its highest position by turning the hand wheel toward you.
- Loosen the needle clamp screw by turning it toward you.
- Remove the needle by pulling it downward.
- Insert the new needle into the needle clamp with the flat side away from you.
- Push the needle up as far as it can go.
- Tighten the needle clamp screw firmly with the screwdriver.
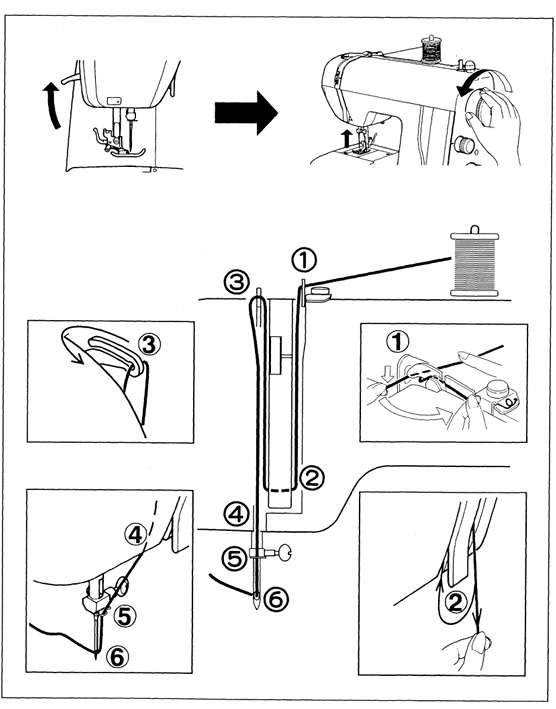
THREADING THE TOP THREAD
- Raise the presser foot lever.
- Raise the needle to its highest position by rotating the hand wheel towards you.
- Thread the machine in the following order as illustrated.
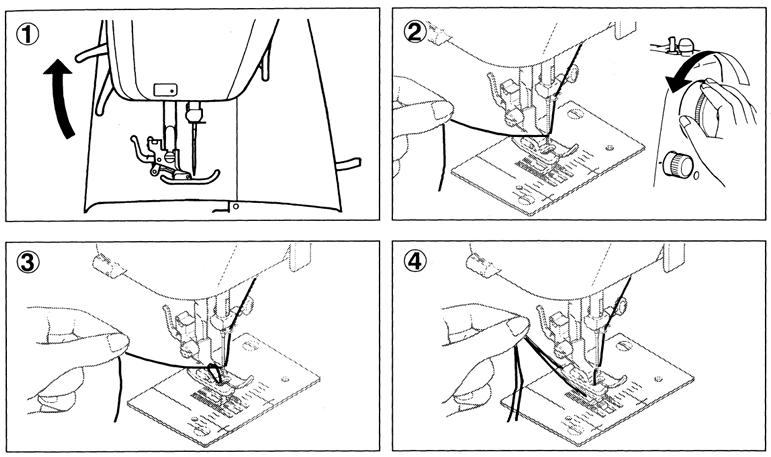
PICKING UP BOBBIN THREAD
- Raise the presser foot lever.
- Holding the needle thread loosely in your left hand, turn the hand wheel towards you with your right hand until the needle comes to its highest position.
- Lightly pull up the top thread, and pick up the bobbin thread, which will appear through the needle plate slot.
- Pull both top and bobbin threads together towards the back of the machine under the presser foot, leaving about 6″ (15 cm) clear.
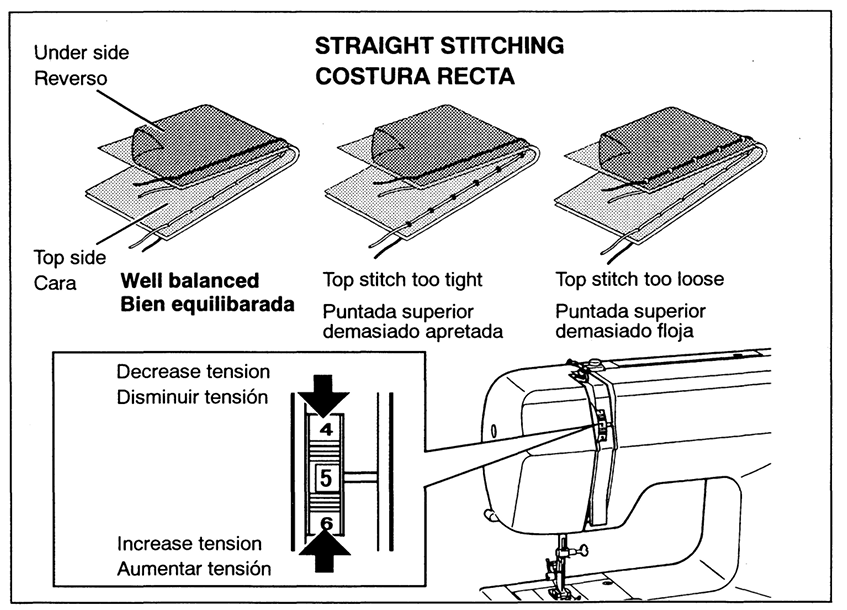
ADJUSTING TOP THREAD TENSION
STRAIGHT STITCHING
The good-looking appearance of your stitching is largely determined by the balanced tension of both top and bobbin threads. The tension is well balanced when these two threads ‘lock’ in the middle of layers of fabric you are sewing. If, when you start to sew, you find that the stitching is irregular, you will need to adjust the tension control. Make any adjustments with the presser foot ‘down’.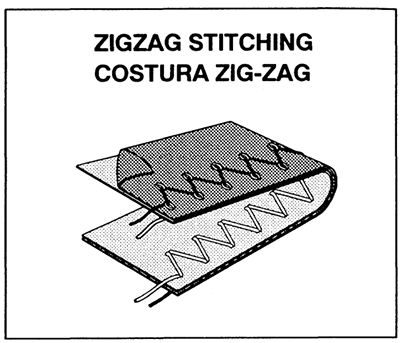
ZIGZAG STITCHING
The top thread may appear on the bottom depending on the thread, fabric, type of stitch, and sewing speed, but the bobbin thread must never appear on the top of the fabric.
ADJUSTING BOBBIN THREAD TENSION
BOBBIN THREAD TENSION REQUIRES ADJUSTMENT LESS FREQUENTLY THAN THE TOP THREAD TENSION.
If the tension is well balanced, but the fabric puckers badly, both top and bobbin thread tensions may be too tight and have to be adjusted. To test if the bobbin thread tension is correct, suspend the bobbin case by the thread and jerk it once. Correct bobbin tension will result in the thread unwinding only one or two inches. If too loose, it will unwind continuously. If it is too tight, it will not unwind at all. When adjusting the tension on the bobbin case, make only slight adjustments with a screwdriver.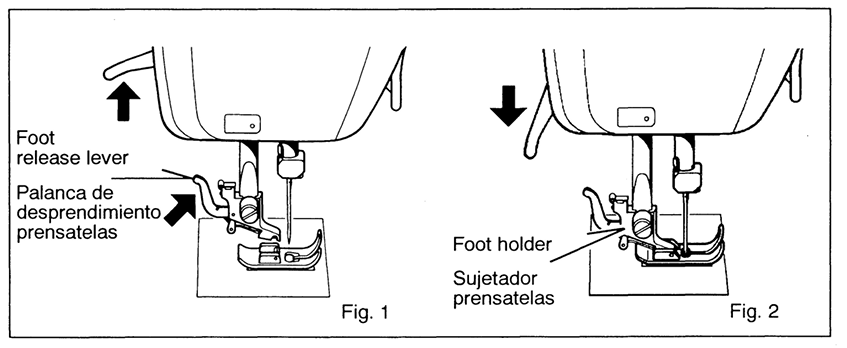
CHANGING PRESSER FEET
Be sure the needle is in the up position. Raise the presser foot lever.
- Raise the foot release lever to remove the foot. (Fig.1)
- Place the desired foot on the needle plate, aligning the needle holes. (Fig.1)
- Lower the presser foot lever so that the foot holder snaps on the foot. (Fig. 2)
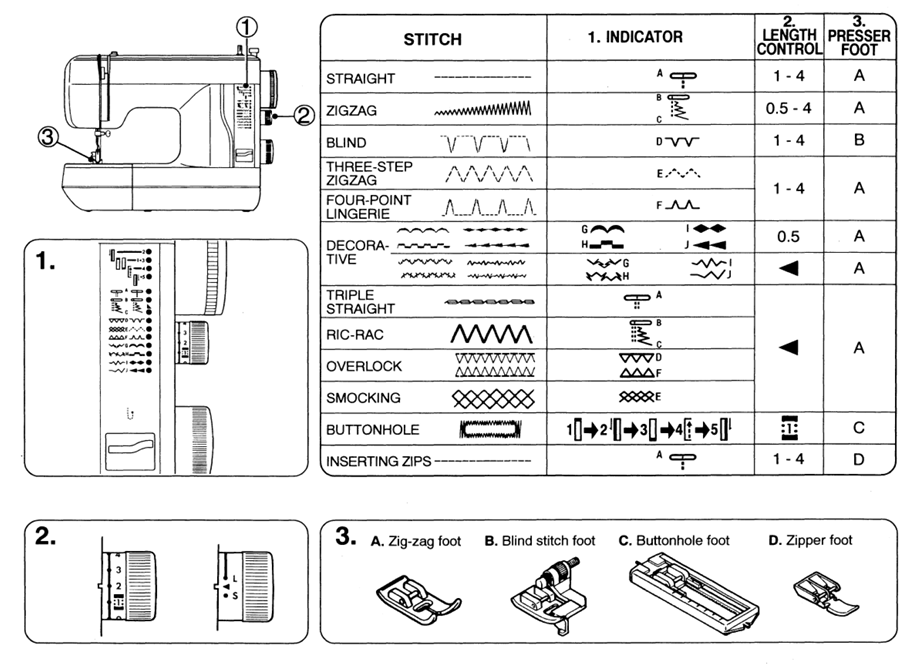
STITCH SELECTOR AND INDICATOR
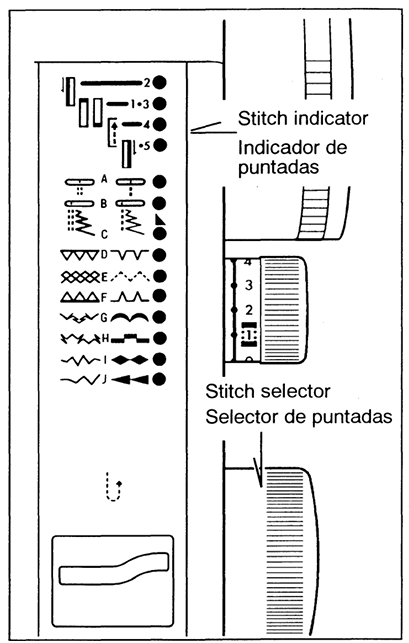
- To select a stitch, be sure the needle is out of the fabric at its highest position.
- Then turn the selector until the required stitch is indicated by the red symbol on the indicator panel.
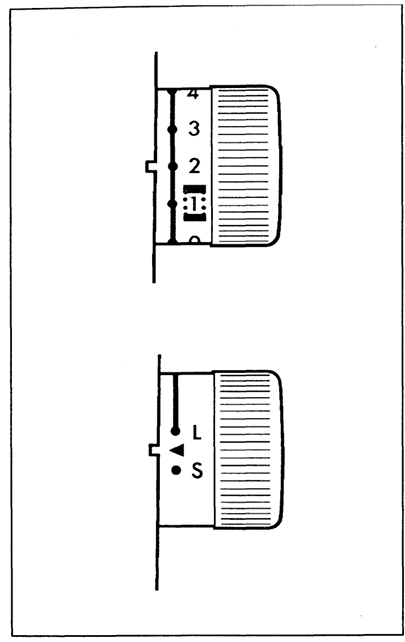
STITCH LENGTH/SUPER (STRETCH) STITCH CONTROL
Stitch length can be selected easily according to the thickness and type of fabric. The super (stretch) stitch pattern group can be selected by turning the same dial to ◄ mark where fine adjustment can be made.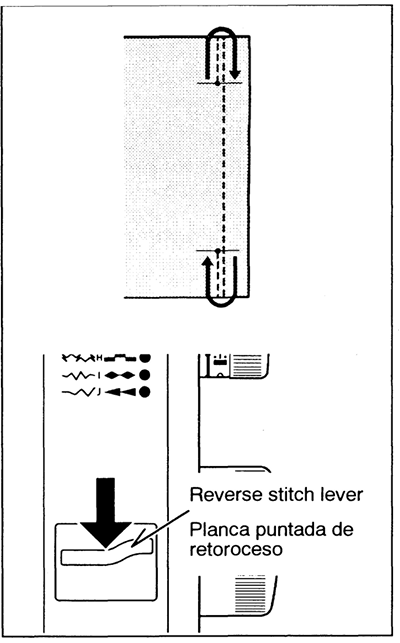
REVERSE STITCH LEVER
It is recommended to begin or end seams with several stitches in reverse for reinforcement. As long as you are pressing down this lever while sewing, the machine will continue to feed the fabric backwards.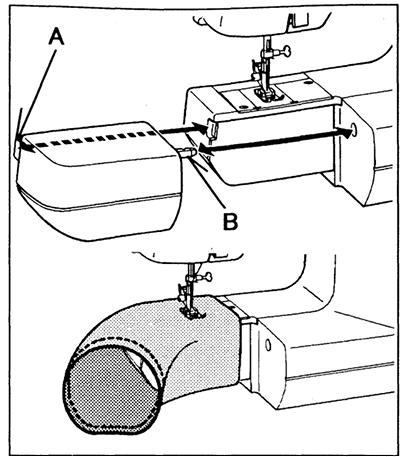
CONVERTING TO FREE-ARM SEWING
Your machine can be used either as a flatbed or as a free-arm model. The extension table is in position, providing a large working surface as a standard flatbed model. By removing the extension table, you can pull it off to the left, as shown, and the machine converts into a free-arm model.
MACHINE SETTING CHART
STRAIGHT STITCH
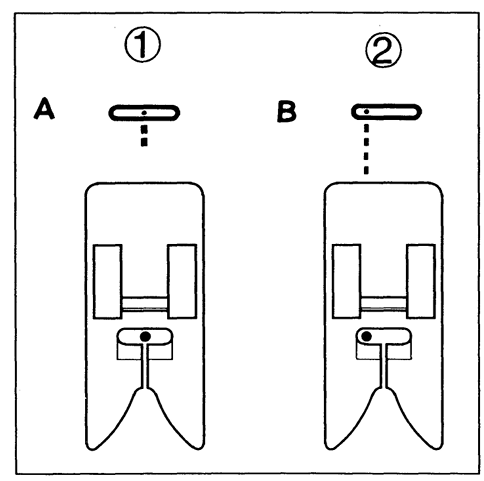
- Straight stitch at center needle position with stitch selector set at pattern A.
- Straight stitch at the left needle position with the stitch selector at pattern B.
STARTING TO SEW
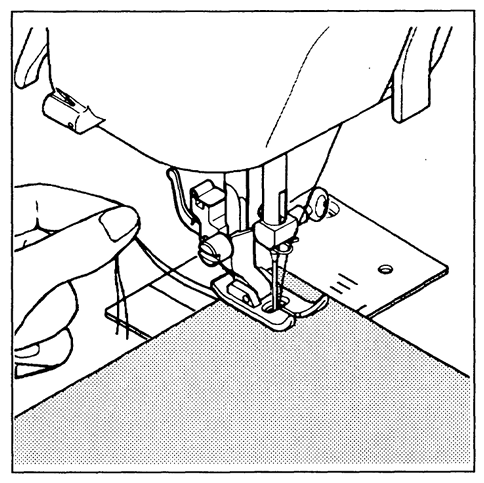
Before placing the material on the machine, see that the ends of the threads have been drawn about 6″ (15 cm) to the rear of the machine. Hold the threads during the sewing of the first 3 or 4 stitches of the seam.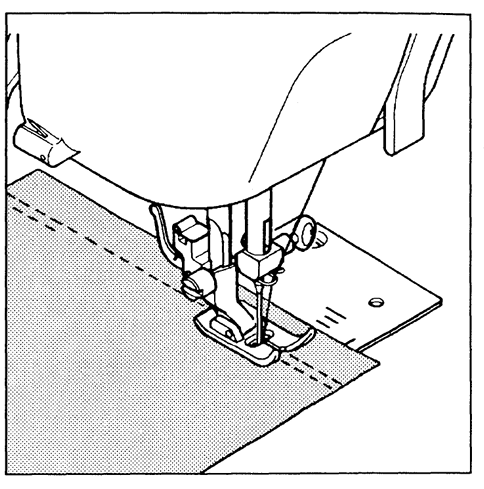
Fasten each seam by back tacking at the beginning and end of the seam.
REMOVING FABRIC
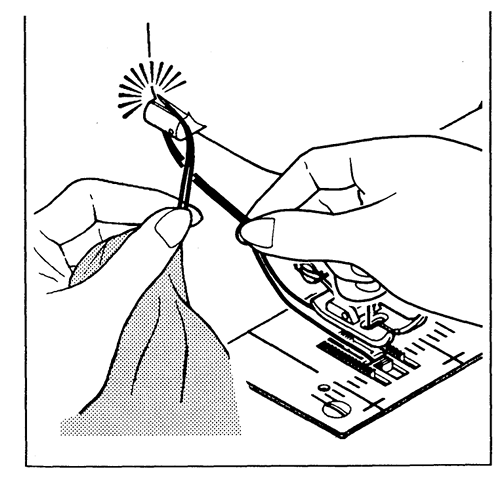
First turn the handwheel towards you until the needle is at its highest position, then raise the presser foot, draw materials to the rear, and cut off excess thread with the thread cutter located on the bottom of the face cover as shown.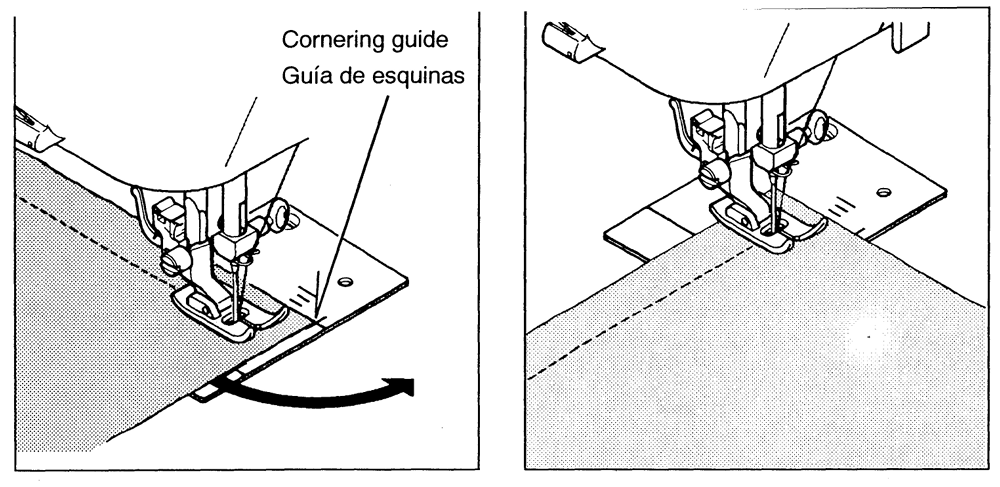
TURNING A SQUARE CORNER
To turn a square corner 5/8″ (16 mm) from the fabric edge, stop stitching with the needle tip piercing the fabric when reaching the cornering guide as shown. Raise the presser foot, turn the fabric.
The new stitching line will align with the 5/8″ (16 mm) seam guide on the side of the needle plate. Lower the presser foot and begin stitching in a new direction.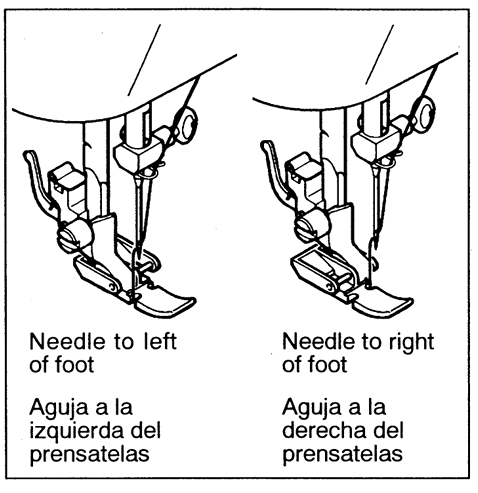
INSERTING ZIPS AND PIPING
SETTING
Use a zipper foot, which allows you to sew to the right or left of the zipper or close to the cord.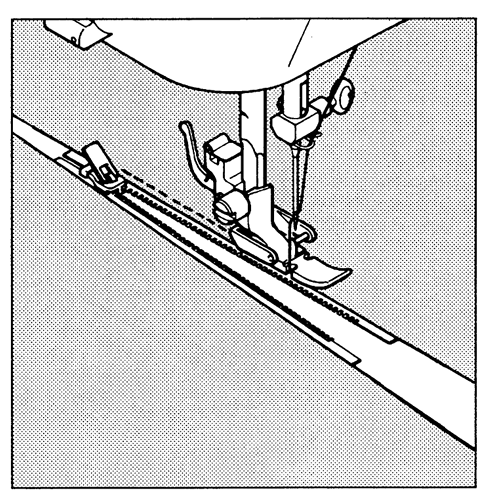
INSERTING ZIPPERS
To sew down the right side, attach the left side of the zipper foot to the presser foot holder so that the needle passes through the opening on the left side of the foot. To sew down the left side, attach the right side of the foot to the foot holder.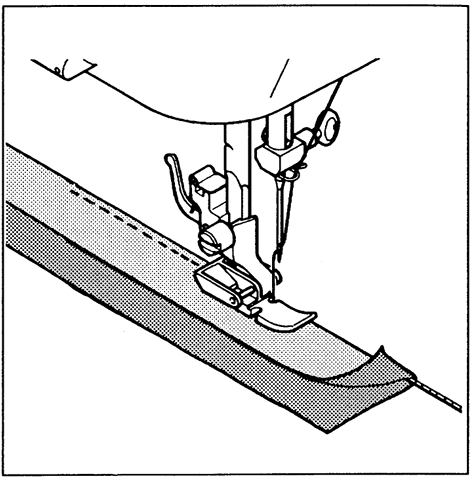
PIPING
To pipe soft furnishings, cover the cord with a bias strip of fabric and pin or tack it to the main piece of fabric. Attach the right side of the zipper foot to the foot holder so that the needle passes through the opening on the right side of the foot.
ZIGZAG STITCH
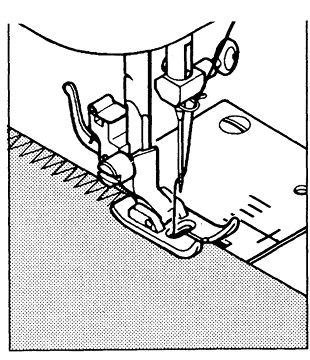
OVERCASTING
This is one of the more frequently used zigzag stitches in garment construction. Place material under the presser foot so that the needle pierces it just short of the outside edge.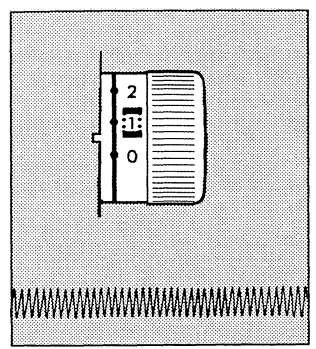
SATIN STITCH
This is a closely spaced, attractive stitch used for applique, bartacking, etc. Slightly loosen top thread tension for satin stitching. Use a backing of tissue paper or interfacing for the sheer materials to avoid puckering.
BLIND STICH PUNTADA INVISIBLE
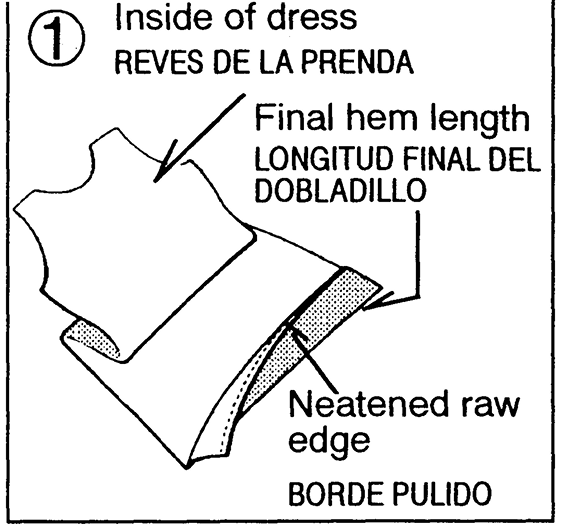
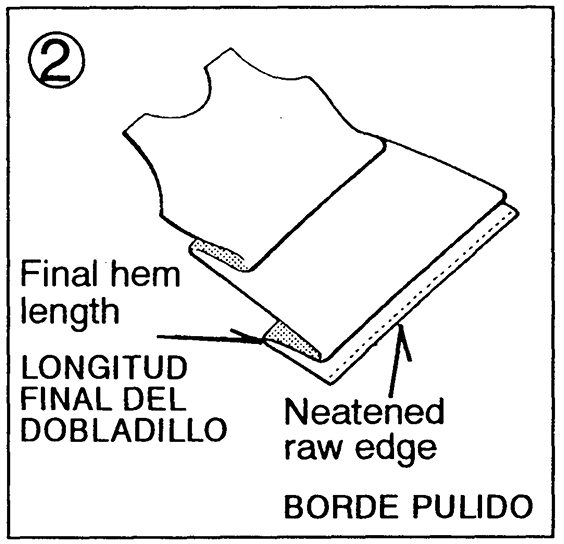
- First, neaten the edge. For lightweights, turn up and baste about 3/8″ (1 cm). For heavyweights, overcast.

- Fold the garment away from them, leaving about 1/4″ (0.6 cm) of the edge extending.

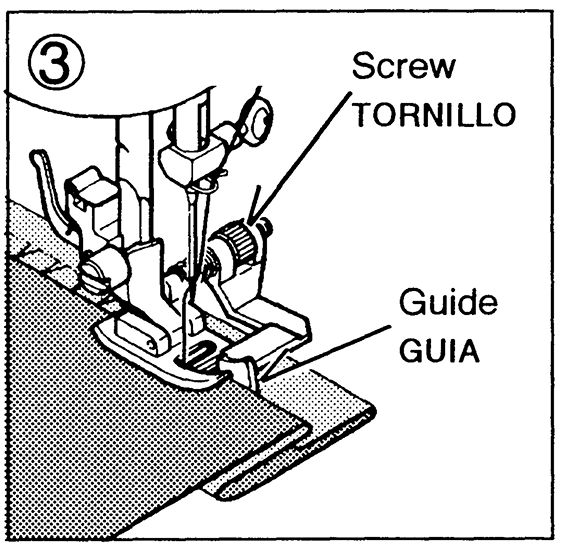
- Place the garment under the blind stitch foot with the fold of the garment against the guide and slide it by turning the screw so that the zigzag just catches the fold.

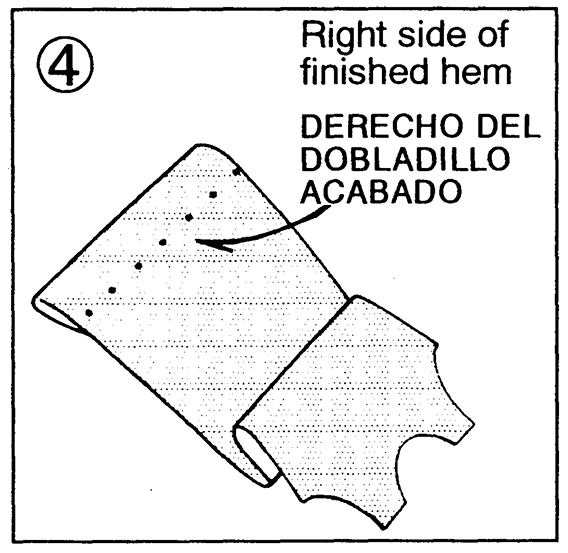
- Press both sides of the finished hem. The right side of the garment will show only the blind stitches.
THREE-STEP ZIGZAG
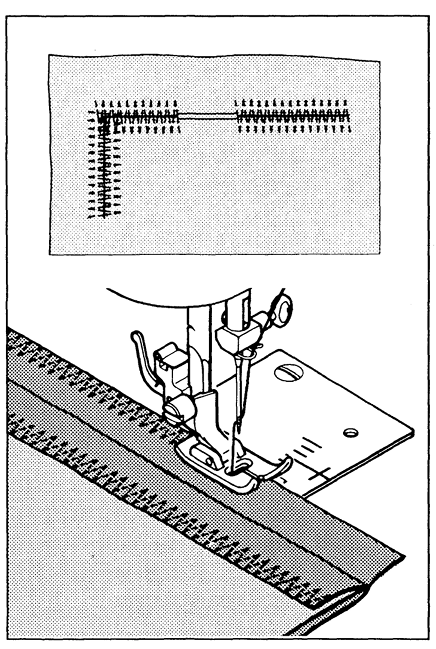
This is a strong stitch because, as its name implies, it makes three short stitches, whereas the normal zig-zag makes only one. For this reason, it is highly recommended for overcasting all types of fabrics. It is also ideal for mending tears, patching, sewing towelling, patchwork, and attaching flat elastic.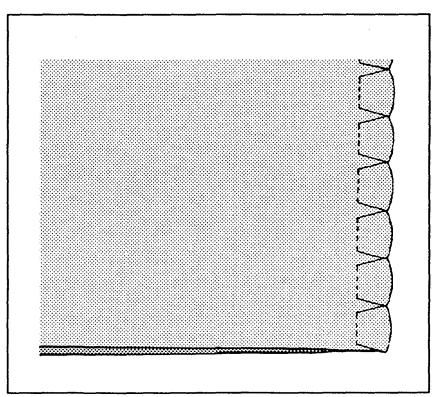
LINGERIE STITCH
Lingerie stitch is for seaming and overcasting sheer, soft fabrics in one operation. It also produces a delicate shell hem on lingerie and other fine garments.
SEAM AND OVERCAST IN ONE
Place the right sides of the fabric together and position them under the presser foot so that the zig-zag part of the stitch sews just over the raw edge.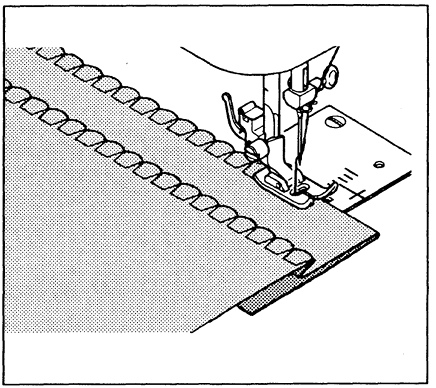
SHELL HEM
Turn under the raw edge and press. Place the fabric right side up so that the zig-zag part of the stitch sews just over the folded edge, pulling the fabric in to form a shell hem. Trim away excess fabric close to the stitching line.
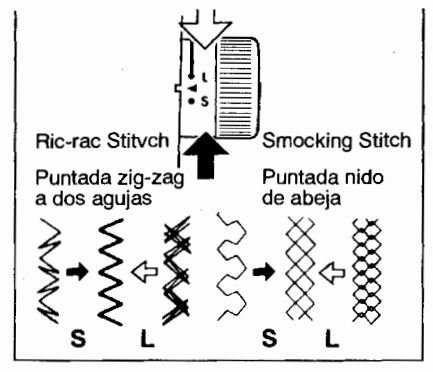
STRETCH STITCHES
Stretch stitches are mainly for use on knit or stretchable fabrics, but can also be used on ordinary materials. Use a ballpoint needle when sewing on stretchable fabric. Use normal needles for non-stretchable fabrics.
ADJUSTING STRETCH STITCH BALANCE
Stitch length/super (stretch) stitch control should be at ◄ the mark for most materials. Depending upon the type of fabric used, you may need to adjust this Control to match forward stitches of stretch sewing with reverse motion stitches. If the stitches are too open, turn the Control to the S position; if the stitches overlap, turn the Control to the L position.
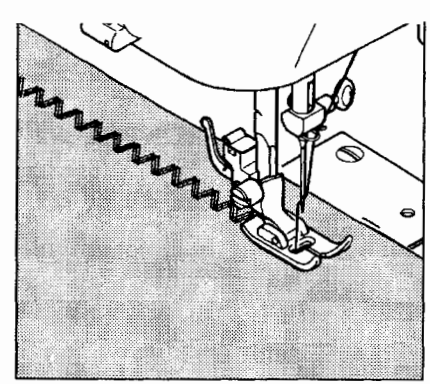
RIC-RAC STITCH
Ric-rac is a quick method of finishing a raw edge and providing a decorative top-stitch in one operation. It is ideal for edging neckbands, armholes, sleeves, and hems.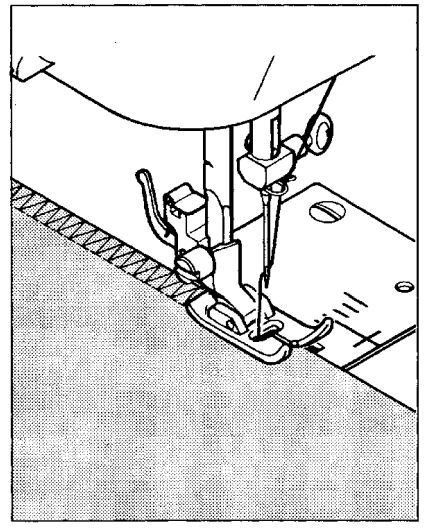
OVERLOCK STITCH
This is the same type of stitch used by the garment industry in making sportswear – it forms and finishes the seam in one operation. It’s very effective for use in repairing raw or worn edges of older garments.
SMOCKING STITCH
- Make a straight line of gathers across the fabric that you wish to smock.
- With a narrow strip of fabric directly under the line of gathering, stitch over the gathers. The design will be a series of small diamonds.
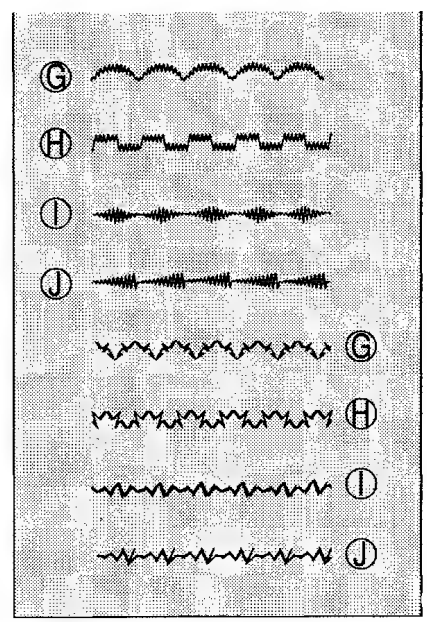
DECORATIVE EMBROIDERY DESIGNS
Your machine will produce a wide range of beautiful decorative embroidery patterns as illustrated on the stitch indicator panel. Simply select the design of your choice and proceed to sew; the pattern will be produced automatically. The final effect of each design will depend on the stitch length setting.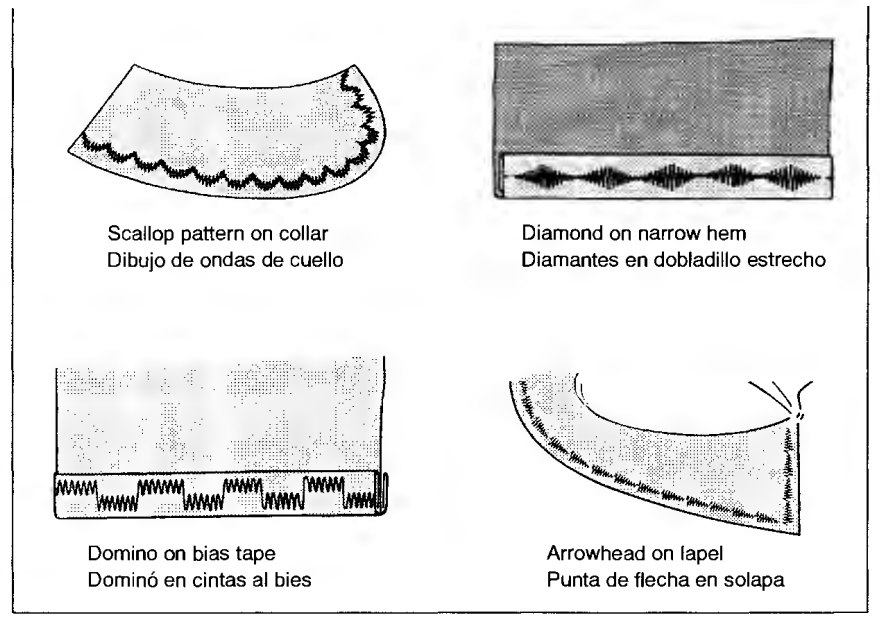
TIPS ON DESIGN STITCHING
- Always make a practice design on a scrap of the fabric you plan to use.
- Start with a full bobbin and plenty of thread on the spool to avoid running out of thread in the middle of your design.
- Reduce the top thread tension slightly.
- On a very soft fabric, you may want to use a tissue paper backing or organdy that can be cut away afterwards.
BUTTONHOLE MAKING
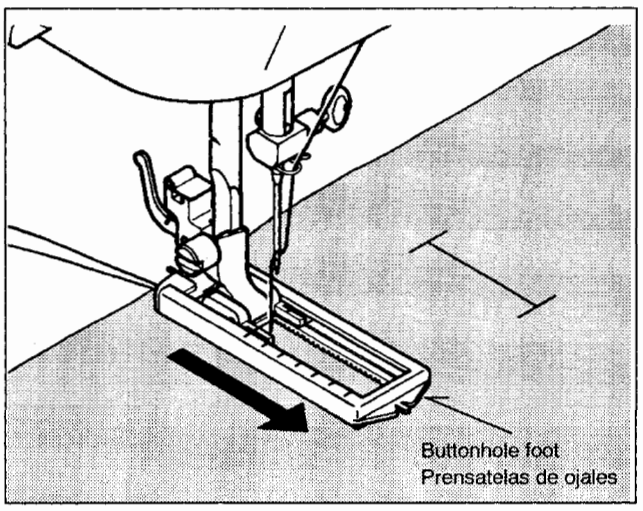
Carefully mark the buttonhole length on your garment. Place the fabric with the buttonhole marked under the buttonhole foot. Slide the foot forward so that the needle pierces the fabric at the beginning of the buttonhole.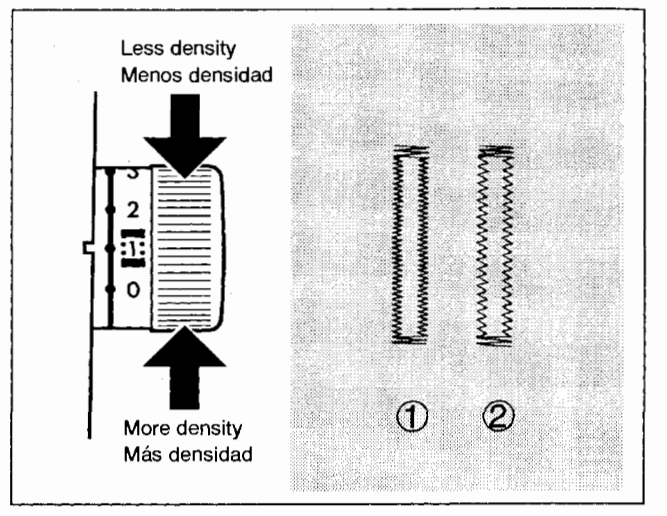
ADJUSTING STITCH LENGTH (DENSITY)
You can also change stitch density to your preference, within the buttonhole zone marked on the stitch length control.
Adjusting stitch length
- Bartack 4 or 5 stitches. Stop sewing at the left stitch and raise the needle to its highest position.
- Stitch forward to the end of the buttonhole mark. Stop sewing at the left stitch and raise the needle.
- Bartack 4 or 5 stitches. Stop sewing at the right stitch and raise the needle.
- Stitch backward until the needle reaches the beginning of the buttonhole.
- Stitch forward to the end of the buttonhole mark to complete the buttonhole.
CORDED BUTTONHOLES
Hook filler cord (crochet thread or buttonhole twist) to the spur and pull both ends of the cord forward under the foot. Sew a buttonhole using zig-zag stitches. Cover the cord. When completed, release the cord from the foot, pull the ends of the cord forward, and snip off the extra length.
CARING FOR YOUR MACHINE
To ensure the best possible operation of your machine, it is necessary to keep the essential parts clean at all times. Always disconnect the machine from the power supply by removing the plug from the socket-outlet.
Cleaning the feed dogs and shuttle area
- Raise the needle to its highest position.
- Remove the bobbin case from the shuttle.
- Push aside the two shuttle keepers.
- Remove the shuttle race cover and the shuttle.
- Clean the feed dogs and shuttle area with the lint brush.
NOTE: Put a drop of sewing machine oil on the center pin of the shuttle and shuttle race as indicated by the arrows. - Be sure the shuttle race forms a half moon on the left side of the machine.
- Holding the shuttle by its center pin, replace it so as to form a half moon on the right side.
- Slide the shuttle race cover back into position.
- Snap the shuttle keepers back into position.
- Feed dogs
- Shuttle race
- Shuttle keeper
- Shuttle
- Shuttle race cover
- Bobbin case
Changing light bulb
Remove the face cover, Unscrew the bulb and firmly screw in a new bulb. Replace the face cover. Disconnect from main supply before changing a bulb. Do not use a bulb of more than 15 watts.
For more manuals by Singer, visit ManualsLibraryy
Singer 132 Featherweight Sewing Machine-FAQs
Why is my Singer Featherweight sewing slowly?
A slow machine is often caused by an old or weak motor, a loose or worn belt, or a thread jam. Cleaning and servicing usually fixes the issue.
How do I adjust stitch length on my Featherweight?
Use the stitch length lever on the machine’s front. Move it up for shorter stitches and down for longer stitches until you reach the desired length.
Why does my Singer sewing machine not sew?
Check if the needle is correctly installed, the bobbin is placed properly, and the machine is threaded correctly. Cleaning lint and adjusting thread tension also helps.
Why is my Featherweight skipping stitches?
Skipped stitches are usually due to a bent or dull needle, improper needle insertion, or incorrect threading. Replacing and reinserting the needle often solves the problem.
What size needle should I use for my Singer Featherweight?
A size 80/12 universal needle works best for most fabrics. It fits the Featherweight perfectly and handles both knits and woven materials.
What should I do if my stitches are loose underneath?
Loose bottom stitches mean the bobbin tension is too weak. Adjust the bobbin case tension slightly and recheck your upper thread tension.
Can I backstitch on a Featherweight sewing machine?
Yes, the machine allows backstitching. Use the reverse lever to secure your stitches at the beginning and end of a seam.
How do I maintain my Singer Featherweight?
Keep it clean by removing lint, oiling moving parts regularly, and checking belt tension. Proper care will keep it running smoothly for years.

