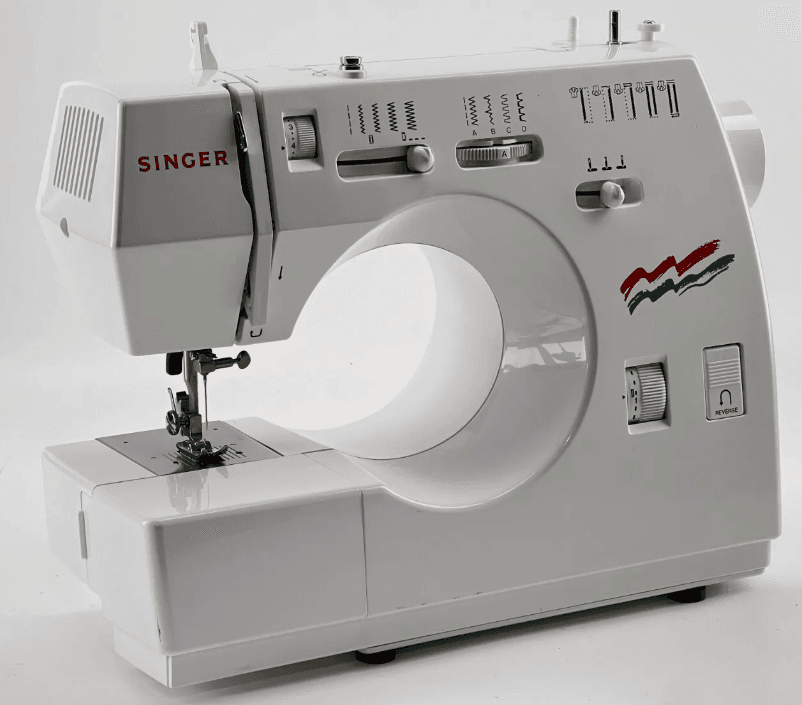
Singer 30215 Sewing Machine
PRINCIPAL PARTS
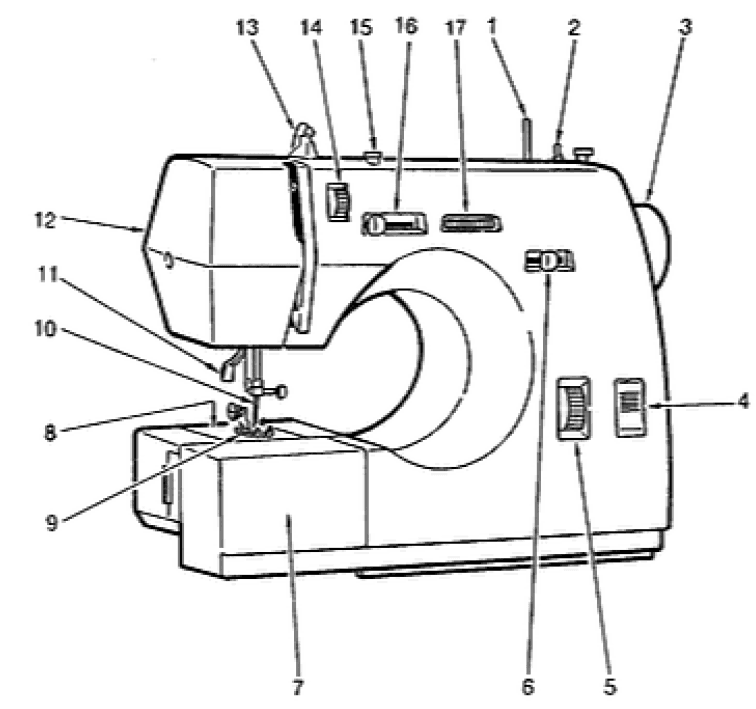
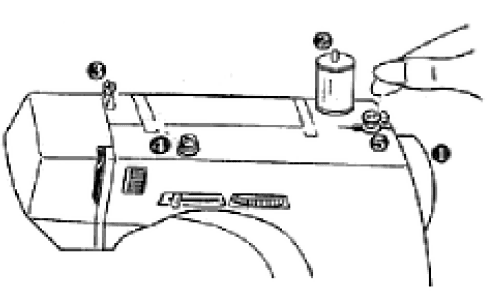
- Spool pin
- Bobbin winder
- Handwheel
- Reverse button
- Stitch length dial
- Needle position selector
- Extension table
- Needle plate
- Presser foot
- Needle
- Presser foot lifter
- Faceplate
- Thread guide
- Tension dial
- Bobbin winder tension disc
- Stitch width lever
- Pattern selector
STANDARD ACCESSORIES INCLUDED WITH MACHINE
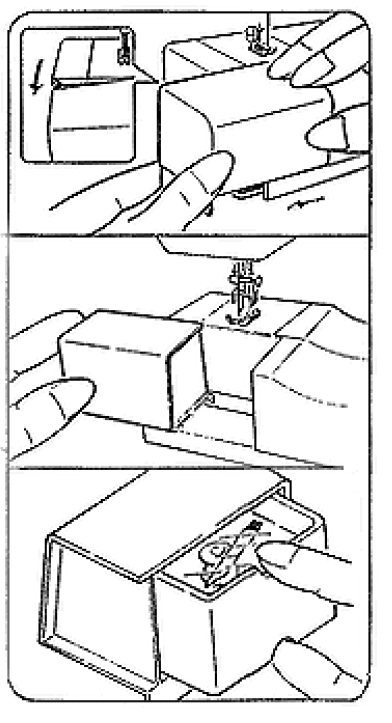
- Note: Accessories are stored inside Extension table.
CONNECTING MACHINE
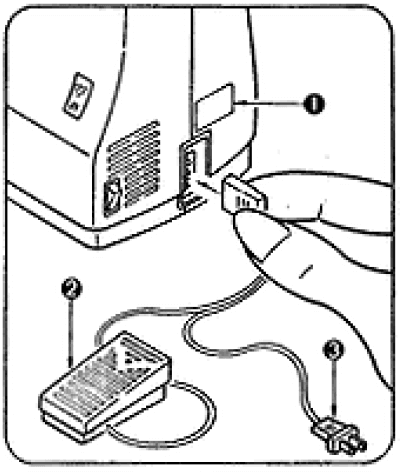
- Before plugging in your machine, be sure that the voltage and number of cycles indicated on the electrical data table (1), conform to your electrical power supply.
- Plug the controller (2), into the receptacle, at the right end of the machine. Then connect the electrical power cord plug (3), to your electrical outlet.

CHOOSING AND CHANGING NEEDLES
- IMPORTANT: For best sewing results, use only Singer needles

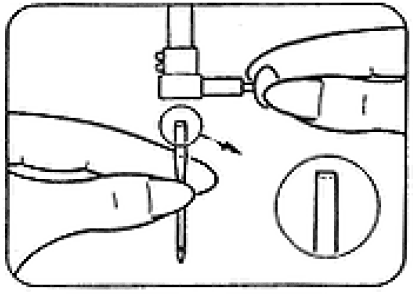
- Loosen needle clamp screw and remove needle. With flat side of needle to the back, insert new needle up into clamp as far as it will go. Tighten needle clamp screw securely.


FREE ARM SEWING
- Pull end of extension table away from machine, as illustrated.

- Topstitch edges on sleeves, or finish waistbands and pants legs easily.
ATTACHING FEED COVER
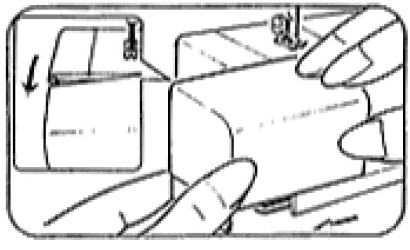
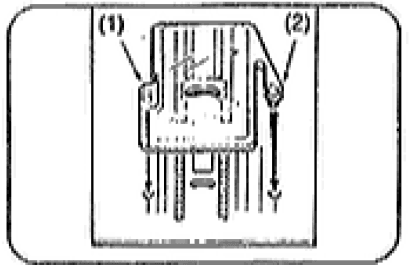
- Press tab (1) and (2) into holes on needle plate

WINDING A BOBBIN
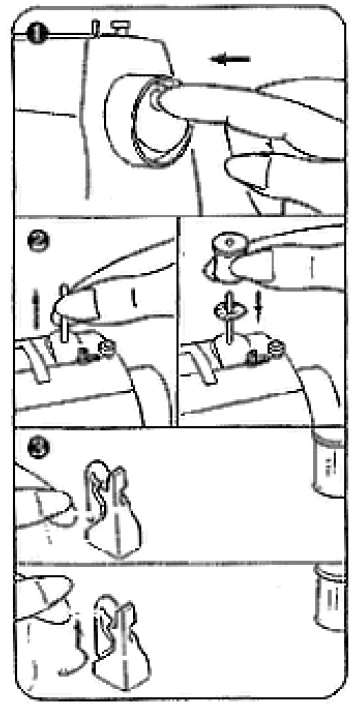
- Push indent.
- Raise spool pin.
- Place felt and thread onto spool pin.

- Lead thread from spool to back side of thread guide.
- Pull thread up to top of slot.

INSERTING THREADED BOBBIN CASE
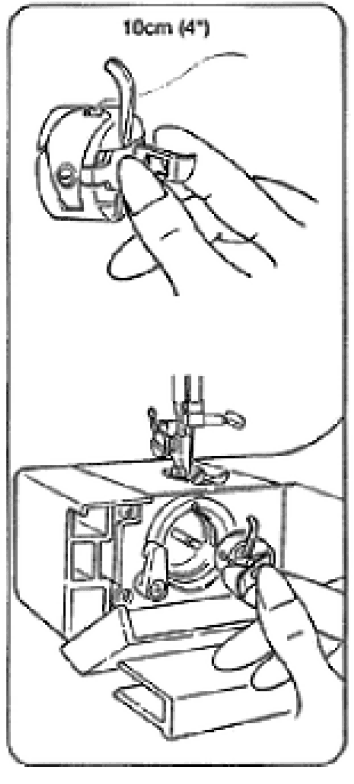
- Pull 10 cm of thread from bobbin case. While holding latch replace bobbin case

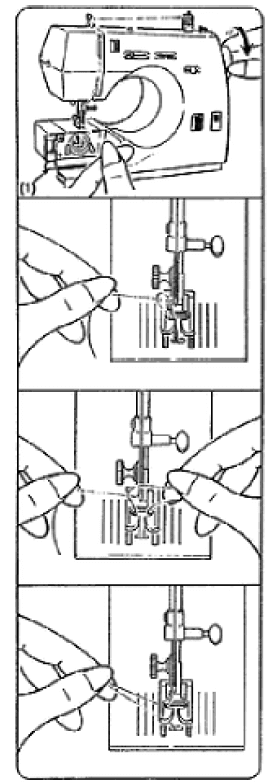
RAISING BOBBIN THREAD
![]()
- Open hook cover (1).
- Hold needle thread.
- Turn hand wheel towards you lowering, then raising needle.
- Gently pull needle thread to raise bobbin thread.
- Open loop.
- Pull both threads back.
- Open hook cover (1)

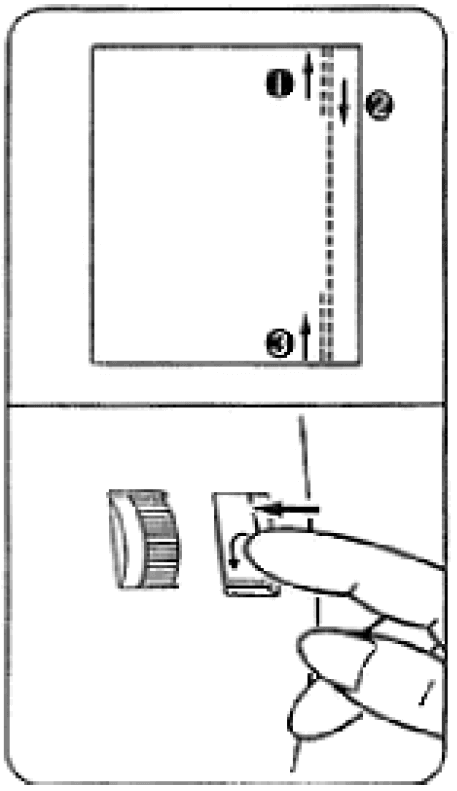
STITCHING IN REVERSE
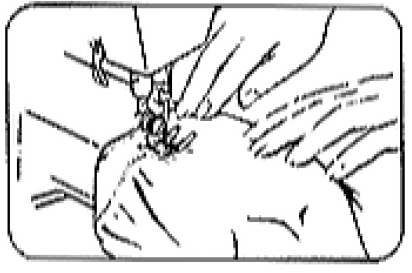
- Secure beginning and end of seam as shown.
- Press reverse button for steps 1 and 3.

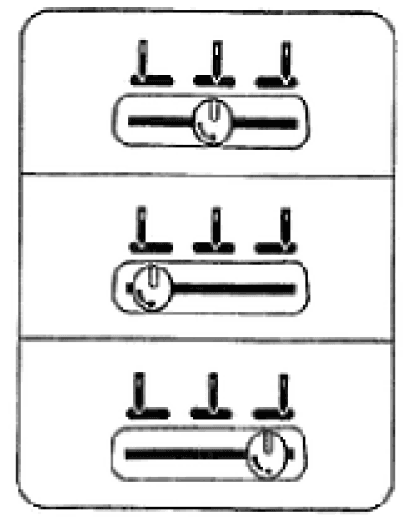
ADJUSTING NEEDLE POSITION
- Center needle position.
- Left needle position.
- Right needle position.

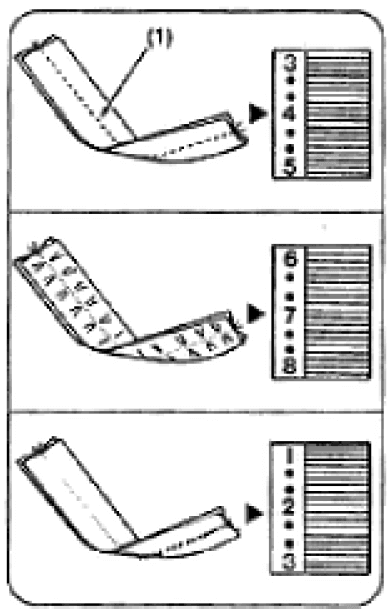
ADJUSTING THREAD TENSION
- Proper tension will produce identical stitches on both the front and back of your fabric (1).
- Too much tension – move tension dial to lower number.
- Too little tension – move tension dial to higher number.


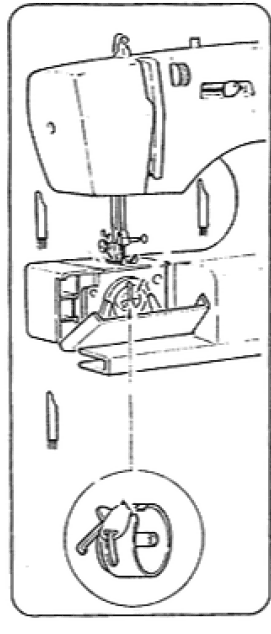
CLEANING MACHINE
![]()
To ensure reliability, take a few minutes to keep the machine clean.
- Using the lint brush, remove lint or dust from:
- presser bar
- needle bar
- shuttle hook (if there is a lot of lint in this area, remove the shuttle hook for cleaning)
- machine surface (if necessary, dampen a soft cloth and use a mild soap to clean the surface)
- Remove needle plate and clean exposed area with a lint brush.

BEFORE STORING YOUR MACHINE
- To disconnect, turn all controls to off (“0”) position, then remove plug from outlet.
- Unplug foot controller from machine.
- Lower presser foot lifter.
- Turn handwheel to lower needle bar to the lowest position.
- Place your machine out of reach of children in safe, dry location.
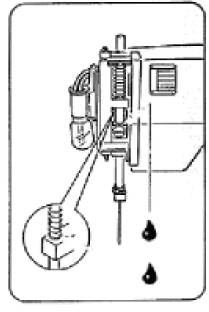
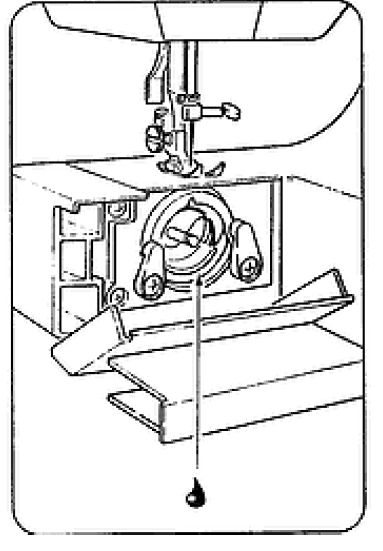
OILING MACHINE
![]()
- Take face plate away from machine. (refer to page 24)
- Apply one drop of sewing machine oil on illustrated areas.
- Open hook cover.
- Take bobbin case out of machine.

- Apply a drop of sewing machine oil on the bottom of shuttle race.

Fabric, Thread and needle Table
- The table below is a practical guide to needle and thread selections for most situations.
- Refer to it before starting to sew. Be sure to use the same size and type of thread in both needle and bobbin. For best results, use only genuine Singer® needles.
PERFORMANCE CHECKLIST
When sewing difficulties occur look back through this manual to make sure you are correctly following the instructions. If you still have a problem, the reminders below may help you to correct it.
NEEDLE DOES NOT MOVE
- Is the machine connected to the electrical supply?
- Is the power and light switch on?
- Is the controller connected?
NEEDLE MOVES BUT THE STITCH IS NOT FORMED
- Is needle defective?
- Is needle fully inserted into the needle clamp?
- Are bobbin and needle correctly threaded?
- Is the bobbin case correctly inserted into the shuttle race area?
NEEDLE BREAKS
- Is needle straight and sharp?
- Is needle correct size?
- Is needle fully inserted into needle clamp?
- Are controls properly set?
- Are accessories correct for application?
BOBBIN WINDING DIFFICULTIES
- Is thread unwinding freely from spool?
- Is bobbin winder engaged?
- Is thread end securely held at start of wind?
UPPER THREAD BREAKS
- Is machine properly threaded?
- Is thread freely unwinding from spool? Is needle correct size for thread?
- Is upper thread tension too tight?
- Is bobbin case properly inserted?
- Is bobbin rim free of nicks?
- LOWER THREAD BREAKS
- Is bobbin correctly wound?
- Is bobbin correctly inserted into bobbin case?
- Is bobbin case correctly threaded?
SKIPPED STITCHES
- Is machine properly threaded?
- Is fabric firmly held down?
- Is needle correct style and size?
- Is needle straight and sharp?
FABRIC DOES NOT MOVE PROPERLY UNDER PRESSER FOOT
- Is presser foot correctly attached to machine?
- Is presser foot lowered?
- Is stitch length correctly set?
For more manuals by Singer, visit ManualsLibraryy
Singer 30215 Sewing Machine-FAQs
How does the Singer sewing machine work?
The Singer sewing machine operates through a mechanism where motion is communicated to the needle arm and shuttle via gears, allowing continuous and curved stitching. The overhanging arm design enables stitching on any part of the work.
What manually controls the sewing machine?
The hand wheel controls the movement of the take-up lever and needle. It can be turned manually or by power and should always be turned toward you when adjusting.
What are the important safety rules when using a sewing machine?
1. Pull back hair and sleeves
2. Wear closed-toed shoes and safety glasses
3. Always turn off and unplug the machine after use and before threading
4. Never sew over pins
5. Avoid sewing through thick or tough materials
What do S1 and S2 mean on a Singer sewing machine?
S1 and S2 on the stitch pattern selector dial stand for additional stitch patterns, offering more options than the basic stitches.
Is a Singer sewing machine easy to use?
Yes, Singer machines are beginner-friendly, especially mechanical models, as they are simple to use without complex settings or digital displays.
What is a spool pin on a sewing machine?
A spool pin is a rod that holds the spool of thread in place during sewing. It is typically made of metal or plastic and fits various sizes of spools.
What is the most important rule in sewing?
Accuracy is crucial in sewing, from cutting fabric and patterns to stitching. Properly following cutting lines ensures the pieces fit together correctly.
What is the code for sewing machines?
The HS Code for sewing machines is 8452.


