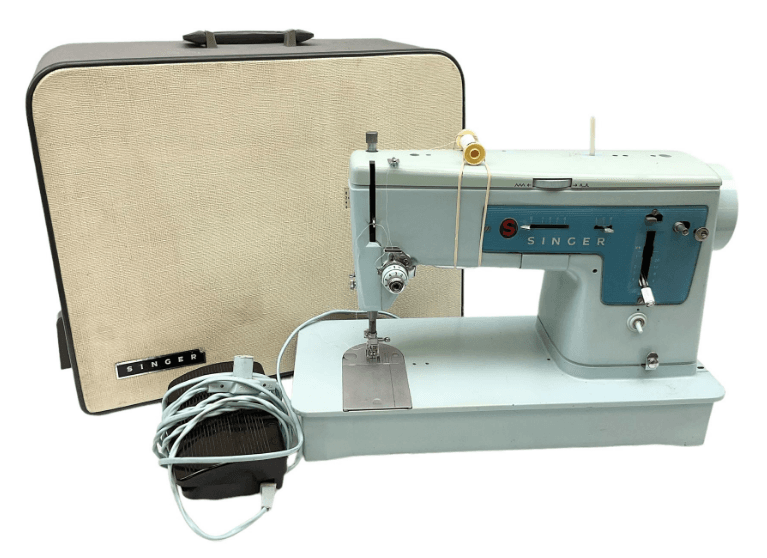
Singer Style Mate 347 Sewing Machine
Getting to know your sewing machine
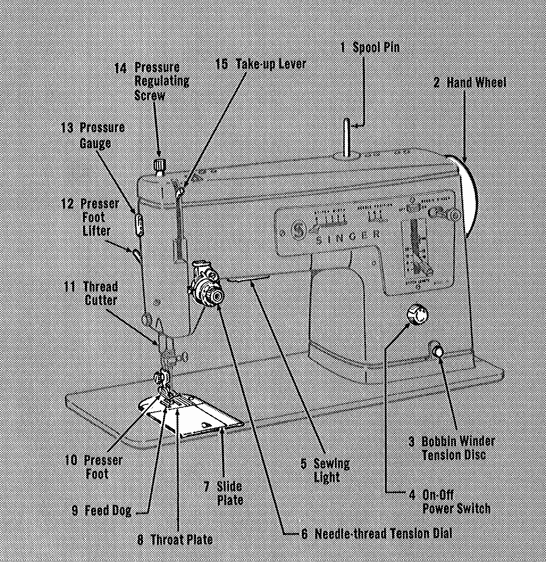
.. And What They Do
- Spool Pin-Holds thread spools of various sizes.
- Hand Wheel— Controls the movement of the take-up lever and needle. Always run it toward you.
- Bobbin Winder Tension Disc– Regulates thread tension for bobbin winding.
- On-Off Power Switch-Turns on the power and the sewing light simultaneously. When the machine is not in use, the switch should be in the OFF position.
- Sowing Light— Pours light on the sewing area.
- Needle-thread Tension Dial — Numbers allow for exact, easy-to-duplicate tension settings.
- Slide Plato – Opens easily for the removal and replacement of the bobbin.
- Throat Plate – Numbered guidelines help you keep seams straight,
- Feed Dog– Feeds fabric as itis being stitched.
- Presser Foot — Holds fabric against feed dog,
- Thread Cutter— Cuts thread conveniently and safely.
- Prosser Foot Lifter —At the back of the machine, raises and lowers presser foot.
- Pressure Gauge — Numbers eliminate guesswork when duplicating settings.
- Pressure Regulating Screw — Regulates degree of pressure exerted on fabric by the presser foot.
- Take-up Lever— Controls needle thread.
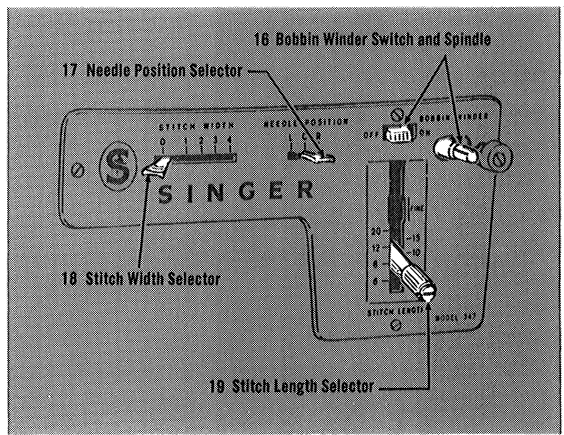
- Bobbin Winder Switch and Spindle – lets you fill the bobbin with thread quickly and easily. Bobbin stops winding when full.
- Needle Position Selector – Places the needle in either left, center, or right stitching position. The CENTER position is used most often. LEFT and RIGHT settings are for special stitch placement.
- Stitch Width Selector — Settings 1 through 4 allow for a variety of zig-zag stitch widths. The 0 setting is for straight stitching.
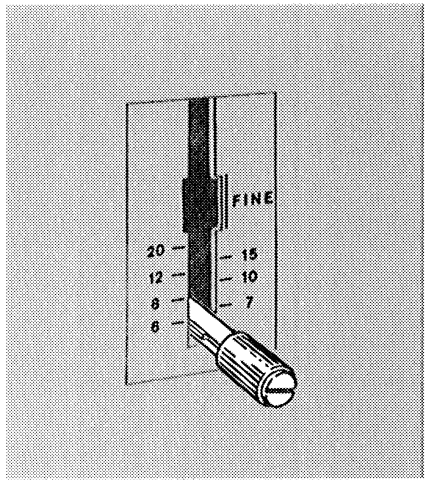
- Stitch Length Selector — I.cts you stitch forward and in reverse. Numbers indicate the number of stitches per inch; FINE area is for closed zig-zag stitching.

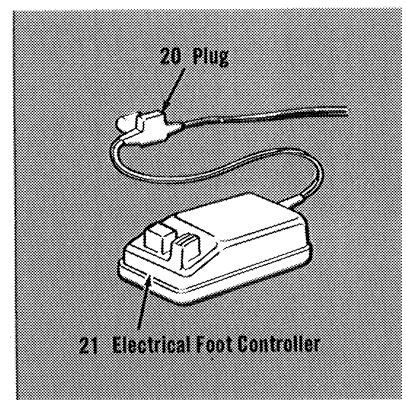
- Plug — Before plugging in the machine, be sure that the voltage and number of cycles stamped on the plate under the hand wheel are within the range marked on the electric meter installed by your power company. To connect the machine, insert the three-hole plug into the three-pin receptacle at the right end of the machine. Insert the two-pin plug into an electrical outlet.
- Electrical Foot Controller — Controls the speed of the machines; the harder you press, the faster it will sew.

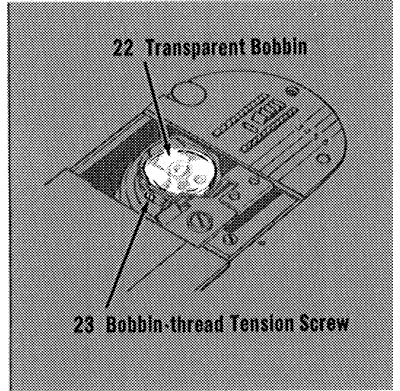
- Transparent Bobbin— Shows thread supply; is easily removed for bobbin winding.
- Bobbin-thread Tension Screw — Seldom needs adjustment. A very slight turn produces a noticeable change in tension.

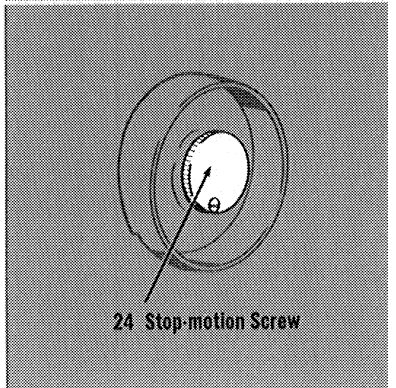
- Stop-motion Screw — Directs power to the needle. Loosen the screw for bobbin winding

How to thread your sewing machine
Like all sewing machines that produce what is called a “lockstitch”, your Style. The mate sewing machine sews with two threads. The upper thread comes from the spool and is threaded through the eye of the needle. The lower thread comes from the bobbin, the small plastic spool that you wind using the machine. It is best to wind the bobbin before threading the needle.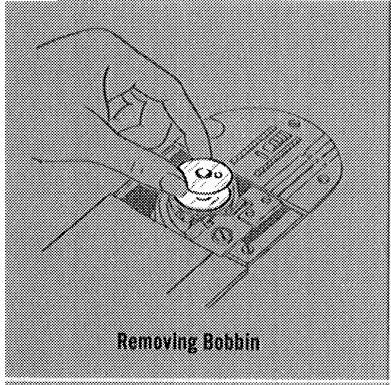
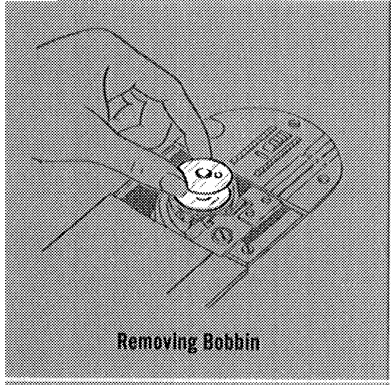
THE BOBBIN THREAD
To Wind the Bobbin
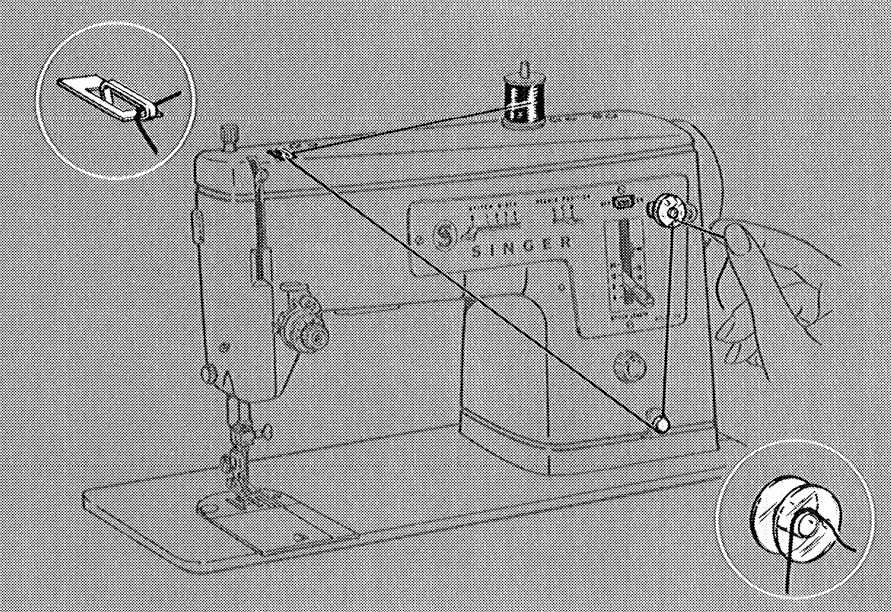
- Turn the hand wheel toward you until the needle is at its highest position.
- Open the slide plate and fit the bobbin.
- Loosen the needle stop-motion screw with your right hand while holding the hand wheel with the left |
- Place the bobbin on the spindle.

- Place the spool of thread on the spool pin and lead the thread through the eyelet and around the tension disc.
- Pass the thread from the inside, through a hole in the bobbin.

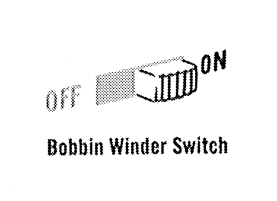
- Move the bobbin winder switch to the ON position, hold the thread end as shown, and start the machine.
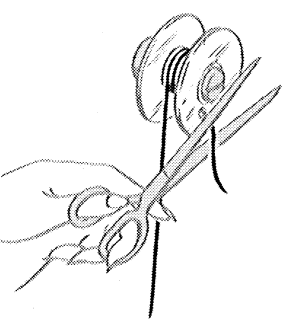
- Cut off the thread end after a few coils have been wound on the bobbin.
- When the required amount of thread has been wound (winding will stop when the bobbin is full), move the bobbin winder switch to the OFF position, and cut the thread.
- “Tighten stop-motion screw by turning it away from you with right hand, while holding the hand wheel with the left hand.

To Thread the Bobbin Case
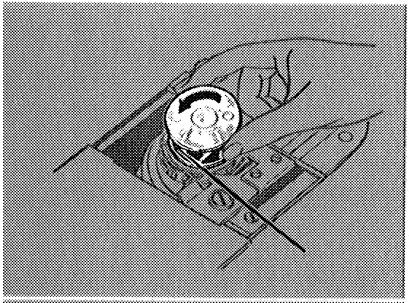
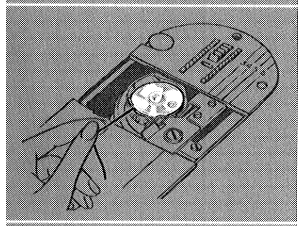
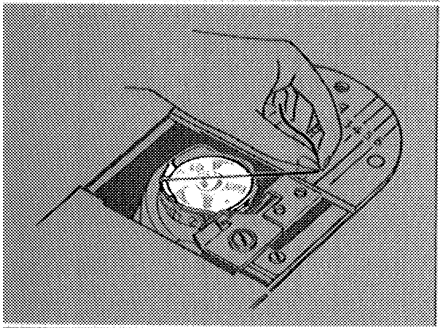
- Hold the bobbin so that the thread unwinds in the direction shown, and insert the bobbin in the bobbin case.

- Pull the thread into a notch, draw it under the tension spring, and into the slot.

- Draw about 3 inches of thread diagonally, across the bobbin.

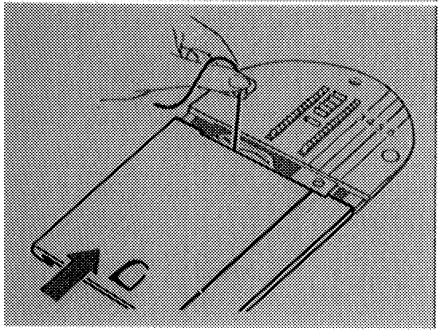
- Close the slide plate with the thread in the slot between the throat plate and slide plate.
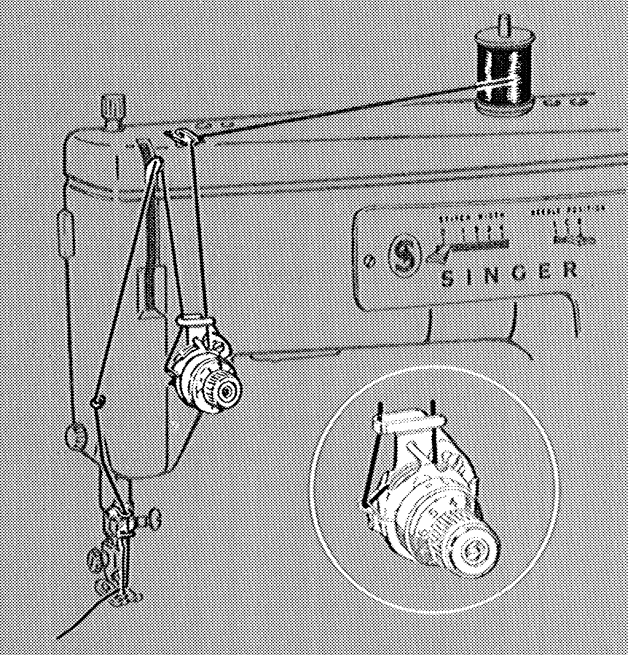
THE NEEDLE THREAD
- Place the spool of thread on the spool pin at the top of the machine.
- “Turn the hand wheel toward you to raise the needle to its highest position.
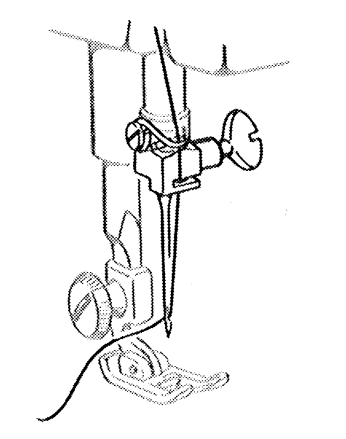
- Lead the thread through the threading points shown. Thread the needle from front to back.
- Draw about 3 inches of thread through the eye of a needle.
RAISING THE BOBBIN THREAD
Now that you have wound the bobbin and threaded the needle, you will need to raise the bobbin thread through the needle hole in the throat plate.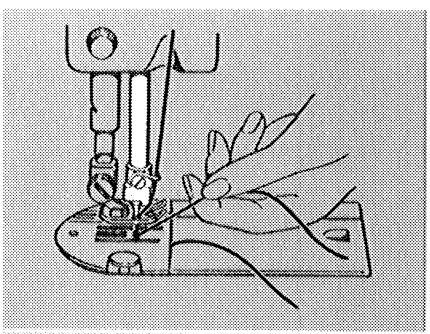
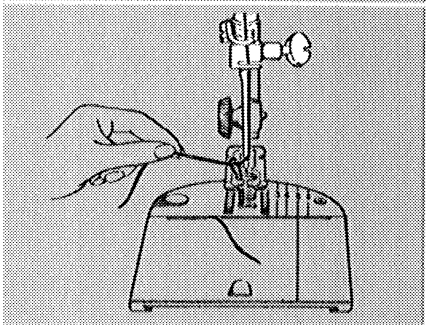
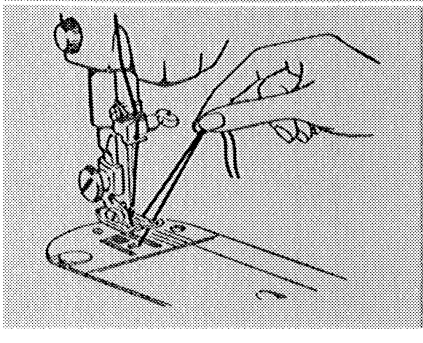
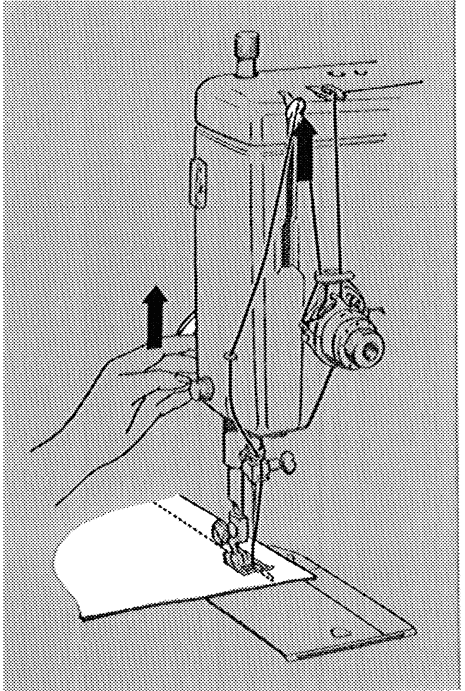
- Hold the needle thread lightly with your left hand and the right-hand wheel slowly toward you so that the needle enters the throat plate.

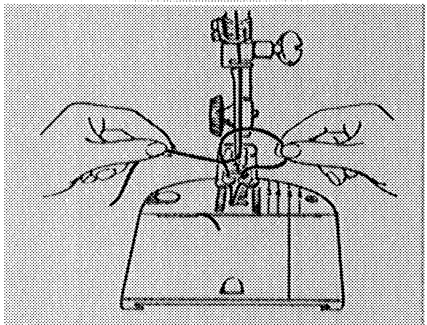
- Continue turning the hand wheel and holding the needle thread ntl needle siscs and bring up the bobbin thread in a loop.

- Undo the loop with your finger.

- Place both needle and bobbin threads under the presser foot, and lay them diagonally across the feed dog.
Straight stitching
- Stitch Width: O
- Needle Position: C
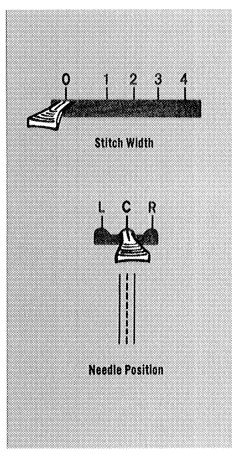
HOW TO POSITION THE NEEDLE
Before you set your Style-Mate sewing machine for any kind of stitching, turn the hand wheel toward you until the needle is above the throat plate. Then, to set for straight stitching, simply move the Stitch Width Selector to O position and the Needle Position Selector to center (C) position. These settings locate your needle and control its movement so that it stitches straight up and down in the center of the needle hole with no sidewise movement as in zig-zag stitching.
HOW TO ADJUST FOR YOUR FABRIC
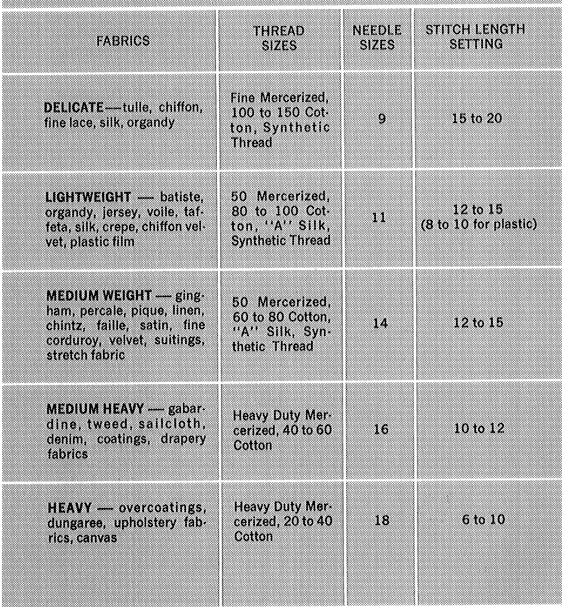
As you get ready to sew, take advantage of the flexibility of your sewing machine. With a choice of needle sizes and three easy-to-use selectors for stitch length, pressure, and needle-thread tension, you can adjust the machine to sew perfectly on a wide variety of fabrics. The table on page 13 will guide you in selecting the correct thread and needle sizes and stitch length according to the weight of your fabric.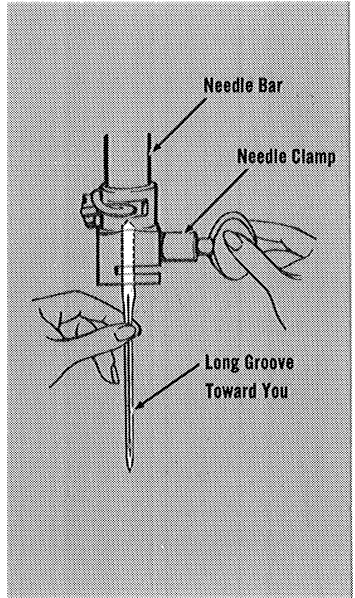
Changing the Needle
- Turn the hand wheel over toward you until the needle is at the highest position.
- Loosen the needle-clamp serew and remove the needle.
- Insert the new needle in the clamp with the flat side of the needle to the back, and the long groove toward you; push it up as far as it will go.
- “Tighten needle clamp screw
FABRIC, NEEDLE, THREAD, AND STITCH LENGTH TABLE
Adjusting Stitch Length
The Stitch Length Selector does two jobs: it controls the number of stitches per inch, and it lets you sew either forward or in reverse. The numbers on either side of the selector represent the number of stitches per inch: the higher the number, the shorter the stitch. stitch. As the Stitch Length Selector is moved up in the FINE area, stitch length diminishes to the vanishing point. The FINE area is used for closed zig-zag stitching only. Generally, shorter stitches are best for lightweight fabric; longer ones for heavy fabric.
To Set Stitch Length
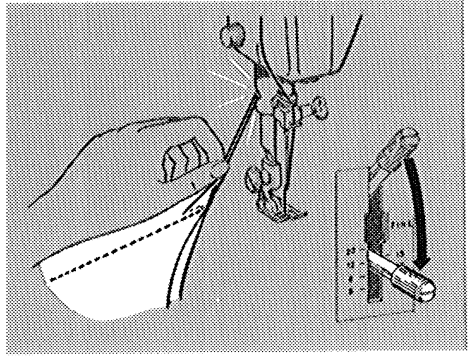
- Loosen thumb nut by turning to the left.
- Position the lever for the desired stitch length.
- Tighten the thumb nut by turning to the right.
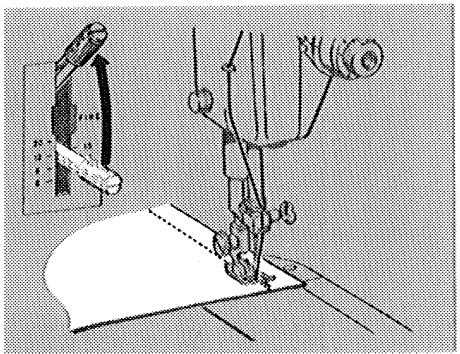
For reverse stitching, simply raise the selector as far as it will go. Do not loosen the thumb nut to reverse unless you are using the No. 6 setting, in the very bottom position.

Adjusting Pressure
The Pressure Screw regulates the pressure that the presser foot exerts on the fabric. Correa pressure is important because it enables the fabric to feed smoothly and evenly, without being marred. The numbered settings on the pressure gauge will assist you in obtaining the correct pressure for the fabric you are using, Generally, heavier fabrics require a high number setting (heavier pressure); light-weight fabrics, a lower setting (lighter pressure). But fabric texture must also be considered. Soft fabrics, for example, require less pressure than crisp fabrics.
- To increase pressure, turn screw downward.
- To decrease pressure, turn screw upward.
- To darn (without an embroidery hoop), reduce pressure to 0.

Adjusting Needle-thread Tension
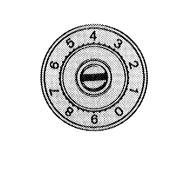
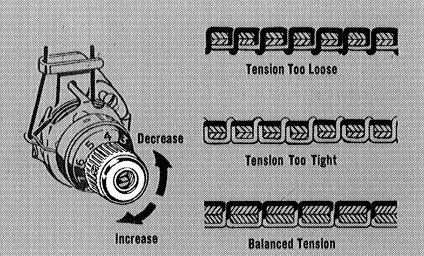
“The tension dial regulates the degree of tension on your needle thread. Set it according to the type of thread and fabric you use. The numbers eliminate guesswork in duplicating settings. Correet tension is important because too much or too little will weaken your seams or cause your fabric to pucker. Make a test sample with the fabric and thread you plan to use and examine it. A perfect stitch will have the needle and bobbin threads locked between the two layers of fabric with no loops on top or bottom, and no puckers. If stitches look loose, increase the needle thread tension. If the fabric puckers, decrease the tension.
- To increase tension, turn the dial to a higher number.
- To decrease tension, turn the dial to a lower number.

Adjusting Bobbin-Thread Tension
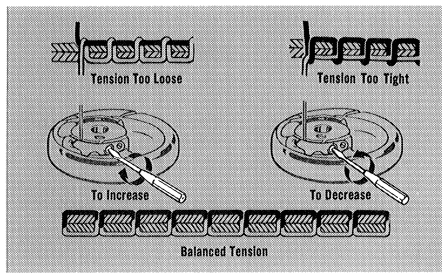
Bobbin-thread tension is controlled by aserew located on the bobbin ease. You will seldom need to adjust the bobbin-head tension since itis usually possible to obtain the correct balance by adjusting the needle-thread tension alone. On those rare occasions when it becomes necessary to adjust the bobbin thread tension, use the small screwdriver, which you will find in your accessory box. A very slight turn on the screw nearest the thread slot on the bobbin case will produce a noticeable change in bobbin-thread tension.
- “To increase tension, turn screw clockwise.
- To decrease tension, turn screw counterelockwise.

HOW TO SEW A SEAM
To Start a Seam
- Set Stitch Length Selector for the desired number of stitches per inch.
- With presser foot up, align the fabric with appropriate scam guideline on throat plate (as described on the following page). Position the needle in the fabric about 1/2 inch from the edge.

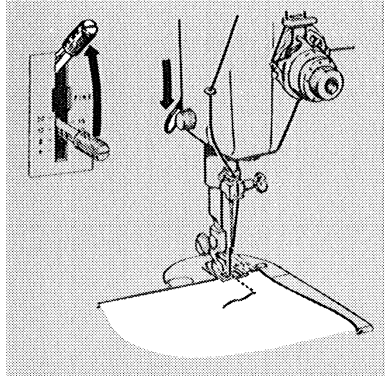
- Lower presser foot and raise the Stitch Length Selector to reverse.
- Backstitch to the edge of the material for reinforcement.

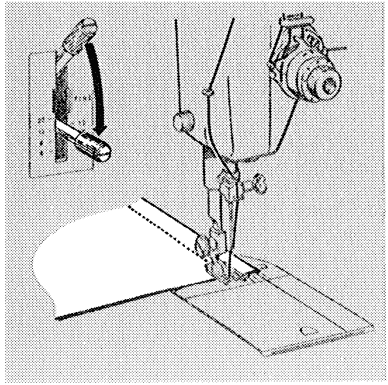
- Lower Stitch Length Selector for forward stitching, and stitch.

To Keep the Seam Straight
As you stitch, use one of the numbered lines on the throat plate as a guide to keep the seams straight. Numbers indicate distance, in 8ths of an inch, from the needle. If you want a % inch seam, for example, line up your fabric with line 5.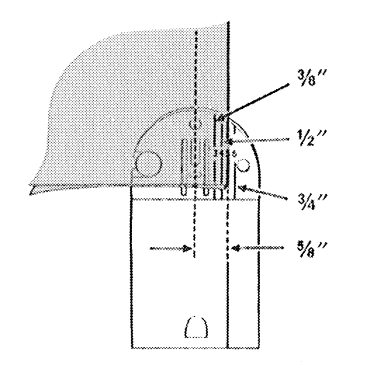
To Guide and Support Fabric
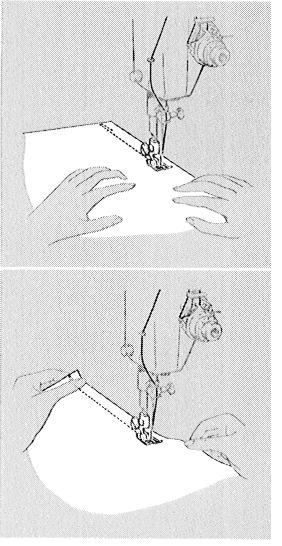
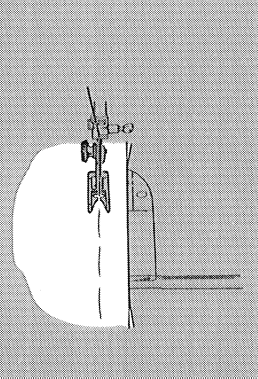
Most fabrics need to be guided in front of the presser foot only, as shown. Some fabrics, however, require support while being stitched:
- For filmy sheers, knits, etc., apply gentle tension by holding the seam in front and back of the presser foot.
- For stretch fabrics, apply firm tension front and back when stitching in the same direction as the stretch. For seams not in the stretch direction, stitch conventionally, guiding the fabric in front of the presser foot.

To End a Seam
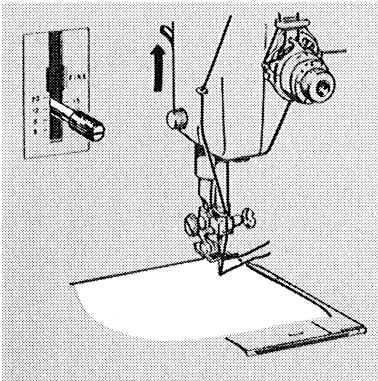
- Stitch to the fabric edge. Raise the Stitch Length Selector as far as it will go, and backstitch to reinforce the end of the seam.

- Turn the hand wheel to bring the needle to its highest point,
- Raise the presser foot and remove the fabric.

- Cut threads on the thread cutter at the rear of the presser bar. Lower Stitch Length Selector for forward stitching.

Zig-Zag stitching
Stitch Width: 1-4
Needle Position: C
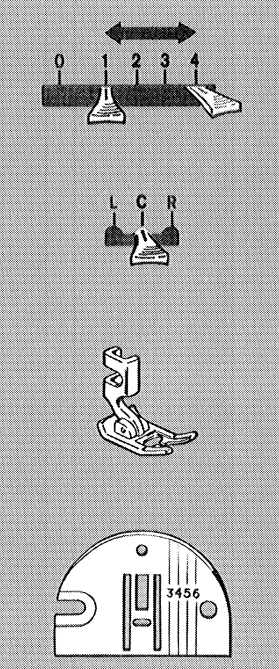
HOW TO SET STITCH WIDTH AND NEEDLE POSITION
To produce a zig-zag stitch, the Stitch Width Selector must be moved from its straight stitch position 0 to any setting between 1 and 4. The higher the number you select, the wider your stitch will be. Be sure to raise the needle above the throat plate and fabric before changing the stitch width. Most of your zig-zag stitching will be done at the center needle position; left and right settings are used for special stitching requirements, such as buttonhole making and button sewing.
HOW TO SET STITCH LENGTH AND NEEDLE THREAD TENSION
When you are preparing to do zig-zag stitching, make a test sample with the fabric and thread you plan to use so that you can adjust your stitch length and needle-thread tension properly. If you need to adjust pressure, see page 15.
Stitch Length
For open zig-zag stitching, choose any stitch length from 6 to 20, depending on how open you wish the stitches to be. If you wish a closely packed zig-zag stitch:
- Move the Stitch Length Selector to the bottom of the FINE area.
- Run the machine at a slow speed.
- Gradually tighten the thumb nut by turning it to the right, until stitches are closely spaced and form a smooth surface.

Needle-thread Tension
All zig-zag stitching requires less tension than straight stitching, and closed zig-zag stitching requires even less tension than open zig-zag stitching. Furthermore, the wider the stitch, the lighter the tension on the thread must be. Thus, stitch width 4 requires the least tension; narrower stitching requires somewhat more. Notice the stitching on your sample. If the stitching looks too taut or if the fabric is puckering, lower the needle thread tension by turning the Tension Dial to a lower number.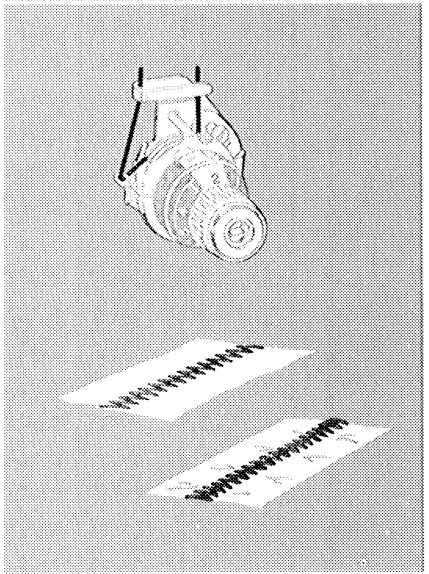
Clothes and home decorations
SEAMS
Pin Basting
Pin basting is a time saver and can be used in place of hand-basting when you are straight stitching seams in easy-to-handle fabrics. When sewing over pins, it is important to use fine pins and to place them correctly in reference to the stitching line.
Place pins so that:
- They are at right angles to the stitching line
- They just nip into the fabric at the stitching line
- There is a minimum pin extension beyond the stitching line. Pins should not extend under both sides of the presser foot, and should never be placed on the underside of the fabric in contact with the feed dog.
The Scam Guide is available for separate purchase.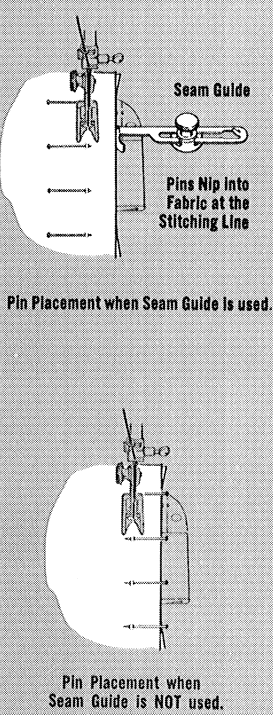
STRAIGHT SEAMS
Stitch Width: 0
Needle Position: C
Stitch Length: 6:20, depending on fabric
- Pin the seams together or baste if necessary. If you pin baste, place pins as instructed on page 23 so that the hinged presser foot will ride freely over the points.
- If you use the Seam Guide (available for separate purchase), align the edge of the guide with the presser foot. Guide the fabric edges lightly against the guide while stitching.

CURVED SEAMS
Follow the same steps as for straight seams except:
- Use a short stitch length for elasticity and strength. For example, if you use 12 stitches per inch for straight seams, select 15 to 20 per inch to stitch curved seams in the same fabric.
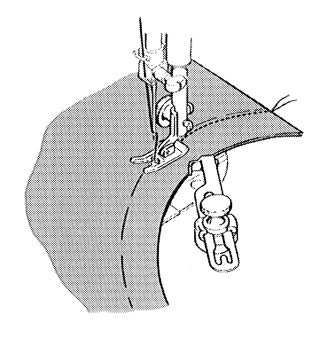
- If you use the Seam Guide, attach it at an angle so that the edge closer to the needle acts as a guide.

PERFORMANCE CHECK LIST
If Machine Fails to Start:
- Are electrical plugs properly connected?
- Is the Power and Light Switch on?
If Thread Breaks:
- Is the machine properly threaded?
- Is the needle the correct size for the thread and fabric you are using?
Is a Catalog 2020 (15×1) needle correctly inserted and securely tightened in the needle clamp? - Is the thread free of shibs and knots?
- Is the JS needle-thread tension too tight?
- Are thread guides, tension discs, and bobbin aca lint-free?
If Fabric Fails to Feed:
- Is the presser foot down?
- Is pressure adjusted properly for the weight and texture of your fabric?
- Is the Sitch Length Selector properly set?
Remember To:
Refer to your Instruction Book. It was written to explain the most efficient way to operate and use this versatile new machine. Keep your machine in good working condition by following the easy at-home-care steps outlined in the Instruction Book
FASHION AIDS AVAILABLE FOR PURCHASE
Among the many FASHION Aids that will fit your Style-Mate sewing machines are those described below. These are available at your local Singer Center. These aids will increase the versatility of your machine and enable you 10 give your sewing that extra professional designer touch.
- The Edge Stitcher… regulates the placement of straight stitching close to a fabric edge using a series of slotted guides.
- The Gathering Foot… ensures evenly spaced shirring with “locked-in” fullness.
- ‘The Ruffler …. for gathered and pleated ruffles. Ruffles may be made separately or made and applied in one operation.
- The Quilter…excellent for the placement of stitching in block, floral, or scroll designs, is especially well adapted to stitching lightly padded materials. “The short open foot permits following curved lines with case and accuracy; the adjustable space guide is placed to the right or left of the needle, keeping rows of stitching parallel.
- Special Purpose Foot… a light, flexible foot designed for 7ig-zag satin stitching, buttonholing, and appliqué. The raised center section allows closely spaced zig-zag stitches to feed smoothly and evenly. The small eyelets at the front of the foot hold filler cord when desired.
- Zipper Foot… makes it easy to place stitching close to a raised edge. “Thus, it is useful for corded seams and zipper insertions. The hinged foot easily rides over pins, heavy layers of fabric, or cross seams.
- Hemmer Foot… using the Hemmer Foot, you can turn and stitch a hem in a single operation. Thus, you can eliminate basting or pinning whenever you are making narrow hems, ruffled edges, lingerie finishes, hemmed seams, and the like.
- Button Foot… this short, open foot holds any two-hole button. The groove in the foot can be used to hold a needle, over which a thread shank can be formed.
- Seam Guide… helps keep seam width uniform when extra control is needed, especially on unusually wide or narrow seams.
For more manuals by Singer, visit ManualsLibraryy
Singer Style Mate 347 Sewing Machine-FAQs
What was the original purpose of the Singer sewing machine?
The Singer sewing machine was designed to enable continuous and curved stitching with an overhanging arm, allowing sewing on any part of the fabric. This innovation made garment production faster and more efficient.
What are the main benefits of using a Singer sewing machine?
✔ Automatic needle threader (reduces eye strain)
✔ One-step buttonhole function (perfect buttonholes in seconds)
✔ Top drop-in bobbin system (easy threading)
✔ Adjustable speed control (sew at your own pace)
How do I thread a Singer sewing machine (Model 347)?
Raise the needle to its highest position.
Place the spool on the thread holder.
Guide the thread through the tension discs and needle eye.
Pull the thread toward the back.
How do I load a bobbin?
Wind the thread onto the bobbin using the bobbin winder.
Insert the bobbin into the bobbin case (follow the machine’s diagram).
Pull the thread through the bobbin tension slot.
How do I adjust the sewing speed?
Use the foot pedal—press lightly for slow stitching or firmly for faster sewing. Some models also have a speed control slider.
How often should I oil my Singer sewing machine?
Every 8-10 hours of use (use Singer sewing machine oil).
Apply 1-2 drops to moving parts (check the manual for oiling points).
How do I clean my sewing machine?
Unplug the machine.
Remove lint with a small brush or compressed air.
Wipe the exterior with a dry cloth.
How long does a sewing machine needle last?
Replace the needle every 6-8 hours of sewing or after 3-5 projects (whichever comes first).
Why is my thread bunching underneath the fabric?
Re-thread the machine (upper and bobbin thread).
Check if the bobbin is inserted correctly.
Adjust the thread tension (refer to the manual).
Why is my sewing machine skipping stitches?
Replace the needle (it may be bent or dull).
Ensure the needle size matches the fabric.
Check if the thread is properly tensioned.


