![]()
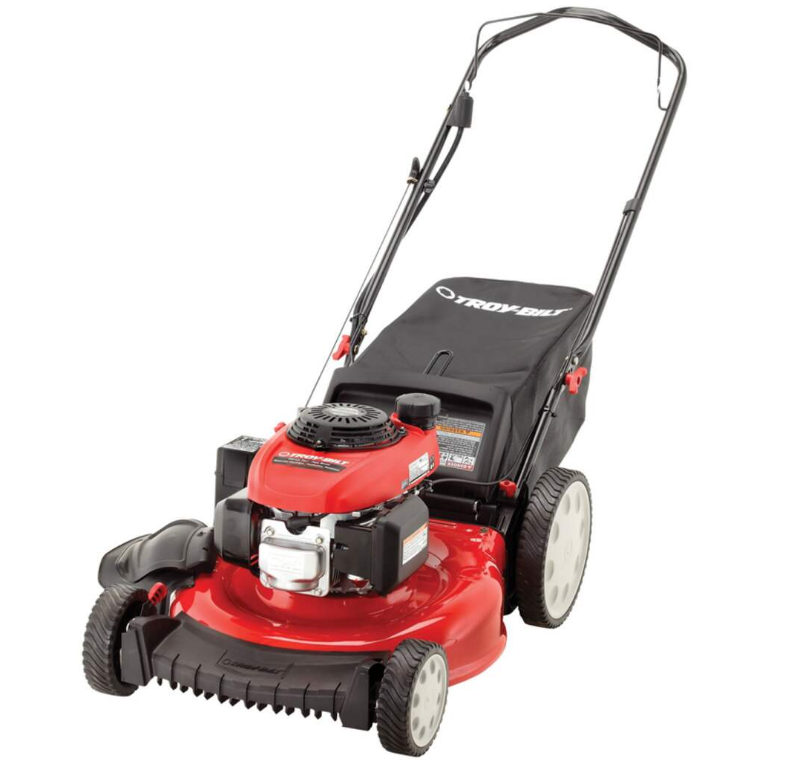
Troy-Bilt TB280ES Self-Propelled Lawn Mower
Important Safe Operation Practices
Children
Tragic accidents can occur if the operator is not alert to the presence of children. Children are often attracted to the mower and the mowing activity. They do not understand the dangers. Never assume that children will remain where you last saw them.
- Keep children out of the mowing area and under the watchful care of a responsible adult other than the operator.
- Be alert and turn the mower off if a child enters the area.
- Before and while moving backwards, look behind and down for small children.
- Use extreme care when approaching blind corners, doorways, shrubs, trees, or other objects that may obscure your vision of a child who may run into the mower.
- Keep children away from hot or running engines. They can suffer burns from a hot muffler.
- Never allow children under 14 years of age to operate this machine. Children 14 and over should read and understand the instructions and safe operation practices in this manual and on the machine, and be trained and supervised by an adult.
Service
Safe Handling Of Gasoline:
- To avoid personal injury or property damage, use extreme care in handling gasoline. Gasoline is extremely flammable, and the vapors are explosive. Serious personal injury can occur when gasoline is spilled on yourself or your clothes, which can ignite. Wash your skin and change clothes immediately.
- Use only an approved gasoline container.
- Never fill containers inside a vehicle or on a truck or trailer bed with a plastic liner. Always place containers on the ground away from your vehicle before filling.
- Remove gas-powered equipment from the truck or trailer and refuel it on the ground. If this is not possible, then refuel such equipment on a trailer with a portable container, rather than from a gasoline dispenser nozzle.
- Keep the nozzle in contact with the rim of the fuel tank or container opening at all times until fueling is complete. Do not use a nozzle lock-open device.
- Extinguish all cigarettes, cigars, pipes, and other sources of ignition.
- Never fuel a machine indoors because flammable vapors will accumulate in the area.
- Never remove the gas cap or add fuel while the engine is hot or running. Allow the engine to cool at least two minutes before refueling.
Assembly & Set-Up
Contents of Carton
- One Lawn Mower
- One Grass Catcher
- One Bottle of Oil
- One Lawn Mower Operator’s Manual
- One Engine Operator’s Manual
- One-Side Discharge Chute
- One Fuse
Assembly
NOTE: This unit is shipped without gasoline or oil in the engine. Fill up with gasoline and oil as instructed in the accompanying engine manual BEFORE operating your mower.
Handle
- Remove any packing material that may be between the upper and lower handles.
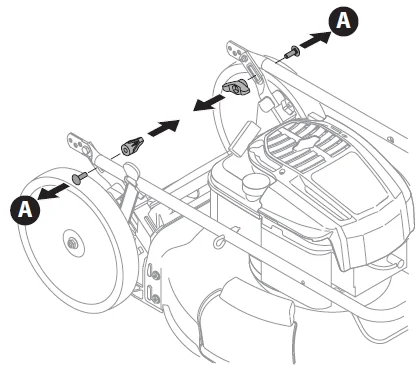
- Remove wing nuts and carriage bolts from the handle as shown in the Figure. Do not loosen or remove adjacent hex head screws.

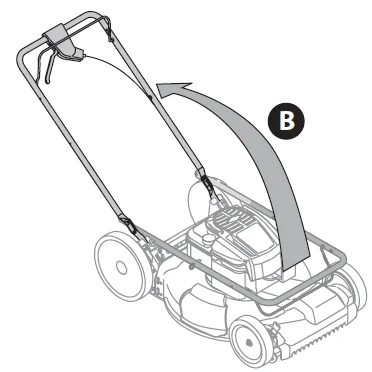
- While stabilizing the mower so it doesn’t move, pivot the upper handle up as shown in the Figure. Do not crimp the cable while lifting the handle up.

- Remove the T-bolts from the handle brackets.
- Follow the steps below to complete the handle assembly:
- Pull upward on the handle until the holes in the lower handle line up with the holes in the handle bracket. NOTE: When pulling upward on the handle, make sure not to pull the handle all the way out.
- Insert the T-bolts removed earlier through the handle brackets and lower handle and tighten securely to secure the handle in place.
- Reattach the wing nuts and carriage bolts removed earlier into the lower holes of the handle.
- The rope guide is attached to the right side of the upper handle. Loosen the wing knob, which secures the rope guide.
- Hold the blade control against the upper handle.
- Slowly pull the starter rope handle from the engine and slip the starter rope into the rope guide.
- Tighten the rope guide wing knob.
- Use cable tie(s) to secure cable(s) to the lower handle.
Grass Catcher
- Follow the steps below to assemble the grass catcher (if needed). Make certain the bag is turned right side out before assembling (the warning label will be on the outside).
- Place the bag over the frame so that its black plastic side is at the bottom.
- Slip the plastic channel of the grass bag over the hooks on the frame.
- Follow the steps below to attach the grass catcher:
- Lift the rear discharge door.
- Place the grass catcher into the slots in the handle brackets. Let go of the discharge door so that it rests on the grass catcher.
To remove the grass catcher, lift the rear discharge door on the mower. Lift the grass catcher up and out of the slots in the handle brackets. Release the rear discharge door to allow it to close the rear opening of the mower.
Side Discharge Chute
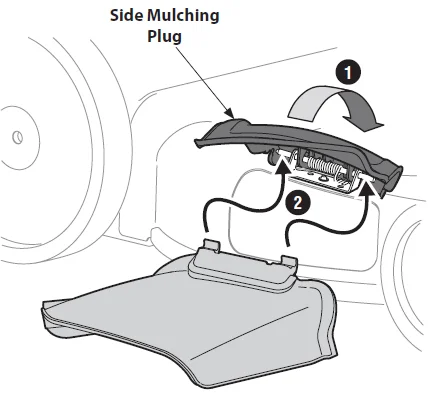
Your mower is shipped as a mulcher. To convert to side discharge, make sure the grass catcher is off the unit and the rear discharge door is closed.
- On the side of the mower, lift the side mulching plug.
- Slide two hooks of the side discharge chute under the hinge pin on the mulching plug assembly. Lower the mulching plug. Do not remove the side mulching plug at any time, even when you are not mulching.

Adjustments
Cutting Height
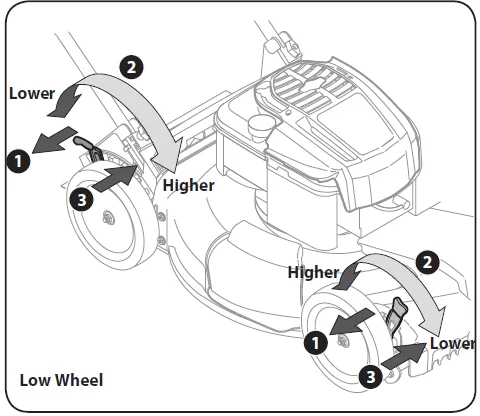
There is a cutting height adjustment lever located above the front and rear right wheel.
- Pull the height adjustment lever towards the wheel (the unit will tend to fall when the lever is moved outward).
- Move the lever to the desired position for a change in cutting height.

- Release the lever towards the deck. IMPORTANT: Both the front and rear wheels must be placed in the same relative position. For rough or uneven lawns, move the height adjustment levers to a higher position. This will stop the scalping of grass.
Handle Pitch
For convenience of operation, you may adjust the pitch of the handle as follows:
- Remove wing nuts and carriage bolts from the handle.
- Position the handle in one of the three positions that is most comfortable.
- Secure into position with wing nuts and carriage bolts removed earlier.
Drive Control
The adjustment wheel is located in the drive control handle housing and is used to tighten or loosen the drive belt. You will need to adjust the drive control if the mower does not propel itself with the drive control engaged or if the mower’s wheels hesitate with the drive control engaged. If either of these conditions occurs, rotate the adjustment wheel clockwise to tighten the cable or counterclockwise to loosen the cable.
Set-Up
Gas and Oil Fill-Up
Refer to the separate engine owner’s manual for additional engine information.
- Add oil provided before starting the unit for the first time out of the box.
- Service the engine with gasoline as instructed in the separate engine owner’s manual.
WARNING: Use extreme care when handling gasoline. Gasoline is extremely flammable, and the vapors are explosive. Never fuel the machine indoors or while the engine is hot or running. Extinguish cigarettes, cigars, pipes, and other sources of ignition.
Controls and Features
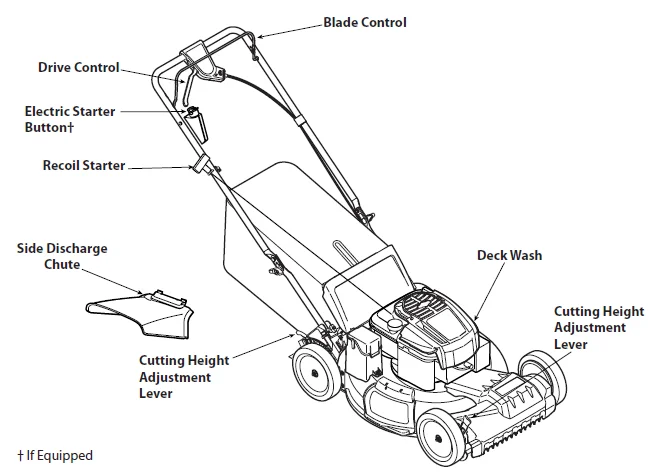
Blade Control
The blade control is attached to the upper handle of the mower. Depress and squeeze it against the upper handle to operate the unit. Release it to stop the engine and the blade.
WARNING: This blade control is a safety device. Never attempt to bypass its operations.
Drive Control
The drive control is located on top of the upper handle and is used to engage the drive. Squeeze it against the upper handle to engage the drive; release it to slow down or stop the mower from propelling.
Cutting Height Adjustment Lever
One adjustment lever is located on the right rear wheel, and one is located on the right front wheel. Both levers have to be at the same relative position to ensure a uniform cut. To adjust the cutting height, refer to the “Assembly & Set-Up” Section.
Deck Wash
Your mower’s deck is equipped with a water port on its surface as part of its deck wash system. Use the deck wash to rinse grass clippings from the deck’s underside.
Side Discharge Chute
Your mower is shipped as a mulcher. To discharge the grass clippings to the side instead, follow the instructions in the “Assembly & Set-Up” section to attach the side discharge chute.
WARNING: Keep hands and feet away from the chute area on the cutting deck. Refer to the warning label on the unit.
Recoil Starter
The recoil starter is attached to the right upper handle. Stand behind the unit and pull the recoil starter rope to start the unit.
Electric Starter Button (If Equipped)
The electric starter button is located on the right side of the upper handle. It is used only for the electric starter.
Operation
Starting Engine
WARNING: Be sure no one other than the operator is standing near the lawn mower while starting the engine or operating the mower. Never run the engine indoors or in enclosed, poorly ventilated areas. Engine exhaust contains carbon monoxide, an odorless and deadly gas. Keep hands, feet, hair, and loose clothing away from any moving parts on the engine and lawn mower.
Follow the set of instructions pertaining to your unit. Refer to the engine manual for help with the engine.
Briggs & Stratton Engine:
- Standing behind the mower, squeeze the blade control against the upper handle.
- Recoil Start: Holding these two handles together firmly, grasp the recoil starter handle and pull the rope out with a rapid, continuous, full arm stroke. Keeping a firm grip on the starter handle, let the rope rewind slowly. Repeat until the engine cranks. Let the rope rewind slowly each time. Electric Start (If Equipped): Insert the plastic push key into the starter button until it snaps in. Push the electric starter button to start the engine.
MTD Engine:
- Standing behind the mower, squeeze the blade control against the upper handle.
- Pull the starter grip lightly until resistance is felt, then pull rapidly to overcome compression, prevent kickback, and start the engine. Repeat if necessary.
IMPORTANT: Do not allow the starter grip to snap back against the engine. Return it gently to prevent damage to the starter.
Stopping Engine
- Release the blade control to stop the engine and blade.
WARNING: Wait for the blade to stop completely before performing any work on the mower or removing the grass catcher.
Using Your Lawn Mower
Be sure the lawn is clear of stones, sticks, wire, or other objects that could damage the lawn mower or engine. Such objects could be accidentally thrown by the mower in any direction and cause serious personal injury to the operator and others.
- Once the engine is running, squeeze the drive control against the upper handle to propel the mower.
WARNING: The operation of any lawn mower can result in foreign objects being thrown into the eyes, which can damage your eyes severely. Always wear safety glasses while operating the mower or while performing any adjustments or repairs on it.
Using as a Mulcher
For mulching grass, remove the grass catcher and allow the rear discharge door to close the rear opening of the mower. For effective mulching, do not cut wet grass. If the grass has been allowed to grow in excess of four inches, mulching is not recommended. Use the grass catcher to bag clippings instead.
Maintenance & Adjustments
Maintenance
General Recommendations
- Always observe safety rules when performing any maintenance.
- The warranty on this lawn mower does not cover items that have been subjected to operator abuse or negligence. To receive full value from the warranty, the operator must maintain the lawn mower as instructed here.
- Changing the engine-governed speed will void the engine warranty.
- All adjustments should be checked at least once each season.
- Periodically check all fasteners and make sure these are tight.
WARNING: Always stop the engine, allow the engine to cool, disconnect the spark plug, and ground against the engine before performing any type of maintenance on your machine.
Lubrication
- Lubricate pivot points on the blade control at least once a season with light oil. This control must operate freely in both directions.
- The transmission is pre-lubricated and sealed at the factory and does not require lubrication.
- Follow the accompanying engine manual for the lubrication schedule and instructions for engine lubrication.
Deck Care
Clean the underside of the mower deck after each use to prevent the build-up of grass clippings or other debris. Follow the steps below
for this job.
- Disconnect the spark plug wire. Drain gasoline from the lawn mower or place a piece of plastic under the gas cap.
- Tip the mower so that it rests on the housing. Keep the side with the air cleaner facing up. Hold the mower firmly. WARNING: Never tip the mower more than 90º in any direction, and do not leave the mower tipped for any length of time. Oil can drain into the upper part of the engine, causing a starting problem.
- Scrape and clean the underside of the deck with a suitable tool.
- Put the mower back on its wheels on the ground. If you had put plastic under the gas cap earlier, make sure to remove it now.
Deck Wash
Your mower’s deck may be equipped with a water port on its surface as part of its deck wash system.
Use the deck wash to rinse grass clippings from the deck’s underside and prevent the buildup of corrosive chemicals.
Complete the following steps AFTER EACH MOWING:
- Push the mower to a level, clear spot on your lawn, near enough for your garden hose to reach. CAUTION: Make certain the mower’s discharge chute is directed AWAY from your house, garage, parked cars, etc.
- Thread the hose coupler (packaged with your mower’s Operator’s Manual) onto the end of your garden hose.
- Attach the hose coupler to the water port on your deck’s surface.
- Turn the water on.
- Start the engine as described in the Operation section.
- Run the engine for a minimum of two minutes, allowing the underside of the cutting deck to thoroughly rinse.
- Release the blade control to stop the engine and blade.
- Turn the water off and detach the hose coupler from the water port on your deck’s surface.
After cleaning your deck, restart the mower. Keep the engine and blade running for a minimum of two minutes, allowing the underside of the cutting deck to thoroughly dry.
Engine Care
A list of key engine maintenance jobs required for good performance by the mower is given below. Follow the accompanying engine manual for a detailed list and instructions.
- Maintain oil level as instructed in the engine manual.
- Service the air cleaner every 25 hours under normal conditions. Clean every few hours under extremely dusty conditions. Poor engine performance and flooding usually indicates that the air cleaner should be serviced. To service the air cleaner, refer to the engine manual.
- Clean the spark plug and reset the gap once a season. Spark plug replacement is recommended at the start of each mowing season. Check the engine manual for the correct plug type and gap specifications.
- Clean the engine regularly with a cloth or brush. Keep the top of the engine clean to permit proper air circulation. Remove all grass, dirt, and combustible debris from the muffler area.
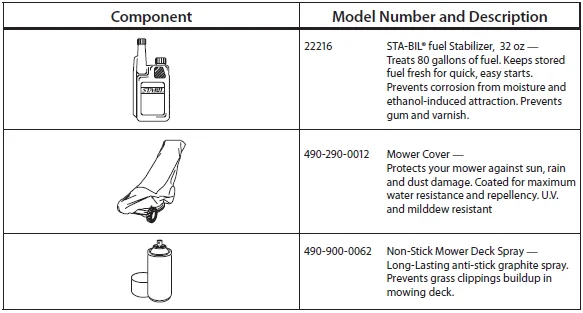
- Engines stored between 30 and 90 days need to be treated with a gasoline stabilizer such as STA-BIL® to prevent deterioration and gum from forming in the fuel system or on essential carburetor parts.
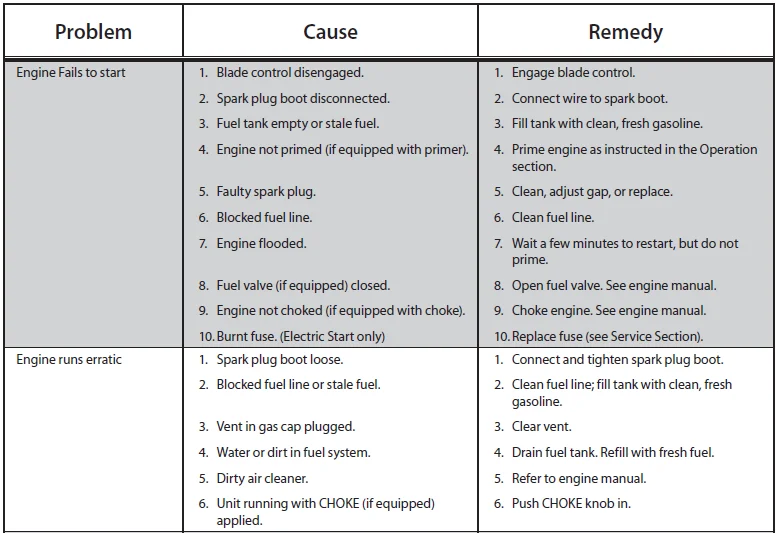
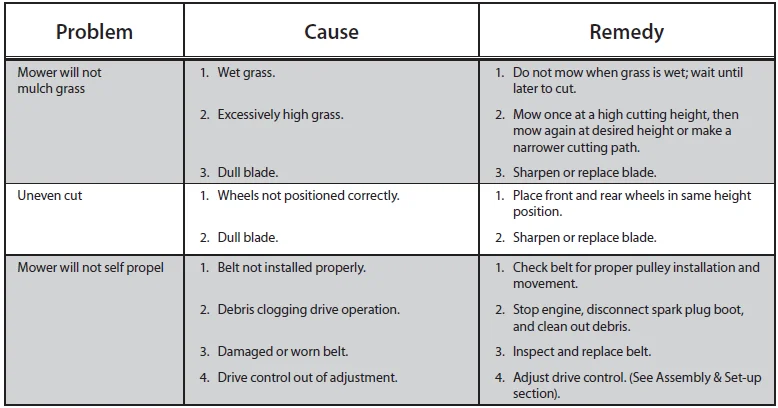
Troubleshooting

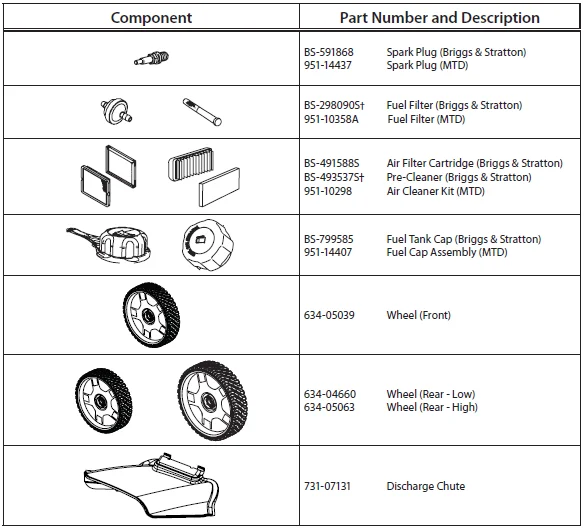
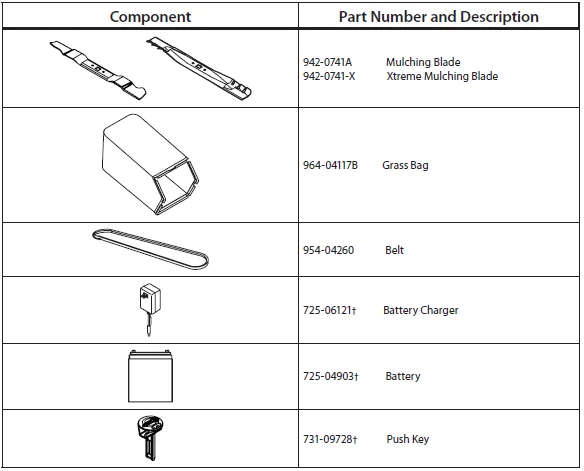
Replacement Parts
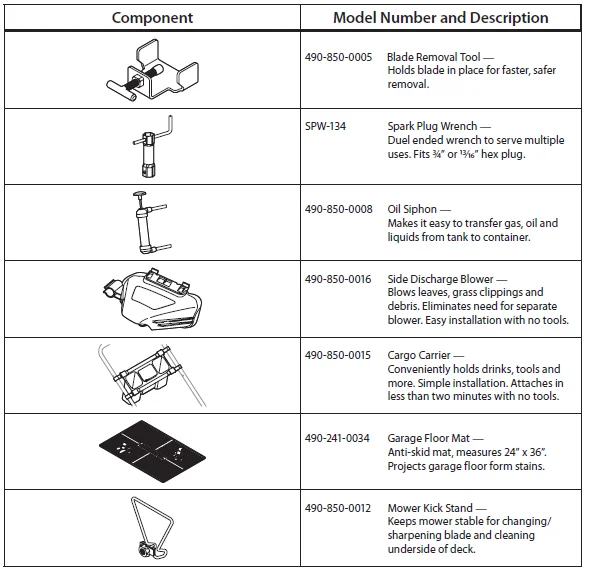
Attachments & Accessories
Customer Support
Please do NOT return the machine to the retailer or dealer without first contacting the Customer Support Department.
If you have difficulty assembling this product or have any questions regarding the controls, operation, or maintenance of this machine, you can seek help from the experts. Choose from the options below:
- Visit us on the web at www.troybilt.com
See How-to Maintenance and Parts Installation Videos at www.troybilt.com/tutorials
- Call a Customer Support Representative at (800) 828-5500 or (330) 558-7220
- Write to Troy-Bilt LLC • P.O. Box 361131 • Cleveland, OH • 44136-0019
For more Manuals by Troy-Bilt, visit ManualsLibraryy
Troy-Bilt TB280ES Self-Propelled Lawn Mower-FAQs
What engine is used in the Troy-Bilt TB280ES mower?
The Troy-Bilt TB280ES comes equipped with a powerful 190cc Briggs & Stratton engine, ensuring reliable and efficient mowing performance.
How do I start the Troy-Bilt TB280ES lawn mower?
To start, engage the parking brake, make sure the PTO lever is off, activate the choke, and turn the ignition key while seated properly. The engine should start smoothly.
Why won’t my Troy-Bilt lawn mower start?
If your mower doesn’t start, check for a clogged fuel filter, ensure the engine is choked, and verify oil levels. Low oil or internal damage can also prevent startup.
How much oil does the Troy-Bilt TB280ES mower need?
This mower typically requires less than one quart (32 oz) of oil. Always check your user manual for exact capacity and use SAE 5W-30 engine oil.
What type of oil should I use in my Troy-Bilt lawn mower?
Use SAE 5W-30 engine oil for best performance in all temperature conditions.
Can I use 5W-30 instead of 10W-30 oil?
Yes. Synthetic 5W-30 or 10W-30 oil can be used safely across all temperature ranges.
How does the self-propelled feature work?
The self-propelled drive uses engine power to turn the wheels. Engaging the drive lever transfers power from the engine to the wheels, reducing the effort needed to push.
Why is my self-propelled mower not moving properly?
Inspect the V-belt and drive pulley for wear or damage, check the self-propel cable, and clear any grass clogging the transmission.
Can I push a self-propelled mower manually?
Yes, you can push it like a regular mower if the self-propel feature is off or not functioning.

