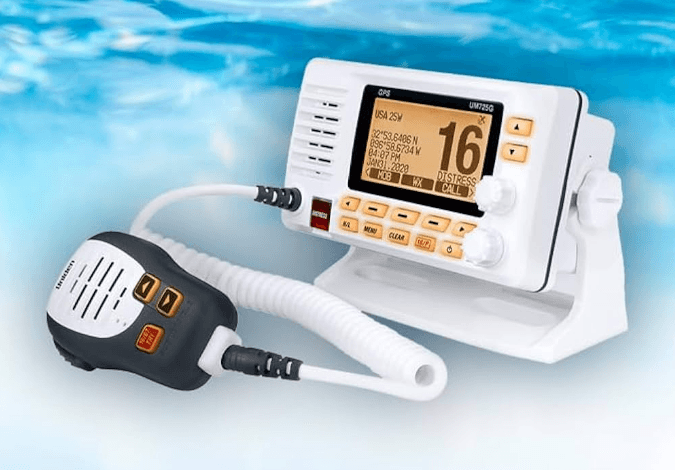
Uniden UM435BK Advanced Fixed Mount VHF Marine Radio
GETTING STARTED
WHAT’S INCLUDED
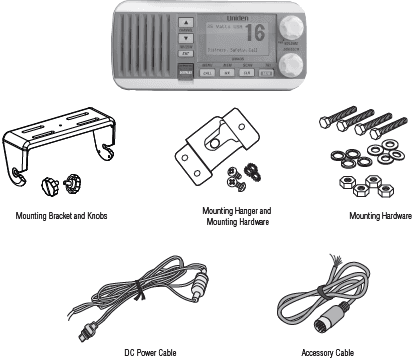
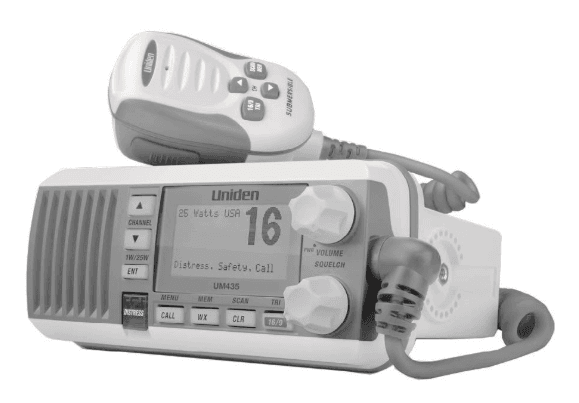
PARTS OF THE RADIO
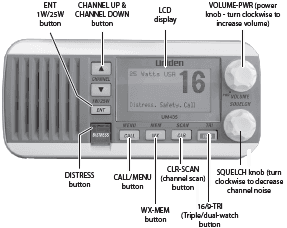
| Button | Press to… | Press and hold to… |
| ENT-1W/25W | Choose an option on a menu or to display the GPS data. | Change the transmit power (see page 12). |
| CHANNEL UP | Move up one channel at a time. | Move quickly up the channels. |
| CHANNEL DOWN | Move down one channel at a time. | Move quickly down the channels. |
|
16/9-TRI | 1st press: Go to Channel 16. 2nd press: Go to Channel 9. 3rd press: Go back to the original channel. | Go into Triple Watch or Dual Watch mode (see page 13). |
| CLR-SCAN | Go to the previous menu or cursor position in menu mode. | Start scanning the channels saved in memory. |
| WX-MEM | Listen to the current weather conditions in your area. | Save a channel into memory or remove a channel from memory. |
| CALL-MENU | Display the call menu. | Display the normal menu. |
| DISTRESS | Select the nature of your distress for a distress call. | Transmit a distress call. |
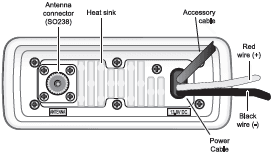
| Connector/Cable | Connects to… | For details, see … |
|
Antenna connector | External VHF antenna with a male PL259 (SO238) connector and 50 Ω impedance. Minimum 4 ft, 3dB rated antenna for sailboats, 8 ft, 6 dB rated for power boats. | Connecting the radio (see page 29). |
| Power cable pigtail | The nominal 13.8 VDC power supply has a negative ground (10.5 VDC to 16.0 VDC) (Red wire +, black wire -). | Connecting the radio (see page 29). |
| Accessory cable pigtail | GPS receiver, GPS chart plotter, and external speaker. | Connecting accessories (see page 30) |
PARTS OF THE MICROPHONE
| Button | Press to… | Press and hold to… |
| ( + ) | Move up one channel at a time. | Move quickly up the channels. |
| ( – ) | Move down one channel at a time. | Move quickly down the channels. |
|
16/9-TRI | 1st press: Go to Channel 16. 2nd press: Go to Channel 9. 3rd press: Go back to the original channel. | Go into Triple Watch or Dual Watch mode (see page 13). |
| SCAN/MEM | Scan channels. | Save the current channel into memory. |
| PUSH TO TALK | Cancel scanning and stay on a channel. | Talk on a channel. |
TURNING ON THE RADIO
Turn the VOLUME-PWR knob clockwise to turn on the radio. As it powers on, the radio displays the user’s MMSI number; if there is no MMSI set, the radio displays MMSI not entered.
When it powers on, the radio selects the last channel used.
HOW IT WORKS
Your radio has three basic modes of operation:
| Mode | What It Does | Use It When | To Turn it on/ off… |
| Normal | Monitors a single marine radio channel and lets you talk on that channel. | You want to talk to another station on a specific channel. | (default mode) |
| Scan | Monitors all the channels you save into memory. | You have a small group of channels you use most often and want to check them for traffic. | Press and hold the CLR-SCAN button. |
| Weather | Monitors the selected NOAA weather channel. | You want to hear the current and forecasted weather in your area. | Press the WX-MEM button. |
In addition to the three basic operation modes, your radio also provides three different “watch” modes which you can activate during any of the three basic modes. In these watch modes, the radio briefly checks for activity on a specific channel and then returns to its previous mode.
| Watch Mode | What It Does | Use It When | To Turn it on./off… |
| Weather Alert | Check for alerts on the last weather channel you used every seven seconds. | You want to be made aware of severe weather conditions in your area. | Select WX-ALERT Mode in the Setup submenu, and then choose ON or OFF. |
| Triple | Check for activity on channels 16 and 9 every two seconds. | You want to monitor a channel yet maintain a watch on channels 16 and 9. | Press and hold 16/9-TRI for two seconds. |
|
Dual | Check for activity on channel 16 every two seconds. | You want to monitor a channel yet maintain a watch on channel 16. | Change Triple Watch to Dual Watch in the Setup menu, then press and hold 16/9-TRI for two seconds. |
USING YOUR RADIO
To display the radio call menu, press CALL-MENU. To display the radio normal menu, press and hold CALL-MENU. The menu has the following options:
- An arrow on the left side indicates the current selection.
- Press CHANNEL UP on the radio or the microphone to move up a line in the menu; if you are at the top line in the menu, the cursor jumps to the bottom of the menu.
- Press ENT-1W/25W to choose the selected item.
- Press CHANNEL DOWN on the radio or the microphone to move down a line in the menu; if you are at the bottom line of the menu, the cursor jumps to the top of the menu.
- Press CLR-SCAN to go back to the previous menu screen.
- From any menu screen, choose Exit or press and hold CALL-MENU to close the menu screen.
Setting the Volume
Turn the volume knob clockwise to increase the speaker volume; turn it counter-clockwise to decrease the volume.
Setting the Squelch Level
The squelch feature reduces the level of static on the speaker by filtering out the background channel noise. At the lowest squelch level, the speaker plays all radio signals, including any noise on the channel. Setting the squelch level higher filters out channel noise and lets only actual radio transmissions through.
While listening to a channel, adjust the SQUELCH knob until the noise is filtered out and you can only hear the transmission. If you switch to a channel with a lot of noise or with a weak transmission, you may need to adjust the squelch level again.
NOTE: Setting the squelch level too high may prevent you from hearing weaker transmissions. If you are having difficulty hearing a transmission, try setting the squelch level lower.
Changing the Channel
Press CHANNEL UP and CHANNEL DOWN briefly to scroll through the channels one channel at a time. Press and hold CHANNEL UP or CHANNEL DOWN to quickly scroll through the channels.
Choosing a Triple Watch or Dual Watch
In Triple Watch mode, the radio briefly checks channels 16 and 9 every two seconds. In Dual Watch mode, the radio checks channel 16 only. Generally, Triple Watch is used in areas where channel 9 is used as a hailing frequency while Dual Watch is used in areas where channel 16 is used for distress and hailing. Your radio comes set to use Triple Watch; if you want to use Dual Watch instead, you will have to select it in the setup:
- Press and hold CALL MENU to display the normal menu.
- Select Setup and then Dual/Tri Watch.
- Choose Dual Watch and press ENT-1W/25W. The radio activates the new setting and returns to the Setup menu.
- To reactive Triple Watch, repeat the procedure described above, but choose Triple Watch in step 3.
Changing Display and Sound Options
Contrast
Your radio display has 10 levels of contrast. To adjust the contrast, press and hold CALL-MENU while the radio is idle. Select System and then Contrast. Use CHANNEL UP and CHANNEL DOWN to change the contrast to your desired level.
To restore the default contrast setting, turn the radio off. Press CALL-MENU and hold it in while you turn the radio on.
Lamp adjust
Your radio has 10 brightness levels on the display. To adjust the brightness, press and hold CALL-MENU while the radio is idle. Select System and then Lamp Adjust. Use CHANNEL UP and CHANNEL DOWN to change the brightness to your desired level.
Turning the key beep on and off
Key beep is the tone that sounds when you press a key or a button. To turn off the key beep, press and hold CALL-MENU while the radio is idle. Select System and then Key Beep. Choose Off to turn off the key beep.
USING DIGITAL SELECTIVE CALLING (DSC) FEATURES
WHAT IS DSC?
Digital Selective Calling (DSC) is a standard that allows you to call other stations using their unique identification code (the Maritime Mobile Service Identity or MMSI number), just like you would call a phone number. To call another station, just enter that station’s MMSI number and choose the voice channel you want to talk on. The radio uses channel 70 to transmit your MMSI number to the other station along with the voice channel you requested. If the other station accepts your call, both radios automatically switch to the requested voice channel so you can talk to the other station.
DSC provides a system for automated distress calls. At the touch of a button, the radio can transmit your MMSI number, the nature of your distress, and your current position based on data from your GPS receiver. The radio repeats the distress call every few minutes until it receives an acknowledgment.
The DSC standard dedicates a VHF channel—channel 70—to digital transmissions only. Since digital transmissions require less bandwidth than voice transmissions, channel 70 avoids the problems of busy voice channels.
ADVANCED DSC FEATURES
Your radio supports the following DSC features:
| Feature | Menu Item | Function |
| Individual Call | Individual | Contact another vessel from your directory. |
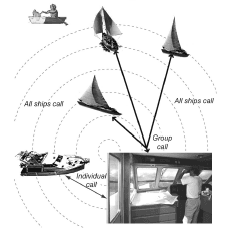
| Group Call | Group | Contact all vessels that share your group MMSI code. |
| All Ships Call | All Ships | Broadcast to all vessels within range (used for safety or advisory messages). |
| Position Request | POS Request | Request the current location of another vessel. |
| Position Send | Position Send | Transmit your current location to another vessel. |
| Test Call | Test | Make sure your radio is working and configured correctly. |
| Name and MMSI Directory | Directory | Store a list of 20 names and MMSI identification codes for DSC calls. |
| Standby Mode | Standby | Automatically respond to all DSC calls within an “Unavailable” status. |
| Received Call Log | Receive Log | Display the last 10 distress calls received by the radio and the last 20 general calls. |
MAKING DSC CALLS
There are essentially four different types of DSC voice calls:
| Call Type | What it does | When to use it |
| Distress | Alerts all stations where you need assistance and sends them your current position. | In an emergency only. |
| Individual | Calls a single station using the User MMSL. | Any time you want to talk to another station. |
| Group | Calls all the stations that have the same Group MMSL as yours. | Any time you want with the whole group you are traveling with at the same time. |
| All Ships | Calls all stations within range of your radio. | Safety warnings (e.g., debris in the water) or any urgent situation. |
Suppose you are coordinating safety for a sailboat race. Before the race starts, you instruct all the racers to enter your group MMSI number into their radios. During the race:
- Throughout the race, you use group calling to update the racers on the time, race status, and any course corrections.
- A powerboat full of spectators comes a little too close to the race path. You use individual calling to contact the power boat and advise them to stay clear of the race.
- You see a rowboat entering the area, but since it doesn’t have a radio, you can’t communicate with the rowboat. You use all ships calling to alert all the other boats in the area of the possible danger.
RECEIVING A DSC CALL
If your radio receives an individual DSC call from another station, it sounds like an incoming call tone and displays the name or MMSI number of the station calling you. To respond to the call, select Send: Able-Comply; the radio sends an acknowledgment and automatically switches to the designated response channel. To reject the call, select Send: Unable-Comply; the radio advises the other station that you are unable to respond to the call.
If the DSC request contains a response channel that you are not allowed to use, the radio displays Not Support CH; your only response option is Send: Unable-Comply.
If the radio receives a group or all ships call, it sounds an incoming call tone and automatically switches to the designated response channel.
INSTALLING THE HARDWARE
MOUNTING THE RADIO
Your radio can sit at any angle in the mounting bracket so it can easily accommodate the best location. First, determine the best place to mount the radio. For optimum performance, find a location that can:
- Properly support the weight of the radio, approximately 2.2 pounds or 1.0 kilograms. You may need to use some type of anchor with the mounting screws to hold the radio, depending on the surface.
- Keep the battery leads as short as possible.
- Keep the antenna lead-in wire as short as possible.
- Allow free airflow around the heat sink on the rear of the radio.
- Avoid interference with the ship’s compass.
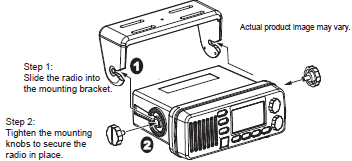
- Install the radio into the mounting bracket.
- Position the radio in the desired location. Mark the edges of the bracket on the mounting surface.

- Use the mounting bracket template (included) to mark the drill holes on the mounting surface.
- Drill the holes for the mounting bracket; be sure to follow any special requirements of the mounting surface.
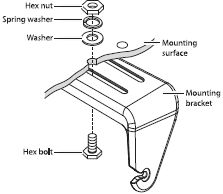
- Remove the bracket from the radio, and use the mounting hardware to secure the bracket to the mounting surface.

- Install the radio back into the mounting bracket.
MAINTENANCE AND TROUBLESHOOTING
Due to its rugged design, your radio requires very little maintenance. However, it is a precision electronic instrument, so you should follow a few precautions:
- If the antenna has been damaged, you should not transmit except in the case of an emergency. A defective antenna may cause damage to your radio.
- You are responsible for continued FCC technical compliance of your radio.
- You should arrange for periodic performance checks with your dealer.
| Problem | Things to Try |
| The radio won’t power on. | Check the power connections. Check the fuse. Check the master battery switch and branch circuit that connects to the radio. |
|
The radio won’t transmit. | Make sure you are not in weather or scan mode. Make sure you are not trying to transmit on a receive-only channel (see the channels and frequency tables beginning on page 37). Make sure you are transmitting at the correct power level for this channel (see the channels and frequency tables beginning on page 37). Make sure the duration of each transmission is less than 5 minutes. |
| Noise comes out of the speaker all the time | Adjust the squelch level; it is probably too low. |
| I can’t hear anything (no volume) from the speaker. | Adjust the squelch level; it is probably too high. |
| I can transmit, but no one can hear me. | Check your UIC channel settings {see Setting the UIC channel mode (USA/CAN/INT) on page 4}. |
| The display flashes, and I don’t know why. | The display will flash if the radio is in a watch mode or in scan mode. Try turning off scanning (page 8), Weather Alert Watch (page 10), or Triple/Dual Watch (page 13). |
| I can’t read the display. | Adjust the contrast and backlight brightness level (see page 14). |
| The display is too bright at night. | Adjust the backlight brightness level. Turn off the radio; hold the CALL-MENU button and turn it back on (see page 14). |
| I can’t see any words on the display. | Reset the radio back to the default brightness level: turn off the radio; hold the CALL-MENU button and turn it back on. |
| Problem | Things to Try |
|
I’m not getting any GPS data on my display. | Make sure your GPS receiver is correctly connected (see Connecting to a GPS receiver, page 30). Make sure your GPS receiver is working properly. Make sure that your GPS receiver supports the NMEA parameters described in NMEA Operation on page 44. |
| I’m not getting any hazard alerts. | Make sure the Weather Alert Watch is turned on. Check to make sure the FIPS codes in your radio include your current location (see Using FIPS codes for weather alerts on page 13). |
|
I’m getting all the hazard alerts, not just the ones for my area. | Check to make sure the FIPS codes in your radio were entered correctly (see Using FIPS codes for weather alerts on page 13). Sometimes the Weather Alert Watch may catch a hazard alert in the middle of the broadcast and miss which FIPS codes are affected. For your safety, the radio triggers the alert tone and switches to the weather channel when this happens. |
| I can’t make Group DSC calls. | Make sure the Group MMSI was entered correctly. |
| Where can I find my radio’s serial number? | Look on the right side of the radio (the side with the microphone cord), behind the mounting bracket. |
| The radio won’t let me enter my User MMSI. What do I do? | Visit our website at www.uniden.com for assistance. |
For more Manuals by Uniden, visit ManualsLibraryy
Uniden UM435BK Advanced Fixed Mount VHF Marine Radio-FAQs
What VHF channel should I monitor while on the water?
Always monitor Channel 16 (156.8 MHz). It’s the national distress, safety, and calling frequency required by the FCC for all vessels underway.
What is the typical range of a VHF marine radio?
VHF radios generally transmit over 5–10 miles, and up to 20 miles to a U.S. Coast Guard station. For longer distances, satellite or HF radios are needed.
What are VHF radio waves used for?
VHF (30–300 MHz) is used for marine communications, FM radio, long-range data transmission, and two-way radio systems.
At what frequency does the VHF band start?
The VHF range starts at 30 MHz and goes up to 300 MHz, offering clear and reliable short-range communication.
What is the channel spacing for VHF marine radios?
Marine VHF radios use 25 kHz channel spacing, which determines how channels are organized and used for transmission.
Does a VHF marine radio need an antenna?
Yes, an antenna is essential for sending and receiving VHF signals. Range improves with antenna height, reaching up to 30 nautical miles or more.
Do I need GPS connected to my VHF radio?
If your VHF radio supports DSC (Digital Selective Calling), connecting a GPS via NMEA 0183 is important for accurate location sharing during emergencies.
What is DSC on a VHF radio?
Digital Selective Calling (DSC) allows automated distress alerts with vessel identification and location, greatly improving emergency response.
What channel should I use for a VHF radio check?
Use Channel 09 (156.45 MHz) for voice radio checks. Avoid using Channel 16 to keep it clear for emergency traffic.

