![]()
VAGKRI VA-AC04 Portable Air Conditioner
IMPORTANT SAFETY INSTRUCTIONS
When using an electrical appliance, especially when children are present, basic safety precautions should always be followed, including the following:
INTENDED USE
- This appliance is not intended for use by persons (including children) with reduced physical, sensory or mental capabilities, or lack of experience and knowledge, unless they have been given supervision or Instruction concerning the use of the appliance by the person responsible for their safety.
- Close supervision is necessary when any appliance is used by or near children. Children should be supervised to ensure that they do not play with the appliance. Cleaning and user maintenance shall not be done by children unless they are older than 8 and supervised. Keep the appliance and its cord out of reach of children.
- Use the appliance only for intended household purposes as described in this User Manual. Any other use is not recommended, as it may cause fire, electric shock, or injury to persons
FOR HOUSEHOLD USE ONLY
SAVE THESE INSTRUCTIONS
Specifications

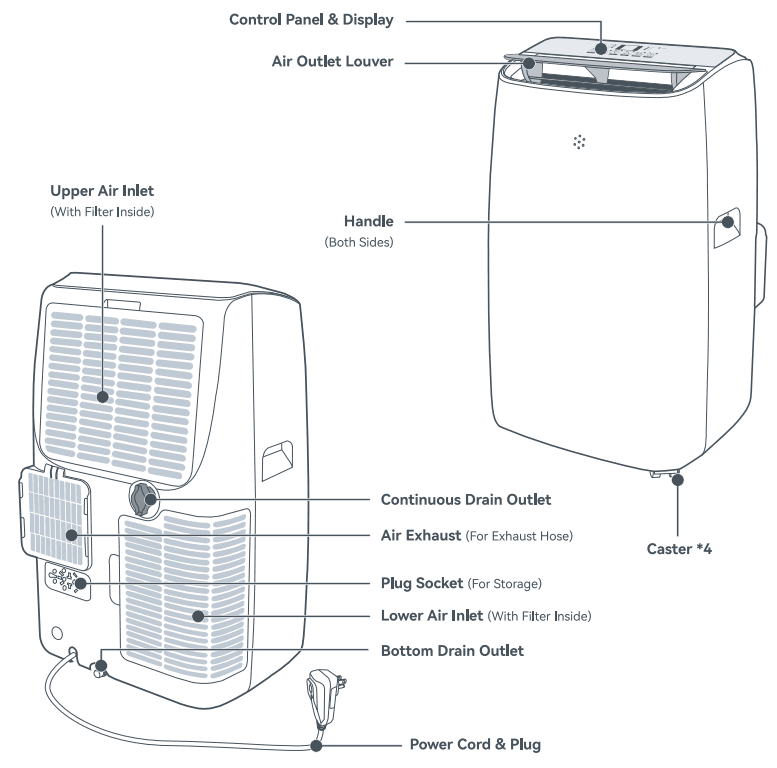
EXPLORING YOUR AIR CONDITIONER
 This unit may have been tilted or placed upside down during transportation. Please set it upright and outside the box for 24 hours before plugging it in.
- Check if all accessories are included. Contact us via [email protected] if there is any missing part.

Other Accessories

Setting Up
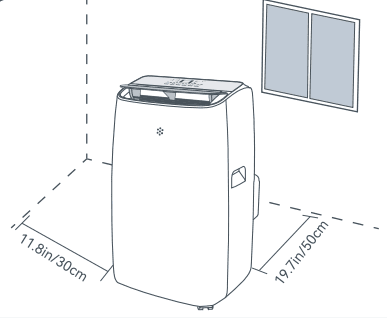
- Locate upright on a firm, flat floor close to a window or opening. Leave enough circulation space around.

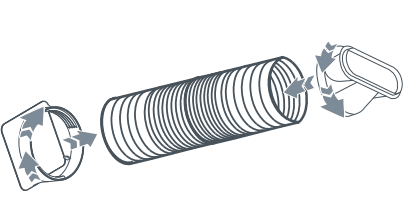
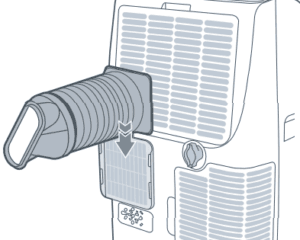
- Connect the hose adapter to one end of the exhaust hose. Connect the window adapter to the other end

- Slide the exhaust hose assembly into the air exhaust.

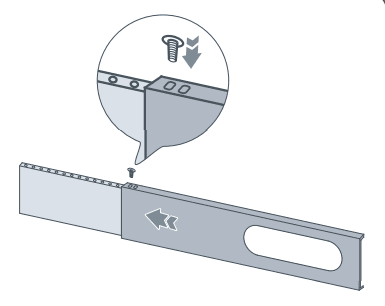
- Adjust the length of the window slider to fit your window. Secure with the included bolt.

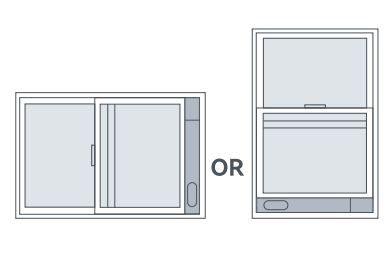
- Close the window to secure the window slider kit in place. Seal the gap with duct tape if required.

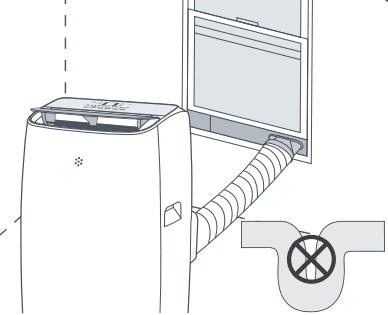
- Insert the exhaust hose into the hole of the window kit. Extend to a minimum length. Avoid any sharp bends or sags.

USING YOUR AIR CONDITIONER
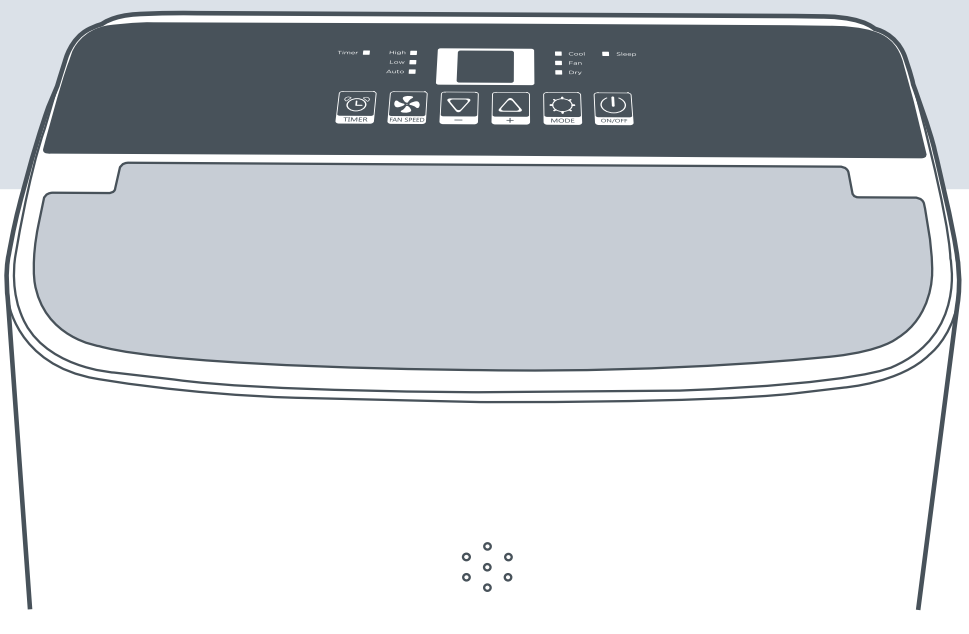
Control Panel & Display
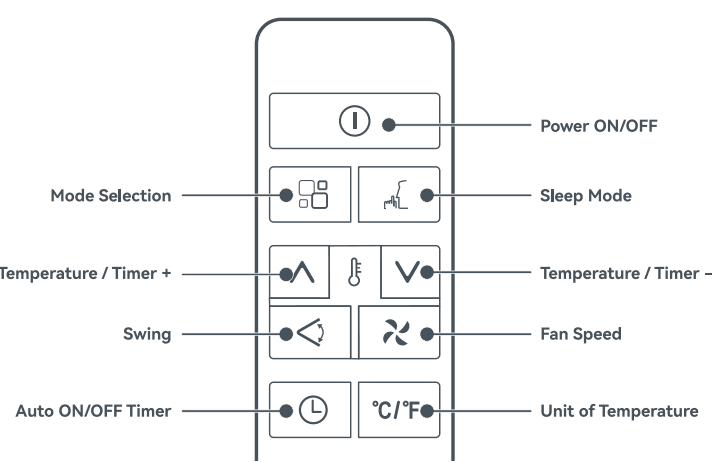
 Power ON/OFF
- Tap to turn the air conditioner ON or OFF the air conditioner.
 Mode Selection
- With the unit on, tap to select Cool / Fan / Dry / Smart mode.
 Temperature / Timer +
- With the unit on, tap to increase temperature or time.
 Temperature / Timer –
- With the unit on, tap to decrease the temperature or time.
 Fan Speed
- With the unit on, tap to select High /Low / Auto fan speed.
 Auto ON/OFF Timer
- Tap to set a time (0.5- 24H) to turn on or off automatically.
- Sleep
- Sleep Mode
- Run with a remote control
- Cool
- Cool Mode
- Fan
- Fan Mode
- Dry
- Dry Mode
 Smart Mode
- High
- High Speed
- LOW
- Low Speed
- Auto
- Auto Speed
- Timer
- Auto ON/OFF Timer

Control Functions
- It is recommended to place the air conditioner on a firm, level surface free from obstructions, with the doors and windows closed for optimum cooling efficiency.
Cool Mode
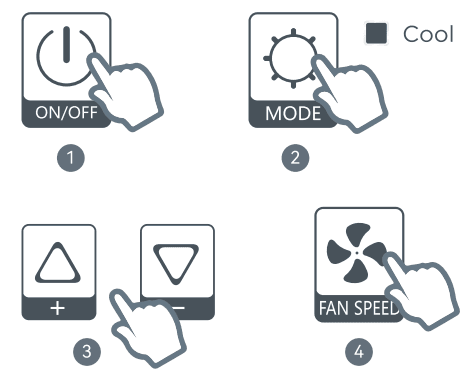
- Tap the ON/OFF button to turn on.
- Tap the MODE button until the Cool indicator lights up.
- Tap +/- button to set desired temperature (64°F~90°F/ 18°C~32°C).
- Tap the FAN SPEED button to select High / Low / Auto speed.
Smart Mode
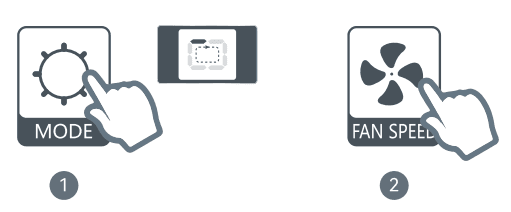
- With the unit on, tap the MODE button until the display screen cycles
 to enable Auto mode.
 - Tap the FAN SPEED button to select High / Low / Auto speed.
- In Smart mode, the unit will automatically run in Cool or Fan mode based on the room temperature.
Sleep Mode
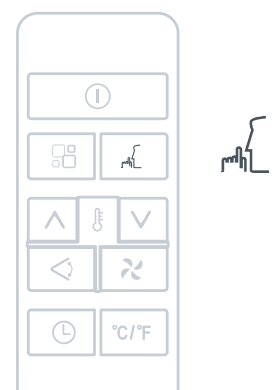
- While in Cool / Dry / Smart mode, press the SLEEP button on the remote control to turn on Sleep mode. The unit will maintain an optimal temperature at low speed with a display of 50% brightness.
- Sleep mode is not available in Fan mode. To cancel, press the SLEEP, MODE, or FAN SPEED button
Using with a Remote Control
- Sleep and Swing features are only available on the remote control. Other buttons function in the same manner as the control panel. (Effective range: 23 ft. / 7 m.)

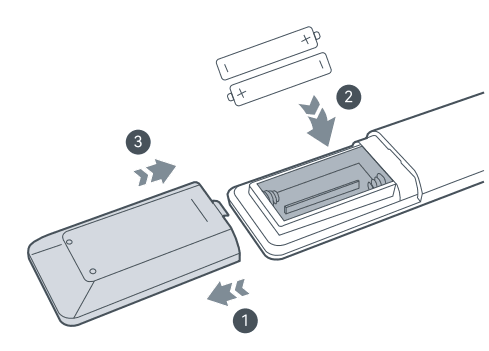
Installing & Replacing Batteries
- Install or replace with new batteries of the same type (AAA Alkaline) when necessary.
- When not using the remote control for an extended period of time, take out the batteries.
- DO NOT attempt to dismantle the batteries.
- DO NOT dispose of the batteries in a fire, as batteries may explode or leak

- Remove the battery box cover along the indicated arrow.
- Install or replace with two new AAA alkaline batteries, making sure the + and – polarities match.
- Install the cover back into place.
CARE AND CLEANING
Air Inlet Grilles & Filters
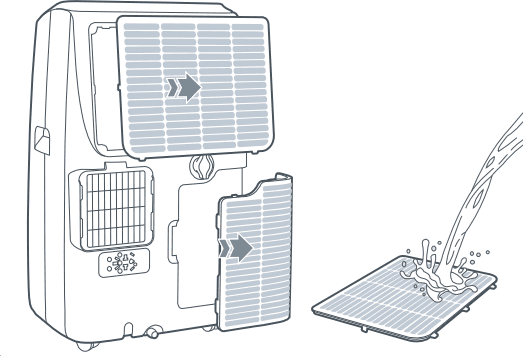
- Open the upper and lower air inlet grilles. Take out the inside air filters.
- Clean with diluted detergent in lukewarm water (≤ 104°F). Rinse well and allow to air dry.
- Return the filters to the original position and install both grilles.
- For optimum cooling efficiency, we recommend cleaning the air filters at least once every two weeks.
Outer Surface
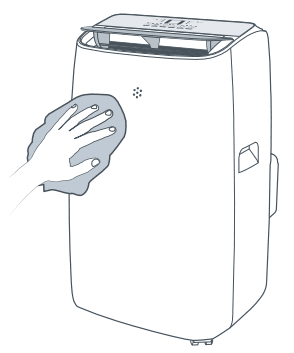
- Wipe with a soft, damp cloth to remove the dirt and dust from the surface.
- Completely dry before reconnecting to a power source.
End of Season Storage
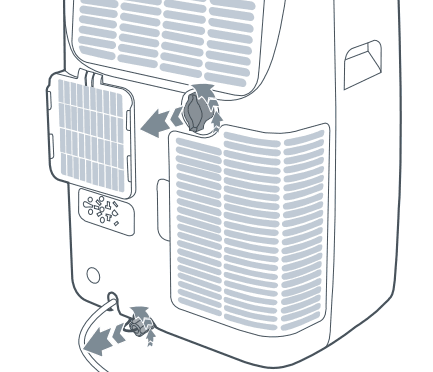
- Completely drain the water in both drain outlets.
- Clean the air inlet grilles and filters as instructed.
- Run in Fan mode for 15-20 minutes. Remove the exhaust hose.
- Clean the outer surface as instructed. Cover and store in a cool, dry location away from direct sunlight.
TROUBLESHOOTING GUIDE
Q: Ft or PF code on display.
- A:
- Ft – Water tank full when cooling. Turn off the unit, drain the water from both drain outlets, and restart.
- PF – Temperature sensor error. Contact our Customer Support for help.
Q: The unit does not start after pressing the ON/OFF button.
- A:
- Check if the air conditioner is properly connected to a powered electrical outlet.
- Drain the water from both drain outlets and restart.
- Press the RESET button on the safety plug. If the power trips off again, contact our Customer Support.
Q: Not cool enough.
- A:
- The doors or windows are not closed. Make sure all the windows and doors are closed.
- Make sure the exhaust hose is properly connected and not blocked.
- The air inlets are blocked. Turn off the unit and clean the inlets and filters as instructed
- The temperature is too high. Set to a lower temperature.
- There are heat sources inside the room. Remove if possible.
WARRANTY AND SERVICE
The warranty will not apply in cases of:
- Accident, misuse, or repairs performed by unauthorized personnel.
- Any unit that has been tampered with or used for commercial purposes.
- Normal wear and tear of wearable parts.
- Use of force, damage caused by external influences.
- Damage caused by non-observance of the User Manual, e.g., connection to an unsuitable mains supply or non-compliance with the instructions.
- Partially or completely dismantled appliances.
- Defects caused by or resulting from repairs, service, or alteration to the product or any of its parts that have been performed by a repair person not authorized. We can only provide after-sales service for products that are sold by VAGKRI or VAGKRI authorized retailers and distributors. If you have purchased your unit from a different place, please contact your seller for return and warranty issues.
For more manuals by VAGKRI, visit ManualsLibraryy
VAGKRI VA-AC04 Portable Air Conditioner-FAQs
Which mode provides the coldest air?
Turbo mode delivers the coldest and most powerful cooling. It quickly lowers the room temperature within 30 minutes before reverting to your previous settings.
Which mode should I use for different conditions?
1. Use Cool mode on hot days.
2. Use Dry mode in humid weather.
3. Choose Eco mode to save energy.
4. Use Turbo mode for rapid cooling.
5. Select Sleep mode at night for comfort and efficiency.
Can I keep my portable AC on all day?
Yes, many portable ACs are designed for continuous operation up to 24 hours, but it’s wise to give the unit short breaks to prevent overheating and extend its lifespan.
How many hours should my AC run daily?
It’s generally safe to run your portable AC for 8–12 hours per day. For best performance, turn it off for 15–20 minutes every 3–4 hours to avoid strain.
Why isn’t my portable AC cooling the room?
Poor cooling can be caused by dirty filters, blocked exhaust hoses, low refrigerant, or incorrect thermostat settings. Regular maintenance helps prevent these issues.
Does my portable AC need maintenance?
Yes, routine maintenance is essential to keep your unit running efficiently and to protect your warranty. This includes cleaning filters and checking for any blockages.
Do I need to add water to this AC unit?
No, the VAGKRI VA-AC04 does not require water unless specified. Some models use evaporative cooling and may need water, but many, like this one, do not.
Should I give my portable AC a break?
While breaks help prevent overheating, modern units are built to run continuously. Frequent restarts can be harder on the system than steady operation.

