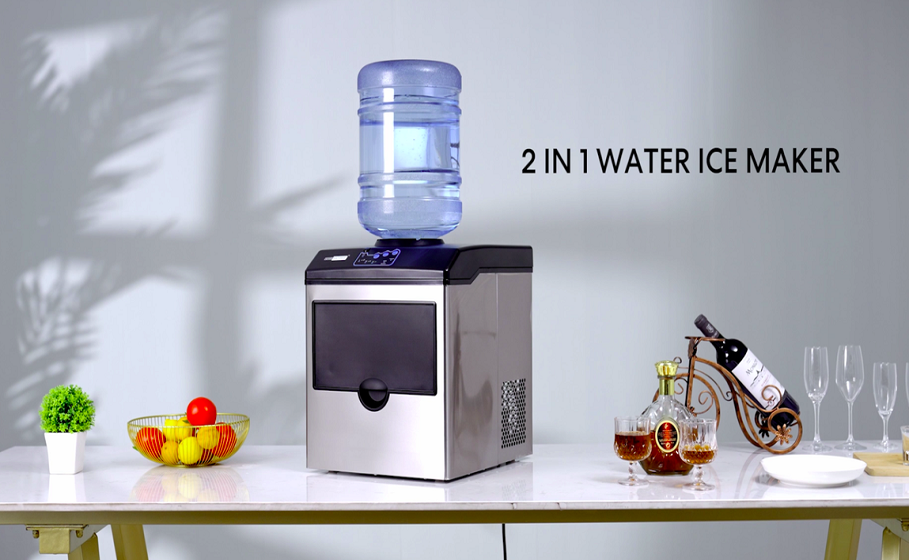
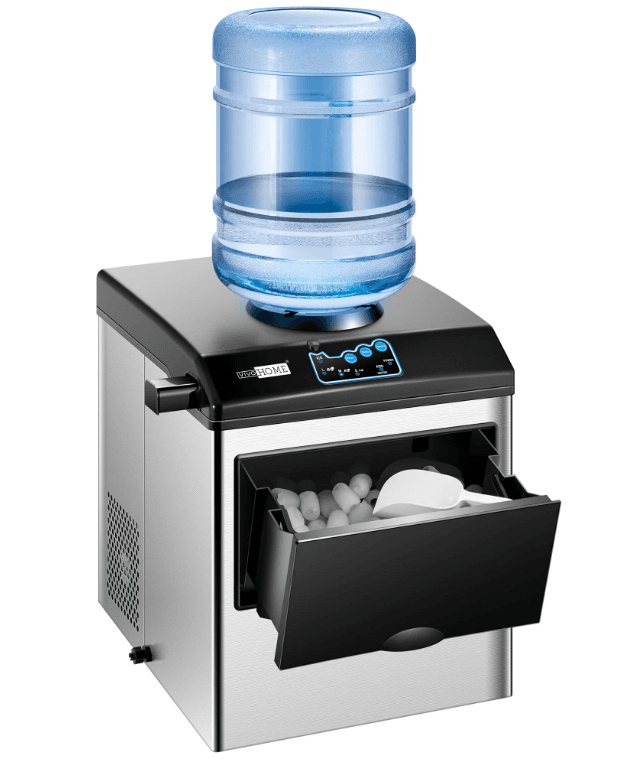
VivoHome VH1043 2-in-1 Ice Maker with Water Dispenser
IMPORTANT SAFETY INSTRUCTIONS
- Your safety and the safety of others are very important.
- We have provided important safety information in this manual. Always read and obey all safety information.
- This is the safety alert symbol: A
- All safety information will follow the safety alert symbol and the words “DANGER” or “WARNING”
PREPARING YOUR ICE MAKER FOR USE
When using electrical appliances, basic safety precautions should be followed to reduce the risk of fire, electric shock, and injury to persons or property. Read all
instructions before using any appliance.
- Do not operate this or any other appliance with a damaged cord. If the supply cord is damaged, it must be replaced by the manufacturer or its service agent,
or a similarly qualified person to avoid a hazard. This ice-maker must be positioned so that the plug is accessible. Connect to properly polarized outlets
only. No other appliance should be plugged into the same outlet. Be sure that the plug is fully inserted into the electrical outlet. - Do not run the power cord over carpeting or other heat insulators. Do not cover the cord. Keep the cord away from traffic areas, and do not submerge it in
water. - We do not recommend the use of an extension cord, as it may overheat and become a risk of fire. If you must use an extension cord, use a No. 14 AWG minimum size with a rating of no less than 1875 watts.
- Please unplug the ice maker before cleaning or performing any repairs or maintenance.
- Use with caution when electrical appliances are used near children.
- Do not use your ice-maker outdoors. Place the ice-maker away from direct sunlight and make sure that there is at least 4 inches of space between the back of your unit and the wall. Keep a minimum distance of 4 inches on each side of your unit away from other items.
- Do not use liquids other than water to make the ice cubes. Do not clean your ice maker with flammable fluids. The fumes can create a fire hazard or an explosion.
- Do not tip over the machine. If the ice maker is brought in from outside in wintertime, give it a few hours to warm up to room temperature before plugging it in.
GETTING TO KNOW YOUR UNIT
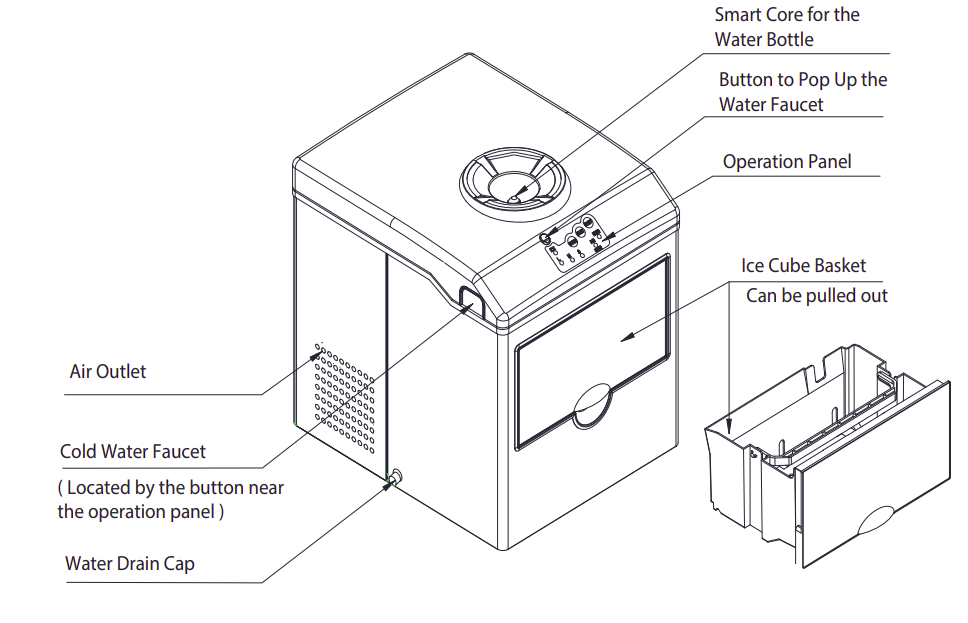
UNIT
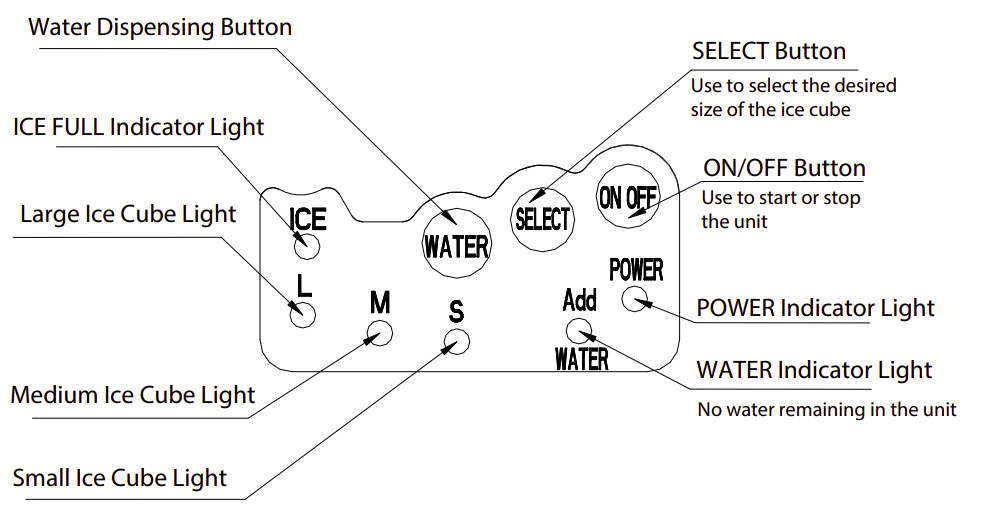
OPERATION PANEL
OPERATING PROCEDURES & MAINTENANCE
UNPACKING YOUR ICE MAKER
- Remove the exterior and interior packaging. Check that ice scoop is included. If any parts are missing, please contact our customer service.
- Clean the interior with lukewarm water and a soft cloth. Take out and clean the ice basket.
- Find a location for your ice maker that is protected from direct sunlight and other sources of heat (e.g., stoves, furnaces, radiators). Place the ice maker on a level surface. Make sure there are at least 4 inches of space between the back and sides of your ice maker and other objects, including the wall.
- Allow one hour for the refrigerant fluid to settle before plugging in the ice maker.
- The appliance must be positioned so that the plug is accessible.
- Before placing the water bottle on the unit, make sure that the drain plug on the back is tightly fastened.
- Hold the water bottle vertically and upside down (over the unit) and place the water bottle into the designated SMART CORE. Apply slight pressure to pierce the bottle cap with the spigot. This unit accepts two-, three-, or five-gallon water bottles with pierceable sealed caps.
CONNECTING YOUR ICE MAKER
Improper use of the grounded plug can result in the risk of electrical shock. If the power cord is damaged, please call our customer service.
- This unit should be properly grounded for your safety. The power cord of this appliance is equipped with a three-prong plug, which connects with a standard three-prong wall outlet to minimize the possibility of electric shock.
- Plug your device into a dedicated, properly installed, grounded wall outlet. Under no circumstances should you cut or remove the third (ground) pin on the power cord. Any questions about power and/or grounding should be directed to a certified electrician.
- This appliance requires a standard 110- 120V, 60 Hz, 3-prong electrical outlet.
CLEANING AND MAINTAINING YOUR ICE MAKER
Before using your ice maker, it is strongly recommended to clean it thoroughly.
- Take out the ice basket.
- Clean the interior with diluted detergent, warm water, and a soft cloth.
- Use the water to rinse the interior parts. Drain the water by unplugging the drain cap on the bottom of the front side.
- The exterior of the ice maker should be cleaned regularly with a mild detergent solution and warm water.
- Dry the interior and exterior with a clean, soft cloth.
- If the machine will not be used for an extended period of time, drain the water completely and dry the interior.
USING YOUR ICE MAKER
MAKING THE ICE-CUBE
- Select the size of the ice cube by pressing the “SELECT” button. If the room temperature is lower than 60°F, it is recommended to select small or medium ice cubes in order to avoid the possibility of ice sticking together.
- Press “POWER” on the control panel to begin the ice-making cycle.
- The ice-making cycle lasts 6 to 12 minutes, depending on the selected size of the ice cube.
- If the water pump cannot supply more water, the ice maker will stop automatically, and the “ADD WATER” Indicator will light up on the control panel. Please check the water bottle and replace it with a full bottle of water. Press the “POWER” button again to resume the ice-making cycle. Allow the refrigerant liquid inside the compressor to settle for at least 3 minutes before restarting.
- When the ice basket is full, the “ICE” indicator on the control panel lights up and the ice maker automatically stops operating.
TROUBLESHOOTING
| PROBLEM | POTENTIAL CAUSE | SOLUTION |
| “WATER” Indicator is on. | Lack of Water. | End the cycle. Replace the current bottle with a full bottle of water. Restart the unit. |
| “ICE” Indicator is on. | The ice basket is full. | Empty the ice basket. |
| Ice cubes stick together | The ice-making cycle is too long. | End the cycle. Restart the unit when the ice block melts. Select “S” on the control panel to make small ice cubes. |
| The water temperature in the inner tank is too low. | Change the water in the inner tank. The temperature of the water should be between 45°F-90°F. | |
| The ice-making cycle is normal but no ice is produced. | The ambient temperature or the water temperature in the inner tank is too high. | Run the ice maker below 90°F. Pour cold water into the tank. |
| Refrigerant liquid leakage. | Verify with a qualified technician | |
| Blocked pipe in the cooling system. | Verify with a qualified technician. |
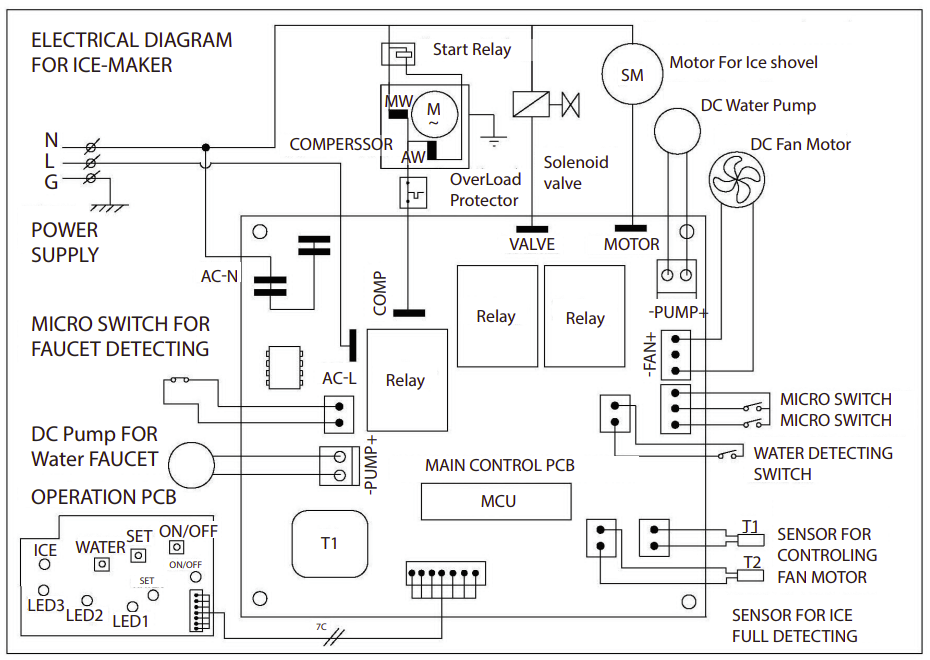
TECHNICAL PARAMETERS & CIRCUIT DIAGRAM
| Model | VH1043 |
| Description | 2-in-1 bottled water ice maker with cold water dispensing function. |
| Power Rating | 115V~, 60Hz |
| Ice-Making Rated Current | 2.0A |
| Ice-harvest Rated Current | 2.7A |
| Refrigerant | R290 1.16Oz/33g |
| Design Pressure | High Side 290Psig |
| Low Side 88Psig | |
| Enclosure | Stainless steel or cold-rolled steel sheet with plastic cover |
| Dimension | 14.1 x 16.7 x 17.8 in. (W x D x H) |
| Net Weight | 33.5 lbs |
For more manuals by VivoHome, visit ManualsLibraryy
VivoHome VH1043 2-in-1 Ice Maker with Water Dispenser-FAQs
Why is my water dispenser working but not the ice maker?
This may be due to a frozen or blocked fill tube. The fill tube delivers water to the ice maker, and if it’s clogged with ice or debris, it can prevent ice production.
Where do I add water to the VivoHome ice maker?
Open the lid, remove the ice basket, and pour water directly into the water tank. Make sure not to exceed the “Max” water level mark.
Why isn’t water flowing into my ice maker?
Check the fill tube and cup at the back of the machine. If they’re frozen or blocked, defrost and clean them to restore proper water flow.
How do I fix an ice maker that’s not dispensing ice?
If the ice has melted and refrozen around the auger, remove the ice bin, thaw and clean it, then reinstall. The dispenser should work once new ice is made.
Is the VivoHome VH1043 ice maker a good product?
Most users find it compact, efficient, and fast at making ice. The crushed ice option is a highlight. However, some mention water leaks and unclear instructions.
What do the ‘S’ and ‘L’ settings mean on the control panel?
‘S’ stands for small ice cubes, and ‘L’ stands for large ice cubes. The machine also features indicators for “Add Water” and “Ice Full” alerts.
How should I clean the VivoHome ice maker?
Unplug the unit, remove any ice, and clean it with a diluted water and vinegar solution. Wipe both the interior and exterior surfaces thoroughly.
What controls water flow into the ice maker?
An internal solenoid valve controls water release into the ice mold. The cooling system then freezes the water into cubes.

