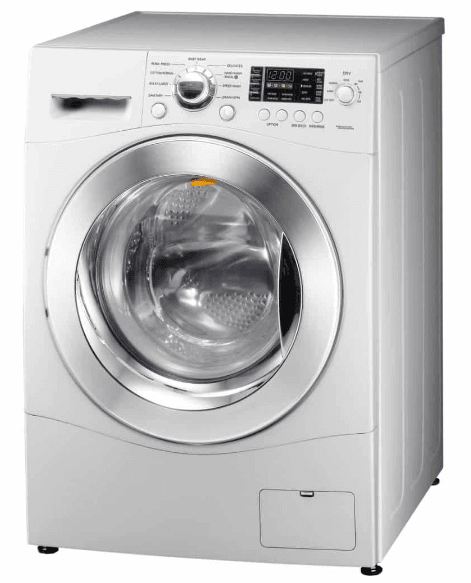
Whirlpool Duet Sport WFW8300SW Front Load Washer
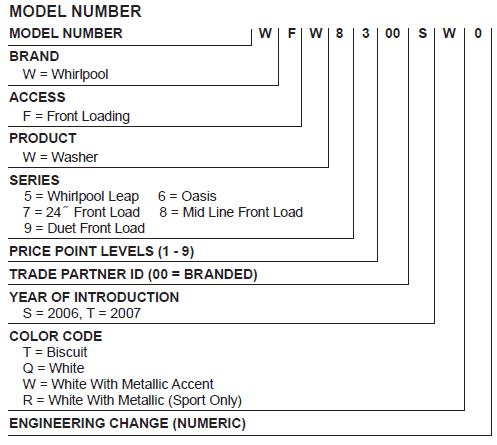
MODEL & SERIAL NUMBER DESIGNATIONS
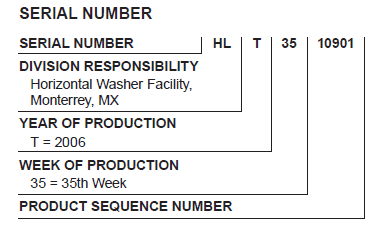
MODEL & SERIAL NUMBER LABEL AND TECH SHEET LOCATIONS
The Model & Serial Number Label and Tech Sheet locations are shown below.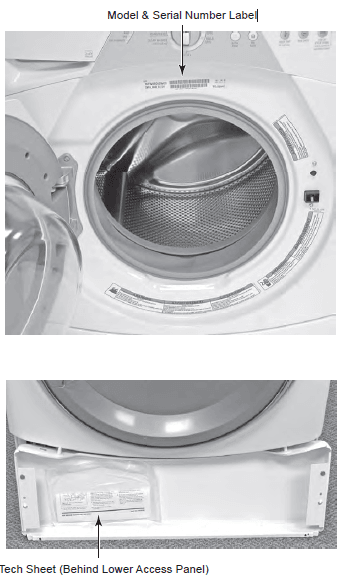
SPECIFICATIONS
| Model Number | WFW8300SW | WFW8500SW | WFW8500SR |
| Model Description | Front Load Washer | Front Load Washer | Front Load Washer |
| Color | White with Gray Accents | White with Gray Accents | White with Sterling Bright Accents |
| Capacity (Cu.Ft. IEC) | 3.3 | 3.6 | 3.6 |
| Temperature Control | ATC – 2 | ATC – 4 | ATC – 4 |
| Heater | No | Yes | Yes |
| Sensors | Suds Sensor, NTC (Thermistor), Water Level Sensor | Suds Sensor, NTC (Thermistor), Water Level Sensor | Suds Sensor, NTC (Thermistor), Water Level Sensor |
| Tumble Speed | Heavy Duty & Normal = 40/35 RPM Gentle = 31 RPM | Heavy Duty & Normal = 40/35 RPM Gentle = 31 RPM | Heavy Duty & Normal = 40/35 RPM Gentle = 31 RPM |
| Spin Speed | High = 1050 RPM Medium = 800 RPM Low = 600 RPM | High = 1100 RPM Medium = 800 RPM Low = 600 RPM | High = 1100 RPM Medium = 800 RPM Low = 600 RPM |
| Motor | Variable Speed; 1/4 HP | Variable Speed; 1/4 HP | Variable Speed; 1/4 HP |
| Voltage | 120V | 120V | 120V |
| Frequency | 60 Hz | 60 Hz | 60 Hz |
| Amps | 10 Amp | 10 Amp | 10 Amp |
| Water Consumption Average DOE (Gallons-Per-Cycle) | 12.77 | 14.1 | 14.1 |
| Rated Load | 15.43 lbs. (7 kg) | 17.64 lbs. (8 kg) | 17.64 lbs. (8 kg) |
| Load Pounds | Maximum = 11.7 Average = 7.35 Minimum = 3 | N/A | N/A |
| Height | 36.0″ | 36.0″ | 36.0″ |
| Install Depth: Min – Max | 29.25″ | 30.00″ | 30.00″ |
| Width | 27″ | 27″ | 27″ |
| Product Weight (approx) | 242 lbs. | 242 lbs. | 242 lbs. |
INSTALLATION INFORMATION
INSTALLATION REQUIREMENTS
TOOLS AND PARTS
Gather the required tools and parts before starting installation. The parts supplied are in the washer drum.
Tools needed for connecting the water inlet hoses
- Pliers (that open to 1-9/16˝ [39.5 mm])
- Flashlight (optional)
Tools needed for installation
- Open-end wrenches 17 mm and 13 mm
- Level
- Woodblock
- Ruler or measuring tape
Parts supplied
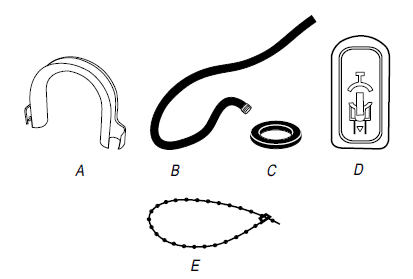
- A. U-shaped hose form
- B. Water inlet hoses (2)
- C. Inlet hose washers (4)
- D. Transit bolt-hole plug
- E. Beaded tie strap
Alternate Parts
Your installation may require additional parts. If you are interested in purchasing one of the items listed here, call the toll-free number on the cover or in the “Assistance or Service” section in the “Use & Care Guide.”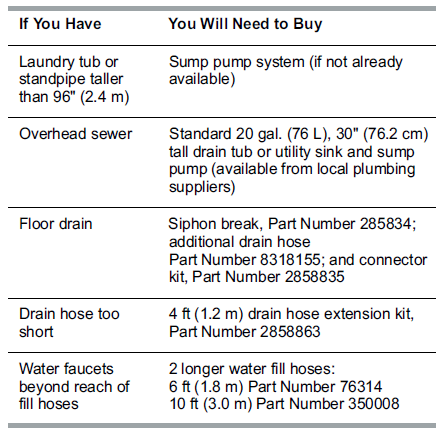
OPTIONS
Pedestal
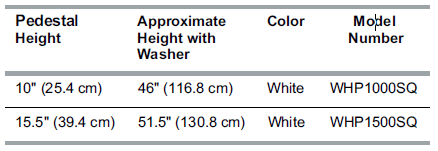
You have the option of purchasing pedestals of different heights separately for this washer. You may select a 10˝ (25.4 cm) or a 15.5˝ (39.4 cm) pedestal. Remember that the pedestal will add to the total height of the unit.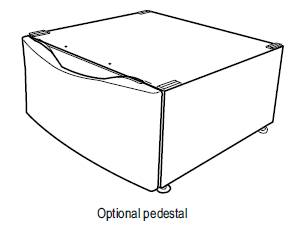
LOCATION REQUIREMENTS
Selecting the proper location for your washer improves performance and minimizes noise and possible washer “walk.” The washer can be installed under a custom counter, or in a basement, laundry room, closet, or recessed area. See “Drain System.” Companion appliance location requirements should also be considered. Proper installation is your responsibility.
You will need
- A water heater is set to deliver 120°F (49°C) water to the washer.
- A grounded electrical outlet located within 6 ft (1.8 m) of where the power cord is attached to the back of the washer. See “Electrical Requirements.”
- Hot and cold water faucets located within 4 ft (1.2 m) of the hot and cold water fill valves, and water pressure of 20-100 psi (137.9-689.6 kPa).
- A level floor with a maximum slope of 1˝(2.5 cm) under the entire washer. Installing the washer on soft floor surfaces, such as carpets or surfaces with foam backing, is not recommended.
- A sturdy and solid floor to support the washer with a total weight (water and load) of 400 lbs (180 kg).
Do not operate your washer in temperatures below 32°F (0°C). Some water can remain in the washer and can cause damage in low temperatures.
Installation Clearances
- The location must be large enough to allow the washer door to be fully opened.
- Additional spacing should be considered for ease of installation and servicing. The door opens more than 90°, and it is not reversible.
- Additional clearances might be required for wall, door, and floor moldings.
- Additional spacing of 1˝ (2.5 cm) on all sides of the washer is recommended to reduce noise transfer.
- Companion appliance spacing should also be considered.
Washer Dimensions
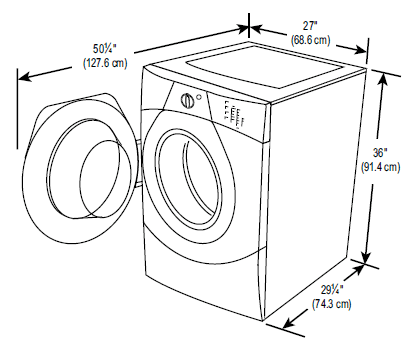
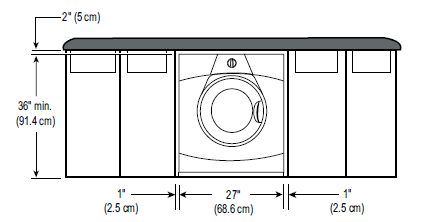
Recommended installation spacing for custom undercounter installation The dimensions shown are for the recommended spacing.
Custom under-counter installation – Washer only
Recessed area or closet installation
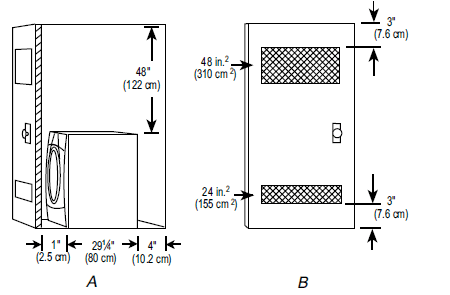
- A. Side view – closet or confined area
- B. Closet door with vents
Recessed or closet installation – Washer on a pedestal
 A. Recessed area
- B. Side view – closet or confined area
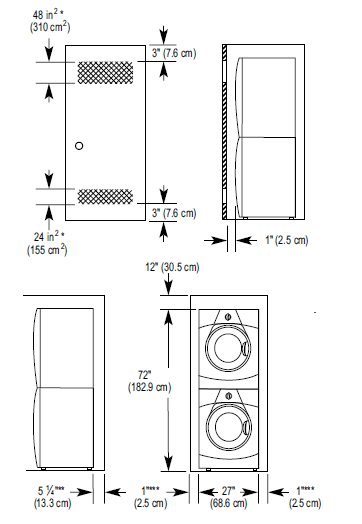
- Min. top and bottom air openings for closet door.
- External exhaust elbow requires additional space.
- Wall, door, and floor molding may require additional spacing.
For cabinet installation with a door, minimum ventilation openings at the top are required.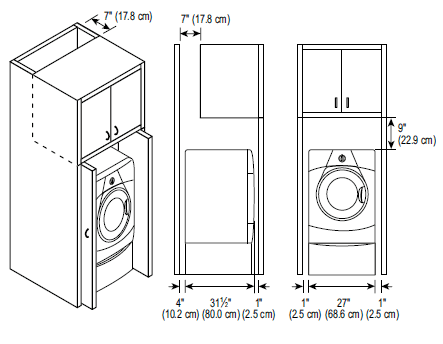
DRAIN SYSTEM
The washer can be installed using the stand-pipe drain system (floor or wall), the laundry tub drain system, or the floor drain system. Select the drain hose installation method you need. See “Tools and Parts.” Standpipe drain system – wall or floor (views A & B) The standpipe drain requires a minimum diameter standpipe of 2˝ (5 cm). The minimum carry-away capacity can be no less than 17 gal. (64 L) per minute. The top of the standpipe must be at least 30˝ (76.2 cm) high and no higher than 96˝ (2.4 m) from the bottom of the washer.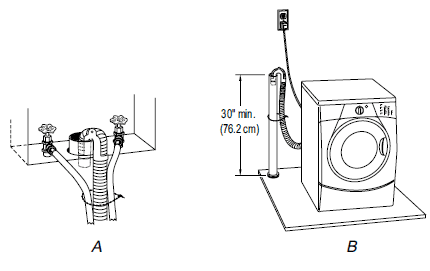
TROUBLESHOOTING
WASHER & COMPONENTS
ERROR CODES
When all cycle indicator lights are blinking, see which status light is also illuminated, and then check the list below for potential problems and troubleshooting checks. An error code may be shown in the Estimated Time Remaining display (on some models).
- “Spin” and “Wash” (HT “Rinse” and “Cycle Complete”) illuminated or “F20” on display (Water Inlet Problem no water or insufficient water supply) Select PAUSE/CANCEL twice to cancel the cycle Unplug the washer or disconnect power.
Check the following
Are water faucets completely turned on? Are screens at the inlet hose connection to the washer clogged? Are water inlet hoses kinked? Are water inlet hoses frozen? Plug in the washer or reconnect power. Re-select the cycle and press START. - “Spin,” “Wash” (HT “Rinse,”“Cycle Complete”), and “Add a Garment” illuminated or “F21” on display (Drain Problem) Select PAUSE/CANCEL twice to cancel the cycle. Unplug the washer or disconnect the power.
Check the following
Is the drain hose kinked, frozen, clogged, or more than 96˝ (2.4 m) above the floor? - For any other Status light combination (Electrical Problem) Select PAUSE/CANCEL twice to cancel the cycle. Select DRAIN/SPIN if there is excessive water in the washer. Re-select the cycle and press START.
NOISY, VIBRATING, OFF-BALANCE - Is the washer level?
The washer must be level. The four feet should be properly installed, and the nuts should be tightened against the washer cabinet. All four feet of the washer must be in firm contact with the floor. If the washer is on a pedestal, the washer must be secured to the pedestal and all four pedestal feet must be in firm contact with the floor. - Washer making a different noise?
As with any new product, you will hear sounds that you are not accustomed to. You may hear various sounds when the door is locked or unlocked, and during the washing, rinsing, or spinning process. Between changes in wash actions, there will be momentary pauses. You will hear water spraying and splashing during the wash and rinse cycles. These new sounds and pauses are part of normal washer operation. - Is the washer installed on a sturdy and solid floor?
Refer to the “Installation Instructions” for flooring requirements. Noise and vibration may be reduced by placing a piece of 3/4˝ (19.1 mm) plywood underneath your washer. The plywood may extend underneath both washer and dryer to keep them at equal heights. - Is the washer gurgling or humming?
As water is drained from the washer, you may hear air being pulled through the pump. This happens during the end of draining. It is normal. - Are you washing items with metal snaps, buckles, or zippers?
You may hear metal items touching the washer drum. This is normal. - Were the 4 shipping bolts in the back of the machine removed?
See “Remove Transport System.” - Was the door opened during “Add a garment”?
Water can drip off the inside of the door when the door is opened after the start of a cycle. - Is HE detergent being used?
The non-high-efficiency detergents can cause over-sudsing that can leak from the rear of the washer. - Are the fill hoses tight?
- Are the fill hose gaskets properly seated?
Check both ends of each hose. See “Connect the Inlet Hoses.” - Is the drain hose properly installed?
The drain hose should be secured to the drainpipe or laundry tub. See “Secure the Drain Hose.” - Is the sink or drain clogged?
The sink and drainpipe must be able to carry away 17 gal. (64 L) of water per minute. If clogged or slow, water can back up out of the drainpipe or sink. Check household plumbing (laundry tubs, faucets, drain pipes, water pipes) for leaks.
DISPENSER OPERATION - Did you follow the manufacturer’s directions when adding detergent and fabric softener to the dispensers?
Measure detergent and fabric softener. Slowly pour into the dispensers. Wipe up all spills. Dilute fabric softener in the fabric softener dispenser. - Did you put powdered or liquid color-safe bleach into the liquid chlorine bleach dispenser (on some models)?
Add powdered or liquid color-safe bleach directly to the washer basket. Do not use the chlorine bleach dispenser for color-safe bleach. - Is the fabric softener dispenser clogged?
Clean the fabric softener dispenser. See “Washer Care” for details. - Are the laundry additives in the correct dispenser compartment?
Add the correct amounts of detergent, fabric softener, or liquid chlorine bleach to the correct compartments. Add powdered or liquid color-safe bleach to the Main Wash compartment. - Is there water in the dispenser at the end of the cycle?
A small amount of water will remain in the dispenser compartment. This is normal.
WASHER ODOR - Have you run the Clean Washer Cycle lately?
To freshen your washer and to avoid odors, see “Cleaning The Washer.” - Are you using HE detergent?
Use of non-HE detergent can cause a film residue which can result in odor. - Did you leave the door open after use?
This washer has a tight seal to avoid water leaks. To avoid odors leave the door open to allow the washer to dry between uses.
DOOR WON’T UNLOCK - Did all of the water drain out of the washer during the spin?
Select DRAIN/SPIN to remove any water remaining in the washer. The washer door will unlock at the end of the drain. - Is the door locked and is the “Add a garment” light on?
Press PAUSE/CANCEL once. The door will unlock.
COMPONENT ACCESS
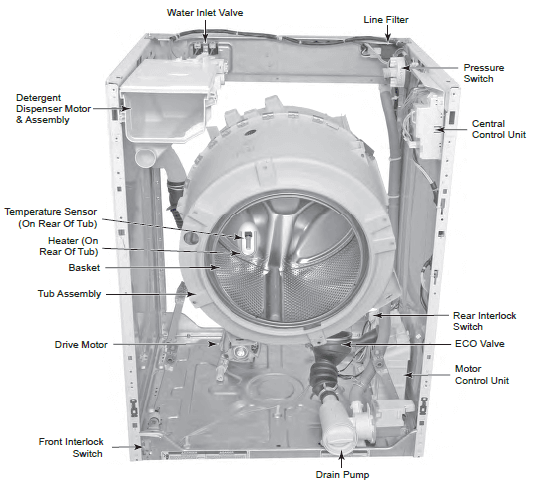
This section instructs you on how to service each component inside the Duet Sport™ Front-Loading Automatic Washer. The components and their locations are shown below.
COMPONENT LOCATIONS
REMOVING THE CONSOLE AND THE TOUCHPAD/LED ASSEMBLY
- Unplug the washer or disconnect the power.
- Turn off the water supply to the washer.
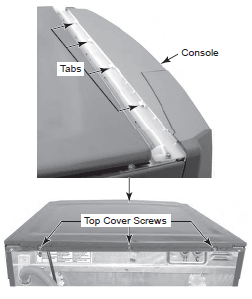
- Remove the three T-20 hex-head Torx screws from the top cover of the washer.
- Pull back on the cover and release the tabs in the console from the slots in the cover, then lift the cover off the unit.

- To remove the console:
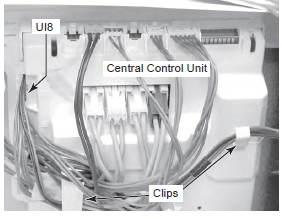
- a) Pull out and disconnect the cable connector UI8 from the central control unit.
- b) Remove the cable wires from the two central control unit clips.

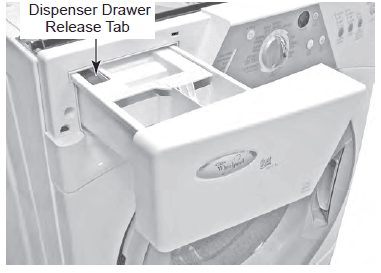
- c) Pull the detergent dispenser drawer out as far as it will go, then press down on the release tab, and remove the drawer from the unit.

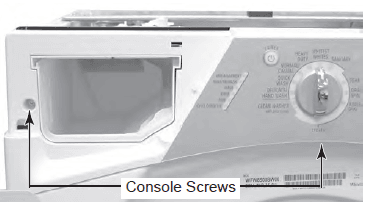
- d) Remove the two screws at the recessed hole and bottom of the console.

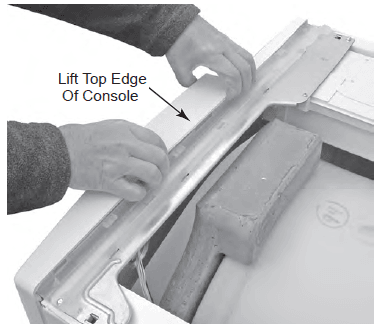
- e) Lift the top edge of the console and unhook it from the holder clips.

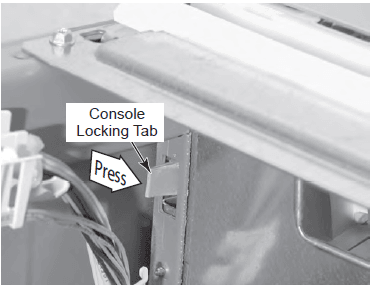
- f) Press the locking tab on the right rear side of the console inward, and remove the console.

- To remove the touchpad/LED assembly:
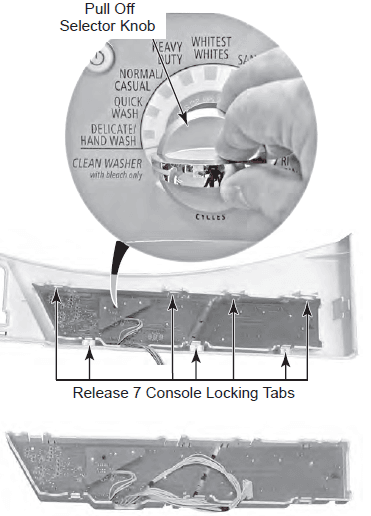
- a) Pull the selector knob off the switch shaft.
- b) Press the seven console locking tabs, unsnap the touchpad/LED assembly, then lift the assembly from the console and remove it.

REMOVING THE CENTRAL CONTROL UNIT
- Unplug the washer or disconnect the power.
- Turn off the water supply to the washer.
- Remove the top cover from the washer (see page 4-2 for the procedure).

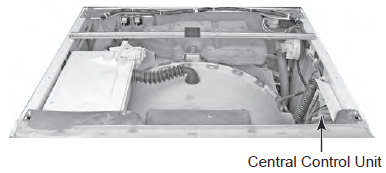
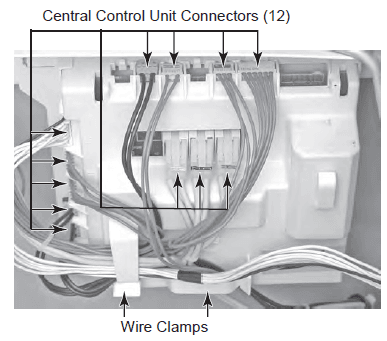
- Pull the wire connectors off the edges of the central control unit circuit board (see the top right photo). When you pull an edge connector off the board, first pry the locking tab away from the connector with a small screwdriver blade to release it.
- Slide the hooked ends of the two wire clamps off the locking tabs, and remove the wires from the clamps.

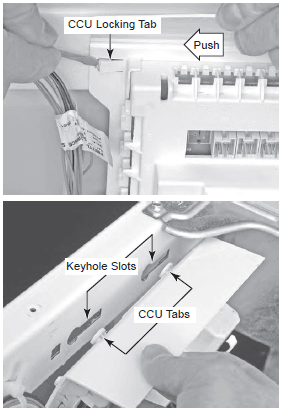
- Pry up on the locking tab, push the central control unit (CCU) toward the rear of the washer as far as it will go, and remove the CCU tabs from the keyhole slots in the chassis.

DIAGNOSTICS & TROUBLESHOOTING
DIAGNOSTICS
DIAGNOSTIC GUIDE
Before servicing, check the following:
- Make sure there is power at the wall outlet.
- Has a household fuse blown or is the circuit breaker tripped? Time delay fuse?
- Are both hot and cold water faucets open and water supply hoses unobstructed?
- All tests/checks should be made with a VOM or DVM having a sensitivity of 20,000 ohms per volt DC or greater.
- Check all connections before replacing components. Look for broken or loose wires, failed terminals, or wires not pressed into connections far enough.
- A potential cause of a control not functioning is corrosion on connections. Observe connections and check for continuity with an ohmmeter.
- Connectors: Look at the top of the connector. Check for broken or loose wires. Check for wires not pressed into the connector far enough to engage metal barbs.
- Resistance checks must be made with the power cord unplugged from the outlet, and with wiring harness or connectors disconnected.
For more manuals by Whirlpool visit, ManualsLibraryy
Whirlpool Duet Sport WFW8300SW Front Load Washer-FAQs
How do I manually open the door on a Whirlpool Duet washer?
To manually open the door, reach down to the right lower front of the washer. Locate the door lock assembly and pull the lock release tab upwards to unlock and open the door.
Does Whirlpool have a reset button?
Many Whirlpool dryers have a reset button, but its location and appearance can vary by model. It might be on the control panel or on the back of the dryer.
How do I unlock a Whirlpool top-load washer without power?
To unlock a top-load washer without power, use a flathead screwdriver to remove the panel. Then, reach inside to locate the door latch, find the tear-drop shaped tab, and pull it. You should hear a click, and the door will open.
How long does a Whirlpool quick wash take?
The Quick Wash cycle on some Whirlpool washers can clean small, lightly soiled loads in 15 to 40 minutes.
Which washing machine mode is better?
The Power Steam program is ideal for lightly soiled cotton, synthetic, and mixed fabric items, effectively removing stains. The SpinDry/Rinse program rinses and spins the load dry without using detergent.
What is Whirlpool diagnostic mode?
Whirlpool’s diagnostic mode allows service personnel to test and verify all machine inputs. It is used for general checkups and troubleshooting before performing specific tests.
What are normal washer settings?
The Normal cycle is used for everyday laundry made of cotton, linen, and durable synthetics. It uses warm water to clean moderately soiled clothes and can run for up to an hour.
Why is my Whirlpool washer making noise?
A common cause for loud noise during the spin cycle is an unbalanced load. When clothes clump on one side of the drum, it creates uneven weight distribution, causing the machine to shake and make noise.

 A. Recessed area