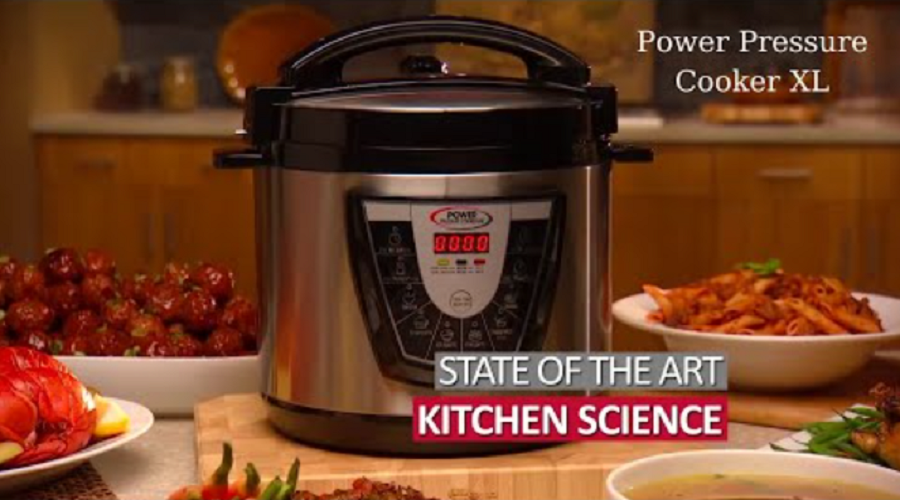
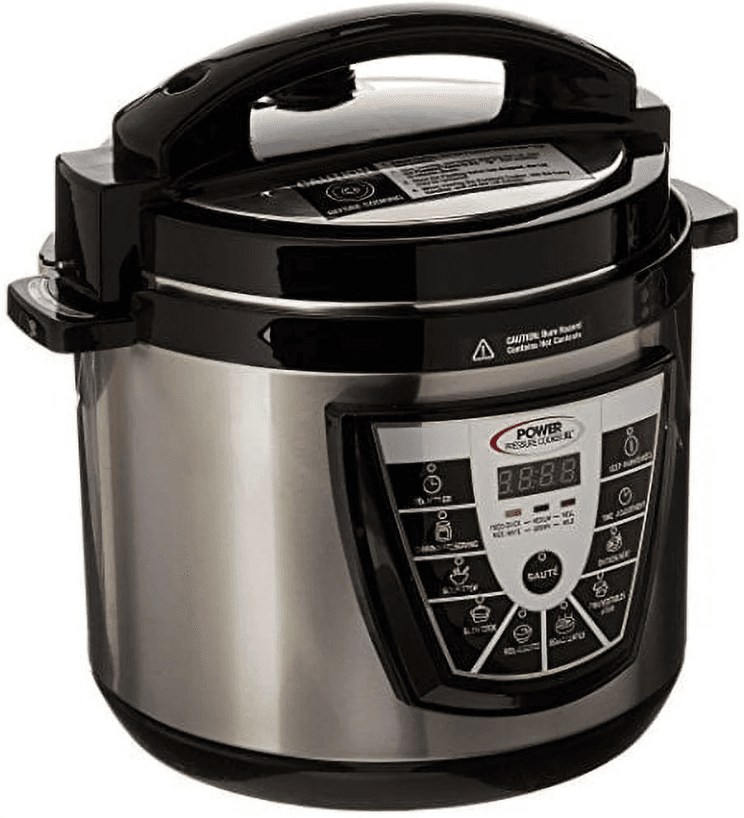
 Power Pressure Cooker XL
 IMPORTANT SAFEGUARDS
- Always attach the cord plug to the appliance first before plugging it into a wall outlet.
- CAUTION HOT SURFACES: This appliance generates extreme heat and steam during use. To avoid injury, do not touch hot stainless steel surfaces, or steam release valves on Lid during operation. Proper instructions must be taken to prevent the risk of personal injury, fires, and damage to property.
- This appliance is not intended for use by persons with reduced physical, sensory, or mental capabilities, or a lack of experience and knowledge unless they are under the supervision of a responsible person or have been given proper instruction in using the appliance.
- This appliance is not intended for use by children, and special care should be taken when the unit is in use in their presence.
- Do not use the appliance for anything other than its intended use.
- Before use, make certain the Lid is properly secured and the Pressure Release Valve is free from debris. See ATTACHING LID in PREPARING FOR USE,
- NEVER USE LID HANDLE to lift or move the cooker. Use only black handles located on the side of the base when lifting and/or moving the unit. DO NOT MOVE COOKER when under pressure or when contents are hot. Hot spilled foods can cause serious burns! To remove contents from the cooker, use the ladle provided.
- NEVER ATTEMPT TO OPEN LID WHILE UNIT IS OPERATING. Do not open the pressure cooker until the unit has cooled and all internal pressure has been released. If the Lid is difficult to rotate, DO NOT FORCE IT OPEN – this indicates that the cooker is still under pressure. See SAFELY RELEASE PRESSURE, in PREPARING FOR USE, p. 12.
- Once pressure is released, follow instructions to open Lid. See OPEN LID in PREPARING FOR USE, p. 13. ALWAYS OPEN LID AWAY FROM FACE AND BODY to avoid steam burns.
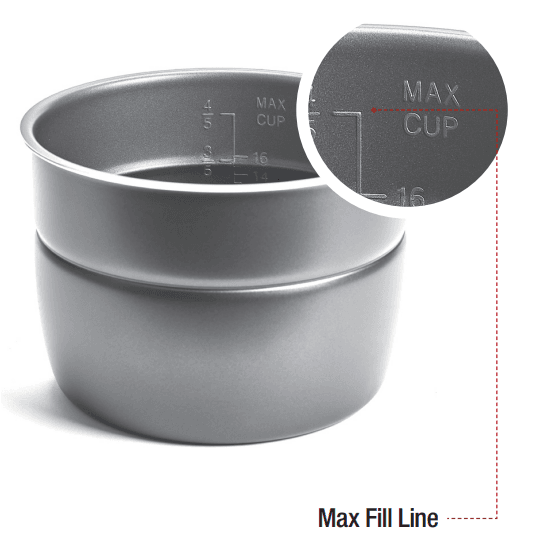
- Some foods, such as rice or beans, expand and create foam when cooking and need special cooking instruction. Pay particular attention to liquid quantities. Do not fill Inner Pot more than HALFWAY when cooking these foods. NEVER FILL ABOVE MAX FILL LINE in Inner Pot. Overfilling may cause clogging of Pressure Release Valve, allowing excess pressure
to develop. - CERTAIN FOODS CANNOT BE COOKED in this appliance because they clog the Pressure Release device (steam vent). These include applesauce, cranberries, pearl barley, oatmeal or other cereals, split peas, noodles, macaroni, rhubarb, and spaghetti.
- Never deep fry or fill with oil. Improper use of pressure cookers can cause fire or burns.
- CAUTION: Do not operate the unit in an appliance garage or under hanging cabinets. Proper space and ventilation are needed to prevent property damage that may occur by steam released during operation. Never operate the unit near any flammable materials, such as dish towels, paper towels, curtains, paper plates, etc.
- Use on a countertop only. Do not operate on unstable surfaces.
- Do not place the pressure cooker on or near a stovetop or in an oven.
- Do not use outdoors.
- Do not operate if the cord or plug is damaged. If the appliance begins to malfunction during use,immediately unplug cord from power source. DO NOT USE OR ATTEMPT TO REPAIR A MALFUNCTIONING APPLIANCE. Return appliance to the nearest authorized service facility for examination, repair, or electrical or mechanical adjustment.
- Do not let cord hang over edge of table or counter or touch hot surfaces.
- Unplug from wall outlet when not in use and before cleaning. Allow to cool before putting on or removing parts.
- Anyone who has not fully read and understood all operating and safety instructions contained in this manual is not qualified to operate or clean this appliance.
- WARNING: TO REDUCE RISK OF ELECTRIC SHOCK, COOK ONLY IN THE REMOVABLE CONTAINER (INNER POT) PROVIDED.
NEVER IMMERSE HOUSING IN WATER. IF THE UNIT FALLS OR ACCIDENTALLY BECOMES IMMERSED IN WATER, UNPLUG FROM THE WALL OUTLET IMMEDIATELY. DO NOT REACH INTO LIQUID IF UNIT IS PLUGGED IN AND IMMERSED. DO NOT IMMERSE OR RINSE CORDS OR PLUGS IN WATER OR OTHER LIQUIDS.
Visit www.PowerPressureCooker.com for additional safety and cooking tips.
Parts & Accessories
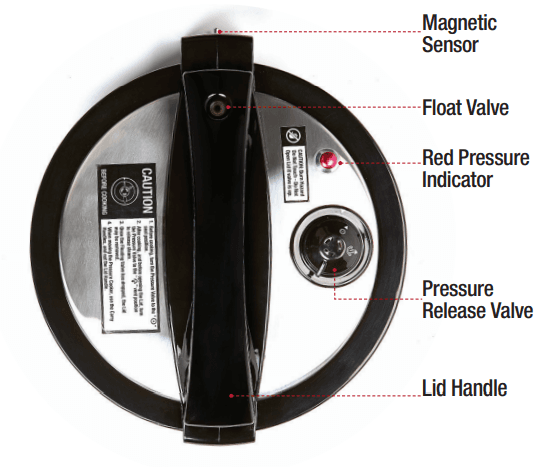
LID – TOP VIEW
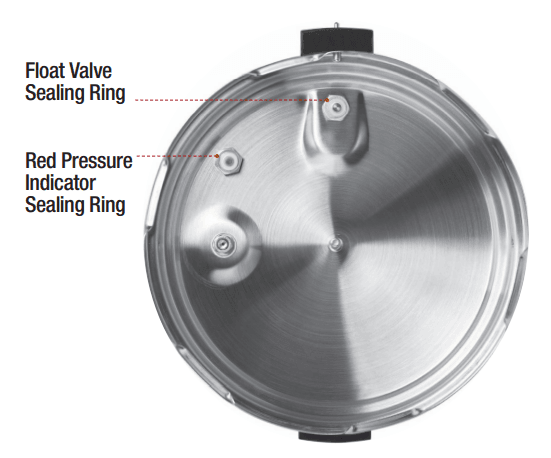
LID – UNDERSIDE (WITHOUT RUBBER GASKET)
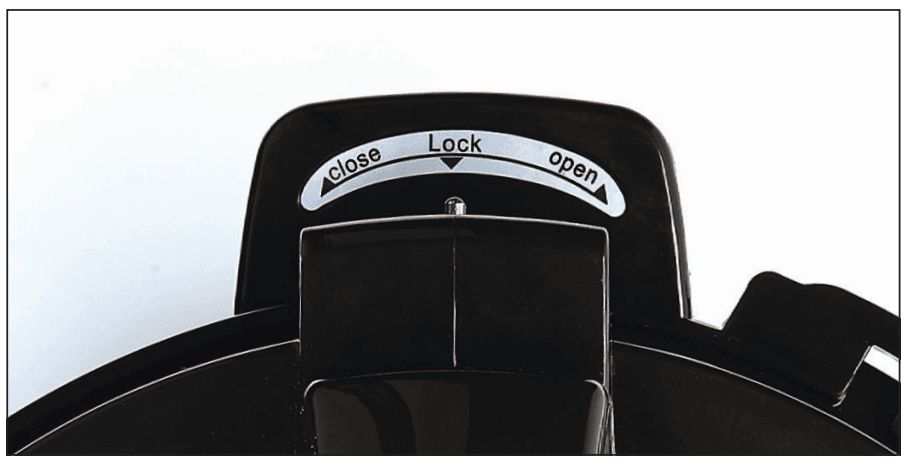
Lock Symbols & Magnetic Sensor
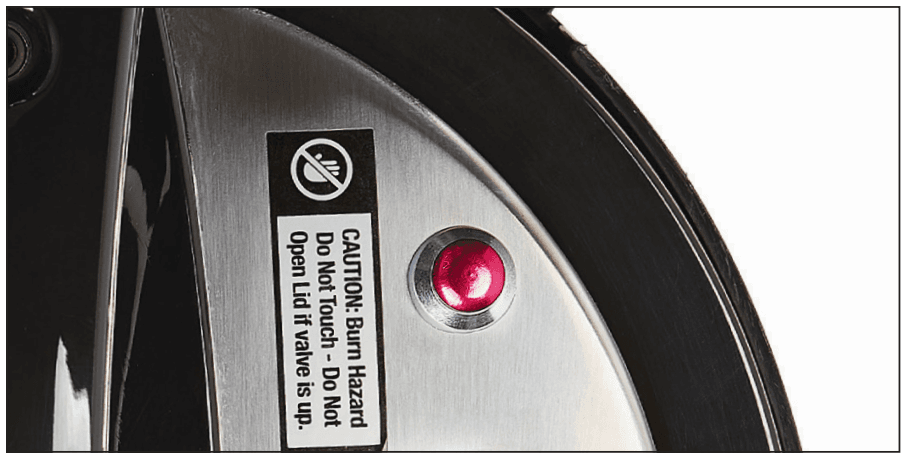
Red Pressure Indicator
Float Valve
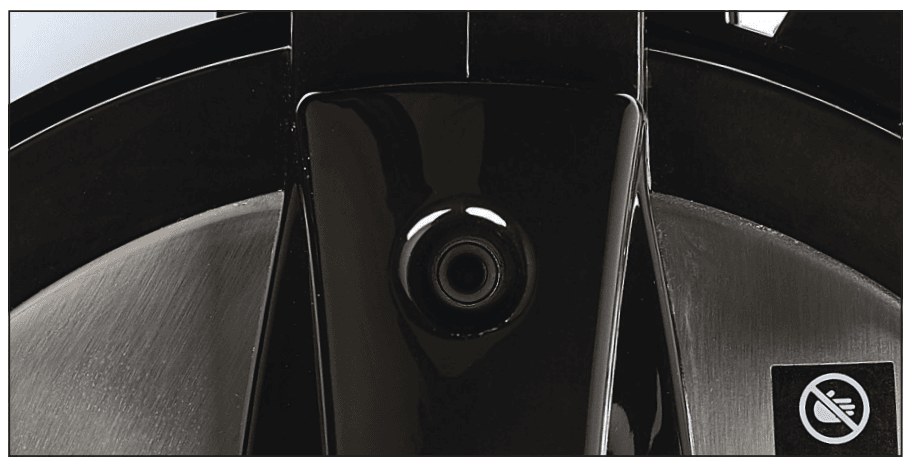
Pressure Release Valve
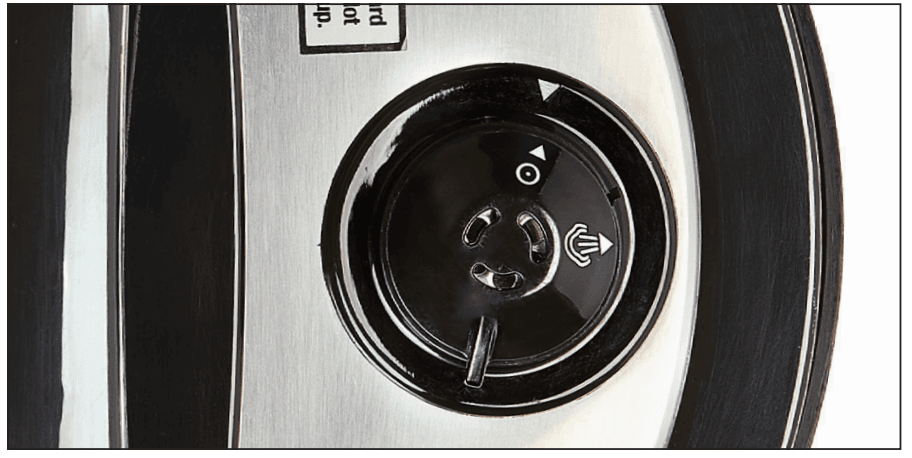
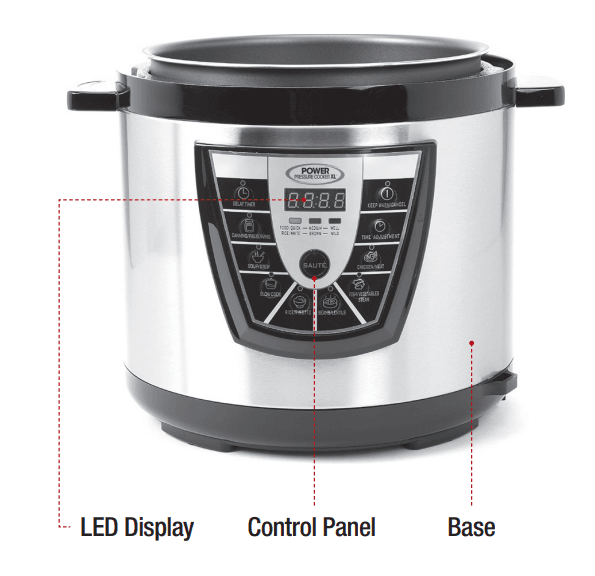
FRONT
INNER POT
Lid Underside (with Rubber Gasket)
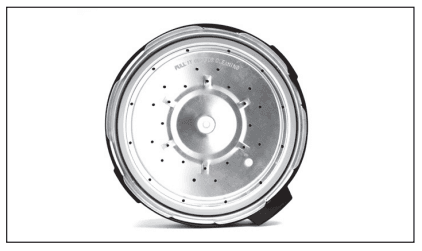
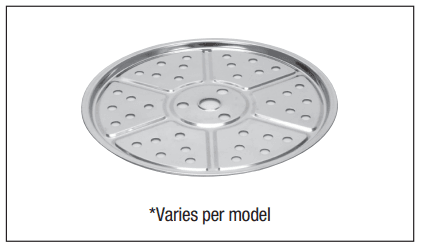
Steamer Tray*
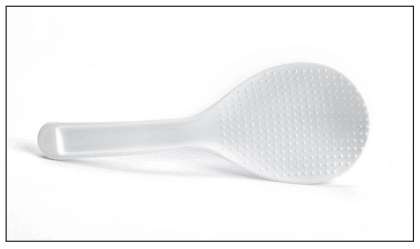
Ladle
Measuring Cup
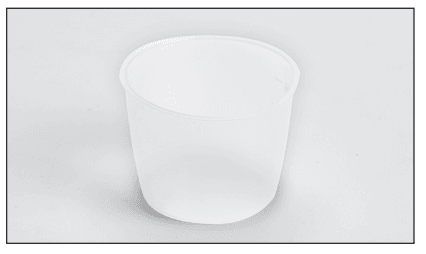
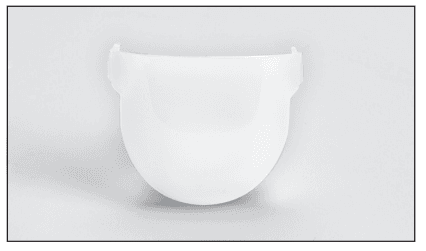
Condensation Collector
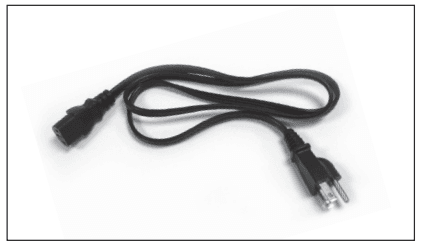
AC Cord
Your Power Pressure Cooker XL has been shipped with parts and accessories as shown above. Check everything carefully before use. If any part appears damaged, do not use this product and contact the supplier using the customer service number located in the back of this owner’s manual. For replacement parts, visit www.PowerPressureCooker.com.
Rack A*
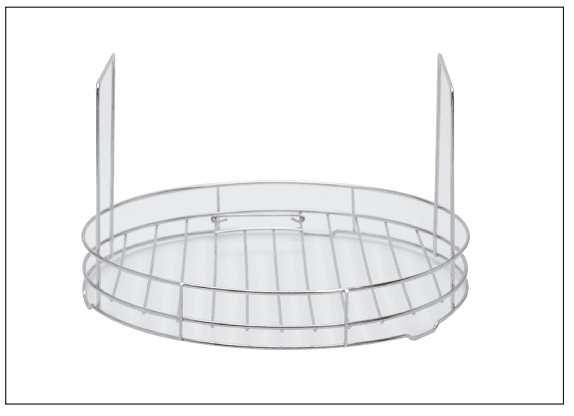
Rack B-1*

Steamer Basket*
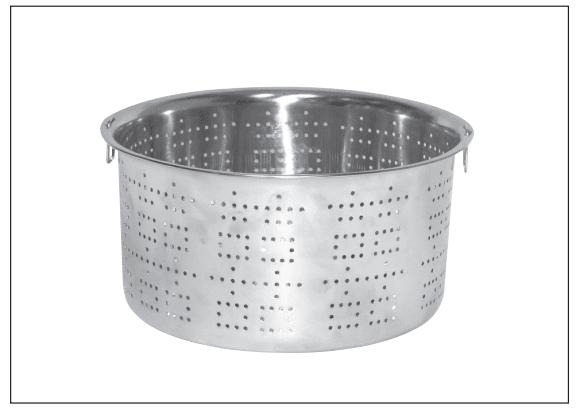
Rack B-2*

The Removable Wire Rack is comprised of 3 independent layers that can be stacked in several different configurations to achieve maximum cooking flexibility in the Power Pressure Cooker XL.
*Only included with units purchased online or by phone. The 3-Layer Wire Rack is the optimal Power Pressure Cooker accessory for poaching, steaming, or cooking different foods at one time. Each of the 3 layers can be positioned differently depending on what you’re cooking. See assembly instructions on the next page.
Three-Layer Rack Assembly (10-qt. PPC-773 model only)
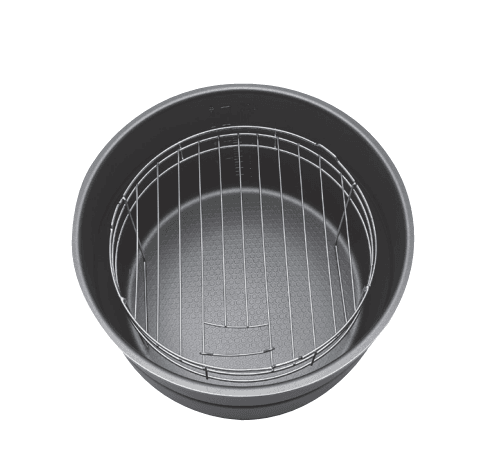 Position 1:
Creates a large, main cooking space at the bottom of the inner pot while leaving a smaller space on the top of the rack. Use when you’d like to keep a smaller amount of the food you’re cooking separate from the main dish.
- Combine ingredients for your main dish into the inner pot.
- Insert Rack A, handles pointing downward.
- Add liquid called for in recipe.
- Place smaller foods on top of Rack A to cook at the same time.
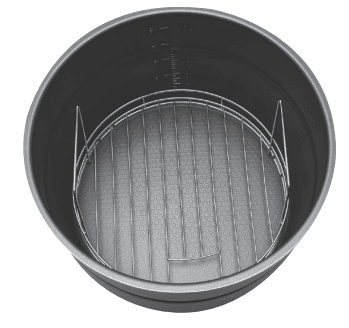
Position 2:
Use this positioning when cooking food that may fall apart easily such as roast chicken or whole dish.
- Insert Rack A into the inner pot, handles pointing upwards.
- Add liquid called for in recipe.
- Place food on Rack A and proceed with recipe.
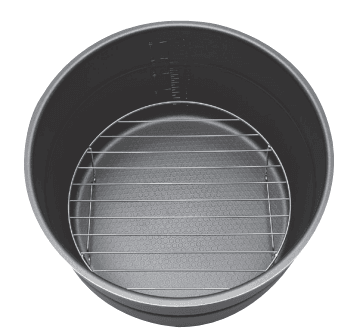
Position 3:
Use this positioning when cooking food that does not require a longer handle for removal.
- Insert Rack B-1 into the inner pot, feet-side down.
- Add liquid called for in recipe.
- Place food on Rack B-1 and proceed with recipe.
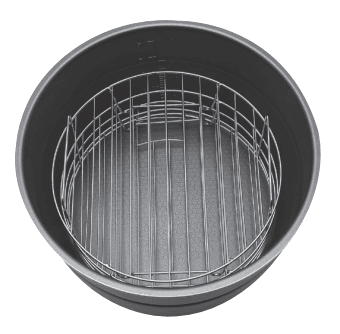
Position 4:
Creates 3 independent cooking layers within the inner pot. Use this positioning to keep foods separate while cooking at the same time.
- Insert Rack A into the inner pot, handles pointing upwards.
- Add liquid called for in recipe.
- Place food on Rack A.
- Insert Rack B-1 (feet-side down) through the handles of Rack A. You may have to re-position the movable wire on Rack A to accommodate Rack B-1.
- Place food onto Rack B-1.
- Place Rack B-2 on top of Rack B-1.
- Place food on top of Rack B-2 if desired and proceed with the recipe.
Features & Benefits
A. BUILT-IN SAFETY DEVICES
- LID SAFETY DEVICE: Prevents pressure build-up if the Lid is not closed properly.
- SPRING-LOADED SAFETY DEVICE: Should all safety features fail, a “spring-loaded” safety
pressure release device will automatically allow steam and pressure to escape around the pot
Lid, thus avoiding a dangerous situation. - BACK-UP SAFETY RELEASE VALVE: Releases built-up pressure if the temperature/pressure sensor device malfunctions.
- CLOG-RESISTANT FEATURE: Helps prevent food from blocking the steam release port.
- PRESSURE & TEMPERATURE SENSORS: Maintain even heat and pressure by automatically activating or deactivating the power supply.
- TEMPERATURE CUT-OFF DEVICE: Should the unit malfunction causing the internal temperature to rise beyond the “SAFE” limit, the device will cut off the power supply and will not automatically reset.
- MAGNETIC SENSOR FOR LID: Assures Lid is properly closed before it will pressurize.
If Lid is not on correctly, a beeping noise will occur, and “LID” will appear on the LED display,
indicating that Lid is not fully closed. NOTE: The Sauté and Slow Cooking presets do not need the Lid to be on the unit to cook. Having the Lid on while Slow Cooking is recommended to prevent splatter. Having the Lid on while using the Sauté preset is not required. The unit will not beep
or show “LID” on the LED display when using the Slow Cooking preset. The unit will beep and show “LID” on the LED display if the unit’s Lid is closed when using the Sauté preset. Always use caution when opening the Lid when the unit contains hot contents.
B. SPECIAL FEATURES
- DIGITAL DISPLAY: The Digital Display on your Power Cooker offers a wide range of choices, including sauté, low-temperature cooking, stewing, and steaming. Cooking time may be adjusted to suit any recipe or personal preference, or delayed to meet the required timetable.
- WARM MODE: At the completion of the cooking cycle, the unit will automatically shift to KEEP WARM mode. KEEP WARM mode keeps cooked food warm for up to 24 hours. NOTE: Foods kept
at KEEP WARM mode for longer than four hours may lose their flavor and texture. - STERILE ENVIRONMENT: Digital Pressure Cooking utilizes temperatures of 248° F (120° C). Traditional stovetop cooking temperatures reach 212° F (100° C). The higher cooking temperature
obtained with a pressure cooker provides a more sterile environment and faster cooking times. - RED PRESSURE INDICATOR: Indicates when the unit is safe to open. If in the “UP” position, the unit is under pressure. When the indicator drops “DOWN,” the unit is not under pressure and you may remove the Lid.
- PRESSURE RELEASE VALVE: Lowers pressure quickly and completely. WARNING: Hot steam is released from the Pressure Release Valve. Tongs or similar utensils are required to open the valve. DO NOT USE BARE HANDS to open the Pressure Release Valve.
- ONE-TOUCH TECHNOLOGY: With preprogrammed default settings, your family’s favorite homemade meals can be easily and quickly cooked to perfection in a single pot, with a single touch of a button.
Instructions for Use
A. PREPARING FOR USE
CHECK PARTS & ACCESSORIES
- Before using, remove parts and accessories from the package and be sure all parts have been
included before discarding any packaging materials. See PARTS & ACCESSORIES, p. 6. - CLEAN INSIDE LID: Remove Lid Liner from Lid by pulling metal knob. Remove the Rubber Gasket from the Lid Liner. Wash the Lid Liner, Gasket, Inner Pot, and other loose accessories with warm, soapy water. NOTE: Be sure to replace the Gasket before reinstalling the Lid Liner.
- Place the Pressure Cooker on a clean, flat surface.
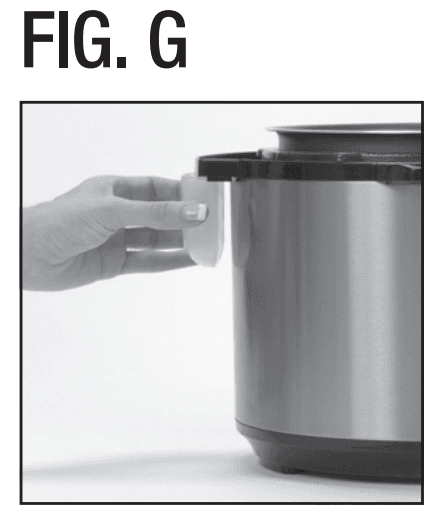
- Attach the Condensation Collector to the side of the unit (see Fig. G).
- Attach the cord plug to the Pressure Cooker first and then into a wall outlet. See the ATTACHING POWER CORD, p. 5. When the unit is first plugged in, “0000” will appear on the LED Display. The unit is automatically “ON” when plugged in.
CONDUCT TEST RUN WITH WATER ONLY
- Fill the Inner Pot with water to about 2/3 full. Never load the Inner Pot above the MAX FILL LINE.
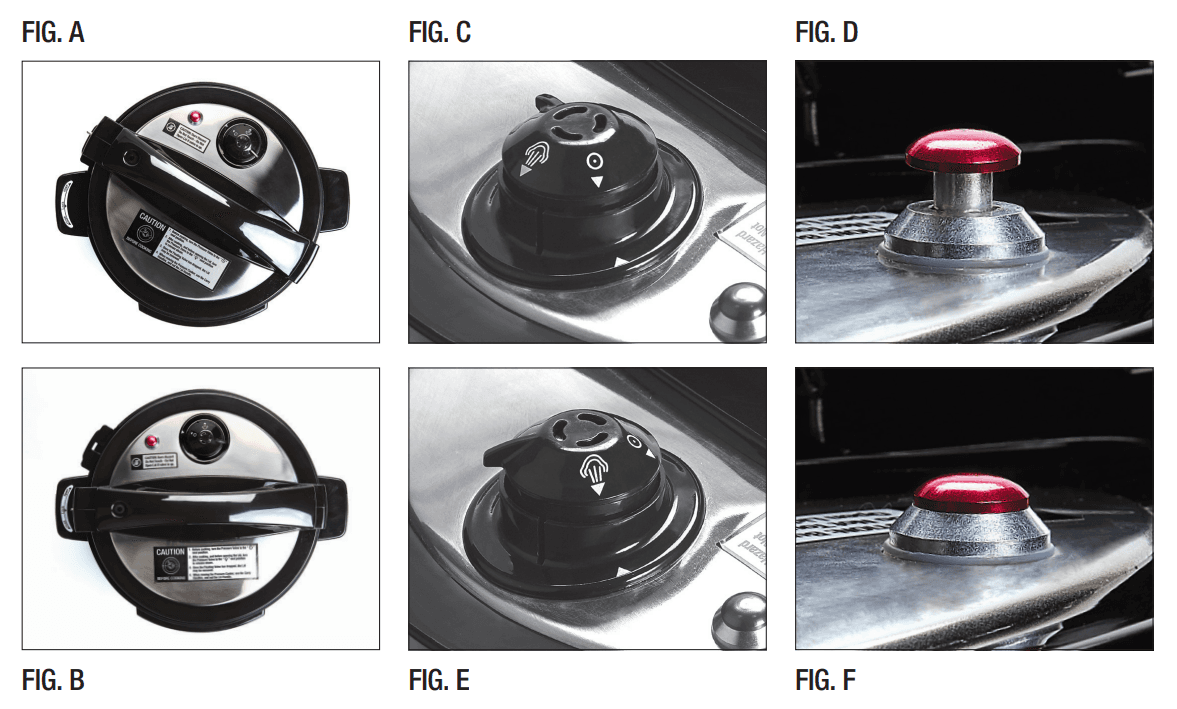
Place Inner Pot in housing. - ATTACHING LID: With LED controls facing you, place the Lid on the unit by holding a black handle. Be sure to align the Magnetic Safety Sensor to the Condensation Collector (see Fig. A). Once aligned, follow the arrows toward “CLOSE” and rotate the Lid counter-clockwise to “LOCK”
position until it “clicks” into place (see Fig. B) and a single “beep” is heard. - Magnetic Safety Sensor ensures Lid is properly closed before the unit can pressurize. If the Lid is not on correctly when starting a cycle, a beeping noise will occur and the word “LID” will appear
on the display, indicating Lid is not fully closed.
NOTE: The Sauté and Slow Cooking options will not need the lid on to cook. It’s recommended
to have the lid on while slow cooking to prevent splatter. - CLOSE PRESSURE RELEASE VALVE: Rotate the Pressure Release Valve on Lid to the “LOCK” position by aligning arrow on the side with the (“
 ”) symbol (see Fig C). The Pressure Release Valve should be in the “LOCK” position when in use. The Pressure Release Valve does not click or lock into place. It is safely secured with a loose fit.
 - Once the Lid is on properly, select the CANNING/ PRESERVING button. This button will automatically set 10 10-minute default time. Allow pressure to build in the unit. The LED display will show a “rotating effect.” This indicates that the unit is now building pressure.
- When the unit has reached full pressure, the Red Pressure Indicator on Lid will move to the “UP” position (see Fig. D). CAUTION: DO NOT ATTEMPT TO OPEN THE LID WHEN RED PRESSURE INDICATOR IS UP. DO NOT TOUCH OR PRESS THE RED PRESSURE INDICATOR DURING OPERATION. Doing so will release hot steam and may cause injury.
- SAFELY RELEASE PRESSURE: Select “KEEP WARM/CANCEL” mode. Using tongs or similar utensils, rotate the Pressure Release Valve counterclockwise from the “LOCK” to the “OPEN” position. The steam release/vent open symbol (“
 ”) on the valve should now line up with the side arrow (see Fig. E). Allow all pressure to escape from the cooker.
WARNING: NEVER USE YOUR HAND TO OPEN OR CLOSE PRESSURE RELEASE VALVE. USE TONGS OR SIMILAR UTENSILS TO OPEN THE VALVE. FOLLOW THESE SAFETY PRECAUTIONS WHEN RELEASING PRESSURE TO PREVENT SERIOUS INJURY. - OPEN LID: When all pressure has escaped the unit, the Red Pressure Indicator on the Lid will drop “DOWN”, indicating the unit is not under pressure and that it is safe to open Lid. See Fig. F. Open the lid by rotating the handle clockwise. A single “beep” will be heard. Lift lid with the handle.
WARNING: PREVENT BURNS! DO NOT TOUCH THE STAINLESS STEEL EXTERIOR. ONLY USE THE BLACK HANDLE ON THE LID TO OPEN IT. THE CONTENTS IN THE COOKER ARE HOT. ALWAYS OPEN LID AWAY FROM FACE AND BODY. - Allow the water in the Inner Pot to cool. Remove the Inner Pot and empty it. Rinse and towel dry. WARNING: DO NOT LIFT BASE TO REMOVE CONTENTS from Inner Pot. Lift the Inner Pot from base with caution when the contents are hot. The Power Pressure Cooker XL is now ready for use!
B. OPERATING INSTRUCTIONS
IMPORTANT: ANY FUNCTION CAN BE STOPPED IMMEDIATELY BY SELECTING THE “CANCEL” BUTTON.
- Place the Pressure Cooker on a clean, flat surface.
- Attach the Condensation Collector to the side of the unit.
- Attach cord plug into Pressure Cooker first and then into wall outlet. See ATTACHING POWER
CORD, p. 5. When the unit is first plugged in, “0000” will appear on the LED Display. The unit is automatically “ON” when plugged in. - Choose the desired recipe. See PRESSURE COOKING TIME CHARTS, p. 16. and refer to the recipe book for detailed directions. Add ingredients to the Inner Pot. NEVER LOAD INNER POT= ABOVE MAX FILL LINE. See IMPORTANT SAFEGUARDS, p. 4. Place the Inner Pot in housing.
- Place the Lid on the cooker using the safe guidelines provided. See ATTACHING LID in PREPARING FOR USE, p. 12.
- Rotate the Pressure Release Valve to the “CLOSE” position. See CLOSE PRESSURE RELEASE VALVE in PREPARING FOR USE, p. 12.
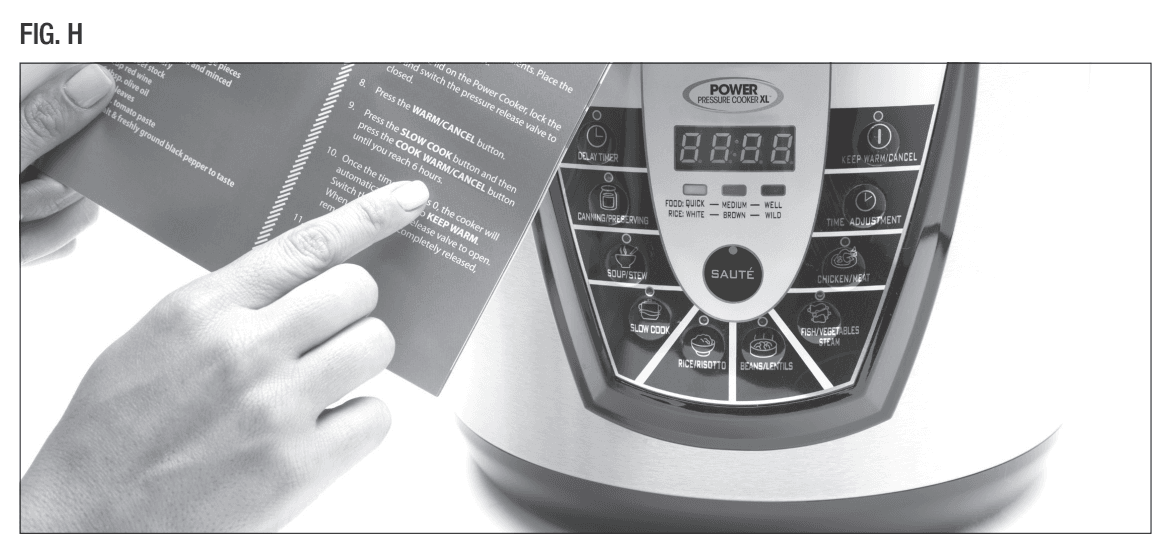
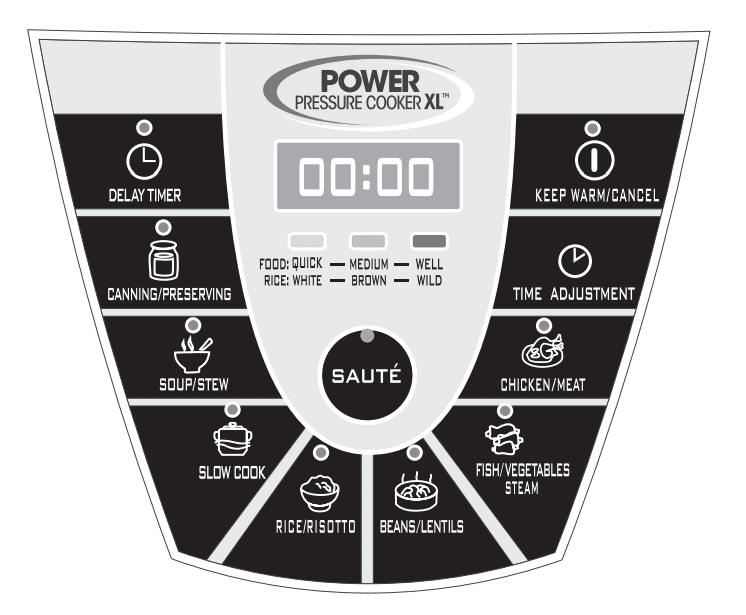
- SELECT COOKING MODE: Based on the recipe, choose from several cooking modes that can be used alone or in combination to produce an infinite variety of results (see Fig. H).
- SELECT COOK TIME: When a specific cooking mode is selected, a default time will be displayed for 5 seconds and the “QUICK” indicator, located in the center of the display, will light up. There are three pre-programmed options to choose from based on how you like your food prepared – “QUICK” being most rare, “MEDIUM” in the middle, and “WELL” being well-done. Based on your recipe and culinary preference, choose “MEDIUM” by selecting the desired cooking mode twice, “WELL” by selecting three times, – OR use “TIME ADJUSTMENT” button to override the pre-programmed times. Select the button until desired cooking time is reached.
- USE DELAY TIMER: This optional setting will allow the cooking process to start at a later
time. To use “DELAY TIMER“, select prior to choosing cooking mode. Indicate desired delay. Then, select cooking mode and cooking time (if necessary). The timer will begin countdown and the cooking cycle will start immediately following selected wait period. - Once the cooking mode (and time) is selected, a “rotating effect” will appear on the LED display
to signify that the unit is building pressure.** - When the unit is under full pressure, the Red Pressure Indicator will move to the “UP” position. DURING THIS TIME, DO NOT ATTEMPT TO MOVE THE UNIT OR OPEN THE LID.
- At the completion of the cooking cycle, the unit will “beep” and enter “KEEP WARM” mode until manually canceled by selecting “CANCEL” button. See instructions for SAFELY RELEASING PRESSURE and OPEN LID in PREPARING FOR USE, p. 13.
**NOTE: THE AMOUNT OF TIME REQUIRED FOR THE “ROTATING EFFECT” ON THE LED DISPLAY TO END, AND THE COUNTDOWN PROCESS TO BEGIN, IS DEPENDENT UPON VOLUME, CONCENTRATION, AND RATIOS OF SOLID TO LIQUID IN COOKER – GENERALLY 5 TO 40 MINUTES.
Pressure Cooking Time Charts
| Digital Display Button | Default Time | Quick-Medium-Well Default Time | Adjustable Cook Time Range | Temperature | Pressure |
| Delay Timer | N/A | N/A | 0–24 hrs. | ||
| Canning/Preserving | 10 mins. | 10-45-120 mins. | 10–120 mins. | 116° C (241° F) | 82.7 kPa (12 psi) |
| Soup/Stew | 10 mins. | 10-30-60 mins. | 10–60 mins. | 109° C (228° F) | 50 kPa (7.2 psi) |
| Slow Cook | 2 hrs. | 2-6-12 hrs. | 2–12 hrs. | 79-93° C (174-199° F) | <30 kPa (<4.3 psi) |
| Rice/Risotto | 6 mins. | 6-18-25 mins. | 6–25 mins. | 109° C (228° F) | 50 kPa (7.2 psi) |
| Beans/Lentils | 5 mins. | 5-15-30 mins. | 5–30 mins. | 109° C (228° F) | 50 kPa (7.2 psi) |
| Fish/Veg/Steam | 2 mins. | 2-4-10 mins. | 2–10 mins. | 109° C (228° F) | 50 kPa (7.2 psi) |
| Meat/Chicken | 15 mins. | 15-40-60 mins. | 15–60 mins. | 109° C (228° F) | 50 kPa (7.2 psi) |
| Sauté | 20 mins. | 20-25-30 mins. | 1–30 mins. | ||
| Keep Warm | N/A | N/A | N/A | 70° C [+/-10° C] (158° F [+/-50° F]) | N/A |
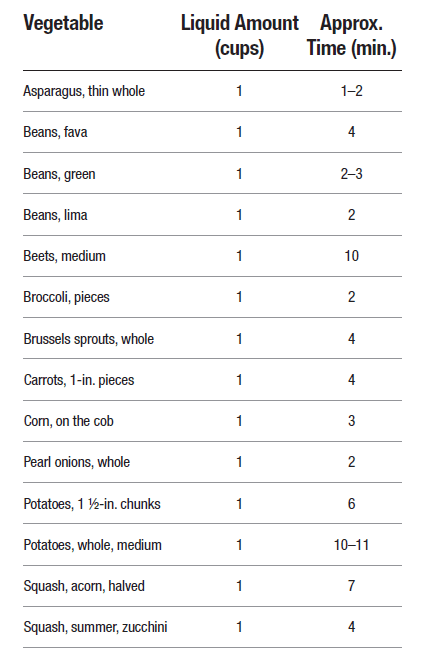
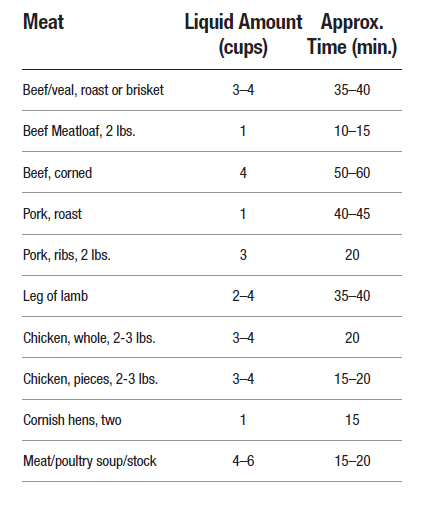
| Seafood/Fish | Liquid Amount (cups) | Approx. Time (min.) |
| Clams | 1 | 2–3 |
| Lobster, 1 1/2–2 lbs. | 1 | 2–3 |
| Shrimp | 1 | 1–2 |
| Fish, soup or stock | 1–4 | 5–6 |
NOTE: All pressure cooking modes require the addition of liquid in some form (water, stock, etc.). Unless you are familiar with the pressure cooking process, follow recipes carefully for liquid addition
suggestions. NEVER fill the Inner Pot above MAX LINE. Always use the Pressure Release Valve to lower pressure quickly.
Frequently Asked Questions
- Does the Power Pressure Cooker XL have lead in in?
No! This unit does not contain lead. - What is the material of construction?
This appliance has a stainless steel housing and an aluminum Inner Pot. - How do you assemble/disassemble the unit?
This appliance comes fully assembled with Float Valve, Pressure Release Valve, and Lid Liner.
Attach Condensation Collector before operation. Please see PREPARING FOR USE, p. 12, in this
manual. - What is the default time?
Each cooking mode has a default time that appears as soon as you select a desired program button. Before the “countdown” clock on the display begins, the unit must first reach the proper pressure and/or temperature for that mode. - How long does it take for the unit to reach full pressure and for the cook time clock to start a countdown?
When the unit is at pre-setting pressure and desired temperature, the “rotating effect” on the LED display will end, and the countdown clock will begin. This time is dependent upon volume, concentration, and ratios of solid to liquid in cooker – generally 5 to 40 minutes. - Can you change the cook time from the default setting?
Yes! You can increase the cook time two ways. Select QUICK, MEDIUM, or WELL. These are pre-programmed settings that will give a pre-determined time – OR – select TIME ADJUSTMENT mode to specifically increase cooking time to suit your needs. - Can you leave the unit on while not at home?
Yes! This unit can be left on while not at home. However, it should not be left unattended,
especially with pets or children around. In addition, review FDA guidelines for food left outside a refrigerator over a length of time. - Can you put frozen foods in unit without defrosting?
Yes! Remember to add an extra 10 minutes to cooking time when cooking frozen meals. - Can I cook with oil in the pressure cooker?
No! Do not attempt to pressure fry in a pressure cooker. Pressure cookers do not have safety measures to prevent oil fumes and fire. Pressurized oil fumes are very dangerous and can cause an explosion.
Troubleshooting
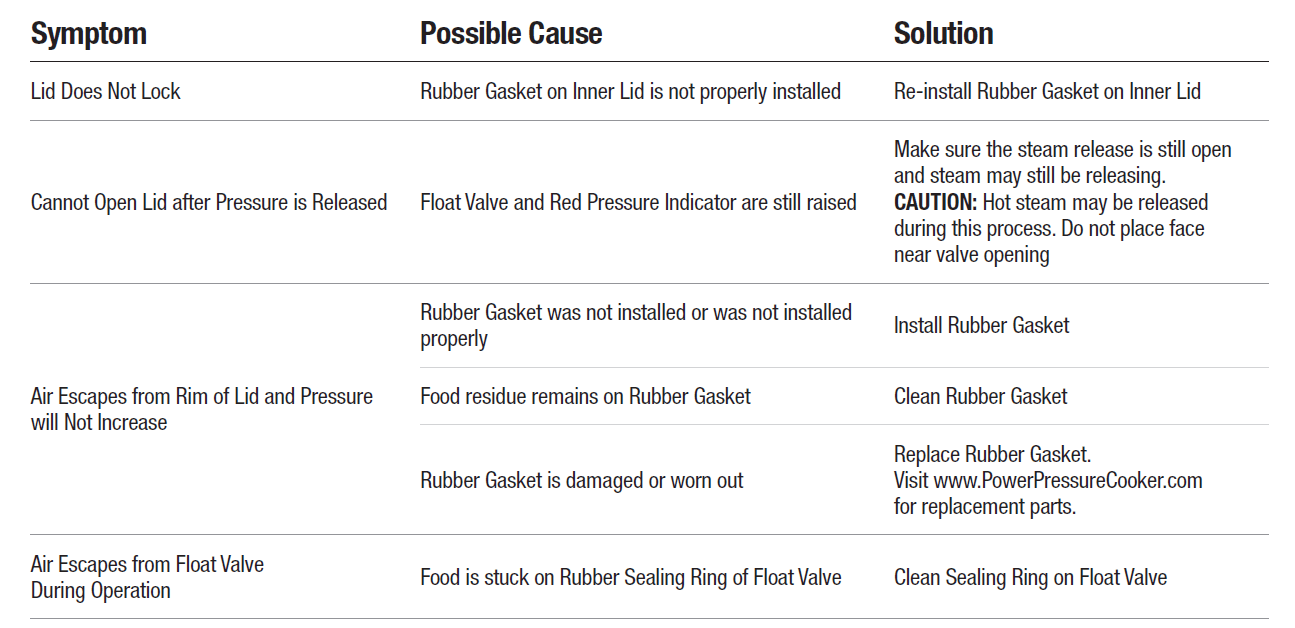
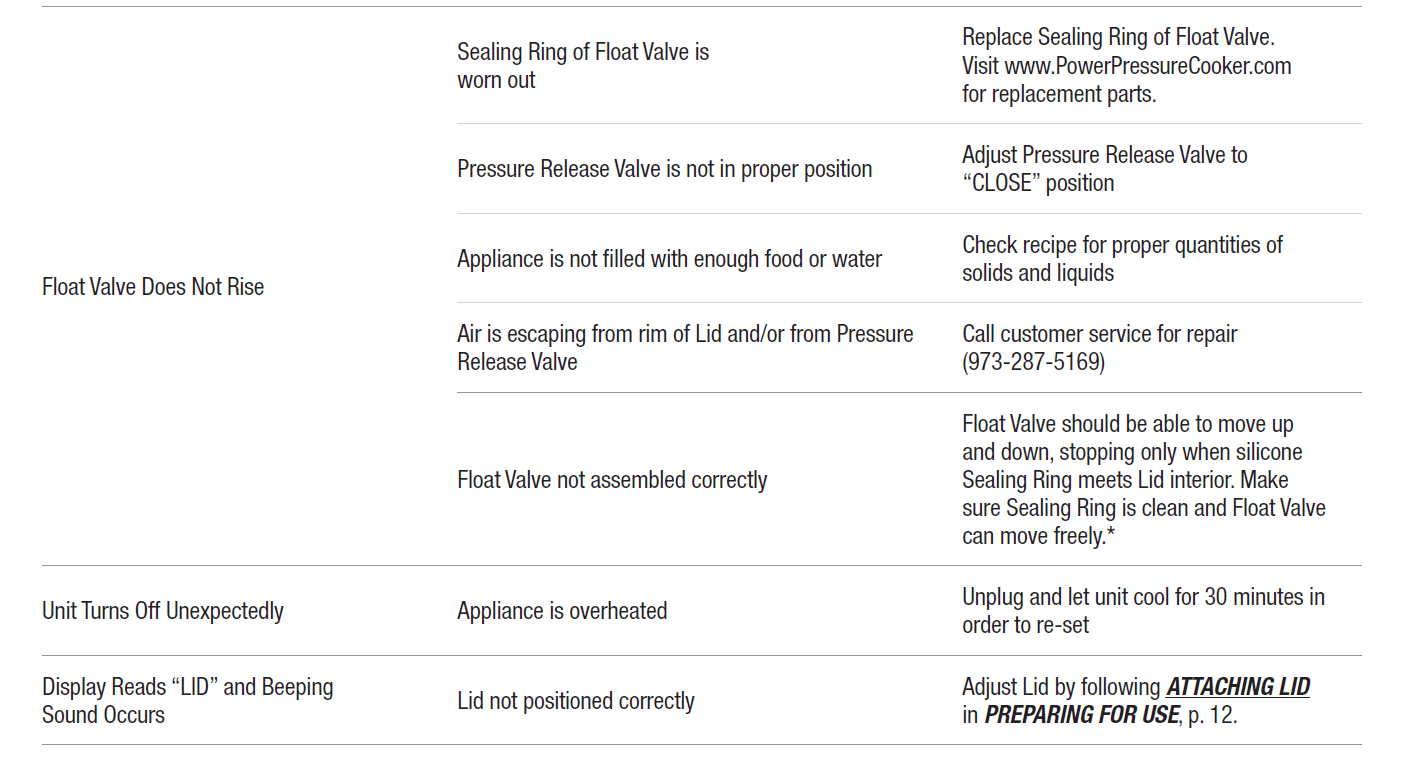
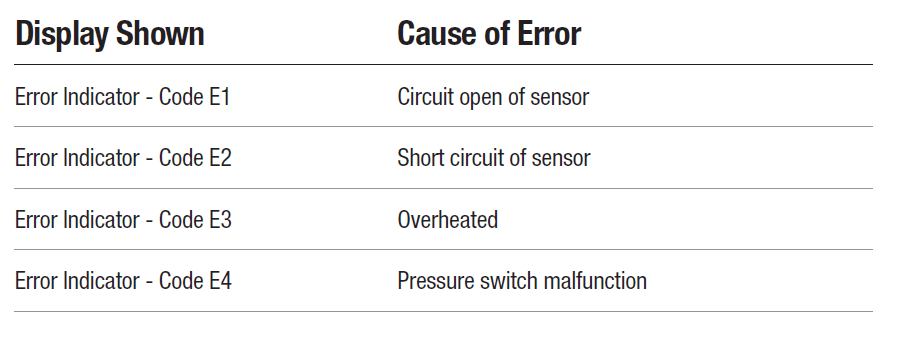
DISPLAY ERROR INDICATOR
NOTE: DO NOT USE OR ATTEMPT TO REPAIR A MALFUNCTIONING APPLIANCE. Contact customer service for further information.
Unit Specifications
| Model Number | Supply Power | Rated Power | Capacity of Inner Pot | Working Pressure | Safety Working Pressure |
| PPC771 | AC 120V 60HZ | 1000W | 6 qt. | 0–80 kPa | 80–90 kPa |
| PPC773 | AC 120V 60HZ | 1400W | 10 qt. | 0–80 kPa | 80–90 kPa |
For more Manuals about Power Pressure Cooker, visit ManualsLibraryy
Power Pressure Cooker XL-FAQs
Why was the Power Pressure Cooker XL discontinued?
The product was deemed unsafe due to reports of the lid exploding during proper use. This posed a significant hazard to users, and the product was discontinued as a result.
How do I reset my Power Pressure Cooker XL?
Unplug the cooker and leave it unplugged for 5 minutes. Plug it back in, release the pressure using the pressure release switch, and then restart the device.
What does “PO” mean on the Power Pressure Cooker XL?
“PO” stands for “Pressure On.” The number displayed afterward indicates the remaining cooking time.
What does the “E3” error code mean?
The “E3” error code signals that the cooker is overheating. To resolve this, unplug the cooker, open the lid, and let it cool down for 30-40 minutes before restarting.
What is a natural release on the Power Pressure Cooker XL?
Natural release occurs when you let the cooker release pressure on its own after the cooking cycle ends. You’ll know the process is complete when the float valve drops back into the lid with a clicking sound.
What are the capacity limits for a pressure cooker?
Most pressure cookers have a maximum safe capacity of two-thirds of their total volume. Overfilling can lead to improper functioning and safety risks.
Why might my pressure cooker stop working?
Common reasons include:
1. A dirty or damaged gasket that prevents a proper seal.
2. Overfilling the cooker, which allows steam to escape.
How do I unlock the Power Pressure Cooker XL?
Press the “KEEP WARM/CANCEL” button. Carefully rotate the pressure valve to the “OPEN” position using tongs or another kitchen tool to release the pressure. Ensure all steam has dissipated before opening the lid.

 Power Pressure Cooker XL
 IMPORTANT SAFEGUARDS