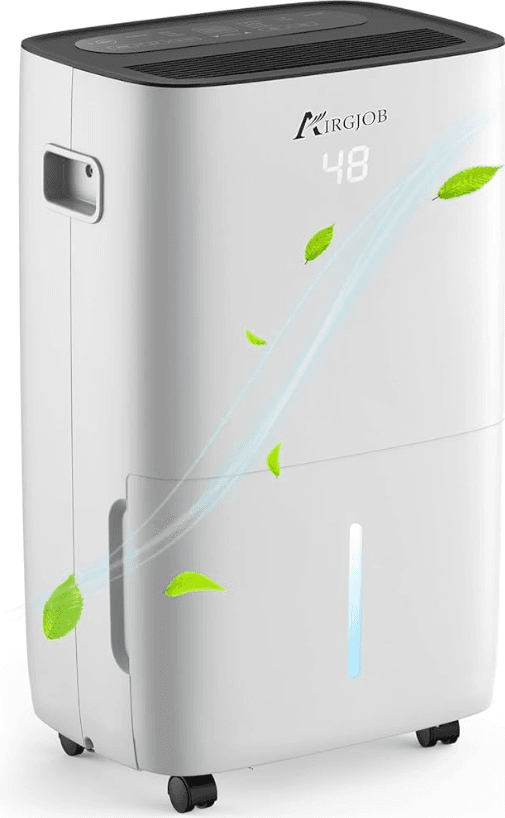
AIRGJOB D026DJ-50PT Dehumidifier
Before First Use
To prevent any internal damage, it is very important to keep refrigeration units (like this one) upright throughout their journey. Please leave it standing upright and outside the box for 12 HOURS before plugging it in.
For Customers
Thank you for choosing a AIRGJOB Dehumidifier to provide you and your family with your home comfort needs. This user manual will provide you with valuable information necessary for the proper care and maintenance of your new dehumidifier. Please take a few moments to read the instructions thoroughly and familiarize yourself with all the operational aspects of this dehumidifier.
This unit removes unwanted moisture from the air to create a more comfortable environment in your home or office. It can be conveniently moved from room to room within your home.
To Access Customer Support Faster
If there is any problem of the product, please contact AIRGJOB Customer Service at AIRGJOBSERVICE@outlook.com with your purchase order ID to help us address the problem faster.
Energy Star Rated Dehumidifier
ENERGY STAR® qualified units remove moisture with less energy than conventional dehumidifiers.
Important Notice For First Use
- DO NOT touch the dehumidifier or the electrical plug with wet hands.
- Always ensure effective grounding. Incorrect grounding may cause electric shock.
- Do NOT exceed the rating of the power outlet or connection device.
- Never use or store gasoline or other flammable vapor or liquid near this unit unless instructed by this manual.
- Disconnect the power if strange sounds, smells, or smoke come from the dehumidifier.
- Always unplug the dehumidifier before emptying the water bucket.
- You should never try to take apart or repair the dehumidifier by yourself.
- Do NOT take the water bucket out while the dehumidifier is working.
- This appliance has been manufactured for use in domestic environments and must not be used for other purposes.
- Maintain a 12-18 inch clearance space around this unit. Do not block or cover air inlet or outlet grilles.
- Never insert your finger or other foreign objects into grills or openings. Take special care to warn children of these dangers.
- If the unit is damaged or it malfunctions, do not continue to operate it. Unplug the product from the electrical outlet. Refer to the troubleshooting section and contact the customer support center.
- DO NOT cover the air inlet or outlet on the appliance as this may cause the unit to fail.
- Do NOT place flower vases or other water containers on top of the unit. Water may spill inside the unit, causing insulation failure and electrical shock or fire.
- To reduce the risk of fire or electric shock, do not use this dehumidifier with any solid-state speed control device.
- This appliance can be used by children aged 8 years and above and persons with reduced physical, sensory, or mental capabilities or lack of experience and knowledge if they have been given supervision or instruction concerning the use of the appliance in a safe way and understand the hazards involved. Children shall not play with the appliance. Cleaning and user maintenance shall not be made by children without supervision.
- Children should be supervised to ensure that they do not play with the appliance.
- Appliances that are obviously damaged must not be operated.
SAVE THESE INSTRUCTIONS/ FOR HOUSEHOLD USE ONLY
Technical Data
| Model | D026DJ-50PT |
| Dehumidifying Capacity (DOE Rating) | 50 Pints/day |
| Power Source | 115 V / 60 Hz |
| Power Input (Watts) | 545 W |
| Rated Current (Amps) | 4.8 A |
| Bucket Capacity | 16.9 Pints |
| Air Flow Volume (H/M/L) | 188/168/151 CFM |
| Noise Level | ≤53dB(A) |
| Product Weight | 40 lbs |
| Dimensions (W × D × H) | 15.4” W × 11.3” D × 24.4” H |
| Energy Star | Yes |
These specifications are for reference only. For actual data, please refer to the rating label on the back of the unit.
Features
Powerful Dehumidifying Capability
Taking advantage of refrigeration technology, the dehumidifier powerfully removes moisture from the air to decrease the humidity level of the room and keep the indoor air dry and comfortable.
Unique Portable Design
The dehumidifier is built to be compact and lightweight. The casters on the bottom of the
unit make it easy to move from room to room.
Customized Mode
Allows you to set specific dehumidity percentage and operation mode for most frequently-using rooms in which you are using your dehumidifier (Sleeping Area—55%, Living Area—50% or Basement—45%).
Digital Mirage Display
Easily monitor humidity changes from across the room.
Adjustable dehumidification
Different dehumidification levels can be selected according to different room requirements.
Save Money
This dehumidifier is Energy-Star rated, and could quickly remove moisture from the air without running up your utility bill. Energy Star units not only save energy for the environment, but also cost 30% less to save your money comparing to non-Energy Star units.
Automatic Defrost
When frost builds up on the evaporator coils, the compressor will cycle off and the fan will continue to run until the frost disappears. When the coils are completely defrosted, the compressor or fan (depending on the model) will automatically restart and dehumidification will resume.
These specifications are for reference only. For actual data, please refer to the rating label on the back of the unit.
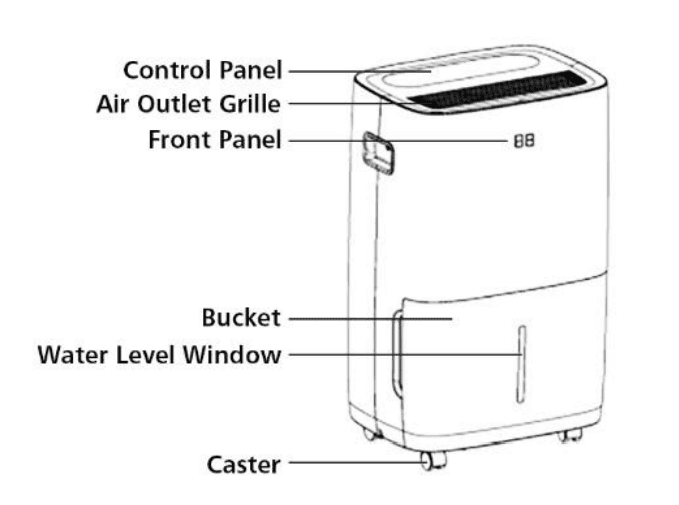
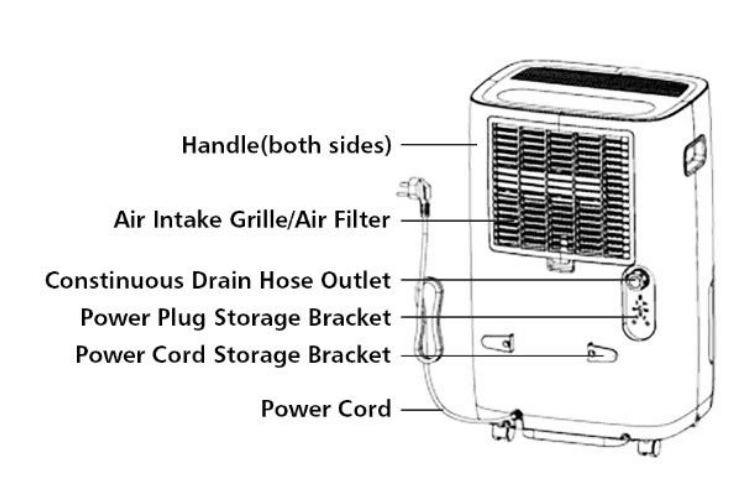
Product Program
Front
Rear
Operating Instructions
 POWER
POWER- MIRAGE
- FILTER
- FAN SPEED
- MODE
- TIMER
POWER Button
Press to turn the dehumidifier on and off.
FILTER Button
When the Filter Alert Light is ON, it is time to clean the filter. Switch the unit OFF and carefully remove the filter from the unit and clean. Replace the filter and switch ON the unit.
FAN SPEED
Press to cycle through High, Medium, or Low fan modes. Higher fan speeds lead to increased moisture removal. When humidity has been reduced or quiet operation is preferred, set the fan to Medium or Low.
HUMIDITY Button
When the unit is switched ON, the Display Screen shows the current humidity percentage. Press ▲ or ▼ select your preferred humidity level. The humidity is adjusted in increments of 5% by pressing ▲ or ▼. The adjustable Relative Humidity (RH) range is between 35% RH to 80% RH. If you want the dehumidifier to operate continuously regardless of the room humidity, press the MODE button until you see “CO” on the digital display. This will enable continuous operation and the “Continuous” indicator will light up on the control panel.
MODE Button
Preset humidity level settings allow the user to easily move the dehumidifier room-to-room and select the corresponding mode for the location in which the dehumidifier is operating for optimum performance. Press the MODE button to choose from Sleeping Area (55%), Living Area (50%) or Basement (45%).
TIMER Button
- Timer Auto On – To program the unit to automatically turn on, press the TIMER button when the unit is off. Press ▲or to increase or decrease the timer in 30 min increments (0.5 hours) up to 10 hours. After 10 hours, each press of the ▲or ▼ buttons will increase the timer in 1 hour increments up to 24 hours. Once the desired time is reached, the unit will automatically turn on.
- Timer Auto Shut-Off – To program the unit to automatically turn off, press the TIMER button when the unit is on. Each press of the ▲ or ▼ buttons will change the timer setting in 30 min increments (0.5 hours) up to 10 hours. After 10 hours, each press of the ▲ or ▼ buttons will increase or decrease the timer in 1 hour increments up to 24 hours. Once the desired time is over, the unit will automatically power off.
- Child-Lock Mode – To lock the control panel, press and hold the TIMER button for 3 seconds. Locking the control panel prevents someone from accidentally changing the settings. When locked, the LOCK indicator will light up. Press and hold the TIMER button for 3 seconds to unlock the control panel.
MIRAGE Button
Backlist display on the front of the dehumidifier that shows the actual humidity level in the room to be easily seen from across the room. Press the MIRAGE button to turn the Mirage Display on and once again to turn the Mirage Display off.
Draining the Connected Water
When the drainage tank is full, the tank full indicator light will turn on, the operation will stop automatically and the buzzer will beep 3 times to alert the user, that the water need to be emptied from the drainage tank. And there are two ways to remove connected water.
Use the Bucket
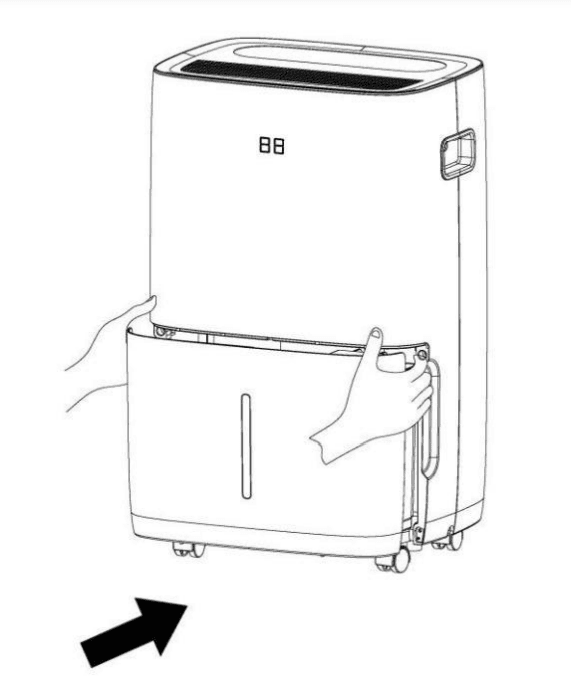
- Lightly press on the sides of the tank with both hands and pull the tank out gently.
- Discard the collected water.
 NOTE
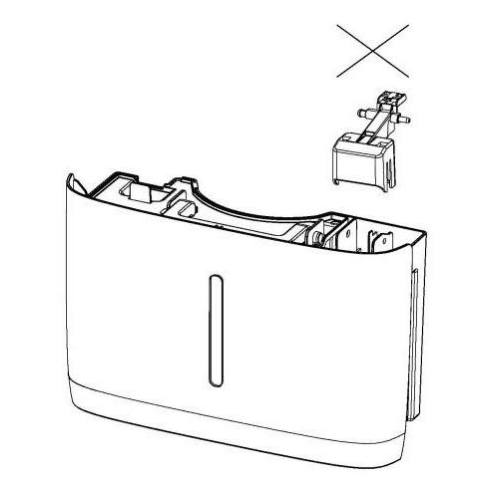
NOTE- Do not remove the float from the water tank. The water full sensor will no longer be able to detect the water level correctly without the float and water may leak from the water tank.

- If the drainage tank is dirty, wash it with cold or lukewarm water. Do not use detergent, scouring pads, chemically treated dust cloths, gasoline, benzene, thinner, or other solvents, as these can scratch and damage the tank and cause water leakage.
- When replacing the drainage tank, press the tank firmly into place with both hands. If the tank is not positioned properly, the “TANK FULL” sensor will be activated, and the dehumidifier will not operate.

- Do not remove the float from the water tank. The water full sensor will no longer be able to detect the water level correctly without the float and water may leak from the water tank.
Continuous Draining
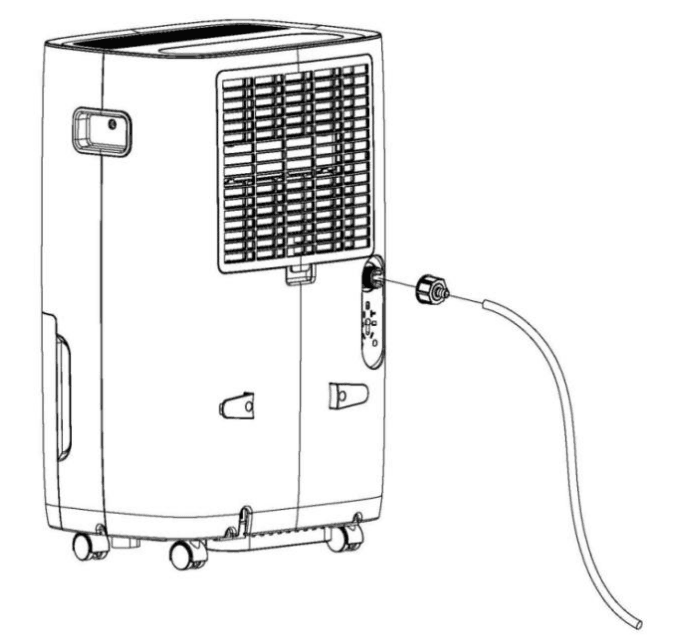
Water can be automatically emptied by attaching a garden hose to the continuous drainage port on the back of the dehumidifier. This will allow the unit to run continuously (depending on the selected humidity level) without having to empty the water bucket. To drain, simply attach a standard garden hose. The thread standard for garden hoses in the US and its territories is known as GHT or “garden hose thread” which has an outer diameter of 1 1/16 inches (1.0625 inches or 27.0 mm) and a pitch of 11.5 TPI.
- Place the dehumidifier on a level surface.
- Unscrew the cap on the back of the unit to access the garden hose nozzle.
- Thread a garden hose (not included) onto the accessible nozzle, leading to a floor drain, and cut to length.
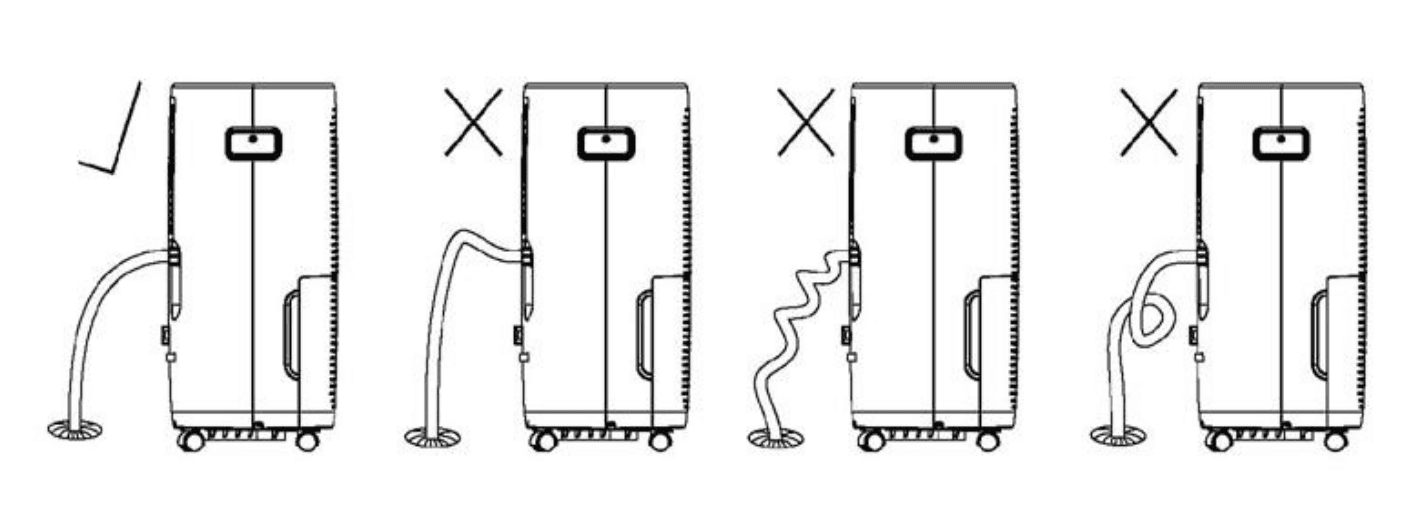
- Make sure that there are no kinks or knots in the garden hose (See picture below).
- Turn on the unit and press the MODE button until it is set to CONTINUOUS.

Garden Hose Installation Reference Guide
Note
- Make sure the connection is tight and there is no leaking.
- Lead the water hose to the floor drain or a suitable drainage facility. The drainage facility should be lower than the drain outlet of the dehumidifier.
- Be sure to run the water hose sloping downward to let the water flow out smoothly.
- When the continuous drain feature is not being used, remove the drain hose from the outlet.
Care & Clean
WARNING: Always switch OFF the dehumidifier and unplug it from the electrical outlet before attempting any cleaning or maintenance of this product.
- Clean the Grill and Case
Use water and a mild detergent. Do not use bleach or abrasives. - Clean the bucket
Every few weeks, clean the bucket thoroughly to prevent growth of mold, mildew and bacteria. Partially fill the bucket with clean water and mild detergent. Swish it around in the bucket, empty and rinse. - Clean the air filter
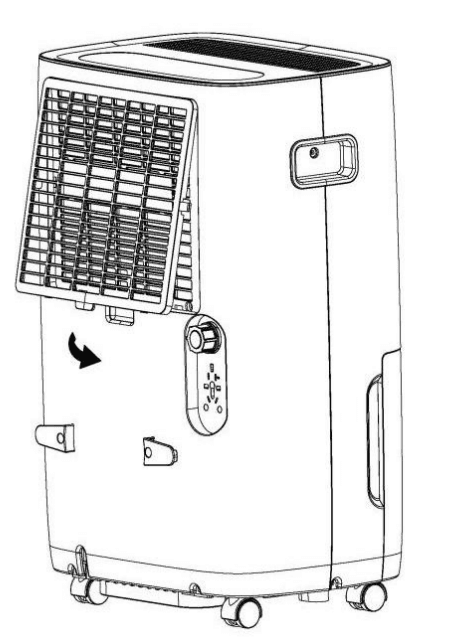
To remove the filter, pull filter outwards. Wash the filter with clean water then dry.
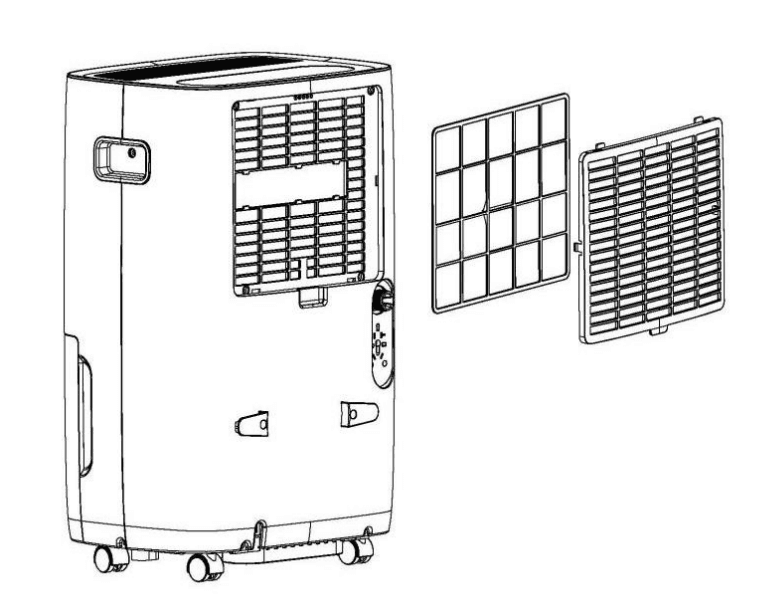
Attach the air filter
Insert the filter into the grill smoothly.
Storing the Dehumidifier
When the unit is not being used for a long period of time and you want to store it note the following steps:
- Empty any water left in the drainage tank.
- Fold up the power supply cord and put it in the water tank.
- Clean the air filter.
- Discard in a cool and dry place.
Clearance
Maintain the minimum clearance around the dehumidifier when the unit is operating as shown in the left drawing.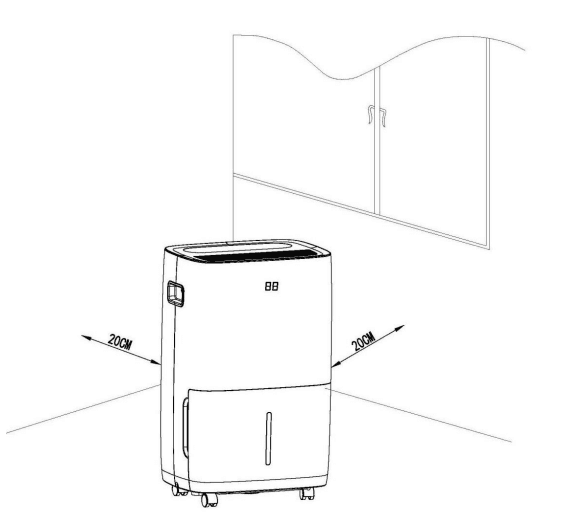
Troubleshooting
If a condition listed below occurs, please check the following items before calling customer service.
| Problem | Solutions |
Dehumidifier does not start | Make sure the dehumidifier’s plug is pushed completely into the outlet. |
| Check the house fuse / circuit breaker box and replace fuse or reset breaker. | |
| Dehumidifier has reached its preset level or bucket is full. | |
| Water bucket is not in the proper position | |
| There is a protective time delay (up to 3 min.) to prevent trip ping of the compressor overload. For this reason, the unit may not start normal dehumidification for 3 min. after it is powered back on. | |
Dehumidifier does not dry the air as it should | Not enough time to remove the moisture. |
| Make sure there are no curtains, blinds, or furniture blocking the front or back of the dehumidifier. | |
| The humidity control may not be set low enough. | |
| Check that all doors, windows and other openings are securely closed. | |
| Room temperature is too low, below 5°C (41°F). | |
| There is a water vapor source in the room. | |
The unit makes a loud noise when operating | Air filter may be dirty. Clean filter. Refer to Care and Cleaning section. |
| The unit is tilted instead of upright as it should be. | |
| The floor surface is not level. | |
| Frost appears on the coils | This is normal. The dehumidifier has Auto defrost feature. |
Water on floor | Hose to connector or hose connection may be loose. |
| Intended to use the bucket to collect water, but the back drain plug is removed. | |
| Pump Mode is on, but water is draining in bucket | Make sure that the included plastic drain tube and nozzle adapter are tightly installed. |
| Continuous Mode is on, but water is draining in bucket | Garden hose must be used while operating Continuous Mode. |
Self-diagnosing Codes
| CODE | POSSIBLE CAUSE | Resolution |
| E1 | Compressor Overheat Protection | Please contact AIRGSERVICE@outlook.com |
| E2 | Condenser Overheat Protection | Please contact AIRGSERVICE@outlook.com |
| EH | Humidity Sensor Malfunction | Please contact AIRGSERVICE@outlook.com |
For more manuals about AIRGJOB, visit ManualsLibraryy
AIRGJOB D026DJ-50PT Dehumidifier-FAQs
How do I reset the Midea dehumidifier after cleaning the filter?
To reset the dehumidifier, press the Filter button after cleaning the filter. The filter light will turn off, and the 250-hour counter will reset. Note: When using the comfort dehumidifying function, the humidity level cannot be manually selected.
How do I activate the pump mode on my Midea dehumidifier?
To activate pump mode, ensure the bucket is in place. Press and hold the Up and Down buttons simultaneously for 3 seconds. This will enable the pump mode on supported models.
How do I turn on and set the Midea dehumidifier?
Press the Power button to turn the dehumidifier on or off. Use the Up/Down buttons to adjust the desired humidity level (35% to 85%). The LED display will show the set level or the room’s actual humidity, ranging from 30% to 90% RH.
How can I reset my dehumidifier if it’s not functioning properly?
If your dehumidifier isn’t working, unplug it for 3 minutes to reset it. After plugging it back in, set the device to the lowest humidity setting or continuous mode and check its operation.
How do I change the humidity settings on my dehumidifier?
Locate the Humidity Control buttons or dial, often labeled “Humidity Level” or “Dryness Setting.” Adjust the settings to your desired humidity level using these controls.
How do I turn on my Midea air conditioner?
Press the ON/OFF button to start the unit. Adjust the fan speed by pressing the FAN button and selecting AUTO, LOW, MED, or HIGH.
How can I troubleshoot my dehumidifier if it’s not working?
1. Check if the circuit breaker or fuse serving the unit is operational.
2. Ensure the dehumidifier controls are in the ON position.
3. Verify the humidistat is set between 50% and 60% relative humidity.
If the problem persists, consult a qualified HVAC technician.
How can I tell if my dehumidifier is full?
Most dehumidifiers have an auto-shutoff feature that turns the unit off when the collection tank is full or when the set humidity level is achieved.
What’s the best time to run my dehumidifier to save energy?
Run your dehumidifier during off-peak energy hours, typically between 10 PM and 7 AM, to reduce electricity costs. Confirm specific off-peak times with your energy provider.

 POWER
POWER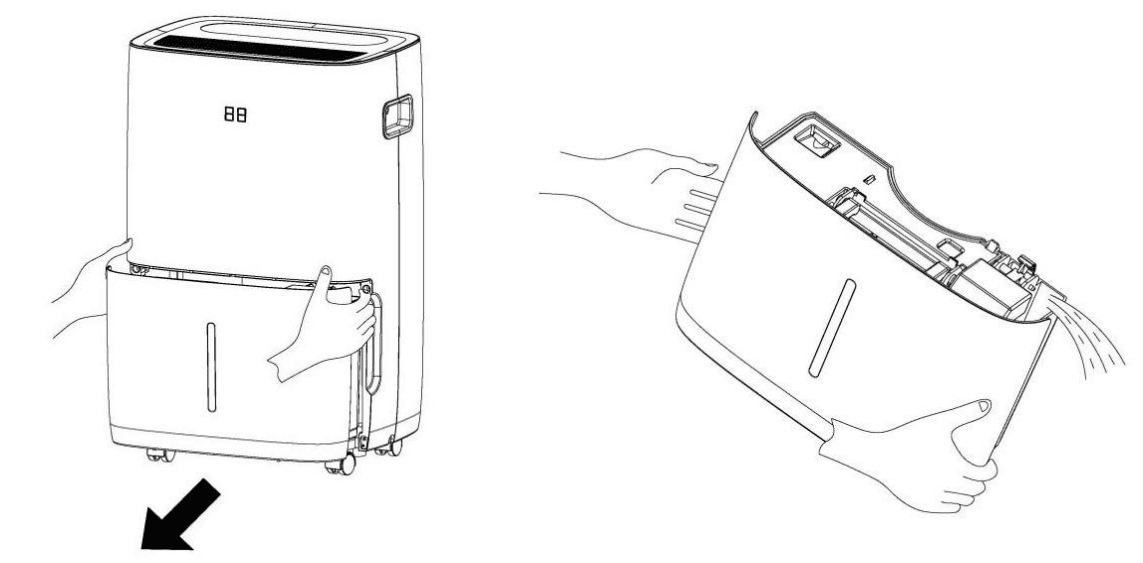 NOTE
NOTE