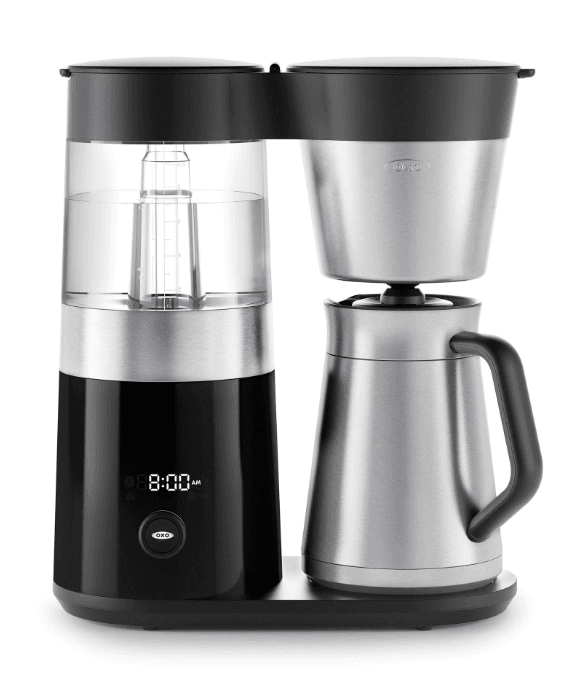
OXO Brew 9 Cup Stainless Steel Coffee Maker

IMPORTANT SAFEGUARDS
Read all instructions.
When using electrical appliances, basic safety precautions should always be followed to reduce the risk of fire, electric shock, and/or injury to persons, including the following:
- Read all instructions. Use this product only as described in this manual.
- Keep the packaging material (cardboard, plastic, etc.) out of the reach of children (danger of asphyxiation or injury).
- Do not touch hot surfaces. Use handles or knobs. Burns can occur from touching hot parts or from spilled hot liquid.
- To protect against fire, electric shock, and injury to persons, do not immerse the cord, plugs, or Coffee Maker in water or other liquid.
- Close supervision is necessary when any appliance is used by or near children.
- The use of accessory attachments not recommended by OXO may result in fire, electric shock, or injury to persons.
- To prevent scalding, do not open the brew basket lid, attempt to dislodge a potential clog, or otherwise touch the brew basket area until the Coffee Maker has sufficiently cooled. Scalding may occur if the lid is removed during brewing cycles. The Coffee Maker must be operated on a flat surface away from the edge of the counter to prevent accidental tipping.
- Use only the carafe provided with the Coffee Maker to collect brewed coffee.
- Do not place on or near a hot gas or electric burner, or in a heated oven.
- Always attach the plug to the appliance first, then
- . To disconnect, turn any controls to the off position, then remove the plug from the wall outlet.
- The coffee carafe is designed for use with this appliance. It must never be used on a range top or in a microwave oven.
- Do not put any substances other than water, descaling products, or coffee grounds into the Coffee Maker. Do not use the Coffee Maker to cook or prepare other liquids or foods.
- Do not use the appliance without the lid properly placed on the carafe.
- Do not touch internal parts while the Coffee Maker is brewing.
- Do not let the cord hang over the edge of the table or counter, or touch hot surfaces.
- Do not rotate or remove the carafe or brew basket while brewing coffee.
- Unplug the Coffee Maker from the outlet when not in use and before cleaning. Allow to cool before putting on or taking off parts and before cleaning the appliance.
- This appliance is intended for household use only. Do not use the appliance for anything other than its intended use. Do not use outdoors.
- Do not operate any appliance with a damaged cord or plug, or after the appliance malfunctions or is dropped or is damaged in any manner. Contact OXO Customer Service at (800) 545-4411. Do not return to the store.
WARNING! To reduce the risk of fire or electric shock, do not remove the bottom cover. Doing so will void the warranty. No user serviceable parts are inside. Repair should be done by authorized service personnel only.
WARNING! Shock Hazard:
This appliance has a polarized plug (one wide blade) that reduces the risk of electric shock. The plug fits only one way into a polarized outlet. Do not defeat the safety purpose of the plug by modifying the plug in any way or using an adapter. If the plug does not fit, reverse the Plug. If it still does not fit, have an electrician replace the outlet. Do not plug this appliance into an outlet with a voltage other than specified on the bottom of this appliance. - CAUTION: To avoid a hazard due to inadvertent resetting of the THERMAL CUTOUT, this appliance must not be supplied through an external switching device, such as a timer, or connected to a circuit that is regularly switched on and off by the utility.
- We selected a short cord for this Coffee Maker to reduce the hazards of becoming tangled in, or tripping over a longer cord. If you need to use a longer cord, an approved extension cord may be used. The electrical rating of the extension cord must be equal to or greater than the rating of the Coffee Maker. Make sure the extension cord is arranged so that it cannot be pulled by children or tripped over.
- To avoid an electrical circuit overload, do not use any high-wattage appliance on the same circuit as this appliance. This Coffee Maker is not intended for use by children, persons with reduced physical, sensory, or mental capabilities, or lack of experience and knowledge, unless they have received supervision or instruction concerning use of the appliance by a person responsible for their safety.
- If the supply cord is damaged, it must be replaced by the manufacturer, its service agent, or similarly qualified persons in order to avoid a hazard.
SAVE THESE INSTRUCTIONS
Our Guarantee
TWO-YEAR Warranty:
Your OXO Brew appliance is guaranteed by OXO for two years from the date of purchase in the case of any manufacturing defects in materials or workmanship. This OXO warranty is only offered on OXO Brew appliances sold new and used in the US and Canada. The OXO warranty covers all costs related to restoring the proven defective product through the repair or replacement of any defective part and necessary labor so that it conforms to its original specifications. A replacement product may be provided instead of repairing a defective product. OXO’s exclusive obligation under this warranty is limited to such repair or replacement. A receipt indicating the purchase date is required for any claims, so please keep it in a safe place. We recommend that you register your product on our website, www.oxo.com/registration.aspx. Although greatly appreciated, the product registration is not required to activate any warranty, and product registration does not eliminate the need for the original proof of purchase. The warranty does not cover damages resulting from misuse or abuse of the product and/or uses inconsistent with this Instruction Manual, attempts at repair, theft, use with unauthorized attachment,s or failure to follow the instructions provided with the product. The warranty becomes void if attempts at repair are made by non-authorized third parties and/or if spare parts, other than those provided by OXO, are used. You may also arrange for service after the warranty expires at an added cost. For questions, returns, repairs or warranty claims within the U.S., please visit www.oxo.com or contact OXO Customer Service at (800) 545-4411. We will be glad to assist you. For customer service, claims, or questions on sales in Canada, OXO Customer Service will gladly put you in touch with the appropriate individuals. This warranty gives you specific legal rights, and you may have other legal rights which vary from state to state, country to country, or province to province. The customer may assert any such rights at their sole discretion.
CONTACT INFO:
If you have any trouble with the product during the warranty period, do not attempt to return it to a retail store. Instead, please visit us online at www.oxo.com or contact us here:
- OXO U.S. Customer Service
- Hours: Monday–Friday, 8:00 am – 5:00 pm (ET)
- Phone: (800) 545-4411
- Mail: OXO International, Inc. 1331 S Seventh St., Building 1, Chambersburg, PA 17201-9912
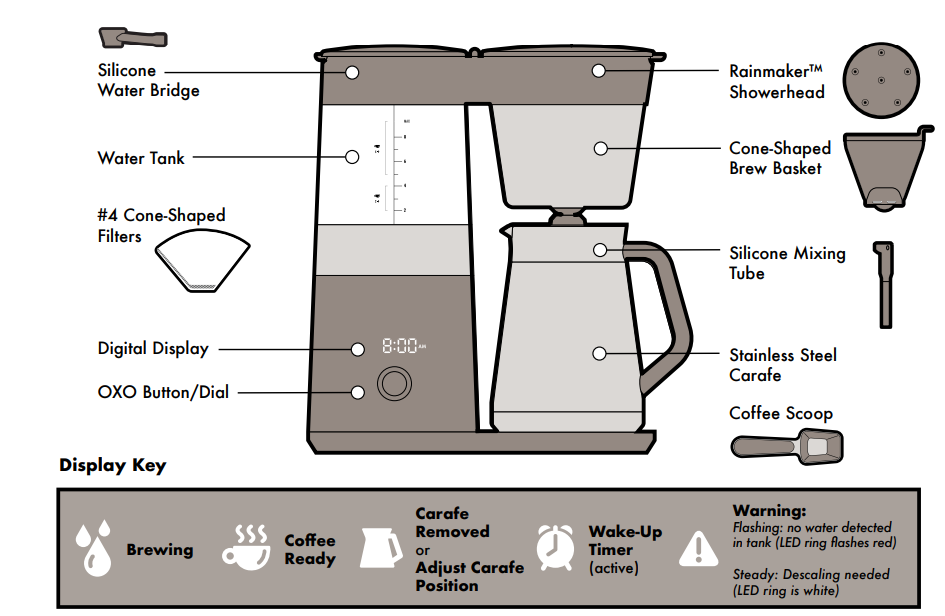
Meet Your Coffee Maker

Before You Begin
- Remove all packaging
- Clean and wash all parts
- Install a silicone mixing tube

- Plug in the coffee maker
- Turn the dial and press the OXO button to set the clock
- Run water-only 5–9 cup brew cycle (Fill tank to MAX fill line)
A Note About Water
Your Coffee Maker uses all of the water in the tank every time you brew. Add only as much water as you need for your pot of coffee. When brewing coffee, select the correct cup range (2–4 or 5–9). This automatically adjusts brewing time for optimal extraction. For best results, always use filtered water. Using distilled water is not recommended.
Water/Coffee Ratio

Brewing
- Add Water to the Water Tank
Only fill to the number of cups desired; your Coffee Maker will use all of the water you put in the tank for every brew cycle. Always fill between the 2 cup and MAX fill lines. - Snap in Brew Basket
Use a #4 cone-shaped paper filter and medium-ground coffee. Do not open the brew basket lid during brew cycle.
Note: A small, harmless amount of steam may collect in the water tank after brewing. Leave the water tank lid open after brewing to help reduce the collection of steam.
- Brew Coffee

Additional Features
Wake-Up Timer
- Fill Water
Fill the Coffee Maker with the desired amounts of coffee and water, and make sure the empty carafe is in place.
Note: The brew cycle will be canceled if there is no water in the tank or if the carafe is not in place below the brew basket at the set brew time. - Set Wake-Up Timer
 The
The icon will remain lit while the timer is set.
 - To Check
To check your wake-up time, press the OXO button. - To Cancel
To cancel the Wake-Up Timer, hold down the OXO button until icon disappears.
Note: You cannot brew coffee while the Wake-Up Timer is set. To brew before the programmed time, cancel the Wake- Up Timer and start a cycle. After brewing, set the Wake-Up Timer again.
Pause & Pour
With the Pause & Pour feature, you can pour a cup any time—no need to wait for the brew cycle to complete. The cycle automatically pauses for up to 60 seconds when you remove the carafe during the brew cycle. Just replace the carafe to continue brewing. The brew cycle is automatically canceled if the carafe is not replaced within 60 seconds.
Note: You may see residual drops of coffee on the base when you remove the carafe.
Silicone Mixing Tube
The silicone mixing tube blends the coffee while it brews, so each sip is equally delicious.
Freshness Timer
The Freshness Timer will begin once the brew cycle is complete. The icon will appear and count up to 60 minutes to show time elapsed since brewing is completed. To cancel Freshness Timer, press the OXO button once.
Note: For the best taste, OXO recommends drinking coffee within one hour of brewing.
For a Better Cup
Adjust the grind size to your preference. If the grounds are too coarse, they may produce weak coffee. If the grounds are too fine, they may produce bitter coffee. Store coffee beans in tinted, airtight containers.
Everyday Cleaning
Always unplug your Coffee Maker before cleaning it. Any service or maintenance other than cleaning or descaling should be performed by an authorized service representative. For more information, call OXO Customer Service at (800) 545-4411.
WARNINGS:
- Never immerse the Coffee Maker power cord or plug in water. Do not allow liquid to come in contact with the power cord or plug. Doing so can result in electrical shock or death.
- To prevent damage to the appliance when cleaning, do not use alkaline cleaning agents, abrasive pads, harsh chemicals, or spray cleaner chemicals when cleaning.
Regular cleaning
Clean the exterior regularly with a damp cloth and wipe dry. If desired, clean once in a while with a soft cloth and mild detergent.
Stain Removal
Remove coffee oil stains in the carafe by soaking overnight with a small amount of dishwasher detergent and water.

Descaling
![]() icon will display after every 90 cycles as a helpful reminder to descale.1 You may also descale manually any time.
icon will display after every 90 cycles as a helpful reminder to descale.1 You may also descale manually any time.
To descale while icon is lit:
- Fill the Water Tank
Add descaling solution and water to the tank up to the MAX fill line. Do not fill past the MAX fill line. Make sure empty carafe is in place with lid fully screwed on. - Turn right until
 icon appears and the LED ring turns red.
 - Press the OXO button to start
The icon will appear.
To descale manually:
- Fill the Water Tank
Add descaling solution and water to the tank up to the MAX fill line.2 The mixture should not exceed the MAX fill line. Do not overfill. Make sure the empty carafe is in place with lid fully screwed on. - Unplug your Coffee Maker
Hold the OXO button and plug in at the same time. icon displays and the LED ring turn red.
 - Press the OXO button to start
The icon will appear.
After descaling:
Fill the water tank to “MAX” and run a 5–9 cup brew cycle with water only. Discard water before next use.
Note: Your Coffee Maker will not work properly if it is not descaled regularly. The warranty is voided if descaling is not carried out under these instructions.
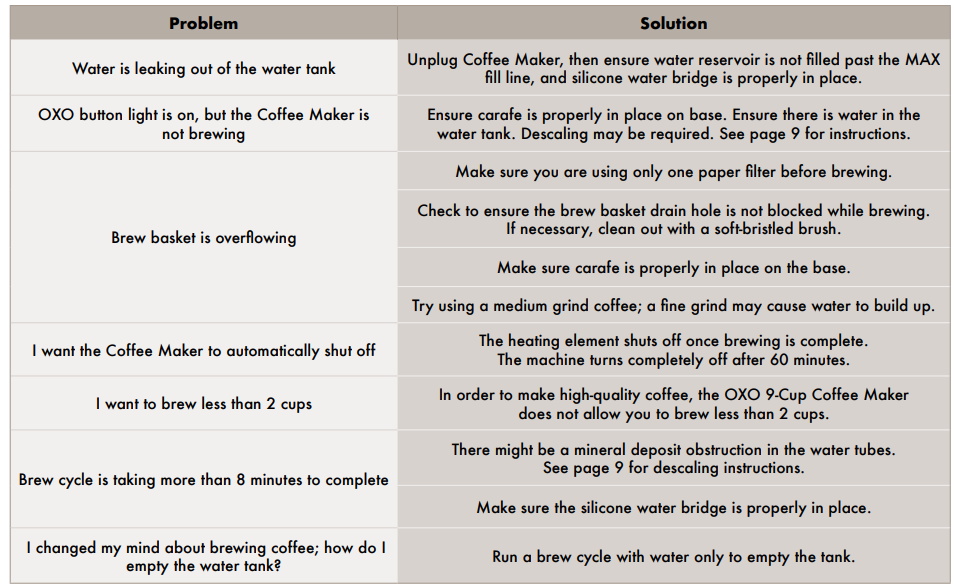
Troubleshooting
 For the most updated troubleshooting information, visit oxo.com
For more manuals by OXO, visit ManualsLibraryy
OXO Brew 9 Cup Stainless Steel Coffee Maker-FAQs
How long does the OXO Brew 9 Cup take to brew?
The brewing process typically takes 6-8 minutes, depending on the amount of coffee being brewed.
Can I brew less than 9 cups?
Yes! The adjustable brew basket allows for smaller batches (as few as 2 cups) while maintaining optimal flavor extraction.
What grind size is best for this coffee maker?
A medium-coarse grind (similar to sea salt) is ideal for balanced extraction and optimal flow rate.
Does the OXO Brew 9 Cup have a thermal carafe?
No, this model does not include a programmable timer—it’s designed for manual brewing.
What type of filters does it use?
It uses standard #4 cone-shaped paper filters (oxygen-bleached recommended for best taste).
How do I clean the stainless steel carafe?
Hand wash with warm, soapy water—avoid the dishwasher to preserve the insulation.
How often should I descale the coffee maker?
Descaling every 3-6 months (or more frequently with hard water) helps maintain performance. Use a citric acid or vinegar solution.
Can I use a reusable metal filter?
Yes, compatible permanent gold or stainless steel filters (size #4) can be used instead of paper filters.
Why is my coffee brewing too slowly?
Check if the grind is too fine (switch to medium-coarse).
Ensure the filter isn’t clogged.
Clean the spray head for proper water dispersion.


 The
The