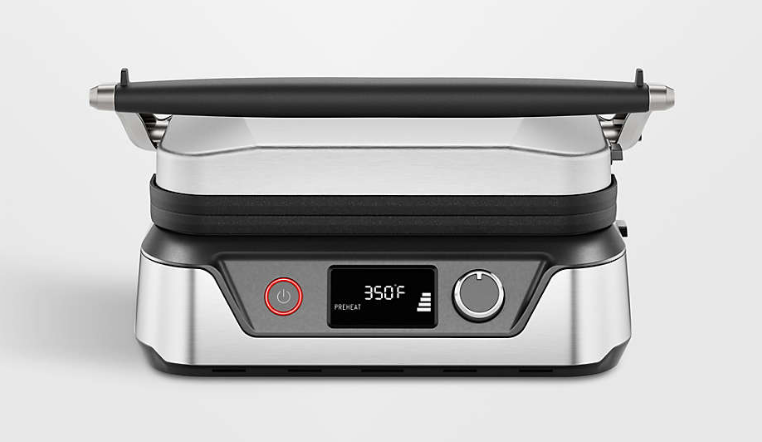
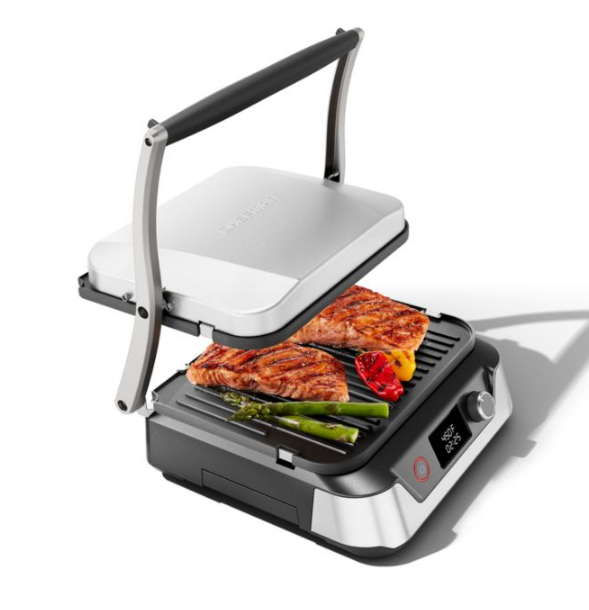
Chefman 5-in-1 Digital Panini Press Grill Sandwich Maker
FEATURES
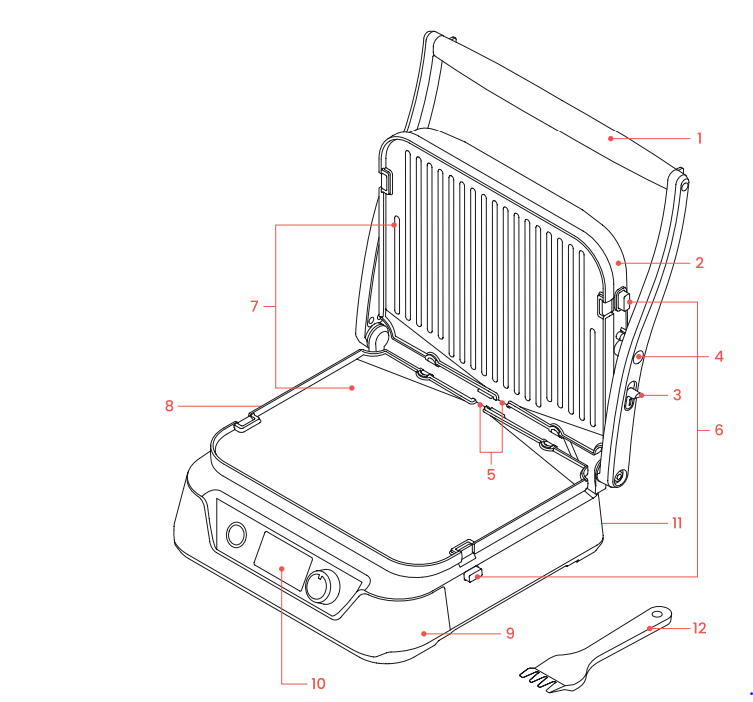
- Cool-Touch Handle
- Adjustable Lid
- Hinge Release Lever
- Floating Hinge
- Drip Spouts
- Plate Eject Buttons
- Reversible Double-Sided Cooking Plates(ridged grill side, smooth griddle side)
- Removable Drip Tray (on side)
- Panini Grill Base
- Control Panel
- Power Cord Storage (on back)
- Scraping Tool
FEATURES
Control Panel
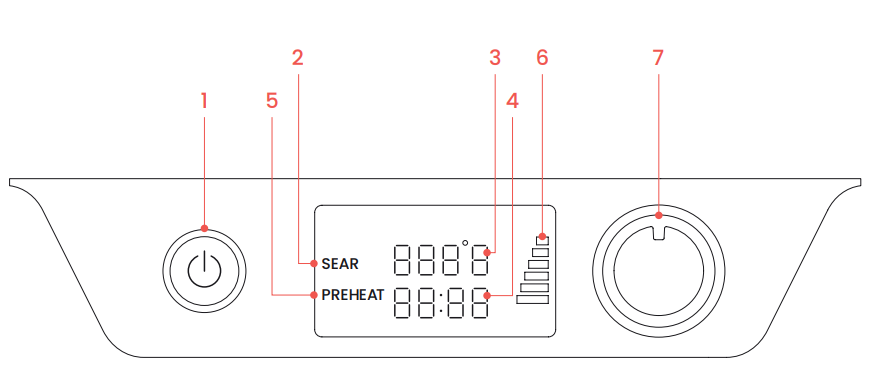
- POWER Button—Press to turn the unit on/off
- SEAR Light—Illuminates when the unit is set to its highest temperature (450°F)
- Temperature Display—Shows the selected temperature (175°F–450°F); adjusts in 25°Fincrements
- Timer Display—Operates as a countdown timer (maximum of 1 hour); adjusts the time in 30-second increments.
- PREHEAT Light—Illuminates when the unit is preheating; turns off when the unit is ready to cook
- Preheating Progress Bars—Show the progress of preheating (preheating is complete when all 6 bars are lit)
- Select and Confirm Knob—Turn to select desired temperature and time; press to confirmyour selection.s
OPERATING INSTRUCTIONS
BEFORE FIRST USE
- Read and remove all packing materials and stickers from the inside and outside of the panini grill except for the rating label, which should remain on the unit. Be sure that all accessories are accounted for before throwing away any packaging.
- Gently wipe down the exterior with a damp cloth or paper towel to remove any packaging residue. Dry completely. CAUTION: Never immerse the panini grill, cord, or plug in water or any other liquid; do not use scouring pads or abrasive cleaners, as they can damage the finish.
- Hand wash the cooking plates, drip tray, and scraping tool with mild liquid soap and a damp cloth or sponge. Dry completely. Alternatively, they can be washed in a dishwasher.
- Place the unit on a flat, heat-resistant surface positioned at least 2 inches away from the wall or any other objects.
- Ensure that the drip tray is inserted into its position on the side of the base. Do not operate the unit without the drip tray in place.
OPERATING INSTRUCTIONS
HOW TO INSERT THE COOKING PLATES
The cooking plates are removable, reversible, and interchangeable, so each plate can be inserted on either side of the unit. To insert the plates:
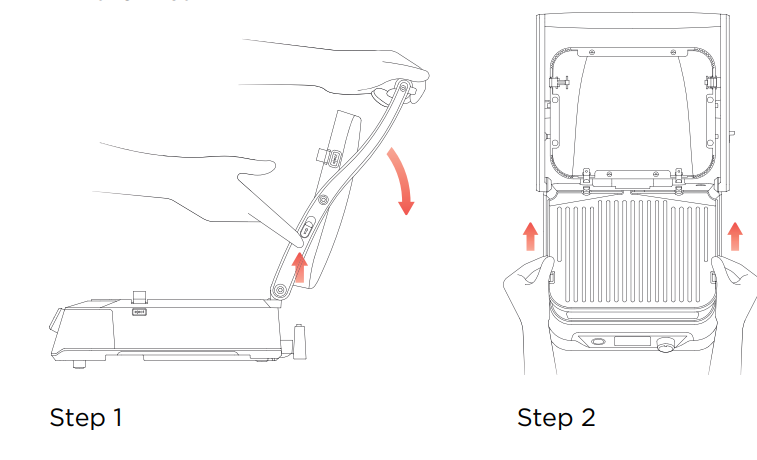
- Orient the unit with its control panel facing you. Open the unit 180° to its flat position by sliding the hinge release lever forward with your right hand and simultaneously pulling the handle up and back with your left hand until it rests flat on the counter. (If adjusting the unit from its open position, pull the handles slightly forward before sliding the lever so it adjusts more easily.)
- Working with one cooking plate at a time, hold the plate horizontally with the drip spout and two cutouts facing away from you. Line up the cutouts with the two metal brackets on the back edge of the base. Slide the cutouts underneath the brackets and gently push the front of the plate down until it snaps into place on the base.
- Turn the unit around and insert the second plate onto the lid side as you did the first.
OPERATING INSTRUCTIONS
HOW TO REMOVE THE COOKING PLATES
Make sure the panini grill is completely cooled and opened 180° to its flat position. (Slide the hinge release lever forward while pulling the handle up and back.)
- Orient the unit with its control panel facing you. Press the plate eject button on the side of the base to release the first cooking plate. The plate will pop up slightly from the base.
- Grasp the plate with two hands, slide it out from underneath the metal brackets, and lift it off the base.
- Remove the second cooking plate just as you did the first.
HOW TO COOK WITH CLOSED PLATES
The unit can be used as a grill press or griddle press to cook food between the top and bottom cooking plates simultaneously, resulting in faster, more even cooking. This method is perfect for making panini, grilled cheeses, and other hot sandwiches, or for grilling smaller quantities of burgers, boneless thin-cut meats, and vegetables.
- Prepare your food to be grilled.
- Check to ensure the drip tray is inserted in its position on the side of the base.
- Insert the cooking plates as directed on p. 11. You can use the grill (ridged) sides, griddle (smooth) sides, or a combination of both. The sides of the cooking plates you use will ultimately depend on the type of food being made, as well as personal preference.
- To release the floating hinge, press the back edge of the top plate up and out. (It will click and release.) This allows the plates to make full contact with the fan and cook evenly. Close the lid gently to ensure the hinge remains released and the unit.
- Press the POWER button. The unit will,l beep and the button will illuminate red. NOTE: When using the panini grill for the first time, a slight odor or smoking might occur. This is normal and will dissipate with use.
- Use the default temperature (400°F) or adjust the temperature by turning the knob. Press the knob to confirm and the displayed temperature will go from blinking to solid.NOTE: To use the SEAR function, set the temperature to 450°F.
- The word PREHEAT and the preheating progress bars will appear on the display as the unit begins heating. When all 6 bars are illuminated, after about 5½ to 6½ minutes, the unit will beep 3 times to indicate it is fully heated, and the timer will blink on the display.
- Open the lid until the handle comes to a resting, upright position. If desired, use an aerosol spray or brush the plates with a small amount of cooking oil.NOTE: Never use aerosol nonstick spray on the cooking plates. It will cause se buildup over time, which may cause sticking.
- Place food in the center of the bottom cooking plate, being careful not to touch the hot plates. If cooking more than one food item, make sure they are of a similar thickness for even cooking. NOTE: The temperature may fluctuate during cooking as the unit maintains temperature. This is normal.
- Close the lid. Gently press the handle down to ensure the lid rests evenly onto the food. Do NOT press the handle down too much, as this can crush foodscause sandwichwich fillings to leak out.
- Set the timer to count down from a maximum time of 1 hour by turning the knobclockwise (increase time) or counterclockwise (decrease time). Press the knob, and thetimer will begin counting down. NOTE: If the timer is not set within 15 seconds after preheating ends, it will disappear from the display. You can continue without the timer.
- When the timer ends, the unit will beep three times and automatically turIf you’re not using the timer, you can cook for up to 60 minutes, at which point the unit will automatically turn off.
- When cooking is finished, open the lid and carefully remove the food silicone or wooden spatula or tongs. (Do not use metal utensils, as they can scratch the nonstick surface.)
- If you’d like to cook additional batches, brush away any crumbs or food residue from eft plates first. If using the timer, follow steps 5-11 above, reset the temperature, place food on the grill after preheating is complete, and reset the timer. NOTE: The preheating is shorter on the second and subsequent batches because the unit is already hot.
- When finished cooking, press the POWER button to turn the unit off if not using the timer. Unplug the unit and let it cool completely before cleaning and storing it in a cool, dry place.
HOW TO COOK WITH OPEN PLATES
The panini grill opens 180° to create one large, flat cooking surface that works just like a grill, griddle, or half grill/half griddle. It’s great when cooking larger quantities of the same food for a crowd, or when making different foods at once without mixing the flavors. You can also cook foods and meats of different thicknesses, each to your preferred level of doneness.
- Set up your panini grill as directed in steps 1–7 on pages 12–13, but instead of closing the grill to preheat, open it 180° to its flat position by sliding the hinge release lever forward with your right hand and pulling the handle up and back with your left hand.
- When the unit is heated, use a non-aerosol cooking spray or brush the plates with a small amount of cooking oil if desired. NOTE: Never use aerosol spray on the cooking plates. It will cause a buildup over time, which may cause sticking.
- Place food on the cooking plates. Do NOT overcrowd the plates, as this will result in uneven cooking.
- Set the timer to count down from a maximum time of 1 hour by turning the knobclockwise (increase time) or counterclockwise (decrease time). Press the knob, andthe timer will begin counting down. NOTE: If the timer is not set within 15 seconds after preheating ends, it will disappear from the display. You can continue to cook without the timer.
- Cook, flipping food when necessary. When the timer ends, the unit will beep 33 times and automatically turn off. If you’re not using the timer, you can cook for up to 60 minutes, at which point the unit will automatically turn off.
- Remove the food from the cooking plates using a silicone or wooden spatula or tongs. (Do not use metal utensils, as they can scratch the nonstick surface.)
- If you’d like to cook additional batches, brush away any crumbs or food residue left on the plates first. If using the timer, reset the temperature, preheat the grill, place food, and reset the timer as you did for the first batch. NOTE: The preheat time will be shorter on the second and subsequent batches because the unit is already hot.
- When finished cooking, press the POWER button to turn the unit off if not the timer. Unplug the unit and let it cool completely before cleaning and storing it in a cool, dry place.
COOKING TIPS
- Preheat the panini grill closed when cooking with closed plates and open when cooking with open plates. (Heat dissipates when preheating the unit open, so preheating will take 3–4 minutes longer.)
- The cooking positions and sides of the cooking plates you use will depend on the food being cooked, as well as personal preference. We recommend using the griddle (ridged) sides of the plates for foods like sandwiches, chicken, eggs, and meats, and vegetables; the griddle (smooth) sides of the plates for foods like pancakes, eggs, and bacon; or one of each side when cooking combinations of foods at the same time. Finding your preferred method and combination may involve some experimenting.
- When cooking with open plates, you will have to flip foods during cooking.
- To make crispier, more flavorful panini and hot sandwiches, brush the outside of your bread with oil or butter before grilling. Crispiness also dependsfillings youlingsyou use—fillings with a lot of moisture can result in a soggier sandavoid this, add breadcrumbs to moist fillings to absorb the excess liquid.
- If you enjoy greens like lettuce on your sandwiches but do not want them to wilt as you grill, simply add them at the end, right before serving.
- For flatter panini, press the handle down gently several times while cooking, NOT overpress, as this can cause fillings to leak out.
- Experiment with a variety of breads and fillings. You can make sweet or savory sandwiches based on your choice of fillings, and you can use all types of bread, such as bagels, brioche, pita, and more. If using rounded bread, baguettes, or sourdough bagels, try flipping them inside out so the flat surface of the bread contacts the grill.
- Do not overcrowd the cooking plates. Too much food, especially if tightly packed, can result in uneven cooking and inhibit browning. Cook food in batches instead.
- To achieve greater flavor and a browned, crispy crust on the surface of meats, engage the SEAR function at the beginning or end of cooking. This will help release juices from the meat and caramelize the surface.
- Boneless cuts of chicken and meat cook most evenly on the panini grill. Avoid cooking bone-in pieces of chicken, as they won’t cook evenly.
- When cooking meats, follow food-safety guidelines for doneness. Because temperatures and food sizes can vary, do not rely only on recipe timing when cooking food. Check foods for doneness against current safety guidelines
before serving.
CLEANING AND MAINTENANCE
With its nonstick cooking plates, removable drip tray, and included scraping tool, the panini grill is super easy to clean.
- Turn off and unplug the unit when done. Let it cool completely before cleaning.
- Use the scraping tool to remove any leftover food from the crockery or to push any excess grease from the plates into the drip tray, if necessary.
- Carefully remove the drip tray and properly dispose of the grease. Wadrip trayriptray and scraping tool with soap and a damp cloth or sponge. Dry completely. The drip tray and scraping tool are dishwasher safe.
- Remove the cooking plates as directed on p. 12. Wash with a mild liquid and a damp and dry cloth or sponge, and dry completely. The cooking plates are dishwasher safe.
- Gently wipe down the exterior with a damp cloth or paper towel, if necessary. Dry completely. CAUTION: Never immerse the panini grill, cord, water, or water in water or any other liquid; do not use scouring pads or abrasive cleaners that can damage the finish.
- Reassemble the unit before storing. Wrap the power cord around the square peg on the back of the unit and store it in a cool, dry place.
FOR MORE MANUALS BY CHEFMAN, VISIT MANUALSLIBRARYY
Chefman 5-in-1 Digital Panini Press Grill Sandwich Maker- FAQs
How do I preheat the Chefman 5-in-1 Panini Press?
Plug in the unit and turn it on.
Set the desired temperature (325°F–375°F recommended for paninis) using the digital controls.
Wait for the indicator light to signal it’s preheated (usually 3–5 minutes).
What’s the best temperature for paninis?
325°F–375°F (medium-high) for crispy, golden paninis without burning.
Lower (300°F) for delicate ingredients like fish or veggies.
Do I need to oil the plates?
Lightly brush olive oil or butter on bread (not plates) for crispiness.
Nonstick ceramic plates don’t require oil, but it enhances flavor.
Can I use it for grilled cheese?
Yes! Close the lid and cook for 3–5 minutes until cheese melts and bread is golden.
How long does it take to cook a panini?
4–6 minutes, depending on fillings and desired crispness.
Are the plates dishwasher-safe?
No. Hand wash only with warm, soapy water and a soft sponge.
How do I clean stuck-on cheese or grease?
Unplug and cool completely.
Wipe plates with a damp cloth or nylon scrubber.
For stubborn residue, use a baking soda paste.
What are the 5 functions?
Panini press (sandwiches)
Grill (burgers, chicken)
Griddle (pancakes, eggs)
Sandwich maker (closed-face)
Open grill (for larger items)
Can I cook meat or veggies?
Yes! Works for:
Chicken breasts (8–10 mins)
Veggies (5–7 mins, brushed with oil)
Quesadillas (3–4 mins)
Why is my sandwich not crispy?
Increase temperature or cooking time.
Press the lid down firmly for even heat.

