Vitamix Ascent X2 Blender
SPECIFICATIONS
- Voltage: 120 V
- Frequency: 50 – 60 Hz
- Current: 12 Amps
- Height: with 48 oz. / 1.4 L container on motor
- base: 17.00 inches / 43.2 cm
- Depth: 9.75 inches / 24.8 cm
- Width: 7.75 inches / 19.7 cm
IMPORTANT SAFEGUARDS
- THE FAILURE TO FOLLOW ANY OF THE IMPORTANT SAFEGUARDS AND IMPORTANT INSTRUCTIONS FOR SAFE USE IS A MISUSE OF YOUR VITAMIX APPLIANCE THAT CAN VOID YOUR WARRANTY AND CREATE THE RISK OF SERIOUS INJURY.
- The instructions appearing in this manual cannot cover every possible condition and situation that may occur. Common sense and caution must be practiced when operating and maintaining any appliance.
- Strictly follow the care and cleaning instructions provided in this manual.
- NEVER use the appliance for anything other than its intended use.
- This appliance is not intended for use by persons (including children) with reduced physical, sensory, or mental capabilities, or lack of experience or knowledge, unless they have been given supervision or instruction concerning use of the appliance by a person responsible for their safety.
- Children should be supervised to ensure that they do not play with the appliance. Keep the cord out of reach of children.
- Remove and discard packaging materials, the power plug cover, and promotional labels before using the appliance for the first time.
- NEVER unplug the appliance by pulling on the cord. To unplug the appliance, grasp the power plug and pull from the outlet.
- NEVER come in contact with moving parts, especially the blades.
- NEVER operate the appliance with loose, nicked, or damaged blending blades. Check the blending blades prior to each use and replace if damaged.
- NEVER tighten the acorn nut (on the top of the blade assembly). If loose, replace the blade assembly immediately.
- NEVER place the appliance on or near a hot gas or electric burner, or where it could touch any other source of heat.
- NEVER modify the plug in any way. If the appliance will not operate, unplug the appliance and reset the household electrical system circuit protector. If the circuit protector continues to trip, unplug the appliance from the outlet and contact a
qualified electrician. - NEVER allow the power cord to hang over the edge of a table or counter, touch hot surfaces, or become knotted.
- ALWAYS ensure the appliance is completely and properly assembled before operation, including the unwinding of the power cord fully before use.
- The blending blade assembly is very sharp. Handle carefully and keep out of reach of children.
- NEVER use attachments other than those provided with the appliance or offered separately from Vitamix. The use of attachments, including preserving jars, not sold or recommended by Vitamix, may cause fire, electric shock, or injury and will
void the warranty. - Alteration or modification of any part of the appliance, including the use of any part or parts that are not genuine authorized Vitamix parts, may cause fire, electric shock, or injury and will void your warranty.
- ALWAYS ensure the appliance is unplugged from the power outlet before cleaning the motor base or centering pad, or touching parts that move.
- NEVER fill the container above the “MAXIMUM CAPACITY” line to avoid the risk of injury caused by damage to the lid and container.
- When blending hot liquids or ingredients in the container, use caution; spray or escaping steam may cause burns.
- ALWAYS begin processing on the lowest speed setting, Variable Speed 1. Keep hands and other exposed skin away from the lid opening to prevent possible burns.
- Extreme caution must be used when moving an appliance or container filled with hot oil or other hot liquids; spray or escaping steam may cause burns.
TAMPER HOLDER INSTALLATION

This device complies with Part 15 of the FCC Rules and Innovation, Science and Economic Development Canada’s license-exempt RSS standard(s). Operation is subject to the following two conditions: (1) this device may not cause interference, and (2) this device must accept any interference, including interference that may cause undesired operation of the device. Changes or modifications not expressly approved by Vitamix could void the user’s authority to operate the equipment.
PARTS AND FEATURES
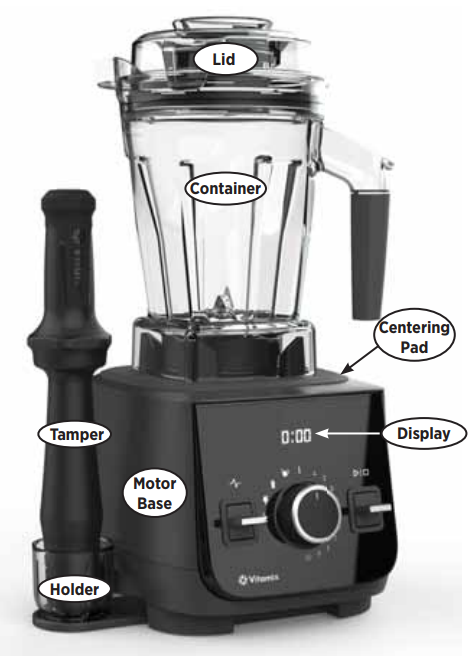
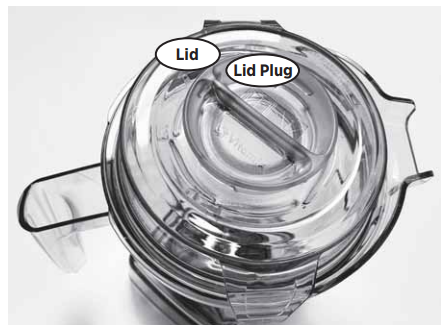
Container, Lid, Lid Plug, and Tamper
NOTE: Previous Ascent-compatible SELF-DETECT® containers will work with the Ascent X Series; however, not all programs will be available.
- 12-Cup Food Processor Attachment with SELF-DETECT (VM0215)
- 48-ounce Aer™ Disc Container (VM0190)
- 48-ounce Container with SELF-DETECT (VM0190)
- 48-ounce Dry Grains Container with SELF-DETECT (VM0190)
- 48-ounce Stainless Steel Container (VM0216)
- 64-ounce Low Profile Container with SELF-DETECT (VM0184)
- The blender and containers communicate through wireless SELF-DETECT technology. Each container is programmed to run on the motor base for optimum performance according to its size and functionality.
- ALWAYS leave the lid on when operating the appliance and remove ONLY the lid plug to use the tamper or to add ingredients.
- NEVER use the tamper for more than 30 consecutive seconds to avoid overheating. The container should not be more than 2/3 full when the tamper is used.
- NEVER operate the appliance without ensuring the lid is securely locked in place.
NOTE: The appliance will run without a lid on the container, but a lid MUST be attached to contain the ingredients during processing. - The lid plug is marked so it can be used as a measuring cup.
- Insert the lid plug through the lid plug opening. Lock the plug in place by rotating it clockwise. To remove, turn the plug counter-clockwise and lift it out.
- Lids and tampers are NOT interchangeable between different container styles, types, and sizes. Use only the tamper and lid supplied with your appliance. If you do not have the correct tamper for your container, contact Vitamix Household Technical Support.
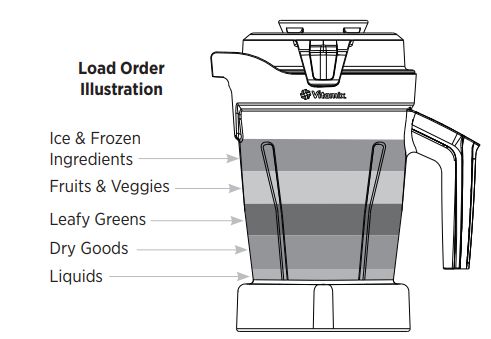
- ALWAYS load the container according to the Vitamix recipe directions or the Load Order Illustration on page 6.
Motor Base
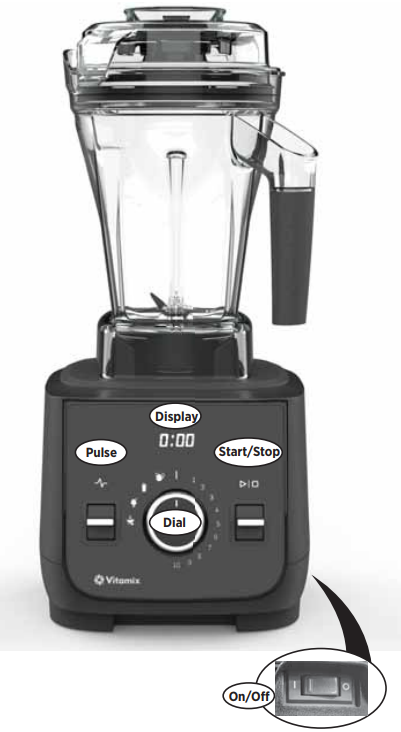
- The motor is designed to protect itself from overheating.
- If the appliance will not start immediately, check to ensure the appliance is plugged in and the On/Off Switch is ON.
- If the motor has overheated, allow the motor to cool for 20-45 minutes.
On/Off Switch – Controls power to the machine and is located on the lower right side of the motor base.
Display
- Container Detect – Shows three dashes (- – -) on the display if a compatible container is not properly positioned on the motor base. 0:00 will show on the display once a compatible SELF-DETECT container is in position. – 0 – will show on the display if there is no program available for the attached container.
- Sleep Mode – Dims the display if the control panel is not used for 30 seconds. To exit sleep mode, rotate the Variable Speed Dial to the desired speed or program for the next blend.
- Error Code – Shows numbers on the display indicating the appliance has experienced a fault. Document the error code number and contact Vitamix Household Technical Support for resolution.
- Timer – Counts up when using variable speed until the Start/Stop Switch is pressed. Each container is programmed with a specific maximum run time. The blender will shut down automatically when the maximum run time has elapsed.
- Motor Overheated – Flashes three dashes —-) On the display, if the motor is overheated. Allow the motor to cool for 20-45
Pulse – Rotates the blade at the speed selected on the Variable Speed Dial.
Start/Stop Switch – Starts or stops the blending at any time and is located on the right side of the control panel.
Variable Speed Dial – Contains all the modes the appliance operates:
- Variable Speed – Provides manual speed control from Variable 1 (slowest) to 10 (highest).
- Standby – Pauses the appliance and has it ready to start the next recipe. Standby is located at the top position on the Variable Speed Dial.
- Self-Cleaning – Runs the cleaning cycle after water and dishwashing liquid have been added to the machine and the lid and lid plug are in place. See page 7 for cleaning procedures.
- Programs – Operates the appliance for preset times and will stop automatically at the end of the program. When the Start/Stop Switch is pressed in the middle of a program, the machine will stop, and the program time will reset on the display to the beginning of the run time. The Program icons are displayed in Vitamix recipes.
Smoothies, Frozen Desserts, Hot Soup
BLENDING
TIPS TO PREVENT OVERHEATING
- Process only Vitamix recipes when learning to use the appliance.
- NEVER process recipes for longer than recommended. Overprocessed blends can also result in the incorrect recipe texture.
- NEVER process recipes at lower or higher speeds than recommended.
- Use the tamper to process thicker mixtures and keep ingredients moving around and through the blades.
BLENDING IN THE CONTAINER
- Press the On/Off Switch on the lower right side of the motor base (see page 5 for location) to the ON (I) position.
- Load the container according to the Vitamix recipe directions or the Load Order Illustration.

- Place the lid onto the container:
- Push down on the lid until the two tabs snap onto the lip of the container.
- Insert the lid plug and turn clockwise to lock it into the lid.
- Place the container with a lid onto the motor base. NOTE: The appliance will run without a lid on the container, but a lid MUST be attached to contain the ingredients during processing. 0:00 will show on the display once a container is in position. Three dashes (- – -) will be displayed if a container is not detected on the motor base.
- TO USE VARIABLE SPEED:
- a. Turn the dial clockwise to Variable Speed 1.
- b. Press the Start/Stop Switch. The blades will begin to turn, and the timer will count the minutes and seconds the blend has been processing.
- c. Rotate the dial between Variable Speed 1 and 10 during the blending cycle to increase or decrease the speed of the blades.
- d. At the end of the blend, rotate the dial counter-clockwise to Standby or press the Start/Stop Switch to stop the appliance.
- TO USE PROGRAMS:
- a. Turn the Variable Speed Dial counter-clockwise to the desired program, and the display will show the default program time.
- b. Press the Start/Stop Switch to start the program. The appliance will stop automatically at the end of the program, or press the Start/Stop Switch at any time to stop the program.
- If the mixture stops circulating:
- a. Remove the lid plug by turning it counter-clockwise, insert the tamper through the lid plug opening, and stir until the mixture ‘burps’.
- b. If this does not work, press the On/Off Switch to stop the motor.
- c. Remove the container from the motor base, remove the lid, and use a rubber spatula to press the air bubble away from the blades.
- d. Add liquid if necessary.
- e. Replace the lid and lid plug and return the container to the motor base, and continue blending.
- After blending, wait until the blades stop completely before removing the lid or the container from the motor base.
- Use a Vitamix Under Blade Scraper or spatula to remove salsa, jelly, jam, peanut butter, and other ingredients from the container.
CARE AND CLEANING
MOTOR BASE CLEANING
- Turn off and unplug the appliance and remove the container from the motor base..
- Wash the outside surface with a damp, soft cloth or sponge rinsed in a mild solution of liquid dish soap and warm water. NOTE: NEVER immerse the power cord, power plug, or motor base in water or any other liquid.
- The centering pad can be removed for more thorough cleaning and is dishwasher safe or can be hand-washed in warm, soapy water.
- Immediately dry all surfaces and polish with a soft cloth.
TAMPER CLEANING
The tamper is dishwasher safe or can be hand-washed in warm, soapy water. Rinse clean under running water and then dry.
CONTAINER CLEANING – DISHWASHER
The container, lid, blade base, and seal are dishwasher safe or can be hand-washed and sanitized using the following procedures.
CONTAINER CLEANING – SELF-CLEANING
- Fill the container half full with warm water and add a couple of drops of dishwashing liquid.
- Snap or push the complete 2-part lid into the locked position.
- Rotate the knob counter-clockwise to the Self-Cleaning icon.
- On the Ascent X2 model, the processing time will display for the Self-Cleaning program.
- Press the Start/Stop Switch.
- The program will stop automatically when complete.
- Rinse and drain all pieces.
CONTAINER CLEANING – VARIABLE SPEED
- Fill the container half full with warm water and add a couple of drops of dishwashing liquid.
- Snap or push the complete 2-part lid into the locked position.
- Press the Start/Stop Switch to turn on the appliance and slowly increase to Variable Speed 10.
- Run the appliance for 30 to 60 seconds.
- Rotate the Variable Speed Dial to Standby or to Variable Speed 1 and press the Start/Stop Switch to turn off the appliance.
- Rinse and drain all pieces.
CONTAINER SANITIZING – BLEACH
- First, perform the “Container Cleaning” instructions.
- Then repeat the “Container Cleaning” instructions but add 1.5 teaspoons (7.4 ml) of liquid bleach to 16 oz. (473 ml) of water.
- Allow the mixture to stand in the container for an additional 1-1/2 minutes.
- Pour the bleach mixture out. Allow the container to air dry. DO NOT rinse after sanitizing. If desired, rinse immediately before next use.
CONTAINER SANITIZING – VINEGAR
- First, perform the “Container Cleaning” instructions.
- Then repeat the “Container Cleaning” instructions, but use 16 oz. (473 ml) of vinegar for every 16 oz. (473 ml) of water.
- Allow the mixture to stand in the container for an additional 3 full minutes. The total contact time of the vinegar solution in the container should equal 5 minutes.
- Pour the vinegar solution out of the container over the inside surface of the 2-part lid.
- Repeat the sanitizing procedure a second time (Steps 2 through 4).
- Allow the container and lid to air dry. DO NOT rinse after sanitizing. If desired, rinse immediately before next use.
FOR MORE MANUALS BY VITAMIX, VISIT MANUALSLIBRARYY
Vitamix Ascent X2 Blender-FAQs
Why does my Vitamix blender keep turning off?
Your Vitamix may be overheating due to Automatic Overload Protection. Turn off the power switch and let it cool for up to 45 minutes before restarting. If the room is warm, the reset time may be longer.
What is the Pulse function used for?
The Pulse button gives you quick, controlled bursts of blending—great for chopping or mixing ingredients without over-processing.
How do I turn on the Vitamix Ascent X2?
Use the On/Off switch located on the right side of the base. The blender won’t operate unless the switch is in the On position.
Can Vitamix replace my blender if it stops working?
Yes, if your blender can’t be repaired, Vitamix may choose to either replace it at no cost or refund the purchase price, depending on their warranty policy and your preference.
What’s the maximum temperature the Vitamix can handle?
The Vitamix Ascent X2 can heat blends up to 170°F (77°C). Avoid placing ingredients hotter than this into the container to prevent damage.
Does the Vitamix blender require regular maintenance?
Yes. Vitamix recommends checking the drive socket and centering pad weekly for wear and tear such as cracks or damage. Replace any damaged parts as needed.
What’s the difference between blending and pulsing?
Blending is continuous and ideal for smooth textures like soups or smoothies. Pulsing delivers short bursts to chop or crush ingredients with more control.
Why did my Vitamix suddenly stop working during use?
It likely triggered the overload protection system. Turn off the blender and allow it to cool for up to 45 minutes before using it again.

