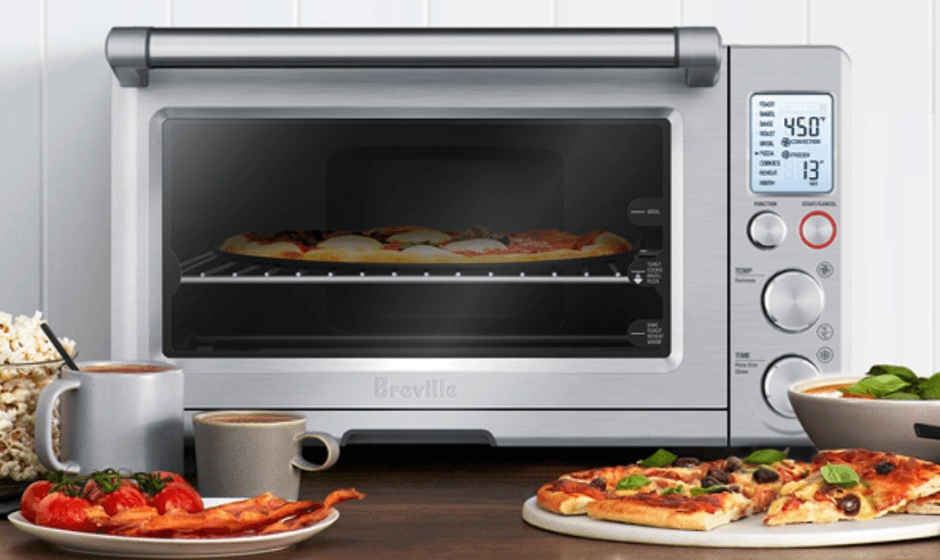
Breville BOV800XL Smart Convection Oven
Important safeguards
- Remove and safely discard any packing materials and promotional labels before using the oven for the first time.
- To eliminate a choking hazard for young children, remove and safely discard the protective cover fitted to the power plug of this appliance.
- Do not place the oven near the edge of a bench or table during operation. Ensure the surface is level, clean, and free of water, flour, etc.
- Always operate the oven on a stable, heat-resistant surface. Do not use on a cloth-covered surface, near curtains, or other flammable materials.
- A fire may occur if the oven is covered or touches flammable material, including curtains, draperies, walls, and the like, when in operation.
- Do not place the oven on or near a hot gas or electric burner, or where it could touch another heated oven.
- Do not let the power cord hang over the edge of a table or counter, or touch hot surfaces.
- To protect against electric shock, do not immerse the oven, power cord, or power plug in water or any other liquid.
- When operating the oven, keep a minimum distance of 4” (10cm) of space on both sides of the appliance. This will allow for adequate air circulation and help prevent the possibility of wall discoloration due to radiated heat.
- Do not touch hot surfaces. Appliance surfaces, including the door and outer surface of the oven, are hot during and after operation. To prevent burns or personal injury, always use protective hot pads or insulated oven mitts, or use handles and knobs where available, when inserting, removing or handling items from the oven. Alternatively, allow the oven to cool down before handling.
- Extreme caution must be used when removing pans, dishes, and accessories such as the included broil rack and baking pan that contain hot oil or other hot liquids.
- The top of the oven is very hot during and after operation. Do not store any item on top of the oven when in operation. The only exceptions are described on Page 43 – one layer of ceramic plates for warming, and any accessory provided by Breville for use in the ribbed section on top of the oven. If the ribbed section is used as a warming tray during operation, protective hot pads or insulated oven mittens should be used when removing heated items. Alternatively, allow the oven to cool down before handling.
- Do not place cardboard, plastic, paper, or other flammable materials in the oven.
KNOW YOUR BREVILLE SMART OVEN™
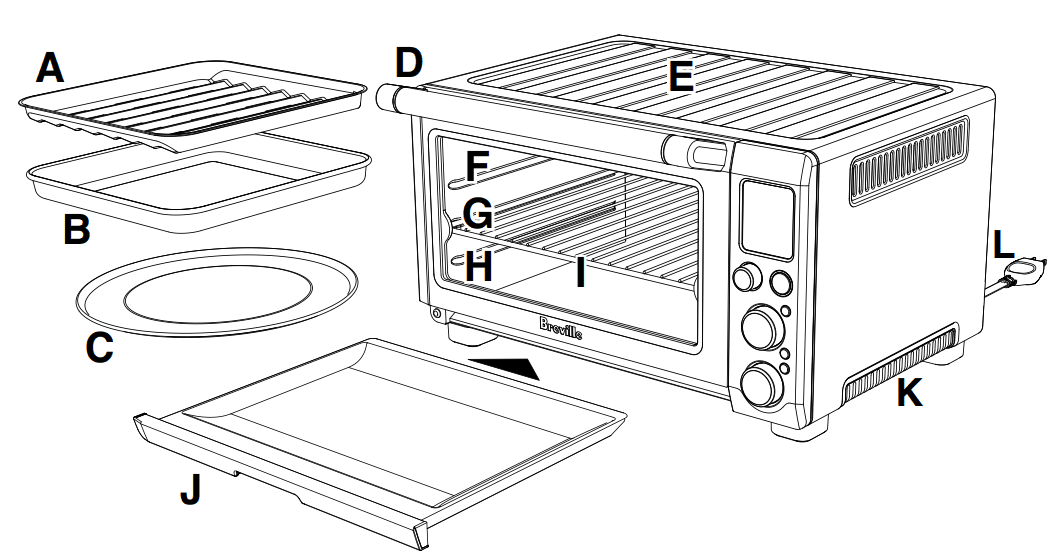
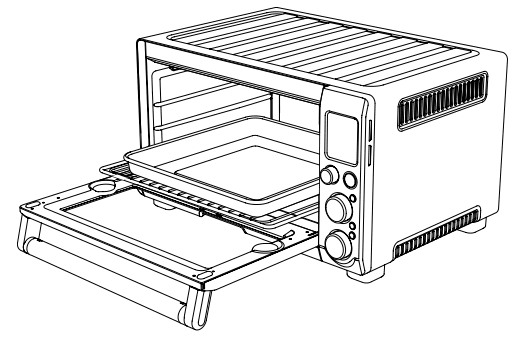
- A. 12” x 12” enamel broil rack.
- B. 12” x 12” enamel baking pan.
- C. 13” non-stick pizza pan.
- D. Door handle.
- E. Ribbed plate warming tray.
- F. Top rack height position: BROIL function.
- G. Middle rack height position: TOAST, BAGEL, PIZZA, and COOKIE functions.
- H. Bottom rack height position: BAKE, ROAST, REHEAT, and WARM functions.
- I Wire rack.
- J. Crumb tray.
- K. Ventilation slots
- L. Breville Assist Plug™
- M. LCD screen.
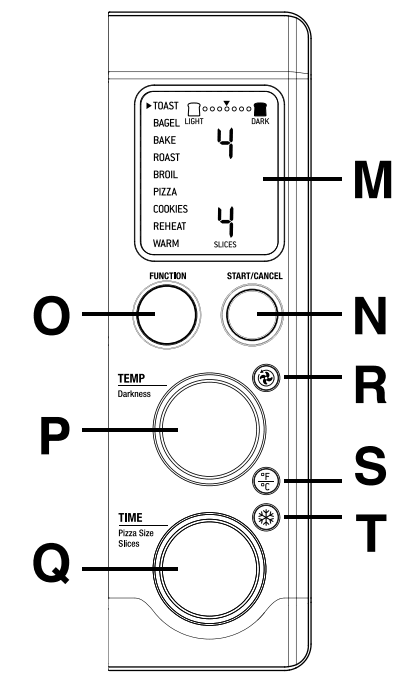
- N. START/CANCEL button.
- O. FUNCTION dial.
- P. TEMPERATURE dial/toast and bagel browning control.
- Q. TIME dial/toast and bagel slice selection/pizza size selection.
- R. CONVECTION button.
- S. TEMPERATURE CONVERSION button.
- T. FROZEN FOODS BUTTON.
Preparing the oven for use
- Remove and safely discard any packing material, promotional labels, and tape from the oven.
- Remove the crumb tray, wire rack, broil rack, baking pan, and pizza pan from the
polyfoam packaging. Wash them in warm, soapy water with a soft sponge, rinse, and dry thoroughly. Re-insert the crumb tray into the oven. - Wipe the interior of the oven with a soft, damp sponge. Dry thoroughly.
- Place the oven on a flat, dry surface. Ensure there is a minimum distance of 4” (10cm) of space on both sides of the appliance. Ensure there are no items on top of the oven.
- Unwind the power cord completely and insert the power plug into a grounded wall outlet.
- The oven alert will sound twice, and the LCD screen will illuminate. The function
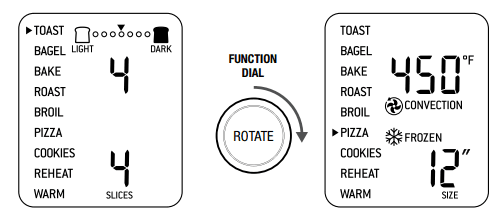
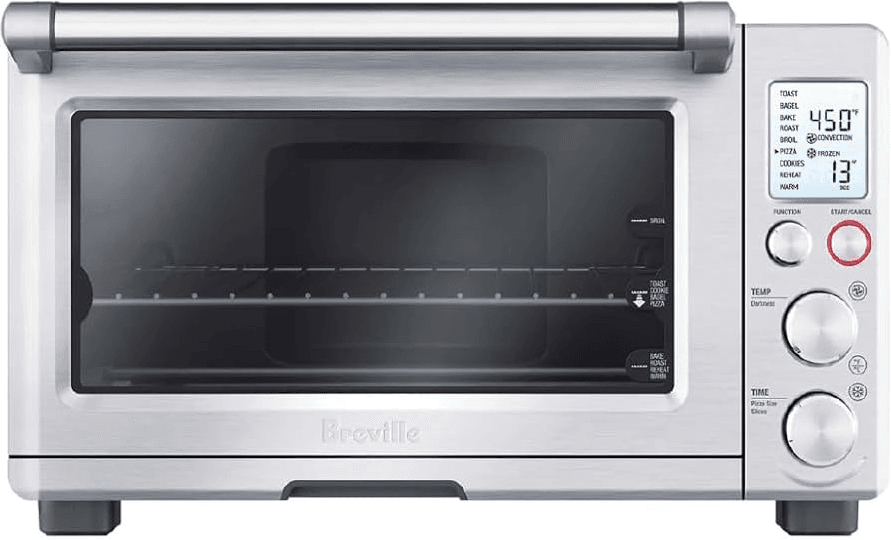
Options will appear with an indicator on the preset TOAST function. - Turn the FUNCTION dial to the right until the indicator reaches the PIZZA function. The top figure on the LCD screen indicates the preset temperature of ‘450°F’, while the bottom figure on the LCD screen indicates the preset ‘12″ SIZE’.
The preset CONVECTION setting and preset FROZEN FOODS setting will also be displayed.
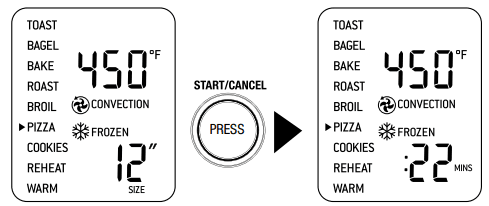
- Press the START/CANCEL button to activate this setting. The button surround will illuminate red, and the oven alert will sound.
- The LCD screen will indicate a blinking ‘PREHEATING’. Once the oven has reached the set temperature, the temperature alert will sound.
- The timer alert will be displayed and automatically begin to count down in one-minute increments.

- At the end of the cooking cycle, the oven alert will sound three times and the START/CANCEL button surround will cease to illuminate.
- The oven is now ready to use.
A note on cooking times
The Breville Smart Oven™ features Element IQ™ – a unique cooking technology that adjusts the power of the cooking elements for optimum results.
Broil
High temperature top heat: melts and browns.
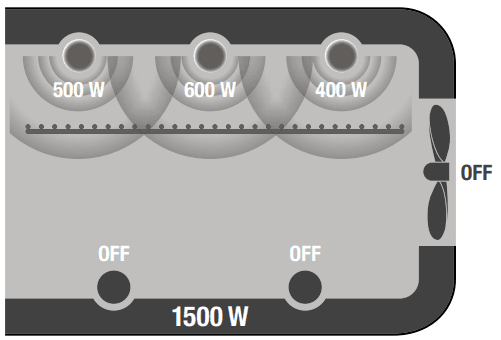
Toast
Searing top and bottom heat: seals and crisps.
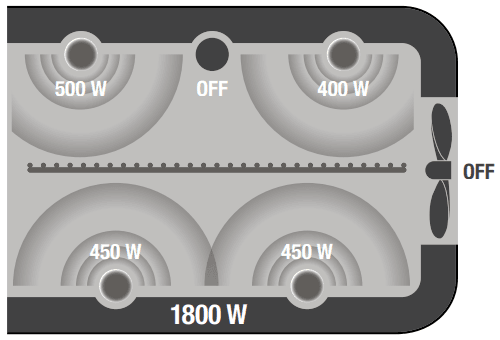
Bake
Even convection heating cooks right through.
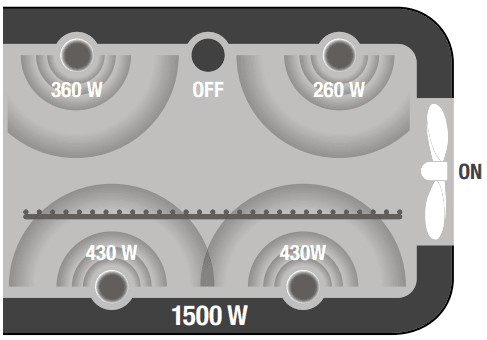
It is normal to notice the following occur during the cooking cycle:
- It is normal that during the BROIL function, the bottom set of elements turns off while the top set is heating at full power.
- Normally, the ends of each heating element will glow more brightly than the
middle of the element. - It is normal that the elements are heating even if they are not lighting up. This cooking technology allows foods to cook more evenly and quickly, significantly reducing cooking times. The oven’s preset cooking temperatures and times, as well
as the cooking temperature and time directions on pre-packaged foods, may need to be changed depending on the recipe, the amount of food, and your taste. We recommend experimenting with the temperature and time settings to produce the desired results. The cooking temperature and time can be adjusted before or during the cooking cycle: - a) The cooking temperature is displayed as the top figure on the LCD screen.
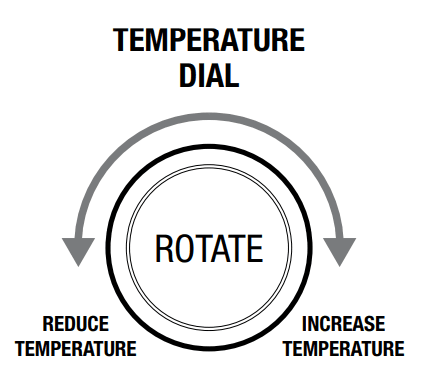
- Turn the TEMPERATURE dial to the left to reduce the temperature, or to the right
to increase the temperature. - The cooking temperature can be adjusted in 10°F increments, from 120°F to a
maximum of 450°F (or in the Celsius mode, 5°C increments, from 50°C to a maximum of 230°C).
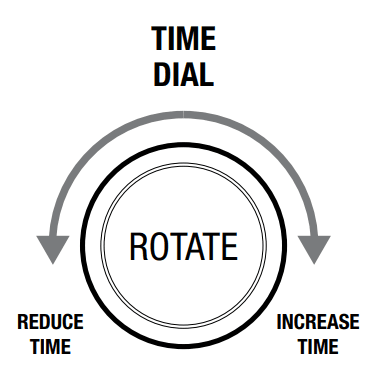
- b) The cooking time is displayed as the bottom figure on the LCD screen.
- Turn the TIME dial to the left to reduce the cooking time, or to the right to increase the cooking time.
- The cooking time can be adjusted in one-minute increments up to 1 hour, and in
5-minute increments between 1 and 2 hours.
OPERATING YOUR BREVILLE SMART OVEN™
TOAST FUNCTION
Elements: Top and bottom heating elements cycle on and off to regulate the correct temperature. The top middle element is off.
Rack Position: Middle rack height position.
Optional Settings: FROZEN FOODS button.
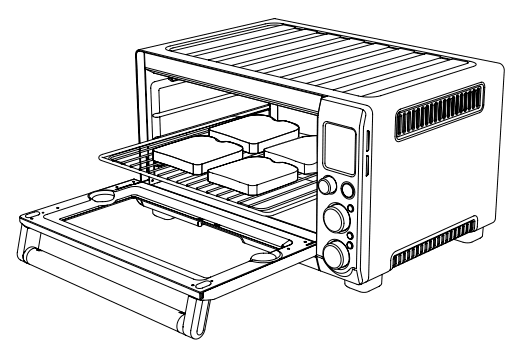
- Insert the wire rack into the middle rack height position. The wire rack should
be positioned with the spokes facing upwards. - If toasting 1-3 slices, center the slices on the wire rack. If toasting 4-6 slices, evenly space them with 2-3 slices at the front of the wire rack and 2-3 slices at the back of the rack.

- Close the oven door.
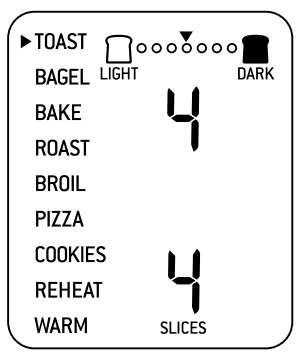
- Turn the FUNCTION dial until the indicator on the LCD screen reaches the TOAST function. The top figure on the LCD screen indicates the preset browning setting ’4’, while the bottom figure on the LCD screen indicates the preset number of slices ‘4’

- The Browning setting and number of slices can be adjusted before or during the toasting cycle.
- a) The Browning setting is displayed as the top figure on the LCD screen.
Turn the TEMPERATURE dial to the left to reduce the browning setting, or to the right to increase the browning setting. The Brownings’ settings are indicated by the row of circles at the top of the LCD screen. The arrow above the circles will move according to the selected setting.
BAGEL FUNCTION
Elements: Top and bottom heating elements cycle on and off to regulate the correct temperature.
Rack Position: Middle rack height position.
Optional Settings: FROZEN FOODS button.
The BAGEL function crisps the insides of your cut bagel while only lightly toasting the outside. This function is also ideal for toasting English muffins, crumpets, or thick-sliced specialty breads, which require one side to be toasted more than the other.
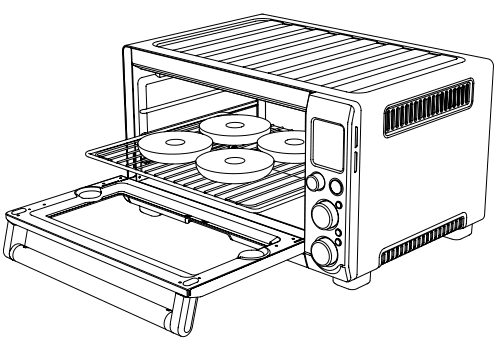
- Insert the wire rack into the middle rack height position. The wire rack should be positioned with the spokes facing upwards.
- Slice each bagel into two equal halves.
- If toasting 1-3 bagel halves, center the halves on the wire rack. If toasting 4-6 halves, evenly space them with 2-3 halves at the front of the wire rack and 2-3 halves at the back of the rack.

- Close the oven door.
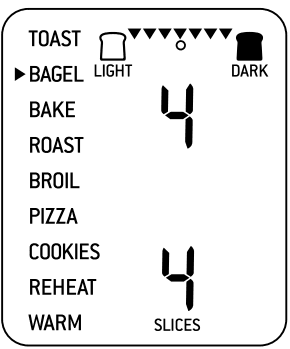
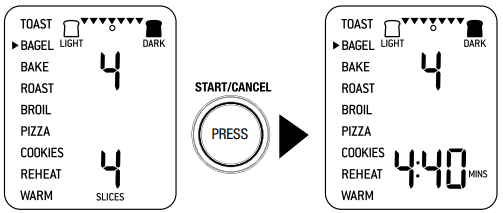
- Turn the FUNCTION dial until the indicator on the LCD screen reaches the BAGEL function. The top figure on the LCD screen indicates the preset browning setting ‘4’, while the bottom figure on the LCD screen indicates the preset number of bagel halves ‘4’.

- The browning setting and number of bagel halves can be adjusted before or during the bagel cycle.
- a) The Browning setting is displayed as the top figure on the LCD screen. Turn the TEMPERATURE dial to the left to reduce the browning setting, or to the right to increase the browning setting. The Browning settings are indicated by the row of circles at the top of the LCD screen. The arrow above the circles will move according to the selected setting.
- Press the START/CANCEL button to activate this setting. The button surround
will illuminate red, and the oven alert will sound. - The timer will be displayed and begin to count down. The time can be adjusted during the bagel cycle by turning the TIME dial.

- At the end of the bagel cycle, the oven alert will sound three times, and the START/CANCEL button surround will cease to illuminate.
BAKE FUNCTION
Elements: Top and bottom heating elements cycle on and off to regulate the correct temperature. The top middle element is off.
Rack Position: Bottom rack height position.
Optional Settings: CONVECTION button.
TEMPERATURE CONVERSION button. The BAKE function cooks food evenly throughout. This function is ideal for baking cakes, muffins, brownies, and pastries. TheThe
BAKE function is also ideal for cooking pre-packaged frozen meals, including lasagna and pot pies.
- Insert the wire rack into the bottom rack height position. The wire rack should be positioned with the spokes facing upwards.
- Close the oven door.
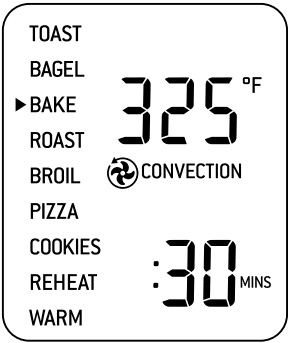
- Turn the FUNCTION dial until the indicator on the LCD screen reaches the BAKE function. The top figure on the LCD screen indicates the preset BAKE temperature of ‘325°F’, while the bottom figure on the LCD screen indicates the preset time of ‘30 MINS’. The preset CONVECTION setting will also be displayed.

- The baking temperature and time can be adjusted before or during the baking cycle:-
- a) The baking temperature is displayed as the top figure on the LCD screen.
Turn the TEMPERATURE dial to adjust the baking temperature is 10°F
increments, from 120°F to a maximum of 450°F (or in the Celsius mode, 5°C
increments, from 50°C to a maximum 230°C). - b) The baking time is displayed as the bottom figure on the LCD screen. Turn the TIME dial to adjust the baking time in one-minute increments up to 1 hour, and in 5-minute increments between 1 and 2 hours.
- a) The baking temperature is displayed as the top figure on the LCD screen.
- Press the START/CANCEL button to activate this setting. The button surround
will illuminate red, and the oven alert will sound. - The LCD screen will indicate a blinking ‘PREHEATING’. Once the oven has reached the set temperature, the temperature alert will sound.
- Place food, positioned on the Breville enamel baking pan or in an oven-proof dish, in the center of the wire rack so air flows around the sides of the food.

- After the PREHEATING alert has sounded, the timer will automatically begin to
count down in one-minute increments. The temperature and time can be adjusted during the baking cycle by turning the corresponding TEMPERATURE and TIME dial. - At the end of the baking cycle, the oven alert will sound three times and the START/CANCEL button surround will cease to illuminate.
- The baking cycle can be stopped at any time by pressing the START/CANCEL
button. This will cancel the cycle, and the button surround illumination will go out.
CARE & CLEANING YOUR BREVILLE SMART OVEN™
Cleaning the outer body and door
- Wipe the outer body with a soft, damp sponge. A non-abrasive liquid cleanser or
mild spray solution may be used to avoid the build-up of stains. Apply the cleanser to the sponge, not the oven surface, before cleaning. - To clean the glass door, use a glass cleaner or mild detergent and a soft, damp sponge or soft plastic scouring pad. Do not use an abrasive cleanser or metal scouring pad, as these will scratch the oven surface.
- Let all surfaces dry thoroughly before inserting the power plug into a wall outlet
and turning the oven ON.
Cleaning the interior
- The walls on the inside of the oven feature a non-stick coating for easy cleaning. To clean any splattering that may occur while cooking, wipe the walls with a soft, damp sponge. A non-abrasive liquid cleanser or mild spray solution may be used to avoid the build-up of stains. Apply the cleanser to the sponge, not the oven surface, before cleaning. Avoid touching the quartz heating elements.
- Let all surfaces dry thoroughly before inserting the power plug into a wall outlet
and turning the oven ON.
Cleaning the crumb tray
- After each use, slide out the crumb tray and discard crumbs. Wipe the tray with a
soft, damp sponge. A non-abrasive liquid cleanser may be used to avoid build-up
of stains. Apply the cleanser to the sponge, not the tray, before cleaning. Dry thoroughly. - To remove baked-on grease, soak the tray in warm soapy water, then wash with
a soft sponge or soft plastic scouring pad. Rinse and dry thoroughly. - Always ensure to re-insert the crumb tray into the oven after cleaning and before inserting the power plug into a wall outlet and turning the oven ON.
Cleaning the wire rack, broil rack, baking pan, and pizza pan
- Wash all accessories in warm, soapy water with a soft sponge or soft plastic
scouring pad. Rinse and dry thoroughly. - The wire rack, broil rack, baking pan, and pizza pan are also dishwasher safe.
Storage
- Ensure the oven is turned OFF by pressing the START/CANCEL button on the control panel. The oven is OFF when the button surround illumination goes out. Then remove the power plug from the wall outlet.
- Allow the oven and all accessories to cool completely.
- Ensure the oven and all accessories are clean and dry.
- Ensure the crumb tray is inserted into the oven, the broil rack is inserted into the
baking pan, and is resting on the wire rack in the middle rack height position. - Ensure the door is closed.
- Store the appliance in an upright position, standing level on its support legs. Do not store anything on top.
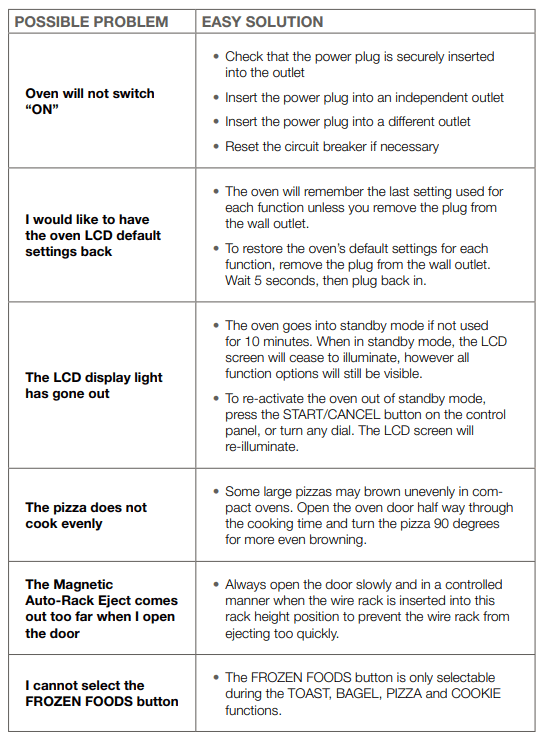
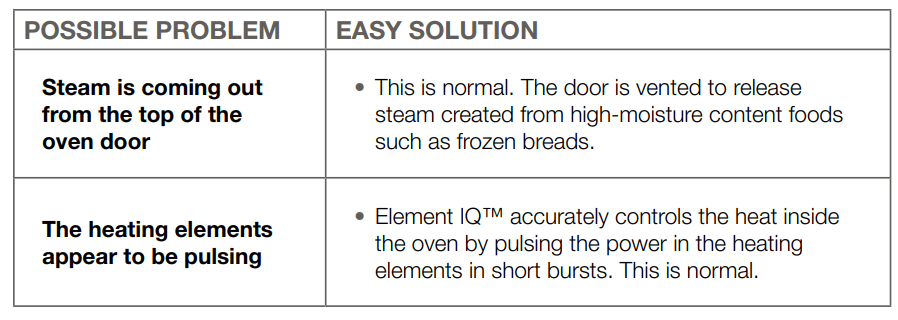
TROUBLESHOOTING
FOR MORE MANUALS BY BREVILLE, VISIT MANUALSLIBRARYY
Breville BOV800XL Smart Convection Oven- FAQs
How long does it take to cook a sandwich?
Most sandwiches are ready in 10 minutes or less, thanks to the double-sided heating that cooks both sides evenly.
How do I use this Panini Press?
Preheat the unit, place your sandwich on the bottom plate, close the lid, and cook until it’s golden brown and crispy.
How do I clean the Panini Press?
Let it cool, wipe off food with a paper towel, then use a damp sponge with mild soap. Use a plastic spatula if needed—do not immerse in water.
Should I use oil or butter?
Yes, brushing a bit of oil or butter on the bread or grill helps prevent sticking and improves browning.
What temperature should I cook at?
Use a medium-high heat (325°F to 375°F) setting for perfect results, if your unit has adjustable temperature control.
How do I know it’s preheated and ready?
The built-in ready light turns on when the press is preheated and ready for use.
Are the grill plates removable and dishwasher-safe?
No, the plates are non-removable but easy to clean due to the nonstick coating.
What’s the difference between this and a regular sandwich maker?
This Panini Press grills both sides, creating crispy textures and grill marks. A regular sandwich maker usually seals the edges and flattens the bread.
Why does it smoke sometimes during use?
Smoke may occur due to grease or food residue. Make sure to clean thoroughly after every use.
What type of cheese is best for paninis?
Mozzarella is a top choice for melting, but cheddar, provolone, and fontina also work well.

