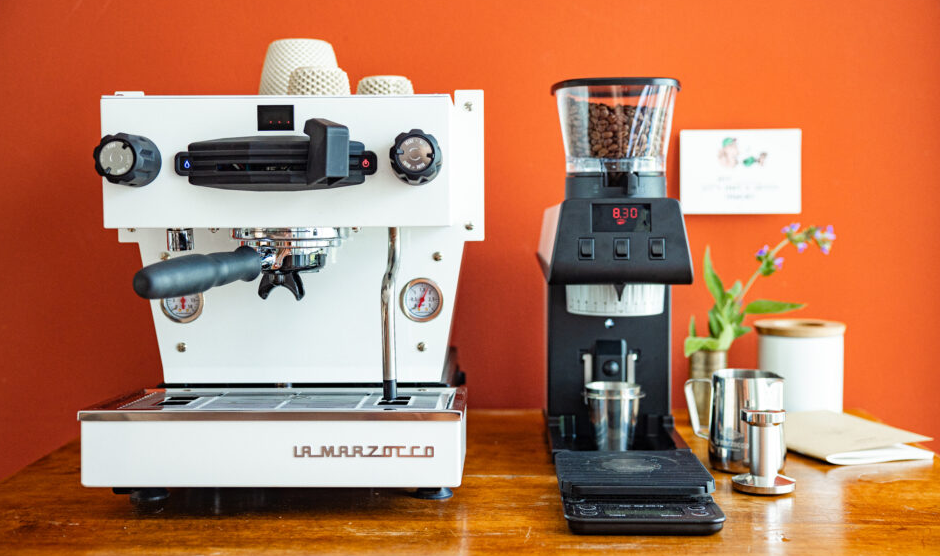
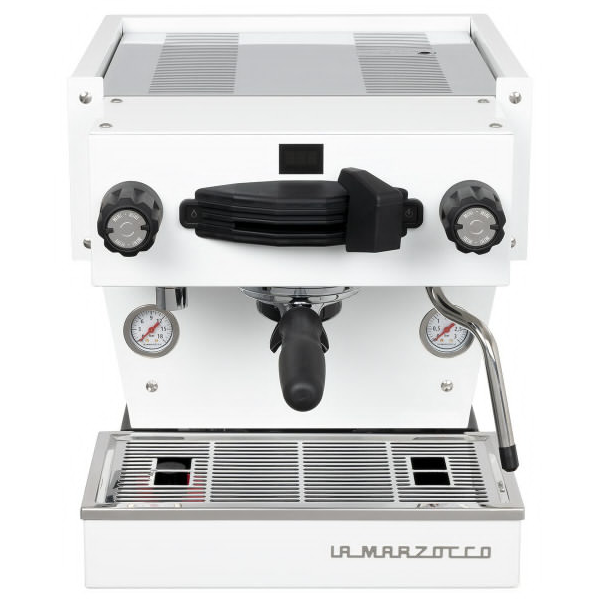
La Marzocco Linea Mini Espresso Machine
IMPORTANT SAFEGUARDS
When using electrical appliances, basic safety precautions should always be followed, including the following:
- Read all instructions.
- Do not touch hot surfaces. Use handles or knobs.
- To protect against fire, electric shock, and injury to persons, do not immerse the cord, plugs, or electrical parts in water or other liquids.
- Close supervision is necessary when any appliance is used by or near children.
- Unplug from the outlet when not in use and before cleaning. Allow to cool before putting on or taking off parts, and before cleaning the appliance.
- Do not operate any appliance with a damaged cord or plug, or after the appliance malfunctions, or has been damaged in any manner. Return the appliance to the nearest authorized service facility for examination, repair, or adjustment.
- The use of accessory attachments not recommended by the appliance manufacturer may result in fire, electric shock, or injury to persons.
- Do not use outdoors.
- Do not let the cord hang over the edge of the table or counter, or touch hot surfaces.
- Do not place on or near a hot gas or electric burner, or in a heated oven.
- Always attach the plug to the appliance first, then plug the cord into the wall outlet. To disconnect, turn off any control to “off,” then remove the plug from the wall outlet.
- Do not use the appliance for anything other than its intended use.
- Save these instructions.
- Use, cleaning, and maintenance of this coffee machine are realized by people (including children more than 8 years of age) with reduced physical, sensory, or mental capabilities, or lack of experience and knowledge, as long as they have been given supervision by a person responsible for their safety and if they understand dangers. Children should be supervised to ensure that they do not play with the appliance. Keep the appliance and its cord out of the reach of children less than 8 years of age.
- The service area is restricted to persons having knowledge and practical experience of the appliance, in particular as far as safety and hygiene are concerned.
- Any modification to the equipment is prohibited; the manufacturer cannot be held liable for damage to property, animals, and/ or persons if the equipment undergoes technical and aesthetic changes, changes in performance and characteristics, and in general is tampered with in one or more of its constituent components.
- Do not immerse the coffee machine in water. It is an electrical appliance.
General Information
WARNING
The manufacturer declines any responsibility for any event leading to liability suits whenever grounding has not been completed according to current local, national, and international regulations and electrical codes, or other electrical parts have been connected improperly.
This appliance is not intended for use by persons (including children) with reduced physical, sensory, or mental capabilities, or lack of experience and knowledge, unless they have been given supervision or instruction concerning use of the appliance by a person responsible for their safety.
The machine must be installed so that qualified technical personnel can easily access it for maintenance.
To reduce the risk of injury, do not drape the cord over the countertop where it can be pulled on by children or tripped over unintentionally.
An espresso coffee machine is essentially made up of a brewing group for hot water for espresso coffee, and a steam boiler that is able to supply steam and hot water for infusions.
This appliance is intended to be used for household and similar applications such as:
- staff kitchen areas in shops, offices, and other working environments;
- farm houses;
- by clients in hotels, motels, and other residential-type environments;
- bed & breakfast-type environments.
Remove the machine from the packaging
- Ensure product’s integrity by inspecting the packaging, making sure it presents no signs of damage that might have affected the enclosed machine.
- Check the machine’s integrity after having carefully removed the packaging. Packaging (boxes, plastic bags, foam parts, and whatever else) must not be left within easy reach of children, due to the potential danger it represents, nor be discarded in the environment.
Safety instructions
- Check to see if the data on the rating plate corresponds to that of the main electrical supply to which the machine will be attached. This equipment must be installed to comply with applicable federal, state, or local plumbing codes.
- The installation must be performed according to local electrical and plumbing codes and regulations. The installation also must comply with the manufacturer’s instructions and must be performed by qualified and authorized personnel.
- Incorrect installation may cause injury/damage to people, animals, or objects, for which the manufacturer shall not be held responsible.
- Safe electrical operation of this device will be achieved only when the connection to the power outlet has been completed correctly and in observance of all local, national, and international electrical codes and safety regulations, and particularly by grounding the unit. Make sure grounding has been done properly, as it represents a fundamental safety requirement. Ensure qualified personnel check such a connection.
- Furthermore, you must ensure that the capacity of the available electrical system is suitable for the maximum power consumption indicated on the espresso machine.
- We do not recommend using adapters, multiple plugs, and/or extension cords. If you cannot avoid using them, make sure that they are exclusively of the kind that conforms to local, national, and international electrical codes and safety regulations, being careful not to exceed the power and current ratings indicated on such adapters and extension cords.
- This device must be used exclusively for the functions it has been designed and built. Any other application is inappropriate and dangerous. The manufacturer shall not be held responsible for any damages caused by improper and/or irrational use.
- Using any electrical device requires that certain fundamental rules be observed. In particular:
- Do not touch the device with wet or moist hands and feet
- Do not use the device while not wearing shoes
- Do not use extension cords in the bath or shower rooms
- Do not unplug the device from the power outlet by pulling on the power supply cable
- Do not expose the device to atmospheric agents
- Do not allow children or untrained people to use this device
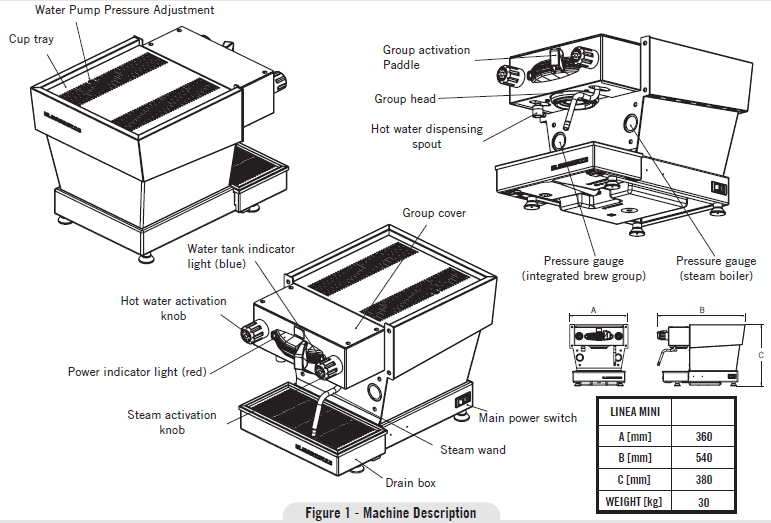
Machine Description
Installation
Espresso machine installation, linea mini
Fill the water reservoir with potable water.
Once the espresso machine has been unpackaged, place it on a hard surface. Remove the drain tray and slide the water reservoir until the water reservoir fills the cover is accessible. Remove the cover and fill the water reservoir with potable water. Replace the fill cover and slide the water reservoir to the operating position, and replace the drain tray. In order to connect the machine up to the water mains, proceed according to the indications given in the Installation Guide and in compliance with any local/national safety standards of the location in which the machine is being installed.
To guarantee a correct and safe functioning of the machine and to maintain an adequate performance level and a high quality of the beverages being brewed, it is important that the incoming water be of a hardness greater than 7°f (70ppm, 4°d) and less than 10°f (100ppm, 6°d), pH should be between 6.5 and 8.5 and the quantity of chlorides be less than 30mg/l. Respecting these values allows the machine to operate at maximum efficiency. If these parameters are not present, a specific filtration device should be installed, while always adhering to the local national standards in place regarding potable water.
In order to enable you to check if your water supply is within the suggested ranges, La Marzocco machines will be equipped with a quick water test kit, including 6 test strips and instruction cards. The parameters that you can measure are Total Hardness, Total Iron, Free Chlorine, Total Chlorine, pH & Total Alkalinity, and Chlorides. Ideally, you should perform a test on the water BEFORE the water treatment system and again AFTER the water system in order to verify if this is actually matching our suggested ranges.
Once the test has been performed, learn which treatment system is most appropriate for your particular water supply by filling out the online water calculator on our website: LA MARZOCCO WATER CALCULATOR (http://www.lamarzocco.com/water_calculator/).
Connect the espresso machine to the power supply.
Connect the espresso machine to a power supply that is rated in accordance with the serial plate on the espresso machine.
Filling the boilers with water.
Complete the following steps to properly fill the boiler tanks:
Steam boiler: Turn the main switch to position “1”, the steam boiler will then automatically fill to a predetermined level. When the correct water level in the steam boiler is reached, the machine will automatically stop filling.
NOTE: It may be necessary to refill the water reservoir during this process.
Integrated brew group: The water flows inside the Integrated brew group directly when the water pump is activated. When the linea mini is turned on, the electronics will activate the water pump to fill both boilers.
Verify the filling of boilers.
The installation is now complete, and the espresso machine should be heating to the operating temperatures.
Brewing after the first installation
Once the first installation procedures are finished, before proceeding with brewing coffee, hot water, and steam, please follow these steps:
- Engage the portafilter by inserting it into the group head and rotating the handle from left to right. Once the portafilter is inserted properly, you can move the paddle on the left side to start the flow of water through the portafilter. Brew water through the group for at least two minutes.
- Being careful to avoid burns, turn on the steam wand for at least one minute.
- Turn on the hot water valve for the time necessary to allow at least 1 liter of water to be brewed.
Adjusting water pump pressure.
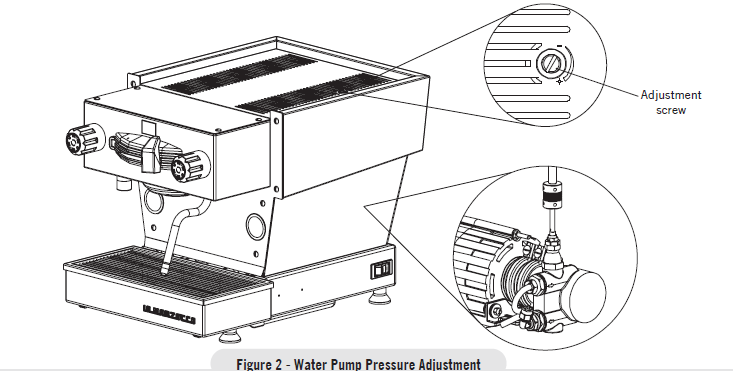
The water pump is factory set at 9 bar pressure. If it becomes necessary to change the pressure, please use the following procedure:
- Locate the water pump adjustment screw and loosen the lock nut.
- Adjust the water pump pressure to the desired measurement.
- Rotate clockwise to increase pressure and counter-clockwise to reduce pressure.

Operation
Installing the portafilter.
Install the portafilter by inserting it into the integrated brew group and rotating the handle from left to right. Once the portafilter is inserted properly, you can move the paddle handle from right to left to start the flow of water through the portafilter. It is important that the portafilter is at operating temperature prior to filling with coffee.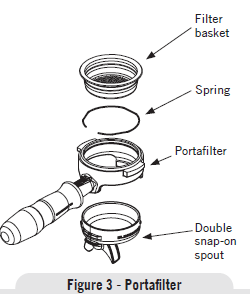
Allow hot water to pass through the empty portafilter for a few seconds before the brewing process to preheat the portafilter.
NOTE: It is important to leave the portafilter locked in the espresso machine when not in use. The portafilter must remain heated for the brewing process to function correctly.
Brewing coffee.
It is now possible to remove the portafilter to make a coffee beverage. Place some ground coffee in the portafilter basket using the single or double basket. Press down on the ground coffee with the supplied tamper and install the portafilter on the Linea Mini. Move the paddle handle from right to left to begin brewing (see Fig.1, page 8).
With the La Marzocco App, it is possible to adjust the temperature of the coffee brewing water. It is recommended to wait for a few seconds until the desired temperature is achieved.
If you want to decrease the temperature, it is recommended to dispense water from the group for a few seconds to speed up the process.
NOTE: Some users believe it is important to allow water to pass through the integrated brew group prior to installing the portafilter to flush any remaining coffee oils and particles from the integrated brew group. Some also flush just after brewing for the same reason. Please experiment to make the best possible procedure for your coffee. There are many techniques for brewing espresso. You can find instructions for many techniques on websites, blogs, and forums.
Dispensing hot water.
You may dispense hot water by using the hot water nozzle. To dispense hot water rotate the left knob (see Fig.4 page 14). This knob commands the hot water delivery.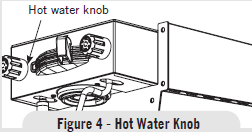
Activation of the flush function.
The flush function is activated by operating the lever shown in Figure 5, turning it from the dispensing position to the deactivation position within 1 second. The machine will dispense hot water for a certain number of seconds (the default setting is 5 seconds, but this can be changed via the App).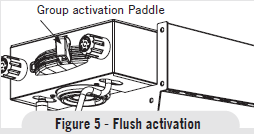
Preventative Maintenance and Cleaning
Cleaning (Daily)
Cleaning the diffuser screen and diffuser screw.
During the discharge operation (subsequent to coffee brewing), small amounts of coffee grounds may slowly build up on and obstruct, even partially, the diffuser screen. Turn off the machine and remove the diffuser screen by unscrewing the diffuser screw. Soak in detergent powder liquid following the instructions of the detergent manufacturer. Rinse thoroughly with clean water, puro caff. Install and run hot water through the group head several times with the screen installed.
Cleaning the brewing system.
Insert the blank basket into the portafilter and put the correct amount of espresso cleaning product (following the product’s instructions) into the filter, engage the portafilter into the Integrated Brew Group.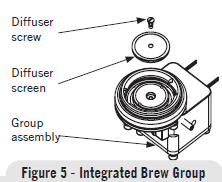
- Move the group activation paddle for said group, as if you were making a regular cup of coffee. Stop the water after about 15-20 seconds.
- Start and stop the group several times until you notice clear water being released instead of soapy water when you remove the portafilter. Do not remove the portafilter when the group is dispensing water.
- Rinse the group using a normal filter in the portafilter by running hot water through it several times.
Cleaning the body.
Wipe the stainless steel surfaces with a soft, non-abrasive cloth in the direction of the glazing marks, if any. Do not use any alcohol or solvents whatsoever on painted, imprinted, or plastic parts in order not to damage them. Clean the side panels using a soft cloth. Clean only with a damp, soft cloth or possibly soaked in warm water and mild soap.
Cleaning the steam nozzles.
Steam nozzles must be cleaned immediately after use with a damp cloth and by producing a short burst of steam so as to prevent the formation of deposits inside the nozzles themselves, which may alter the flavor of other drinks to be heated. If milk residue is present on the steam wand, soak the tip in a container of hot water, then it will be possible to wipe the tip clean. Repeat the process if residue remains.
Cleaning the hot water nozzles.
Hot water nozzles must be cleaned periodically with a damp cloth soaked in water and/or mild soap.
NOTE: This cleaning schedule is based upon a moderate to average use (5-20) cups per day. If machine use is less than moderate, then this schedule may be adjusted accordingly.
Clean the water reservoir and the drain box:
The water reservoir needs to be cleaned periodically to ensure that no algae forms on the inside surfaces. To clean, first remove the water reservoir from the machine. Disconnect the clear plastic water intake hose. Hand wash each part with water containing mild soap.
Steam boiler draining.
Yearly, we recommend to fully drain the steam boiler by means of the specific drain cock located on the side of the boiler or under the boiler.
Indicator light status
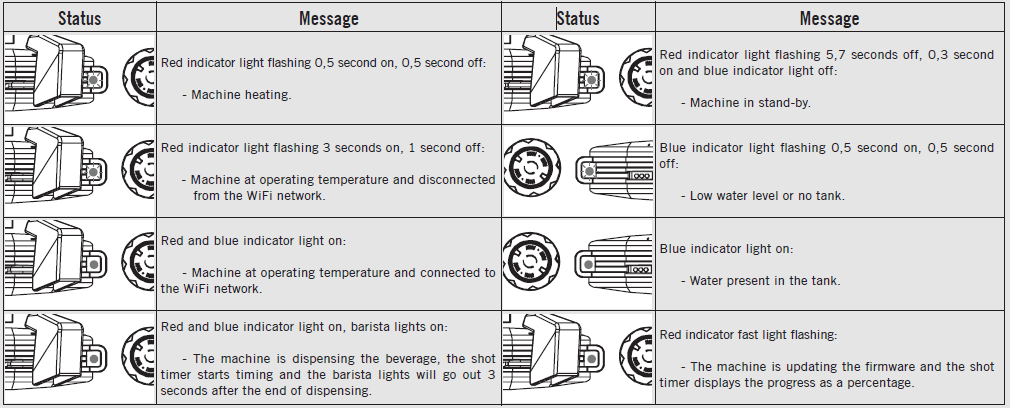
For more Manuals by La Marzocco, visit ManualsLibraryy
La Marzocco Linea Mini Espresso Machine-FAQs
How long does it take for the Linea Mini to heat up?
The Linea Mini takes about 10 minutes to heat up for espresso and around 20 minutes for full steam pressure. A red blinking light means the boiler is still heating.
How can I adjust the brew pressure on the Linea Mini?
You can adjust the pump pressure using a screw located on the top right of the machine. Only adjust the pressure while a shot is actively brewing.
Why are La Marzocco machines so expensive?
La Marzocco machines are crafted with precision engineering to deliver consistent temperature and pressure. This level of build quality and performance contributes to their premium price.
What is the ideal brewing temperature for the Linea Mini?
A good starting point is 93°C for medium roast coffee. For beginners, it’s also recommended to set the steam level to 1.
Is the Linea Mini suitable for commercial use?
Yes, the Linea Mini is NSF-certified and capable of light commercial tasks, making it suitable for coffee carts, events, or small businesses.
When should I start timing my espresso shot?
Begin the shot timer when the pump activates and water starts contacting the coffee. This includes any pre-infusion time.
How much pressure does the Linea Mini use?
The Linea Mini is pre-set to operate at 9 bars of pressure, which is standard for espresso extraction.
How do I lubricate the espresso lever?
Remove the E61 lever by unscrewing the flathead nut and cam shaft. Apply food-safe lubricant to the cam head and reassemble the group head.

