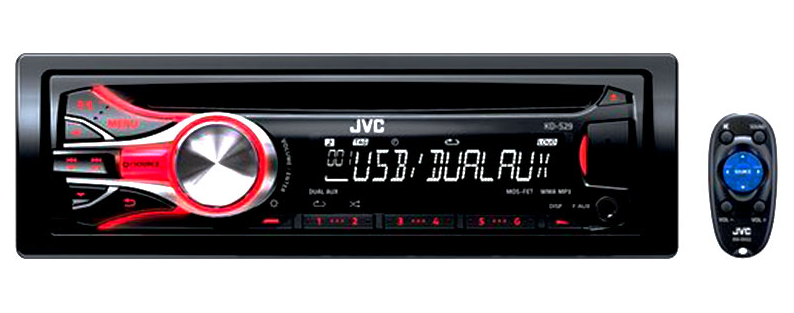
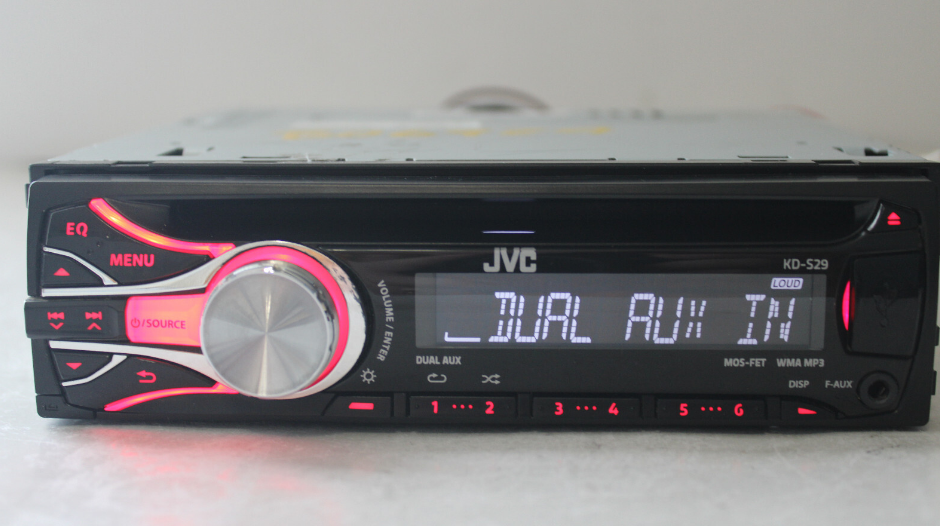
JVC KDS29 CD Receiver
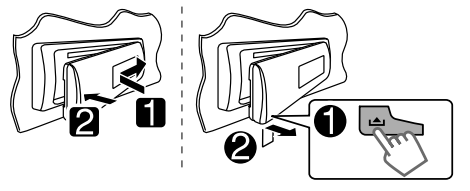
How to attach/detach the control panel
How to reset your unit
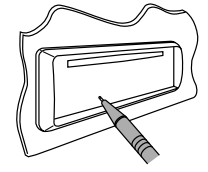
Your preset adjustments will also be erased.
How to forcibly eject a disc
- Be careful not to drop the disc when it ejects.
- If this does not work, reset your unit.
Canceling the display demonstration
The display demonstration is always turned on unless you cancel it.


- Select the demo off
- Press MENU to exit.
Setting the clock

- Select Clock

- Select Clock Set

- Adjust the hour

- Adjust the minute.

- Press MENU to exit.
Display information
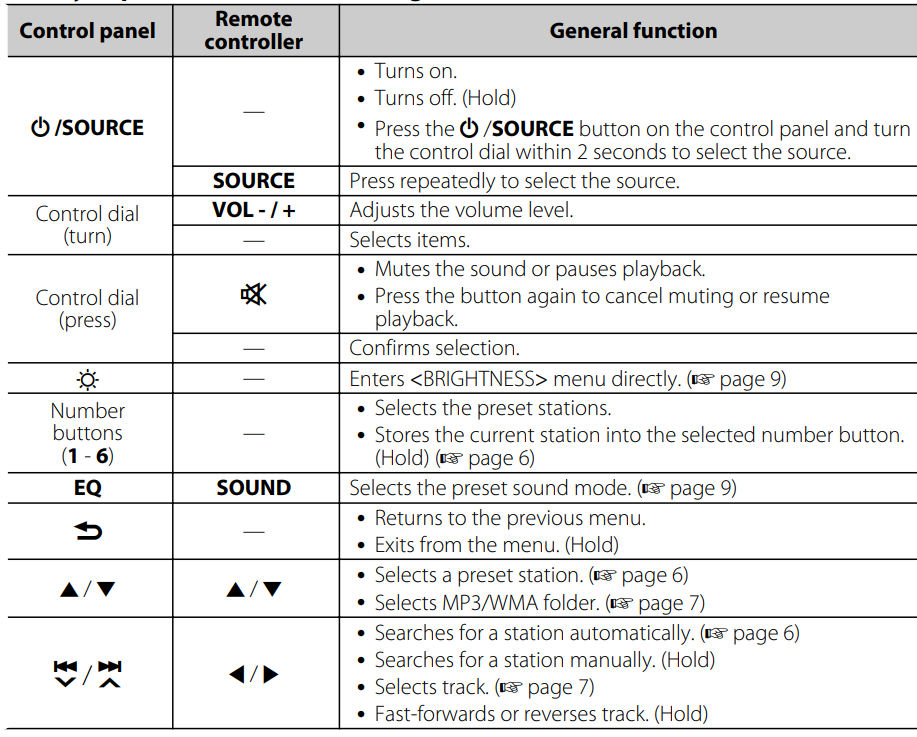
Changes the display information. (Press) Scrolls the current display information. (Hold)

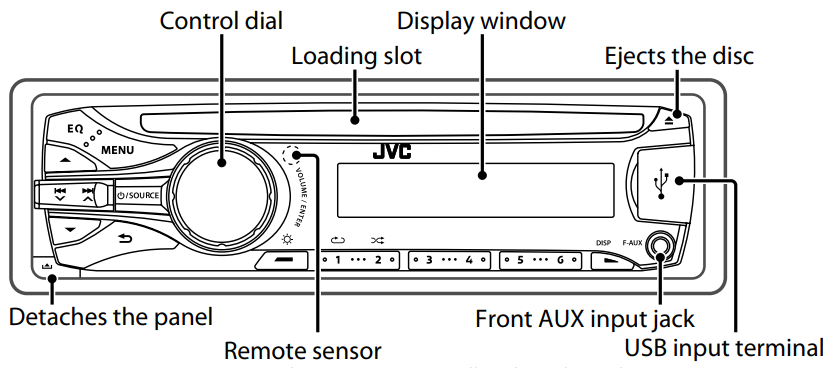
Control panel
Remote controller
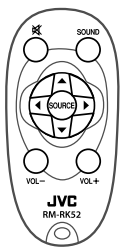
When you press or hold the following button(s)…
RADIO
Searching for a station
- Select or. FM OR AM
- Auto search. (Press) Manual search. (Hold)
Storing stations in memory
Manual presetting
You can preset up to 18 stations for FM and 6 stations for AM. While listening to a station…

The preset number flashes and “MEMORY” appears. The current station is stored in the
selected number button (1 – 6).
 “PRESET MODE” flashes
- Select a preset number

CD/USB
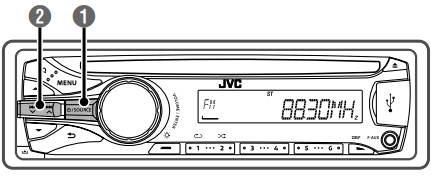
Playing a CD/USB device
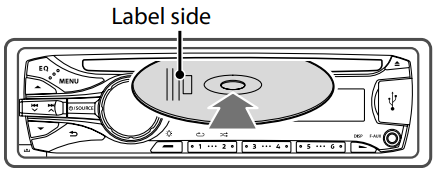
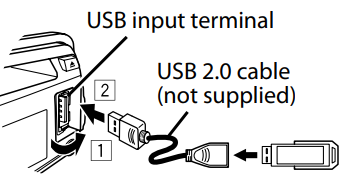
- This unit can play MP3/WMA files stored on CD-R, CD-RW, and USB mass storage devices (such as a USB memory and a Digital Audio Player).
- Make sure all important data has been backed up. We shall bear no responsibility for any loss of data in a USB mass storage class device while using this system.
- Ejected disc not removed within 15 seconds will reload automatically.
- If the disc cannot be ejected, ‘ page 3.
Selecting a folder/track
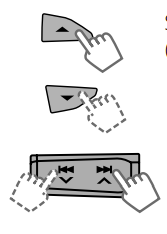
- Selects track. (Press)
- Fast-forwards or reverses the track. (Hold)
Selecting a track/folder from the list

- Select a folder.

- Select a track.

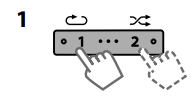
Selecting the playback modes
You can select one of the following playback modes at a time.
External component
Playing an external component from the Front/Rear AUX
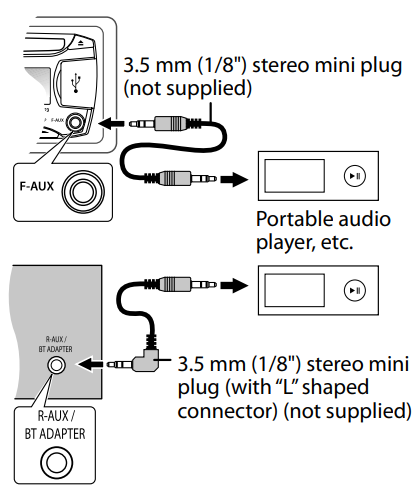
- Connect to F-AUX on the control panel and/or R-AUX on the rear panel.

- Set the source as necessary.

- Select <F-AUX> or <R-AUX>
- Turn on the connected component and start playing the source
Bluetooth
For Bluetooth operations, it is required to connect the Bluetooth adapter, KS-BTA100
(separately purchased) to the auxiliary input jack (R-AUX/BT ADAPTER) on the rear of
the unit. (‘ Installation/Connection Manual)
- KS-BTA100 is not available in some countries. Please contact your dealer where you purchased this unit.
- Operations may be different depending on the connected Bluetooth device. For
details, refer also to the instructions supplied with the device.
Preparation
- Register (pair) a Bluetooth device with KS-BTA100
- Change the settings of this unit

- Press MENU to exit.
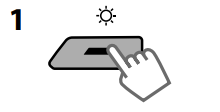
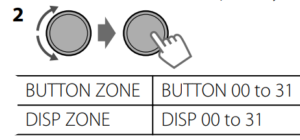
Brightness adjustments
You can select your preferred brightness for
Sound adjustments
Selecting the preset sound
You can select a preset sound mode for each source, suitable for the music genre.
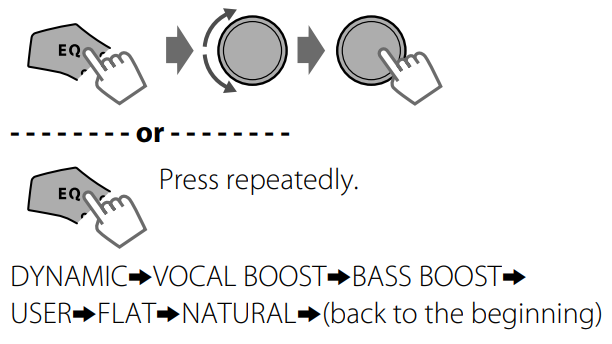
Pro Equalizer
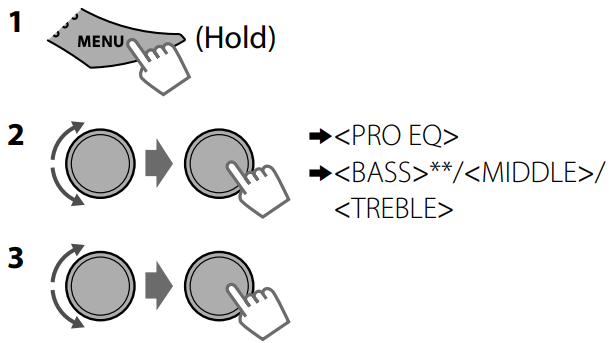
Menu Operations
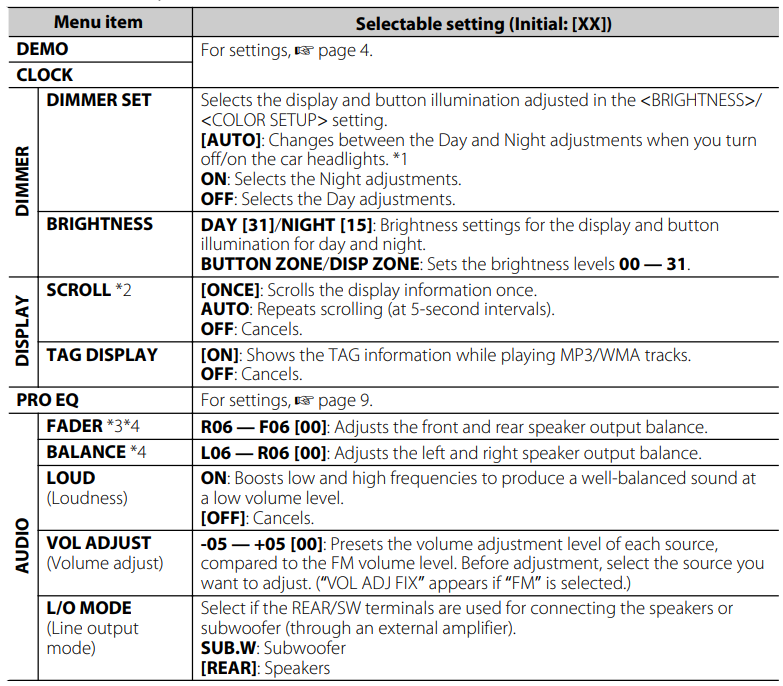
- The illumination control lead connection is required. (See “Installation/Connection Manual.) This setting may not work correctly on some vehicles (particularly on those having a control dial for dimming). In this case, change the setting to something other than.
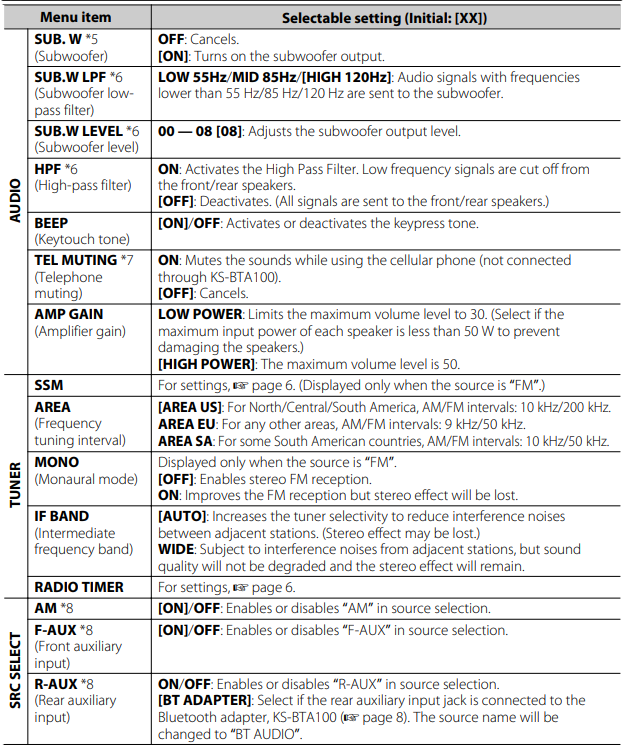
- Some characters or symbols will not be shown correctly (or will be blanked) on the display.
- If you are using a two-speaker system, set the fader level to “00”.
- This adjustment will not affect the subwoofer output.
Remote Controller
Preparing
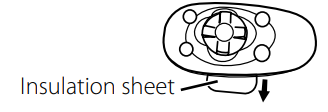
When you use the remote controller for the first time, pull out the insulation sheet
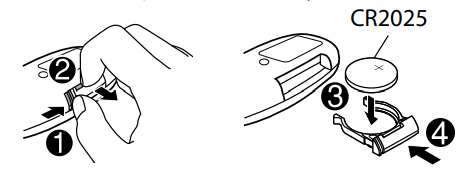
Replacing the lithium coin battery
- If the effectiveness of the remote controller decreases, replace the battery
Warning:
- Do not install any battery other than CR2025 or its equivalent.
- Do not leave the remote controller in places (such as dashboards) exposed to direct
sunlight for a long time. - Store the battery in places out of reach of children.
- Do not recharge, short, disassemble, heat the battery, or dispose of it in a fire.
- Do not place the battery with other metallic materials.
- Do not poke the battery with tweezers or similar tools.
- Insulate the battery by wrapping it with tape when disposing of or storing it.
Additional information
About discs
This unit can only play the following CDs:

This unit can play back multi-session discs; however, unclosed sessions will be skipped
during playback
Unplayable discs
- Discs that are not round.
- Discs with coloring on the recording surface or discs that are dirty.
- Recordable/Rewritable disc that has not been finalized. (For details on disc finalization, refer to your disc writing software and your disc recorder instruction manual.)
- 8 cm (3 inch) CD. Attempting to insert using an adapter can cause a malfunction. There may also be problems ejecting the disc if inserted.
Handling discs
- Do not touch the recording surface of the disc.
- Do not stick tape, etc., on the disc, or use a disc with tape stuck on it.
- Do not use any accessories for the disc.
- Clean from the center of the disc and move outwards.
- Clean the disc with a dry silicon or soft cloth. Do not use any solvents.
- When removing discs from this unit, pull them out horizontally.
- Remove any burrs from the center hole and disc edge before inserting a disc.
DualDisc playback
The non-DVD side of a “DualDisc” does not comply with the “Compact Disc Digital Audio” standard. Therefore, the use of the non-DVD side of a DualDisc on this product may not be recommended.
About audio files
Playable files
- File extensions: MP3(.mp3), WMA(.wma)
- Bit rate: MP3: 8 kbps – 320 kbps, WMA: 32 kbps – 192 kbps
- Sampling frequency: MP3: 48 kHz, 44.1 kHz, 32 kHz, 24 kHz, 22.05 kHz, 16 kHz, 12 kHz, 11.025 kHz, 8 kHz WMA: 48 kHz, 44.1 kHz, 32 kHz
- Variable bit rate (VBR) files. (The elapsed time for VBR files will not be displayed correctly.)
Unplayable files
- MP3 files:
- – encoded in MP3i and MP3 PRO format
- – encoded in an inappropriate format
- – encoded with Layer 1/2
- WMA files:
- – encoded in lossless, professional, and voice format
- – not based upon Windows Media® Audio
- – copy-protected with DRM
- Files that include data such as AIFF, ATRAC3, etc.
About the USB device
- When connecting a USB cable, use the USB 2.0 cable.
- You cannot connect a computer or portable HDD to the USB input terminal of the unit.
- Connect only one USB device to the unit at a time. Do not use a USB hub.
- USB devices equipped with special functions, such as data security functions, cannot be used with the unit.
- Do not use a USB device with 2 or more partitions.
- This unit cannot recognize a USB device whose rating is other than 5 V and exceeds 1 A.
- This unit may not recognize a memory card inserted into the USB card reader.
- This unit may not play back files in a USB device properly when using a USB extension cord.
- Depending on the shape of the USB devices and connection ports, some USB devices may not be attached properly, or the connection might be loose.
- Operation and power supply may not work as intended for some USB devices
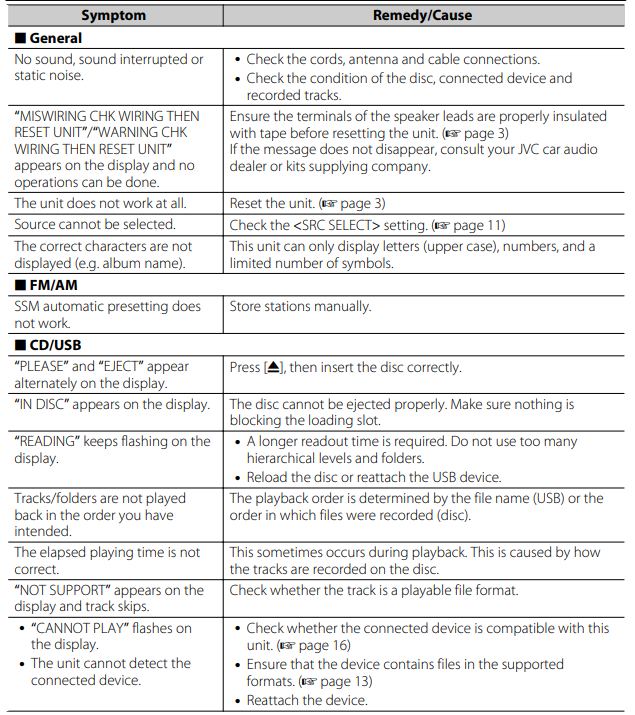
Troubleshooting
Specifications
AUDIO AMPLIFIER SECTION

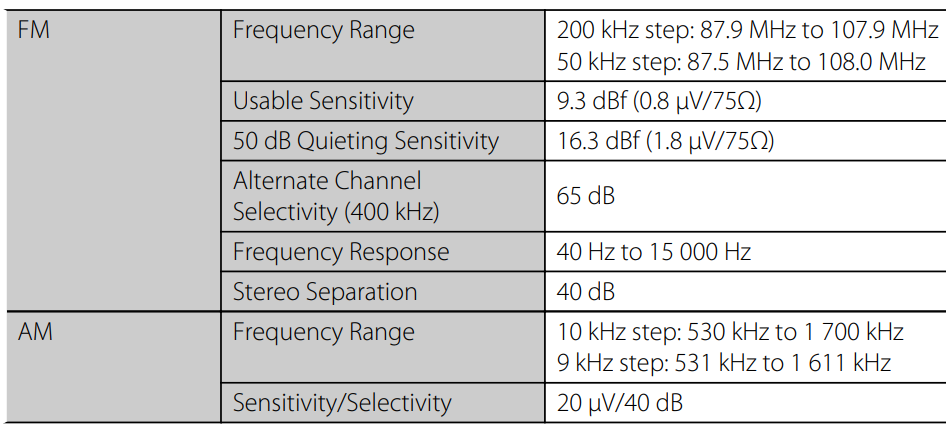
TUNER SECTION
CD PLAYER SECTION

USB SECTION

GENERAL

FOR MORE MANUALS BY JVC, VISIT MANUALSLIBRARYY
JVC KDS29 CD Receiver-FAQs
How do I eject a CD from my JVC CD receiver?
If a CD is inside, the display will show “PLEASE” and “EJECT.” Press the 0 button to eject the disc. Be careful not to let it fall while removing it.
How can I turn off demo mode on the JVC unit?
Press and hold the SEL button for over 2 seconds. Use the arrow buttons to find “DEMO,” then press – to switch it to “DEMO OFF.” Press SEL again to confirm.
What is the Sound Lift feature on JVC receivers?
Sound Lift lets you virtually raise the sound position by adjusting frequency output—ideal if your speakers are mounted low.
How do I adjust the equalizer on the JVC radio?
Choose the frequency band you want to modify, then use the gain control to increase or decrease volume levels around that frequency. You can also adjust bandwidth (Q) for finer control.
How can I manually set the clock on the JVC receiver?
In manual mode, press the SET button. Tap it to change the minutes step-by-step, or hold it to advance quickly. Release it close to your desired time, then press again for precise setting.
How do I reset my JVC car radio if there’s no reset button?
Try pressing and holding buttons like DSPL + BACK/MODE, DSPL + CALL, or SOURCE/OFF for more than 2 seconds—depending on the model.
Is there a keyboard shortcut to eject a CD?
Yes, press Windows + E to open File Explorer, then right-click the CD/DVD drive and select Eject.
What should I do if my CD isn’t working or playing?
If a CD won’t play, moisture might be the cause. Open the tray and let the unit sit for about an hour. If the problem continues, the laser lens may need cleaning.
How do I turn on AV mode on the JVC receiver?
To activate AV mode, press and hold the power or display button, or tap the screen if it’s touch-enabled. You can also select your desired AV source from the Home menu.



 “PRESET MODE” flashes
