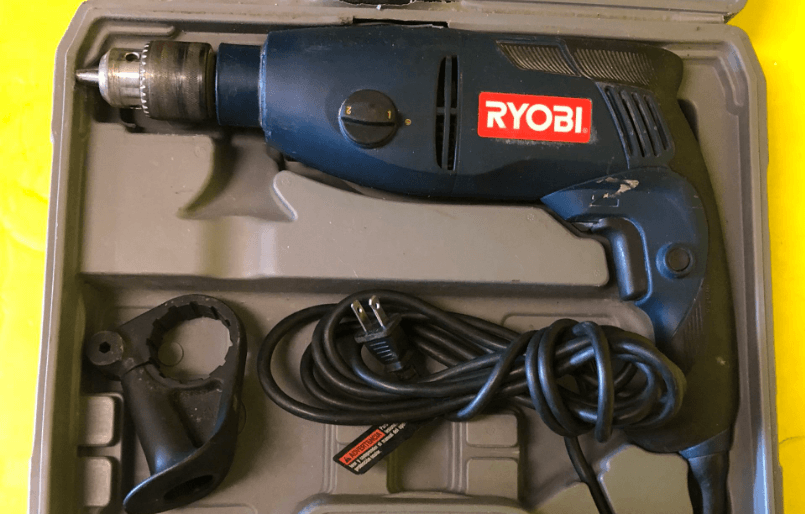
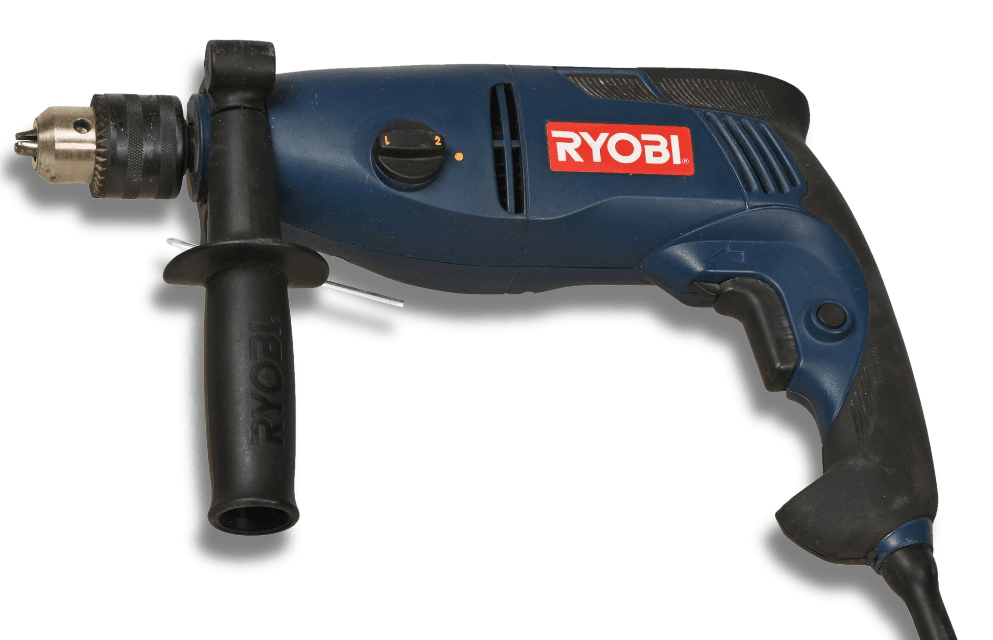
Ryobi D552H Corded Hammer Drill
GENERAL SAFETY RULES
Work Area SAFETY
- Keep the work area clean and well lit. Cluttered or dark areas invite accidents.
- Do not operate power tools in explosive atmospheres, such as those containing flammable liquids, gases, or dust. Power tools create sparks, which may ignite the dust or fumes.
- Keep children and bystanders at a safe distance while operating a power tool. Distractions can cause you to lose control.
ELECTRICAL SAFETY
- Power tool plugs must match the outlet. Never modify the plug in any way. Do not use any adapter plugs with earthed (grounded) power tools. Unmodified plugs and
Matching outlets will reduce the risk of electric shock. - Avoid body contact with earthed or grounded surfaces such as pipes, radiators, ranges, and refrigerators. There is an increased risk of electric shock if your body
is earthed or grounded. - Do not expose power tools to rain or wet conditions. Water entering a power tool will increase the risk of an electric shock.
- Do not abuse the cord. Never use the cord for carrying, pulling, or unplugging the power tool. Keep the cord away from heat, oil, sharp edges, or moving parts. Damaged or entangled cords increase the risk of electric shock.
- When operating a power tool outdoors, use an extension cord suitable for outdoor use. Use of a cord suitable for outdoor use reduces the risk of electric shock.
PERSONAL SAFETY
- Stay alert, watch what you are doing, and use common sense when operating a power tool. Do not use a power tool while you are tired or under the influence of drugs, alcohol, or medication. A moment of inattention while operating power tools may result in serious personal injury.
- Use safety equipment. Always wear eye protection. Safety equipment such as a dust mask, non-skid safety shoes, a hard hat, or hearing protection is used for appropriate Conditions will reduce personal injuries.
- Avoid accidental starting. Ensure the switch is in the off position before plugging in. Carrying power tools with your finger on the switch or plugging in power tools that have the switch on invites accidents.
- Remove any adjusting key or wrench before turning the power tool on. A wrench or a key left attached to a rotating part of the power tool may result in personal injury.
- Do not overreach. Keep proper footing and balance at all times. This enables better control of the power tool in unexpected situations.
- Dress properly. Do not wear loose clothing or jewelry. Keep your hair, clothing, and gloves away from moving parts. Loose clothes, jewelry, or long hair can be caught in moving parts.
- If devices are provided for the connection of dust extraction and collection facilities, ensure these are connected and properly used. Use of these devices can
Reduce dust-related hazards. - Do not wear loose clothing or jewelry. Contain long hair. Loose clothes, jewelry, or long hair can be drawn into air vents.
- Do not use on a ladder or unstable support. Stable footing on a solid surface enables better control of the power tool in unexpected situations.
POWER TOOL USE AND CARE
- Do not force the power tool. Use the correct power tool for your application. The correct power tool will do the job better and safer at the rate for which it was designed.
- Do not use the power tool if the switch does not turn it on and off. Any power tool that cannot be controlled with the switch is dangerous and must be repaired.
- Disconnect the plug from the power source and/or the battery pack from the power tool before making any adjustments, changing accessories, or storing power tools. Such preventive safety measures reduce the risk of starting the power tool accidentally.
- Store idle power tools out of the reach of children and do not allow persons unfamiliar with the power tool or these instructions to operate the power tool. Power tools are dangerous in the hands of untrained users.
- Maintain power tools. Check for misalignment or binding of moving parts, breakage of parts, and any other condition that may affect the power tool’s operation. If damaged, have the power tool repaired before use. Many accidents are caused by poorly maintained power tools.
- Keep cutting tools sharp and clean. Properly maintained cutting tools with sharp cutting edges are less likely to bind and are easier to control.
- Use the power tool, accessories, and tool bits, etc., following these instructions and in the manner intended for the particular type of power tool, taking into account the working conditions and the work to be performed. Use of the power tool for operations different from those intended could result in a hazardous situation.
FEATURES
PRODUCT SPECIFICATIONS
- Chuck Capacity……………………………………………….. 1/2 in.
- Switch……………………….. VSR (Variable Speed Reversible)
- Blows Per Minute …………………… 0-17,000/0-51,000 BPM
- No Load Speed ……………….0-1,000/0-3,000 r/min. (RPM)
- Input …………………………. 120 V, AC only, 60 Hz, 5.5 Amps
- Net Weight…………………………………………………… 6.25 lbs.
KNOW YOUR HAMMER DRILL
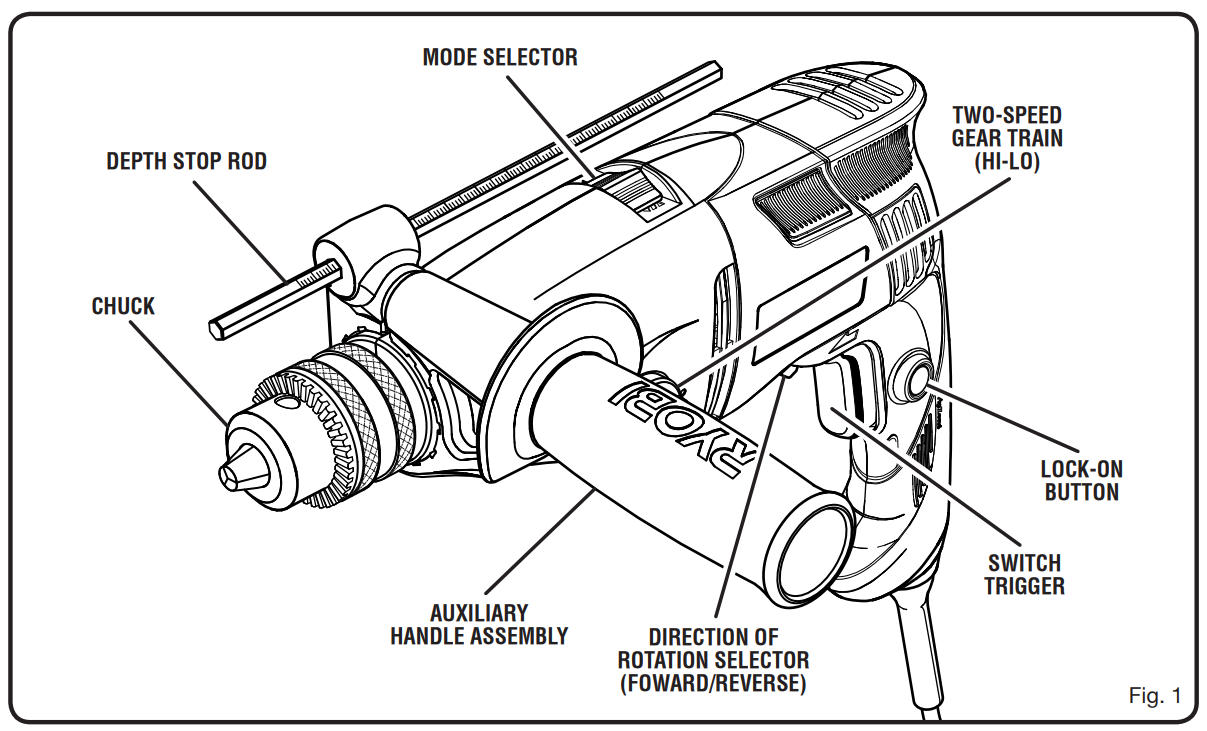
See Figure 1. The safe use of this product requires an understanding of the information on the tool and in this operator’s manual, as well as a knowledge of the project you are attempting. Before using this product, familiarize yourself with all operating features and safety rules.
Auxiliary Handle ASSEMBLY
Your drill is equipped with an auxiliary handle assembly. For ease of operation, use the handle with either the left or right hand.
Blows per minute
This tool features an impact speed of 0-17,000 and 0-51,000 BPM (Blows Per Minute). Blows Per Minute is the number of impacts per minute.
Depth stop rod
A depth stop rod has been supplied with this product to assist in controlling the depth of drilled holes.
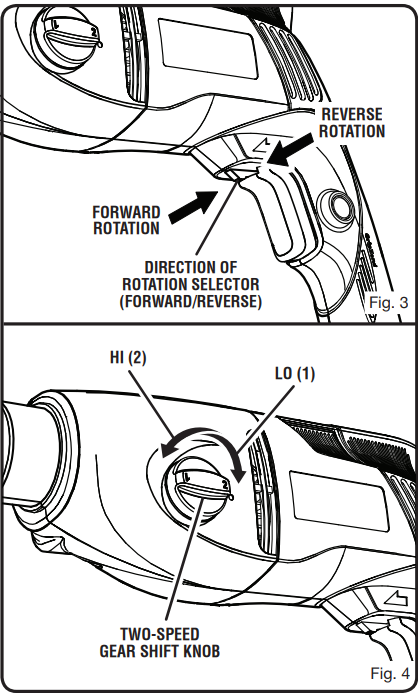
DIRECTION OF ROTATION SELECTOR (FORWARD/REVERSE)
Your drill has a direction of rotation (forward/reverse) selector located above the switch trigger for changing the direction of bit rotation.
lock-on button
The lock-on button is convenient for continuous drilling for extended periods.
Mode selector: Select either hammer mode or drilling mode depending on
the type of material in which you are drilling.
TWO-SPEED GEAR TRAIN
The two-speed gear train is designed for drilling or driving at LO (1) or HI (2) speeds. A switch is located on the side of your drill for selecting either LO (1) or HI (2) speed.
VARIABLE SPEED
The variable speed switch trigger delivers higher speed with increased trigger pressure and lower speed with decreased trigger pressure.
ASSEMBLY
UNPACKING
This product has been shipped completely assembled.
- Carefully remove the product and any accessories from the box. Make sure that all items listed in the packing list are included.
- Inspect the product carefully to make sure no breakage or damage occurred during shipping.
- Do not discard the packing material until you have carefully inspected and satisfactorily operated the product.
- If any parts are damaged or missing, please call 1-800-525-2579 for assistance.
PACKING LIST
- Hammer Drill with Auxiliary Handle Assembly
- Chuck Key
- Depth Stop Rod
- Case
- Operator’s Manual
OPERATION
APPLICATIONS
You may use this product for the purposes listed below:
- Hammer drilling in concrete, brick, or other masonry
- Drilling in wood
- Drilling in ceramics, plastics, fiberglass, and laminates
- Drilling in metals
- Mixing paint
SWITCH TRIGGER
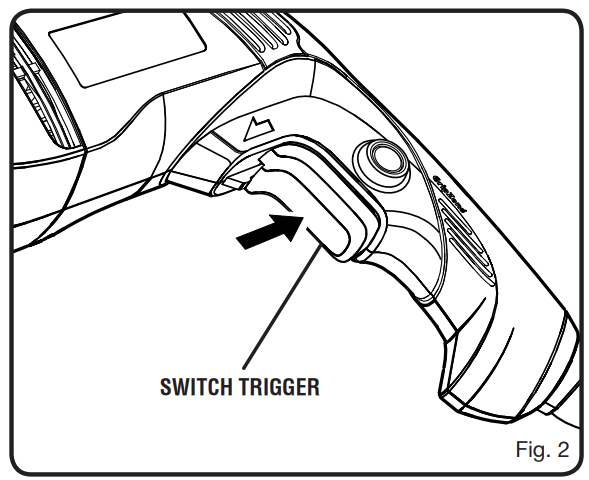
See Figure 2. To turn the drill ON, depress the switch trigger. To turn it OFF, release the switch trigger.
VARIABLE SPEED
The variable speed switch delivers higher speed with increased trigger pressure and lower speed with decreased trigger pressure.e
DIRECTION OF ROTATION SELECTOR (FORWARD/REVERSE)
See Figure 3. The direction of bit rotation is reversible and is controlled by a selector located above the switch trigger. With the drill held in normal operating position, the direction of rotation selector should be positioned to the left of the switch trigger for forward drilling. The drilling direction is reversed when the selector is to the right of the switch trigger. To stop the drill, release the switch trigger and allow the chuck to come to a complete stop.
TWO-SPEED GEAR TRAIN
See Figure 4. The drill has a two-speed gear train designed for drilling or driving at LO (1) or HI (2) speeds. A switch is located on the side of the drill to select either LO (1) or HI (2) speed. When the gear drill is in the LO (1) speed range, the speed will decrease, and the unit will have more power and torque. When using the drill in the HI (2) speed range, the speed will increase, and the unit will have less power and torque. Use LO (1) speed for high power and torque applications, usually for drill bits larger than 3/8 in. Use HI (2) speed for fast drilling or driving applications, usually for drill bits smaller than 3/8 in.
INSTALLING BITS
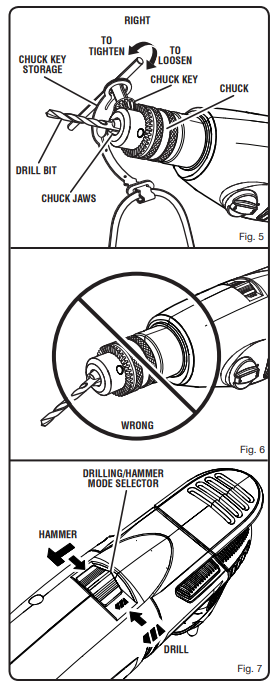
See Figures 5 – 6.
- Unplug the drill.
- Insert the chuck key and twist counterclockwise.
- Open or close the chuck jaws to a point where the opening is slightly larger than the bit size you intend to use. Also, raise the front of the drill slightly to keep the bit from falling out of the chuck jaws.
- Insert the drill bit.
- Tighten the chuck jaws securely on the drill bit, using the chuck key provided.
- Remove the chuck key.
REMOVING BITS
See Figure 5.
- Unplug the drill.
- Loosen the chuck jaws using the chuck key provided.
- Remove the drill bit.
- Remove the chuck key.
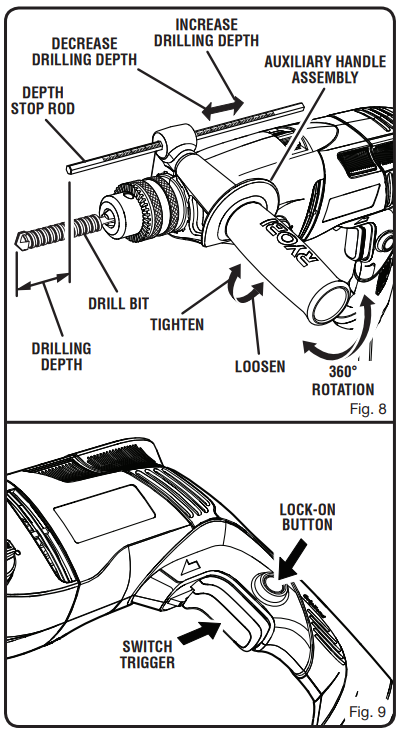
SELECTING hammer MODE or drilling mode
See Figure 7. To adjust for the type of drilling, slide the selector on top of the motor housing to hammer mode or drilling mode. The hammer mode symbol is on the right, and the drill bit symbol is on the left.t
USING THE AUXILIARY HANDLE ASSEMBLY
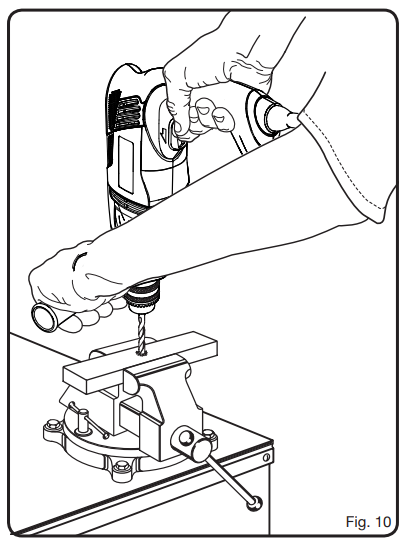
See Figure 8. The drill is equipped with an auxiliary handle assembly. For ease of operation, use the handle with either the left or right hand. The handle can be rotated 360°.
To adjust the auxiliary handle assembly:
- Loosen the handle assembly by turning the handle counterclockwise.
- Rotate the handle assembly to the desired operating position.
- Securely tighten by turning the handle assembly clockwise.
Be sure the handle assembly is securely tightened against the depth stop clamp. This secures the depth stop rod at the desired depth of cut. It also secures the handle assembly.
lock-on button
See Figure 9. This drill is equipped with a lock-on feature, which is convenient for continuous drilling for extended periods of time.
To lock on:
- Depress the switch trigger.
- Push in and hold the lock-on button, located on the side of the handle.
- Release the switch trigger.
- Release the lock-on butt, on and the drill will continue running.
- To release the lock, depress and release the switch trigger.
If the lock-on feature is engaged during use and the drill becomes disconnected from the power supply, disengage the lock-on feature immediately.
DRILLING
See Figure 10.
- Depress and release the switch trigger to be sure the drill is in the OFF position before connecting it to the power supply.
- Check the direction of rotation selector for the correct setting (forward or reverse).
- Secure the material to be drilled in a vise or with clamps to keep it from turning as the drill bit rotates.
- Plug the drill into the power supply source.
- Hold the drill firmly and place the bit at the point to be drilled.
- Depress the switch trigger to start the drill. Do not lock the switch ON for jobs where the drill may need to be stopped suddenly.
- Move the drill bit into the workpiece, applying only enough pressure to keep the bit cutting. Do not force the drill or apply side pressure to elongate a hole. Let the drill and bit do the work.
- When drilling a hard, smooth surface, use a center punch to mark the desired hole location. This will prevent the drill bit from slipping off center as the hole is started.
- When drilling metals, use a light oil on the drill bit to keep it from overheating. The oil will prolong the life of the bit and increase the drilling action.
- If the bit jams in the workpiece or if the drill stalls, stop the tool immediately. Remove the bit from the workpiece and determine the reason for jamming.
WOOD DRILLING
For maximum performance, use high-speed steel bits for wood drilling.
- Select normal drilling mode.
- Begin drilling at a very low speed to prevent the bit from slipping off the starting point. Increase the speed as the drill bit bites into the material.
- When drilling through holes, place a block of wood behind the workpiece to prevent ragged or splintered edges on the back side of the hole.
METAL DRILLING
For maximum performance, use high-speed steel bits for metal or steel drilling.
- Select normal drilling mode.
- Begin drilling at a very low speed to prevent the bit from slipping off the starting point.
- Maintain a speed and pressure that allows cutting without overheating the bit. Applying too much pressure will:
- Overheat the drill.;
- Wear the bearings.
- Bend or burn bits, and
- Produce off-center or irregular-shaped holes.
MASONRY DRILLING
For maximum performance, use carbide-tipped masonry impact bits or designated hammer drill bits when drilling holes in brick, tile, concrete, etc.
- Slide adjustment button on hammer drill left for hammer mode.
- Apply light pressure and medium speed for best results in brick.
- Apply additional pressure for hard materials such as concrete.
- When drilling holes in tile, practice on a scrap piece to determine the best speed and pressure. Begin drilling at a very low speed to prevent the bit from slipping off the starting point.
MAINTENANCE
GENERAL MAINTENANCE
Avoid using solvents when cleaning plastic parts. Most plastics are susceptible to damage from various types of commercial solvents and may be damaged by their use. Use clean cloths to remove dirt, dust, oil, grease, etc. Electric tools used on fiberglass material, wallboard, spackling compounds, or plaster are subject to accelerated wear and
possible premature failure because the fiberglass chips and grindings are highly abrasive to bearings, brushes, commutators, etc. Consequently, we do not recommend using this tool for extended work on these types of materials. However, if you do work with any of these materials, it is extremely important to clean the tool using compressed air.
LUBRICATION
All of the bearings in this tool are lubricated with a sufficient amount of high-grade lubricant for the life of the unit under normal operating conditions. Therefore, no further lubrication is required.d
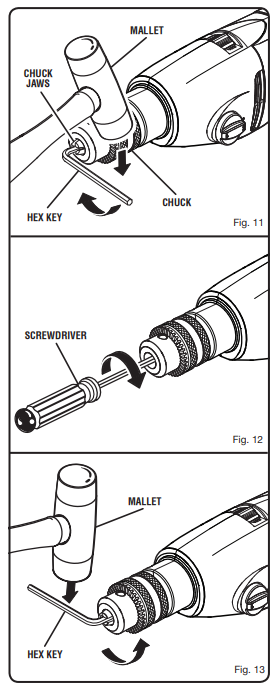
Chuck Removal
See Figures 11 – 13. The chuck may be removed and replaced with a new one.
- Unplug the drill.
- Operate the chuck jaws using the provided chuck key.
- Insert a 5/16 in. or larger hex key into the chuck of the drill and tighten the chuck jaws securely.
- Tap the hex key sharply with a mallet in a clockwise direction. This will loosen the screw in the chuck for easy removal.
- Open the chuck jaws and remove the hex key. Remove the chuck screw by turning it in a clockwise direction.
To Retighten a Loose Chuck
The chuck may become loose on the spindle and develop a wobble. Also, the chuck screw may become loose, causing the chuck jaws to bind and prevent them from closing. To
tighten:
- Unplug the drill.
- Open the chuck jaws.
- Insert the hex key into the chuck and tighten the chuck jaws securely. Tap the hex key sharply with a mallet in a clockwise direction. This will tighten the chuck on the spindle.
- Open the chuck jaws and remove the hex key.
- Tighten the chuck screw by turning it in a counterclockwise direction.
FOR MORE MANUALS BY RYOBI, VISIT MANUALSLIBRARYY
Ryobi D552H Corded Hammer Drill-FAQs
What is the Ryobi D552H hammer drill used for?
The Ryobi D552H is designed for drilling into hard materials like brick, concrete, and stone using masonry bits.
What does the hammer setting do?
The hammer mode (indicated by a hammer icon) adds a pounding action to help drill into tough surfaces like concrete.
What voltage does the Ryobi D552H use?
It operates on standard 120V (U.S.) or 240V (UK/EU), depending on the model.
How do I change the drill speed?
Speed 1 (Low RPM) – Higher torque for tough materials.
Speed 2 (High RPM) – Faster drilling for softer materials.
Can this drill be used on concrete?
Yes, with masonry bits and hammer mode enabled, it can drill into concrete, brick, and block.
What safety gear should I use?
Safety glasses (eye protection)
Ear protection (hammer drills are loud, ~120 dB)
Gloves & dust mask (for debris and vibration)
How do I maintain the hammer drill?
Clean after use with a dry cloth.
Store in a dry place (avoid moisture).
Lubricate the chuck if needed.
Why does my drill bit keep slipping?
Ensure the chuck is tightened properly.
Use a pilot hole for better grip.
Check for worn or damaged bits.
Can I use this as a regular drill (without hammer mode)?
Yes, switch to drill mode (no hammer icon) for wood, metal, or plastic.
What’s the difference between SDS and this drill?
SDS drills have a special chuck for stronger hammering (better for heavy-duty concrete).
Standard hammer drills (like the D552H) are lighter-duty but still effective for DIY tasks.

