Aqara G4 Smart Wireless Video Doorbell
Product Introduction:
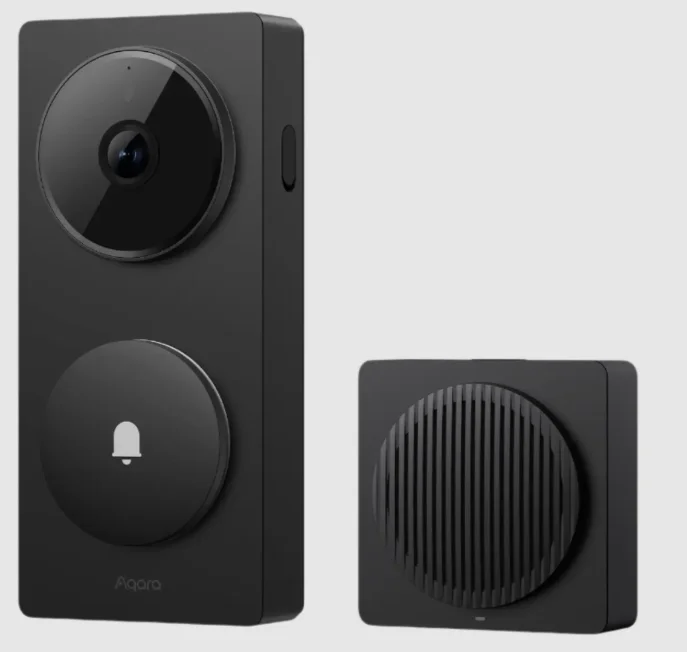
Aqara Smart Video Doorbell G4 consists of an outdoor doorbell and an indoor chime repeater. When the doorbell detects visitors ringing, loitering, or entering, it will start recording and send a notification through the app. The facial recognition software, which runs locally on the device, can be set up to recognize visitors.The 2 megapixel doorbell camera features a lens with a 162° wide-angle field of view and is equipped with a 940 nm nm infrared night vision flood light, invisible to human eyes. The built-in speaker enables two-way communication with visitors, and can also change the owner’s voice for added privacy. The doorbell also has a tamper alarm function, so you can wake it up at any time through the app to check the outdoor situation. The doorbell is powered with 6 AA batteries, with its ultra-low power consumption designed to guarantee an ultra-long endurance. This product shall be powered by a certificated SELV or Class 2 AC-AC/DC converter with matching parameters. A MicroSD card can be inserted into the repeater for local storage. There is also a wedge-shaped bracket with a fixed angle of 20° is disposed to adjust the lens orientation. This product can be connected to the Aqara Home app and Apple HomeKit to enable more smart identification and control functionality.
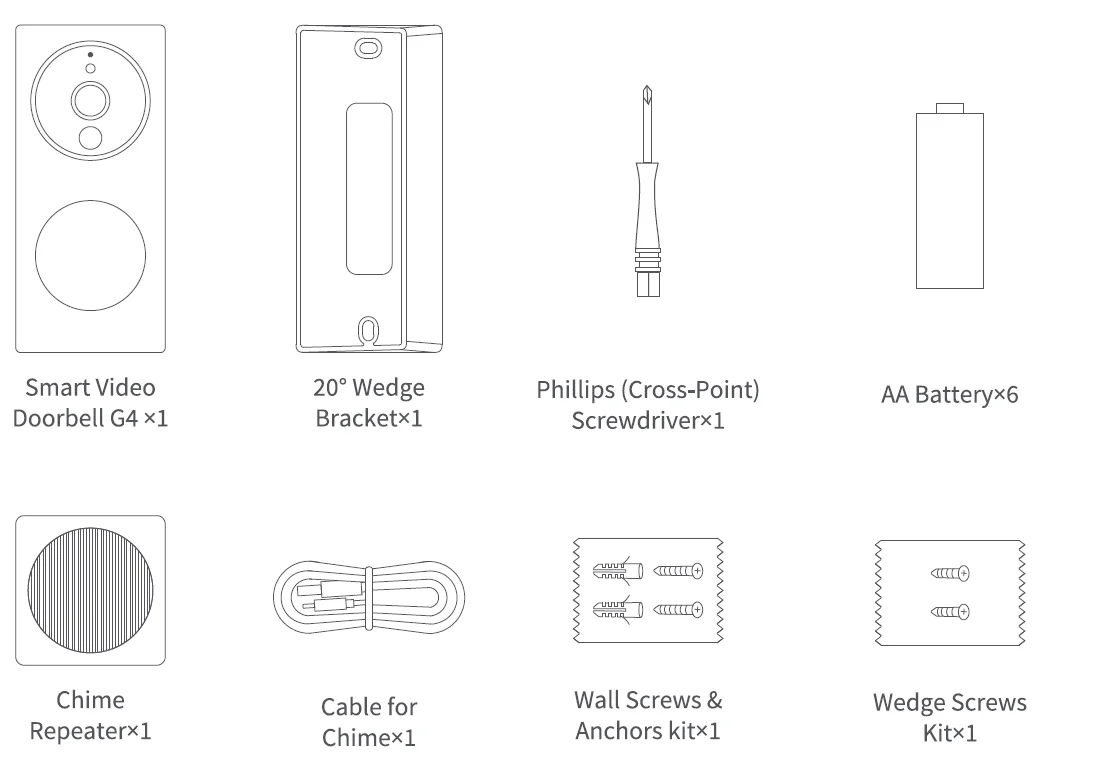
What is in the Box
Smart Video Doorbell G4:
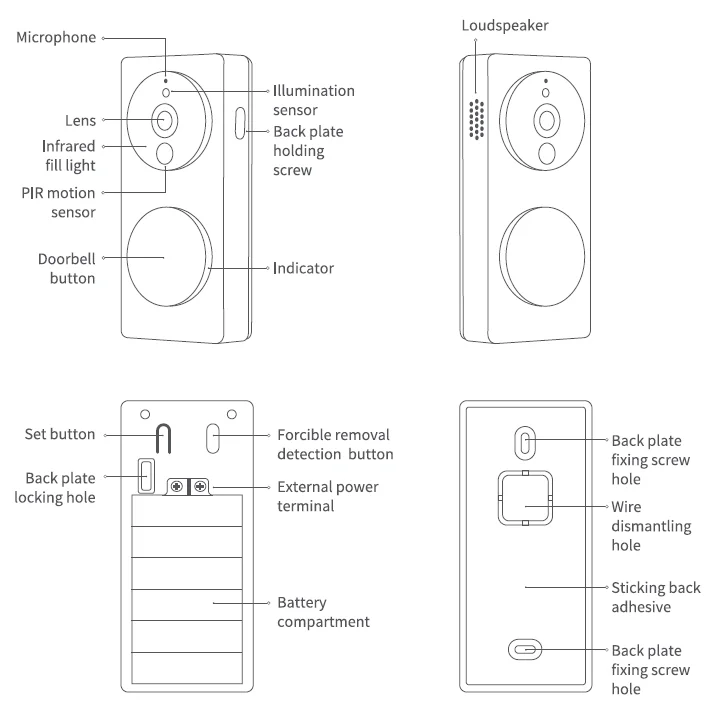
Description of the function buttons:
- Doorbell button: Click to trigger the Chime Repeater to ring.
- Set button: Long-press for 10 seconds to restore the factory settings.
- Forcible removal detection button: It works normally when pressed, pops up to trigger the alarm sound, and pushes the alarm message (the anti-disassembly function takes effect after it is turned on, and this function is turned off by default).
Chime Repeater:

Description of the Menu button:
- Short press for one time: Turn off the bell/alarm sound.
- Long-press for 10 seconds: Reset the network and unbind the device.
- Press 10 times quickly: Restore the factory settings.
Basic parameters:
Smart Video Doorbell G4:
- Model: SVD-C01/ SVD-C03
- Video Resolution: 1080p
- Viewing Angle: 162° (diagonal)
- PIR Detection Angle: Horizontal 120°, vertical 80°
- Wireless Protocols: Wi-Fi IEEE 802.11 b/g/n 2.4 GHz
- Battery: 6 * LRG AA alkaline battery (Replaceable)
- Wired Input: 12V-24V AC 0.2A 50/60Hz or 8-24V DC 0.5A
- Operating Temperature: -18°C ~ 50°C (-0.4°F ~ 122°F)
- Operating Humidity: 0 ~ 95% RH, no condensation
Chime Repeater:
- Model: SVD-C02/ SVD-C04
- Loudspeaker Power: 2W
- Wireless Protocols: Wi-Fi IEEE 802.11 b/g/n 2.4 GHz
- Ports: USB-C
- Input Power: 5V==1A
- Total Power Consumption: 5 W
- Local Storage: MicroSD card (not included). CLASS 10 or above is supported, up to 512 GB storage.
- Operating Temperature: 0°C ~ 40°C (32°F ~ 104°F)
- Operating Humidity: 0 ~ 95% RH, no condensation
- Gross Weight: 50g / 1.21 lbs.
- Package Size: 148+96×73 mm (5.83+3.78×2.87 in.)
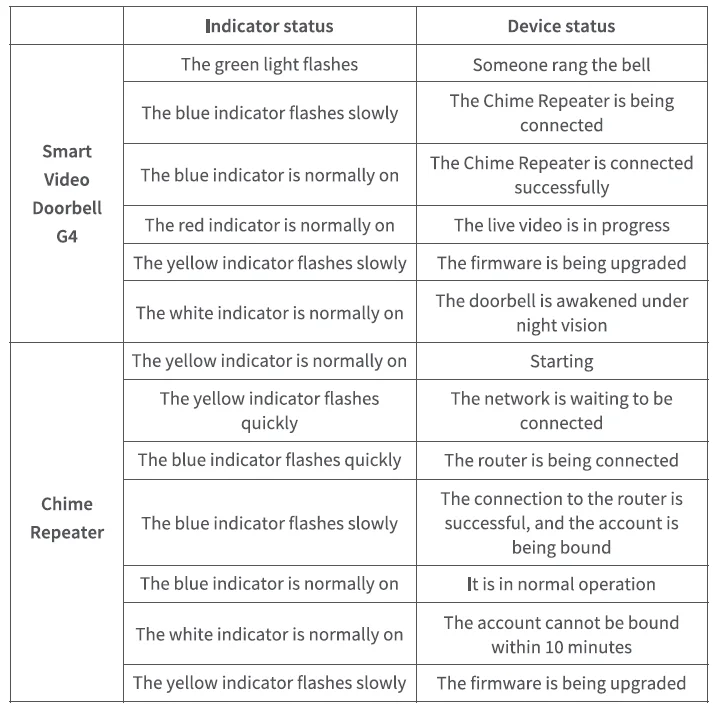
Description for the indicator status:
Instructions before Installation:
To ensure the correct use of this product, please read the following contents carefully and be prepared before installation.
- Before using this product, you need to download the Aqara Home app and register an account. If you only use Apple’s “Home” app to connect this product, no such operations are required, but you will not be able to experience the many unique functions in the Aqara Home app, such as visitor records generated based on local face recognition, setting custom ringtones, and other functions.
- When this product is powered by a battery, the battery life is directly related to the frequency of doorbell wake-ups. If the doorbell wake-up is triggered 30 times a day, the battery life will be about 3-4 months. When the doorbell’s work mode is switched to power-saving mode, the battery life will be extended, but the doorbell cannot wake up after a person is detected by PIR The doorbell can only be woken up by pressing. the doorbell button, triggering the tamper alarm, or remotely opening the video from the app.
- Please choose the installation location and power supply mode of the doorbell according to the actual situation. Before installing the product, you need to connect the device to the network and install the battery or connect the external power supply. The installation process of this product needs to be completed through a certain process and special tools. The operations should be followed by reading the detailed instructions.
Product installation
- Select the installation location
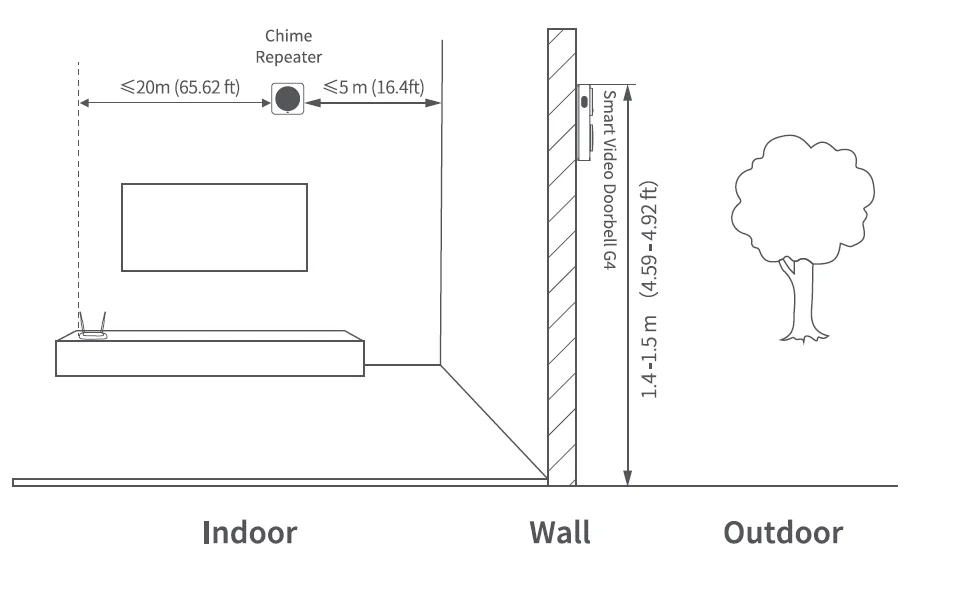
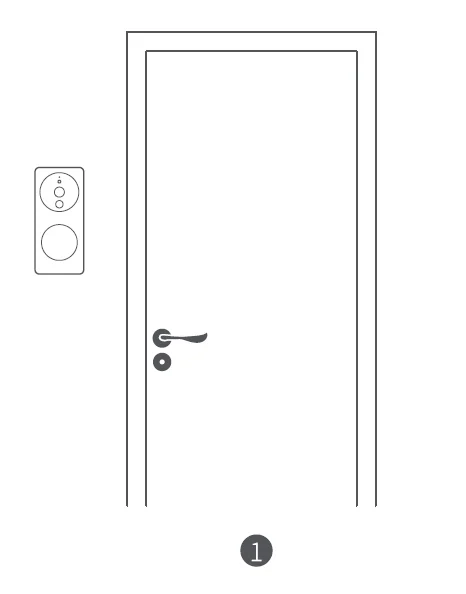
As shown in the figure below, the Doorbell is recommended to be installed on the outdoor wall or door (if it is a metal door, it is recommended to be installed on the wall next to the door) at a height of 1.4-1.5 m from the ground. The Chime Repeater installation position is recommended to be within a horizontal distance of ≤5 m from the wall of the entrance door, which can ensure a good wireless connection to the Doorbell. It is best to keep the linear distance between the Chime Repeater and the wireless router within 20 m.
- Select the power supply mode
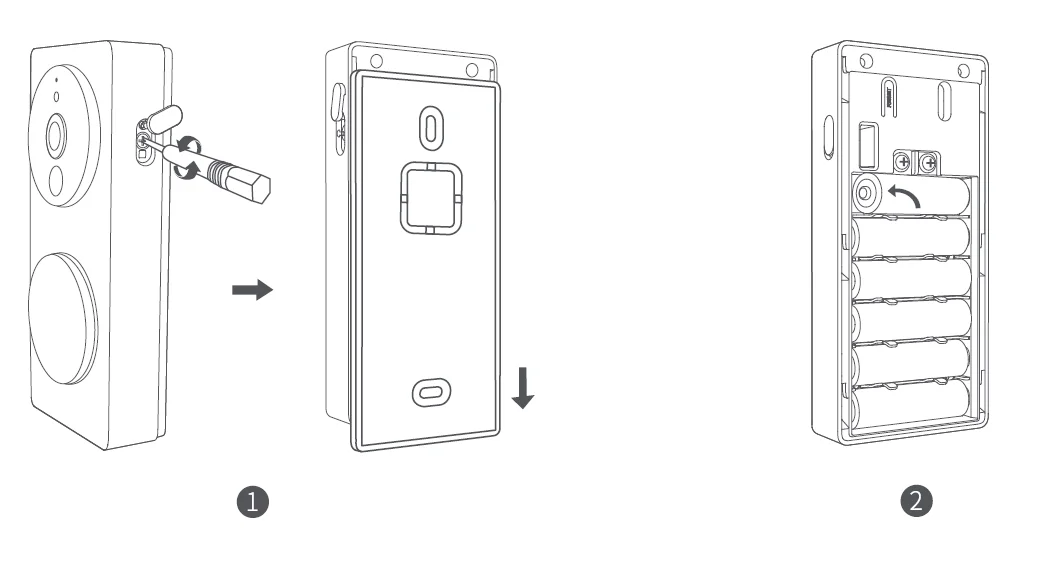
The outdoor Smart Video Doorbell G4 supports two power supply modes: battery or external power supply. Please choose in accordance with the actual situation at the door. The specific operation is as follows:- Battery power-up: Refer to the following steps and schematic diagrams.
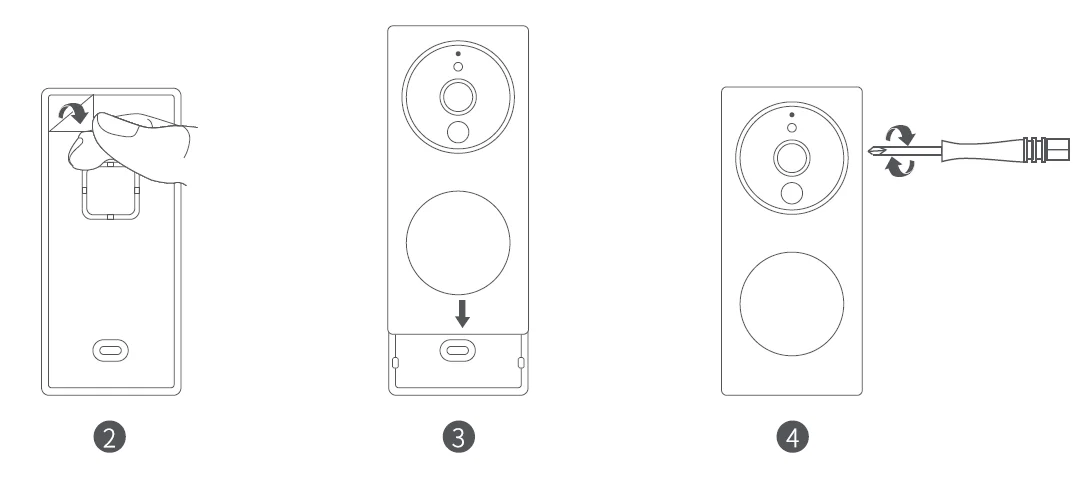
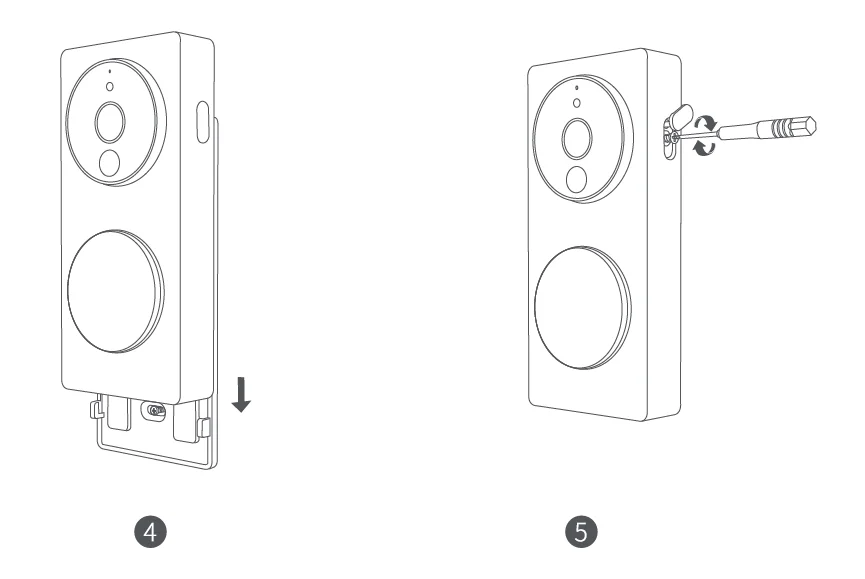
- When using for the first time, please use the Phillips (cross-point) screwdriver in the accessories to loosen the holding screws of the back plate; hold the Doorbell; and slide the back plate down to take it out.
- Install the battery according to the positive and negative poles marked in the battery compartment (please install the battery after the Chime Repeater is connected to the network, according to the requirements in the chapter of “Quick Connection of the Device”).

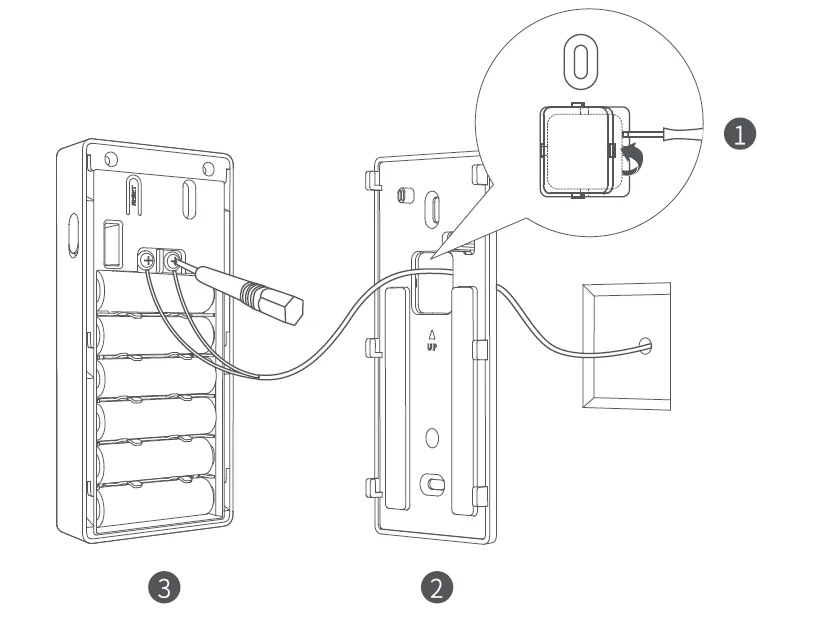
- External power supply: If an external power supply is used, please add the following operations when fixing the back plate:
- Use tools to remove the wire dismantling hole baffle on the back plate.
- Pass the reserved power cord through the dismantling hole.
- Connect the power cord to the external power terminal of the doorbell and lock the screw, taking care to avoid a short circuit of the power cord.

- Battery power-up: Refer to the following steps and schematic diagrams.
- Select an installation method
- Install the outdoor Doorbell
Fix the back plate before installation. The back plate can be fixed in the following two ways:
Method 1 (adhesive fixing method)
The adhesive method is suitable for the installation of wooden doors, ceramic tile walls, and other positions that are inconvenient to punch holes. The installation steps and schematic diagram are as follows:- In order to avoid the installation deflection of the Doorbell affecting the normal display of the image, please ensure that the Doorbell does not tilt in the horizontal and vertical directions according to the requirements shown in Figure 1 before installation.

- Tear off the adhesive protection paper; stick the back plate on a flat and clean wall or door; and press it once as a whole after sticking it to ensure that the back plate will not fall off.
- Slide the Doorbell close to the back plate from top to bottom until it completely overlaps.
- Use a Phillips (cross-point) screwdriver to lock the screw on the right side of the Doorbell and fasten the silicone waterproof cover.

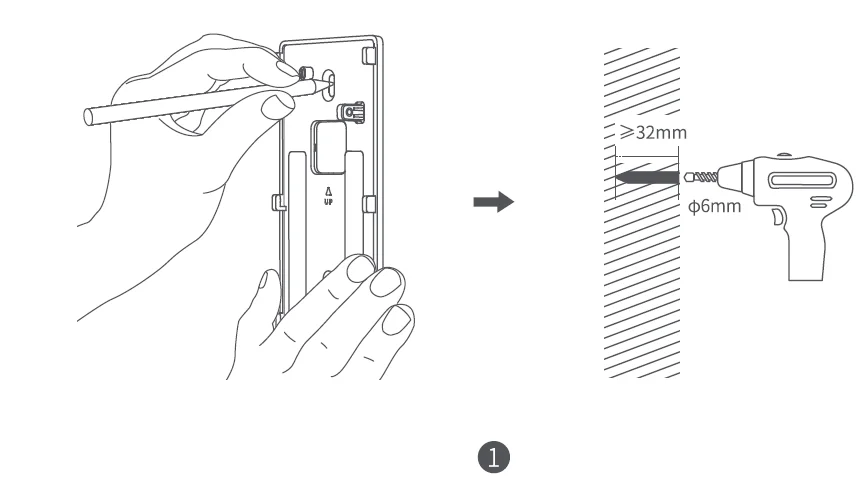
Method 2 (screw fixing method) - Stick the wall-mounted back plate close to the wall; trace the punching position according to the reserved screw hole of the bracket; and use a 6mm diameter drill bit to punch holes on the wall with a punching depth of ≥32mm.

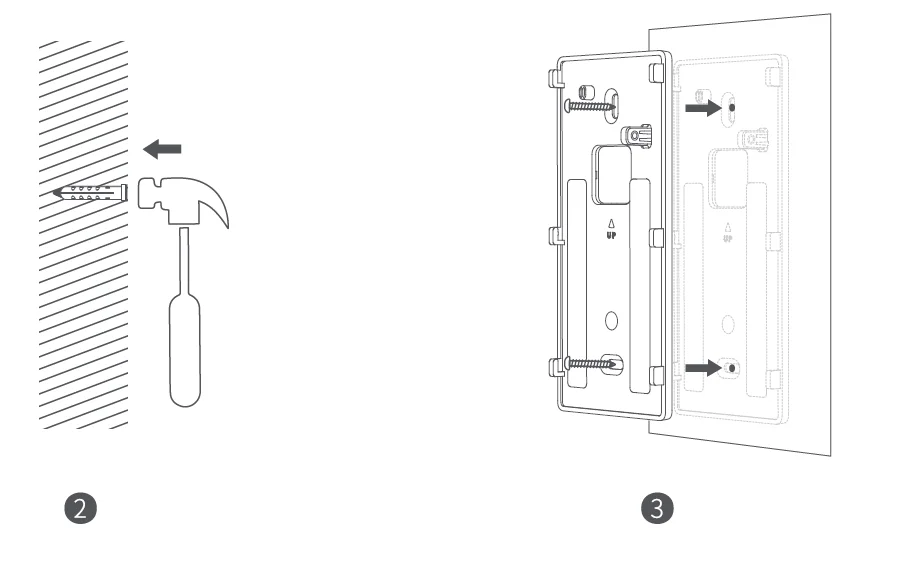
- Fix the expansion tube from the accessory package into the punched hole with a hammer and ensure the surface is smooth.
- Use the self-tapping screws from the accessory package to lock the wall bracket on the wall.

- Slide the Doorbell close to the back plate from top to bottom until it completely overlaps.
- Use a Phillips (cross-point) screwdriver to lock the screw on the right side of the Doorbell and fasten the silicone waterproof cover.

Method 3 (adding 20° steering bracket)
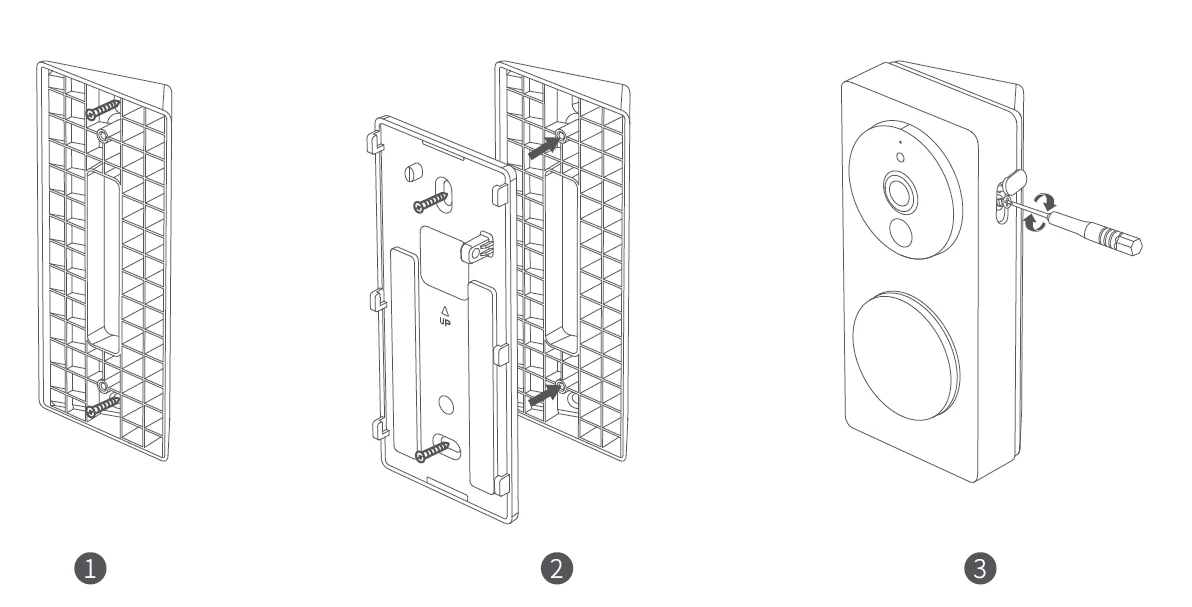
When the doorbell is installed at both sides of the door, the lens orientation can be adjusted by adding oblique triangular brackets from the accessories. The specific operations are as follows: - Install the triangle bracket on the wall first, and you can choose to fix it with screws.
- Then use screws to lock the back plate of the doorbell on the triangular bracket.
- Secure the installation and lock the doorbell on the back plate.

- In order to avoid the installation deflection of the Doorbell affecting the normal display of the image, please ensure that the Doorbell does not tilt in the horizontal and vertical directions according to the requirements shown in Figure 1 before installation.
- Install the indoor Chime Repeater
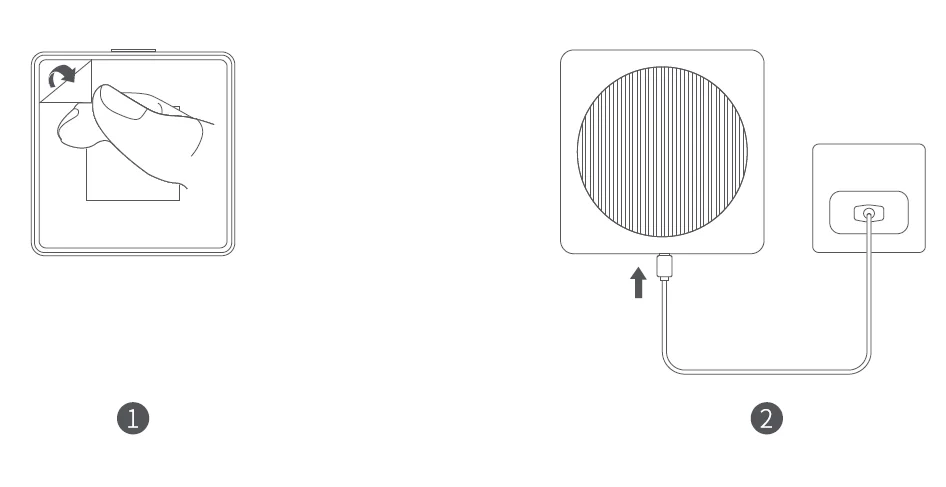
The indoor Chime Repeater can be placed on the platform or attached to the wall with adhesive. Refer to the following steps and schematic diagram for installation:- Tear off the adhesive protection paper; stick the Chime Repeater on a flat and clean wall or table; and press it once as a whole after sticking it to ensure that the product will not fall off.
- Plug the Type-C power cord into the device to power on, and confirm that the indicator lights up normally, which means that the device starts normally.

- Install the outdoor Doorbell
Notes:
- When installing the device with adhesive backing, it is necessary to ensure that the installation surface is smooth and clean, and the adhesive has sufficient contact area with the installation surface. The materials of the installation surface, such as glass, ceramic tile, marble, and latex paint wall, are the best.
- The external power supply can’t charge the battery in the battery compartment. When the battery is loaded and the device is connected to the external power supply, the Doorbell will preferentially use the external power supply.
- When a DC power supply is used as an external power supply, the power terminals do not distinguish between positive and negative poles, and both terminals can be connected to positive or negative poles. Please ensure that there is no short circuit between the terminals.
- When the battery is used for a power supply, the Doorbell is in a low power consumption working mode, and it will automatically go to sleep when there is no ringing or other trigger source. Only when someone stays or rings the bell will it wake up to work, and the battery life is directly related to the actual wake-up frequency. When the external power supply is used for the power supply, the Doorbell will always work and will not enter the sleep state.
- To ensure the battery life, please use LR6 AA batteries. The mixed use of new and old batteries will seriously affect the working time and safety of the Doorbell. Please ensure that the six batteries replaced each time are brand new.
- Warranty is not given if the tamper-evident label attached to the screw inside the battery compartment is torn, damaged, or destroyed.
- The Doobell can only be paired with the Chime Repeater it is shipped with, and vice versa. Confirmation can be made through the HomeKit QR codes at the bottom. After-sales services require a full set of returns.
Quick connection of the device:
- Download the Client
Search for “Aqara Home” in the Apple App Store, Google Play, Xiaomi GetApps, Huawei App Gallery, or scan the following QR code to download the Aqara Home app.
- Power on the device:
Please turn on the power supply of the Chime Repeater first, and install the battery in the Doorbell after the Chime Repeater is successfully added to the APP. At the same time, pay attention to the following points:
*The Doorbell and Chime Repeater have been paired before leaving the factory, and the user cannot untie them, so they cannot be used with other doorbells.
* Just connect the Chime Repeater to the network, and the Doorbell will automatically connect to the Chime Repeater after the Chime Repeater connects to the network.
*After the Chime Repeater is powered on and started for 10 minutes, the network connection is still not performed, then the device will enter the stop state where the white light is always on. If you want to perform the network connection again, please unplug the power supply and plug it in again, or press the function button for 10 seconds to reset the network. When the indicator light changes to the flashing yellow light, you can access the network again. - Add doorbell
Access Aqara Home
Close your mobile phone to the Chime Repeater, open the Aqara Home app, click “+” on the top right corner of the home page, select “Smart Video Doorbell G4”, and follow the instructions of the App. After a successful connection, the Chime Repeater status indicator will be a solid blue light. If the Chime Repeater binding fails, please confirm whether the following reasons exist:- The Chime Repeater only supports the Wi-Fi network of the 2.4 GHz band, but does not support the Wi-Fi network of the 5 GHz band.
- Unsupported special characters are entered in the Wi-Fi name or password, failing to connect to the router. Please change them to commonly-used characters before trying again.
- Check whether the router has enabled the Wi-Fi anti-squatter setting; if so, it will result in the failure of the device to connect to the network.
- Check whether the router has enabled AP Isolation; if so, it will result in the failure of the phone to search for the device within the local area network.
Access Apple HomeKit
Open the Apple “Home” app. Click the”+” in the upper right corner to go to the page of Add Accessories. Scan or manually enter the HomeKit setting code at the bottom of the Chime Repeater (HomeKit QR code), and bind the device to HomeKit. Common HomeKit add failures are as follows:
- It prompts that “No accessories can be added”. The error message cached in the iOS system cannot be released due to repeated failure. Restart the iOS device (iPhone or iPad) and reset the Chime Repeater before trying again.
- It prompts that “accessories have been added”. Please restart the iOS device and reset the Chime Repeater, and then add the doorbell by manually entering the HomeKit setting code.
- It prompts that “no accessories are found”. Please reset the Chime Repeater. Wait for 3 minutes, and then manually enter the HomeKit setting code to add it again.
Other functions
For more device functions, please log in to the Aqara Home app for use. Use of the Works with Apple badge means that an accessory has been designed to work specifically with the technology identified in the badge and has been certified by the developer to meet Apple performance standards. Apple is not responsible for the operation of this device or its compliance with safety and regulatory standards. A 10-day recording history from your Smart Video Doorbell G4 is securely stored in iCloud and available to view in the Apple Home app on your iPhone, iPad, or Mac. You can add one camera to a 50GB plan, up to five cameras to a 200GB plan, or up to an unlimited number of cameras to a 2TB plan at no additional cost. Camera recordings
don’t count against your iCloud storage limit.
- Online Customer Service: www.aqara.com/support
- Manufacturer: Lumi United Technology Co., Ltd.
- Address: Room 801-804, Building 1, Chongwen Park, Nanshan iPark, No. 3370, Liuxian Avenue, Fuguang Community, Taoyuan Residential District, Nanshan District, Shenzhen, China.
- Email: [email protected]
For more manuals by Aqara, visit ManualsLibraryy
Aqara G4 Smart Wireless Video Doorbell-FAQs
Can the Aqara G4 record 24/7?
Yes, with a MicroSD card up to 512GB, the doorbell can record continuously, with storage safely housed in the indoor chime repeater.
Is the Aqara G4 compatible with Zigbee?
Yes, it works with Aqara Zigbee hubs, enabling alerts, sirens, and integration with other smart home devices.
How does the Aqara G4 work?
The doorbell consists of an outdoor unit and an indoor chime repeater. It detects visitors, motion, or loitering, starts recording, and sends notifications via the Aqara app.
Is the Aqara G4 waterproof?
Yes, it has an IP rating for weather resistance, making it durable against rain, snow, sunlight, and extreme temperatures.
What power options does the Aqara G4 support?
It can be powered with six AA 1.5V batteries or connected to existing doorbell wiring (12–24V AC or 8–24V DC).
How long do the batteries last?
The recommended LR6 alkaline batteries can last up to 5 years, depending on usage.
Can I view Aqara G4 footage remotely?
Yes, the footage can be viewed through the Aqara app on your smartphone or tablet.
Does the Aqara G4 support HomeKit and other smart platforms?
Yes, it supports Apple HomeKit, Amazon Alexa, Google Assistant, IFTTT, and other compatible smart home ecosystems.
Do Aqara cameras and doorbells ensure privacy?
Yes, Aqara devices provide encryption, secure storage options, and advanced data protection to keep recordings safe.

