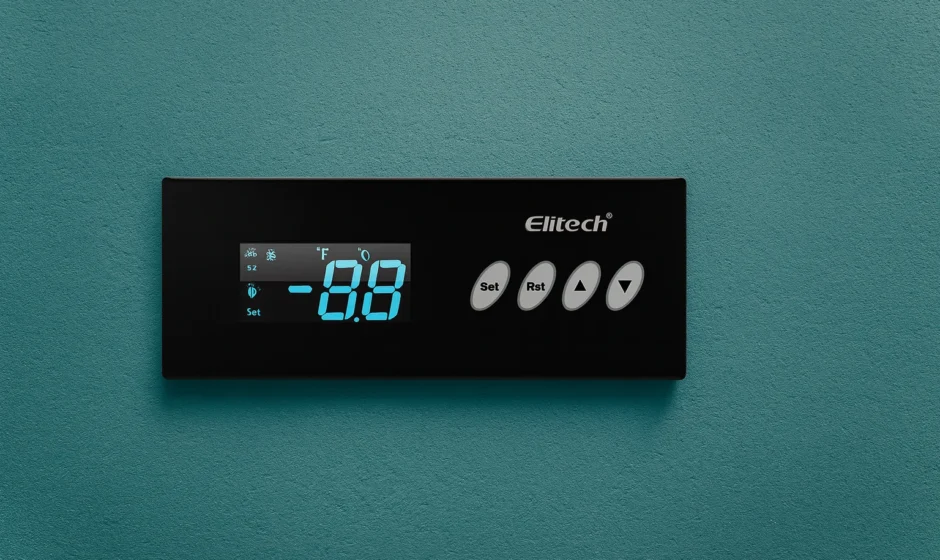
Adexa ECS-10HT1 Temperature Controller
1. Product Overview
ECS-01HT1 universal temperature controller can convert Fahrenheit and Celsius display, switching between cooling/heating modes. The allocation of the cabinet temperature sensor and defrosting control sensor. Optional defrost relay output and copy card function.
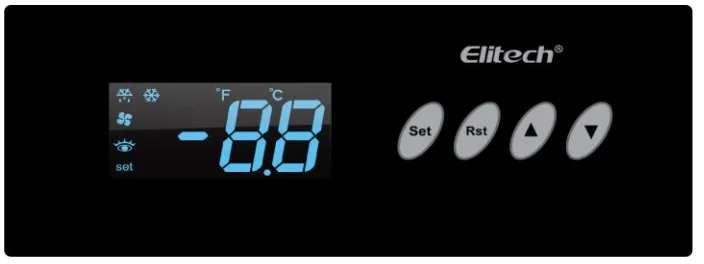
2. Operation and display panel

3. Specifications and dimensions
Installation dimension: 71mm × 29mm
Controller size: 78.5mm × 34.5mm × 74mm
4. Technical parameters
- Measuring range: -50~99℃/℉ (only refers to the sensor calibration value set to 0)
- Temperature resolution: 9.9~-9.9, 0.1℃/℉, the others 1℃/2℉
- Measurement accuracy: -40℃~50℃ ±1℃, 50℃~70℃ ±2℃, the others ±3℃, or -40℉~99℉ ±2℉, the others ±6℉
- Temperature controlling range: -50~99℃/℉
- Power supply: 220±10% (VAC), 50/60Hz
- Power consumption: <3W
- Rated current of the relays: Refrigeration: 30A/220VAC, it can directly drive 1.5 HP (220VAC) compressor, single phase; 17A/220VAC, it can directly drive 1.0 HP (220VAC) compressor, single phase
Defrost: 10A/220VAC (suggest connect the max 1.4KW electric heating wire) - Front panel waterproof: IP65
- The back shell is waterproof: None
- Operation condition: 0℃~55℃
- Relative humidity: 20%~85% (relative humidity)
5. Indicator light status description


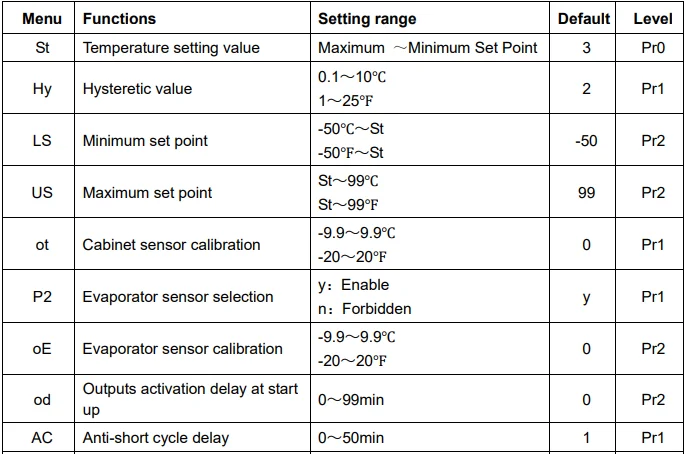
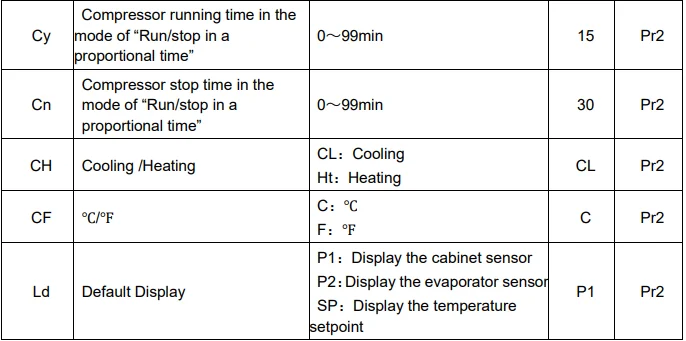
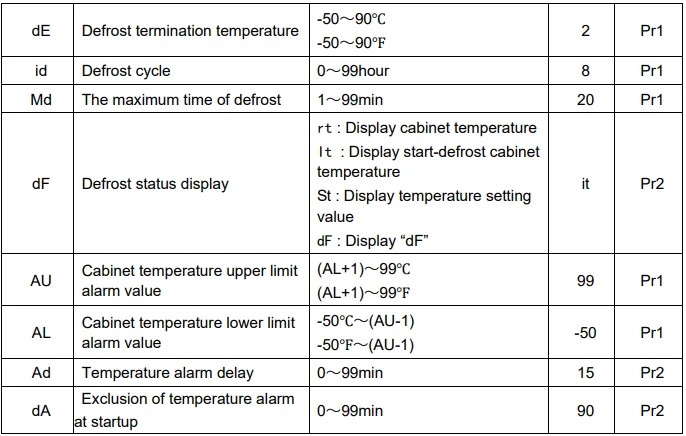
6. Parameter table
7. Front panel commands
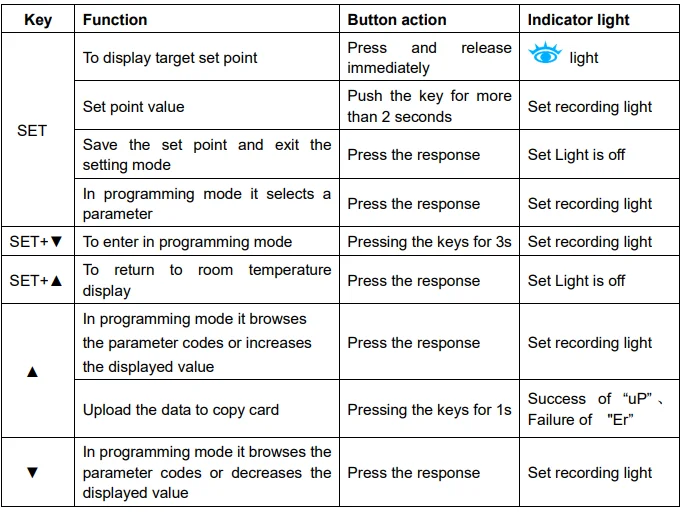

How to see the set point:
- Push and immediately release the SET key; the set point will be displayed, and the
 LED will start lighting.
 - Push and immediately release the SET key or wait about 15s to return to normal visualisation.
How to change the set point:
- Push the SET key for more than 2 seconds to change the set point value.
- The value of the set point will be displayed, and the “set” LED starts lighting.
- To change the set value, press ▲ or ▼ within 15s.
- To memorise the new set point value, push the SET key again or wait 15s.
How to change a parameter value:
To change the parameter’s value, operate as follows (first level Pr1):
- Enter the programming mode by pressing the SET + ▼ keys for 3s, the “set” LED starts to light.
- Select the required parameter. Press the SET key to display its value.
- Use ▲ or ▼ to change its value.
- Press SET to store the new value and move to the following parameter.
- To exit: press SET + ▲ or wait 15s without pressing a key.
Hidden menu (the second level Pr2)
(The hidden menu includes all the parameters of the instrument, Pr1 and Pr2.)
- Enter the programming mode by pressing the SET + ▼ keys for 3s, the “set” LED starts to light.
- Then push again the SET + ▼ keys for more than 7s. The L2 label will be displayed immediately followed by the Hy parameter.
- Select the required parameter.
- Press the SET key to display its value.
- Use ▲ or ▼ to change its value.
- Press SET to store the new value and move to the following parameter.
- To exit: press SET + ▲ or wait 15s without pressing a key.
Note: If no parameter is present in L1, after 3s the “nP” message is displayed. Keep the keys pushed until the L2 message is displayed.
How to move a parameter from the hidden menu to the first level and vice versa:
Each parameter present in the hidden menu can be removed or put into the first level (user level) by pressing SET + ▼. In the hidden menu, when a parameter is present in the first level, the decimal point is on.
To lock/unlock the keyboard:
- Press and hold the ” ▲ + ▼ for more than 3s, the “oF” message will be displayed, and the keyboard will be locked.
- Press and hold the ” ▲ + ▼ for more than 3s, the “on” message will be displayed, and the keyboard will be unlocked.
Manual defrost
- Press
 to view the current evaporator sensor measured temperature value.
 - Push
 the key for more than 2 seconds, and a manual defrost will start.
8. Output
1. Cooling/Heating:
Cooling:
Normal status: When the cabinet temperature is higher than the set point + hysteresis (Hy), and finishes the anti-short cycle delay time (AC), cooling will start. When the cabinet temperature is lower than the set point, cooling will stop. For the first time, the power is on, and the time is up to (od) value. If the cabinet temperature is higher than the set point + hysteresis (Hy), cooling will start.
Heating:
Normal status: When the cabinet temperature is lower than the set point and finishes the anti-short cycle delay time (AC), heating will start. When the cabinet temperature is higher than the set point + hysteresis (Hy), heating will stop. For the first time, the power is on, and the time is up to (od) value. If the cabinet temperature is lower than the set point, heating will start. If the cabinet sensor is faulty, the compressor will run and stop according to the set time (running time Cy and stop time Cn).
2. Defrost:
- If the defrost cycle (id = 0), the defrost will be forbidden.
- id ≠ 0:
- The evaporator sensor starts to work (P2 = y). If the evaporator sensor temperature is higher than the defrost termination temperature (dE), it cannot open the defrost function.
- The evaporator sensor starts to work (P2 = y), and the evaporator sensor temperature is lower than the defrost termination temperature (dE), or (P2 = n), the defrost function will start when one of the following conditions is met:
- The controller will start defrosting according to the set defrost cycle.
- Press
 for 2s to start defrost.
 - Under the defrost state (any of the following conditions can close defrosting):
- The evaporator sensor starts to work (P2 = y), evaporator sensor temperature > defrost termination temperature (d7), defrost is closed.
- The maximum time of defrost (Md) runs out, and defrost is closed.
- Press
 for 2s to stop defrost.
3. Fault alarm:

- When the temperature sensor is faulty, it displays P1 or P2. It will recover when the problem is solved.
- Cabinet over-temperature alarm: When the cabinet temperature is beyond the (AU) set point, Ad and (dA) are all finished, it will display HA. When the temperature is lower than (AU), the alarm will stop. When the cabinet temperature is below the (AL) set point, Ad and (dA) are all finished, it will display LA. When the temperature is higher than (AL), the alarm will stop.
9. Hot key
1) Upload:
- Program one controller with the front keypad.
- Insert the Hot Key and push ▲ the key; the “uP” message appears.
- Turn off the instrument, remove the Hot Key, then turn the controller on again.
2) Download:
- Insert the Hot Key and push the ▼ key; the controller will display “do”.
- Turn off the instrument, remove the Hot Key, then turn the controller on again.
Note: The “Er” message is displayed for failed programming. In this case, push the key again if you want to restart the upload or remove the Hot Key to abort the operation. Please make sure that the power is stable during this time.
10. Wiring diagram
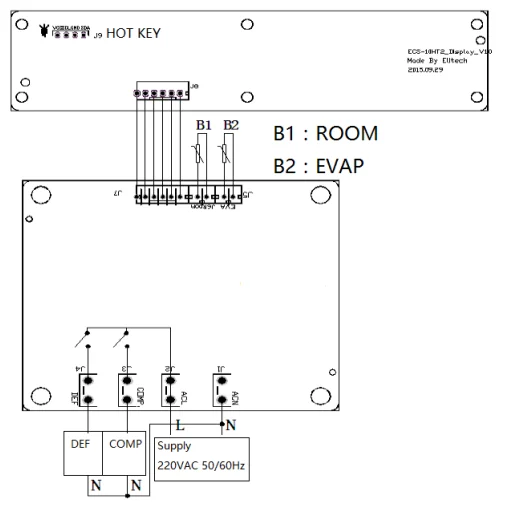
11. Safety rules
Danger:
- Strictly distinguish the power wire, relay output, sensor down-lead, and data line, and the relay must not be overloaded.
- Prohibit connecting the wire terminals without an electricity cut-off.
Warning:
Prohibit using this unit in the environment of over-damp, high temperature, strong electromagnetic interference, or strong corrosion.
Notice:
- The power supply should conform to the voltage value indicated in the instructions, and make sure of a steady power supply.
- To avoid possible interference, the sensor down-lead/data line and power wire should be kept at a proper distance.
- When the evaporator sensor is installed, the sensor should be well connected with the copper tube, which is 5cm away from the evaporator inlet.
For More Manuals By Adexa, Visit ManualsLibraryy.
Adexa ECS-10HT1 Temperature Controller-FAQs
How do I fix a malfunctioning temperature controller?
Check the power supply, verify sensor connections, review parameter settings, or restore factory defaults. Replace faulty sensors if needed.
Which is safer: T1 or T6 temperature class?
T6 is the safest because it has the lowest maximum surface temperature (85°C). T1 is the hottest and therefore the least safe for ignition-sensitive environments.
What does ATEX Code “h” mean?
The symbol h indicates protection for non-electrical equipment used in hazardous atmospheres, regardless of the specific protection method.
What are the four temperature scales?
The main temperature scales are Celsius, Fahrenheit, Kelvin, and Rankine.
What setting is best for a commercial fridge?
A temperature around 3°C (37°F) keeps food safe. Settings between 0–4°C are acceptable.
Is 0 on a fridge dial considered “off”?
Yes. Setting the dial to 0 usually switches the refrigeration system off.
How do I reset refrigerator temperature settings?
Adjust the digital panel or thermostat dial, then wait several hours for the new temperature to stabilize.
How do I test a temperature control sensor?
Use a multimeter to check resistance values for RTD/thermocouple sensors. If readings do not change with temperature, the sensor may be faulty.
What is the ATEX symbol?
The ATEX marking appears as Ex, indicating the device is certified for explosive or hazardous zones.
What does PID temperature control mean?
PID control uses proportional, integral, and derivative functions to maintain very stable and accurate temperature regulation.

