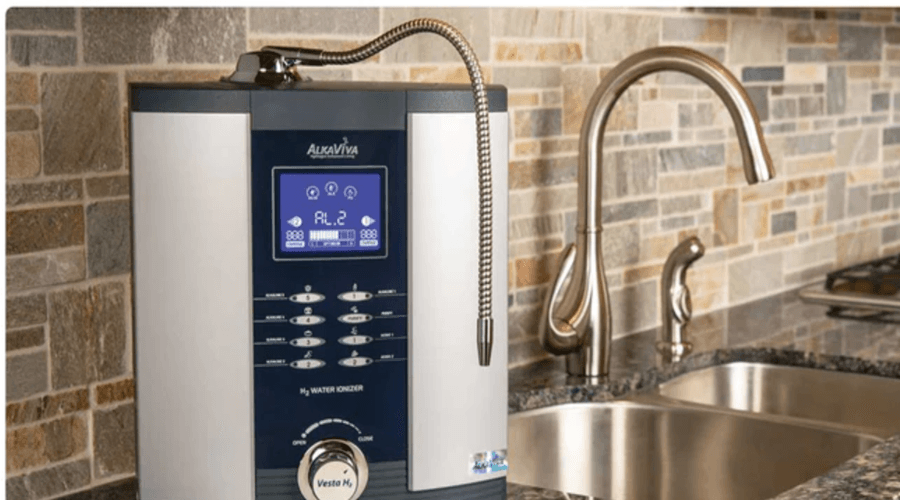
AlkaViva Vesta H2 Countertop Water Ionizer
Important Safety Warnings and Precautions
Electrical Precautions and Safeguards
- This appliance must be grounded. In the event of a malfunction or breakdown, the ground will reduce the risk of electric shock by providing a path of least resistance to electrical current. This appliance is equipped with a cord having an appliance grounding conductor and a grounding plug. The plug must be plugged into an appropriate outlet that is installed and grounded in accordance with all local codes and ordinances.
- NEVER attempt to repair or service the unit yourself. Attempting to do so will void your valuable warranty! Contact AlkaViva Customer Service to arrange service or repair.
- If your ionizer becomes submerged in water, unplug the power cord from the wall before removing the ionizer from the water. Failure to do so may cause electric shock!
- Do not use your ionizer at voltages other than specified (AC 110-120V). Use a grounded outlet. Do not plug in your ionizer where it will exceed the rating of the outlet or electrical wiring. Failure to do so can result in fire, injury, and/or damage to your wiring, your ionizer, or yourself!
- NEVER touch the power cord or plug with wet hands – this may result in electric shock!
- Do not wash your ionizer by immersion or by pouring water over the main body; always unplug your ionizer while cleaning the casing. Clean with a damp sponge or cloth.
- Ensure the power plug is firmly and properly inserted into the outlet – failure to do so may result in electric shock or fire!
- Keep the power cord and your ionizer away from hot surfaces or appliances – failure to do so may result in electric shock or fire!
- Do not operate your ionizer with a damaged power cord or plug or insert it into a faulty or worn outlet.
- Never insert foreign objects into your ionizer.
- Always unplug your ionizer when changing a fuse or cleaning your ionizer. Failure to do so may result in an electric shock!
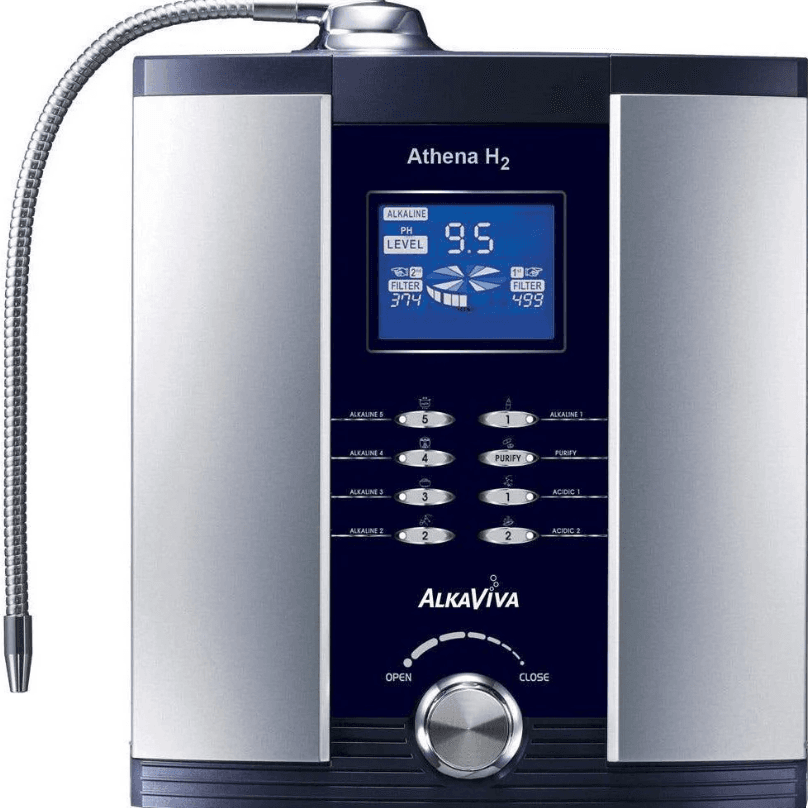
Let’s Take A Tour of Your NEW H2 Series Ionizer!
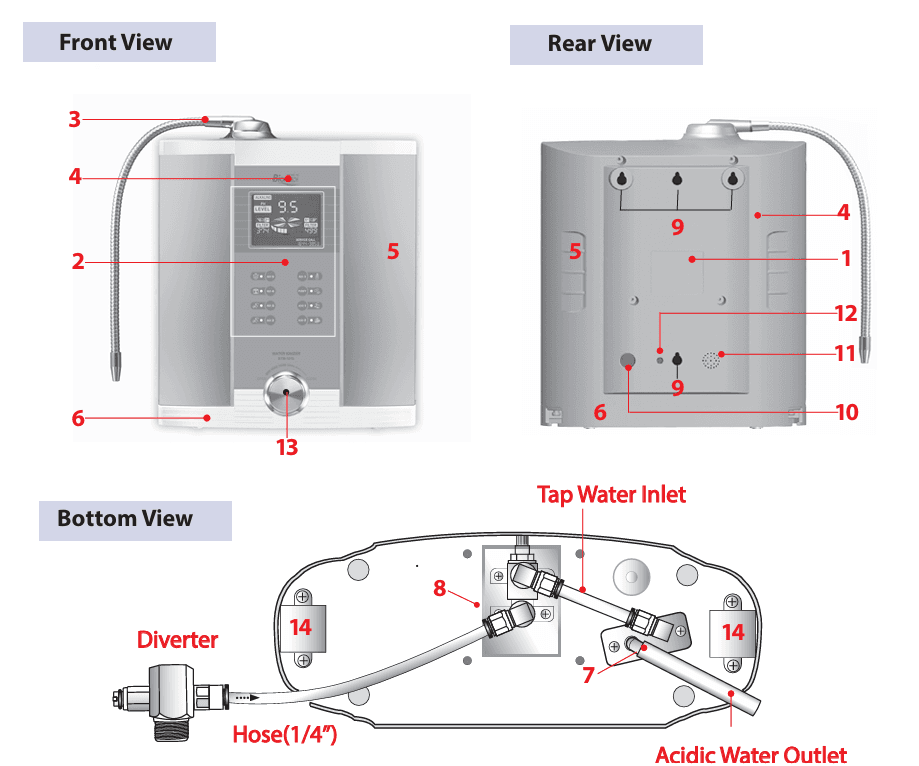
| # | Name | Description |
| 1 | Back Panel | Covers the back of the ionizer. |
| 2 | Control Panel | Function controls and display. Detailed on next page. |
| 3 | Flexible Stainless Steel Spout | Outlet for either alkaline or acidic water (user-selected). |
| 4 | Front Panel | Covers the front of the ionizer. |
| 5 | Filter Cover | Remove this panel to change filters. |
| 6 | Bottom Panel | Covers the bottom of the ionizer. |
| 7 | Acidic Water Outlet | For acidic water. Labeled with red sticker. |
| 8 | Water Inlet | Tap water supply. Labeled with a black sticker. |
| 9 | Key-hole Slots | For wall mounting. |
| 10 | Fuse Holder | Fuse. |
| 11 | Audio Speaker | Transmits voice and melody. |
| 12 | Audio Volume Control | Volume control. |
| 13 | Flow Control Valve | On/Off and water flow adjustment. |
| 14 | Locking Device | Filter cover safety lock. Depress when removing the filter cover. |
Control Panel
Installation Procedure
Installation Precautions
- Protect your ionizer from freezing temperatures.
- Protect your ionizer from direct sunlight.
- Do not put anything heavy on top of your ionizer.
- Do not install your ionizer on an unstable or soft surface.
- Install only on a hard and level surface.
- Do not install it close to a stove.
- Install close to a properly grounded electrical outlet.
- Do not close, bend, pinch, press, or otherwise obstruct hoses.
If you have installation questions, please call AlkaViva Customer Service.
Installation Options
- Install Method 1: At your sink attached to your faucet with the diverter,
- Install Method 2: At your sink but plumbed directly to your cold water line (no diverter) and,
- Install Method 3: Under-sink – completely out of sight with a small dedicated faucet. It is recommended that Methods 2 and 3 be done by a plumber.
Make Sure You Have All the Accessories
Before installation, please check to ensure you have the accessories pictured below. Please note that the diverter and adapters accommodate the vast majority of standard faucets. The angle-stop adapter fits both 1/2” and 3/8” standard plumbing. If you have a non-standard or a custom faucet, or plumbing, you may need to locate and purchase additional parts. If you need help, please contact AlkaViva Customer Service.
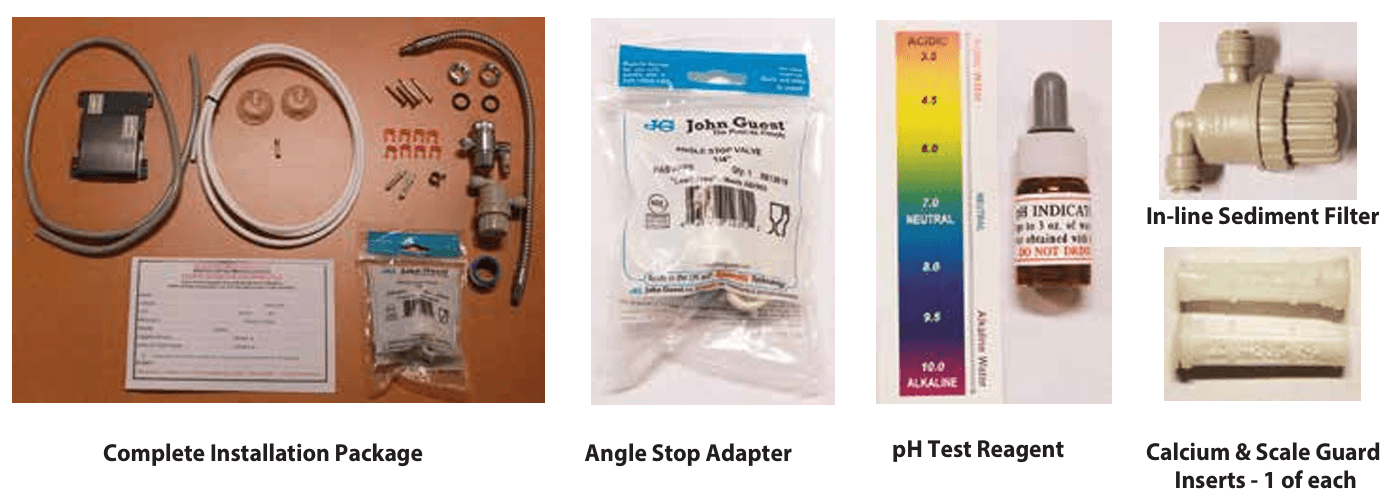
NOTE: The sediment filter is an optional accessory that will further protect your ionizer and lengthen the life of your filters. It is installed in the 1/4” white tap water inlet hose before it enters your ionizer in any of the three installation methods. It can be opened and cleaned as needed.
Install Method 1: At the sink with a diverter (easiest)
Tools You May Need:
- Standard pliers or channel locks
- A sharp knife or a good pair of kitchen scissors
- ATTACH DIVERTER TO YOUR TAP – Remove the aerator from the tap (pliers may be required) and attach the diverter valve in its place. There are adapters supplied in case the diverter does not fit your tap. If you have leaks at the diverter, use the plumber’s Teflon tape (included).
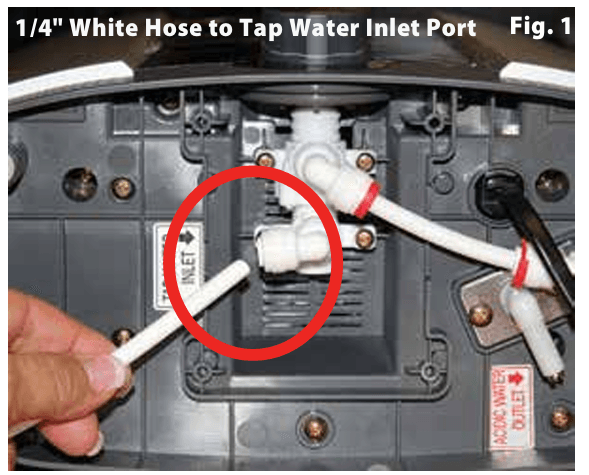
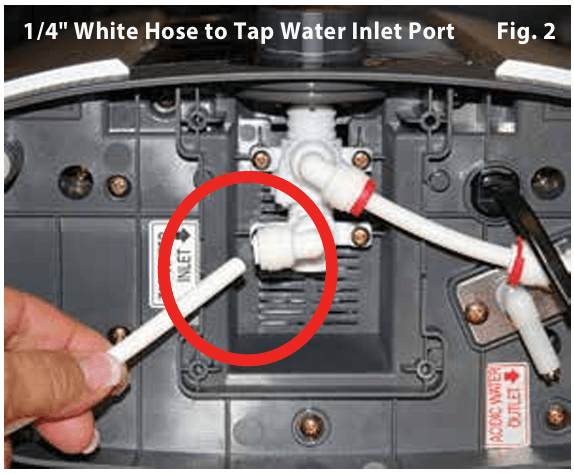
- ATTACH THE 1/4” WHITE TAP WATER INLET HOSE (Fig. 1) – Attach the white 1/4” hose to the white port on the bottom of the ionizer labeled TAP WATER INLET. To attach the white hose, simply push it firmly into the opening on the white port. Give it a gentle tug to ensure proper connection. If it is properly installed, it will not come out. If you need to remove it, press on the ring at the end of the fitting while pulling out.

- ATTACH THE GRAY ACIDIC WATER OUTLET HOSE (Fig. 2) – Attach the gray hose to the white plastic port labeled ACIDIC WATER OUTLET on the bottom of the ionizer. First, slide a squeeze clamp over the end of the hose. Attach the gray hose by simply pushing it firmly over the white plastic port. Soaking it in hot water for 30 seconds will make attaching it very easy. Squeeze the clamp and position it over the white port. Ensure the opposite end runs into the sink.

- POSITION YOUR IONIZER – Ensure it is on a hard and level surface. See installation precautions.
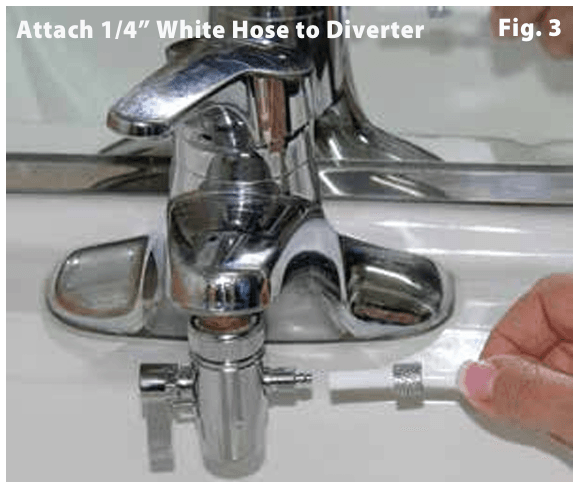
- ATTACH THE 1/4” WHITE HOSE TO THE DIVERTER (Fig. 3) – Measure the appropriate length of white hose, allowing for a reasonable amount of slack, and cut using a sharp knife or scissors. Remove the small compression nut on the back of the diverter (opposite of the lever). Slide the nut over the opposite (free) end of the white 1/4” hose with the threads positioned so it will screw onto the diverter. Push the hose firmly onto the nipple, then screw the compression nut back on. Ensure the nut is tightened firmly. Do not over-tighten.

- CONNECT THE POWER CORD – Use an appropriate grounded outlet.
- INSTALL FLEXIBLE STAINLESS STEEL SPOUT – Screw the spout clockwise into the threaded silver port on top of the ionizer. Do not over-tighten.
- SAVE THE BOX your ionizer came packed in. This will help if your ionizer needs to be transported at a later date.
Install Method 2. At the sink, direct plumb (more difficult/convenient/attractive)
Tools You May Need:
- Wrench
- Pliers
- Drill with 1/4″ or 5/16″ bit
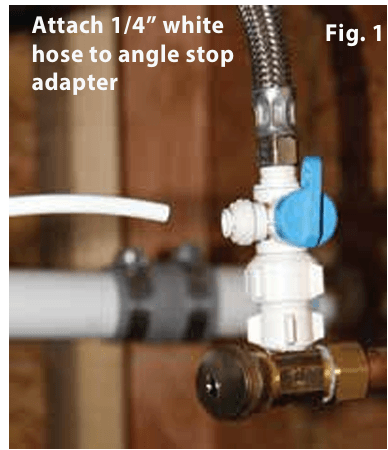
- INSTALL ANGLE STOP ADAPTER (included) to COLD WATER SUPPLY LINE: Locate the cold water line. Shut off the cold water supply. Unscrew the flexible supply line from the angle stop. Attach the adapter. (Fits standard 1/2 and 3/8” plumbing.) Make sure the adapter is in an “open” position (blue knob parallel to the length of the body of the adapter). Leave Angel stop closed. (water shut off) (Fig 1)
- ATTACH THE WHITE 1/4” TAP WATER INLET HOSE TO THE ANGLE STOP ADAPTER (Fig. 1) Attach the white 1/4” hose to the adapter by simply pushing firmly into the white port. Give a gentle tug to ensure proper connection. It should not come out. You will need a way to route the white hose from the adapter to your ionizer. Most newer sinks have cutouts that will work for this. If not, drill a 1/4” hole.

- ATTACH THE WHITE 1/4” TAP WATER INLET HOSE TO YOUR IONIZER (Fig. 2) Attach the opposite (free end) of the white 1/4” hose to the white TAP WATER INLET port on the bottom of the ionizer. To attach the white hose, simply push it firmly into the TAP WATER INLET port. Give it a gentle tug to ensure proper connection. It should not come out. To remove it, press on the end of the fitting and pull it out at the same time.

- ATTACH THE GRAY ACIDIC WATER OUTLET HOSE (Fig. 3) – Attach the gray hose to the white plastic port labeled ACIDIC WATER OUTLET on the bottom of the ionizer. First, slide a squeeze clamp over the end of the hose. Attach the gray hose by simply pushing it firmly over the white plastic port. Soaking it in hot water for 30 seconds will make attaching it very easy. Squeeze the clamp and position it over the white port. Ensure the opposite end runs into the sink.

- POSITION YOUR IONIZER – Ensure it is on a hard and level surface. See installation precautions.
- CONNECT THE POWER CORD – Use an appropriate grounded outlet.
- INSTALL FLEXIBLE STAINLESS STEEL SPOUT – Screw the spout clockwise into the threaded silver port on top of the ionizer. Do not over-tighten.
- SAVE THE BOX your ionizer came packed in. This will help if your ionizer needs to be transported at a later date.
Install Method 3. Under-sink with conversion kit (most difficult)
Under-sink installations can only be accomplished with an AlkaViva Under-sink Conversion kit. Of the shelf, parts will not work. Your ionizer will require a very specialized faucet and a variety of other parts. The Conversion Kit comes with everything needed including instructions to complete this type of installation. It is recommended that a plumber perform this type of installation. Please contact AlkaViva Customer Service for details.
Operating Your Ionizer
Operating Precautions
- Do not run hot water through your ionizer. Doing so will damage your filters.
- Do not clean by spraying or pouring water over the ionizer. Clean using warm soapy water and a sponge or clean rag.
- Do not use benzene, paint thinner, or insecticidal sprays for cleaning your ionizer. Doing so can damage the finish.
- Do not close, bend, pinch, press, or otherwise obstruct output ports or hoses.
- If the appliance makes strange or unusual noises or odors are detected, unplug the power cord immediately and contact AlkaViva Customer Service to arrange service.
- Unplug your ionizer if you plan not to use it for an extended period. Filter replacement may be necessary when you use it again. Store your filter in a plastic bag inside of your refrigerator to prevent bacterial growth.
- Your ionizer is not under warranty for any damage caused by hard water.
- Do not use an ionizer downstream of any ion exchange water softening system or reverse osmosis system without first consulting AlkaViva Customer Service.
- Make sure to use your ionizer only with potable water which is suitable for human consumption.
- DO NOT use your ionizer with well water, water with extreme hardness, high sediment or TDS levels without first contacting AlkaViva Customer Service.
Start the Water Flow Through Your Ionizer
For Installation Method #1 – at the sink with a diverter:
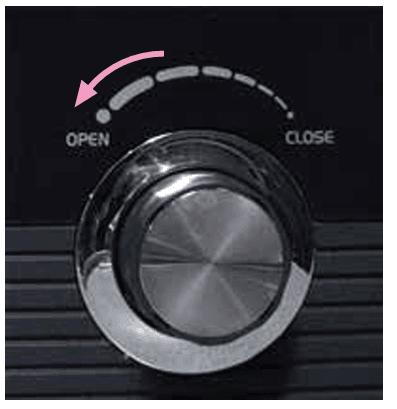
- OPEN THE FLOW CONTROL VALVE – This control is on the front of the machine and has an ON and OFF position. Try initially setting this halfway between ON and OFF Important: This is one of the most critical features in controlling your ionizer’s performance. This control WILL DIRECTLY impact the performance of your ionizer. A slow flow will yield higher performance; a fast flow will yield lower performance.
- TURN ON YOUR COLD WATER FAUCET – Turn the diverter lever until the water runs
through your ionizer. - NOTICE THE DIFFERENCE IN FLOW RATES by adjusting the FLOW CONTROL VALVE from a slow trickle to the fastest flow. When you begin hydrogen-infused ionized water, start with it
in the normal range for optimal results.
For Installation Method #2 – at the sink direct plumbed
- TURN ON YOUR WATER SUPPLY LINE AT THE ANGLE STOP – Ensure the angle stop adapter is in the open position. (The blue knob is parallel to the length of the adapter body.)
- OPEN THE FLOW CONTROL VALVE – This control is on the front of machine and has an ON and OFF position. When ionizing water initially try opening the valve half way between ON and OFF.
- NOTICE THE DIFFERENCE IN FLOW RATES by adjusting FLOW CONTROL VALVE from a slow trickle to the fastest flow. When you begin making hydrogen-infused ionized water, start with it in the normal range for optimal results.
Important: This is one of the most critical features in controlling your ionizer’s performance. This control WILL DIRECTLY impact the performance of your ionizer. A slow flow will yield higher performance; a fast flow will yield lower performance.
WHAT YOU WILL NOTICE:
- The control panel will illuminate, and water should flow from both hoses.
- The Digital Filter Life Indicator will begin to register numbers and you will hear your ionizer’s “voice” announcing the mode of operation. For instance: “Purified water selected”.
NOTE: The water will initially come out discolored (light to charcoal gray) due to carbon dust in the new filter. This is not harmful and is typical of all carbon filters. Allow the water to flow for 1-2 minutes in the PURIFIED mode until it runs clear.
Selecting Alkaline Ionized Hydrogen-Infused Water
Control Panel
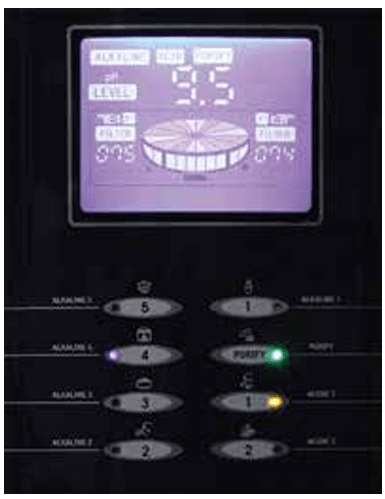
When you select Alkaline water, it will flow through the Flexible Stainless Spout at the top of your H2 Series Ionizer.
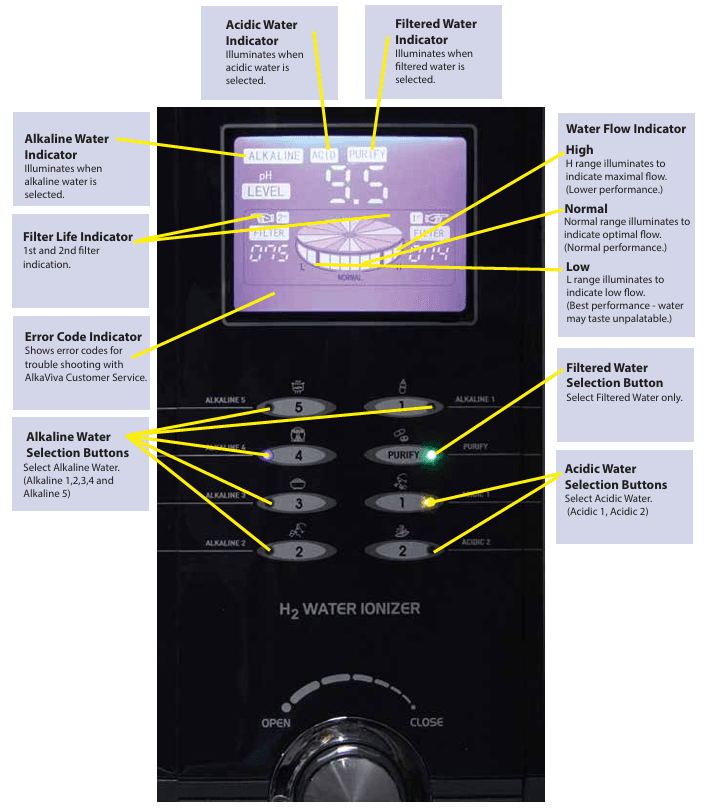
- Open the Flow Control Valve to let the water flow in. Your control panel will illuminate and the word ALKALINE will show on the display. For optimal performance, set the value so the flow is in the normal range on the display.
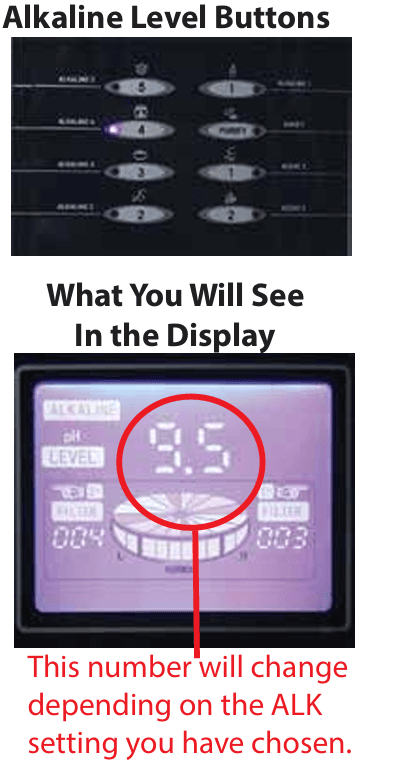
- Use the ALK button to select the level. The level you have selected will illuminate next to the ALK button and a numerical approximation of the pH level will appear on the display.
- You will hear voice confirmation: “Alkaline Ionized Water on process.”

- To change alkaline levels, simply depress the button of the alkaline level desired, ALK 1-5. ALK 1 is the weakest setting and ALK 5 is the strongest.
- Your H2 Series Ionizer will always “remember” the last setting used. If you were using ALK 2, the next time you start your ionizer it will automatically start on ALK 2.

The exception to the above: when ALK 5 (strong alkaline) is selected, your H2 Series Ionizer will come on at the last ALK 1-4 level used the next time you use it. When the tap water flows through your H2 Series Ionizer, the Water Flow Indicator illuminates: L when the water pressure/flow rate is low and H when it is high, NORMAL when it is normal. Your H2 Series Ionizer will produce optimal performance for drinking water (the perfect balance in pH, -ORP, H2 and taste) when it is in the normal range.
Selecting Acidic Ionized Water
When you select Acidic water, it will flow through the Flexible Stainless Spout at the top of your H2 Series Ionizer.
- Open the Flow Control Valve to let the water flow in. Your Control Panel will illuminate.
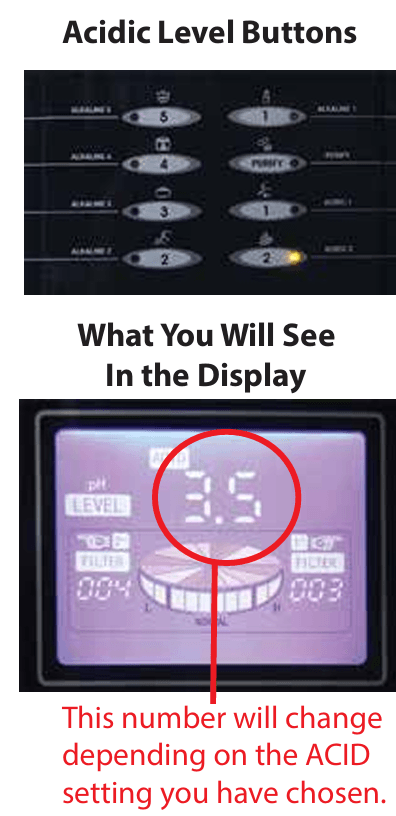
- Use the ACID button to select the level. Your control panel will illuminate and the word ACID will show on the display. For optimal performance, set the value so the flow is in the normal range on the display.
- You will hear voice confirmation: “Acidic Ionized Water in the process.” You will also hear a melody to alert you that acidic water is running.

- To change acid levels, simply depress the button of the acidic level desired, ACID 1 or 2. ACID 1 is the weakest setting and ACID 2 is the strongest.
- Your H2 Series Ionizer will always “remember” the last alkaline setting used. If you were using ACID 1, the next time you start your ionizer it will revert to the last ALK 1-4 level you used. When you select Alkaline water, it will flow through the Flexible Stainless Spout at the top of your H2 Series Ionizer. When you select Acidic water, it will flow through the Flexible Stainless Spout at the top of your H2 Series Ionizer.
- When the tap water flows through your H2 Series Ionizer, the Water Flow Indicator illuminates: L when the water pressure is low and H when it is high, NORMAL when it is normal.
NOTE:
- Acidic ionized water is not intended for regular drinking water. Acidic ionized water has many great uses. Learn more about this in the next section on using acidic water.
- The DARC cleaning system will help keep your electrodes clean. Running acidic water through your ionizer will keep the rest of the components of the machine clean. If you live in a hard water area this should be done daily for 1-2 minutes.
Selecting Purified Water
Purified water is only filtered, not ionized. When selected, it will flow through the Flexible Stainless Spout at the top of your H2 Series Ionizer.
- Open the Flow Control Valve to let the water flow in. NOTE: Your control panel will illuminate.
- Use the PURIFIED button to select filtered water. On the control panel the word PURIFY will illuminate and the letters “PU” will illuminate on the display panel.
- You will hear voice confirmation: “Crystal clear water in production.”
- Your H2 Series Ionizer will always “remember” the last alkaline setting used. If you were using PURIFIED, the next time you start your ionizer it will revert to the last ALK 1-4 level you used. When the tap water flows through your H2 Series Ionizer the Water Flow Indicator illuminates: L when the water pressure is low and H when it is high, NORMAL when it is normal.

Manually Adjusting the Power
While AutoAdjust automatically provides very new real-time adjustments to the pulse width, you can also manually adjust the power to best suit your unique water quality and desired performance requirements. By manually changing the power steps for each Alkaline and Acidic level, you can change the main power settings, making bigger and more impactful changes in performance. Here’s how:
- Step 1. Start water flow through your ionizer by turning on the Flow Control valve and/or Diverter.
- Step 2. For this example, we will use the ALK 5 level. You may manually set this for each ALK or ACID level. Select the ALK or ACID level you’d like to adjust – just as you would for changing levels under normal operation.
- Step 3. Press and hold the ALK 5 button until the Display changes and looks like this: The first digit (5) means “ALK Level 5” and the second digit (3) means electric power value 3. There are four electric power values available; Power Level 1 is the lowest and Power Level 4 is the highest. If you want to raise or lower the Power Value, press the same button (ALK Level 5). The second digit will change to reflect the power level.
- Step 4. Press “purify” to set the value. The next time you use the ionizer, it will “remember” the last manually selected Power Level. You must set each ALK and ACID level.
- Step 5. For other levels, please repeat the steps above.
Ionizer Performance Factors
Very Important Information About Your Ionizer Performance
There are three primary factors that control the performance of your ionizer:
- The quality of your source water and its mineral content. We cannot control this factor.
- The voltage being applied to the water. You control this by selecting the ALK level or ACID level on the control panel. The higher the setting, the more voltage or power applied to the water.
- The flow rate of water through your ionizer. You control this with the Flow Control knob on the control panel. This determines how long the water is being processed. With a fast flow your ionizer will produce lower pH, with a slow flow it will produce higher pH.
Water quality and mineral content vary greatly in different localities. Use the pH Test Kit and be sure to test your source water. Generally in “hard water” areas where mineral content is higher, your ionizer will easily reach high levels of pH even with a faster flow. In “soft water” areas where mineral content is lower, your ionizer may only reach the higher levels of pH with a slower flow. If your source water tests at a very low pH, you may want to “boost” performance by adding a calcium cartridge into the calcium port at the top of the ionizer filter (see the next section).
How to Measure pH
- Fill a shot glass or other small, clean glass container with about 1 inch of alkaline, acidic or purified water.
- Place 3 drops of the pH reagent into the vessel and gently shake or stir. If the reagent and water are not mixed well, the correct result may not be achieved. Too many or too few drops will affect results.
- The pH value is determined by matching the color to the pH color chart provided.
- Keep the pH reagent in a dark and cool place. DO NOT expose to sunlight or heat.
- Be sure to rinse out the vessel thoroughly prior to each use or the pH level may be incorrect.
- Do not drink the water that has been tested with the pH testing solution.
How to Add Scale Guard or Calcium Inserts
- Ensure the water flow is off.
- The inserts go into a port on the top of your filter. To access the filter, follow the instructions in Section 7 – How to Replace The Filter.
- Once you have the filter removed, unscrew the cap on the top of the filter body. If you have previously used an insert, dispose of the old insert. (Fig 1)
- The new insert will have a soft silicone protective cap. Remove the cap.
- Place the new insert into the port on the top of the filter, with the open end up. DO NOT EMPTY THE CONTENTS INTO THE PORT. (Fig. 2)
- Replace the cap on the port of the filter. Tighten firmly. You will experience leaking water if not tightened properly.
- Replace the filter following the instructions in the Section 7 – How to Replace The Filter.


Trouble Shooting Guide
| Abnormal condition | Cause(s) | Resolution |
|
The Control Panel does not come on. | The power plug is not properly inserted, or it is inserted into a faulty outlet. | Properly insert power plug into a correctly functioning power outlet |
| The fuse is blown. The fuse is not inserted properly. | Replace the fuse. A spare fuse is included in your reagent kit. (3A /110 V fuse) | |
| The Control Panel / display indicators do not come on even after turning the tap on. |
Faulty PCB (Printed Circuit Board) | Immediately unplug the unit and contact AlkaViva to arrange service. |
|
pH test shows alkaline water color as neutral (7) while acidic water color gets yellow (6). | Faulty or evaporated reagent: alkaline / acidity are always produced in inverse proportion. Therefore, showing an acidic color means inversely that alkaline water has to be generated from the unit. Lack of alkaline color can result from a chemical reaction where carbonic acid in water evaporates some test reagent elements. |
Test pH value on level 3 or 4 water; replace reagent. |
|
Power supply is suddenly cut off while operating the unit. | Elevated level of salt in the water or high TDS; extended operation at high pH; sudden flux in electrical current. In these cases your machine will shut down automatically to protect the electrodes and circuitry. | Wait – the unit will become operational again after about 30-60 minutes. Your ionizer has a safety mechanism built-in to protect the electrodes and circuitry. This mechanism will shut the ionizer down automatically. This mechanism protects the unit from overuse or excessive electric current. |
|
Low output of alkaline water from the unit. | Filter is clogged. Premature clogging may be caused by sudden drop in water quality and an influx of sediment or other contaminants, which stress the filter. | Replace your filter. Clean pre-filter |
| Low pressure in your household plumbing. | Ensure water supply valves are fully open. The water pressure in house may be too low. | |
| The input hose is bent, kinked or otherwise restricted. | Straighten the bent hose. |
| Abnormal condition | Cause(s) | Resolution |
|
Strange smell from Alkaline water. | Expired filter from ordinary use or premature clogging due to flux in water quality. | Replace your filter. |
| Sudden flux in water quality with elevated level of some disinfectants and naturally occurring elements in the water (not Chlorine). These elevated levels are observed in some areas during summer months. These levels fall within safe drinking water standards, yet will cause a reaction with ionized water causing a unique smell. |
Select lower pH level (1-2). If still present, filter replacement may be necessary. | |
|
Water appears milkish; white snow like particles in the bottom of your glass. | You have high hardness (calcium primarily) in your water. The white is extracted CaCO3 (Calcium carbonate). In water where elevated levels of CO3 exist, what you see after ionization is CO2 in the water bonded with Ca. | This is calcium! It is not only harmless, but actually good for you. Remember the ionizer separates and condenses the alkaline minerals and this is what you are seeing. You can lower the setting (1-2) and reduce this effect. Typically this only occurs in hard water areas. |
|
At first no smell, but then smell from the alkaline water about one hour later. | Your water bottle or receptacle is foul and needs cleaning. Contamination mixes with alkaline water when filling your bottle. |
Clean your bottle or receptacle. Try selecting lower pH level (1- 2). |
| Expired filter. | Replace your filter. | |
| Water leakage from the filter cartridge housing. | Filter not installed correctly into filter housing. | Remove your filter and reinstall it properly following the filter replacement instructions. Increase the quantity of source water inflow. |
|
No acid water flow from the acidic output port. |
Acidic output hose is bent, kinked or otherwise restricted. |
Straighten the bent hose; increase water flow from supply. |
For more manuals by AlkaViva, visit ManualsLibraryy
AlkaViva Vesta H2 Countertop Water Ionizer-FAQs
What does a water ionizer do?
A water ionizer uses electrolysis to separate incoming water into acidic and alkaline components, raising the pH of drinking water to create alkaline water.
How can I use alkaline ionized water?
Alkaline ionized water can be used for drinking, cooking, washing food to remove oil and dirt, and cleaning. Acidic water is suitable for washing food (removes chemicals), bathing, and as an antiseptic.
How long does ionized alkaline water last?
Ionized alkaline water retains its properties for 1-2 weeks when stored in a cool place or refrigerated. The alkaline and antioxidant properties are strongest within the first 3 days, but they diminish after 18-24 hours.
What pH value does a water ionizer add to the water?
A water ionizer typically raises the pH of water to a range between 8 to 11, making it more alkaline.
How does the AlkaViva water ionizer work?
The AlkaViva water ionizer uses a two-step process: a multistage activated carbon filter with tourmaline and coral calcium, followed by an electrical charge passed through platinum-coated titanium electrodes to ionize the water.
Do water ionizers purify water?
No, water ionizers do not purify water. While they adjust the pH of the water, they may not provide sufficient filtration to remove contaminants.
What is the pH of ionized water?
Ionized water typically has a pH between 8 and 9, making it more alkaline compared to neutral water with a pH of 7.
Are there any side effects of drinking ionized water?
Drinking strongly alkaline water can irritate the eyes, skin, and mucous membranes. Additionally, it may lead to gastrointestinal issues, especially if consumed excessively.
What is the best time to drink alkaline water?
It’s best to drink alkaline water at least 30 minutes before meals and 1.5 to 2 hours after meals, as it may slow down digestion when consumed with food.

