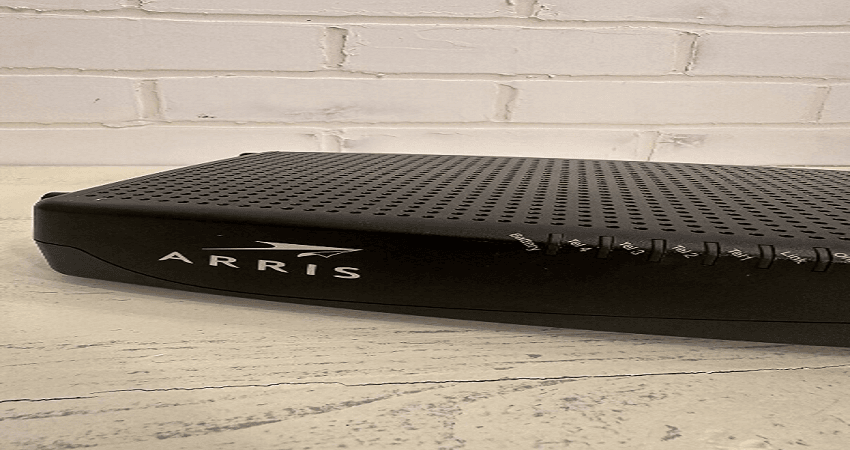
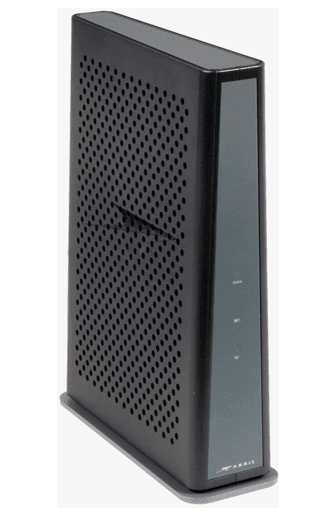
Arris Touchstone DG3450 Docsis 3.1 Wireless Modem
Introduction
Get ready to experience the Internet’s express lane! Whether you’re checking out streaming media, downloading new software, or checking your email, the Touchstone DG3450 Data Gateway brings it all to you faster and more reliably. The Touchstone DG3450 Data Gateway provides four Ethernet connections for use as the hub of your home/office Local Area Network (LAN). The DG3450 also provides 802.11a/b/g/n/ac wireless connectivity for enhanced mobility and versatility. Installation is simple and your cable company will assist you with any special requirements.
About this Manual
This manual covers the Touchstone DG3450 Data Gateway. The model number is on the label affixed to the Data Gateway.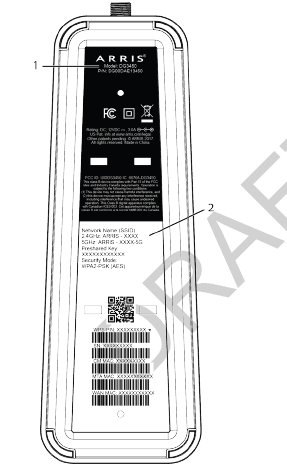
- Model Number
- Security Label
What About Security?
Having a high-speed, always-on connection to the Internet requires a certain amount of responsibility to other Internet users—including the need to maintain a reasonably secure system. While no system is 100% secure, you can use the following tips to enhance your system’s security:
- Keep the operating system of your computer updated with the latest security patches. Run the system update utility at least weekly.
- Keep your email program updated with the latest security patches. In addition, avoid opening emails containing attachments, or opening files sent through chat rooms, whenever possible.
- Install a virus checker and keep it updated.
- Avoid providing web or file-sharing services over your Data Gateway. Besides certain vulnerability problems, most cable companies prohibit running servers on consumer-level accounts and may suspend your account for violating your terms of service.
- Use the service provider’s mail servers for sending email.
- Avoid using proxy software unless you are certain that it is not open for abuse by other Internet users (some are shipped open by default). Criminals can take advantage of open proxies to hide their identity when breaking into other computers or sending spam. If you have an open proxy, your service provider may suspend your account to protect the rest of the network.
- The DG3450 ships with wireless LAN security set by default (for the same reasons that you should run only secured proxies). See the security label on your product for the factory security settings. If you need to modify the default wireless security settings, see Configuring Your Wireless Connection.
Ethernet or Wireless?
There are two ways to connect your computer (or other equipment) to the Data Gateway. The following will help you decide which is best for you:
Ethernet
Ethernet is a standard method of connecting two or more computers into a Local Area Network (LAN). You can use the Ethernet connection if your computer has built-in Ethernet hardware.
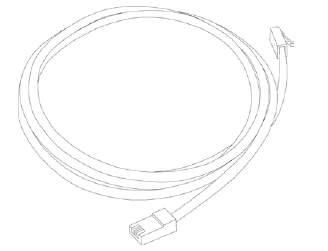
The Data Gateway package comes with one 4-foot (1.2m) Ethernet cable (the connectors look like wide telephone connectors); you can purchase more cables if necessary at a computer retailer. If you are connecting the Data Gateway directly to a computer, or an Ethernet hub with a cross-over switch, ask for Category 5e (CAT5e) straight-through cable. CAT5e cable is required for gigabit Ethernet (Gig-E), not regular CAT5 cable.
Wireless
Wireless access lets you connect additional (wireless-capable) devices to Data Gateway. The 802.11 wireless LAN standard allows one or more computers to access the DG3450 using a wireless (radio) signal. These connections are in addition to the connections supported via Ethernet.
Both
If you have two or more computers, you can use Ethernet for up to four devices and wireless for the others. To connect five or more computers to the Ethernet ports, you will need an Ethernet hub (available at computer retailers.)
Installing and Connecting your Data Gateway
Before you start, make sure that:
- You have contacted your cable company and verified that they provide data service using standard DOCSIS technology.
- You have all the Items You Need (page 10).
- Cable and power outlets are available near the computer. If a cable outlet is not conveniently located, your cable company can install a new one. If you have ordered service, your cable company should configure the Data Gateway automatically. You need only follow the instructions in this section to install and connect the Data Gateway.
Front Panel
The front of the DG3450 has the following indicators.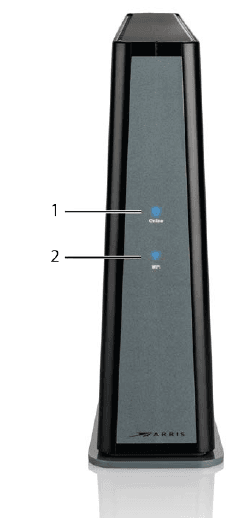
- Online: indicates internet data transmission status.
- Wireless: indicates the status of the wireless LAN.
Rear Panel
The rear of the Data Gateway has the following connectors and controls.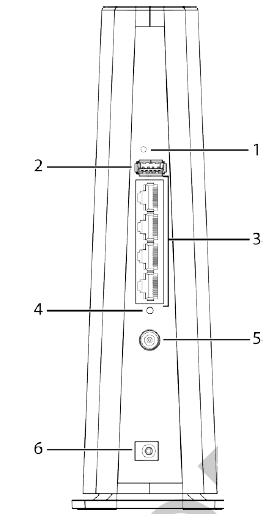
- Reset button: resets the Data Gateway as if you power cycled the unit. Use a pointed non-metallic object to press this button.
- USB: USB host connector – future support for external USB devices.
- Ethernet (1 – 4): connectors for use with a computer LAN port.
- MoCA LED: indicates the status of the MoCA connection.
- Cable: a connector for the coaxial cable.
- Power: a connector for the power cord.
Selecting an Installation Location
There are several factors to consider when choosing a location to install your Data Gateway:
- Is an AC outlet available nearby? For best results, the outlet should not be switched and should be close enough to the Data Gateway that extension cords are not required.
- Is a cable jack available? For best performance, keep the number of splitters between the jack and cable drop to a minimum. Each splitter attenuates (reduces) the signal available to the Data Gateway. A large number of splitters can slow down the Internet connection.
- If you are connecting devices to the Ethernet ports, can you easily run cables between the Data Gateway’s location and those devices?
- If you want to install the Data Gateway on a desktop, is there enough space on either side to keep the vents clear? Blocking the vents may cause overheating.
- How close are your wireless devices? The Data Gateway wireless connection range is typically 100–200 feet (30m–65m). Several factors can affect the connection range, as described below.
Desktop Mounting Instructions
Position the Data Gateway so that:
- it stands vertically on its base (Do not lay it flat on its side.)
- air flows freely around it
- the back faces the nearest wall
- it will not fall to the floor if bumped or moved
- the ventilation holes on the sides of the unit are not blocked
Factors Affecting Wireless Range
Several factors can affect the usable range for wireless connections.
| Increases range |
|
| Decreases range |
|
Connecting the Data Gateway
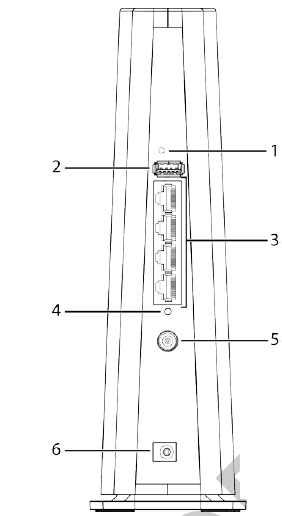
- Connect one end of the coax cable to the cable outlet or splitter, and the other end to the Data Gateway’s Cable connector (5). Tighten the connections by hand, then tighten an additional 1/8 turn with a wrench.
- Insert the plug from the power cord into the Power connector on the back of the Data Gateway (6) and insert the power cord into a convenient AC outlet.
- Connect one end of the Ethernet cable to any Ethernet port on the back of the Data Gateway, (3) and the other end to the Ethernet port on a computer, hub, or broadband router.
Configuring Your Wireless Connection
- The DG3450 ships with wireless LAN security set by default. See the security label on your product for the factory security settings.
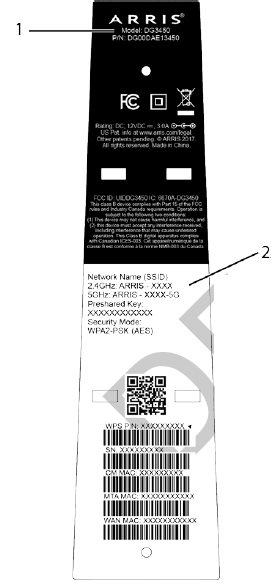
- Security Label
If you need to modify the Data Gateway’s default wireless security settings, or if you want to configure any other wireless LAN settings, refer to the following instructions.
Accessing the Configuration Interface
Follow these steps to access the configuration interface.
- If security has been properly set up on your computer to access the wireless LAN on the DG3450, use the connection utility for your operating system to connect to the wireless LAN using its network name (SSID), as shown on the security label.
- If you cannot access the wireless LAN, you must first establish a wired Ethernet connection between your computer and the DG3450.
- In your web browser, open the page http://192.168.0.1/ to access the wireless router setup.
Setting Parental Controls
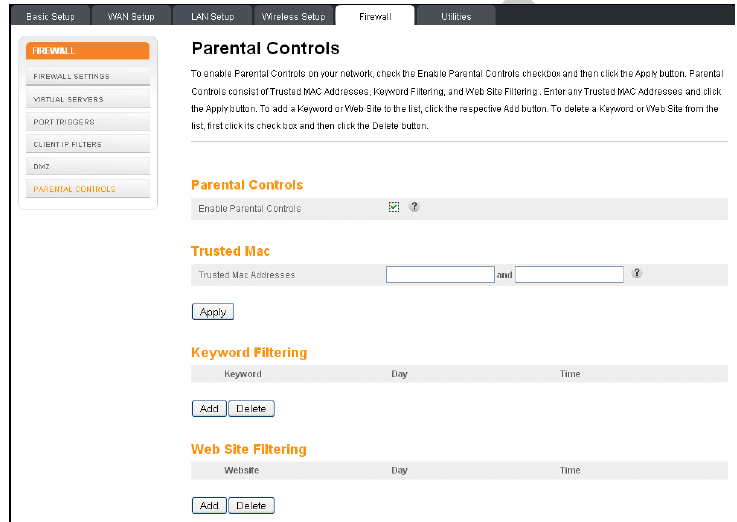
The Parental Control feature allows you to block specified keywords and websites from being accessed and also to specify trusted computers in the network. Trusted computers are not affected by parental control settings.
Finding the MAC Address of a Computer
To set up trusted computers you must first determine the MAC address of those computers. Use the operating system of your computer to find its MAC address, as follows:
- Windows: from the Start menu, find and select the Control Panel. Double-click Network & Sharing Center. Then double-click either “Wireless Network Connection” for a wireless connection, or “Local Area Connection” for an Ethernet connection. Next, click the Details button. The “Physical Address” line shows the MAC address.
- macOS: open System Preferences and click the Network icon. To find the Ethernet MAC address, select Built-in Ethernet from the Show drop-down, then click the Ethernet tab. The “Ethernet ID” field shows the MAC address. To find the wireless MAC address, select Airport from the Show drop-down, then click the Airport tab. The “Airport ID” field shows the MAC address.
- Linux: open a shell window and type /sbin/if config (and press Enter). The wireless interface is eth1 (unless there is no Ethernet adapter, in which case the interface is eth0).
Making Your Parental Control Settings
Follow these steps to set up your Parental Controls:
- Access and log into the wireless configuration interface as explained in Accessing the Configuration Interface.
- Click the Firewall tab and then click Parental Controls in the side menu to display the Parental Controls screen.
- Check the Enable Parental Controls checkbox and click the Apply button.

- Configure any or all of the following parental controls:
Trusted MAC Addresses
Enter the MAC addresses of any “trusted” computers on the network and click the Apply button. You can add two trusted computers. Once added, these trusted computers will not be affected by the parental control settings. For example, you may want the computers of the father and mother to be trusted, while the childrens’ computers have parental controls in effect.
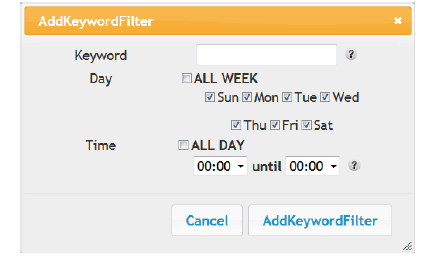
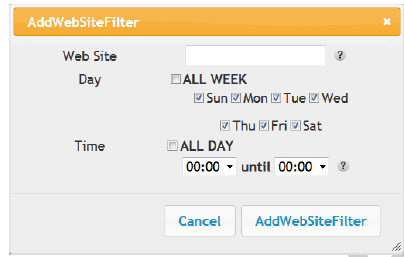
You can add a list of keywords and web sites that you want to block. To add a keyword orweb site to the list, click the respective Add button. To delete a keyword or web site from the list, first click its check box and then click the Delete button.
Add Keyword Filter Dialog Box
Add Web Site Filter Dialog Box
Adding a Keyword or Web Site Filter
- a. Enter the keyword in the Keyword field or web site URL address in the Web Site field.
- b. Click the checkboxes for the days you want access blocked, or click the All Week checkbox for all week.
- c. Set the start time and end time during the specified days (24-hour clock). (0:00 until 0:00 indicates all day, or just click the All Day checkbox.)
- d. Click the Add Keyword Filter or Add Web Site Filter button respectively. Then click the Apply button.
Configuring Your Ethernet Connection
If your computer is equipped with a LAN card providing an Ethernet connection, you may have to configure your computer’s TCP/IP settings. The steps that follow will guide you through setting your computer’s TCP/IP settings to work with the Data Gateway.
Requirements
Make sure you have the following before attempting to configure your Ethernet connection:
- Computer with Ethernet interface.
- Ethernet cable (supplied).
- IP address, subnet, gateway, and DNS information for installations not using DHCP.
How to use this chapter
The following list shows the procedures for modifying the TCP/IP settings on the computer. The procedure is slightly different depending on the operating system that you are using. Please ensure you are using the correct steps for the operating system on your computer. Follow the links below for instructions to configure your Ethernet connection on your operating system.
TCP/IP Configuration for Windows XP
Follow these steps to configure the Ethernet interface on a Windows XP operating system.
- From the computer, select Start > Settings > Control Panel and double-click Network Connections in the Control Panel. The Network Connection window displays a list of LAN connections and associated network adapters.
- Double-click the local area connection to be used for your device’s network connection. The Local Area Connection Status widow displays.
- Click Properties.
- Select TCP/IP by clicking it one time. Then click Properties.
- Click the General tab. Then click Obtain an IP address automatically and click OK.
- Click OK to accept the new settings, and OK again to close the Properties window.
- You may have to restart your computer in order for your computer to obtain a new IP address from the network.
TCP/IP Configuration for Windows Vista
Follow these steps to configure the Ethernet interface on a Windows Vista operating system.
- Open the Vista Control Panel.
- Double-click Network and Sharing Center to display the Network and Sharing Center Window.
- Click Manage network connections. If prompted for a connection, choose Local Area Connection. The Network Connections window displays.
- Double-click the Local Area Connection to open the Properties window:
- TCP/IP Configuration for Windows Vista
- For either TCP/IPv4 or TCP/IPv6, select Obtain an IP address automatically and Obtain DNS server address automatically, unless instructed otherwise by your cable provider.
- Click OK to accept the new settings and close the Properties window.
TCP/IP Configuration for macOS
Follow these steps to configure the Ethernet interface on a macOS operating system.
- Open System Preferences, either by choosing System Preferences from the Apple menu or by clicking the System Preferences icon in the dock.
- Click the Network icon.
- Choose Automatic from the Location drop-down menu, and Built-in Ethernet from the Show menu.
- Choose the TCP/IP tab, if necessary. If you are using TCP/IPv4, go to step 5. If your cable provider requires TCP/IPv6, go to step 8.
- Choose Using DHCP from the Configure IPv4 menu.
- If necessary, click the Renew DHCP Lease button.
- Close the System Properties application. TCP/IPv4 configuration is completed.
- If you are using TCP/IPv6, click Configure IPv6 near the bottom of the previous window.
- Choose Automatically from the Configure IPv6 drop-down menu and click OK.
- Close the System Properties application.
Setting up Your Computer to Use the Data Gateway
Follow the instructions in the information packet supplied by your service provider. Contact your service provider if you need help setting up your computer.
Indicator Lights for the DG3450
The Data Gateway has LED indicator lights to assist in troubleshooting.
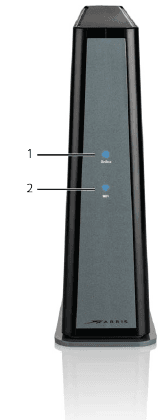
- Online
- Wi-Fi
Online LED
The following table shows light patterns for the Online LED during normal operation.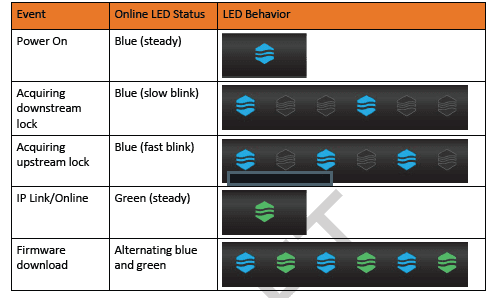
Wi-Fi LED
The following table shows light patterns for the Wi-Fi LED during normal operation.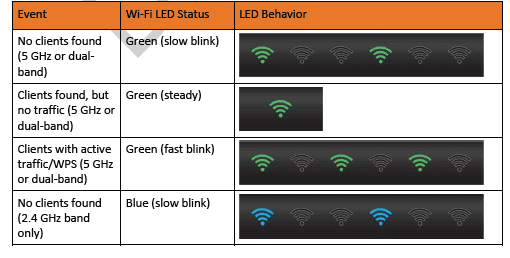

Using the Reset Button
Use the Reset button (1), on the back of the Data Gateway, to reset the modem and perform initialization as if you power cycled the unit. You may need to reset the Data Gateway if you are having problems connecting to the Internet. Using this button will be rare. Use a pointed non-metallic object to press this button. The Reset button is recessed to prevent accidental resets.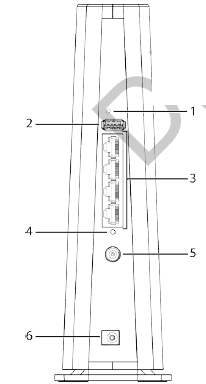
- Reset button
- USB
- Ethernet (1 – 4)
- MoCA LED
- Cable
- Power1. Reset button
Resetting the Router to Factory Defaults
To reset the router to factory defaults, press and hold the Reset button on the back of the Data Gateway for more than fifteen seconds. This restores the wireless setup configuration and router configuration parameters to the factory defaults. You may need to do this if a misconfiguration has locked out all access.
Troubleshooting
The Data Gateway is plugged in, but the Power light is Off
Check all power connections. Is the power cord plugged in firmly at both ends? If you plugged the power cord into a power strip, make sure the strip is switched on. Try to plug the power cord into a different outlet. If the outlet is controlled by a wall switch, make sure the switch is on. Finally, check the fuse or circuit breaker panel.
For more manuals by Arris visit, ManualsLibraryy
Arris Touchstone DG3450 Docsis 3.1 Wireless Modem-FAQs
How many devices can connect to the Arris DG3450?
The modem supports up to four devices via Ethernet and additional devices wirelessly. To connect more than four wired devices, an Ethernet hub is required.
What is the default login for the Arris DG3450?
The default username is admin, and the password is the Pre-Shared Key found on the modem’s label.
How can I reset the Arris DG3450 modem?
While the modem is powered on, press and hold the Reset button on the back of the device for 10 seconds. You can use a pen or paperclip to press the button.
What is the Arris DG3450?
The DG3450 is a DOCSIS 3.1 wireless gateway offering up to 2.5 Gbps of broadband speed. It features dual-band 4×4 802.11ac Wi-Fi for superior wireless performance, including video streaming.
What is the maximum speed of the Arris DG3450?
The DG3450 supports up to 2.5 Gbps broadband speeds using 32×8 channel bonding and DOCSIS 3.1 technology.
What’s the difference between a router and a modem?
A modem connects directly to your internet service provider (ISP), while a router creates a local area network (LAN) for devices in your home. The DG3450 combines both functions into a single device.
What is the IP address for the Arris DG3450?
To access the modem’s login page, type 192.168.0.1 into your web browser’s address bar and press Enter.
What is the default password for the Arris DG3450?
The default username is admin, and the default password is password (all lowercase). Ensure you are connected to the modem to log in.
Which app can I use with the Arris DG3450?
The ARRIS SURFboard Manager app allows you to manage your Wi-Fi network, monitor connected devices, set parental controls, and more directly from your mobile device.

