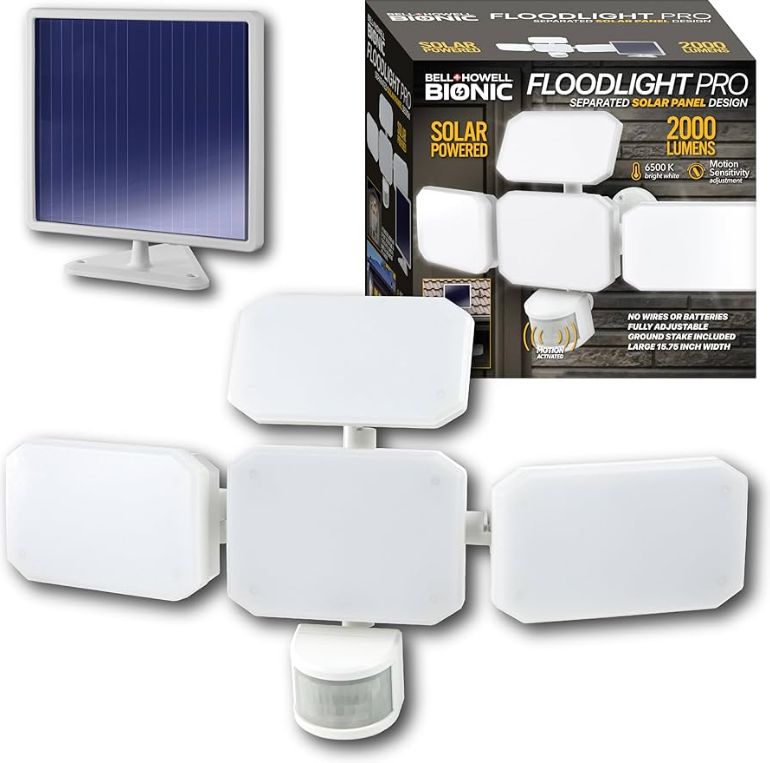
Bell Howell 9422 Bionic Floodlight Pro Solar Lights
PARTS & FEATURES
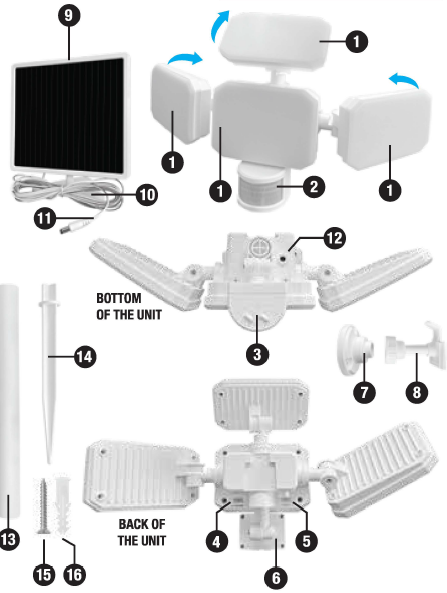
- Multi-directional panels with total of 193 LEDs
- Motion sensor
- Motion sensor controls (day/night and distance)
- Sensor time switch (30s, 60s or 120s)
- 1K (1000lm brightness) – OFF 2K (2000lm brightness) Switch
- Adjustment knob
- Mounting plate (unit)
- Adapter
- Solar Panel
- Mounting plate (solar panel)
- Solar panel cable
- Solar panel port
- Stake
- Ground spike
- Screws (x6) 1 I
- Plastic anchors (x6)
INSTALLATION
PLEASE READ THIS MANUAL CAREFULLY BEFORE USE AND KEEP IT FOR FUTURE USE.
- When picking a place to install the solar panel of the Bionic Solar Floodlight Pro, CHOOSE A LOCATION WITH MAXIMUM SUN EXPOSURE DURING THE DAY.
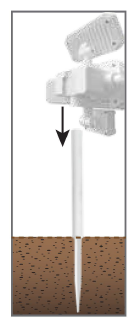
- Do not use the floodlight to force the stake into the ground. First, insert the stake into the ground, and then place the floodlight over it.
- Avoid areas under trees or bushes, as this can prevent the Bionic Solar Floodlight Pro from charging properly.
- Do not install Bionic Solar Floodlight Pro near an existing outdoor light. The built-in sensor will prevent it from turning the solar lights on.
- When using the Bionic Solar Floodlight Pro in the fall and winter, please note that due to fewer daylight hours, the batteries might not charge fully. This may affect the amount of time the Bionic Solar Floodlight Pro will be on.
MOUNTING FLOODLIGHT
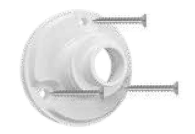
- Drill holes matching the pattern on the Mounting Plate and install plastic anchors (included). Attach the Mounting Plate
using 3 screws (included).
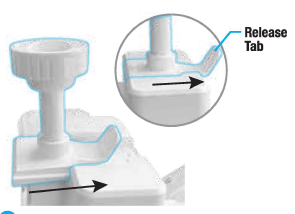
- Insert the Mounting Plate Assembly into the floodlight. Push in as shown above.

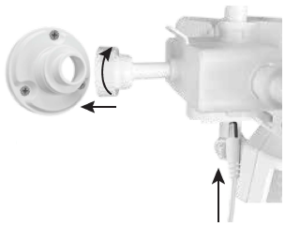
- Align the arm of the floodlight with the opening on the Mounting Plate. Twist the dial clockwise to tighten and secure it.
- Insert the solar panel cable into the port located on the bottom of the floodlight.

- INSTALL SOLAR PANEL: When picking a place to install the solar panel of the Bionic Solar Floodlight Pro, CHOOSE A LOCATION WITH MAXIMUM SUN EXPOSURE DURING THE DAY.
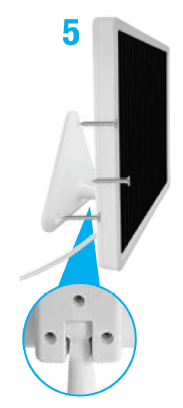
- For maximum charging results, mount the solar panel
as described below. - Drill holes matching the pattern on the Mounting Plate
of the solar panel and install plastic anchors (included). - Attach the solar panel using 3 screws (included).
- You can adjust the angle of the solar panel by moving the arm/mounting plate assembly.
- The solar panel can also be placed on a hard surface (as shown on the right).
- For maximum charging results, mount the solar panel
INSTALLING FLOODLIGHT IN-GROUND
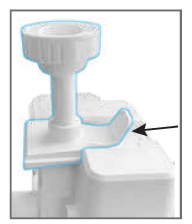
- If needed, remove the Mounting Plate Assembly by pulling
on the release tab and sliding the mounting plate out.
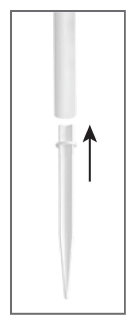
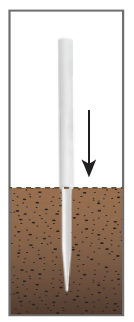
- Insert the Ground Spike into the Stake.

- Make sure the soil is softened with water. Insert the Stake into the ground.

- Insert a floodlight over the Stake.

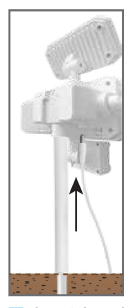
- Insert the solar panel cable into the port located on the bottom of the floodlight.

- INSTALL SOLAR PANEL: When picking a place to install the solar panel of the Bionic Solar Floodlight Pro, CHOOSE A LOCATION WITH MAXIMUM SUN EXPOSURE DURING THE DAY.
- For maximum charging results, mount the solar panel as described below.
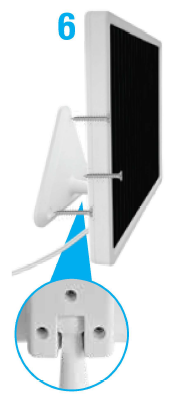
- Drill holes matching the pattern on the Mounting Plate of the solar panel and install plastic anchors (included).
- Attach the solar panel using 3 screws (included).
- You can adjust the angle of the solar panel by moving
the arm/mounting plate assembly. - The solar panel can also be placed on a hard surface
(as shown on the right).
USUAGE
SENSOR MODE
CHOOSE BRIGHTNESS: 1000 LUMENS (LOW) or 2000 LUMENS (HIGH)
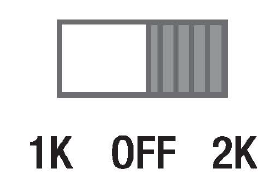
When using for the first time, turn the Floodlight ON by sliding the switch to 1 K or 2K. Leave the solar panel in direct sunlight for 24 hours to facilitate solar charging.
CHOOSE SENSOR TIME: 30 SEC, 60 SEC, or 120 SEC
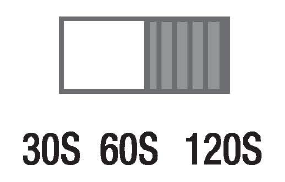
The “30S / 60S / 120S” switch determines the amount of time the light will stay on after all motion has stopped. The light will turn off automatically once the set time has passed.
ADJUSTING LUX LEVEL AND SENSOR DISTANCE
Adjust the settings on the motion sensor by turning the dials located at the bottom.

NIGHT: Set the dial so the slanted end is on the left D. In this setting, the light will turn on at night when motion has been detected.
ALL-DAY USE: Rotate the dial 270° to the right (-¢-). In this setting, the light will turn on at any time of day when motion has been detected
SHORTER SENSOR DISTANCE: Set the dial so the slanted end
is on the left (- ). This is a setting for a shorter sensor distance.
LONGER SENSOR DISTANCE: Rotate the dial 270° to the
right(+). This is a setting for longer sensor distance.
ADJUSTING ANGLES
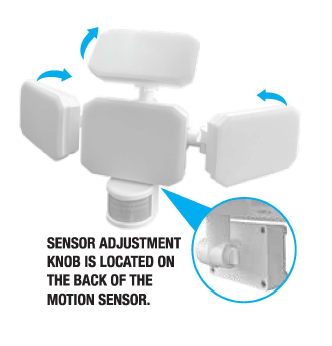
- To adjust the angle of the motion sensor, loosen the adjustment knob by turning it counterclockwise. Once the desired angle has been selected, turn it clockwise to tighten the knob.
- If the unit is mounted, swivel the arm of the floodlight to direct the light where needed. All 3 of the light panels are multi-directional at different angles. Move each panel to select the best angle.
CLEANING
Wipe down the unit using water and a soft, damp cloth only. Do not use harsh chemicals. Do not spray with a hose or power washer.
TECHNICAL INFORMATION
- LED counts: 193pcs LED
- Lumens: High mode: 2000± 1 OOlm Low mode: 1000±50lm
- Product Size (inches)/ WT (lbs): Solar panel: 8.27″x7.72″x3.07″/1.17LBs
- Light: 15.79″x8.15″x4.37″/1 .37LBs
- Cord length: 14.9ft
- Battery: Li 18650 2x1800mAh rechargeable batteries
- Color Temperature: 6000-7000K
- Waterproof rating: IP65
FOR MORE MANUALS BY BELL+HOWELL, VISIT MANUALSLIBRARYY
Bell Howell 9422 Bionic Floodlight Pro Solar Lights-FAQs
How does the Bionic Floodlight work?
The Bell+Howell Bionic Floodlight uses motion-sensing technology. When movement is detected, all three light panels switch on instantly, illuminating the area with bright light. The light automatically shuts off about 30 seconds after motion stops or moves out of range.
How do solar floodlights work?
Solar floodlights collect energy from the sun during the day, storing it in a rechargeable battery. At night, the stored energy powers the LEDs, providing bright, eco-friendly lighting without electricity costs.
How do I turn on the Bell+Howell solar light?
Press the ON/OFF button once. The light will turn on automatically at night after charging during the day. If it doesn’t, check that it has had at least 8 hours of direct sunlight.
How long does a Bionic Floodlight stay on?
In motion-sensor mode, the light stays on for about 30 seconds per activation. If movement continues, the light will stay on throughout the night.
How long does it take to charge solar floodlights?
On average, the Bionic Floodlight needs 8–10 hours of direct sunlight for a full charge, which will power the light overnight.
How do I use solar lights for the first time?
Charge the light for a full 8–10 hours in direct sunlight before first use. Then press the ON switch and place it where it receives maximum sun exposure.
How do I know if my solar light is working?
Cover the solar panel during the day — if the light turns on, it is working. If not, check the switch, battery, or placement for sunlight exposure.
Can solar lights charge when switched off?
Yes. Even when switched off, the panel will continue to collect solar energy and charge the internal battery.
Do solar lights need to be turned off during the day?
No. You can leave them switched on — they automatically charge in the day and turn on at night. Turning them off during the day is only needed if you want to save battery for later use.
How long do solar light batteries last?
Most rechargeable batteries in solar floodlights last 1–2 years before needing replacement.


