Black and Decker HHVK320J DustBuster Cordless Handheld Vacuum
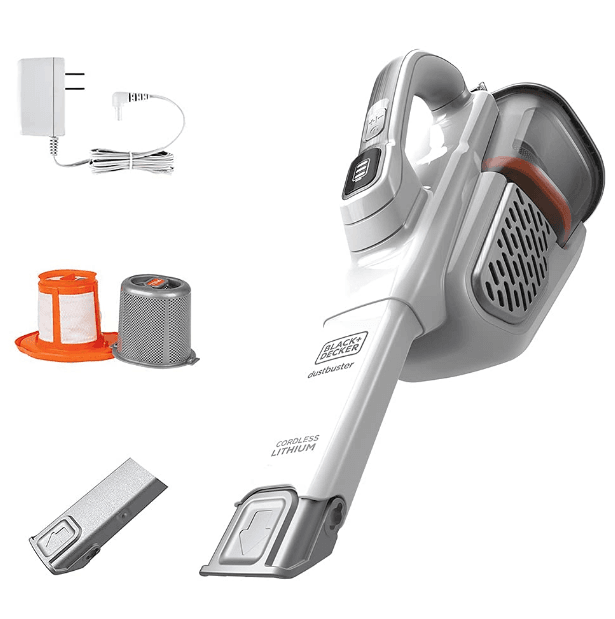
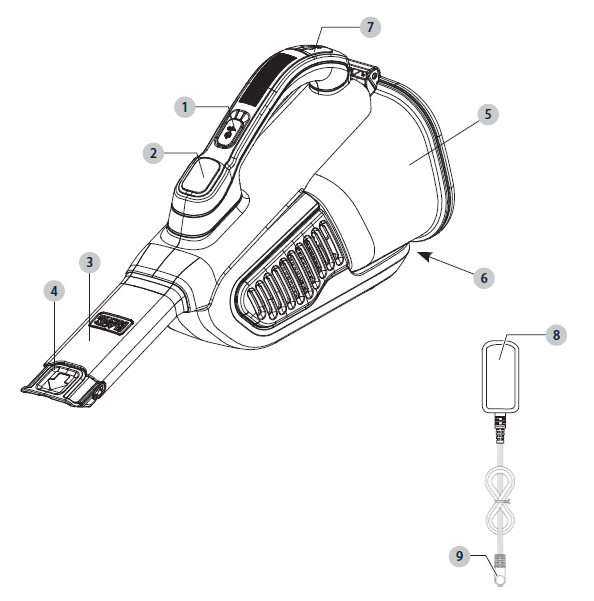
Components
- On/Off switch
- State of charge indicator
- Vacuum nozzle
- Extendable crevice tool
- Dust bowl
- Dust bowl release button
- Charging port
- Jack plug charger
- Jack plug
- WARNING! Read all safety warnings and all instructions. Failure to follow the warnings and instructions may result in electric shock, fire, and/or serious injury.
- WARNING: To reduce the risk of injury, read the instruction manual.
Intended Use
Your BLACK+DECKER vacuum has been designed for vacuuming everyday dry messes. This appliance is intended for household use only.
READ ALL INSTRUCTIONS BEFORE USING THIS APPLIANCE.
- WARNING: Some household dust contains chemicals known to the State of California to cause cancer, birth defects or other reproductive harm, such as asbestos and lead in lead-based paint.
- WARNING: Do not attempt to modify or repair the appliance.
- WARNING: Do not charge the battery at ambient temperatures below 39 °F (4 °C) or above 104 °F (40 °C). Follow all charging instructions and do not charge the appliance outside of the temperature range specified in the instructions. Charging improperly or at temperatures outside of the specified range may damage the battery and increase the risk of fire.
- WARNING: To reduce the risk of fire, electrical shock, or injury:
- Shock Hazard. To protect against risk of electrical shock, do not put the charging base in water or other liquid.
- Do not allow it to be used as a toy. Close attention is necessary when used by or near children.
- Use only as described in this manual. Use only the manufacturer’s recommended attachments.
- Do not use with a damaged cord or plug. If the appliance is not working as it should, has been dropped, damaged, left outdoors, or dropped into water, return it to a service center.
- Do not pull or carry by cord, use cord as a handle, close a door on cord, or pull cord around sharp edges or corners. Do not run the appliance over the cord. Keep the cord away from heated surfaces.
- Do not unplug by pulling on the cord. To unplug, grasp the plug, not the cord.
- Do not handle the charger, including the charger plug and charger terminals, with wet hands.
- Do not put any object into openings. Do not use with any opening blocked; keep free of dust, lint, hair, and anything that may reduce air flow.
- Keep hair, loose clothing, fingers, and all parts of the body away from openings and moving parts.
- Use extra care when cleaning on stairs.
- Do not use to pick up flammable or combustible liquids, such as gasoline, or use in areas where they may be present.
- Do not pick up anything that is burning or smoking, such as cigarettes, matches, or hot ashes.
- Do not use without dust bag and/or filters in place.
- Do not charge the unit outdoors.
- Use only the charger supplied by the manufacturer to recharge.
- Do not incinerate the appliance even if it is severely damaged. The batteries can explode in a fire.
- This appliance is intended for household use only and not for commercial or industrial use.
- Do not allow the cord to hang over the edge of a table or counter or touch hot surfaces.
- The unit should be placed or mounted away from sinks and hot surfaces.
- Plug the charger directly into an electrical outlet.
- Use the charger only in a standard electrical outlet (120V/60Hz).
- Unplug the charger from the outlet before any routine cleaning or maintenance.
- Do not look into the air vents when the unit is switched on, as sometimes there is a possibility of small debris being discharged from the air vents, especially after cleaning / replacement of the filters, as debris inside the unit can be disturbed.
- This product includes rechargeable Li-ion batteries. Do not incinerate batteries as they will explode at high temperatures.
- Leaks from battery cells can occur under extreme conditions. If the liquid, which is a 20‑35% solution of potassium hydroxide, gets on the skin, (1) wash quickly with soap and water or (2) neutralize with a mild acid such as lemon juice or vinegar. If the liquid gets into the eyes, flush them immediately with clean water for a minimum of 10 minutes. Seek medical attention.
SAVE THESE INSTRUCTIONS
Additional Safety Information
WARNING: Never modify the appliance or any part of it. Damage or personal injury could result.
- Wear protective clothing and wash exposed areas with soap and water. Allowing dust to get into your mouth, eyes, or to lie on the skin may promote absorption of harmful chemicals. Direct particles away from the face and body.
- Air vents often cover moving parts and should be avoided. Loose clothes, jewelry or long hair can be caught in moving parts.
The label on your tool may include the following symbols. The symbols and their definitions are as follows: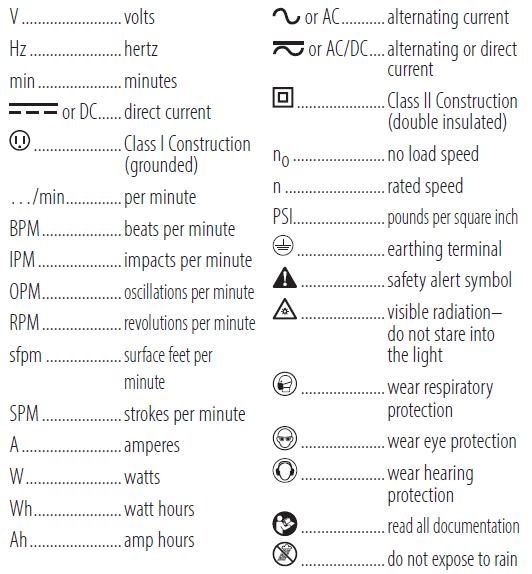
- Before first use, the battery must be charged for at least 5 hours.
- Make sure the appliance is switched off.
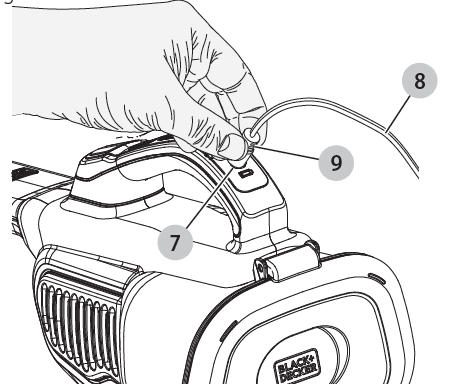
- Fig. B – Plug the jack plug 9 of the jack plug charger 8 into the charging port 7 of the vacuum.
- Plug the charger into any standard 120-Volt 60-Hz electrical outlet.

NOTE: While charging, the charger may become warm. This is normal and does not indicate a problem. The appliance can be left connected to the charger indefinitely.
Charging Indicator LED
- While charging, the white LEDs on the charger 8 will flash and increase in sections.
- When charging is completed, the white LEDs will turn off.
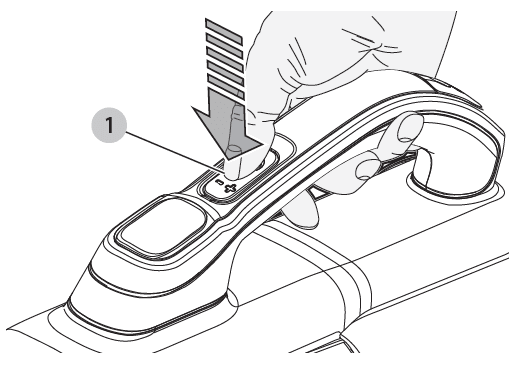
Switching On/Off (Fig. C)
- To switch the appliance ON, press the On/Off switch 1.
- Press the On/Off switch 1 again to engage boost mode.
- Press the On/Off switch 1 to turn the vacuum off.
State of charge indicator
This appliance includes a state of charge indicator 2, which consists of three white LED lights 10 that indicate the level of charge remaining in the battery. This feature is only activated when the vacuum is powered on. The state of charge indicator is an indication of approximate levels of charge remaining in the battery pack according to the following indicators:
The LED battery indicator displays the remaining charge and warns you when the battery is low. The final LED will flash continuously when there is only 1 minute of runtime remaining. All LEDs will flash when the unit is discharged.
NOTE: The state of charge indicator is only an indication of the charge left on the battery. It does not indicate tool functionality and is subject to variation based on product components, temperature and end-user application.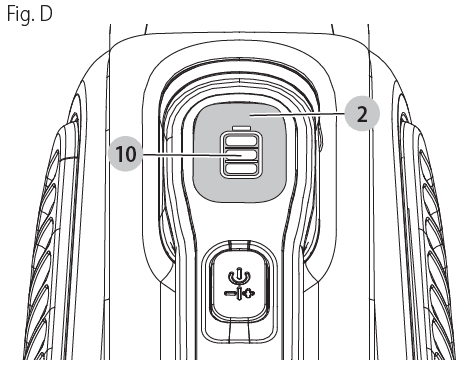
Extendable Crevice Tool
- To extend the crevice tool 4, pull it out from the vacuum nozzle 3 until it clicks in place.
- To collapse the crevice tool 4, push it into the vacuum nozzle 3 until it clicks in place.
Dry pick up
For everyday spills of dry material.
- Do not fill the dust bowl 5 beyond the end of the filter.
Optimizing the suction force
In order to keep the suction force optimized, the filters must be cleared regularly during use.
Emptying and cleaning the product
Removing the dust bowl and filter (Fig. E, F)
WARNING: The filter is reusable and should be cleaned regularly.
- Hold the dust bowl over a trash can before pressing the dust bowl release button 6 to release the dust bowl access door 11 as shown in Figure E.
- While holding the dust bowl over a trash can, lightly shake it to empty the dust bowl 5.
- Lift the prefilter 12 out of the dust bowl 5 as shown in Figure F.
- Lift the filter 13 out of the dust bowl 5.
- While holding the dust bowl over a trash can, empty the dust bowl 5.
- Install the filter 13 into the dust bowl 5, then install the prefilter 12 into the dust bowl 5.
- Close the dust bowl access door 11 until it clicks firmly into place.
WARNING: Never use the appliance without the filters. Optimum dust collection will only be achieved with a clean filter.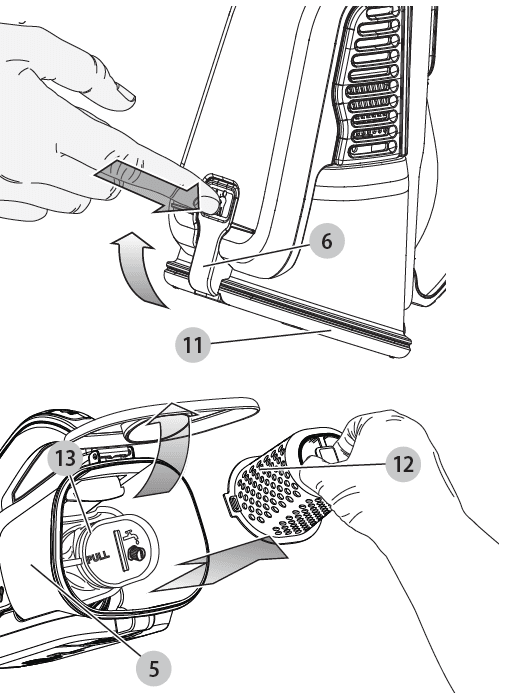
Cleaning the dust bowl and filter
- The prefilter 12 and filter 13 can be washed in warm, soapy water. The dust bowl 5 can be wiped clean with a dry cloth.
- Make sure the filter 13, prefilter 12, and the dust bowl 5 are dry before installing.
Replacing the filters
The filters should be replaced every 6 to 9 months and whenever worn or damaged. Replacement filters are available from your BLACK+DECKER dealer. Visit www.blackanddecker.com to locate dealers.
- Remove the old filters as described in Emptying and Cleaning the Product.
- Fit the new filters as described in Emptying and Cleaning the Product. (cat. no: HHVKF10)
These fit all units. When these filters reach the end of their lifespan, they must be disposed of at a local recycling center.
MAINTENANCE
Use only mild soap and a damp cloth to clean the vacuum. Never let any liquid get inside the vac; never immerse any part of the vac into a liquid.
IMPORTANT: To assure product SAFETY and RELIABILITY, repairs, maintenance, and adjustments (other than those listed in this manual) should be performed by authorized service centers or other qualified service organizations, always using identical replacement parts.
TROUBLESHOOTING
If the product does not work, check the following:
- The charger was correctly plugged in for recharge. (It feels slightly warm to the touch.)
- The charger cord is not damaged and is correctly attached.
- The charger is plugged into a working electrical outlet.
For assistance with your product, visit our website www.blackanddecker.com for the location of the service center nearest you or call the BLACK+DECKER help line at 1–800–544 6986.
Battery Removal and Disposal
This product uses Lithium-Ion rechargeable and recyclable batteries. When the batteries no longer hold a charge, they should be removed from the vacuum and recycled. They must not be incinerated or composted. The batteries can be taken for disposal to a BLACK+DECKER Company-Owned or Authorized Service Center. Some local retailers are also participating in a national recycling program (see “RBRC® Seal”). Call your local retailer for details. If you bring the batteries to a BLACK+DECKER Company-Owned or Authorized Service Center, the Center will arrange to recycle old batteries. Or, contact your local municipality for proper disposal instructions in your city/town.
To remove the battery pack for disposal:
- First, before attempting to disassemble the product, turn it on and leave it on until the motor completely stops, ensuring a complete discharge of the batteries.
- Using a hex screwdriver, remove the seven screws securing the two housing halves.
- Lift the housing cover away from the assembly.
- Detach all lead connections from the battery pack.
- Remove the battery pack and dispose of it as per the recommended guidelines.
Accessories
WARNING: Since accessories, other than those offered by BLACK+DECKER, have not been tested with this product, use of such accessories with this product could be hazardous. To reduce the risk of injury, only BLACK+DECKER recommended accessories should be used with this product. Recommended accessories for use with your product are available at extra cost from your local dealer or authorized service center. If you need assistance in locating any accessory, please contact BLACK+DECKER. Call 1‑800‑544‑6986.
WARNING: To assure product SAFETY and RELIABILITY, repairs, maintenance and adjustment (including brush inspection and replacement, when applicable) should be performed by a factory service center or an authorized service center. Always use identical replacement parts.
Register Online
Thank you for your purchase. Register your product now for:
- WARRANTY SERVICE: Registering your product will help you obtain more efficient warranty service in case there is a problem with your product.
- CONFIRMATION OF OWNERSHIP: In case of an insurance loss, such as fire, flood or theft, your registration of ownership will serve as your proof of purchase.
- FOR YOUR SAFETY: Registering your product will allow us to contact you in the unlikely event a safety notification is required under the Federal Consumer Safety Act.
- Register online at www.BlackandDecker.com/NewOwner.
SERVICE INFORMATION
All BLACK+DECKER Service Centers are staffed with trained personnel to provide customers with efficient and reliable power tool service. Whether you need technical advice, repair, or genuine factory replacement parts, contact the BLACK+DECKER location nearest you. To find your local service location, call: 1-800-544-6986 or visit www.blackanddecker.com
Two-Year Limited Warranty
For warranty terms, go to https://www.blackanddecker.com/support/warranty-policy. To request a written copy of the warranty terms, contact Customer Service at Black & Decker, 701 East Joppa Road, Towson, MD 21286 or call 1‑800‑544‑6986.
ATIN AMERICA: This warranty does not apply to products sold in Latin America. For products sold in Latin America, check country-specific warranty information contained in the packaging, call the local company or see the website for such information.
For more manuals by Black and Decker, visit ManualsLibraryy
Black and Decker HHVK320J DustBuster Cordless Handheld Vacuum-FAQs
Why does my DustBuster keep turning on and off?
If your DustBuster runs for a few seconds and then shuts off, it may be due to a battery issue, faulty charging circuit, or a loose internal connection. Check the charger, battery health, and ensure all components are securely in place.
Can I keep my DustBuster plugged in all the time?
Yes, you can leave the vacuum connected to the charger indefinitely. It’s safe and recommended in the user manual.
How do I know when my DustBuster is fully charged?
The LED charging indicator will glow steadily once the unit is fully charged. It’s safe to keep it connected even after charging is complete.
What can I use a DustBuster for?
The DustBuster is ideal for quick clean-ups, crumbs, small messes, and hard-to-reach areas. Its compact design and strong suction make it perfect for everyday use.
Is it safe to leave the charger plugged in all day?
Yes, for this DustBuster model it is. However, as a general rule for electronic devices, long-term constant charging can reduce battery capacity over time. Still, the DustBuster is designed to handle being plugged in safely.
Do Black+Decker batteries wear out over time?
Yes.
1. Ni-Cad batteries typically last for 150–200 full charge cycles.
2. Lithium-ion batteries usually provide up to 300 cycles before noticeable wear.
How do I clean my DustBuster?
1. Wash the filters regularly with warm, soapy water.
2. Let them dry completely for 24 hours before reinstalling.
3. Replace the filter every 6–9 months, or if it appears damaged or worn.
Can I replace the battery in my DustBuster?
Yes. To replace the battery:
1. Remove the 7 screws (note: the one near the charging port is different).
2. Carefully separate the motor and battery pack to access the battery.
How long does it take to fully charge the DustBuster?
The HHVK320J typically charges in about 4–6 hours. The LED indicator will confirm once charging is complete.


