Blackmagic Design ATEM Live Production Studio Switchers
Getting Started
Introducing ATEM
- ATEM Production Studio Switchers are professional broadcast-grade digital production switchers capable of switching and processing a variety of video sources in live video production and broadcast environments. The switcher uses the current and familiar M/E (Mix Effects) based design with software and hardware control options that provide an intuitive, fast, and easy-to-use workflow for program/preview switching! If you’re used to the older A/B direct switcher style, ATEM switchers also support A/B direct switching which makes it easy to get started!
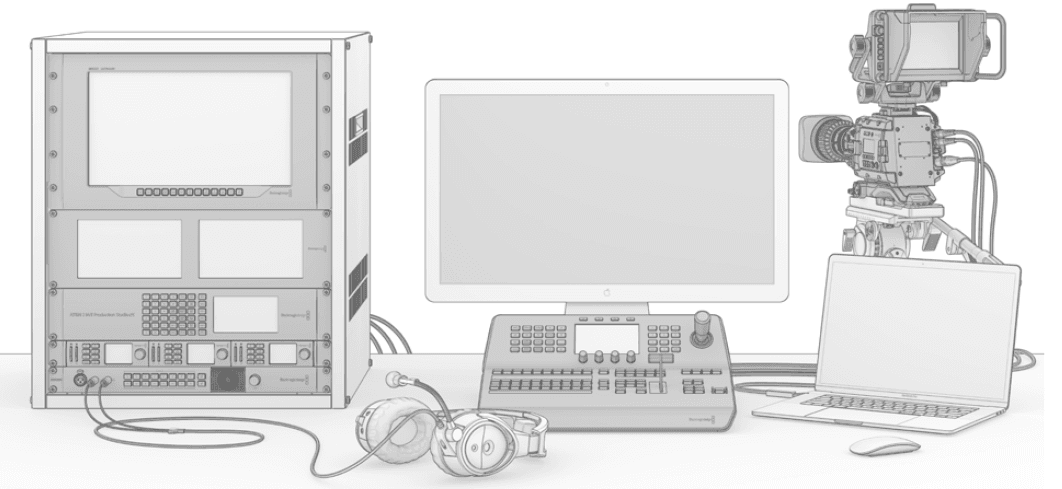
- An ATEM production switcher only requires an ATEM production switcher and the included software control panel to get started. Then you can optionally add one or more hardware control panels if you need a more advanced solution. Multiple control panels can be connected to control the same switcher by simple Ethernet connections. The ATEM software control panel can be installed on as many computers as you like at no extra cost

- You can build a custom ATEM live broadcast system to suit your individual requirements
What is an M/E Switcher?
- If you have used low-cost switchers before, then these might not have used the mixed effects style of operation that’s commonly called a M/E style of operation. If you have used a M/E style switcher, then you might want to skip ahead to install and get working with your new ATEM switcher
- When you’re starting out with a switcher for the first time, the ATEM can look a little intimidating with all its buttons and knobs, however, it’s all very logically laid out so it’s very simple to use! ATEM is a true high-end broadcast switcher that operates using the M/E workflow standards used in the broadcast industry. This means once you get familiar with how it works, you will feel instantly at home on virtually any switcher used in broadcast today
What is an A/B Direct Switcher?
- If you have been using video switchers for a long time, then you might be used to older-style A/B direct switchers and you can easily set your ATEM switcher to A/B direct switching in the ATEM software preferences. See the Transition Control section of this instruction manual for details about where to change this setting.
Understanding the ATEM Switcher
- The ATEM switcher provides all the video processing as well as all video input and output connectors, connection for control panels, and power connections. You use the switcher by connecting and using various types of control panels. This allows the switcher to be located remotely, such as in machine rooms where it’s closer to the connected video devices, while the control panel can be placed in a location where it is easier to run production
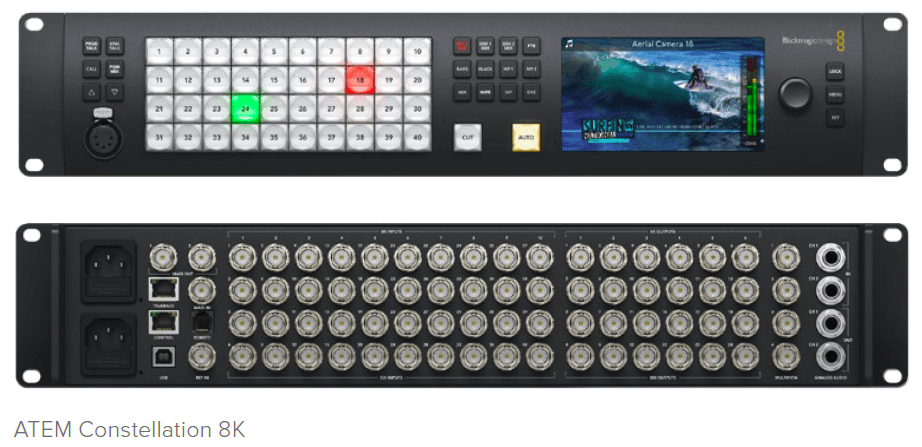
- ATEM Constellation 8K is a switcher capable of switching up to 40 external Ultra HD inputs via independent 12G-SDI connectors, or 10 8K inputs via quad link 12G-SDI. This switcher features six 8K outputs plus an 8K multiview output, or 4 Ultra HD multiviews. You can switch video from HD 1080p59.94, Ultra HD 2160p59.94, all the way up to 8K 4320p59.94. The built in control panel with LCD and talkback lets you switch directly from the front panel so you can quickly confirm all your sources and test your production setup before going to air

- ATEM Production Studio 4K supports SD, HD and Ultra HD video and is capable of switching 8 external inputs from its SDI and HDMI connectors. The front panel keypad lets you select instantly between auxiliary output sources and the small LCD gives you instant feedback on the status of the auxiliary output.

Plugging in an ATEM Hardware Panel
If you have purchased an ATEM hardware panel, then you won’t want to wait to plug in your computer, as it’s much more fun to plug in the hardware panel first! Plugging in the hardware panel is simple because it’s already set to the correct network settings to plug into your switcher without any changes required.
- Plug in the power to the hardware panel. For redundant power on ATEM Advanced panels with built-in power supplies, plug in a second IEC power cord.
TIP ATEM 1 M/E Advanced Panel 10 has a 12v XLR input for portable field use when powered by a battery or for backup 12-volt power provided by an alternative power source, such as a UPS. - Plug one end of an Ethernet cable into one of the hardware panel’s Ethernet ports. Any of the ports will do, as there is an Ethernet switch inside the panel, so all ports work the same.
- Plug the other end of the same cable into the Ethernet port labeled Switcher Control on the switcher
If you need to manually set the network settings, then you might need to get the assistance of a technically minded friend who understands how to set IP addresses. By default, the switcher is set to a fixed IP address of 192.168.10.240, and the ATEM advanced panels are set to a fixed IP of 192.168.10.60. Go to the ‘Connecting to a Network’ section in this manual to see how to check and set your switcher to these addresses. Then it should work OK with a direct connection between the hardware panel and the switcher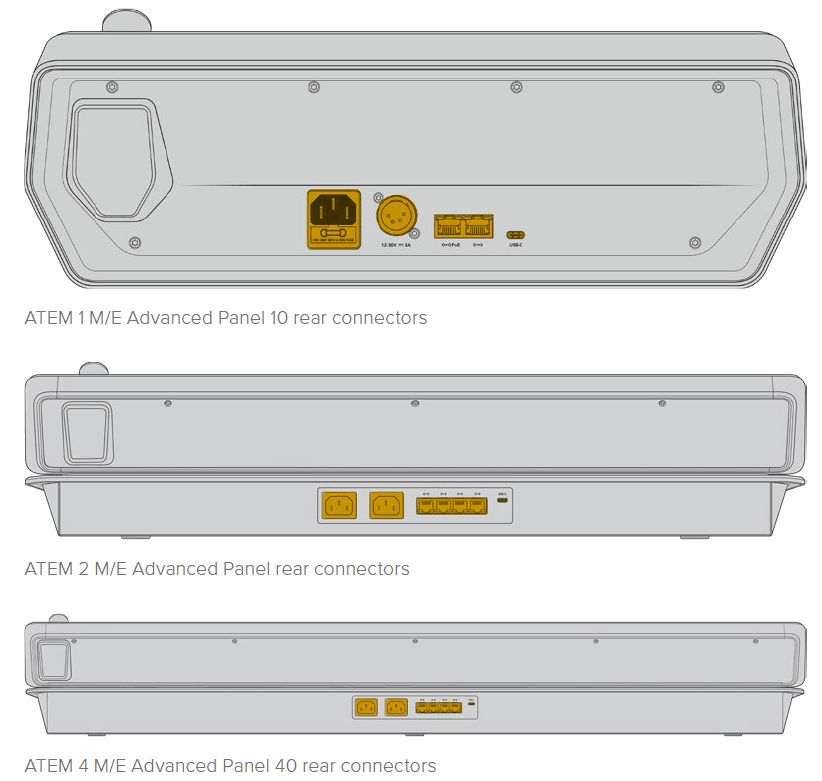
To install ATEM Software Control:
- From a web browser navigate to www.blackmagicdesign.com/support and download the latest ATEM Constellation drivers.
- When the file has finished downloading, double-click the ‘install ATEM’ icon to run the installer. Follow the prompts to the end and press ‘install’ to install the software.
- Once the software is installed, navigate to the ‘Blackmagic ATEM Switchers’ folder in your applications or programs folder and double click ‘ATEM Software Control’. Now the software is installed you will need to connect the switcher to the computer. This can be done by connecting the devices directly via USB or Ethernet or connecting over a network.
Updating the Switcher Software
- Connect the switcher via the USB port. If you already have your switcher connected to your computer via Ethernet, you can update via the Ethernet connection. When upgrading software via USB, make sure the switcher is the only ATEM device connected via USB to the computer running the setup utility software. If more than one ATEM device is connected, the switcher may not be recognized. Updating the Software 28
- Launch ATEM Setup.
- If the switcher software requires updating, you will be prompted by a window asking if you would like to update the software. Click ‘update’ to initiate the update process, which may take a few minutes. It’s important you don’t unplug the power from the switcher during the software update.
- Once the software update is complete, a window will prompt you to cycle power on the switcher. Turn your switcher off and on, then ‘close’ the dialog box.
Updating via Ethernet
Updating your ATEM switcher or advanced panel via Ethernet is generally faster and easier, however, there are some instances, such as those below, where it may not be possible and you will need to update via USB:
- Updating the internal software for the first time.
- Your ATEM network settings are already configured to work straight away, however, if your are connecting to a network with other video equipment, there may be potential IP address conflicts which may prevent communication between your computer and your switcher. Network settings can only be set via USB
Connecting Video Outputs
- Video Outputs
- There are multiple video outputs on your ATEM switcher which can be used to connect to a wide range of video equipment. ATEM Constellation 8K supports HD, Ultra HD and 8K. ATEM Production Studio 4K and Broadcast Studio 4K models include Ultra HD, HD and SD via SDI. HDMI is also supported on ATEM Production Studio 4K models. Descriptions of each output connection are listed in this section.
- SDI Program Output
- This SDI output switches between Ultra HD, HD and SD. It outputs the main program video output of your ATEM switcher and can be connected to any SDI based video device. The audio on this output can use embedded HDMI and SDI audio from your cameras as well as external audio via the switcher XLR inputs. ATEM Production Switcher models include a breakout cable for external audio.
- HDMI Program Output
- Similar to the SDI program output, this output switches between Ultra HD, HD and SD. It outputs the main program video output of the switcher and can be connected to televisions, video projectors or even Blackmagic Design’s HyperDeck disk recorders. The audio on this output can use embedded HDMI and SDI audio from your cameras as well as external audio via the switcher XLR inputs.
- Multiview SDI and HDMI Output
- The multiview outputs on all ATEM switchers are HD except for ATEM 4 M/E Broadcast Studio 4K, which are HD or Ultra HD, and ATEM Constellation 8K, which are HD, Ultra HD or 8K. You can choose from a selection of multiview output formats and frame rates. This feature increases compatibility with a wider range of monitors, plus you can output your multiview in Ultra HD even if you are working in regular HD. Refer to the ‘using ATEM Software Control’ chapter,
multiview settings section for more information - Auxiliary SDI Outputs
ATEM switchers have auxiliary SDI connections that output the same video format in use. The number of auxiliary outputs vary between models:- ATEM Production Studio 4K has 1 auxiliary output
- ATEM 1 M/E Production Studio 4K has 3 auxiliary outputs
- ATEM 2 M/E Production Studio 4K has 6 auxiliary outputs
- ATEM 4 M/E Broadcast Studio 4K has 6 auxiliary outputs
- M/E Output
- ATEM 2 M/E Production Studio 4K and ATEM 4 M/E Broadcast Studio 4K have a dedicated SDI preview output for M/E 1, as well as HD and Ultra HD SDI program outputs for M/Es 1 and 2. These can be used as additional previews or program outputs for mix effects blocks 1 and 2. ATEM 4 M/E Broadcast Studio 4K has 4 M/Es. M/E 3 and M/E 4 are typically routed back through M/E 1 or 2 to create complex layered scenes. You can also output a feed from M/E 3 or M/E 4 by assigning them to auxiliary SDI outputs
Using the ATEM Constellation 8K
Front Panel
- ATEM Constellation 8K includes a fully functioning front panel that lets you operate the switcher from the front panel. While you can easily use the front panel for live switching, its intended purpose is for initially test your production setup before going to air. For example, the control panel lets you quickly test keyers, switch sources, and generally confirm everything is working fine before settling into the main production. This is why we added a lock button so once you are happy that everything is working fine, you can lock the panel and make sure there are no accidental changes to air.
Performing a Transition
- When checking your setup, the first step you may want to try is to perform a transition. The group of 40 large buttons represents the inputs into the switcher. All 40 buttons are active in HD and Ultra HD mode and the first 10 buttons control the 10 quad link 8K inputs in 8K mode. When you first turn on the switcher, you will see input 1 is the button illuminated red. This means that input 1 is on air and if you have a video source connected to input 1 it will appear on the program output. In this example, we have input 1 on air and we want to transition to input 4

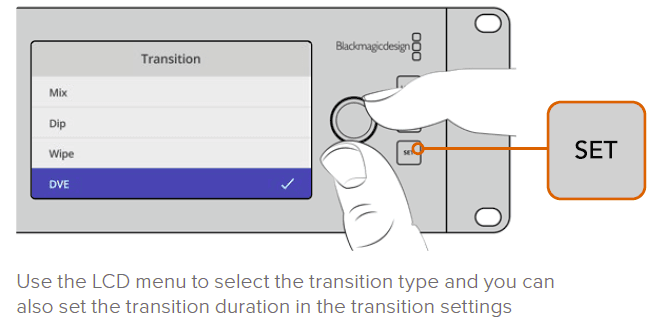
To change the transition type:
- Press the menu button to display the menus.
- Scroll with the knob through the menus to the ‘transition’ menu.
- Press the set button and you will see the transition menu page will be selected.
- Scroll down the list of items in the transition menu until you get to the transition item.
- Press the set button and scroll through the list of options. Let’s select the DVE transition.
- Press ‘set’ to select it. You can press the ‘menu’ button to back out of the menus back to the main video preview screen

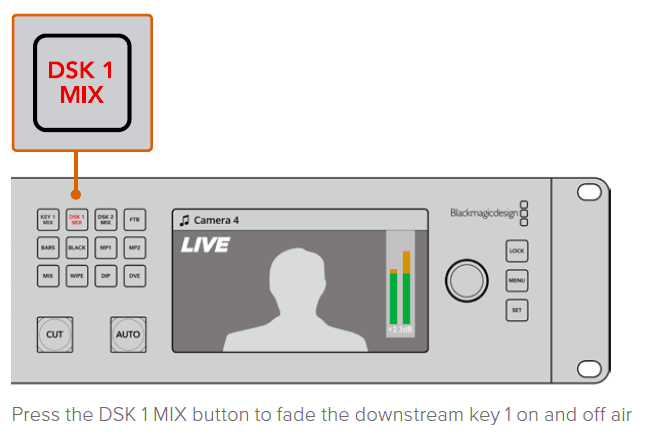
Fading the Downstream Key 1
- You can trigger the downstream key 1 from the front panel by using the DSK 1 MIX button. This can be useful when you have a logo or bug and you want to bring it on and off again regularly. For example, you could have a ‘live’ logo that you want to fade on from time to time. You can set up the logo in the downstream key 1 and then use the DSK 1 MIX button to bring it on and off air. The duration of the transition when pressing the button will be set in the downstream key LCD menu, or on a control panel

Using the Lock Button
- The lock button prevents accidental switching and changes to settings for transitions and media players. When the front panel is locked, the ‘lock’ button glows a dim red and if a button is pressed it is ignored and the ‘lock’ button flashes bright red. The ‘lock’ button doesn’t affect the LCD menus or the comms buttons such as ‘prod talk’ and ‘eng talk’. To unlock the front panel, press and hold the ‘lock’ button for one second. To lock the front panel, press and hold the ‘lock’ button for two seconds.
The Call Button
- Holding down the ‘call’ button will flash the tally light on all connected cameras. This is a helpful way of seeking the camera operators’ attention, or to let your operators know you are about to go live.
Using ATEM Software Control
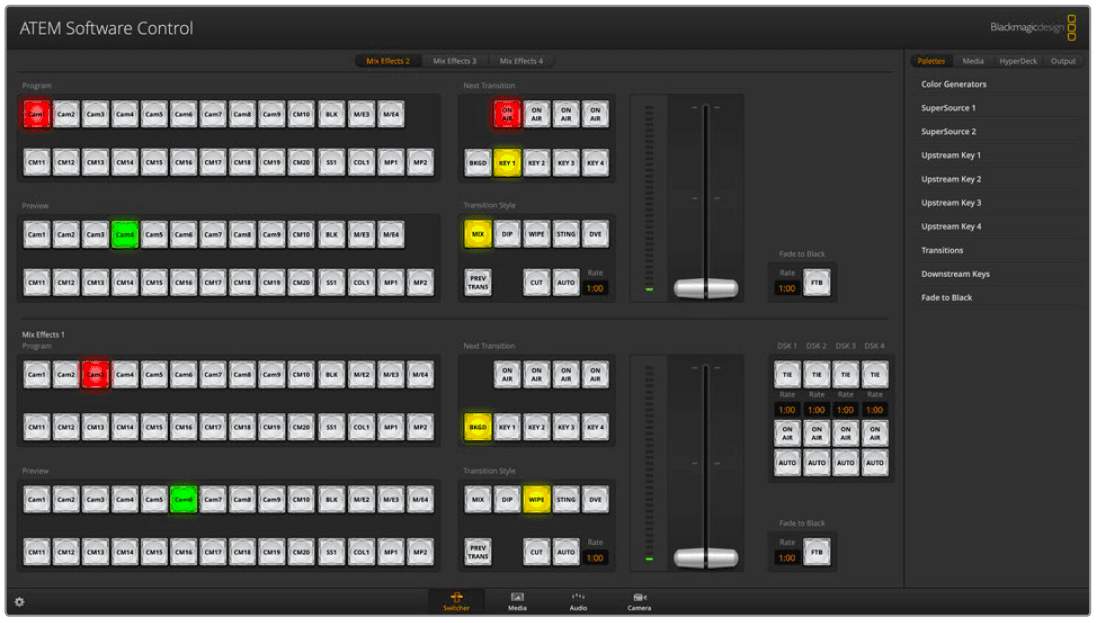
 The ATEM Software Control is included with your ATEM switcher and allows you to control your switcher in a similar way to a full hardware control panel. However, instead of menu buttons, it uses a range of palettes on the right side that shows you all the processing features of your production switcher and allows settings to be easily made.
Switcher Control Panel
- Switcher Panel
When first launched, the switcher screen is selected, which is the main control interface for the switcher. The software control panel must be connected to a switcher to run.
Audio Mixer
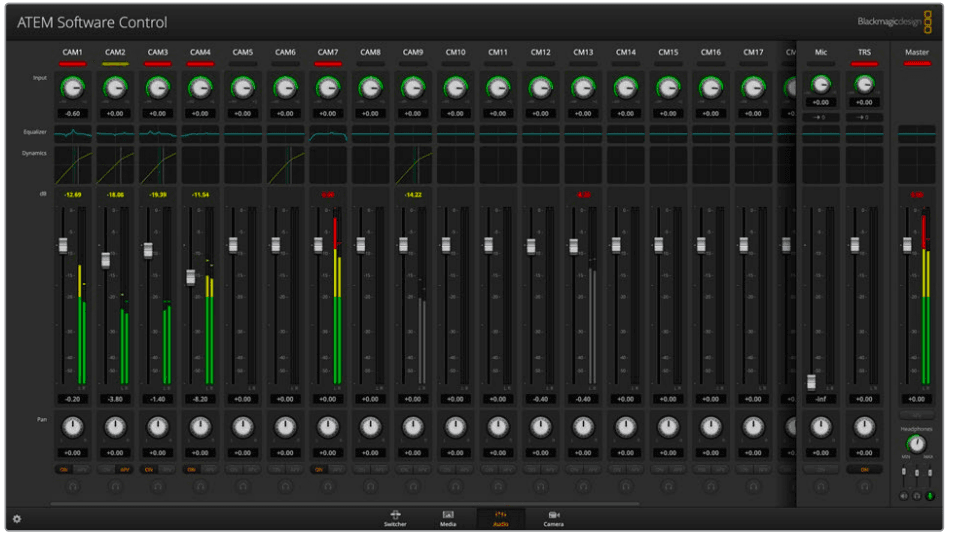
- The Audio tab in ATEM Software Control contains an audio mixer interface which becomes active when controlling any ATEM switcher

- ATEM switchers include a built-in audio mixer that lets you use the embedded HDMI and SDI audio from your cameras, media servers and other inputs without the need for an external audio mixer. This is perfect when using an ATEM switcher on location or in small spaces within modern OB vehicles as you don’t have to find room for an external audio mixer. The audio is mixed in the Audio tab of ATEM Software Control and output via the SDI and HDMI program outputs.
Camera Control
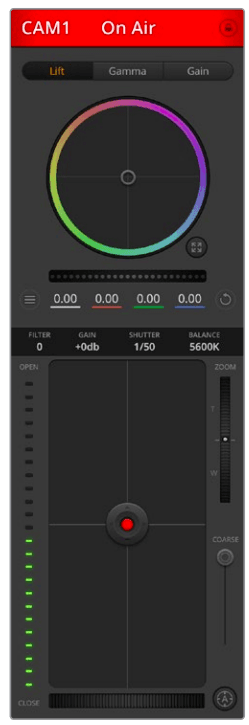
- The Camera tab in the software is where you can control cameras remotely, in a similar way to how traditional external camera control units can control cameras, however with ATEM switchers, this functionality is built into the software so it’s always available. Settings such as iris, gain, focus, detail and zoom control are easily adjusted using compatible lenses, plus you can color balance cameras and create unique looks using the DaVinci Resolve primary color corrector that’s built into the Blackmagic cameras running software v1.8.1 or later

- The ATEM Camera Control lets you control Blackmagic Design cameras
Switcher Settings
 Click on the settings cog icon to open the settings window which allows you to change the video input selections and labels. Setting labels are important, and they are visible in the multiview output as on-screen labels and on the ATEM Advanced Panel. In the settings window, you can also set the switcher video standard. This is the master video standard that the whole switcher operates at, and it’s very important you set this to the same video standard as your video inputs. More details on setting the video standards are included later in this manual
Processing Palettes
- The software control panel features tabs for the processing palette, media player, and capture options. The following processing palettes are available. These change based on the model you’re connected to, and are an easy way to see what processing is available in the switcher. Different ATEM models will have different features, so the palettes can change. The palettes also show the order of the processing in the switcher. You can expand and minimize palettes to save space and scroll them up and down to get the adjustments you need to set
Palettes Tab
The Palettes tab contains the following processing controls.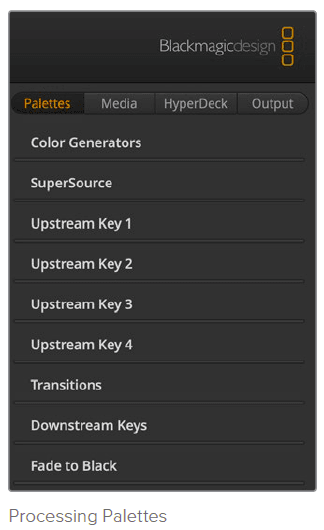
- Color Generators 1 and 2
- The ATEM switcher has two color matte generators which can be configured from the color generator palette using a color picker or by setting hue, saturation, and luminance levels.
- SuperSource
- ATEM switchers with more than 1 M/E include a feature referred to as SuperSource that will allow you to arrange multiple sources on the monitor at one time. For more information refer to the section ‘Using SuperSource’ later in this manual.
- Upstream Keys
- Depending on the switcher model, ATEM has up to four upstream keyers per M/E which can be configured from the upstream key palettes. Each keyer has its own palette. Within each palette the keyer can be configured as a luma key, chroma key, pattern key or DVE. The type of key available will also depend on the switcher model and if the DVE is available. The selected palette will display all the parameters that are available to configure the keyer. More information on how to use upstream keyers is included later in this manual
HyperDeck Tab
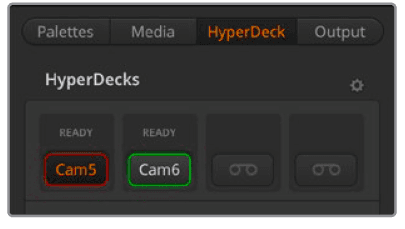
- Hyperdecks
- You can connect up to 10 Blackmagic HyperDeck Studio model disk recorders and control them using ATEM Software Control’s HyperDecks palette. For more information refer to the ‘HyperDeck Control’ section of this manual.
Using the Audio Mixer
- The audio tab is used to mix audio sources connected to any ATEM switcher via HDMI, SDI, external audio and also from the built-in media players in ATEM 1 M/E, 2 M/E, and 4 M/E switcher models. Cameras, media players and external audio sources are listed along the top of the audio mixer along with the master audio output for the program outputs of the switcher

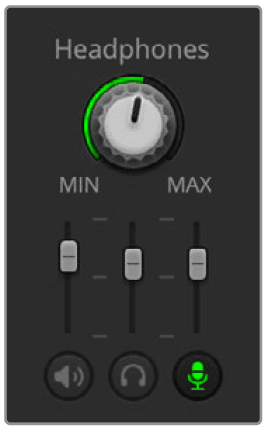
Headphones Settings on ATEM Constellation 8K
- On ATEM Constellation 8K, the headphones settings are used to adjust the audio mix for the headphones output. ATEM Constellation 8K features a control panel with talkback controls. A headset can be connected via the 5 pin XLR connector on the front panel for communicating with camera operators. However, the headset is not just limited to talkback use as you can also use the headset microphone for doing voice overs and you can use the headset headphones for program audio monitoring

- These controls for ATEM Constellation 8K are different to ATEM Production Studio switchers and ATEM Broadcast Studio switchers that have ‘monitor’ XLR outputs. Instead, your headphones monitor master, talkback and sidetone audio.
- Master
- Adjust the master level slider to set the program audio level in the headset and if you don’t want to listen to program audio, then slide this control fully to the left.
- Talkback
- The talkback level slider sets the audio level of camera operators who are talking to you and by setting the master and talkback sliders you can get your preferred balance of talkback and program audio into your headset.
Using the 6 Band Parametric Equalizer
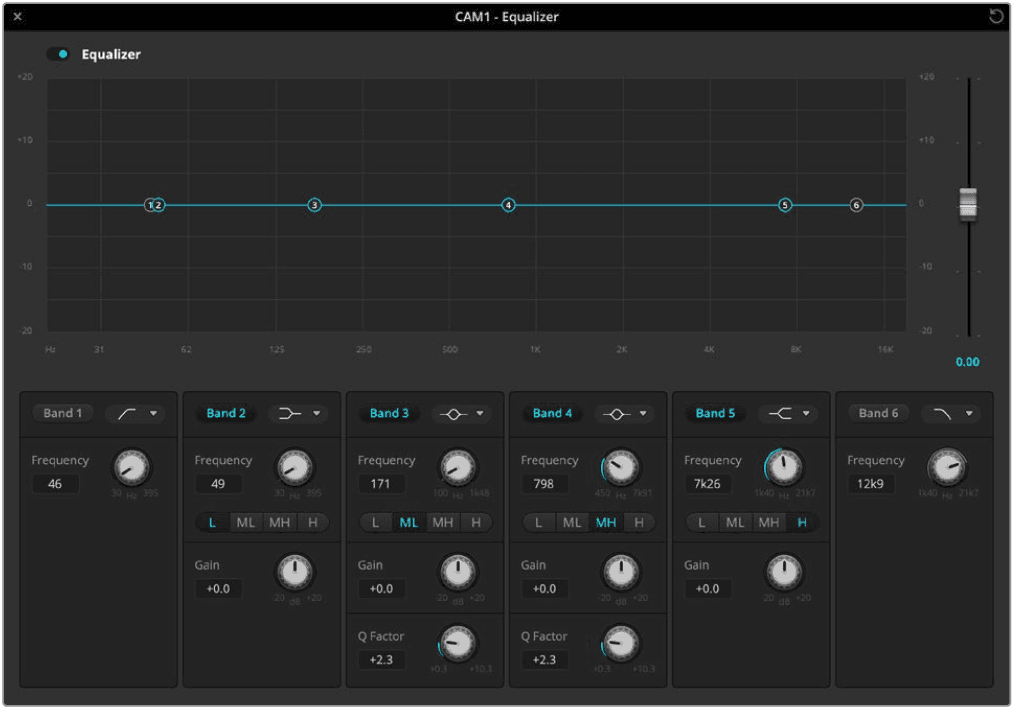
- Each input and the master output, has a 6 band parametric equalizer which can be used to control specific frequencies. This could include reducing low frequency hum or noise on a microphone input, or boosting the low frequencies on a thin sounding track, or even to add uniqueness to each input so they are more distinct in the final mix. You have many creative options.
- Parametric Equalizer
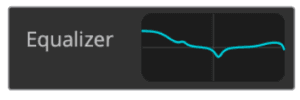
To open the parametric equalizer for an input or the master output, click on the corresponding equalizer indicator
- Click on an input’s equalizer indicator to open a 6 band parametric equalizer
- The first item you will notice is the graph along the top of the window with numbered indicators from 1 to 6. These numbered indicators are adjustable handles that correspond to bands 1 to 6.
- Each band of the 6 band parametric equalizer has a column of settings. These settings will differ based on which band you are controlling and what filter type you are using

- Each audio input has its own 6 band parametric equalizer
Camera Control Settings
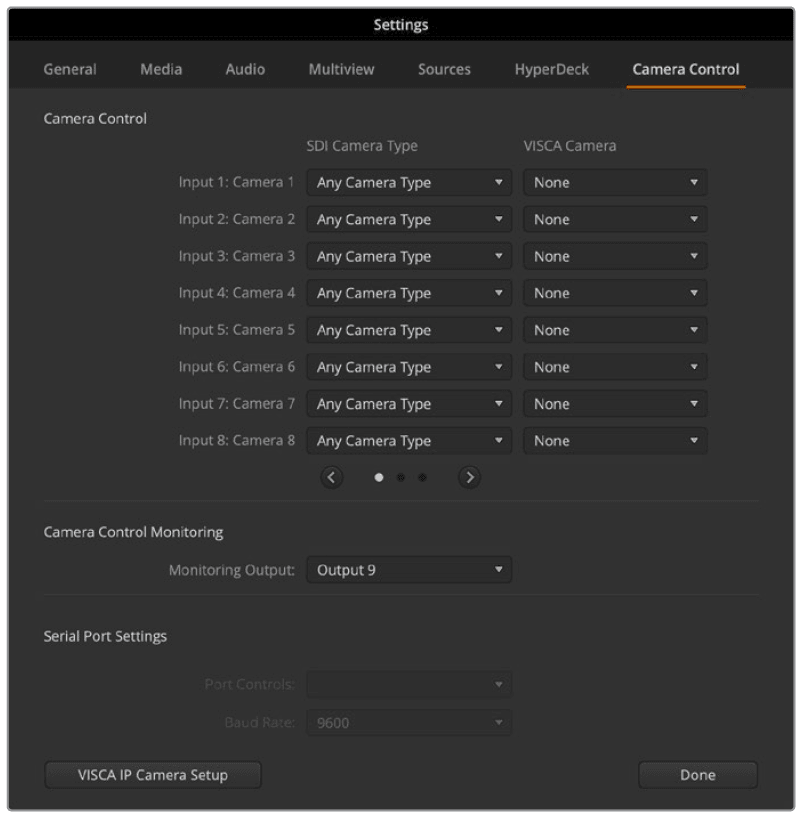
- The camera control tab features settings for assigning cameras to inputs and selecting your monitoring ouput

- Camera Control tab on ATEM Constellation 8K
- Camera Control
- The camera type menu lets you select a Blackmagic camera for each input, or you can select ‘any camera type’ when adding third party cameras. Selecting the correct camera for the input will ensure that all the parameters for that camera are set correctly.
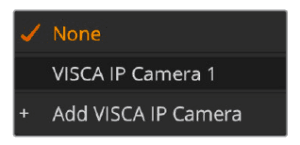
ATEM Constellation 8K model switchers support VISCA over IP. To add PTZ cameras and PTZ camera heads controlled by VISCA over IP:
- Using the camera type menu select ‘any camera type’.
- Click on the corresponding VISCA camera menu. If you’ve already added a VISCA camera it will appear in the list, or you can click the ‘add VISCA IP Camera’ option

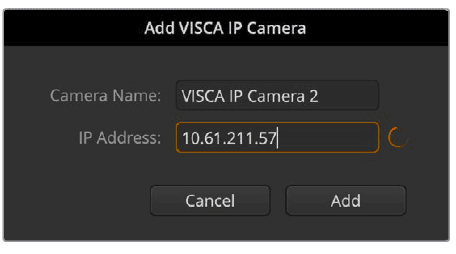
- In the ‘add VISCA IP camera’ menu enter the IP address for the PTZ camera or camera head. You can also enter a custom camera name. Click ‘add’

HyperDeck Control
Introducing HyperDeck Control
- Connect up to 10 Blackmagic HyperDeck Studio disk recorders to your switcher and control them using the HyperDecks palette in ATEM Software Control, or from the system control buttons on an ATEM advanced panel. This is a very powerful feature! With ten HyperDecks connected to your switcher, it’s like having a portable videotape department able to record outputs from your switcher, play back graphics, or you can even set your switcher to roll prerecorded segments at the press of a button

- HyperDeck Extreme 8K HDR and HyperDeck Extreme Control
Connecting HyperDecks
Connecting Blackmagic HyperDecks to your switcher is very similar to connecting cameras and other video sources via your switcher’s SDI or HDMI inputs. The only additional connection is Ethernet which lets your ATEM switcher communicate with the HyperDeck disk recorder
- Using the Ethernet connector, connect your HyperDeck disk recorder to the same network your ATEM switcher is connected to.
- Press the remote button marked ‘REM’ on the HyperDeck’s control panel. The ‘REM’ button will illuminate which means the HyperDeck has remote control enabled. If you are using a HyperDeck Studio Mini, turn remote on via the settings tab on the LCD menu.
- Plug the SDI or HDMI output of your HyperDeck into the SDI inputs of your ATEM switcher, or the HDMI inputs if available. If you are using quad link SDI, it’s important to connect each input and output in the correct order.
- If you want to record your ATEM switcher’s program output with your HyperDeck, plug one of the switcher’s SDI auxiliary outputs into the SDI input of your HyperDeck. With ATEM Constellation 8K, you can connect any SDI output to the SDI input of your HyperDeck.
- Repeat the process for each HyperDeck you want to connect.
Using ATEM Micro Panel
ATEM Micro Panel is a compact hardware panel for those who want to use an external panel but don’t need the size of the larger ATEM advanced panels. Featuring the same buttons as ATEM advanced panels, the micro panel can control all ATEM switchers from 1 M/E to 4 M/E models. With Bluetooth and a low profile transition fader, the panel is perfect if you need to take a panel with you
Connecting via USB
- Connecting your panel via USB-C is the easiest way to get started. Using a USB cable connect the panel to your computer’s USB port. USB is also required to charge the internal battery and access ATEM Setup utility to change your button mapping and change button colors.

Connecting via Bluetooth
You can connect your ATEM Micro Panel to your computer via Bluetooth for increased flexibility. It’s worth noting that the panel prioritizes the USB connection, which means it needs to be unplugged from the computer for Bluetooth to be available. If you need to charge the panel while using Bluetooth use an external USB power supply.
To connect to Mac via Bluetooth
- On the rear panel, move the battery switch to the ‘on’ position to power your ATEM Micro Panel using the internal battery.
- Press the ‘Bluetooth’ button. A blue light will flash to let you know the micro panel is ready to pair.
- On your Mac, open ‘system settings’ and select ‘Bluetooth’ in the left hand column. You should see your ATEM Micro Panel listed under ‘nearby devices’. Click the ‘connect’ button

Using ATEM Setup
To use ATEM Setup
- Connect ATEM Micro Panel to your computer via USB.
- Launch ATEM Setup. The panel will appear in the setup utility home page. Use the arrows on the left and right to navigate between the ATEM Micro Panel and your ATEM switcher.
- Click on the circular ‘setup’ icon or the image of the ATEM Micro Panel to open the setup page
Using ATEM Advanced Panels
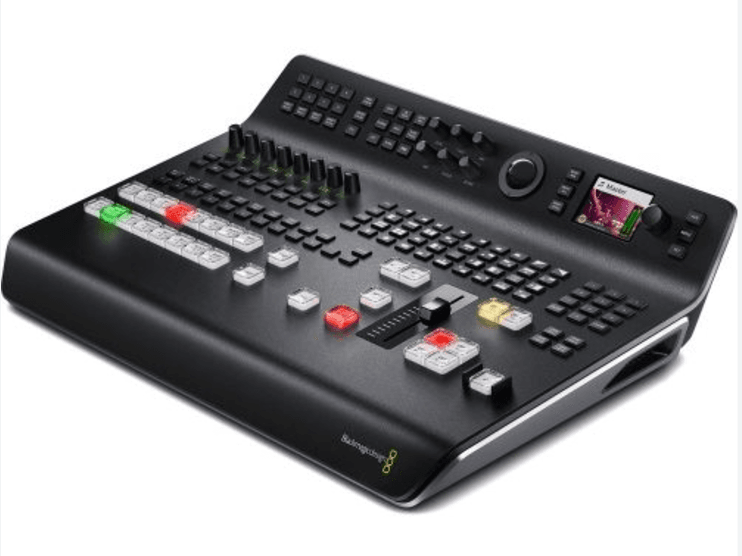
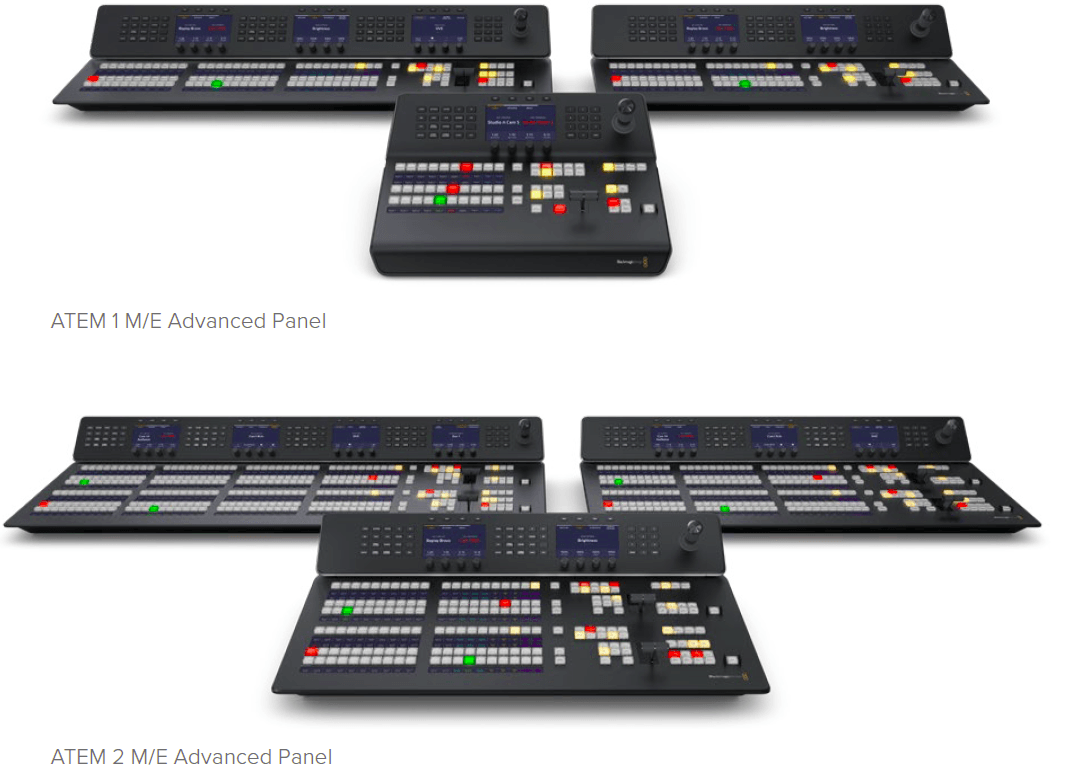
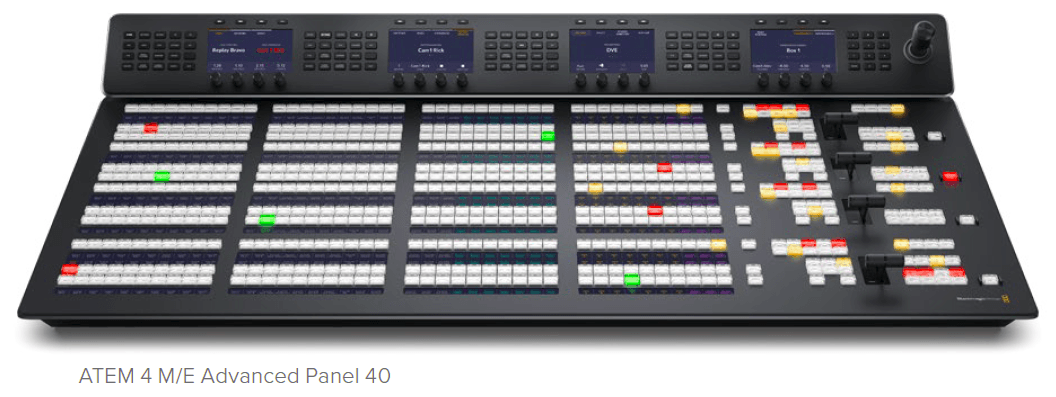
- ATEM advanced panels are ‘hands on’ control panels for ATEM switchers that plug into your switcher using an Ethernet connection. The keyboard has similar functions to the software panel and the main buttons are laid out in a similar ME style, so it’s easy to move between the hardware and software interfaces
- When using a hardware advanced panel and the software panels together, any change on one panel will be reflected on the other and you can use both panels at the same time. You can also plug in more than one hardware panel if you need a more advanced solution


- This section shows how to use the different ATEM advanced panels that are available should you need a hardware panel for your live production.
Plugging in an ATEM Hardware Panel
If you have purchased an ATEM hardware panel, then you will want to wait to plug in your computer, as it’s much more fun to plug in the hardware panel first!
Plugging in the hardware panel is simple because it’s already set to the correct network settings to plug into your switcher without any changes required.
- Plug in the power to the hardware panel. For redundant power on ATEM Advanced panels with built-in power supplies, plug in a second IEC power cord.
- Plug one end of an Ethernet cable into one of the hardware panel’s Ethernet ports. Any of the ports will do, as there is an Ethernet switch inside the panel, so all ports work the same.
- Plug the other end of the same cable into the Ethernet port labeled Switcher Control on the switcher
Understanding ATEM Hardware Panel Network Settings
- The hardware panel’s network settings are configured from the network setup menu in the hardware panel’s system control. Along with its own IP address, the hardware panel also needs to be configured with the network location of the switcher, so that communication between the two devices can be established over the Ethernet connection. If the hardware panel’s network settings are correctly configured, you will see the panel light up and buttons turn on so you can control the switcher
Setting the Switcher IP Location
To set the network location of the switcher on the hardware panel, so the panel can find the switcher and communicate, follow these steps:
Changing the IP location on an ATEM advanced panel
- When there is no communication with the switcher, the LCD will say ‘connecting’ and notify you of the IP address it is searching for. If the panel can’t find the switcher, the connection will time out and a notification will ask you to check the IP address. Press the ‘network’ soft button above the LCD to open the network settings.
- In the network settings, press the right arrow in the system control buttons next to the LCD to move to the ‘switcher IP address’ setting.
- Now use the corresponding LCD soft control knobs to set the correct IP address for your switcher.
- Press the ‘save changes’ soft button to confirm the setting. Your panel will now connect with your switcher
 On the ATEM Advanced Panel, press the ‘network’ LCD soft button to open the network settings on the LCD, then use the system control arrow buttons to navigate to the switcher IP address setting. Use the soft controls to set the network IP address for your switcher, and don’t forget to save the changes.
Joystick and Numeric Keypad
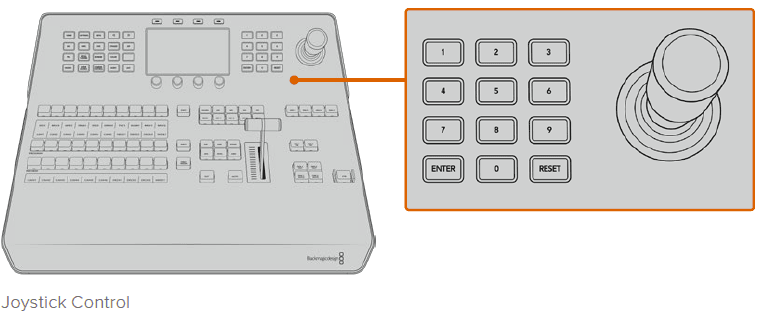
- The number pad is used to enter numerical data. For example, the number pad can be used to enter a numerical value for transition duration. When entering data using the number pad, the soft buttons below each parameter are used to apply the entered data to that parameter. The Joystick is a 3-axis joystick that is used to size and position keys, DVEs and other elements. You can also use the joystick to control VISCA PTZ remote cameras.

Operating your ATEM Switcher
Internal Video Sources
In addition to the SDI and HDMI inputs, the switcher also has 8 internal sources that can be used in production. The internal source names are represented on the software control panel using both long and short names. On the advanced panel, a long name is used to represent the internal sources and the labels represent what the sources are, so they are easy to understand
 Black
Black- Internally generated black is available as a source and can be used as a black matte in production.
 Color Bars
- Internally generated color bars are available as a source. Color bars can be useful for verifying signals going out of the switcher and can also be useful when setting up a chroma key with a vectorscope monitor.
 Color Generators
- ATEM switchers have two color sources that can be customized to generate any color matte for use in production. Color sources can be used to add color borders for wipe transitions or as dip-through colors for a dip transition such as dip-through white.
Keying using ATEM Switchers
- Keyers are a powerful production tool that allows the arrangement of visual elements from different sources on the same video image. To do this, multiple layers of video or graphics are stacked on top of the background video. Altering the transparency of various parts of these layers allows the background layer to be visible. This process is called keying. Various techniques are used to create this selective transparency and these correspond to the different types of keyers available on your switcher.
Understanding Keying
- A key requires two video sources; the fill signal and the key or cut signal. The fill signal contains a video image which is to be stacked on top of the background, while the key signal is used to select regions of the fill signal to be made transparent. The fill and key signals can be selected from any of the switcher’s external inputs or internal sources, allowing both still and moving images to be used as fill or key sources
Luma Key
- A luma key or self key consists of one video source containing the video image that will be stacked on top of the background. All of the black areas defined by the luminance in the video signal will be made transparent so that the background can be revealed underneath. Since only one image is used to define the areas to be cut out, a luma key uses the same signal for fill and key. The following images are an example of what background, luma key signals and the resulting combined image might look like.

- Background
- A full-screen image, often a camera source.
- Fill
- The graphic you plan to display on top of your background video. Notice that the final composition does not retain any black from the graphic because all of the black parts have been cut out of the image.
Linear Key
- A linear key consists of two video sources; the fill signal and the key or cut signal. The fill signal contains a video image which is to be stacked on top of the background, while the key signal contains a grayscale mask that is used to define regions of the fill signal to be made transparent. Since both the fill and key signals are video inputs, both signals can be in motion while on screen. The following images are examples of what background, fill, key signals and the resulting combined image might look like.

Adapter Cables for Talkback and Camera Control
Talkback Pin Connections
- The ‘talkback’ connector on the back panel of ATEM Constellation 8K is for routing engineering talkback and production talkback. You can make an adapter cable with an RJ45 connector using this pinout diagram

Developer Information
Blackmagic SDI Camera Control Protocol
- Version 1.3
- If you are a software developer you can use the SDI Camera Control Protocol to construct devices that integrate with our products. Here at Blackmagic Design our approach is to open up our protocols and we eagerly look forward to seeing what you come up with!
- Overview
- The Blackmagic SDI Camera Control Protocol is used by ATEM switchers, Blackmagic 3G-SDI Shield for Arduino and the Blackmagic Camera Control app to provide Camera Control functionality with supported Blackmagic Design cameras. Please refer to the ‘Understanding Studio Camera Control’ chapter section of this manual, or the ATEM Switchers Manual and SDK manual for more information. These can be downloaded at www.blackmagicdesign.com/support
- This document describes an extensible protocol for sending a uni-directional stream of small control messages embedded in the non-active picture region of a digital video stream. The video stream containing the protocol stream may be broadcast to a number of devices. Device addressing is used to allow the sender to specify which device each message is directed to.
- Assumptions
- Alignment and padding constraints are explicitly described in the protocol document. Bit fields are packed from LSB first. Message groups, individual messages and command headers are defined as and can be assumed to be 32 bit aligned.
- Blanking Encoding
A message group is encoded into a SMPTE 291M packet with DID/SDID x51/x53 in the active region of VANC line 16.
Example Protocol Packets
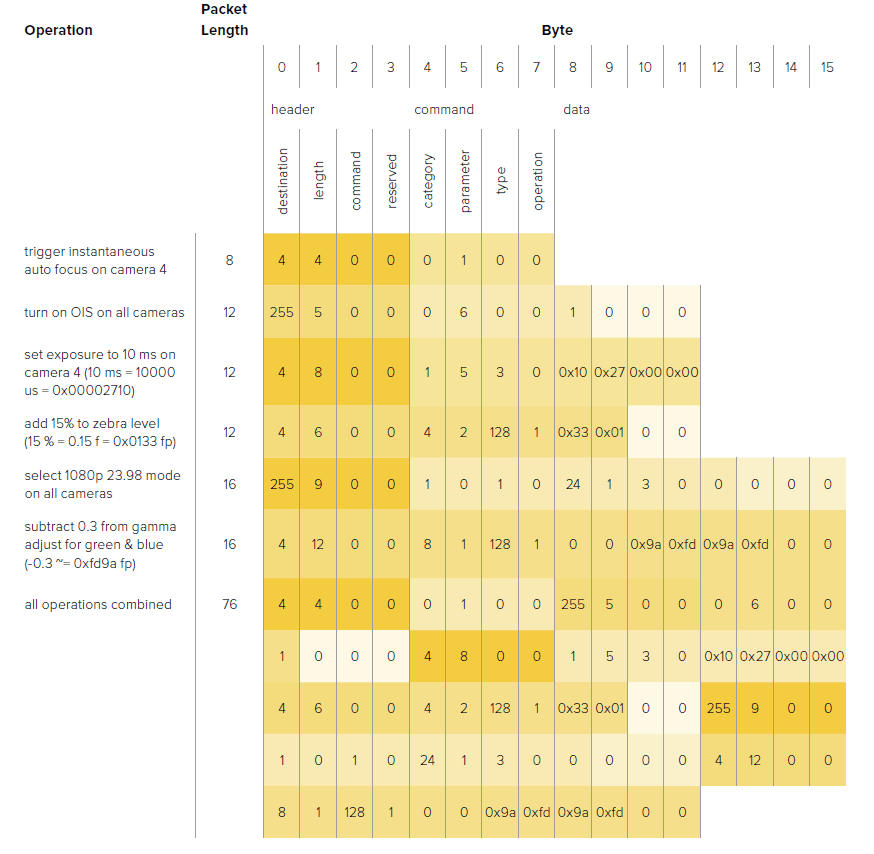
Visca Commands for PTZ control via SDI
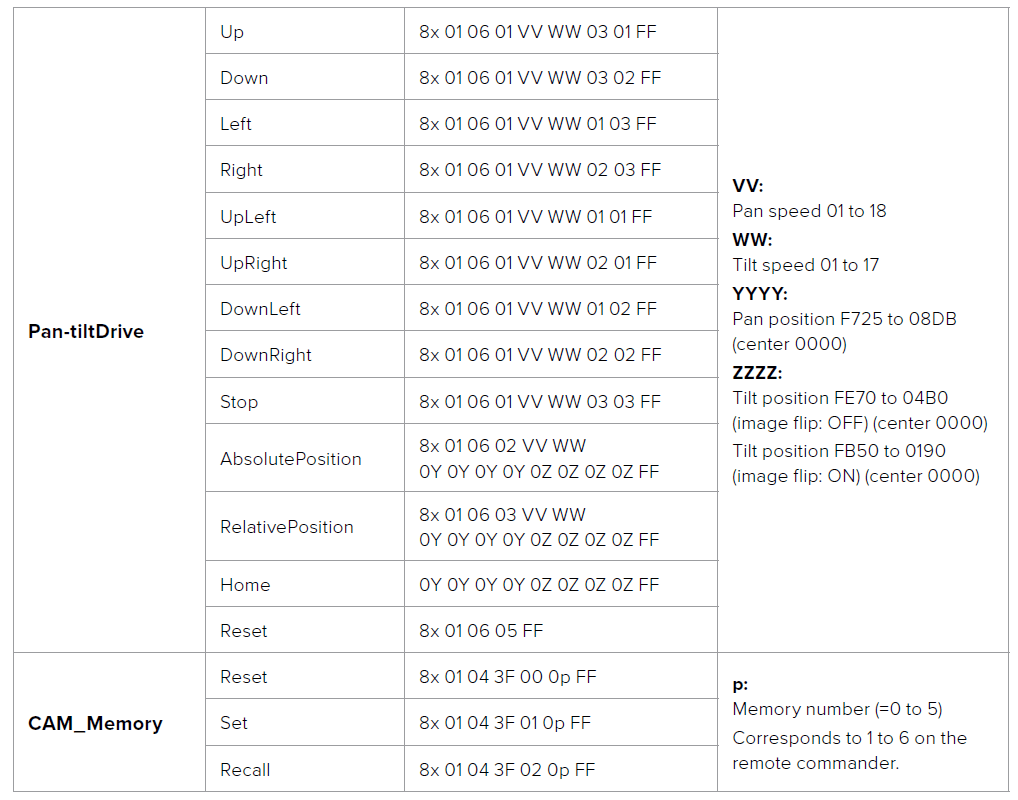
Compatible motorized heads include the following:
- KXWell KT-PH180BMD
- PTZOptics PT-Broadcaster
- RUSHWORKS PTX Model 1
Help
Getting Help
The fastest way to obtain help is to go to the Blackmagic Design online support pages and check the latest support material available for your ATEM switcher.
- Blackmagic Design online support pages
- The latest manual, software and support notes can be found at the Blackmagic Design support center at www.blackmagicdesign.com/support
- Contacting Blackmagic Design support
- If you can’t find the help you need in our support material, please use the “Send us an email” button on the support page to email a support request. Alternatively, click on the “Find your local support team” button on the support page and call your nearest Blackmagic Design support office.
- Checking the version currently installed
- To check which version of ATEM software is installed on your computer, open the About ATEM Software Control window.
- On Mac, open ATEM Software Control from the Applications folder. Select About ATEM Software Control from the application menu to reveal the version number.
- On Windows, open ATEM Software Control from your ‘start’ menu. Click on ‘help’ in the menu bar and select ‘about’ to reveal the version number
- How to get the latest updates
- After checking the version of ATEM software installed on your computer, please visit the Blackmagic Design support center at www.blackmagicdesign.com/support to check for the latest updates. While it is usually a good idea to run the latest updates, it is a wise practice to avoid updating any software if you are in the middle of an important project.
For more manuals by Blackmagic Design, visit ManualsLibraryy
Blackmagic Design ATEM Live Production Studio Switchers-FAQs
What format does the ATEM Media Player use?
ATEM Media Player supports PNG, TGA, BMP, GIF, JPEG, and TIFF files.
What is the default IP address of the ATEM TV Studio?
The default IP address for the ATEM TV Studio is 192.168.10.240.
What does an ATEM switcher do?
An ATEM switcher is a professional live production tool that allows seamless switching between multiple video inputs for live events like concerts and TV shows.
How do you record using the ATEM Software Control?
To record, click on the OUTPUT tab in the ATEM Software Control, then click on RECORD STREAM to start or stop a recording.
What is the resolution of the ATEM monitor?
The minimum monitor resolution for ATEM is 1366 x 768. The ATEM Mini Pro supports direct live streaming over ethernet using RTMP.
Where can I find the ATEM streaming XML file?
On Windows, navigate to C:\Program Files (x86)\Blackmagic Design\Blackmagic ATEM Switchers\ATEM Software Control.
On Mac, look under Library/Application Support/Blackmagic Design/Switchers
What is the default IP for the Black Box switch?
The Black Box switch’s default IP address is 192.168.1.1, with a subnet mask of 255.255.255.0.
What is the default IP of the HDMI encoder?
The default IP address of the HDMI encoder is 192.168.1.168.
Is ATEM an encoder?
Yes, the Blackmagic ATEM Mini functions as both a switcher and a hardware encoder, enabling live streaming.
What does “ATEM” mean in video production
ATEM refers to Blackmagic’s line of video switchers, designed for real-time switching between multiple video sources during live production.
How does a switcher work?
Switchers take video inputs and mix them into an output. They allow layering inputs and adding effects like lower thirds or score bugs.
What is the purpose of ATEM?
ATEM switchers are used for seamless video switching in live productions and streaming.

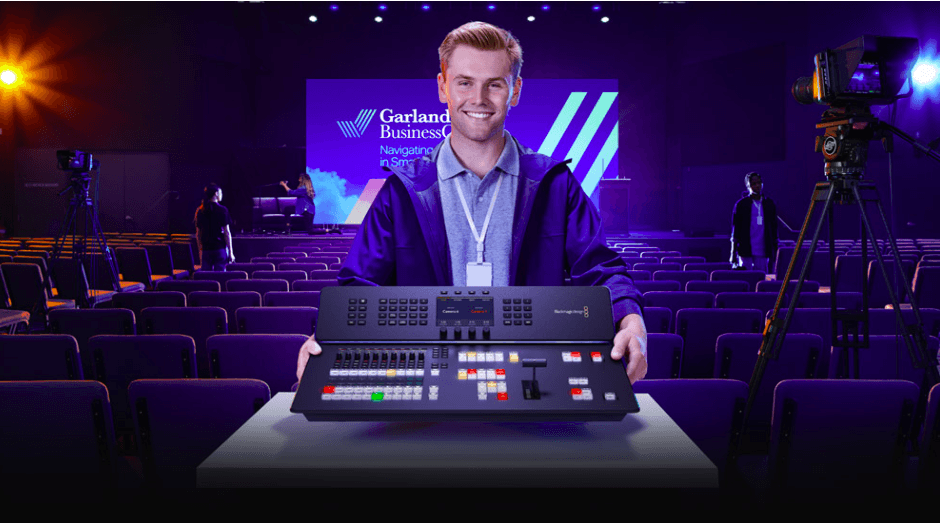


 Click on the settings cog icon to open the settings window which allows you to change the video input selections and labels. Setting labels are important, and they are visible in the multiview output as on-screen labels and on the ATEM Advanced Panel. In the settings window, you can also set the switcher video standard. This is the master video standard that the whole switcher operates at, and it’s very important you set this to the same video standard as your video inputs. More details on setting the video standards are included later in this manual


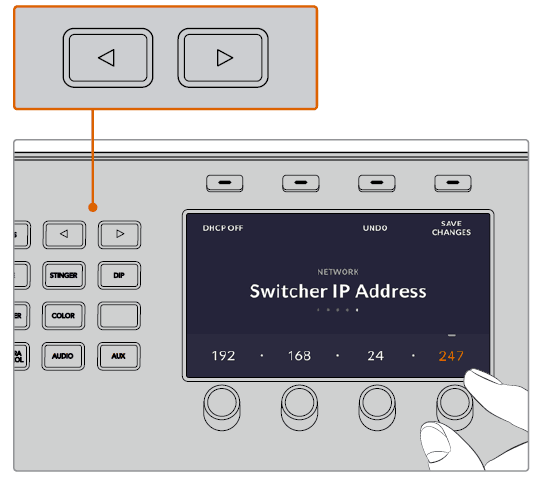 On the ATEM Advanced Panel, press the ‘network’ LCD soft button to open the network settings on the LCD, then use the system control arrow buttons to navigate to the switcher IP address setting. Use the soft controls to set the network IP address for your switcher, and don’t forget to save the changes.