Blackmagic Design ATEM Mini Pro

Getting Started
At first glance ATEM Mini might seem intimidating with all the connectors and buttons, however the unit is actually very easy to set up and use. Each feature serves a specific function and it won’t take long to get familiar with ATEM Mini and know exactly what each feature does. This section of the manual will show you how to get started with your ATEM Mini, including how to connect power, connect an HDMI video source, connect a microphone and plug into your computer so you can start broadcasting online
Plugging in Power
- The first step to getting started is to plug in the mains power supply using the supplied power adapter. If your power supply has a locking ring, secure the connection to ATEM Mini by tightening the connector to the unit. This locks the power cable to ATEM Mini preventing it from being accidentally removed.
- Connect power to ATEM Mini’s power input using the supplied cable

- Secure the connector to ATEM Mini by tightening the connector screw

- TIP
- It’s important to note that the power supplies for ATEM Mini are different as the ATEM Mini Pro and Extreme models use a little more power so its power supply can provide more current. However they are both 12 volts. So this means it’s important to use the power adapter supplied with each unit. If you have different models of ATEM Mini then it might be a good idea to label each power adapter so you know which adapter is for each unit.
Plugging in a Monitor and Testing Inputs
- With your video sources connected, you can now plug an HDMI television into ATEM Mini’s HDMI output and check all the inputs are working. This is also a good opportunity to check sources and see if your shots are smoothly switching between each other

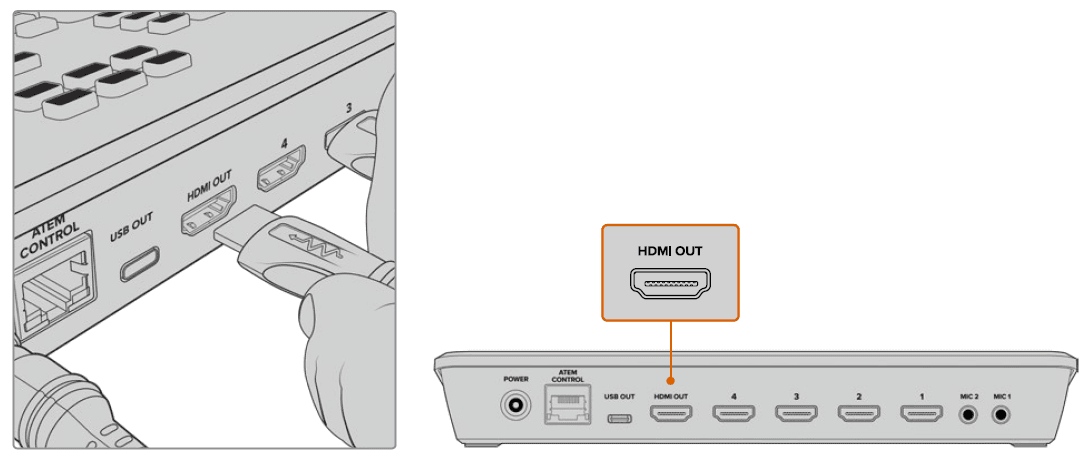
- Plug an HDMI television or monitor into ATEM Mini’s HDMI output so you can monitor your program output and check all your sources are working properly
- TIP
- ATEM Mini Pro and Extreme models have a powerful multiview feature that lets you see all your inputs, plus program and preview outputs simultaneously on one screen. For more information, refer to the ‘Using the Multiview’ section
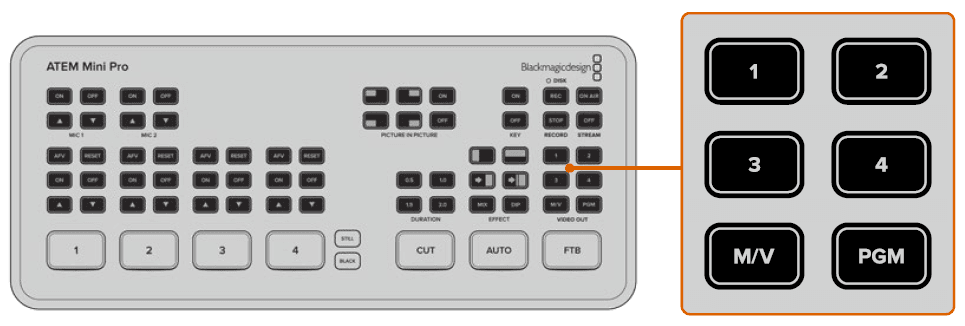
- To check your sources, simply press the numbered video out buttons on ATEM Mini’s control panel and watch the HDMI television. If your sources are working correctly, you should see them switch between each other. On ATEM Mini Extreme models, the video out buttons select the source for the second HDMI output.

Connect a Microphone
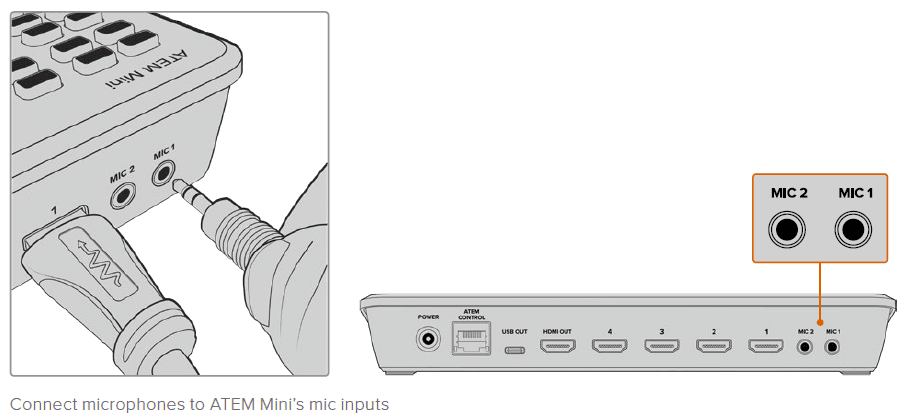
- When broadcasting a PowerPoint presentation or a Kickstarter video, you might want to use a microphone so your voice can be heard loud and clear. Plug a microphone, for example a small wireless collar microphone, into one of the 3.5mm audio inputs.
- If you are broadcasting an interview, plug the second microphone into the second 3.5mm audio input. You can even plug a music player into one of the audio inputs and mix it into your production

- To add the microphone to your audio mix, press the ‘on’ button. This switches the mic input on air until you press ‘off’. The button will illuminate red when on air.

Connecting to Skype or Zoom
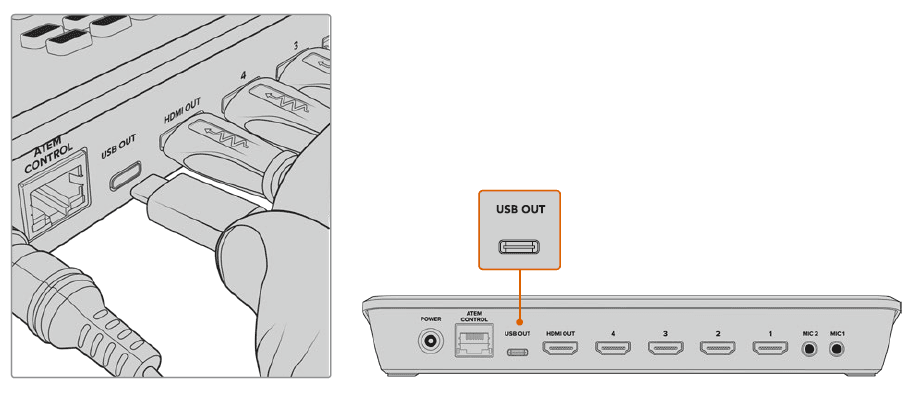
- Plug ATEM Mini’s webcam output into your computer’s USB input. Your computer will recognize ATEM Mini as a webcam and you can select it as the webcam source in your streaming program, such as Skype, Zoom or OBS Studio.

- Plug your computer into ATEM Mini’s webcam out USB-C connector
Switching your Production
- With ATEM Mini, you can switch cleanly using professional cuts or transitions. For example, a cut will instantly change from one source to another and a transition will change sources over a defined duration often using an effect. For more information, refer to the ‘using cuts and
transitions section later in this manual.
Using Cuts and Transitions
- When switching video sources, you can use a straight cut which will immediately change one source to another, or a transition which gradually changes one source to another over a defined duration. Transitions appear as an effect, for example, a cross dissolve or mix, a dip to color, or even a stylized wipe and you have many styles to choose from.
Switching Sources using an auto-transition
- Transitions let you smoothly switch from one source to another over a defined duration. For example, a mix transition gradually fades the current source into the next until the original source is no longer visible. A wipe transition will move a line across the original source revealing another effectively wiping across the image.
- You can add a colored border, or make it soft so the edge is smooth and pleasing. You can even use digital video effects or DVEs, such as a squeeze or push, to move the images as they transition from one to the other. In the demonstration below ATEM Mini will switch from input 1 to input 2 using a mix transition:
To perform a mix auto transition
- Press the ‘mix’ button to select a mix transition.

- Now press the duration you want for the mix.

- Press the ‘auto’ button to tell ATEM Mini you want to use an automated transition.
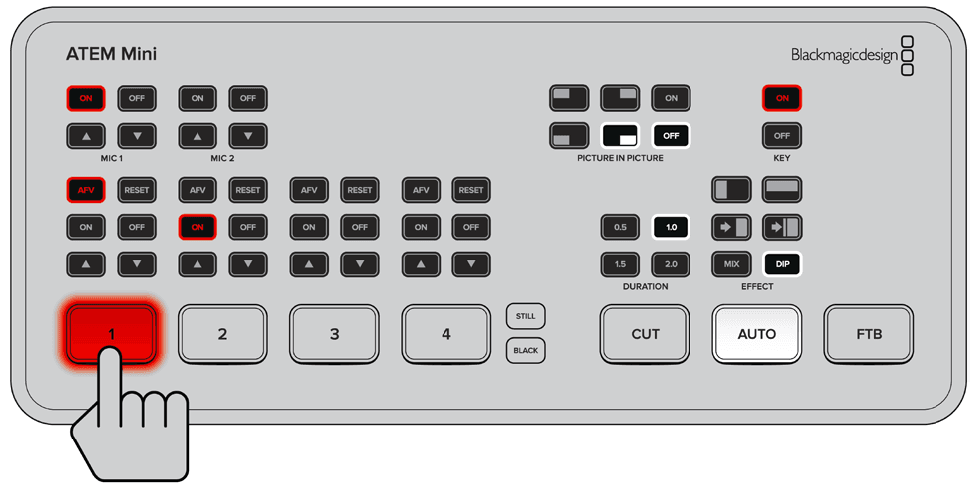
- Press the input 2 button to perform the mix transition. You will now see inputs 1 and 2 buttons illuminated red while the transition happens and your broadcast changes to input 2. When the transition is complete, input 2 will be illuminated red to indicate it is now live on air.
Controlling Audio
- When setting up your production or during your broadcast, you will likely want to control audio levels if the sound is too quiet or too loud. When an audio level is too loud it will clip. Clipping means the audio has increased beyond the maximum accepted level and when this happens it can distort and sound unpleasant.
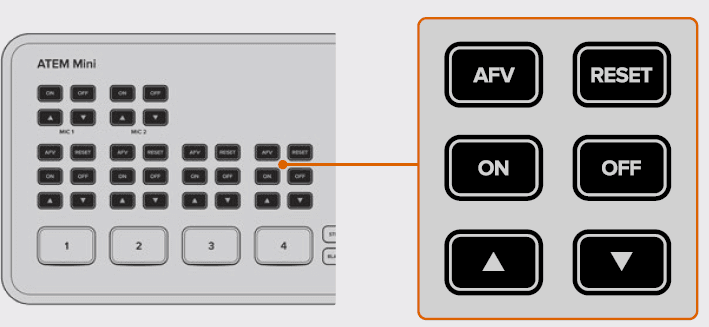
- Pressing the up and down arrow buttons for each input will increase or decrease the audio level for the respective source. For example, if the presenter’s voice is too loud and risks clipping, you can decrease the audio level by pressing the down button incrementally until the level is safe
- ON OFF
- Pressing the on or off buttons will let you permanently enable the audio from the respective input source, or turn its audio off completely.

- ON – When the input’s audio is set to ‘on’, the input audio will be heard permanently, even if the source is not currently on air.
- OFF – When the input’s audio is set to ‘off’, the source audio will never be heard even if the source video is on air.
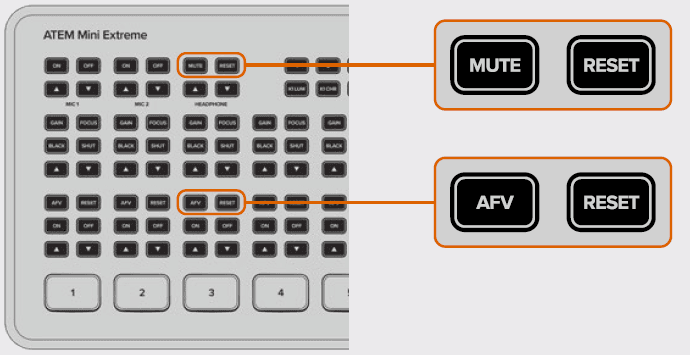
- AFV
- AFV stands for ‘audio follows video’ and will let the audio for a respective input be heard whenever the source is switched on air.

- To enable or disable AFV for each input, simply press its AFV button.
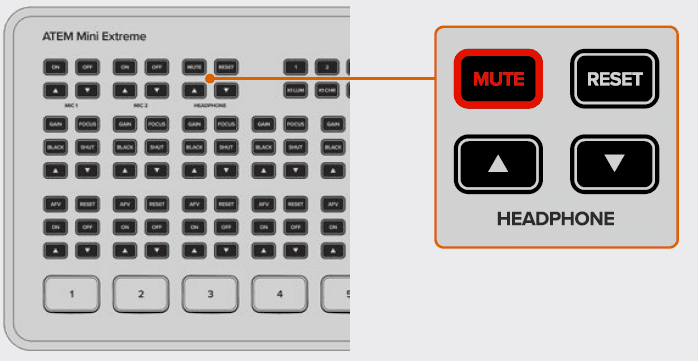
- MUTE
- Headphone controls include a mute button to silence all audio playback including program audio. This is helpful if a presenter wants to mute program audio while speaking. The button will illuminate red when selected.

- RESET
Pressing the ‘reset’ button will restore the input audio level to its default position. This is helpful if you want to cancel any adjustments or reference the original level before you made changes. - On ATEM Mini Extreme, pressing the reset button for the headphone input will restore the headphone level to its default setting

Using the Upstream Keyer
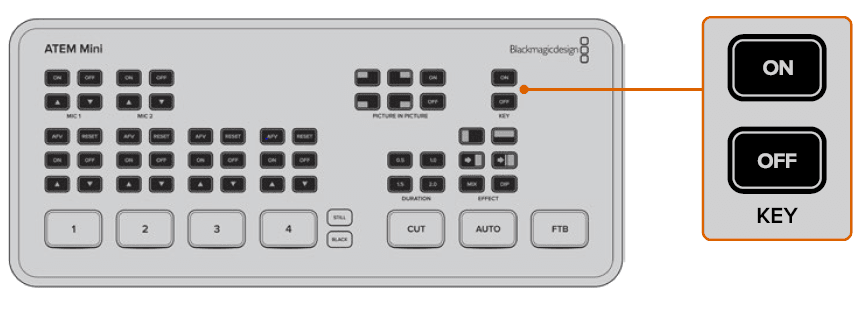
- ATEM Mini’s upstream keyer is used to superimpose graphics or blend one video layer over another using transparency. This means you can tell ATEM Mini to make an input source’s background color invisible using the chroma keyer or only use a specific section of a graphic using a luma or linear key. Linear keys are great for visual effects, titles, and lower-third graphics.

- Press the ‘key’ on or off buttons to switch the upstream keyer on and off air
- TIP
- ATEM Mini’s advanced chroma keyer is perfect for keying graphics from a PowerPoint presentation. For example, you could have a series of graphics designed
to be keyed over a background and these can played out directly from a PowerPoint sequence. All you need to do is make any invisible areas green, or any solid color that isn’t used in your graphic, then set the chroma keyer to make that color transparent. The images from your computer will be high quality over HDMI so will key very cleanly and look fantastic.
Additional Features on ATEM Mini Pro and ATEM Mini Extreme
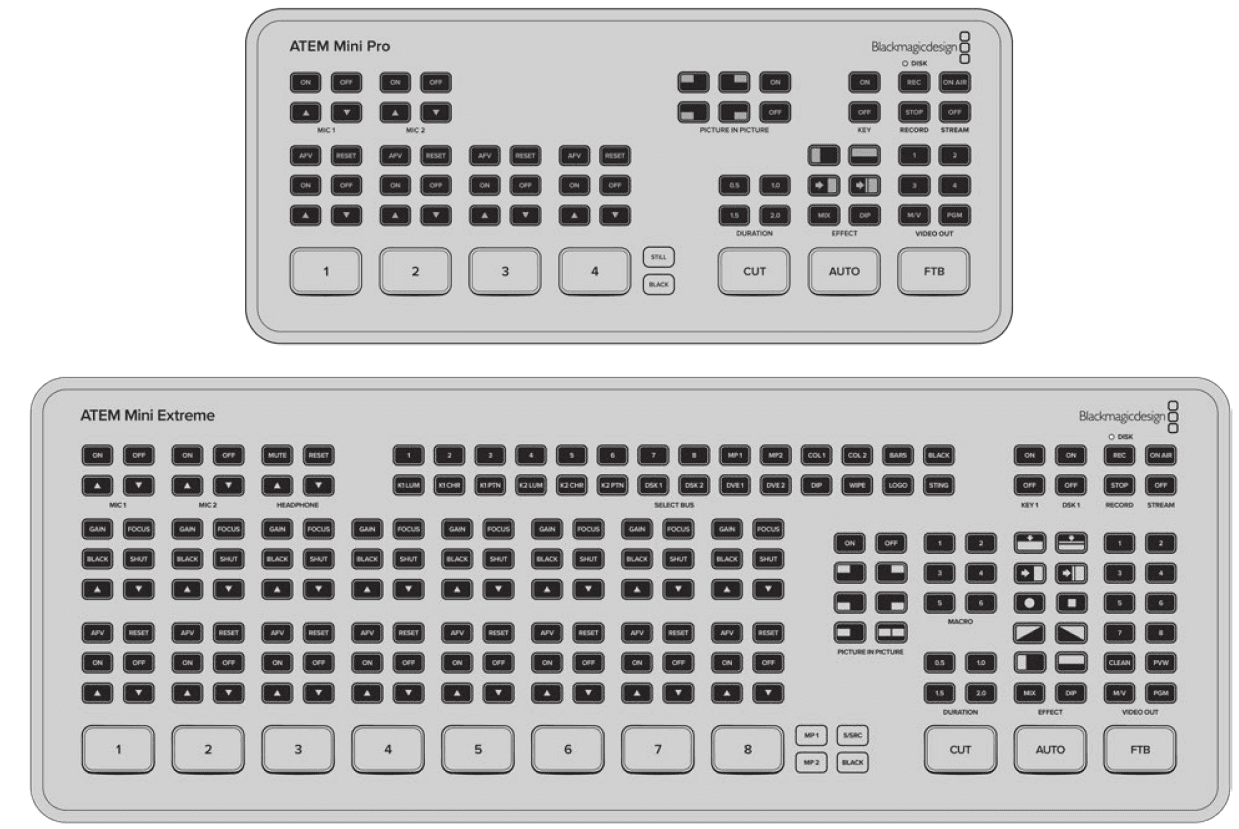
- ATEM Mini Pro and Extreme model switchers have additional features that give you more options for your broadcast and even more ability to control your production directly from the unit without the need for a computer.
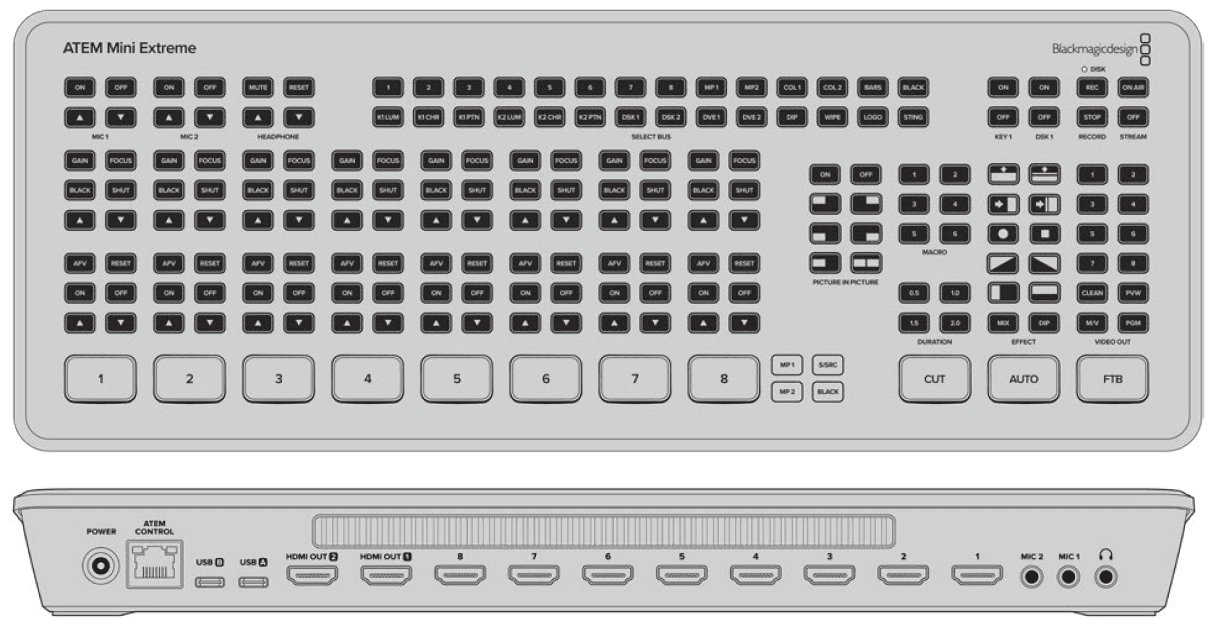
- Dedicated buttons on the control panel let you switch sources to the HDMI output, start/stop streaming and start/stop recording

- ATEM Mini Pro and Extreme model switchers provide more features so you have more control from their built in control panels plus additional streaming options
- You also have the choice of streaming via the webcam output or direct streaming via Ethernet. At any time, you can record your broadcast to an external disk via USB-C and use the dedicated record buttons on ATEM Mini Pro to start and stop recording.
- One of the most exciting additional features is the multiview. This powerful feature displays a multiview on the HDMI video output that shows a comprehensive overview of your production. All HDMI input sources, the program and preview outputs, plus important recording, streaming and audio status information is presented on one screen so you always know exactly what is
happening during your broadcast! - This section describes all the additional features and how to use them
Setting the HDMI Output using the Video Out Buttons
- The video out buttons on the right side of the switcher are used to switch sources to the HDMI output on ATEM Mini Pro and HDMI out 1 on ATEM Mini Extreme. The default output source for ATEM Mini Pro is the multiview and you can read more about this powerful feature later in this section. ATEM Mini Extreme’s default output is program for output 1 and multiview for output 2.

- Press the video out buttons to switch a source to the HDMI output
- To change the HDMI output source, press any of the video out buttons. For example you can select the HDMI inputs for isolated camera recordings, or select the program output or multiview. Compared to ATEM Mini, having the buttons built into ATEM Mini Pro and Extreme means you can change the HDMI output directly from the unit itself! In addition to the 8 HDMI inputs, program and multiview, ATEM Mini Extreme lets you select a clean feed or the preview output.
- NOTE If you want to switch camera 1 direct or preview to the HDMI output, these sources are available from the ‘output’ menu in ATEM Software Control
Direct Streaming via Ethernet
- ATEM Mini Pro and Extreme Switcher’s Ethernet connector lets you stream directly while simultaneously providing the added benefits of ATEM Software Control. You can learn more about this powerful control software in the ‘using ATEM Software Control’ section.

- Plug into your internet router via Ethernet to stream directly
- You can select which platform you want to use in ATEM Software Control and set all the relevant settings for your stream. If you are setting up a broadcast on your channel that you will regularly use, these settings will be stored in your switcher and you can then plug into any internet connection at any time and broadcast directly from the unit. This section includes how to configure settings for YouTube Studio and Twitch.
- TIP
- As you’re setting up your broadcast, it’s worth loading a standby graphic into ATEM Software Control’s media player and switching it to the program output so you can perform a quick test broadcast before actually going live.
- To configure your settings for YouTube Studio

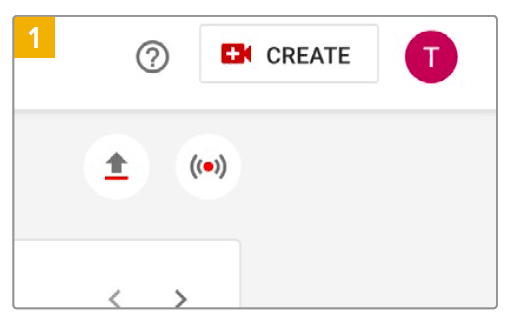
- Log into your YouTube account. Click the ‘go live’ icon

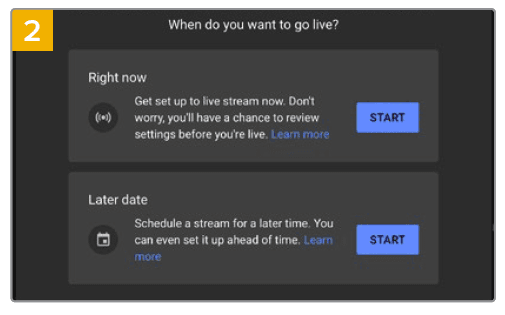
- If prompted, choose to start your stream ‘right now’ or at a ‘later date’ and select ‘streaming software’ from the options. Otherwise, select Edit

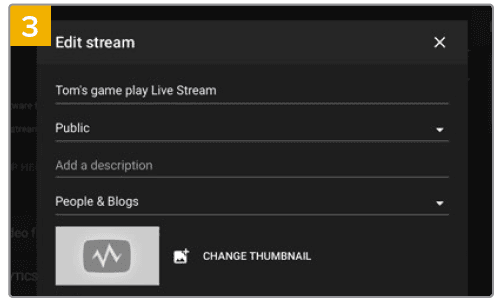
- Enter your broadcast name and details. Set the broadcast to ‘public’ so anyone can watch

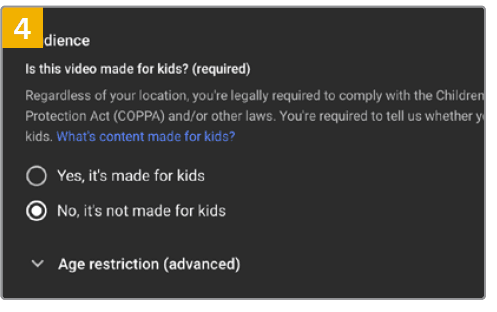
- Set the child protection to the appropriate setting and press save

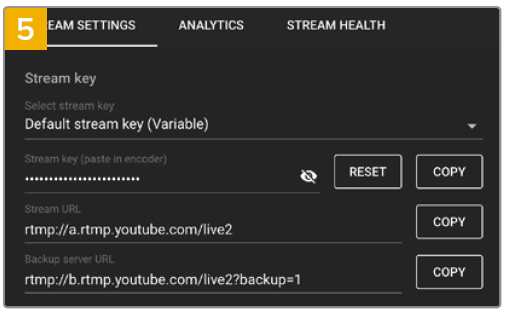
- An auto-generated stream key will appear in the stream settings, click ‘copy’ to copy the stream key.
- Now you have copied the stream key for your broadcast, you will need to paste it into the stream details in ATEM Software Control

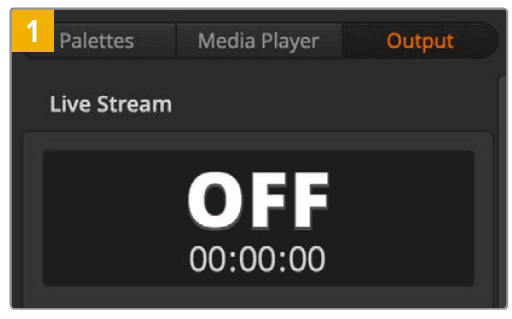
- In ATEM Software Control’s processing palettes, click on the ‘output’ tab. Open the ‘live stream’ palette

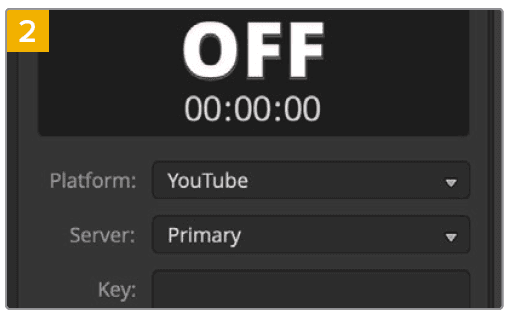
- Set the platform to YouTube by clicking in the menu and selecting YouTube from the menu list. Set the server to ‘primary’

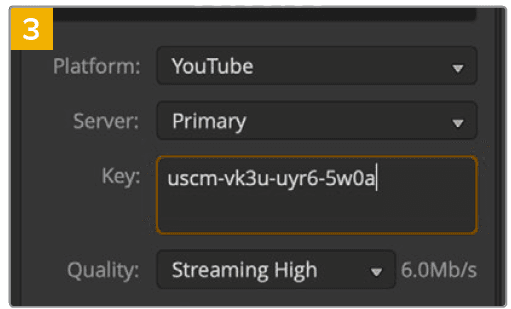
- In the ‘key’ setting, paste the stream key you copied from YouTube

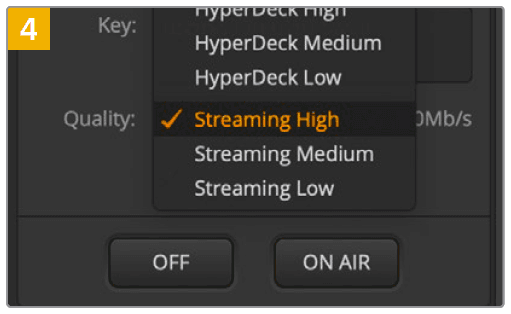
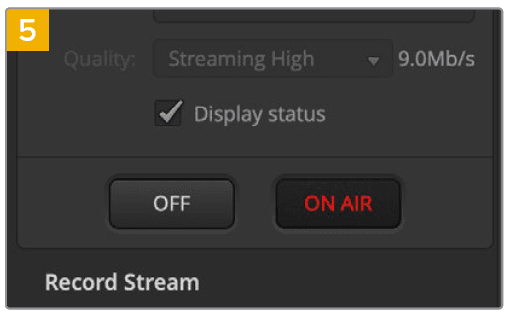
- Set the streaming quality to low, medium, or high. This will also set the quality for the recording output via USB-C.

- With all the streaming details now set, it’s worth performing a quick test broadcast to make sure everything is working. Press the ‘on air’ button on your switcher, or click on the on air button in the live stream palette
- YouTube Studio is now ready to start broadcasting. It may take a few moments for the memory buffer to initiate. When the buffering is complete, the ‘go live’ button will appear in the YouTube Studio manager and all you need to do is click ‘go live’. You are now broadcasting!
- To test that everything is working properly, click the ‘share’ icon, copy the link and paste it into a new window or tab in your internet browser. You can now monitor your live stream just like a member of your audience. When your production has finished, press the ‘off’ streaming button on your switcher to stop
your broadcast.
Direct Streaming by Sharing Your Computer Internet
With ATEM Software Control now connected to your switcher, you can set up a direct stream via your computer’s internet connection. To set up your ATEM Mini Pro or ATEM Mini Extreme for software control and direct streaming:
- Plug your ATEM into your computer’s spare Ethernet port. It may take a moment for DHCP to find the unit and assign an IP address.
- Launch ATEM Software Control.
- You will see ATEM Mini Pro or ATEM Mini Extreme listed as a connected ATEM switcher on your network. Simply select your switcher from the list.
- Click ‘connect’.
- Configure your computer to share its internet connection through its Ethernet port.
Mac: in System Preferences, click ‘sharing’ then select ‘Internet sharing’ from the ‘service’ list. In the ‘share your connection from’ menu, choose ‘wi-fi’ if your Mac is connected to the internet over wifi. In the ‘to computers using’ list, select ‘ethernet’. In the ‘service’ list, tick the ‘internet sharing’ checkbox. When you are asked if you are sure you want to turn on internet sharing, click ‘start’. Windows: in the Windows search box, type ‘view network connections’ and press enter. Right-click on the internet connection and select ‘properties’. On the ‘sharing’ tab, tick ‘allow other network users to connect through this computer’s internet connection’. Select a network connection in the menu then click ‘OK’. - ATEM Software Control will now appear with buttons and indicators illuminated. You can now operate your switcher the same way you would via USB-C. Your ATEM switcher is now setup for direct streaming via your computer.
Additional Features on ATEM Mini Extreme
- With ATEM Mini Extreme, there are more button options for your broadcast available directly from the control panel. These include dedicated buttons for camera control, a select bus and six direct macro selection buttons

- With ATEM Mini Extreme, you can connect two USB-C devices at the same time. This means you can record to USB while streaming to your computer via USB or tethering to a smartphone so you can stream using your smartphone’s internet connection.
Connecting Headphones
ATEM Mini Extreme model switchers have a headphone input for monitoring the program output using headphones.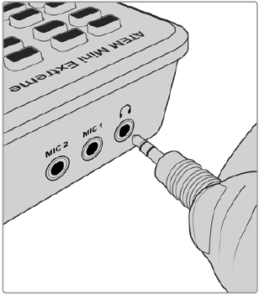
Using SuperSource
- ATEM Mini Extreme switcher models include a feature referred to as SuperSource allows you to arrange multiple sources on the monitor at one time. The SuperSource processor appears on your ATEM switcher as a single video input. For example, if you were broadcasting a discussion between four presenters, you could superimpose them all over the background. It is a similar feature to picture-in-picture but more powerful as you can add more sources.

- Setting up SuperSource
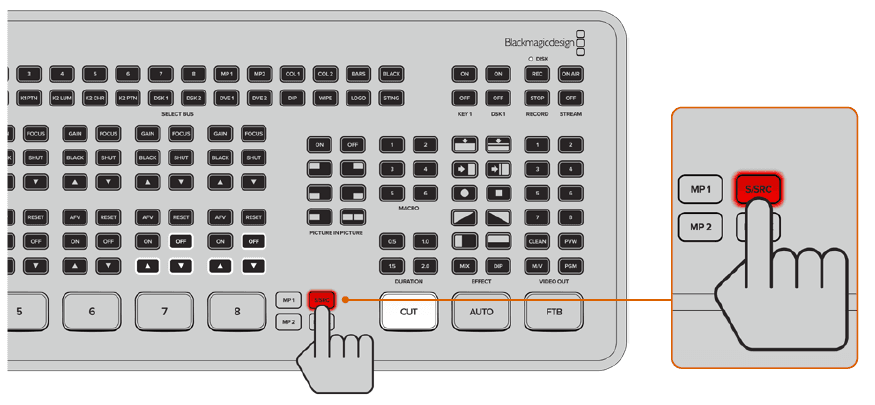
- To set up SuperSource, first, you need to be able to view it on your monitor. Do this by either assigning SuperSource from the tab in ATEM Software control to a multiview window or by switching to the S/SRC option on ATEM Mini Extreme while a monitor is connected
- Positioning Sources
- In ATEM Software Control open the SuperSource palette and choose from one of the four preset layouts. Click the one that is closest to the look you want, this will automatically arrange the boxes into the preset positions indicated in the software. Make sure the box is enabled. You can then change the position and size via the X Position, Y Position, and Size fields.
- Ticking the Enable Crop check box allows you to crop the image. The crop parameters are Top, Bottom, Left and Right. You may then wish to alter the parameters of boxes 2 to 4 by doing similar steps. If you make a mistake, click on the menu icon on the right hand side of the Box Control tab and you can easily reset the parameters

- Background and Foreground Art
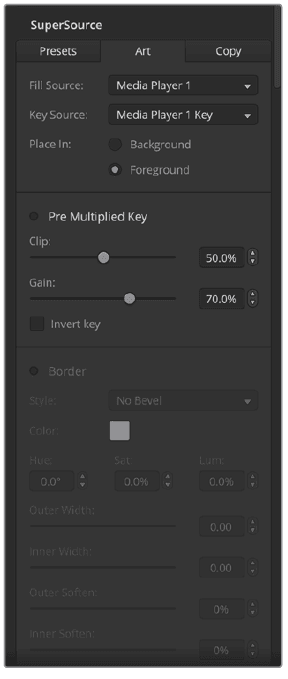
- To use background art, clicking on the ‘art’ tab in the software to reveal the art settings. To use art as a background source, select the place in background option. Then choose your art fill source via the menu. Assign the source and your choice will be placed behind the on screen boxes.
- If you wish to make the art foreground, then select source in foreground and choose whether your graphic is pre-multiplied or not. If it is pre multiplied then tick the check box, assign the Art Fill Source and the Art Key Source. This will now allow the art to be placed over the enabled box or boxes. If your art is not pre multiplied then you can use the clip and gain controls as discussed in the Keying section of this manual to achieve the desired result.

- Putting SuperSource On Air
- The entire SuperSource processor appears on your ATEM Switcher as a video input. Simply select the SuperSource button on ATEM Mini Extreme or in ATEM Software Control to use the composite you have just made
Using the Multiview
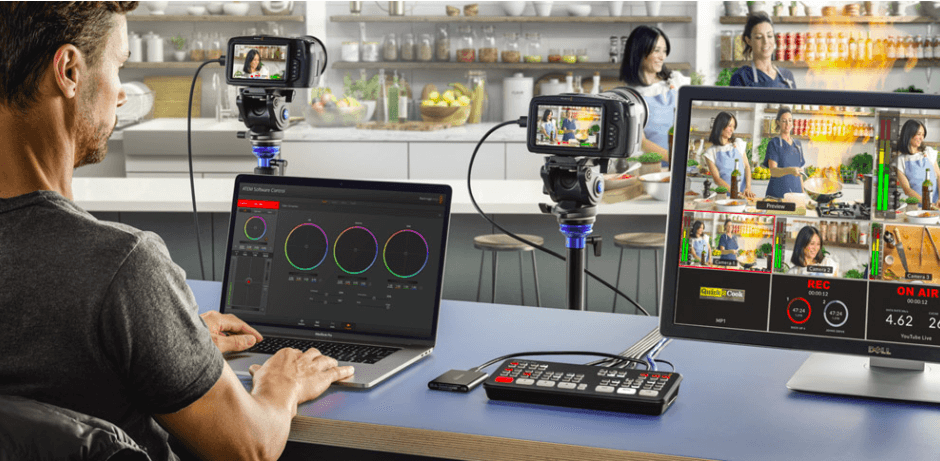
- ATEM Mini Pro and Extreme model switchers have a powerful multiview feature that lets you monitor all HDMI inputs, together with the program and preview outputs as a group of views on one screen. The multiview also displays the media player, streaming status, disk recording disk status, audio levels, plus Fairlight EQ and dynamics indicators. This feature provides a comprehensive overview so you will always know exactly what is happening with your broadcast

- The multiview is a powerful feature that lets you monitor all sources and outputs simultaneously
ATEM Software Control
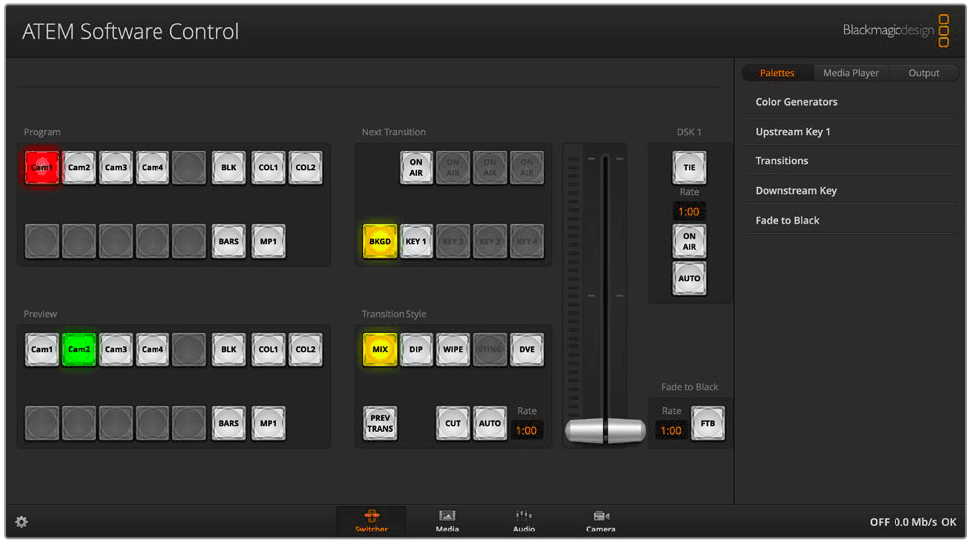
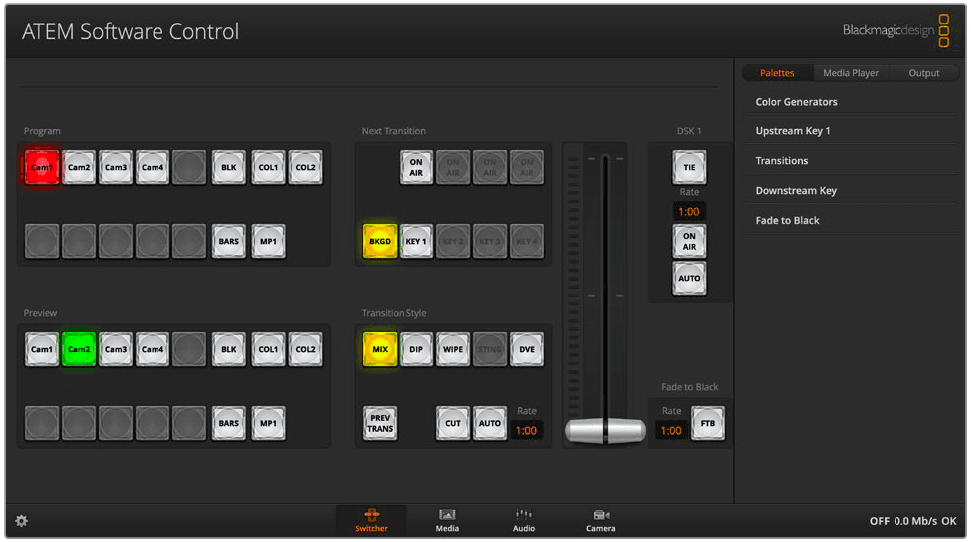
- ATEM Software Control is a powerful software control panel that gives you a lot more control over your ATEM Mini. Once you start using ATEM Software Control you will quickly see just how much your ATEM Mini can actually do. For example, you can manually perform transitions using the fader bar, select internal sources on the program and preview buttons, mix audio using a mixer with channel faders, set up keyers, load graphics in the media pool and much, much more.

- ATEM Software Control is included in the ATEM software installer and can be downloaded from the Blackmagic Design website. It’s free and allows you to control your switcher in a similar way to a full hardware control panel. A range of palettes on the right side shows you all processing features of your ATEM Mini and allows settings to be easily made.
- You can also use ATEM Software Control to configure your switcher settings. For more information on how to use ATEM Software Control, refer to ‘using ATEM Software Control’ in the following sections of the manual.
- Switching Modes
- ‘Cut bus’ is the default switching mode which lets you change sources as soon as you press an input button. Setting ATEM Mini to ‘program preview’ mode lets you preview the source before switching it to air.
- Cut Bus
- In cut bus mode, as soon as you press an input button, it will immediately switch to air. This is a fast and easy way of switching

- In cut bus mode, pressing an input button will instantly switch it to air
Using ATEM Software Control
- ATEM Software Control has four main control windows: Switcher, Media, Audio, and Camera. You can open these windows by clicking the three main buttons at the bottom of the interface or by pressing the Shift and left/right arrow hotkeys. A general settings window can be opened by selecting the gear icon at the lower left of the interface.
- Switcher Panel
- When first launched, the switcher screen is selected, which is the main control interface for the switcher. ATEM Mini must be connected to your computer via USB for the software control panel to run.

- Mouse or Trackpad Operation
- The virtual buttons, sliders and fader bar on the software control panel are operated using your computer mouse or a trackpad if you’re using a laptop.
- To activate a button, click once with the left mouse button. To activate a slider, click and hold down the left mouse button while dragging. Similarly, to control the fader bar, click and hold down the left mouse button on the fader bar handle and drag up or down.
Preparing Media on a Computer
Formatting Media on a Mac Computer
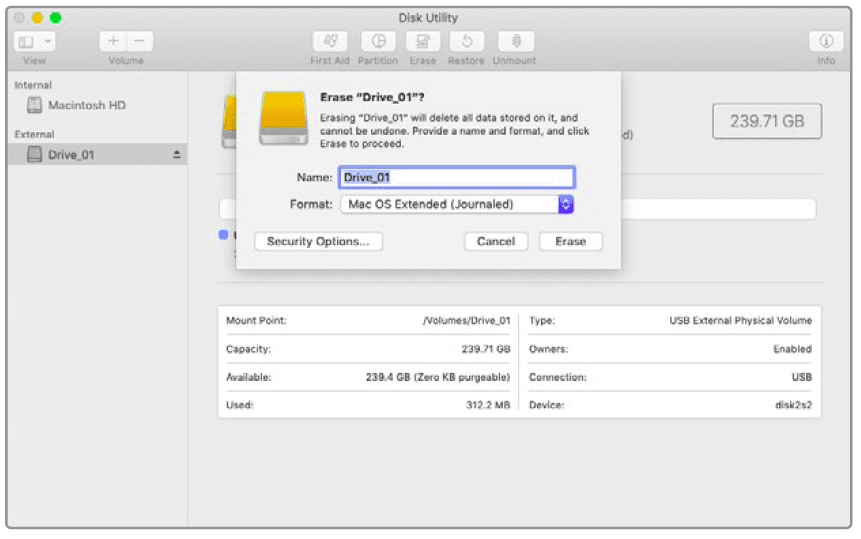
The Disk Utility application included with your Mac can format a drive in the HFS+ or exFAT formats. Make sure you back up anything important from your disk as you will lose everything on it when it is formatted
- Connect your disk to your computer with an external dock, USB hub, or cable adapter and dismiss any message offering to use your drive for Time Machine backups.
- On your computer, go to applications/utilities and launch Disk Utility.
- Click on the disk icon of your drive and then click the erase tab.
- Set the format to Mac OS Extended (Journaled) or exFAT.
- Type a name for the new volume and then click erase. Your media will quickly be formatted and made ready for recording

Formatting Media on a Windows computer
The format dialog box can format a drive in the exFAT format on a Windows PC. Make sure you back up anything important from your drive as you will lose everything on it when it is formatted
- Connect the drive to your computer with an external dock, USB hub, or cable adapter.
- Open the start menu or start screen and choose computer. Right-click on your drive.
- From the contextual menu, choose format
- Set the file system to exFAT and the allocation unit size to 128 kilobytes.
- Type a volume label, select quick format and click ‘start’.
- Your drive will quickly be formatted and made ready for recording.Use the Format dialog box feature in Windows to format your external disk in the exFAT format
Capture Video
The capture video option supports legacy model ATEM switchers with USB capture features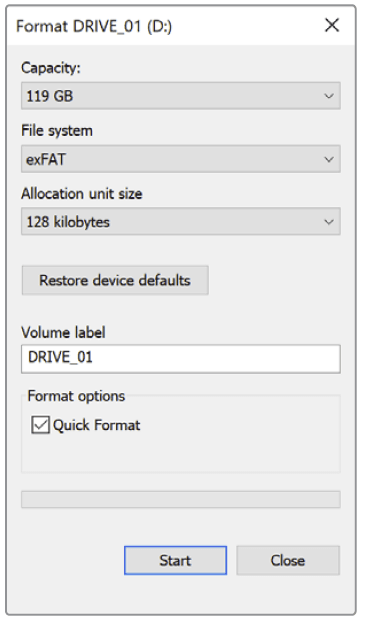
Capture Still
If you need to capture a still image from your broadcast simply click on the ‘capture still’ button. This acts like a still store which lets you add capture files to the media pool. You can then immediately load a still into the media player and use it in your broadcast, or save the media pool to your computer.
To save the media pool
- Go to the menu bar at the top of your screen and click on ‘file/save as’.
- Choose the location you want to save to.
- Click ‘save’. `Now that your media pool is saved on your computer, you can access the captured stills and use them in your graphics software
Timecode Generator
The timecode generator automatically runs time of day timecode from the moment you launch ATEM Software Control. However, you can reset the counter to zero, or manually enter a new timecode value to start from When using ATEM Mini Pro or Extreme, the timecode generator can be set to time of day, or free run timecode where you can set a manual preset timecode
To manually set a preset timecode value
- Click in the ‘run mode’ menu and select ‘free run’.
- In the smaller timecode counter, type in a defined timecode value. As you type, the new values will appear green. To confirm the change and set the timecode running, click ‘set’.
Time of Day
- When ATEM Mini Pro or Extreme switcher is connected to your computer, the unit will sync time of day timecode with your computer. The unit has a built in clock that can continue running for approximately 6 days, so once you disconnect the switcher from your computer, the time of day timecode will continue until the battery is depleted. The battery will charge while connected to your computer via USB.
- NOTE The timecode generator is also crucial when recording isolated files on Blackmagic Pocket Cinema Cameras 4K and 6K. When these cameras are connected to ATEM Mini’s HDMI inputs, they will automatically conform to the ATEM timecode generator. That means when all cameras are recording the same timecode, you can edit your broadcast in post production and have all cameras easily synchronized on a multicamera timeline. For example, you can import your isolated camera recordings in DaVinci Resolve and setup a multicamera edit with all cameras synced to the same timecode.
Using the Audio Mixer
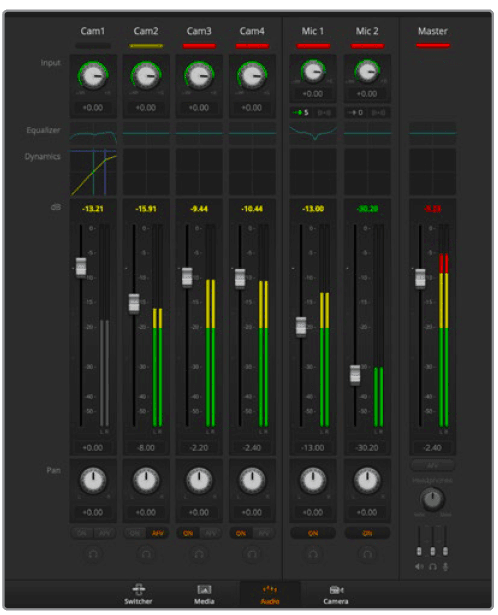
- The audio tab is used to mix audio sources connected to ATEM Mini via HDMI and mic audio. Cameras and external mic audio sources are listed along the top of the audio mixer along with the master audio output for the USB webcam program output to your computer
 The audio mixer displays tally lights for any audio sources that are currently on air or when AFV is selected, as well as audio level, audio balance and buttons for selecting which audio should be used.
 - Below each audio source is an audio level meter, a fader for setting the maximum audio level, and a knob for setting the left/right audio channel balance. The master fader on the right side of the audio mixer is used to set the gain on the audio level on the USB webcam program output and has its own audio level meter. Next to the master fader are mic faders which let you control the audio level for microphones connected to the mic inputs.
- The buttons below each audio level meter determine whether audio is always available for mixing or only when the source is on air. The solo monitoring feature for each input is grayed out as it supports ATEM Production Studio and Broadcast Studio model switchers.
- Tally
Any source whose audio is on air is lit with a red tally light in the software. In the example on this page, camera 3 and camera 4 are lit because their audio is set to be always on. The tally light will be illuminated dull yellow when AFV is selected and the channel’s associated camera is off air. This also applies to the master fader tally light when the master fader AFV button is selected. When FTB is activated, the master fader tally light will blink red. - Audio Level
- Drag the audio level fader to set the gain on the audio level for each camera and audio source. The numbers under each audio level meter show the maximum audio level set by the fader. The numbers above the audio meter show the peak audio level reached by the audio source. A green number represents low to medium audio levels.
- Audio Balance
- The audio mixer supports stereo audio from each audio source. If you wish to change the left and right audio channel balance for a camera or other audio source, adjust the knob to the desired balance point

- The audio meter for Cam1 is shown in gray to indicate that its audio will not be used as neither of its ON or AFV buttons are enabled. Cam2 has AFV selected but its audio is not currently being used as the camera is not on air as is indicated by its dull yellow tally light. Cam3 and Cam4 have their direct mix set to ON so their mixed audio is always used and their tally lights remain lit, even if another camera is currently on air. The audio level meters for mics 1 and 2 are also set to ‘on’ and therefore always present in the mix.
Master Audio Level Output
- The master fader on the right side of the audio mixer is used to set the gain on the audio level for the USB webcam program output and has its own audio level meter. Select the AFV button on the master audio output fader to enable the AFV fade-to-black feature. This lets you fade your master audio when you click on the fade to black button.
Using the Media Page
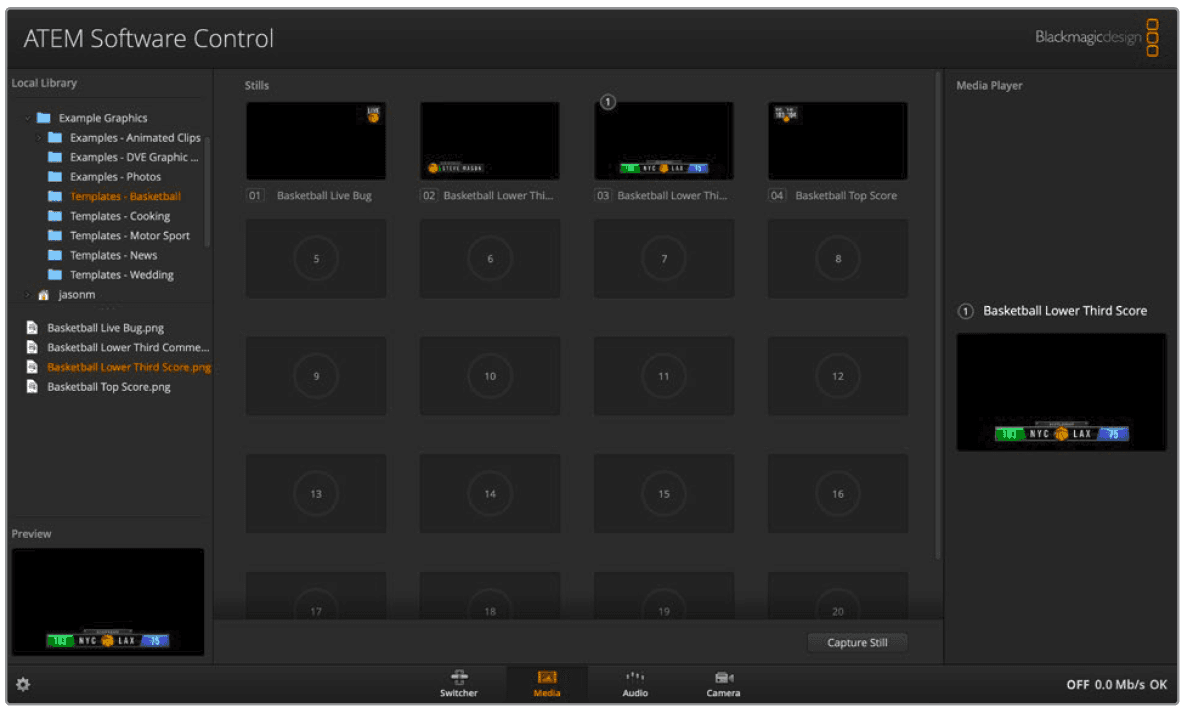
- The media page is where all your graphics or stills are stored and is very easy to use. Simply find the still you want to use with the browse window, then drag and drop the file into a slot in the media pool. From there, you can load any one of those stills into the media player and switch it to air using the media player 1 source button on the software control panel. You can also use stills in the media player with the upstream and downstream keyer

Keep reading this section for information on how to use the media page in ATEM Software Control.
Navigating the Browse Window
The browse window is a simplified file browser that lets you navigate your computer to look for graphics files. All attached drives on your computer are displayed, and you can select folders from them. View sub folders by clicking on the arrows next to each folder. The ‘preview’ window will show any selected graphics files.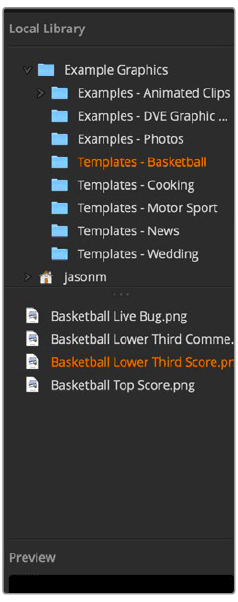
Using Camera Control
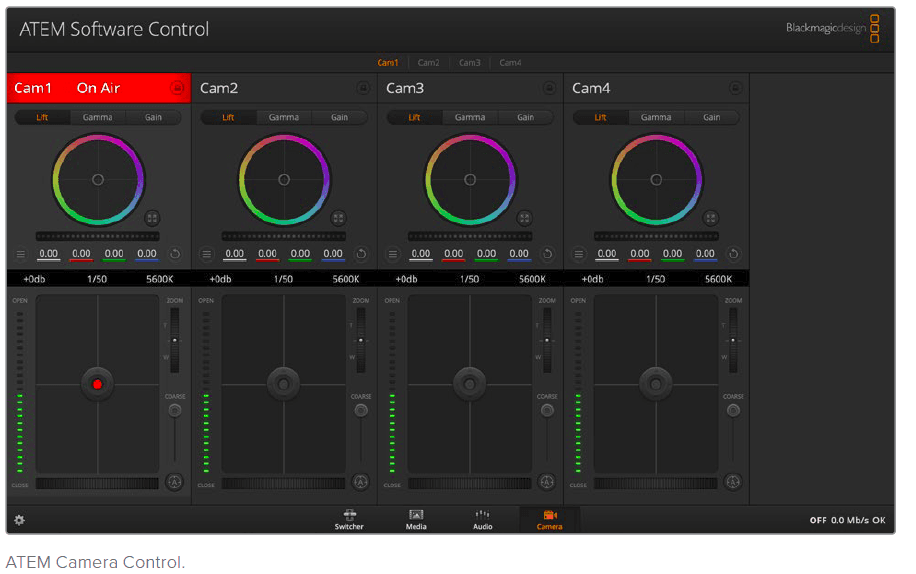
- Clicking on the ‘camera’ button in ATEM Software Control opens the camera control feature that lets you control Blackmagic Pocket Cinema Camera 4K and 6K from your ATEM Mini. Camera settings such as iris, gain, focus, detail and zoom control are easily adjusted using compatible lenses, plus you can color balance cameras and create unique looks using the DaVinci Resolve primary color corrector that’s built into the camera.

- Camera Control Panel
Launch ATEM Software Control and click on the ‘camera’ button located at the bottom of the software window. You’ll see a row of labeled Blackmagic camera controllers containing tools to adjust and refine each camera’s image. The controllers are easy to use. Simply click the buttons using your mouse, or click and drag features to adjust. - Camera Control Selection
The button row at the top of the camera control page lets you select the camera number you would like to control. - Channel Status
The channel status at the top of each camera controller displays the camera label, On Air indicator and lock button. Press the lock button to lock all the controls for a specific camera. When on air, the channel status illuminates red and displays the On Air alert.
Using Macros
What is a Macro?
- A macro is an easy way to automate a sequence of switcher actions so you can repeat the sequence at the press, or click, of a button. For example, you can record a sequence of transitions between several video sources, including key effects, audio mixer adjustments, camera control settings and more. Record all your actions to a macro button, then when you press that button all your recorded actions will be instantly performed. Macros are recorded using the macros window in ATEM Software Control and are stored inside your ATEM Mini. You can run all your recorded macros using the software control panel.
Changing Switcher Settings
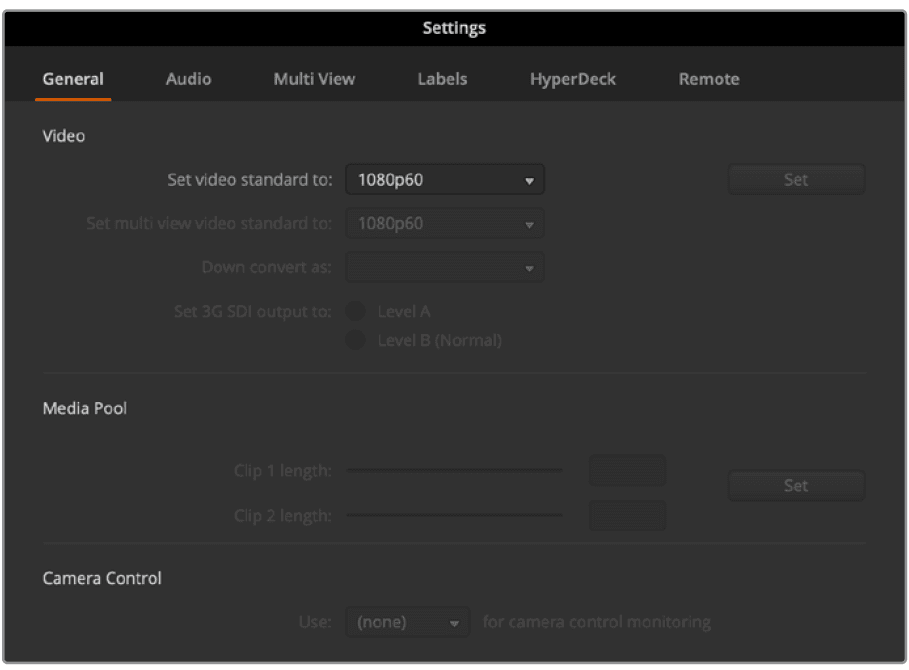
- Clicking on the switcher settings ‘gear’ icon will open the settings window where you can change general switcher settings, audio, label, HyperDeck and remote settings. These settings are divided into tabs. If you are using ATEM Mini Pro or Extreme switchers, you will also have a multiview settings tab.

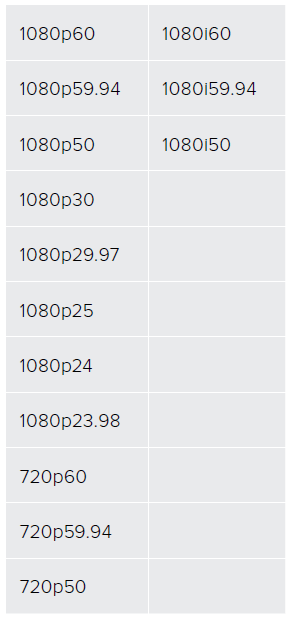
- Supported Video Input Standards

Setting Audio Input and Output Behavior
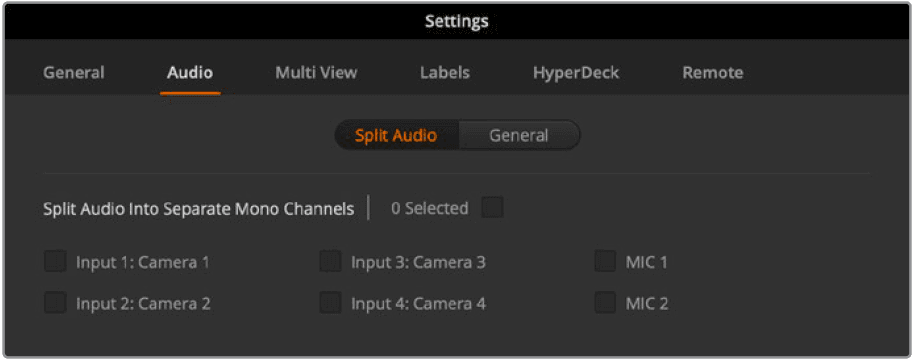
- The ‘audio’ tab lets you control the nature of the audio follow video feature plus set the mic inputs to mic or line level audio. Microphones typically have weaker signals compared to line outputs from other audio devices. This means when mic is selected, the input is boosted slightly to compensate. This also means that if mic is accidentally selected when a line level input is plugged in, the audio will sound unusually loud. If the audio sounds much louder than it should be, check that line is selected instead of mic

Labels Settings
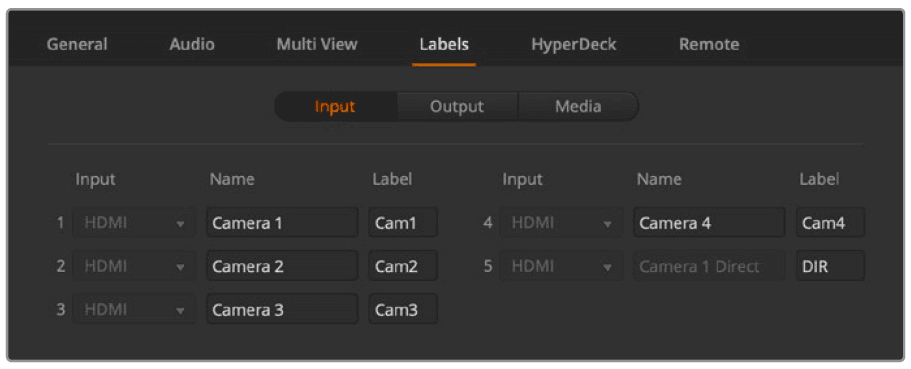
- The input labels settings let you customize the name of each input using a long and short name. The short name will appear on the switcher input buttons on the software panel. The short 4 character name is used to identify the video input on the source names display. The longer input names support up to 20 characters and are displayed in various menu selection boxes on the software control panel and on the ATEM advanced panel displays.
For more manuals by Blackmagic Design, visit ManualsLibraryy
Blackmagic Design ATEM Mini Pro-FAQs
What is the purpose of the ATEM Mini Pro?
The ATEM Mini Pro allows you to edit live events by recording multiple video streams, including clean feeds of all inputs and programs, simultaneously.
What format does the ATEM Mini Pro record in?
It records in H.264 format and supports recording to USB disks.
What are the output options of the ATEM Mini?
The ATEM Mini features a USB output for streaming, functioning like a webcam, and an HDMI output for projectors.
Can you use the ATEM Mini without software?
Yes, the ATEM Mini can function as a standalone vision mixer using its front panel buttons.
Is the ATEM Mini Pro an encoder?
Yes, the ATEM Mini Pro is a switcher and hardware encoder, allowing streaming to various platforms.
Does the ATEM Mini have audio input?
Yes, it has 2 dedicated audio input sources and supports switching between multiple HDMI video sources.
What does “ATEM” mean in Blackmagic Design?
“ATEM” is the family name of switcher products, inspired by the Egyptian god, Atum.
Is the ATEM Software Control free?
Yes, the ATEM Software Control for Mac and Windows is free and included with the product.
Can the ATEM control other cameras?
Yes, it can remotely control up to four cameras, including Blackmagic URSA and Studio models.
What does “DVE” stand for in ATEM?
“DVE” stands for Digital Video Effect, used for Picture-in-Picture overlays and other effects.
What is the primary function of the ATEM Mini Pro?
The ATEM Mini Pro is designed for professional multi-camera productions and integrates with streaming platforms and software.










 The audio mixer displays tally lights for any audio sources that are currently on air or when AFV is selected, as well as audio level, audio balance and buttons for selecting which audio should be used.