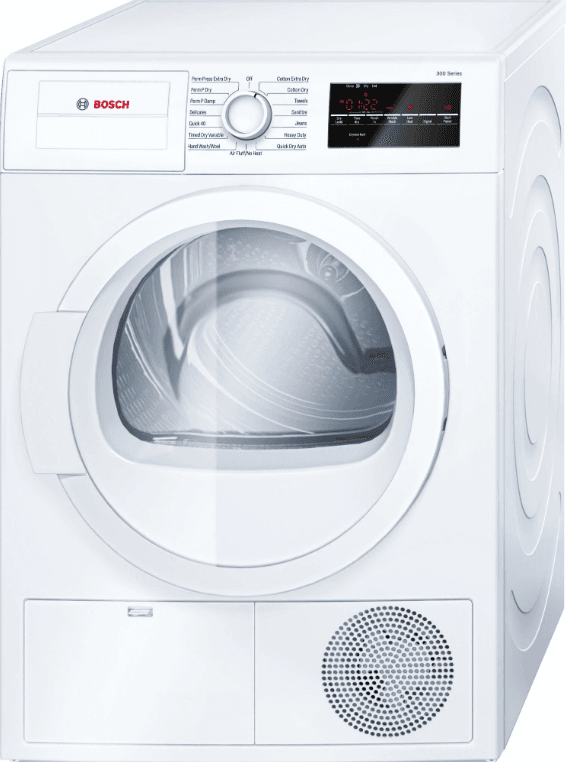
Bosch WTVC533 Vision 500 Series Electric Clothes Dryer
Important Safety Instructions
- Read all instructions before using the dryer. Bosch dryers are
provided with Operating, Care, and Installation Instructions. - Do not dry articles that have been previously cleaned, washed,
soaked, or spotted with gasoline, dry cleaning solvents, or other
flammable or explosive substances, as they give off vapors that could ignite or explode. To reduce the risk of fire, clothes,
cleaning rags, mop heads, and the like, that have traces of any flammable substance, such as vegetable oil, cooking oil,
petroleum-based oils or distillates, waxes, fats, etc., must not be placed in the dryer. These items may contain some flammable substance(s), even after washing, which may smoke or catch fire by themselves. Do not place items exposed to
cooking oils in your dryer. Items contaminated with cooking oils may contribute to a chemical reaction that could cause a
laundry load to catch fire. - The dryer must only be used for its intended purpose.
- When children become old enough to operate the appliance, it is the responsibility of the parents or legal guardians to ensure that they are instructed in safe practices by qualified persons.
- Do not allow children to play on or in the appliance at any time; severe injury or death could result. Children should be kept a safe distance away from appliances at all times. Children should only be permitted within an appliance’s vicinity if under close, constant adult supervision.
- Do not allow children’s toys, or other items that might encourage children to climb on the dryer, to be stored on or in the dryer, or on shelves or in cabinets or other storage areas adjacent to the dryer.
- Do not sit or stand on the top of the dryer.
- Do not allow anyone to climb, lean, or hang on any part of the dryer, including any protruding components such as the appliance door or a pullout shelf.
- To reduce the risk of poisoning or chemical burns, keep all cleaning products out of the reach of children.
- Store all laundry chemicals and aids in a cool, dry place according to the manufacturer’s instructions. Make sure children cannot reach them. Gasoline, combustible materials, and materials that produce flammable vapors, flammable liquids, and substances that pose a fire hazard must not be
stored near the dryer. - Keep pets away from the dryer.
- BEFORE THE APPLIANCE IS REMOVED FROM SERVICE OR DISCARDED, REMOVE THE DOOR TO THE DRYING
COMPARTMENT. - Do not reach into the appliance if the drum is rotating.
- Do not install or store this appliance where it will be exposed
to the weather or the elements, such as water/moisture, dirt,
corrosive/salt air, and excessive cold. - Do not tamper with the controls.
- Do not repair or replace any part of the appliance or attempt any service unless specifically recommended in the user-maintenance instructions or in published user repair instructions that you understand and have the skills to carry out.
- Do not use fabric softeners or products to eliminate static unless recommended by the fabric manufacturer.
- Do not use heat to dry articles containing foam rubber (may be
labeled latex foam) or similarly textured rubber-like materials.
Foam rubber materials can ignite by spontaneous combustion. - Do not dry articles containing spunbonded olefin. Spunbonded
olefin can melt and can ignite by spontaneous combustion. - Check the lint screen before each laundry load and clean as needed. Excess lint buildup can damage the dryer and create a potential fire hazard.
- Keep the area around the exhaust opening and the adjacent surroundings areas free from the accumulation of lint, dust, and dirt. An obstructed port might reduce the airflow and cause overheating.
- The interior of the machine and the exhaust duct should be cleaned
periodically by qualified service personnel. - Removing any panel or cover, including the light cover, may expose live electrical circuits. Removing any panel, including the round service panel in the front, can also expose sharp edges and points as well as hot surfaces. Always unplug the dryer from the electrical supply before attempting any service. Disconnect the power cord by grasping the plug, not the
cord. - To avoid fire hazards, do not use an extension cord, an adapter, or any other non-manufacturer-supplied electrical connector or
cord, to connect the dryer to the electrical supply. - Always check clothing pockets and shake out all laundry items
INSTALLATION INSTRUCTIONS
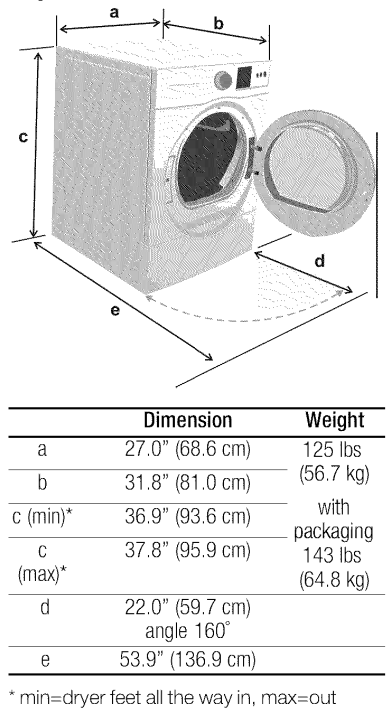
Dryer Dimensions
Useful Tools
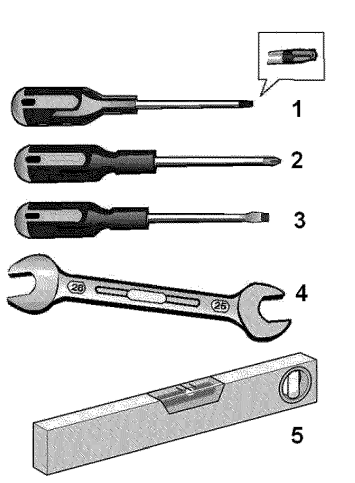
The following tools are helpful during installation:
- T20 star head screwdriver
- Philips screwdriver (#2)
- Flat blade screwdriver
- Open-end wrench 1 in. (25mm)
- Bubble level
Checklist for Installation
- Unpack the dryer.
- Remove all objects from the drum.
- Check the dryer for visible damage.
- Position the dryer near the installation location (see page 8).
- If required, change the door hinge to the left (see page 9).
- If needed, install the side or bottom exhaust air outlet on the
dryer (see page 19). - Have the gas supply connected by a qualified technician (see page 15).
- Install exhaust ductwork if necessary. Follow the installation instructions supplied by the appropriate ductwork parts manufacturers (see page 18).
- Move the dryer to its final location.
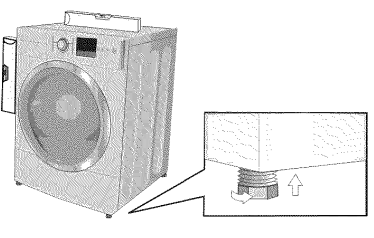
- Position and then level the dryer.

- Connect the exhaust duct to the exhaust air outlet on the dryer (see page 16).
- Insert the dryer electrical plug into the wall receptacle (see page 15).
- Open the shut-off valve.
- Read the operating instructions to understand how your dryer
operates. (see page 21). - Conduct an appliance test:
- Check that the drum is empty.
- Close the dryer door.
- Switch the dryer to “Extra Dry” and then press the “Start/Pause” button.
- After 3-5 minutes, press the “Start/Pause” button and open the door.
- If the interior of the dryer feels warm, the dryer has been
connected properly. Switch the dryer to “OFF”. - If the dryer does not work, switch the dryer to “OFF”. Look in the troubleshooting section (page 31) and find the
fault.
Door Hinge Reversal
The door is hinged on the right-hand side of the dryer at the factory. The door hinge can be reversed if necessary.
Tools Needed: T20 star head screwdriver
Hinge Reversal Parts: Hinge (with 4 white plastic bushings)
Hinge Cover Plate Door Assembly
Hinge Reversal Procedure
- Unplug the dryer.
- Prepare a firm, flat, padded surface to lay the dryer door on
while changing the hinge. - Open the dryer door to fully expose the hinge cover.
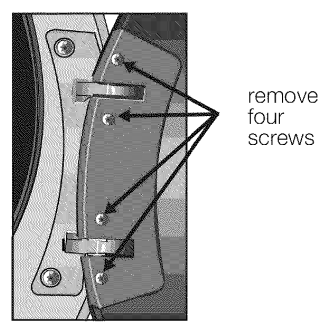
- Remove the 4 screws holding the hinge cover in place.

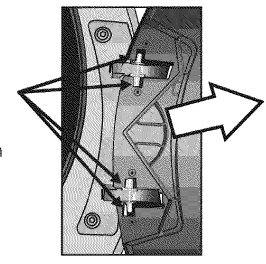
- Rotate the door so that it is perpendicular to the dryer front.
Slide the door away from the dryer so the hinge pins slide out of the grooves in the dryer door.
- Lay the dryer door face down on a firm, flat, padded surface, with the bottom of the door facing towards you.
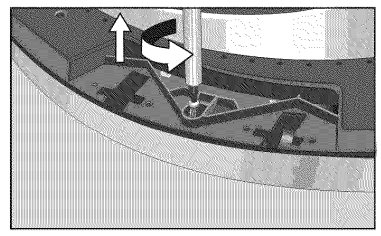
- Remove the single screw that was hidden by the hinge cover plate

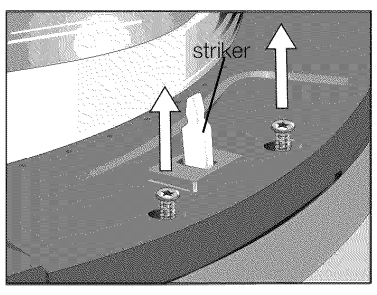
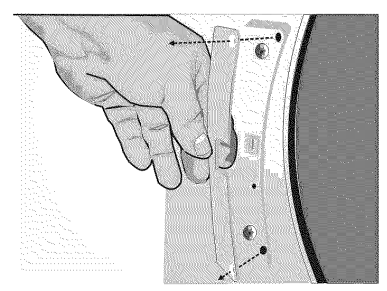
- Remove the two screws holding the striker cover plate in place.
Hold the striker while lifting the cover to keep the parts
together in place, and set the assembly aside for later reinstallation.
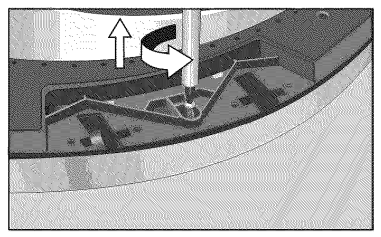
- Remove the single screw that was hidden by the striker plate cover.

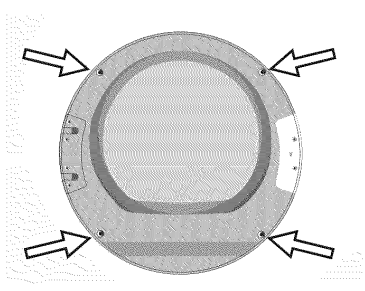
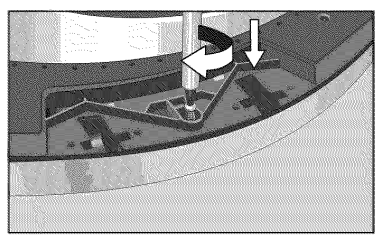
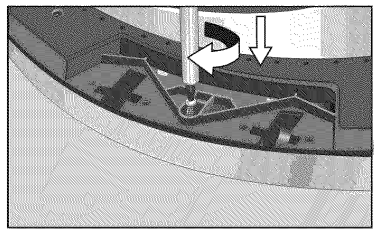
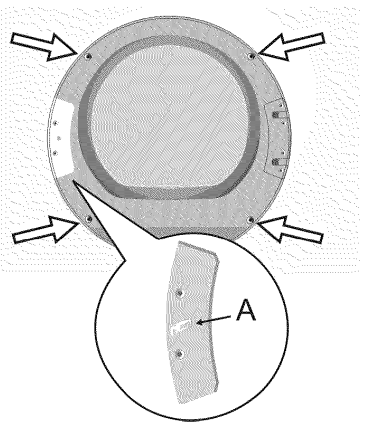
- Remove the four screws holding the front ring to the door body.

- Flip the door over so the front ring faces up.
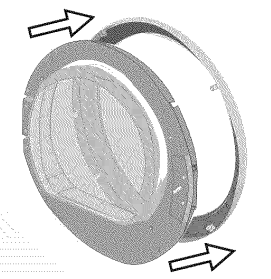
- Remove the front ring from the dryer door.

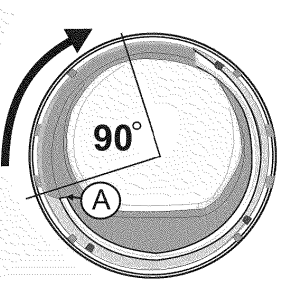
- The cover glass has a raised glass edge that goes about two-thirds of the way around the glass. Be sure, this raised edge faces up towards you. Observe the position of the leading edge of the raised glass handle, marked in the illustration below as (А).

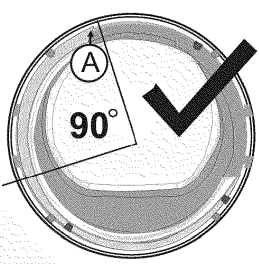
- Note the new position of the cover glass. The leading edge of the raised glass edge should have moved 90 degrees clockwise from its starting point, as shown in the illustration below as (A).

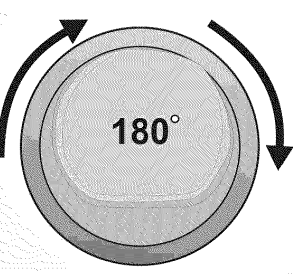
- Rotate the front ring 180 degrees so the door handle is now on the right-hand side. The door handle is located on the inside of the front ring. It is a hand-sized indent.

- Flip the door over so the back faces up.
- Reassemble the parts, preserving their new alignments.
- Reinsert the single screw that goes under the hinge cover plate. Tighten the screw securely.

- Reinsert the single screw that goes under the striker plate. Tighten the screw securely.

- Rotate the striker cover and striker 180 degrees so the assembly fits into the installation area on the opposite side of the door (where the hinge had been). Reinstall the striker cover and striker to the new location and securely tighten the two cover screws.
- Reinsert and tighten the four front ring screws.

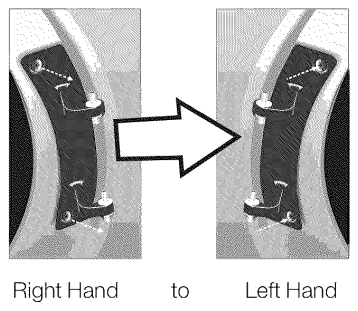
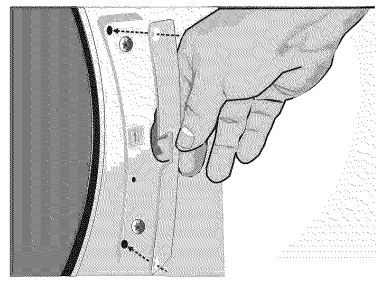
- Remove the two screws holding the plastic cover plate over the left-hand hinge mounting position on the dryer housing. Remove the plate and set it aside with the two screws.

- Remove the two screws holding the metal door hinge to the dryer housing. Remove the hinge from the housing.

- Reattach the door hinge to the dryer housing at the left side of the dryer door opening. Tighten both screws completely, making sure they hold the hinge securely.
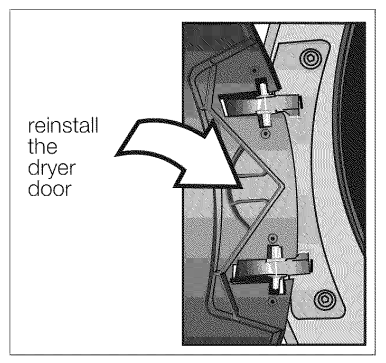
- The door is now ready to be mounted back on the dryer.
- Reinstall the dryer door by sliding it onto the hinge pins. Avoid allowing the four plastic bushings to fall off the hinge pins. If any fall off, reinstall them on the hinge pins before reinstalling the dryer door.

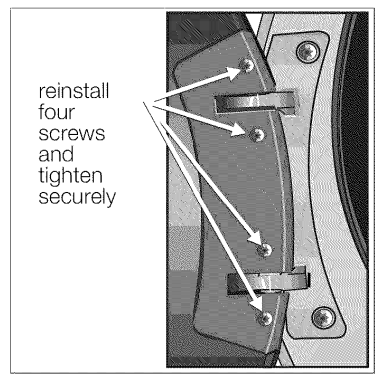
- Reinstall the hinge cover plate removed in step 4. Insert and tighten the 4 screws holding the hinge cover plate in place.

- Install the plastic cover plate over the original hinge position at the right-hand side of the dryer door opening. Insert and tighten the two screws holding the plate in place.

- Test that the door opens and closes properly. The door should
latch securely. The hinge reversal process is complete.
OPERATING INSTRUCTIONS
Panel
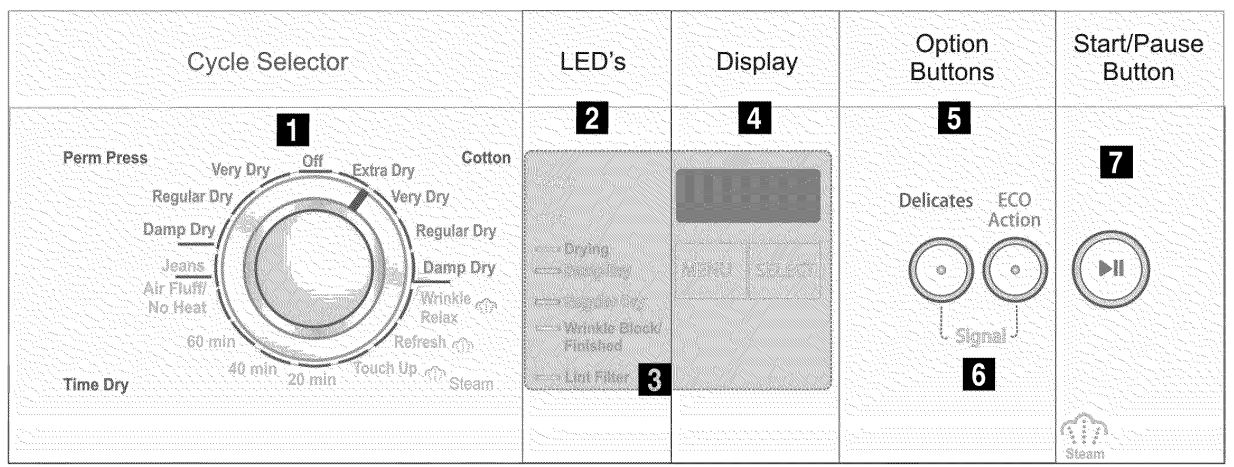
- Cycle Selector: Switches the machine on and off and selects the program (see page 23). It can be turned in both directions. To switch off the dryer, rotate the cycle selector to “Off”.
- LED Indicator Lights: LED lights light up in sequence to show the current moisture state of the drying process. Wrinkle Block®/Finished – at the end of the drying cycle, an acoustic
signal sounds and the Wrinkle Block/Finished LED lights up. The drum rotates at specific intervals for one hour to prevent the laundry from creasing (see page 24). - Lint Filter LED: Blinks as a reminder to clean the lint filter after use. Blinks for 10 seconds when the door is opened after a cycle ends, or if airflow is reduced enough to create a “CLn” or “E:12” error (see troubleshooting guide, page
31). - Display: The 300 and 500 Series LED countdown indicates the estimated remaining time of a running cycle (in minutes).The
800 Series indicates the settings of additional options and the
estimated remaining time of programs. (See page 26) The Additional Options Menu selects one of the additional options
Select changes the settings of the selected option - Option buttons: Add functions to the cycle selected. The option button LED is lit when the option is selected. Press the option
button again to turn the option off (LED turns off). Delicates: Press for temperature-sensitive textiles (e.g., acrylic fibers). The temperature of the drying process is reduced, and the drying time is extended correspondingly. ECOAction: Press for additional energy savings (use only for cotton and permanent press cycles). Press the option button before starting an automatic cycle. - Signal 300 and 500 Series Press both option buttons at the same time to enable the acoustic signal. When the cycle is finished, an audible beeping tone will be emitted (see page 23). Press both buttons again to disable the signal.
800 Series The 800 Series signal is set using the LCD menu (see page 26). - Start/Pause Button: Starts, interrupts, and ends the drying
process. Start/Pause LED Status Lit Red: Program is running and “Pause” can be activated. Blinking: Settings can be changed, the drying cycle can be started, or the program is in “Pause” mode. Not Lit: Cycle is finished, or there is no cycle selected.
Cleaning and care
Cleaning the exhaust duct
Inspect and clean the exhaust ducting at least once a year to prevent
clogging. A partially clogged exhaust will lengthen the drying time and will result in poor performance of the dryer.
- Turn off the circuit breaker
- Unplug the dryer from the power supply.
- Disconnect the duct from the dryer.
- Vacuum the inside of the duct to remove any accumulation of lint or debris.
- Reconnect the duct. Professional duct cleaning is recommended. See page 18.
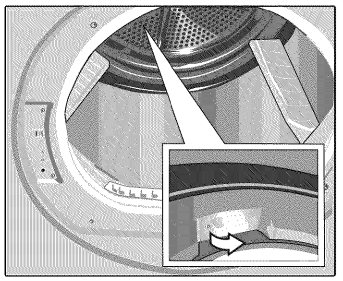
Cleaning the moisture sensor
The moisture sensor has to be cleaned periodically because a fine layer of transparent buildup is deposited on the sensor.
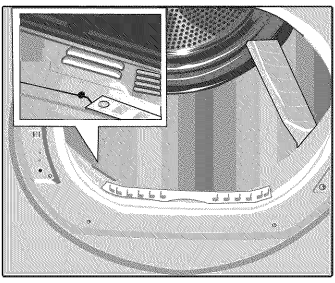
This deposit can easily be removed by wiping the sensors (the two bars next to the lint filter) with a cloth and a little white vinegar.
Cleaning the lint filter housing
Lint and small debris may accumulate in the lower portion of the lint filter opening. With the lint filter removed, accumulated lint can be seen and easily removed with a vacuum cleaner using a narrow crevice cleaning tool. If you do not have a crevice cleaning tool that will reach the bottom of the opening, you may contact Customer Service for a list of sources and recommended attachments.
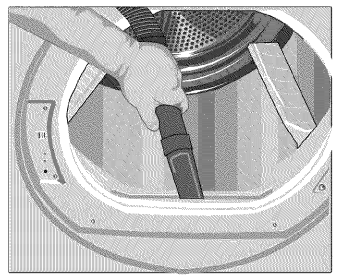
Any accumulation of lint or debris should be removed at least once a month using your vacuum cleaner.
Cleaning the Steam nozzle
Once a year, inspect the nozzle outlet. If you suspect blockage, wipe the outside of the nozzle with a cloth moistened with vinegar. If the nozzle is completely blocked, consult the troubleshooting guide (see page 32) for removal and cleaning instructions. If the nozzle remains blocked, call customer service (see page 33).
Change the light bulb.
The dryer light turns on inside the drum when you open the door and stays on for about 5 minutes or until the door is closed. The light turns off about 4 seconds after the door is closed. To change the light bulb:
- Set program selector to “Off”.
- Turn off the circuit breaker.
- Unplug the dryer from the power supply.
- Open the door and locate the dryer light on the upper left side of the seal.

- Loosen the screw and open the dryer light cover.
- Turn the bulb counterclockwise. Replace the bulb with a new appliance bulb only (obtainable through the parts department).
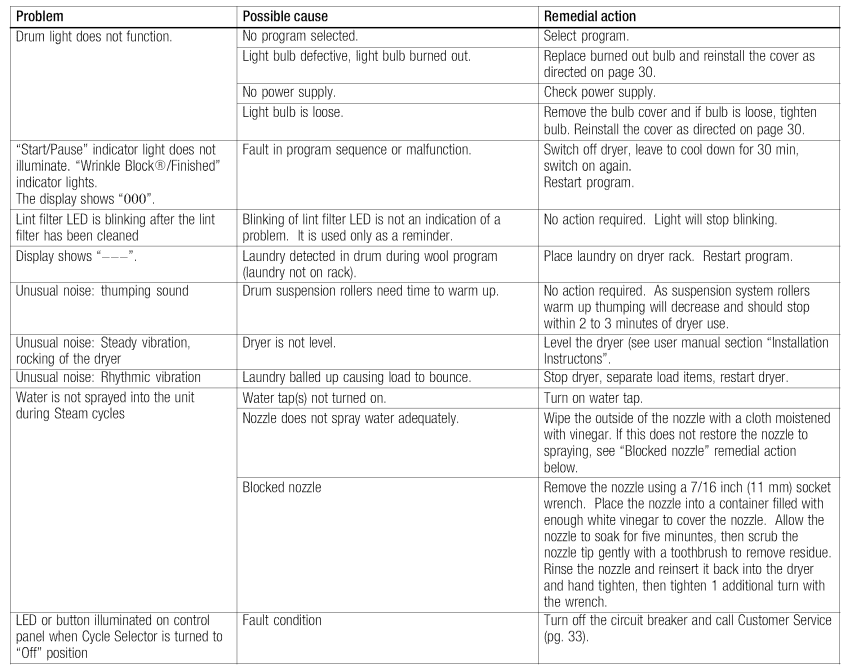
Troubleshooting
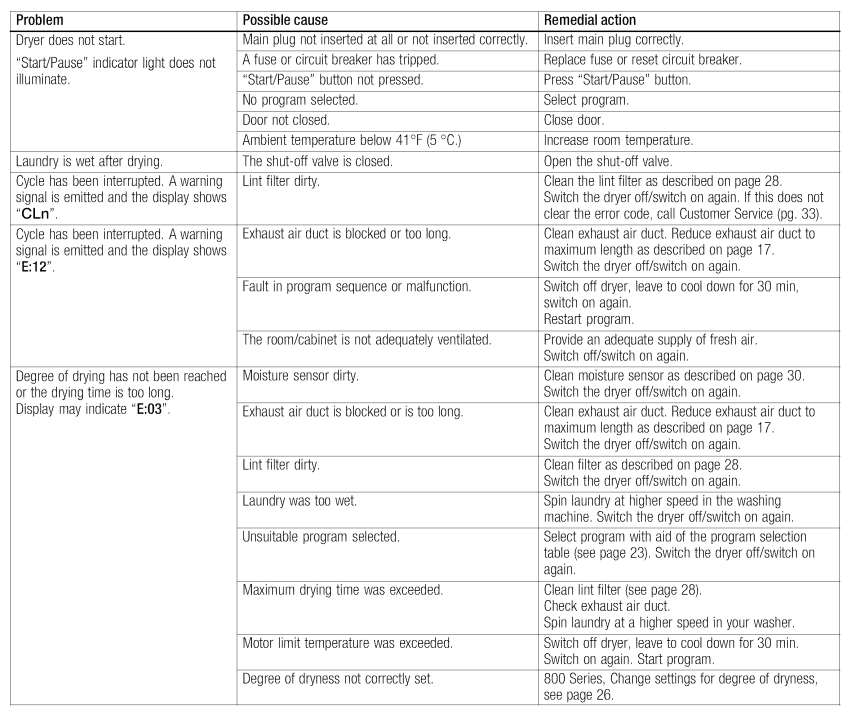
Before calling Customer Service, check whether you can rectify the fault yourself by means of the following table. If a fault cannot be rectified or a repair is required:
- Set program selector to “Off”.
- Turn off the circuit breaker.
- Pull the main plug out of the socket.
- Call customer service (see page 33).
FOR MORE MANUALS BY BOSCH, VISIT MANUALSLIBRARYY
Bosch WTVC533 Vision 500 Series Electric Clothes Dryer-FAQs
How long does a Bosch dryer take to dry clothes?
Most Bosch dryers dry clothes in under 60 minutes, using efficient tumble drying and hot air circulation.
How do I clean the filter on my Bosch 500 Series dryer?
Remove the lint filter after every cycle.
Wipe it with a damp cloth or rinse under water (let it dry fully before reinserting).
For deep cleaning, use a soft brush or vacuum to remove trapped lint.
Why is my Bosch dryer not drying clothes properly?
Possible causes:
Clogged lint filter (clean after every use).
Blocked vent hose (check for obstructions).
Overloaded dryer (reduce load size for better airflow).
What does the “CrE” code mean on my Bosch dryer?
“CrE” is a maintenance reminder, not an error. Clean the lint filter and check the exhaust vent for blockages.
Why does my Bosch dryer smell like burning?
Lint buildup in the filter or vent (clean immediately).
Overheating motor (let the dryer cool down and check for obstructions).
How do I unlock my Bosch dryer?
If the key symbol appears, the control lock is activated. Press and hold the “Start/Stop” button for 3 seconds to unlock.
Where is the moisture sensor on a Bosch dryer?
Located near the lint filter (two metal strips). Clean it with a damp cloth and vinegar to ensure accurate drying.
What is the “Easy Care” setting on my Bosch dryer?
This setting is for synthetic fabrics (polyester, nylon)—uses medium heat to prevent wrinkles and shrinkage.

