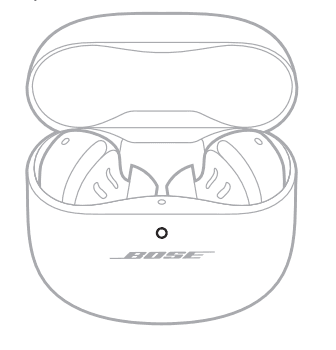
Bose QuietComfort Ultra Earbuds

CONTENTS
Confirm that the following parts are included


NOTE: Medium eartips are attached to the earbuds. For help identifying the eartip sizes, see page 17.

NOTE: Size 1 bands are attached to the earbuds. For help identifying the band sizes, see page 17.

NOTE: If any part of your product appears to be missing or damaged, don’t use it. Visit support.Bose.com/QCUE for troubleshooting articles, videos, and product repair or replacement.
The Bose Music app lets you set up and control the earbuds from any mobile device, such as a smartphone or tablet.
Using the app, you can verify the earbud fit, manage Bluetooth connections, manage earbud settings, adjust the audio, choose your voice prompt language, and get any future updates and new features made available by Bose.
NOTE: If you have already created a Bose account for another Bose product, see “Add the earbuds to an existing account.”
DOWNLOAD THE BOSE MUSIC APP
- On your mobile device, download the Bose Music app.
NOTE: If you’re located in Mainland China, download the Bose app.
- Follow the app instructions.
ADD THE EARBUDS TO AN EXISTING ACCOUNT
To add your Bose QuietComfort Ultra Earbuds, open the Bose Music app and add your earbuds.
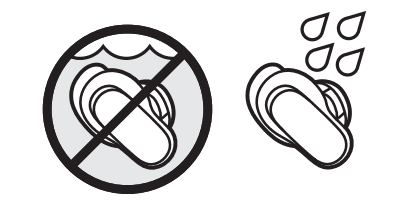
The earbuds are rated IPX4 water resistant. They are designed to be sweat and weather resistant but aren’t meant to be submerged under water.
CAUTIONS:
- Do NOT swim or shower with the earbuds.
- Do NOT submerge the earbuds.
NOTES:
- To prevent corrosion, regularly clean the charging contacts on the earbuds with a dry, soft cotton swab or equivalent.
- IPX4 isn’t a permanent condition, and resistance might decrease as a result of normal wear.
INSERT THE EARBUDS
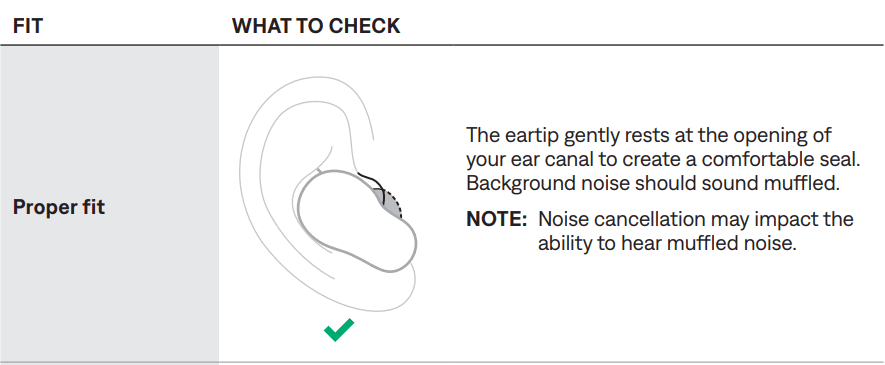
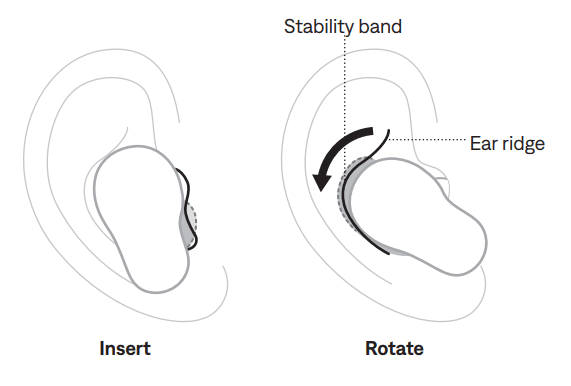
- Insert the earbud so the eartip gently rests at the opening of your ear canal.
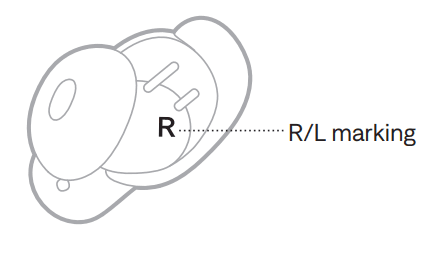
NOTE: Each earbud is marked with either an R (right) or L (left).
- Slightly rotate the earbud back until the eartip creates a comfortable seal at your ear canal and the stability band rests against your ear ridge.
NOTE: You may need to rotate the earbud back and forth for the eartip to create a comfortable seal. However, rotating it too far back or forward may impact the audio and microphone sound quality.
- Check the fit (see page 15).
- Repeat steps 1 – 3 to insert the other earbud. When you insert the earbuds, the audio is personalized to your ears for the best audio performance and noise cancellation.
NOTE: If you’re sharing the earbuds, place them in the charging case to clear the audio personalization between each user.
CHECK YOUR FIT
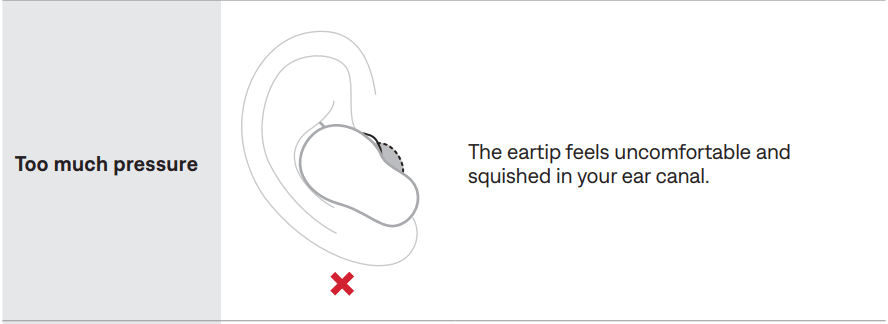
For the best fit, audio performance, and noise cancellation, use a mirror to make sure you’re using the correct size eartips and stability bands. You may need to try a different size eartip or stability band for each ear.
TIP: You can also check your fit using the Earbud Seal Test in the Bose Music app. You can access this option from the Settings menu.
Eartips
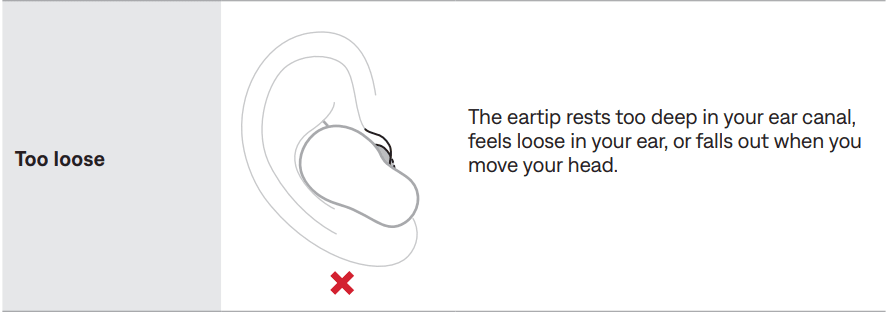

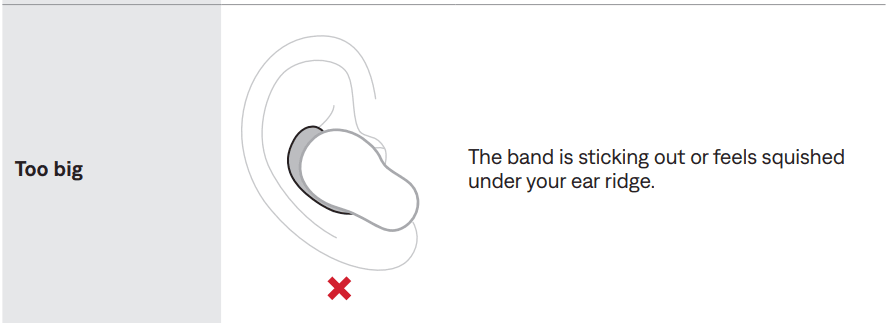
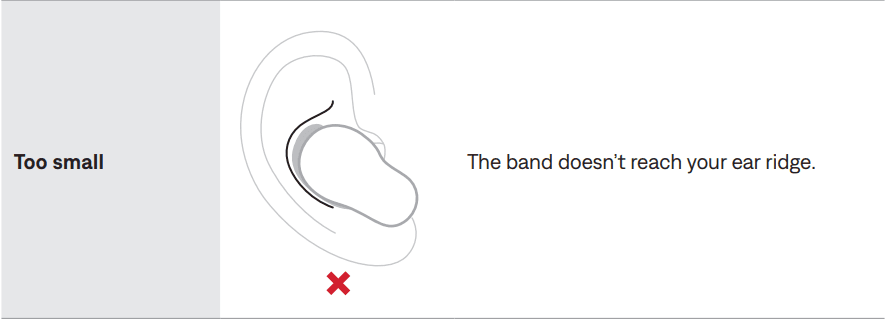
TRY ANOTHER SIZE
Wear the earbuds for an extended period of time. If the earbuds don’t feel comfortable or secure, or noise cancellation or sound quality isn’t as expected, try another size eartip or stability band. You may need to try all three eartip or band sizes or use a different size eartip or band for each ear.
Eartips
Three sizes of eartips are included with the earbuds: small, medium, and large.
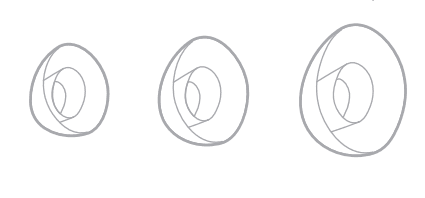
Medium eartips come attached to the earbuds. If they feel too small, try large eartips. If they feel too big, try small eartips.
Stability bands
The stability bands are marked with size 1 (small), 2 (medium), or 3 (large) and an R (right) or L (left).
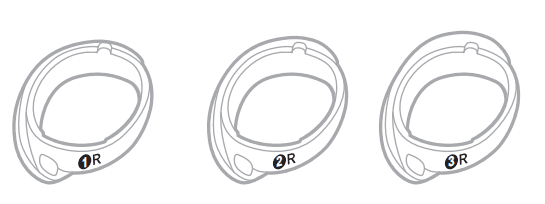
Size 1 bands come attached to the earbuds. If they feel too small, try size 2 bands.
CHANGE THE EARTIPS
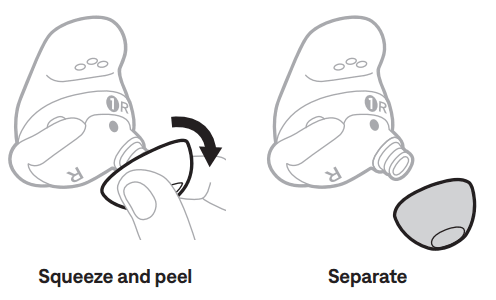
- Holding the earbud, gently squeeze the eartip and peel it away from the earbud.
 CAUTION: To prevent tearing, do NOT pull on the edge of the eartip.
 - Choose a new eartip size (see page 17).
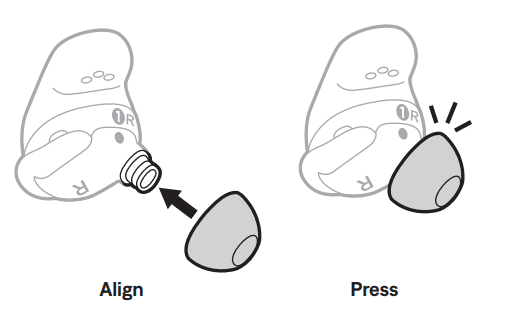
- Align the eartip with the earbud nozzle and press the eartip onto the nozzle until you feel it snap securely into place and hear it click.

- Repeat steps 1 – 3 for the other earbud as needed.
NOTE: You may need to use a different size eartip for each ear. - Insert the earbuds (see page 14).
- Check the fit (see page 15).
NOTES:
- If you change the eartip, you may need to change the stability band so the band rests comfortably against your ear ridge (see page 19).
- To see how-to videos about changing the eartips, visit: support.Bose.com/QCUE
- If you need additional eartip sizes, contact Bose customer service or visit support.Bose.com/QCUE
CHANGE THE STABILITY BANDS
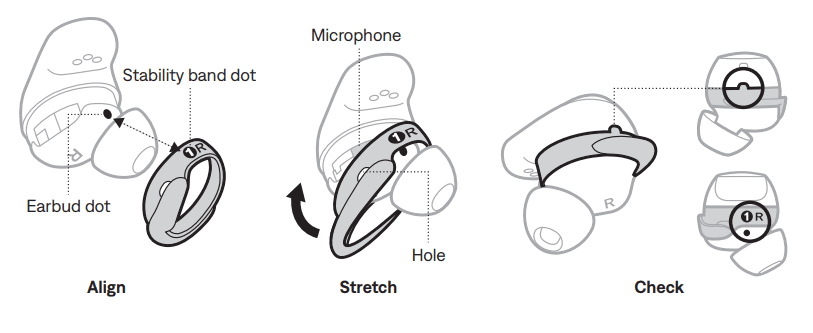
- Holding the earbud, gently grab the stability band scoop and peel the band toward you, over the eartip, and away from the earbud.
 CAUTION: To prevent tearing, do NOT pull on the thin part of the band.
 - Choose a new band size (see page 17). Select the band marked with either an R (right) or L (left), depending on the earbud.
- With the band markings facing you and the band scoop facing away from you, align the dot on the band with the gray dot on the bottom of the earbud.
- Gently stretch the band over the eartip, making sure the dots align and the tab on the band fits in the notch on the top of the earbud.
NOTE: Aligning the band correctly makes sure that the hole on the side of the band is over the earbud microphone so the microphone isn’t blocked. - Press down until the band fits securely into place, then check for alignment.

- Repeat steps 1 – 5 for the other earbud as needed.
NOTE: You may need to use a different size band for each ear. - Insert the earbuds (see page 14).
- Check the fit (see page 15).
NOTES:
- To see how-to videos about changing the bands, visit: support.Bose.com/QCUE
- If you need additional stability band sizes, contact Bose customer service or visit support.Bose.com/QCUE
POWER
POWER ON
Open the charging case.
The earbuds power on. The earbuds status light blinks white and then glows according to the charging status (see page 39). The charging case status light glows according to the battery level (see page 40).
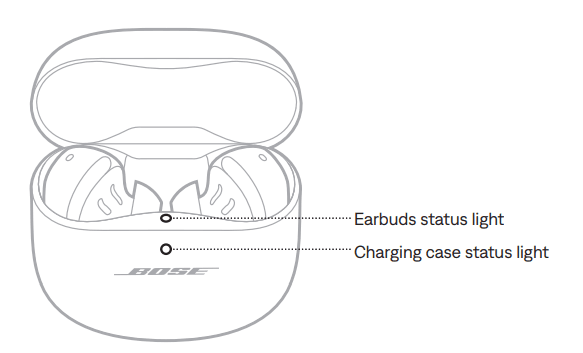 NOTE: When you remove the earbuds from the charging case, close the case to help preserve the battery life and keep the case free of debris.
POWER OFF
- Place both earbuds in the charging case.
 The earbuds disconnect from your mobile device.
 - Close the case.
The earbuds power off. The charging case status light glows according to the battery level (see page 40).
STANDBY
Standby conserves the earbud battery when an earbud is out of the case and not in use. The earbud switches to Standby when you remove it from your ear and don’t move it for 10 minutes.
To wake the earbud, insert the earbud in your ear.
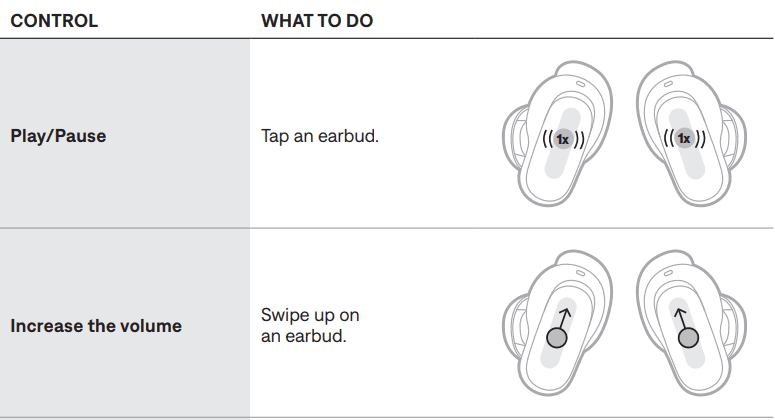
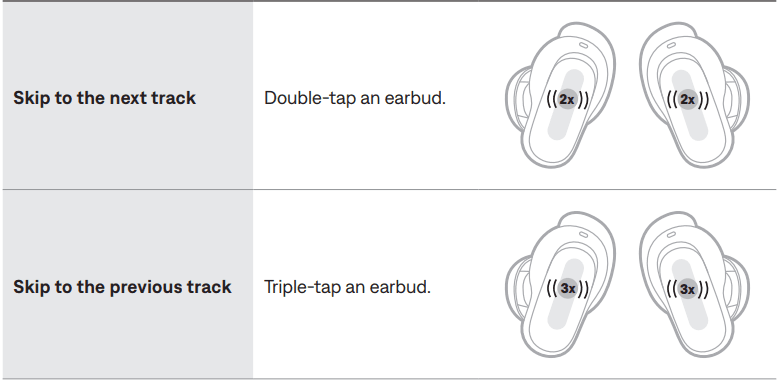
Use touch control by tapping or swiping the touch surface of either earbud. With touch control, you can play/pause audio, change the volume, perform basic call functions, and use a shortcut to change the mode or change immersive audio settings (see page 27).
TOUCH CONTROL
TOUCH SURFACE AREA
The touch surface is located on the outer surface of both earbuds. It controls media playback, volume, phone calls, and your shortcuts.

MEDIA PLAYBACK AND VOLUME

PHONE CALLS
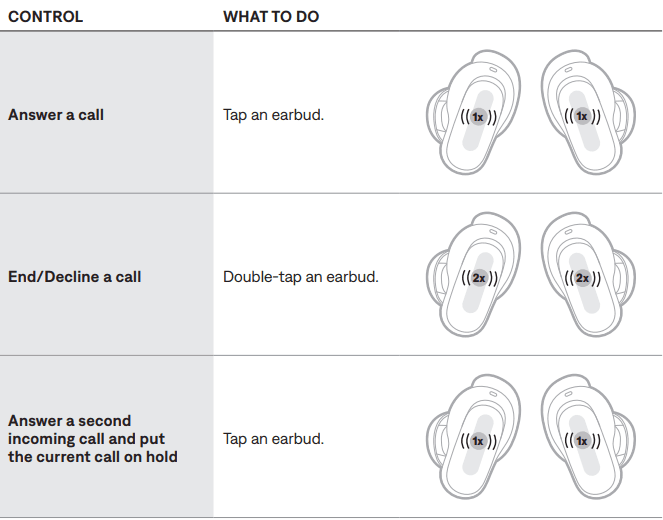

Call notifications
A voice prompt announces incoming callers and call status. To stop call notifications, disable voice prompts using the Bose Music app. You can access this option from the Settings menu.
MODES
For information about changing the mode, see page 33.
IMMERSIVE AUDIO SETTINGS
For information about changing the immersive audio setting, see page 31.
MOBILE DEVICE VOICE CONTROL
You can set a shortcut to access your mobile device voice control using the earbuds. The microphone on the earbuds acts as an extension of the microphone on your mobile device.
NOTE: To access mobile device voice control using the earbuds, it must be set as a shortcut (see page 27).
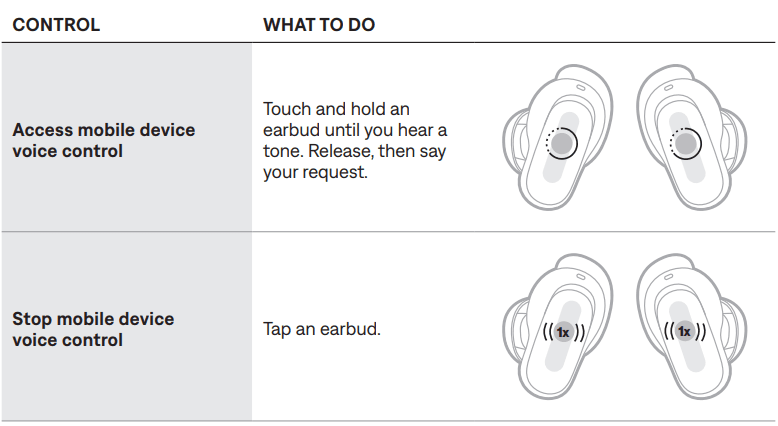
A shortcut enables you to quickly and easily access one of the following functions:
- Cycle through modes (see page 32)
- Cycle through immersive audio settings (see page 30)
- Use your mobile device voice control (see page 26)
NOTE: By default, cycling through modes is enabled on both earbuds.
USE YOUR SHORTCUT
Touch and hold an earbud.

CARE AND MAINTENANCE
STORE THE EARBUDS
When you’re not using the earbuds, store them in the charging case. Close the charging case to help preserve battery life and keep the charging case free of debris.
REPLACEMENT PARTS AND ACCESSORIES
Replacement parts and accessories can be ordered through Bose customer service. Visit: support.Bose.com/QCUE
LIMITED WARRANTY
The earbuds are covered by a limited warranty. Visit our website at worldwide.Bose.com/Warranty for details of the limited warranty. To register your product, visit worldwide.Bose.com/ProductRegistration for instructions. Failure to register will not affect your limited warranty rights.
UPDATE THE EARBUDS
The earbuds begin updating automatically when connected to the Bose Music app and an update is available. Follow the app instructions.
THE CHARGING CASE
Update the charging case using the Bose Updater website. On your computer, visit btu.Bose.com and follow the on-screen instructions.
TROUBLESHOOTING
TRY THESE SOLUTIONS FIRST
If you experience problems with the earbuds, try these solutions first:
- Charge the earbuds and the charging case (see page 34).
- Power on the earbuds (see page 21).
- Check the earbuds’ status light (see page 39) and the charging case status light (see page 40).
- Make sure your mobile device supports Bluetooth connections (see page 41).
- Download the Bose Music app and run available software updates (see page 12).
- Move your mobile device closer to the earbuds (30 ft or 9 m) and away from any interference or obstructions.
- Increase the volume on the earbuds, your mobile device, and the music app.
- Connect another mobile device (see page 12).
OTHER SOLUTIONS
If you could not resolve your issue, see the table below to identify symptoms and solutions to common problems. You can also access troubleshooting articles, videos, and other resources at: support.Bose.com/QCUE
If you’re unable to resolve your issue, contact Bose customer service. Visit: worldwide.Bose.com/contact
- SYMPTOM: Earbuds don’t power on
- SOLUTION:
- Make sure the earbuds aren’t in Standby mode. To wake the earbuds, insert the earbuds in your ears.
- Place both earbuds in the charging case until they magnetically snap into place. Close and re-open the case. The earbuds status light blinks white and then displays the charging status (see page 39).
- If the earbuds have been exposed to high or low temperatures, let the earbuds return to room temperature.
- See “Earbuds don’t charge” on page 61.
- SYMPTOM: Earbuds don’t reconnect with macOS
- SOLUTION:
- Use the Bose Music app to select your earbuds. On the main screen, tap Source, then use the Paired Devices list to reconnect your earbuds to your computer.
- SYMPTOM: Earbuds don’t respond during app setup
- SOLUTION:
- Uninstall the Bose Music app on your mobile device. Reinstall the app (see page 12).
- Ensure you’re using the Bose Music app for setup (see page 12).
- Ensure you have given the Bose Music app access to Bluetooth connections in your mobile device Settings menu.
- Ensure the Bluetooth feature is on in your mobile device’s Settings menu.
- SYMPTOM: Bose Music app doesn’t work on mobile devices
- SOLUTION:
- Make sure your mobile device is compatible with the Bose Music app and meets minimum system requirements. For more information, refer to the app store on your mobile device.
- Uninstall the Bose Music app on your mobile device. Reinstall the app (see page 12).
- SYMPTOM: Eartips are falling off
- SOLUTION:
- Make sure the eartips are securely attached to the earbuds (see page 18).
- SYMPTOM: Stability bands are falling off
- SOLUTION:
- Make sure the bands are securely attached to the earbuds (see page 19).
- Make sure the bands are positioned on the earbuds correctly (see page 19).
REBOOT THE EARBUDS AND CHARGING CASE
If the earbuds or charging case are unresponsive, you can reboot them.
NOTE: Rebooting the earbuds clears the earbud device list. It doesn’t clear other settings.
- Remove the earbuds from the Bluetooth list on your device.
- With the earbuds in the charging case and the case open, press and hold the button on the back of the case for 25 seconds until the earbuds status light blinks white 2 times, slowly blinks blue, and then turns off.
NOTE: Make sure both earbuds are in the case and the case is open.
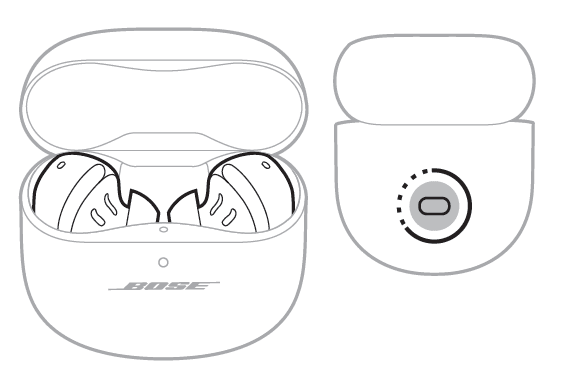
When the reboot is complete, the earbuds status light glows according to the charging status (see page 39), and the charging case status light glows according to the battery level (see page 40).
RESTORE THE EARBUDS TO FACTORY SETTINGS
A restore to factory settings clears all settings and returns the earbuds to their original out-of-box state. After, the earbuds can be configured as if they were being set up for the first time.
Restoring to factory settings is only recommended if you are having issues with the earbuds or if you have been instructed to do so by Bose customer service.
- Remove the earbuds from the Bluetooth list on your device.
- Remove the earbuds from your Bose account using the Bose Music app.
NOTE: For more information about how to remove the earbuds from your Bose account using the Bose Music app, visit: support.Bose.com/QCUE - With the earbuds in the charging case and the case open, press and hold the button on the back of the case for 25 seconds until the earbuds status light blinks white 2 times, slowly blinks blue, and then turns off.
NOTE: Make sure both earbuds are in the case and the case is open.
- Repeat the previous step 2 more times.
After the third time, the status light blinks amber for 3 seconds to indicate that factory settings are being restored.
When the restore is complete, the status light slowly blinks blue. The earbuds are now in their original out-of-box state.
NOTE: If you’re unable to resolve your issue, additional troubleshooting and support are available at: support.Bose.com/QCUE
For more manuals by Bose, visit ManualsLibraryy
Bose QuietComfort Ultra Earbuds-FAQs
How do I control the volume on Bose QuietComfort Ultra Earbuds?
Swipe up on the right earbud to increase the volume and swipe down to decrease it.
Are the Bose QuietComfort Ultra Earbuds waterproof?
They are rated IPX4, meaning they’re resistant to sweat and light splashes of water from any direction—but not fully waterproof or submersible.
How do I turn on or switch noise cancelling modes?
Touch and hold either earbud to cycle through noise cancelling modes. A voice prompt will let you know which mode is selected.
What sound modes are available on the Bose QuietComfort Ultra?
Default modes include Quiet, Aware, and Immersion. You can customize or add more modes using the Bose app under the “Modes” section.
How can I reduce background noise?
Touch and hold an earbud to switch to a noise cancelling mode like Quiet or Immersion. This helps reduce ambient noise effectively.
What do the touch controls on the earbuds do?
The touch surface lets you:
1. Play/Pause music
2. Skip tracks
3. Adjust volume
4. Answer or end calls
Just swipe or tap to use these functions.
How long does it take to fully charge the earbuds?
Place both earbuds securely in the case. A full charge takes about 2 hours.
What app do I need for the Bose QuietComfort Ultra Earbuds?
Use the Bose Music app, available on both iOS and Android, to customize modes, update firmware, and manage device settings.
How do I increase the volume?
Swipe up on the touch surface of the right earbud to raise the volume.


 CAUTION: To prevent tearing, do NOT pull on the edge of the eartip.
 CAUTION: To prevent tearing, do NOT pull on the thin part of the band.
 The earbuds disconnect from your mobile device.