
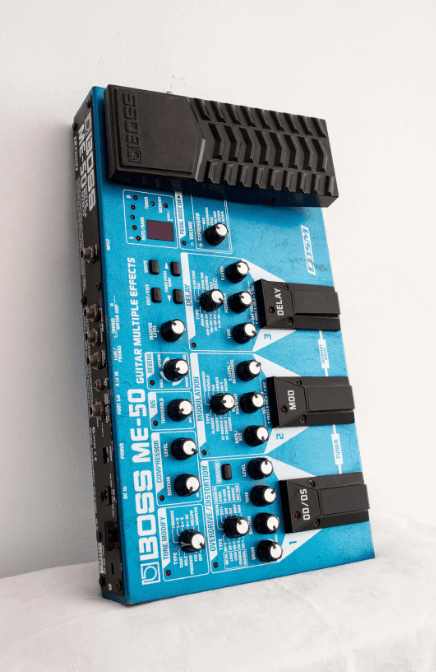
BOSS ME-50 Guitar Multiple Effects Pedal
IMPORTANT NOTES
Power Supply: Use of Batteries
- Do not use this unit on the same power circuit with any device that will generate line noise (such as an electric motor or variable lighting system).
- The AC adaptor will begin to generate heat after long hours of consecutive use. This is normal and is not a cause for concern.
- The use of an AC adaptor is recommended as the unit’s power consumption is relatively high. Should you prefer to use batteries, please use the alkaline type.
- When installing or replacing batteries, always turn off the power on this unit and disconnect any other devices you may have connected. This way, you can prevent malfunction and/or damage to speakers or other devices.
- Batteries are supplied with the unit. The life of these batteries may be limited, however, since their primary purpose was to enable testing.
- Before connecting this unit to other devices, turn off the power to all units. This will help prevent malfunctions and/or damage to speakers or other devices.
Placement
- Using the unit near power amplifiers (or other equipment containing large power transformers) may induce hum. To alleviate the problem, change the orientation of this unit, or move it farther away from the source of interference.
- This device may interfere with radio and television reception. Do not use this device in the vicinity of such receivers.
- Noise may be produced if wireless communications devices, such as cell phones, are operated in the vicinity of this unit. Such noise could occur when receiving or initiating a call, or while conversing. Should you experience such problems, you should relocate such wireless devices so they are at a greater distance from this unit, or switch them off.
- Do not expose the unit to direct sunlight, place it near devices that radiate heat, leave it inside an enclosed vehicle, or otherwise subject it to temperature extremes. Excessive heat can deform or discolor the unit.
Maintenance
- For everyday cleaning wipe the unit with a soft, dry cloth or one that has been slightly dampened with water. To remove stubborn dirt, use a cloth impregnated with a mild, non-abrasive detergent. Afterward, be sure to wipe the unit thoroughly with a soft, dry cloth.
- Never use benzine, thinners, alcohol, or solvents of any kind, to avoid the possibility of discoloration and/or deformation.
Additional Precautions
- Please be aware that the contents of memory can be irretrievably lost as a result of a malfunction, or the improper operation of the unit. To protect yourself against the risk of losing important data, we recommend that you periodically save a backup copy of important data you have written on the paper.
- Unfortunately, it may be impossible to restore the contents of data that was stored in the unit’s memory once it has been lost. Roland Corporation assumes no liability concerning such loss of data.
- Use a reasonable amount of care when using the unit’s buttons, sliders, or other controls; and when using its jacks and connectors. Rough handling can lead to malfunctions.
- When connecting/disconnecting all cables, grasp the connector itself—never pull on the cable. This way you will avoid causing shorts, or damage to the cable’s internal elements.
- Security Slot ( )
http://www.kensington.com/
Playing Sounds
Installing Batteries
* Batteries are supplied with the unit. The life of these batteries may be limited, however, since their primary purpose was to enable testing.
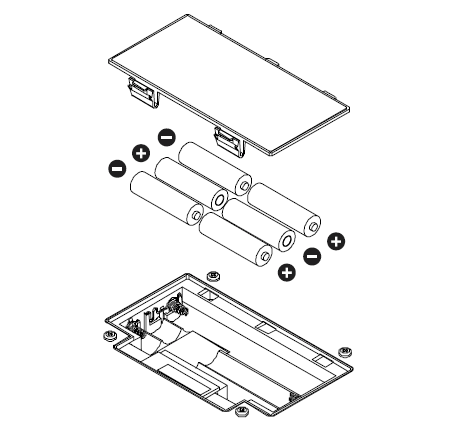
Insert the included batteries as shown in the figure, being careful to orient the batteries correctly.
Note:
- When turning the unit upside-down, get a bunch of newspapers or magazines, and place them under the four corners or at both ends to prevent damage to the buttons and controls. Also, you should try to orient the unit so no buttons or controls get damaged.
- When turning the unit upside-down, handle it with care to avoid dropping it, or allowing it to fall or tip over.
- Make sure the “+” and “-” ends of the batteries are oriented correctly.
- When the batteries run down, the POWER indicator gets dim. If this happens, replace it with new batteries.
- When replacing the batteries, use the six AA type.
- Avoid using new batteries together with used ones. In addition, avoid mixing different types of batteries. Doing so can result in fluid leakage.
- Battery life can vary depending on battery type.
Continuous usage time under battery power is about 12 hours with alkaline batteries and about 3.5 hours with carbon batteries.
(This may vary according to usage conditions.)
Making the Connections
The ME-50 is not equipped with any internal amplifier or speakers. To listen to sound with the ME-50, connect it to a guitar amp, stereo headphones, or other such sound equipment.
* To prevent malfunction and/or damage to speakers or other devices, always turn down the volume, and turn off the power on all devices before making any connections.
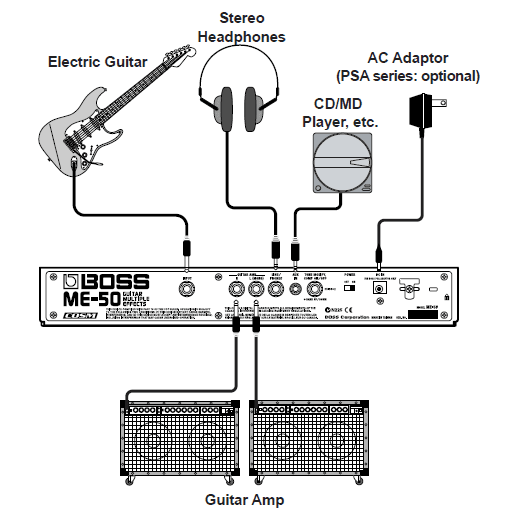
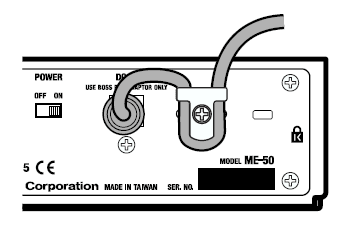
- To prevent the inadvertent disruption of power to your unit (should the plug be pulled out accidentally), and to avoid applying undue stress to the AC adaptor jack, anchor the power cord using the cord hook, as shown in the illustration.

- When outputting monaurally, connect a cable only to the OUTPUT L (MONO) jack.
- Do not use a cable containing a resistor to connect CD or MD players to the AUX IN jack.
- When you use the LINE/PHONES jack, the built-in guitar-amp simulator lets you enjoy impressive guitar sound, even with headphones.
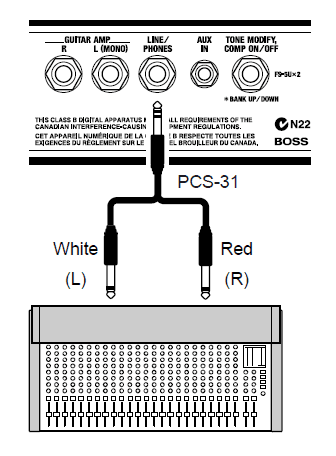
- Use a special cable (the optional PCS-31) to send output from the LINE/PHONES jack to equipment such as a mixer. Using an ordinary cable will cause only the left channel sound to be output.

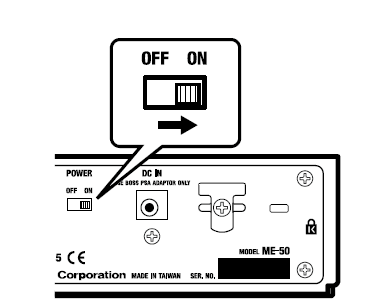
Turning on the Power
Once the connections have been completed, turn on the power to your various devices in the order specified. By turning on devices in the wrong order, you risk causing malfunction and/or damage to speakers and other devices.
- CD/MD Player)
- ME-50

- Guitar Amp / Stereo, Etc.
- * Turn up the volume on amps and other equipment only after all connections are completed and the power for connected devices is turned on.
- * This unit is equipped with a protection circuit. A brief interval (several seconds) after power-up is required before the unit will operate normally.
Adjusting the Volume
Adjust the ME-50’s volume with the MASTER LEVEL knob.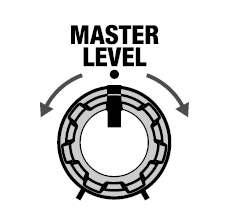
- * Raising the MASTER LEVEL knob too much may result in sound distortion.
- * When the effects are all off, input and output are at the same levels as when the MASTER LEVEL knob is at the center position.
- * The setting of the MASTER LEVEL knob is stored in memory for each Patch (p. 20).
If There Is No Sound/If the Volume is Low
- Are connections to other devices correctly made?
Check the connections once more. - Is the volume turned down?
Check the volume levels on any connected amp or mixer. - Can you hear sound through the headphones when the headphones are connected?
If you can hear sounds, it may be that there is a short in the cable used to connect the amp or other device, or perhaps a mistake in an external device’s settings. Check the connecting cables and external devices once more. - Has the level been lowered with the expression pedal?
Sounds are not output when the toe of the expression pedal is in the raised position while the pedal is set to function as a volume pedal. (p. 19) - Is the ME-50 in Tuner mode (p. 24)?
Output is muted in Tuner mode. - Is a cable containing a resistor being used to connect a CD or MD player to the AUX IN jack?
Using a cable containing a resistor may prevent sound from CD and MD players from being audible.
Turning Off the Power
- Turn down the volume of the ME-50 and any connected device.
- Turn off the power to Guitar Amp / Stereo, Multitrack Recorder, etc.
- Turn the ME-50’s power off.
Using the Effects
About the Effect Connection Sequence
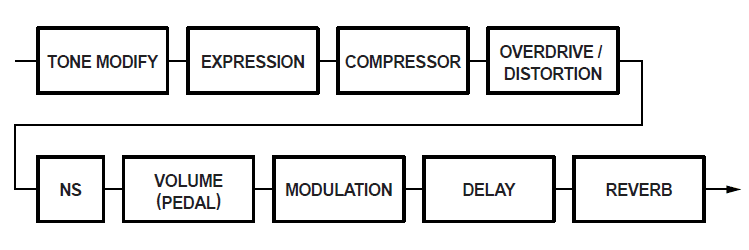
The ME-50 automatically selects the optimum sequence for connecting the effects according to the effect (p. 19) you select with the expression pedal.
- When WAH, RING MOD, +1OCTAVE, or -1OCTAVE is Selected

- When RESONANCE and VOICE are Selected
 Also, when the MODULATION type is TREMOLO or UNI-V, MODULATION is connected before OVERDRIVE/DISTORTION.
(Example) EXPRESSION: WAH; MODULATION: TREMOLO
TONE MODIFY
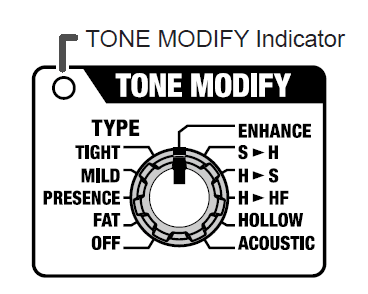
This changes the characteristics of the connected guitar.
Switching Tone Modify On and Off with the Foot Switch
With a foot switch (the optional FS-5U) connected to the FOOT SW jack on the rear panel, you can use the foot switch to switch Tone Modify on and off.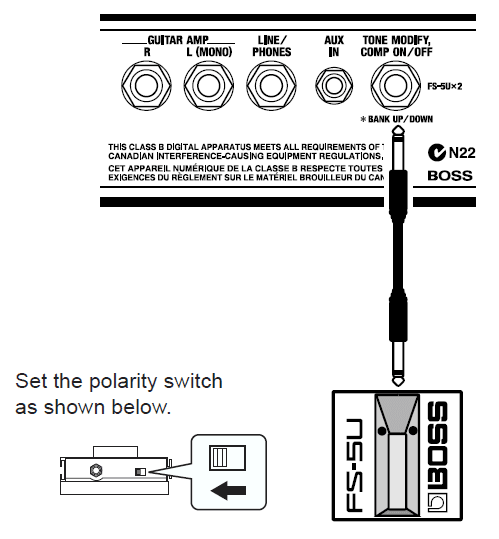
- When in Memory mode, the bank-switching function is enabled (p. 22).
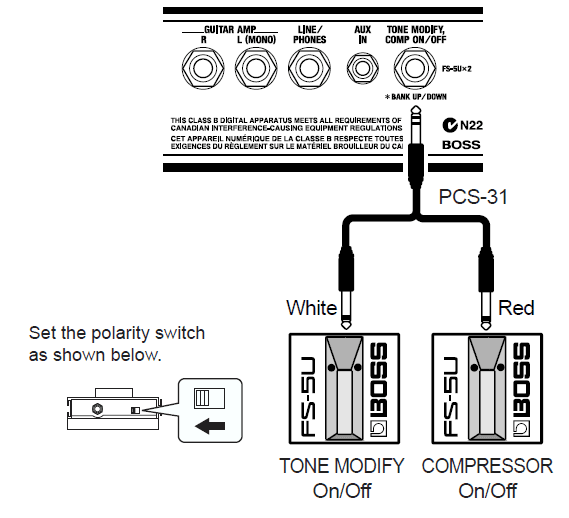
- By connecting with a special cable (the optional PCS-31), you can connect two-foot switches, one for Tone Modify ON/OFF, and one to switch the Compressor on and off (p. 10).
COMPRESSOR
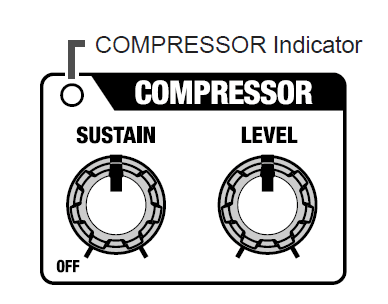
This is an effect that produces a long sustain by evening out the volume level of the input signal. You can also use it as a “limiter” to suppress only the sound peaks and prevent distortion.
SUSTAIN knob
This adjusts the depth of the effect. Turning it to the right (clockwise) produces a longer sustain. When using this as a limiter, turn the SUSTAIN knob to the left (counterclockwise).
- When not using the Compressor, turn the SUSTAIN knob to OFF. When switched OFF, the COMPRESSOR indicator goes out.
LEVEL knob
Adjusts the volume level when the Compressor is on. Use this in achieving a volume balance when switching the Compressor on and off.
Switching the Compressor On and Off with the Foot Switch
With the special cable (the optional PCS-31) used to connect two foot switches (the optional FS-5U) to the FOOT SW jack on the rear panel, you can use one foot switch for Tone Modify ON/OFF, and one to switch the Compressor on and off (p. **). Connect as shown below.
OVERDRIVE/DISTORTION
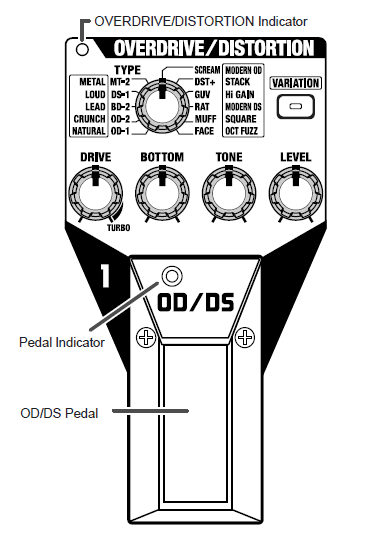
These are effects that distort the sound. You can use the TYPE knob in combination with [VARIATION] to get 22 different types of distortion.
- OD/DS pedal
Each time you press the pedal, the effect switches through Overdrive/Distortion ON and OFF. When switched on, the OVERDRIVE/DISTORTION indicator and pedal indicator lights up. - DRIVE knob
Adjusts the amount of distortion. Turning the knob to the right (clockwise) creates a stronger distortion and increases the volume. Turning this all the way to the TURBO range increases the effect even more. - BOTTOM knob
Adjusts the low-frequency range. Turning the knob to the left (counterclockwise) cuts the low end more; the low frequencies are boosted as the knob is turned to the right. - TONE knob
Adjusts the tone. Turning the knob to the left creates a milder sound; a sharper sound is produced as the knob is turned to the right. - LEVEL knob
Adjusts the volume.- * Noise may be mixed in if you turn the LEVEL knob up too high. Adjust the LEVEL knob so that the apparent volume level remains the same whether the effects are on or off.
MODULATION
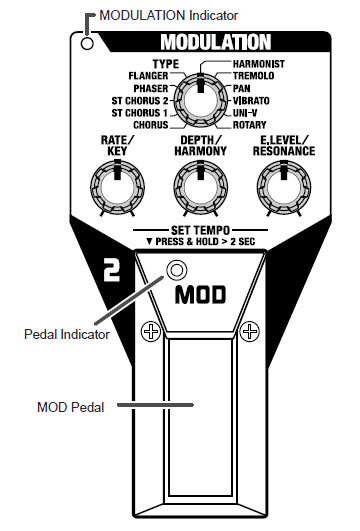
An effect that broadens sound and adds undulations is called “modulation.”
The ME-50 comes with 11 different types of Modulation effects. Select any one of these as the effect to be used.
- MOD pedal
Depress the pedal to toggle Modulation on/off. When switched on, the MODULATION indicator and pedal indicator light up. - TYPE knob
Select the effect to be used from the eleven effects available. - CHORUS
This chorus effect outputs the same sound from both L and R.- RATE/KEY knob
Adjusts the rate of modulation. - DEPTH/HARMONY knob
Adjusts the depth of modulation. - E.LEVEL/RESONANCE knob
Adjusts the volume of the chorus sound.
- RATE/KEY knob
- ST CHORUS 1
This is a stereo-chorus effect that adds different chorus sounds to L and R.- RATE/KEY knob
Adjusts the rate of modulation. - DEPTH/HARMONY knob
Adjusts the depth of modulation. - E.LEVEL/RESONANCE knob
Adjusts the volume of the chorus sound.
- RATE/KEY knob
- ST CHORUS 2
This is a stereo-chorus effect produced by synthesizing the spatial characteristics of the direct sound and the effect sound.- RATE/KEY knob
Adjusts the rate of modulation. - DEPTH/HARMONY knob
Adjusts the depth of modulation. - E.LEVEL/RESONANCE knob
Adjusts the volume of the chorus sound.
- RATE/KEY knob
- PHASER
Adding varied-phase portions to the direct sound, adds a twisting “warp” effect to the sound.- RATE/KEY knob
Adjusts the rate of phaser effect. - DEPTH/HARMONY knob.
Adjusts the depth of phaser effect. - E.LEVEL/RESONANCE knob
Adjusts the amount of resonance.
- RATE/KEY knob
For more manuals by Boss, visit ManualsLibraryy
BOSS ME-50 Guitar Multiple Effects Pedal-FAQs
How do I connect multiple guitar pedals together?
The simplest way is a linear chain setup, where the output of one pedal connects to the input of the next. This method is beginner-friendly and widely used.
How do I connect the BOSS ME-50 to an amplifier?
1. Turn down the amp volume and ensure the ME-50 is powered off.
2. Connect a guitar cable from the SEND port of the amplifier to the INPUT of the ME-50.
Is the BOSS ME-50 an analog or digital pedal?
The ME-50 is a digital multi-effects unit, but it is designed to sound and respond similarly to analog effects.
How do guitar effects pedals work?
Guitar pedals modify the signal from the guitar before sending it to the amp or other pedals, adding effects such as distortion, reverb, or delay.
How can I power multiple BOSS pedals?
You can use a daisy chain power setup, such as the PCS-20A, to power multiple pedals from a single adapter like the PSA or PSB-1U power supply.
What voltage do BOSS guitar pedals require?
Most BOSS pedals use a 9V power supply. Always check the voltage requirement specific to your model.
Do guitar effects pedals require power?
Yes, all effects pedals need power, either from a battery or an external power supply.
How do I control multiple guitar pedals at once?
Using a switcher with multiple inputs allows you to turn multiple pedals on or off with a single click, making performance changes easier.


 Also, when the MODULATION type is TREMOLO or UNI-V, MODULATION is connected before OVERDRIVE/DISTORTION.