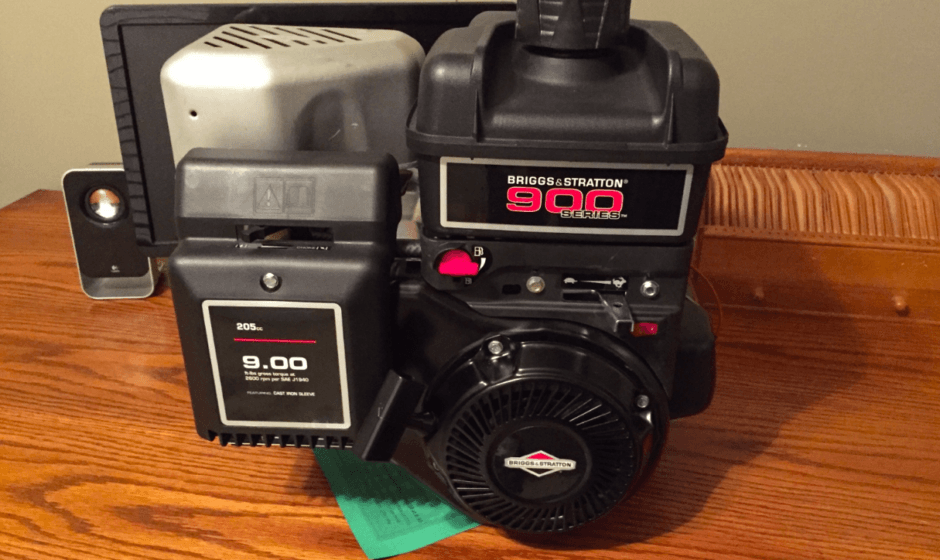
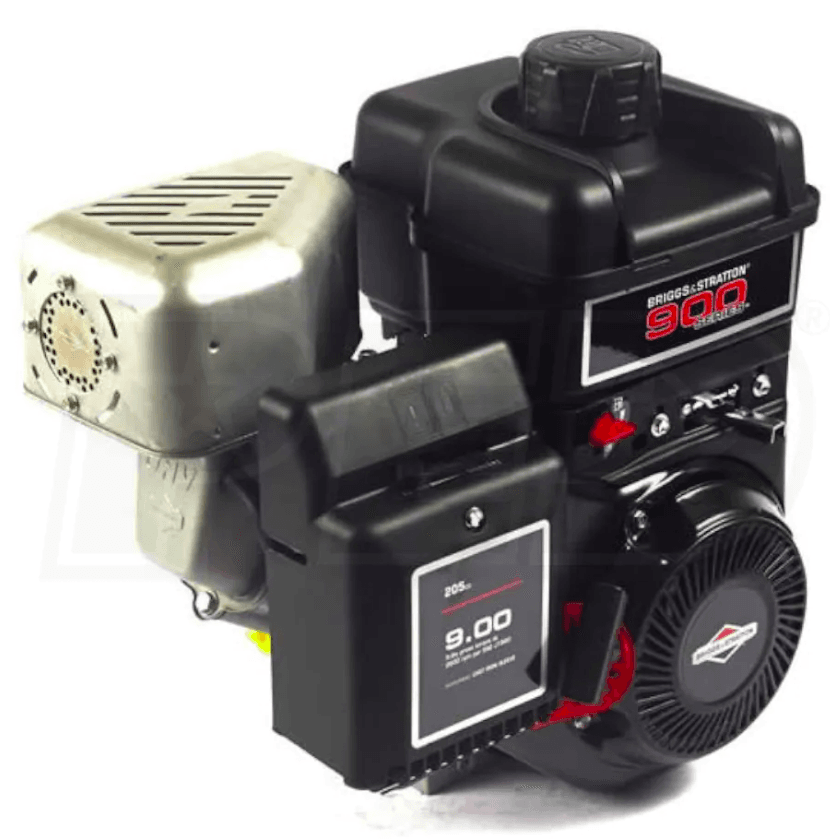
Briggs and Stratton Power Built 900 Series Engine
Operator Safety

- The safety alert symbol is used to identify safety information about hazards that can result in personal injury. A signal word (DANGER, WARNING, or CAUTION) is used with the alert symbol to indicate the likelihood and the potential severity of injury
- WARNING
- Briggs & Stratton does not approve or authorize the use of these engines on 3-wheel vehicles. All Terrain Vehicles (ATVs), motor bikes, fun/recreational go-karts, aircraft products, or vehicles intended for use in competitive events. Use of these engines in such
applications could result in property damage, serious injury (including paralysis), or even death. - WARNING
- Gasoline and its vapors are extremely flammable and explosive. Fire or explosion can cause severe burns or death.
- When Adding Fuel
- Turn the engine off and let it cool for at least 2 minutes before removing the fuel cap.
- Fill the fuel tank outdoors or in a well-ventilated area.
- Do not overfill the fuel tank. To allow for expansion of the gasoline, do not fill above the bottom of the fuel tank neck.
- Keep gasoline away from sparks, open flames, pilot lights, heat, and other ignition sources.
- Check fuel lines, tank, cap, and fittings frequently for cracks or leaks.
- Replace if necessary
- If fuel spills, wait until it evaporates before starting the engine.
- When Starting the Engine
- Ensure that the spark plug, muffler, fuel cap, and air cleaner (if equipped) are in place and secured.
- Do not crank the engine with the spark plug removed.
- If the engine floods, set the choke (if equipped) to OPEN/RUN position, move the throttle (if equipped) to FAST position, and crank until the engine starts.
- When Operating Equipment
- Do not tip the engine or equipment at an angle that causes gasoline to spill.
- Do not choke the carburetor to stop the engine.
- Never start or run the engine with the air cleaner assembly (if equipped) or the air filter (if equipped) removed.
- When Changing Oil
- If you drain the oil from the top oil fill tube, the fuel tank must be empty, or fuel can leak out and result in a fire or explosion.
- When Transporting Equipment
- Transport with fuel tank EMPTY or with fuel shut-off valve OFF.
- When Storing Gasoline Or Equipment With Fuel In The Tank
- Store away from furnaces, stoves, water heaters, or other appliances that have a pilot light or other ignition source because they can ignite gasoline vapors.
- WARNING
- It is a violation of California Public Resources Code, Section 4442, to use or operate the engine on any forest-covered, brush-covered, or grass-covered land unless the exhaust system is equipped with a spark arrester, as defined in Section 4442, and maintained in effective working order. Other states or federal jurisdictions may have similar laws. Contact the original equipment manufacturer, retailer, or dealer to obtain a spark arrester designed for the exhaust system installed on this engine.
Features and Controls
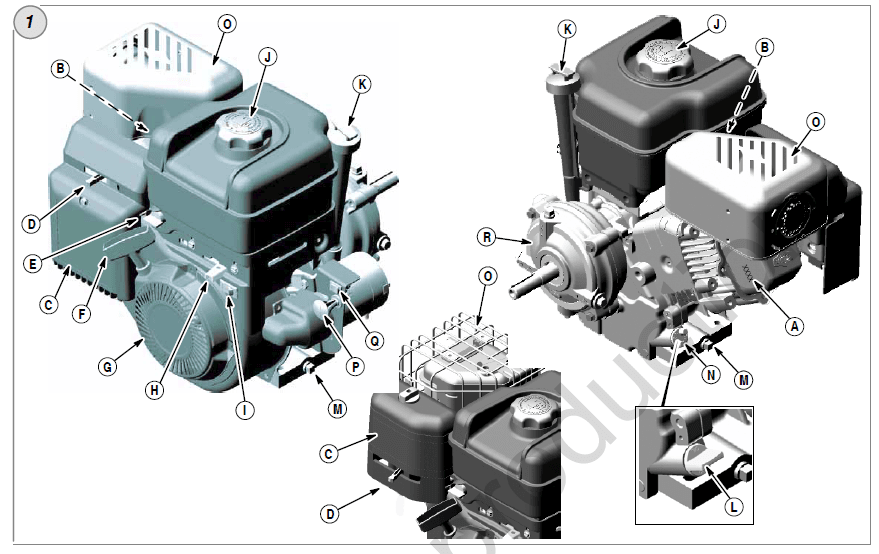
Compare illustration 1 with your engine to familiarize yourself with the location of various features and controls.
- A. Engine Identification (located on cover) Model Type Code
- B. Spark Plug
- C. Air Cleaner (flat or oval)
- D. Choke Control
- E. Fuel Shut-off Valve (optional)
- F. Starter Cord Handle
- G. Finger Guard
- H. Throttle Control (optional)
- I Stop Switch (optional)
- J. Fuel Tank and Cap
- K. Extended Dipstick (optional)
- L. Short Dipstick (optional)
- M. Oil Drain Plug
- N. Oil Fill
- O. Muffler
- Muffler Guard (optional)
- Spark Arrester (optional)
- P. Safety Key (electric start models)
- Q. ON/OFF Switch (electric start models)
- R. Gear Reduction Unit (optional
Operation
- Oil capacity (see the Specifications section)
Oil Recommendations
- We recommend the use of Briggs & Stratton Warranty Certified oils for best performance. Other high-quality detergent oils are acceptable if classified for service SF, SG, SH, SJ or higher. Do not use special additives.
- Outdoor temperatures determine the proper oil viscosity for the engine. Use the chart to select the best viscosity for the outdoor temperature range expected.
How To Check/Add Oil
- Before adding or checking the oil
- Place the engine level.
- Clean the oil fill area of any debris.
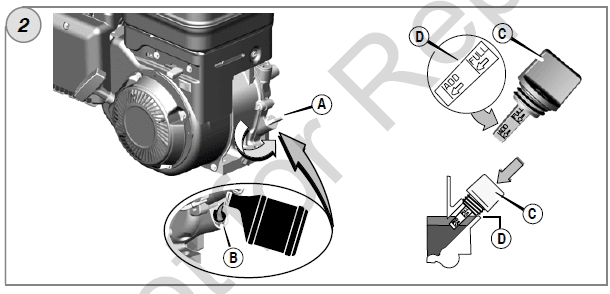
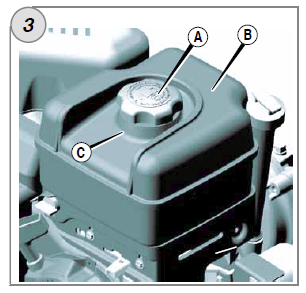
Models with oil fill cap (Figure 2)
- Remove the oil fill cap (A).
- To add oil, pour the oil slowly into the engine oil fill (B). Fill to the point of overflowing.
- Replace and tighten the oil fill cap.
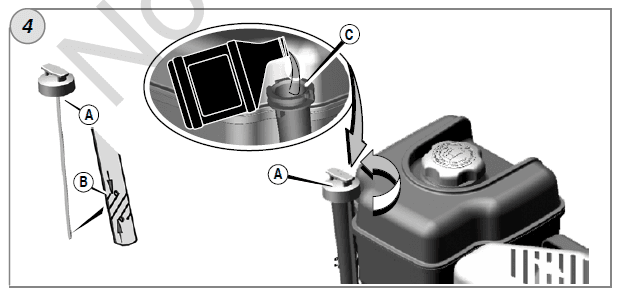
Models with short dipsticks (Figure 2)
- Remove the dipstick (C) and wipe with a clean cloth.
- Insert the dipstick but do not screw in. The oil level should be at the FULL mark (D).
- To add oil, pour the oil slowly into the engine oil fill (B). Fill to the point of overflowing.
- Replace and tighten the dipstick.
How To Start The Engine
NOTICE: This engine was shipped from Briggs & Stratton without oil. Before you start the engine, make sure you add oil according to the instructions in this manual. If you start the engine without oil, it will be damaged beyond repair and will not be covered under warranty.
Note: Equipment may have remote controls. See the equipment manual for the location and operation of remote controls.
- Check the oil level. See the How to Check/Add Oil section.
- Make sure the equipment drive controls, if equipped, are disengaged.
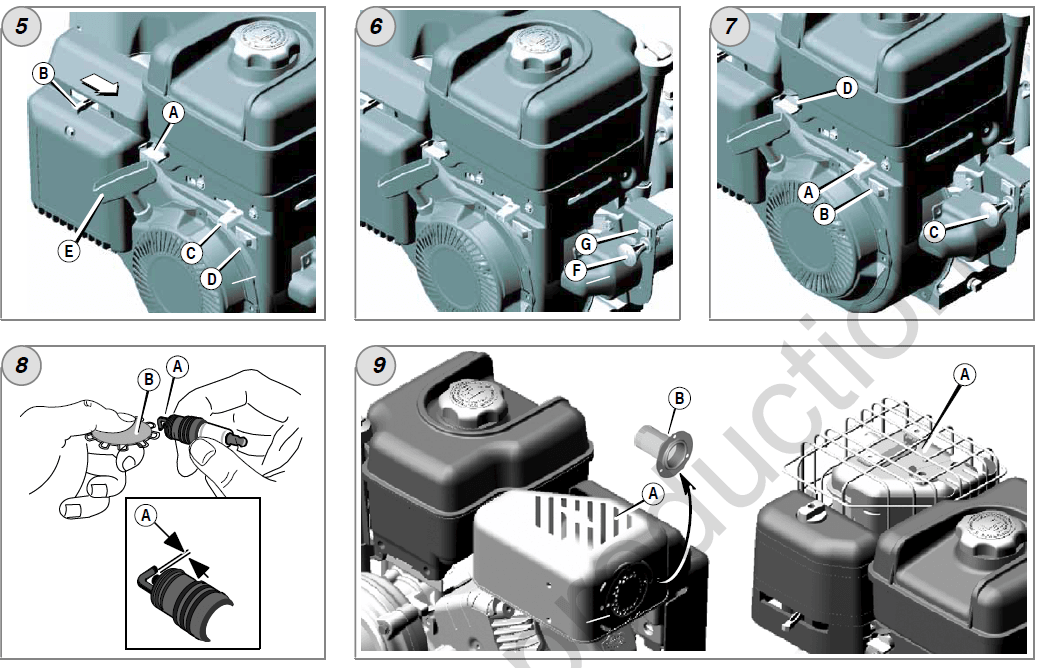
- Turn the fuel shut-off valve (A), if equipped, to the on position (Figure 5).
- Move the choke control lever (B) to the choke position.
Note: Choke is usually unnecessary when restarting a warm engine. - Move the throttle control lever (C), if equipped, to the fast position. Operate the engine with the throttle control lever in the fast position.
- On engines equipped with a stop switch (D), move the switch to the on position.
- Rewind Start: Firmly hold the starter cord handle (E). Pull the starter cord handle slowly until resistance is felt, then pull rapidly.
How To Stop The Engine
- On models equipped with a throttle control lever (A), move the throttle control lever to slow and then to the stop position (see Figure 7).
- Or move the stop switch (B), (if equipped) to the stop position.
- Or Electric Start: Remove the safety key (C). Keep the safety key out of reach of children.
- After the engine stops, turn the fuel shut-off valve (D) to the closed position.
Maintenance
- Use only original equipment replacement parts. Other parts may not perform as well, may damage the unit, or may result in injury. In addition, the use of other parts may void your warranty.
- We recommend that you see any Briggs & Stratton Authorized Dealer for all maintenance and service of the engine and engine parts.
NOTICE: All the components used to build this engine must remain in place for proper operation.
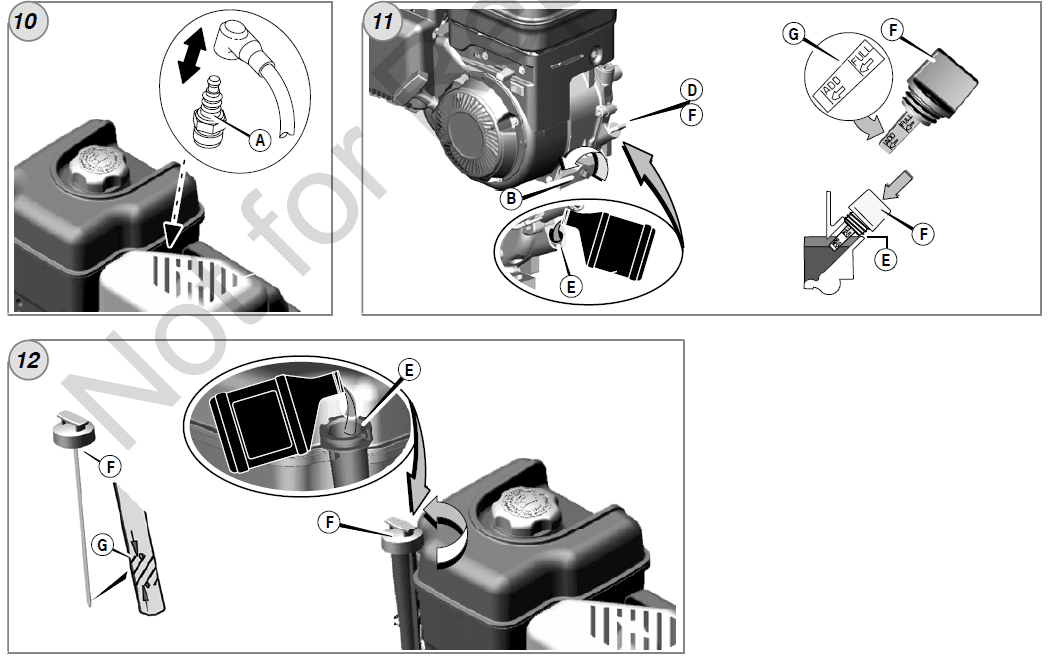
How To Change The Oil – Figure 10 11 12
- Used oil is a hazardous waste product and must be disposed of properly. Do not discard household waste. Check with your local authorities, service center, or dealer for safe disposal/recycling facilities.
Remove Oil
- With the engine off but still warm, disconnect the spark plug wire (A) and keep it away from the spark plug (Figure 10).
- Remove the oil drain plug (B, Figure 11). Drain the oil into an approved receptacle.
Note: Any of the oil drain plugs shown below may be installed in the engine. - After the oil has drained, install and tighten the oil drain plug.
Add oil
- Place the engine level.
- Clean the oil fill area of any debris.
- See the Specifications section for oil capacity.
Models with an oil fill cap
- Remove the oil fill cap (D, Figure 11).
- Pour the oil slowly into the engine oil fill (E). Fill to the point of overflowing.
- Replace and tighten the oil fill cap.
Models with short dipsticks
- Remove the dipstick (F, Figure 11) and wipe with a clean cloth.
- Pour the oil slowly into the engine oil fill (E). Fill to the point of overflowing.
- Install the dipstick but do not screw in. Remove and check the oil level. The oil level should be at the FULL mark (G) on the dipstick.
- Install and tighten the dipstick
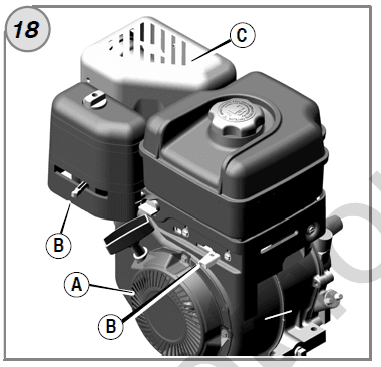
How To Clean The Air Cooling System – Figure 18
- This is an air-cooled engine. Dirt or debris can restrict air flow and cause the engine to overheat, resulting in poor performance and reduced engine life.
- Use a brush or dry cloth to remove debris from the finger guard (A) (Figure 18). Keep linkage, springs, and controls (B) clean. Keep the area around and behind the muffler (C) free of any combustible debris.
Storage
Fuel System
- Fuel can become stale when stored for over 30 days. Stale fuel causes acid and gum deposits to form in the fuel system or on essential carburetor parts. To keep fuel fresh, use Briggs & Stratton FRESH START® fuel stabilizer, available as a liquid additive or a drip concentrate cartridge.
- There is no need to drain gasoline from the engine if a fuel stabilizer is added according to instructions. Run the engine for 2 minutes to circulate the stabilizer throughout the fuel system. The engine and fuel can then be stored up to 24 months.
- If gasoline in the engine has not been treated with a fuel stabilizer, it must be drained into an approved container. Run the engine until it stops from a lack of fuel. The use of a fuel stabilizer in the storage container is recommended to maintain freshness.
- Engine Oil
- While the engine is still warm, change the engine oil.
Specifications
| Engine Specifications | |
| Model | 120000 |
| Displacement | 12.48 ci (205 cc) |
| Bore | 2.688 in (68.28 mm) |
| Stroke | 2.200 in (55.88 mm) |
| Oil Capacity | 18 – 20 oz (0.54 – 0.59 L) |
| Gear Reduction Oil | 80W-90 |
| Engine Specifications | |
| Model | 150000 |
| Displacement | 15.24 ci (250 cc) |
| Bore | 2.970 in (75.44 mm) |
| Stroke | 2.200 in (55.88 mm) |
| Oil Capacity | 18 – 20 oz (0.54 – 0.59 L) |
| Gear Reduction Oil | 80W-90 |
| Tune-up Specifications * | |
| Model | 120000, 150000 |
| Spark Plug Gap | 0.030 in (0.76 mm) |
| Spark Plug Torque | 180 lb-in (20 Nm) |
| Armature Air Gap | 0.010 – 0.014 in (0.25 – 0.36 mm) |
| Intake Valve Clearance | 0.004 – 0.006 in (0.10 – 0.15 mm) |
| Exhaust Valve Clearance | 0.009 – 0.011 in (0.23 – 0.28 mm) |
| Tune-up Specifications * | |
| Model | 200000, 210000 |
| Spark Plug Gap | 0.030 in (0.76 mm) |
| Spark Plug Torque | 180 lb-in (20 Nm) |
| Armature Air Gap | 0.008 – 0.012 in (0.20 – 0.30 mm) |
| Intake Valve Clearance | 0.004 – 0.006 in (0.10 – 0.15 mm) |
| Exhaust Valve Clearance | 0.009 – 0.011 in (0.23 – 0.28 mm) |
LIMITED WARRANTY
- Briggs & Stratton Corporation will repair or replace, free of charge, any part(s) of the engine that is defective in material or workmanship or both. Transportation charges on products submitted for repair or replacement under this warranty must be borne by the purchaser. This warranty is effective for and is subject to the time periods and conditions stated below. For warranty service, find the nearest Authorized Service Dealer in our dealer locator map at BRIGGSandSTRATTON.COM, or by calling 1-800-233-3723, or as listed in the ‘Yellow Pages’.
- There is no other expressed warranty. Implied warranties, including those of merchantability and fitness for a particular purpose, are limited to one year from purchase, or to the extent permitted by law, and all implied warranties are excluded. Liability for incidental or consequential damages is excluded to the extent exclusion is permitted by law. Some states or countries do not allow limitations on how long an implied warranty lasts, and some states or countries do not allow the exclusion or limitation of incidental or consequential damages, so the above limitation and exclusion may not apply to you. This warranty gives you specific legal rights, and you may also have other rights which vary from state to state and country to country
For more manuals by Briggs and Stratton, visit ManualsLibraryy
Briggs and Stratton Power Built 900 Series Engine-FAQs
Why won’t my Briggs and Stratton engine start?
Old fuel, dirt, or debris in the engine are the most common reasons. If fuel is left untreated in the tank for long periods, it can cause starting problems or even damage the engine.
How long can a Briggs and Stratton engine last?
With regular maintenance—like keeping the oil clean and using a proper air filter—these engines can easily run for over 2,000 hours.
How often should I change the oil in my Briggs and Stratton engine?
You should change the engine oil every 50 hours of use or once a year, whichever comes first. Always check and top off the oil during the season as needed.
Why is the starter rope hard to pull?
If the starter rope is stuck or difficult to pull, it could be because the engine flywheel brake is engaged. Make sure to fully press down the safety bar on the handle before pulling the cord.
What types of equipment use Briggs and Stratton engines?
Briggs and Stratton engines are commonly used in a wide range of lawn care equipment like push mowers, riding mowers, and zero-turn mowers.
What led to Briggs and Stratton’s financial troubles?
The company’s decline has been attributed to internal mismanagement, poor executive decisions, and strained relationships with its unionized workforce.
What is the maximum operating speed for a Briggs and Stratton engine?
These engines typically operate between 1800 and 3600 RPM. The idle speed is usually around 1750 RPM. Always follow manufacturer recommendations and never exceed the specified top speed.
What are engine running hours?
Engine hours indicate the total time an engine has run. This helps track usage and plan for maintenance, especially in industrial and heavy-duty applications.

