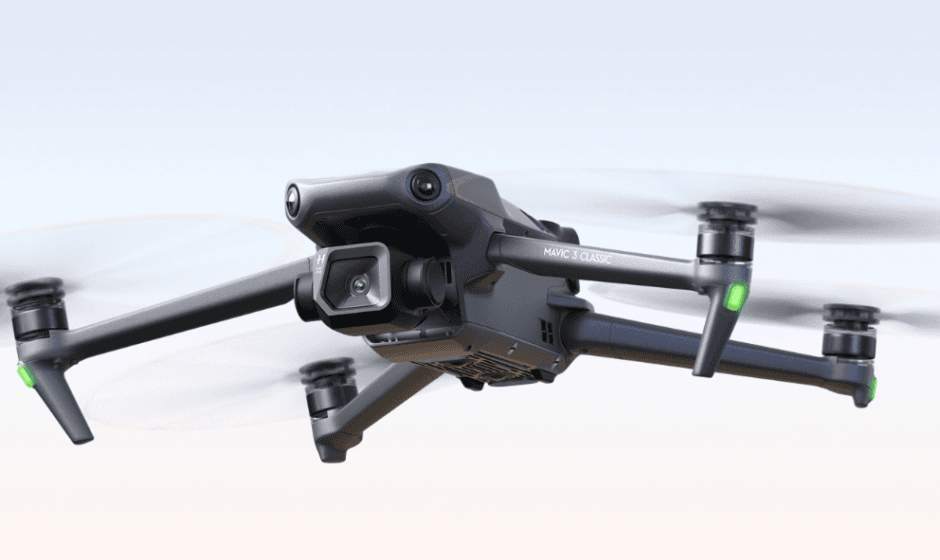
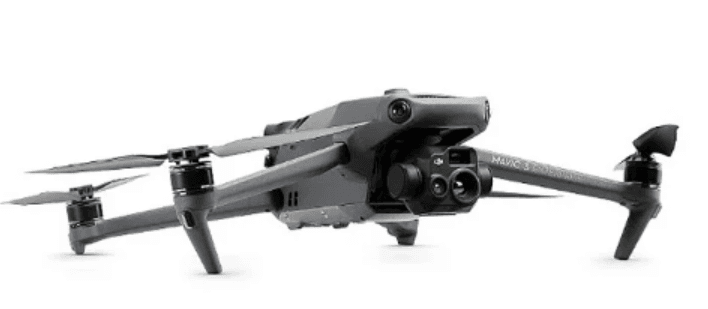
DJI Mavic 3 Classic Drone
Introduction
DJI Mavic 3 Classic features both an Infrared Sensing System and Forward, Backward, Upward, Lateral, and Downward Vision Systems, allowing for hovering and flying indoors as well as outdoors and for automatic Return to Home while avoiding obstacles in all directions. The aircraft has a maximum flight speed of 47 mph (75.6 kph) and a maximum flight time of 46 minutes.
Users can connect to the internet via Wi-Fi while the Android operating system includes both
Bluetooth and GNSS. The DJI RC remote controller comes with a wide range of aircraft and gimbal
controls as well as customizable buttons. It has a maximum operating time of approximately 4
hours. The RC-N1 remote controller displays the video transmission from the aircraft to DJI Fly on
a mobile device. The aircraft and camera are easy to control using the onboard buttons and the
remote controller has a runtime of 6 hours.
Feature Highlights
Gimbal and Camera: DJI Mavic 3 Classic uses a 4/3 CMOS sensor Hasselblad L2D-20c camera, capable of shooting 20MP photos and 5.1K 50fps/DCl 4K 120fps H.264/H.265 videos. The camera has an adjustable aperture of f/2.8 to f/11, a dynamic range of 12.8 stops, and supports 10-bit D-Log video.
Video Transmission: With four built-in antennas and D)I’s long-range transmission 03+ technology, DJI Mavic 3 Classic offers a maximum transmission range of 15 km and video quality at up to 1080p 60fps from the aircraft to the DJ Fly app. The remote controller works at both 2.4 and 5.8 GHz and is capable of selecting the best transmission channel automatically.
Intelligent Flight Modes: The user can focus on operating the aircraft while the Advanced Pilot Assistance System 5.0 (APAS 5.0) helps the aircraft to avoid obstacles in all directions and effortlessly capture complex shots using FocusTrack, MasterShots, QuickShots and Hyperlapse.
Using for the First Time
DJI Mavic 3 Classic is folded before being packaged. Follow the steps below to unfold the aircraft and remote controller.
Preparing the Aircraft
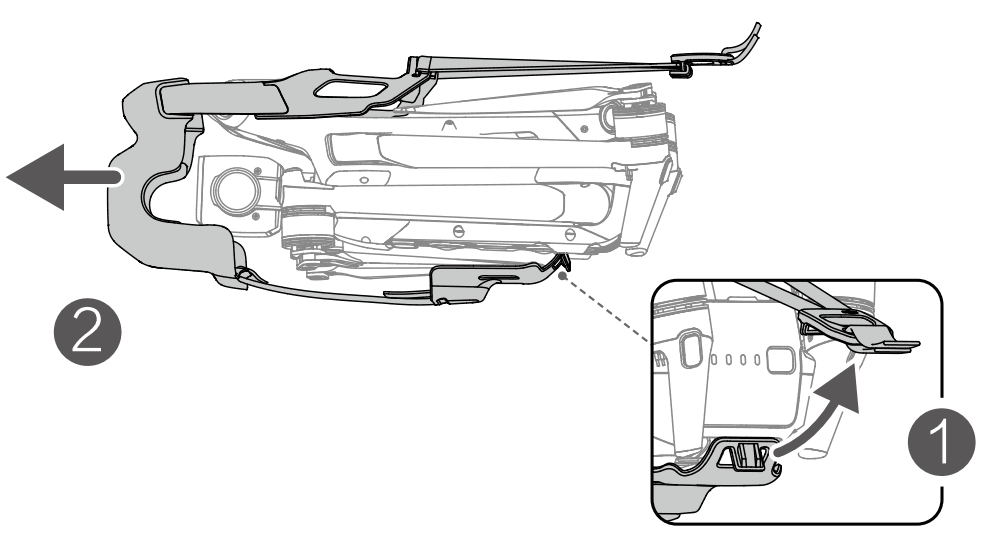
- Remove the storage cover.

- All Intelligent Flight Batteries are in hibernation mode before delivery to ensure safety. Charge and activate the Intelligent Flight Batteries for the first time. It takes approximately 1 hour and 36 minutes to fully charge an Intelligent Flight Battery using the provided DJI 65W charger. Charging time is tested when using the fixed cable of the charger. It is recommended to use this cable to charge the Intelligent Flight Battery.

- Unfold the front arms, followed by the rear arms, and then the propeller blades.

Preparing the Remote Controller
Follow the steps below to prepare to use the DJI RC remote controller.
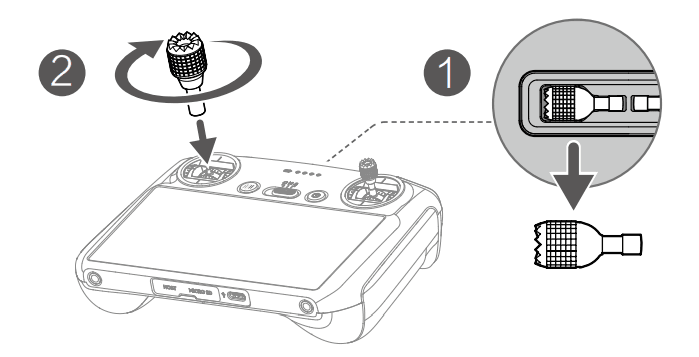
- Remove the control sticks from the storage slots and mount them on the remote controller.

- The remote controller needs to be activated before first use and an internet connection is required for activation. Press, and then press again and hold the power button to power on the remote controller. Follow the on-screen prompts to activate the remote controller.
Follow the steps below to prepare the DJI RC-N1 remote controller.
- Remove the control sticks from their storage slots on the remote controller and screw them into place.
- Pull out the mobile device holder. Choose an appropriate remote controller cable based on the type of mobile device. A Lightning connector cable, Micro USB cable, and USB-C cable are included in the packaging. Connect the end of the cable with the phone icon to your mobile device. Make sure the mobile device is secured.

Diagram
Aircraft
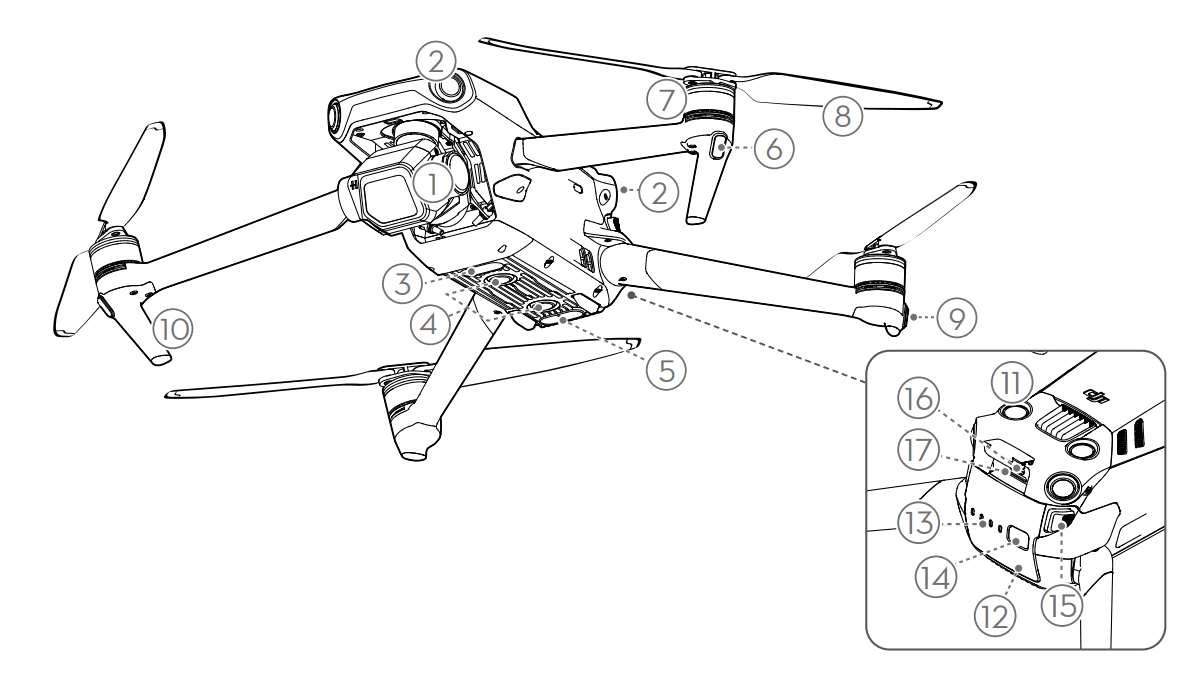
- Gimbal and Camera
- Horizontal Omnidirectional Vision System
- Auxiliary Bottom Light
- Downward Vision System
- Infrared Sensing System
- Front LEDs
- Motors
- Propellers
- Aircraft Status Indicators
- Landing Gears (Built-in antennas)
- Upward Vision System
- Intelligent Flight Battery
- Battery Level LEDs
- Power Button
- Battery Buckles
- USB-C Port
- microSD Card Slot
DJI RC Remote Controller
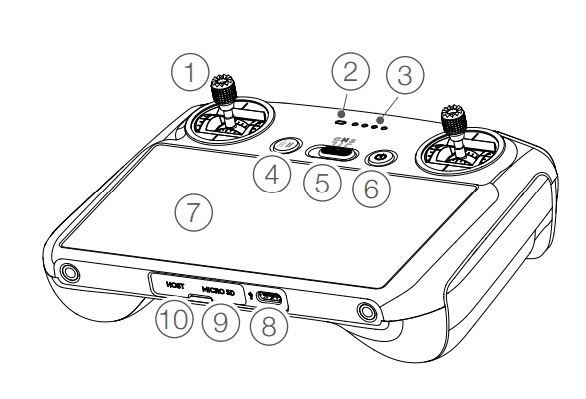
- Control Sticks
Use the control sticks to control the movement of the aircraft. The control sticks are removable and easy to store. Set the flight control mode in DJ! Fly. - Status LED
Indicates the status of the remote controller. - Battery Level LEDs
Displays the current battery level of the remote controller. - Flight Pause/Return to Home (RTH) Button
Press once to make the aircraft brake and hover in place (only when GNSS or Vision Systems are available). Press and hold to initiate RTH. Press again to cancel RTH. - Flight Mode Switch
‘Switch between Cine, Normal, and Sport mode. - Power Button
Press once to check the current battery level. Press, and then press and hold to power the remote controller on or off. ‘When the remote controller is powered on, press once to turn the touchscreen on off. - Touchscreen
Touch the screen to operate the remote controller. Note that the touchscreen is not waterproof. Operate with caution - USB-C Port
For charging and connecting the remote controller to your computer. - microSD Card Slot
For inserting a microSD card. - Host Port (USB-C)
Reserved port.
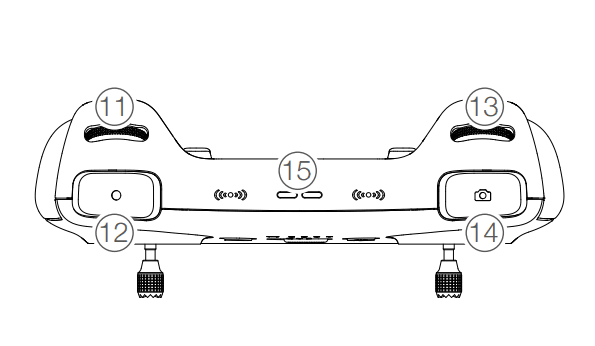
- Gimbal Dial
Controls the ik of the camera. - Record Button
Press once to start or stop recording. - Camera Control Dial
Control zoom info out by default. The dial function can be set in DJi iy. - Focus/Shutter Button
Press halfway down on the button to auto-focus and press all the way down to take 2 photos. Press once to switch to photo mode when in record mode. - Speaker
Outputs sound. - Control Sticks Storage Slot
For storing the control sticks. - Customizable C2 Button
Control Auxiliary Bottom Light by default (switch between recentering the gimbal and pointing the gimbal downward by default when using in EU). The function can be set in DJI Fly. - Customizable C1 Button Switch between recentering the gimbal and pointing the gimbal downward. The function can be set in JI Fy.
Aircraft Status Indicators
DJI Mavic 3 Classic has front LEDs and aircraft status indicators.
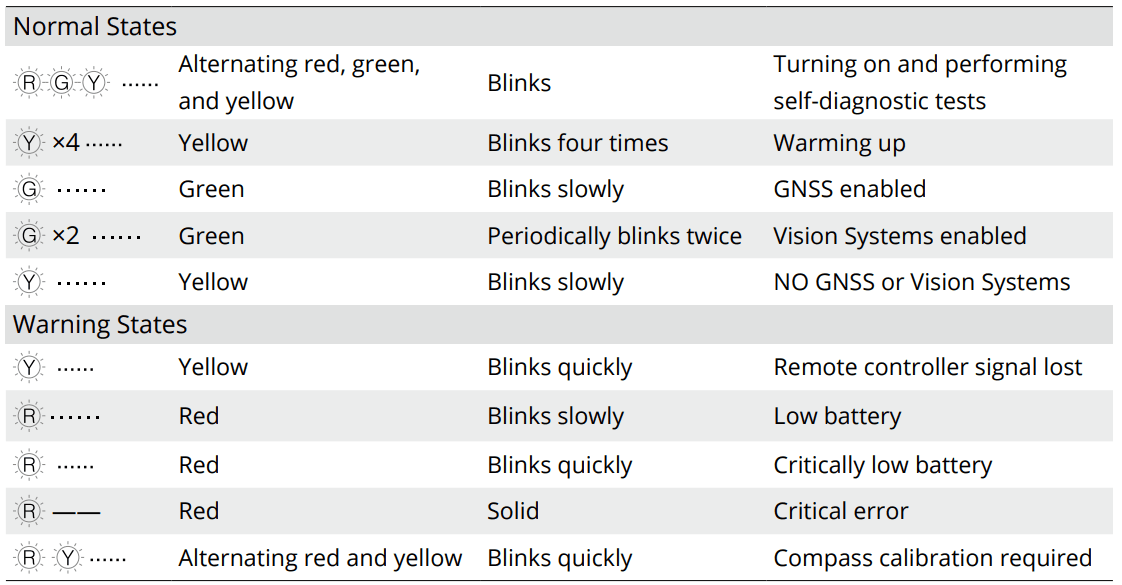
When the aircraft is powered on but the motors are not running, the front LEDs glow solid red to display the orientation of the aircraft. When the aircraft is powered on but the motors are not running, the aircraft status indicators display the status of the flight control system. Refer to the table below for more information about the aircraft status indicators.
Aircraft Status Indicator States
After the motor starts, the front LEDs blink red and green alternately and the aircraft status indicators blink green. The green lights indicate the aircraft is a UAV and the red lights indicate the heading and position of the aircraft.
Return to Home
Return to Home (RTH) returns the aircraft to the last recorded Home Point when the positioning system is functioning normally. There are three types of RTH: Smart RTH, Low Battery RTH, and Failsafe RTH. The aircraft automatically flies back to the Home Point and lands when Smart RTH is initiated, the aircraft enters Low Battery RTH, or the video link signal is lost during the flight.
Advanced RTH
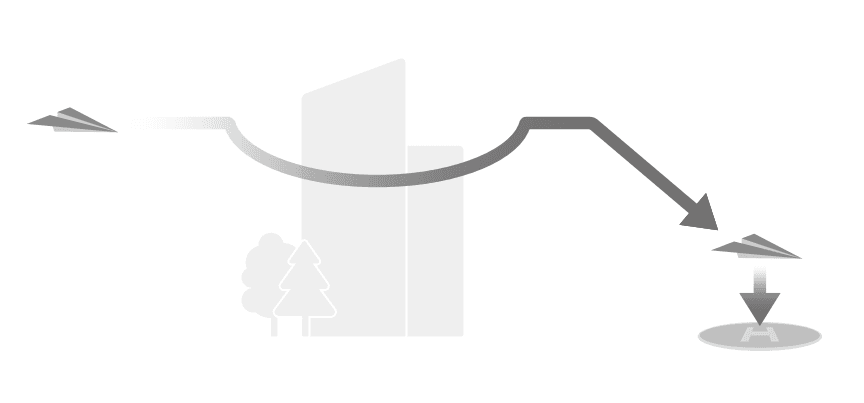
Advanced RTH is enabled if the lighting is sufficient and the environment is suitable for the vision systems when Smart RTH is triggered. The aircraft will automatically plan the best RTH path, which will be displayed in DJI Fly and will adjust according to the environment.
RTH Settings
RTH settings are available for Advanced RTH. Go to the camera view in DJI Fly and tap![]() Safety > RTH.
Safety > RTH.
- Optimal: Regardless of the RTH Altitude settings, the aircraft automatically plans the optimal RTH path and adjusts the altitude according to environmental factors such as obstacles and transmission signals. The optimal RTH path means the aircraft will travel the shortest distance possible reducing the amount of battery power used and increasing flight time.
- Preset: When the aircraft is farther than 50 m from the home point when RTH begins, the aircraft will plan the RTH path, fly to an open area while avoiding obstacles, ascend to the RTH Altitude, and return to home using the best path. When the aircraft is at a distance of 5 to 50 m from the home point when RTH begins, the aircraft will not ascend to the RTH Altitude and instead return to home using the best path at the current altitude. When the aircraft is near the home point, the aircraft will descend while flying forward if the current altitude is higher than the RTH Altitude.
Advanced RTH Procedure
- The Home Point is recorded.
- Advanced RTH is triggered.
- The aircraft brakes and hover in place.
- The aircraft lands immediately if it is less than 5 m from the Home Point when RTH begins.
- If the aircraft is farther than 5 m from the home point when RTH begins, the aircraft will plan the best path according to the RTH settings and fly to the home point while avoiding obstacles and GEO zones. The aircraft front will always point in the same direction as the flight direction.
- The aircraft will fly automatically according to the RTH settings, environment, and transmission signal during RTH.
- The aircraft lands and the motors stop after reaching the Home Point.

Landing Protection
Landing Protection will activate during Smart RTH. When the aircraft begins landing, Landing Protection is enabled
- During Landing Protection, the aircraft will automatically detect and carefully land on suitable ground.
- If the ground is determined unsuitable for landing, the aircraft will hover and wait for pilot confirmation.
- If Landing Protection is not operational, DJI Fly will display a landing prompt when the aircraft descends below 0.5 m. Pull down on the throttle stick for more than one second or use the auto landing slider to land.
Precision Landing
The aircraft automatically scans and attempts to match the terrain features below during RTH. The aircraft will land when the current terrain matches the Home Point. A prompt will appear in DJ! Fly if the terrain match fails.
Vision Systems and Infrared Sensing System
DJI Mavic 3 Classic is equipped with both an Infrared Sensing System and Forward, Backward, Lateral, Upward, and Downward Vision Systems. The Upward and Downward Vision Systems consist of two cameras each, and the Forward, Backward, and Lateral Vision Systems consist of four cameras in total. The Infrared Sensing System consists of two 3D infrared modules. The Downward Vision System and Infrared Sensing System help the aircraft maintain its current position, hover in place more precisely, and to fly indoors or in other environments where GNSS is unavailable. In addition, the Auxiliary Bottom Light located on the underside of the aircraft improves visibility for the Downward Vision System in weak light conditions.
Detection Range
Forward Vision System
Precision Measurement Range: 0.5-20 m; FOV: 90° (horizontal), 103° (vertical)
Backward Vision System
Precision Measurement Range: 0.5-16 m; FOV: 90° (horizontal), 103° (vertical)
Lateral Vision System
Precision Measurement Range: 0.5-25 m; FOV: 90° (horizontal), 85° (vertical)
Upward Vision System
Precision Measurement Range: 0.2-10 m; FOV: 100° (front and back), 90° (left and right)
Downward Vision System
Precision Measurement Range: 0.3-18 m; FOV: 130° (front and back), 160° (left and right). The
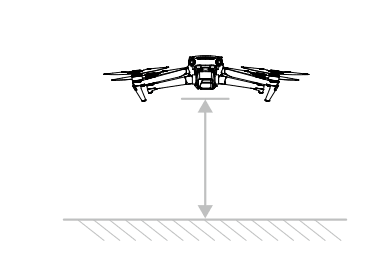
Downward Vision System works best when the aircraft is at an altitude of 0.5 to 30 m.
Using the Vision Systems
When GNSS is unavailable, the Downward Vision System is enabled if the surface has a clear texture and sufficient light. The Forward, Backward, Lateral, and Upward Vision Systems will activate automatically when the aircraft is powered on if the aircraft is in Normal or Cine mode and Obstacle Avoidance is set to Bypass or Brake in DJI Fly. The aircraft can actively brake when detecting obstacles when using the Forward, Backward, Lateral, and Upward Vision Systems. The Forward, Backward, Lateral, and Upward Vision Systems work best with adequate lighting and clearly marked or textured obstacles. Due to inertia, users must make sure to brake the aircraft within a reasonable distance.
Intelligent Flight Mode
FocusTrack
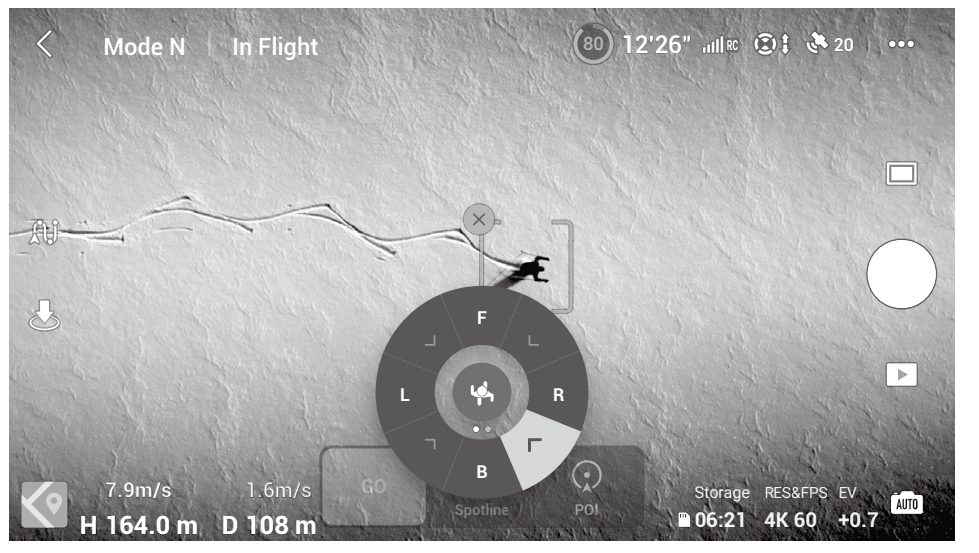
FocusTrack includes Spotlight 2.0, Point of Interest 3.0, and ActiveTrack 5.0.
Spotlight 2.0
Control the aircraft manually while the camera remains locked on the subject. The mode supports both stationary and moving subjects such as vehicles, boats, and people. Move the roll stick to circle the subject, move the pitch stick to alter the distance from the subject, move the throttle stick to change the altitude, and move the pan stick to adjust the frame. In Spotlight mode, the aircraft will hover in place when there is an obstacle detected when the vision systems are working normally, no matter the behavior is set to Bypass or Brake in DJI Fly. Note that the vision systems are disabled in Sport mode.
Point of Interest 3.0 (POI 3.0)
The aircraft tracks the subject in a circle based on the radius and flight speed that is set. The mode supports both static and moving subjects such as vehicles, boats, and people. The max flight speed is 12 m/s and the flight speed may be adjusted dynamically according to the actual radius. Move the roll stick to change the speed, the pitch stick to alter the distance from the subject, the throttle stick to change the altitude, and the pan stick to adjust the frame. The aircraft will bypass obstacles in this mode regardless of the settings in DJI Fly when the vision systems are working normally.
ActiveTrack 5.0
ActiveTrack 5.0 is divided into Trace and Parallel, which support tracking both stationary and moving subjects such as vehicles, boats, and people. In Sport, Normal, and Cine mode, the max flight speed is 12 m/s. Move the roll stick to circle the subject, the pitch stick to alter the distance from the subject, the throttle stick to change the altitude, and the pan stick to adjust the frame. The aircraft will bypass obstacles in ActiveTrack 5.0 regardless of the settings in DJ! Fly.
Trace: The aircraft tracks the subject at a constant distance and altitude with a constant angle in the direction of the subject. The aircraft can track subjects in eight directions including front, back, left, right, forward diagonal left, front diagonal right, backward diagonal left, and backward diagonal right. The direction is set to back by default and this setting is only available when the subject is moving in a stable direction. The direction of tracking can be adjusted during tracking.
Parallel: The aircraft tracks the subject at a constant angle and distance from the side. In ActiveTrack, the aircraft maintains a distance of 4-20 m when tracking people with an altitude of 2-20 m (the optimal distance is 5-10 m and altitude is 2-10 m), and a distance of 6-100 m when tracking vehicles or boats with an altitude of 6-100 m (the optimal distance is 20-50 m and altitude is 10-50 m). The aircraft will fly to the supported distance and altitude range if the distance and altitude is out of range when ActiveTrack begins. Fly the aircraft at the optimal distance and altitude for the best performance.
Using FocusTrack
- Take off.

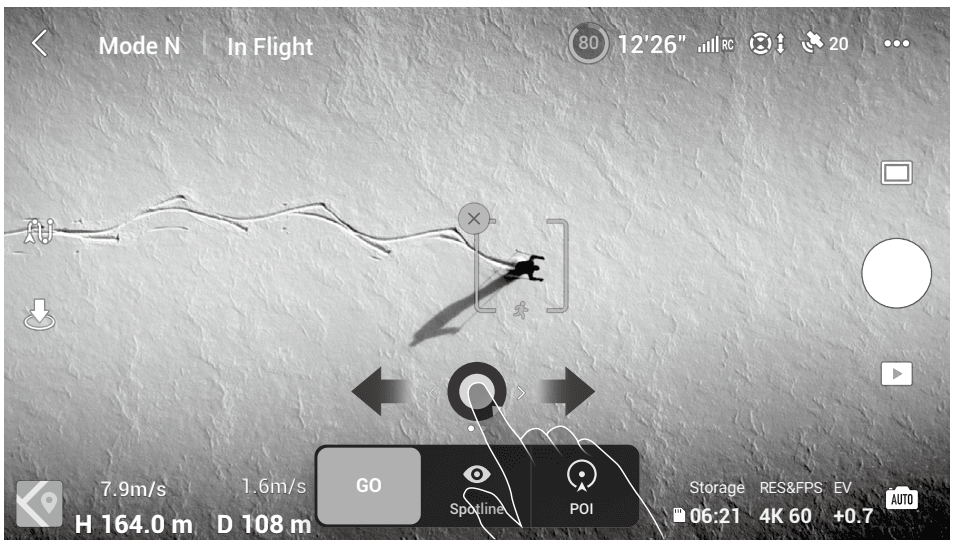
- Drag a box around the subject in the camera view or enable Subject Scanning under Control settings in DJI Fly and tap the recognized subject to enable FocusTrack. The default mode is Spotlight. Tap the icon to switch between Spotlight, ActiveTrack, and POI. FocusTrack supports 3x zoom. The zoom ratio will be limited if it is too large to recognize a subject. Tap GO to start FocusTrack.

- In Trace of ActiveTrack, the tracking direction can be changed using the direction wheel. The direction wheel will be minimized if there is no operation for an extended period or any other area of the screen is tapped. Trace or Parallel can be selected once the direction wheel is minimized. The tracking will be reset to back once Trace is selected again.

- Tap the shutter/record button to take photos or start recording. View the footage in Playback.
Waypoint Flight
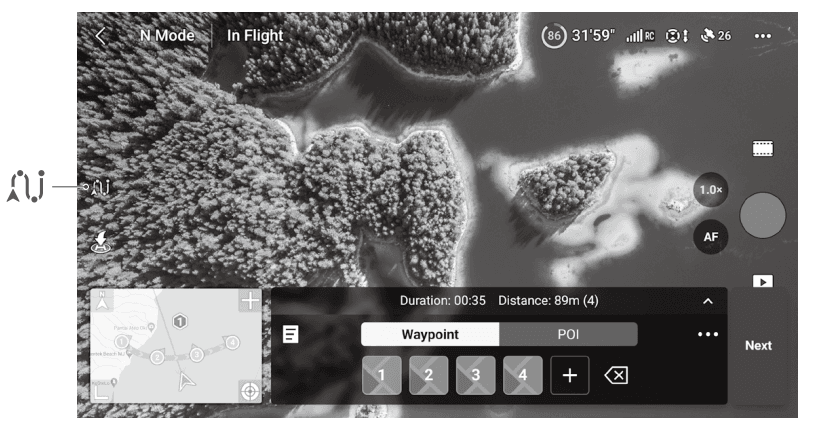
Waypoint Flight enables the aircraft to capture images during a flight according to the waypoint flight route generated by the preset waypoints. Points of Interest (POI) can be linked to the waypoints. The heading will point toward the POI during the flight. A waypoint flight route can be saved and repeated.
Using Waypoint Flight
- Enable Waypoint Flight: Tap the Waypoint Flight icon on the left of the camera view in DJI Fly to enable Waypoint Flight.

- Waypoint Settings
Pin Waypoint
Waypoints can be pinned via the map before take-off. Waypoints can be pinned via the remote controller, operation panel, and map after the aircraft takes off, GNSS is required.
- Using the Remote Controller: Press once on the Fn button (RC-N1) or C1 button (DJI RC/DJI RC Pro) to pin a waypoint.
- Using the Operation Panel: Tap + on the operation panel to pin a waypoint.
- Using the Map: Enter and tap on the map to pin a waypoint. The default altitude of a waypoint via the map is set to 50 m. Press and hold on to a waypoint to move its position on the map.
Settings
Tap the waypoint number for settings such as camera action, altitude, speed, heading, gimbal tilt, zoom, and hovering time.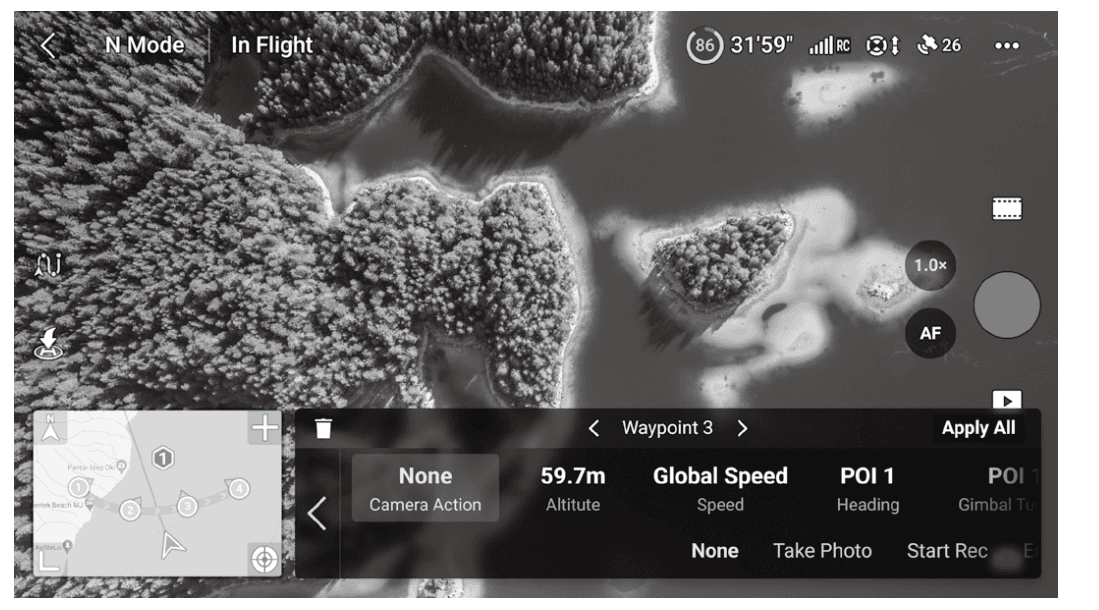
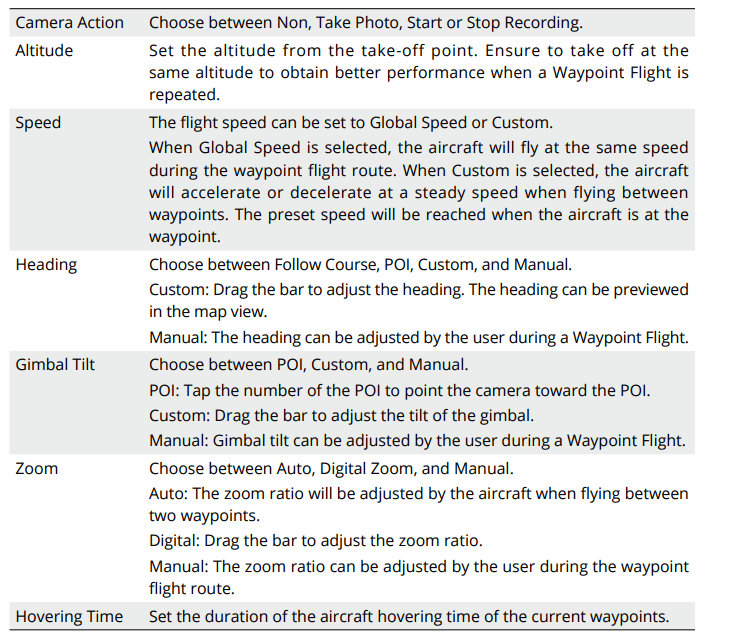
All the settings except camera action can be applied to all waypoints after selecting Apply to All. Tap the delete icon to delete a waypoint.
- POI Settings: Tap POI on the operation panel to switch to POI settings. Use the same method to pin a POI as used with a waypoint. Tap the number of the POI to set the altitude of the POI. The POI can be linked to a waypoint. Multiple waypoints can be linked to the same POI, the camera will point toward the POI during the Waypoint Flight.
- Plan a Waypoint Flight: Tap three dots to plan a Waypoint Flight. Tap Next to adjust the Global Speed, the behavior of End of Flight, On Signal Lost, and Start Point. The settings apply to all waypoints.
- Perform a Waypoint Flight
Flight
Once pre-flight preparation is complete, it is recommended to hone your flight skills and practice flying safely. Make sure that all flights are carried out in an open area. Refer to the Remote Controller and DJI Fly sections for information about using the remote controller and the app to control the aircraft.
Flight Environment Requirements
- DO NOT use the aircraft in severe weather conditions including wind speeds exceeding 12 m/s, snow, rain, and fog.
- Only fly in open areas. Tall structures and large metal structures may affect the accuracy of the onboard compass and GNSS system. It is recommended to keep the aircraft at least 5m away from structures.
- Avoid obstacles, crowds, high-voltage power lines, trees, and bodies of water. It is recommended to keep the aircraft at least 3 m above water.
- Minimize interference by avoiding areas with high levels of electromagnetism such as locations near power lines, base stations, electrical substations, and broadcasting towers.
- Aircraft and battery performance is subject to environmental factors such as air density and temperature. Be careful when flying 6,000 m or more above sea level, since battery and aircraft performance may be reduced.
- Aircraft cannot use GNSS within the polar regions. Use the Downward Vision System when flying in such locations.
- DO NOT take off from moving objects such as cars, ships, and airplanes.
- DO NOT use the aircraft, remote controller, battery, and battery charger near accidents, fires, explosions, floods, tsunamis, avalanches, landslides, earthquakes, dust, or sandstorms.
- Use the battery charger in a temperature range of 5° to 40° C (41° to 104° F).
- Operate the aircraft, battery, remote controller, and battery charger in a dry environment.
- DO NOT use the battery charger in humid environments.
Flight Limits and GEO Zones
GEO (Geospatial Environment Online) System
DJI’s Geospatial Environment Online (GEO) System is a global information system that provides real-time information on flight safety and restriction updates and prevents UAVs from flying in restricted airspace. Under exceptional circumstances, restricted areas can be unlocked to allow flights in. Prior to that, the user must submit an unlocking request based on the current restriction level in the intended flight area.
The GEO system may not fully comply with local laws and regulations. Users shall be responsible for their own flight safety and must consult with the local authorities on the relevant legal and regulatory requirements before requesting to unlock a flight in a restricted area. For more information about the GEO system, visit https://www.dji.com/flysafe.
Flight Limits
For safety reasons, flight limits are enabled by default to help users operate this aircraft safely. Users can set flight limits on height and distance. Altitude limits, distance limits, and GEO zones function concurrently to manage flight safety when GNSS is available. Only altitude can be limited when GNSS is unavailable.
Flight Altitude and Distance Limits
The flight altitude and distance limits can be changed in DJI Fly. Based on these settings, the aircraft will fly in a restricted cylinder, as shown below: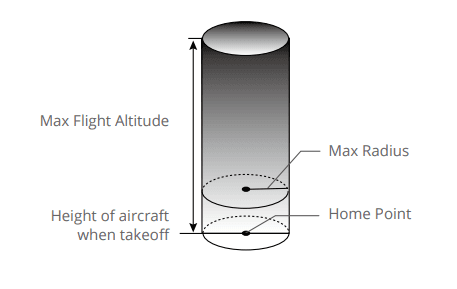
When GNSS is available
Only the Downward Vision System is available
GEO Zones
All GEO zones are listed on the DJI official website at http://www.dji.com/flysafe/geo-map. GEO zones are divided into different categories and include locations such as airports, flying fields where manned aircraft operate at low altitudes, borders between countries, and sensitive locations such as power plants. There will be prompts in the DJI Fly app to fly in GEO zones.
Pre-Flight Checklist
- Make sure the remote controller, mobile device, and Intelligent Flight Battery are fully charged.
- Make sure the Intelligent Flight Battery and the propellers are mounted securely.
- Make sure the aircraft arms are unfolded.
- Make sure the gimbal and camera are functioning normally.
- Make sure that there is nothing obstructing the motors and that they are functioning normally.
- Make sure that DJI Fly is successfully connected to the aircraft.
- Make sure that the camera lens and Vision System sensors are clean.
- Use only genuine DJI parts or parts certified by DJI. Unauthorized parts or parts from non- DJ! certified manufacturers may cause system malfunctions and compromise safety
- Check if the Remote ID is up to date and working.
- Make sure the max flight altitude is set properly according to local regulations.
- DO NOT fly over a density population.
- Make sure the aircraft and remote controller are functioning normally.
Flight Test
Takeoff/Landing Procedures
- Place the aircraft in an open, flat area with the aircraft status indicator facing towards you.
- Tum on the aircraft and the remote controller.
- Launch DJ Fly and enter the camera view.
- Wait until the self-check is finished, it is safe to fl if there is no abnormal warning in DJI Fly.
- Gently push the throttle stick to take off or use auto-takeoff.
- Pull the throttle stick or use auto-landing to land the aircraft.
- After landing, push the throttle stick down and hold. The motors stop after one second.
- Tum off the aircraft and remote controller.
Video Suggestions and Tips
- The pre-flight checklist is designed to help you fly safely and to ensure that you can shoot video during flight. Go through the full pre-flight checklist before each flight.
- Select the desired gimbal operation mode in DJi Fly.
- Use Normal or Cine mode to record video.
- DO NOT fly in bad weather conditions such as when it is raining or windy.
- Choose the camera settings that best suit your needs.
- Perform flight tests to establish flight routes and to preview scenes.
For more manuals by DJI, Visit ManualsLibraryy
DJI Mavic 3 Classic Drone-FAQs
How far can the DJI Mavic 3 Classic fly?
In an unobstructed environment with no interference, the Mavic 3 Classic can fly up to 15 km under FCC compliance. Always monitor Return to Home (RTH) notifications in the DJI Fly app.
What are the key features of the Mavic 3 Classic?
The Mavic 3 Classic includes Infrared Sensing and Vision Systems (Forward, Backward, Upward, Lateral, and Downward), enabling precise hovering, obstacle avoidance, and automatic Return to Home (RTH).
Can the Mavic 3 Classic fly in the rain?
No, the Mavic 3 Classic is not waterproof. Flying in rainy conditions is not recommended as water can damage internal components.
Is the Mavic 3 Classic a professional-grade drone?
Yes, it features Hasselblad’s high-quality imaging standards, making it suitable for professional aerial photography.
How do I charge the DJI Mavic 3 Classic?
1. Method 1: Use a Type-C cable to charge directly through the rear port of the aircraft.
2. Method 2: Insert batteries into the Battery Charging Hub until fully charged.
Does the Mavic 3 Classic support Remote ID?
Yes, the Mavic 3 series supports Remote ID, ensuring compliance with aviation regulations.
Can the Mavic 3 Classic be used for mapping?
No, the Mavic 3 Classic does not support mapping. For professional mapping, consider DJI Enterprise drones like the Matrice 300 RTK or Phantom 4 RTK.
Where can I find the DJI Wi-Fi password?
The default Wi-Fi password is usually listed next to the QR code on the drone’s carrying case. The common default password is 12341234.
What is the minimum operating temperature for the Mavic 3 Classic?
The drone operates between -10°C and 40°C. Avoid extreme temperatures for optimal performance.
How high can the DJI Mavic 3 Classic fly?
The Mavic 3 Classic can reach up to 19,685 feet (6,000 meters), similar to commercial aircraft cruising altitudes. However, flight altitude restrictions may apply depending on your location.

