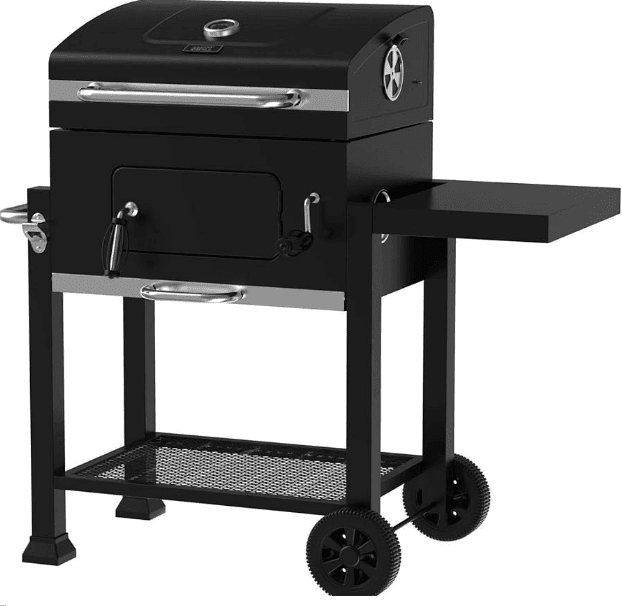
Expert Grill XG1910200103 Charcoal Grill
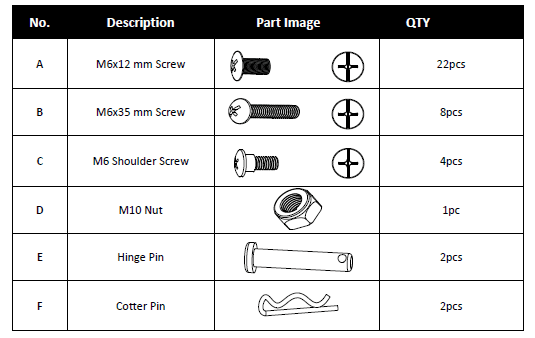
Parts List with graphic
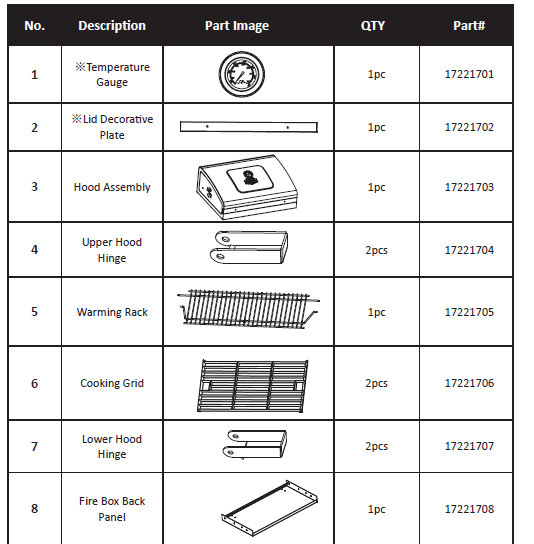

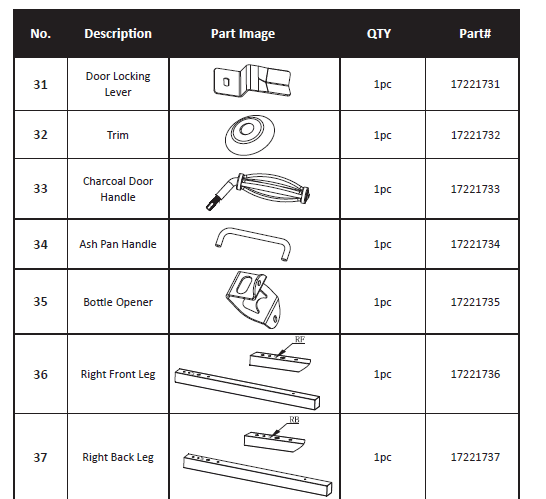
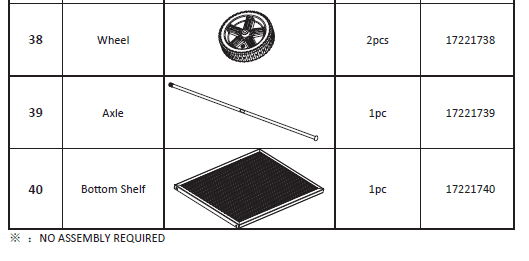
HARDWARE KIT
ASSEMBLY PREPARATION
Before beginning assembly of product, make sure all parts are present. Inspect contents of box to make sure all parts are included and not damaged. If any part is missing or damaged, do not attempt to assemble the product.
Estimated Assembly Time: 1 hour by two people
Tools required for assembly:
- Phillips Head Screwdriver:1pc (not included);

- Wrench: 1pc (not included)

- Plier 1pc: (not included)

ASSEMBLY INSTRUCTIONS
IMPORTANT: ASSEMBLE ON FLAT AND SOFT SURFACE TO AVOID SCRATCHING.
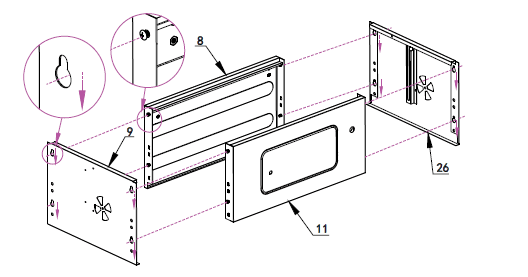
- Loosen pre‐assembled Screws and leave the screw heads protruding approximately 1/5 inch. Hang the side panels onto the screws and tighten them as shown.

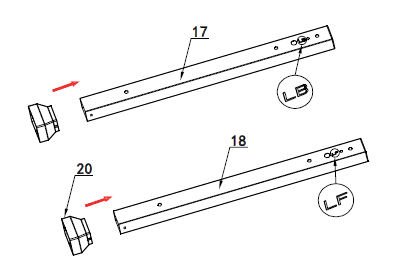
- Put Leg End Cap (20) into Left Back Leg (17) and Left Front Leg (18). Make sure the Leg End Cap is locked into the square hole on the legs.

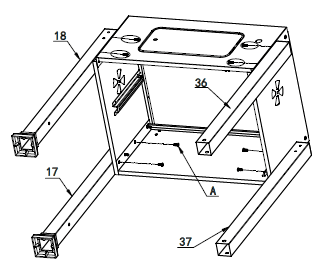
- Use 8pcs A screws to attach legs to each corner of the Firebox as shown.

A M6X12 mm Screw X 8
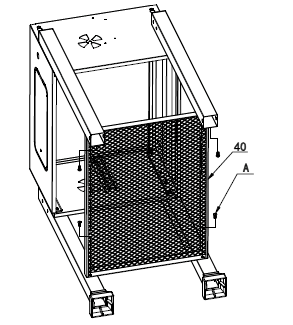
X 8 - Use 4pcs A Screws to attach the Bottom Shelf (40) to the 4 Legs.

M6X12 mm Screw X 4
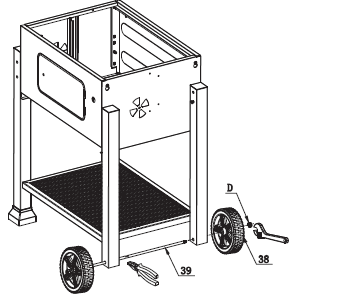
X 4 - Thread Axle (39) through the Wheels (38), Right Left Leg and Right Back Leg, and then fasten D Nut as shown.

M10 NUT X 1
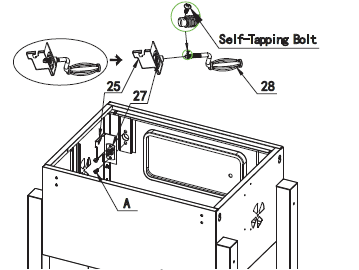
X 1 - Remove the pre-assembled Self-Tapping Bolt from the tip of Crank Handle and loosen the handle from the bracket. Use 2pcs A Screws to attach the Right Shaft Support Bracket (25) together with Handle Locking Bracket (27) from inside of Firebox front panel.

A M6X12 mm Screw X 2
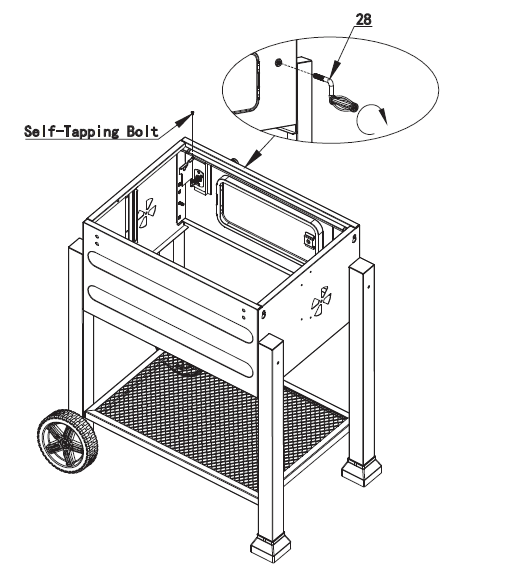
X 2 - Rotate the Crank Handle (28) into the hole of the front panel and then fasten the Self-Tapping Bolt to the end of the Crank Handle (28).
Note: Make sure to rotate the crank handle counterclockwise completely to the end.
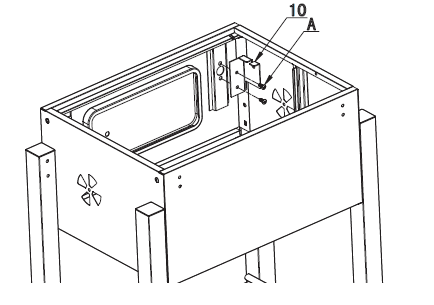
- 8. Use 2pcs A screws to attach the Left Shaft Support Bracket (10) to the Firebox.
 A M6X12 mm Screw
  X 2
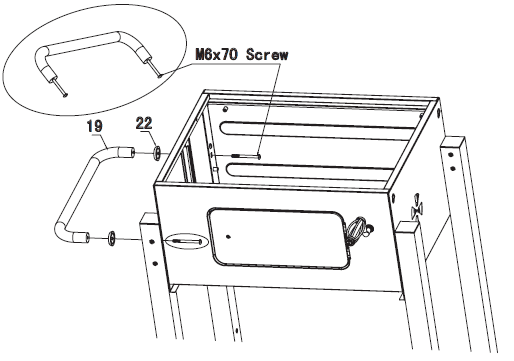
X 2 - Loosen the pre-assembled M6x70 screws from Cart Handle (19), and then assemble the handle together with spacer (22) to the Left side of the Cart according to the diagram as shown.

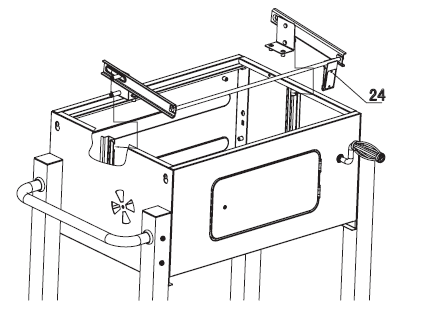
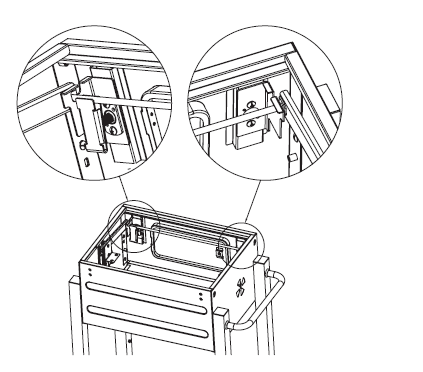
- Put the Bolts of the Shaft Assembly (24) into the slot of the Left & Right Fire box side panel. Fit the shaft onto the slot of the bracket of the fire box front panel.


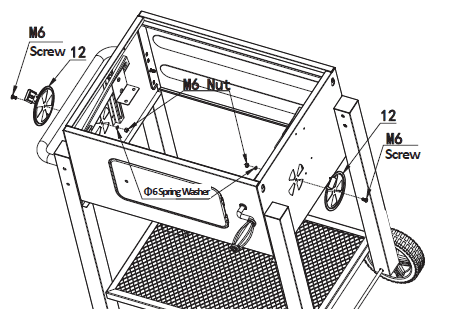
- Loosen the pre-assembled M6 screws, Φ6 Spring Washers and M6 Nuts from Butterfly Dampers (12), and then assemble the Butterfly Dampers to the side of Fire Box according to the diagram as shown.

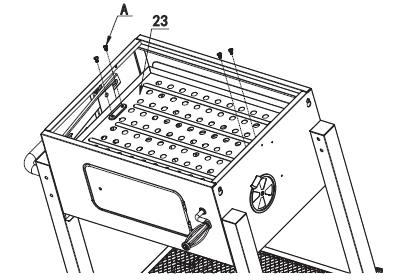
- Align the holes of the charcoal pan (23) with the holes on Shaft Assembly brackets, and install the charcoal pan (23) onto the brackets by tightening 4pcs A crews as shown.
 A M6X12 mm Screw
  X 4
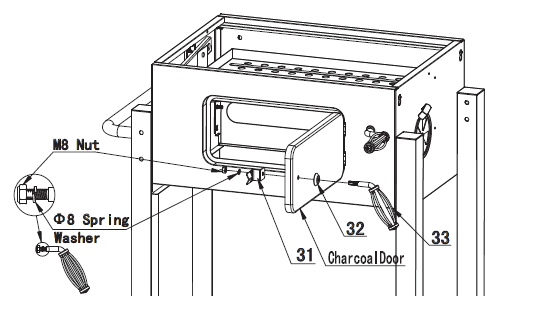
X 4 - Loosen the pre-assembled M8 Nut and spring washer from the handle (33), and then assemble the handle to Charcoal Door according to the diagram as shown.

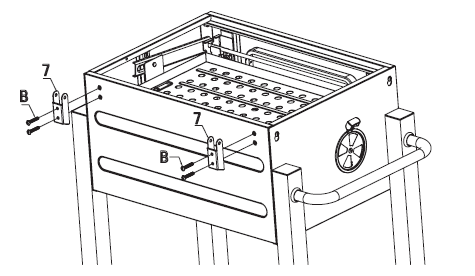
- Use 4pcs B screws to attach Lower Hood Hinges (7) to the firebox back panel.
 B M6X35 mm Screw
  X 4
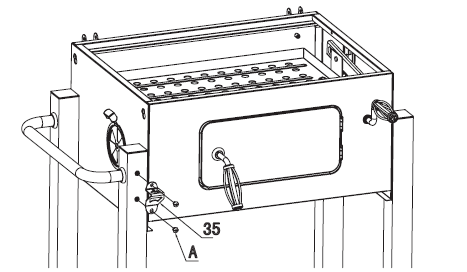
X 4 - Use 2pcs A screws to attach Bottle Opener (35) to Left Front Leg.
 A M6X12 mm Screw
  X 2
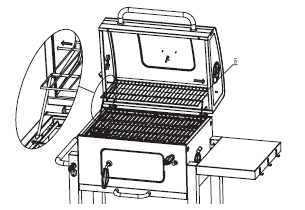
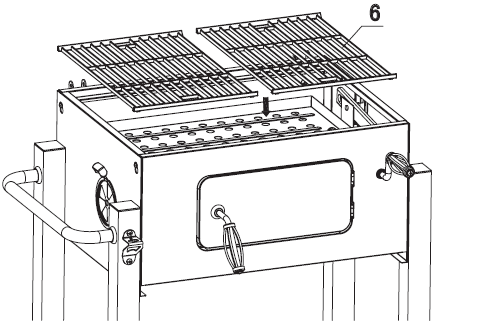
X 2 - Place the Cooking Grates (6) inside the firebox as shown.

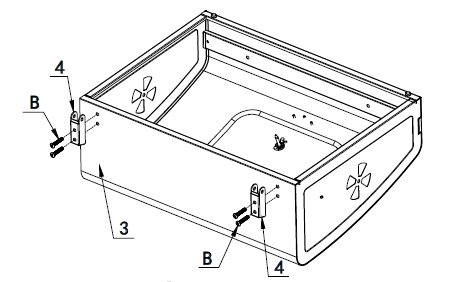
- Use 4pcs B screws to attach Upper Hood Hinges (4) to the back of the Hood.
 B M6X35 mm Screw
  X 4
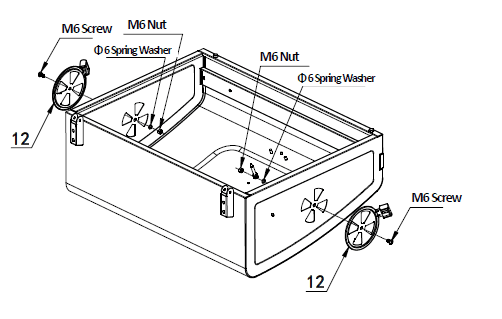
X 4 - Loosen the pre‐assembled M6 screws, Φ6 Spring Washers and M6 Nuts from Butterfly Dampers (12), and then assemble the Butterfly Dampers to both sides of Hood according to the diagram as shown.

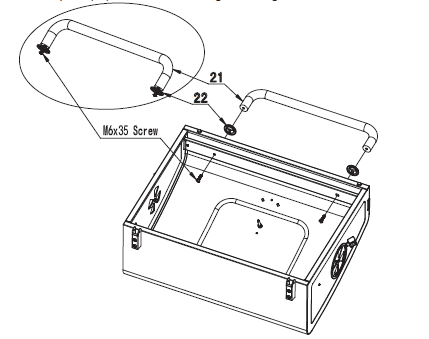
- Loosen the pre-assembled M6x35 screws from Hood Handle (21), and then assemble the handle together with spacer (22) to the hood according to the diagram as shown.

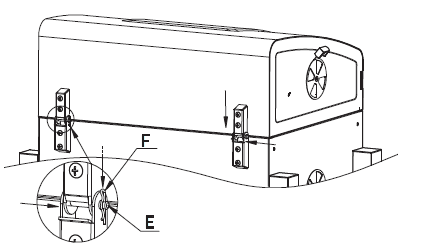
- Position Hood onto Firebox with hinges aligned as shown. Insert Hinge Pins (E) through hinges. Secure hinge pins with Cotter Pins (F)
 E Hinge Pin
F Cotter Pin
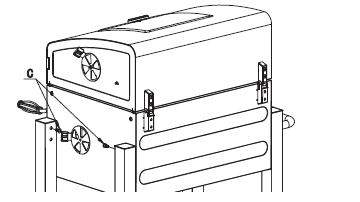
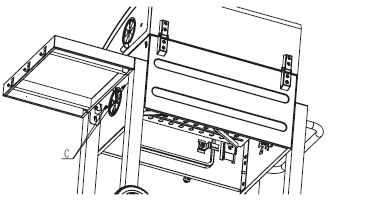
- Insert M6 Shoulder Screw (C) into the top hole of each leg as shown. Tighten screws to leave the screws head protruding approximately 1/5 inch.
 Hang the Side Shelf Brackets onto the protruding bolt heads, and then fully tighten screws as shown.
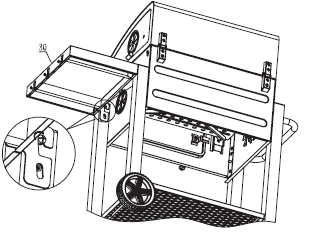
 Insert M6 Shoulder Screw (C) into the lower holes of side shelf bracket and fully tighten screws as shown below.
 C M6 shoulder screw
  X 4
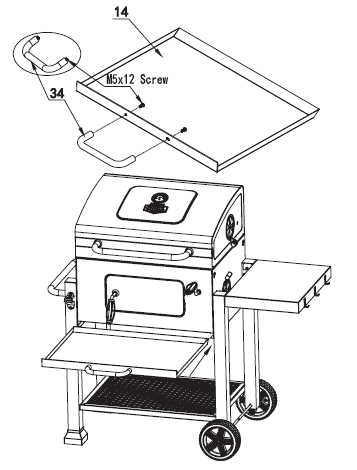
X 4 - Loosen the pre-assembled M5x12 Screws from Ash Pan Handle (34), and then assemble the handle to Ash Pan (14) according to the diagram as shown. Then insert the Ash Pan under the Firebox as shown.

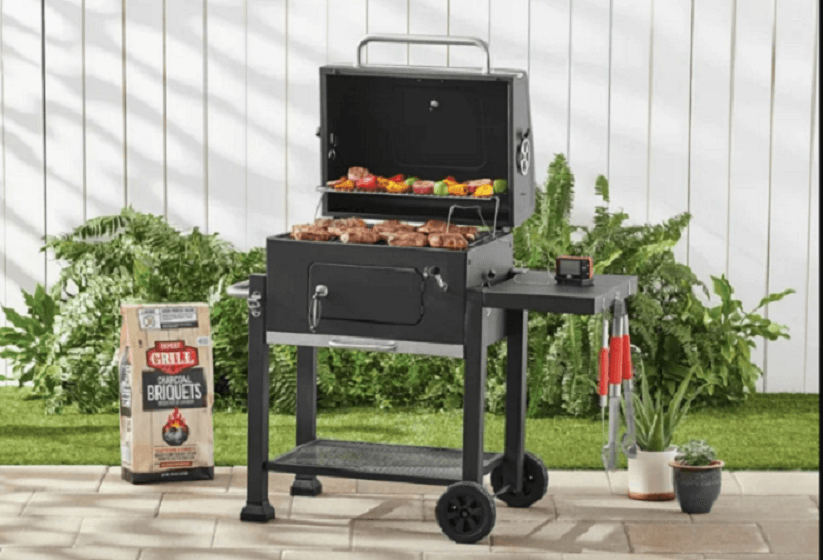
- Install the Warming Rack as shown.

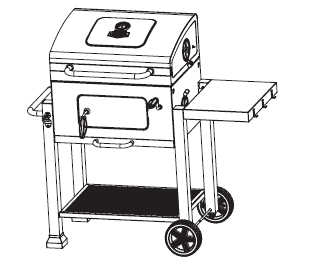
- Assembly is completed.

2‐YEAR LIMITED WARRANTY
This warranty is non‐transferable and does not cover failures due to misuse of improper installation or maintenance. This warranty is for replacement of defective parts only. We are not responsible for incidental or consequential damages or labor costs. This warranty does not cover corrosion or discoloration after the grill is used, or lack of maintenance, hostile environment, accidents, alterations, abuse or neglect.
This warranty does not cover damage caused by heat, abrasive and chemical cleaners, or any damage to other components used in the installation or operation of the charcoal grill. And paint is not warranted and may require touch‐up. Some states do not allow the limitation or exclusion of incidental or consequential damages, so the above limitations or exclusions may not apply to you. This warranty gives you specific legal rights, and you may also have other rights that vary from state to state.
DO NOT RETURN TO STORE
For service regarding this warranty, call our Customer Service Department at 1-866-206-0888 from 8:00am to 4:30pm eastern time, Monday through Friday for assistance. Proof of purchase in the form of an original receipt with date of purchase is required. DO NOT ship parts or units without a return authorization number. Upon receipt of an authorization number, the product must be shipped prepaid.
For more manuals by Expert Grill visit, ManualsLibraryy
Expert Grill XG1910200103 Charcoal Grill-FAQs
How do you use a built-in charcoal grill?
1. Place the empty chimney starter on the lower grate of the grill.
2. Fill the chimney with charcoal.
3. Remove the chimney and set lighter cubes onto the grate.
4. Light the cubes with a utility lighter and place the chimney on top.
How do you use a portable charcoal grill?
1. Set it on a flat, stable surface away from flammable materials.
2. Open the vents, light the charcoal, and wait until it’s ashed over.
3. Spread the charcoal evenly, heat the cooking grate, and start grilling.
What is the purpose of a charcoal grill?
A charcoal grill cooks food directly over high heat, adding a smoky flavor. It allows for grilling, smoking, baking, and searing at various temperatures.
How do you control the temperature on a chargriller smoker?
Adjust the side damper and smokestack to control airflow:
1. Open dampers for more heat.
2. Close dampers to cool down.
How does a smokeless charcoal grill work?
Smokeless charcoal grills use an innovative airflow system to circulate air efficiently, reducing smoke and quickly reaching cooking temperature while maximizing coal usage.
Is a charcoal grill hotter with the lid open or closed?
1. Open lid: More oxygen enters, increasing heat.
2. Closed lid: Oxygen supply decreases, lowering the heat.
Why are my coals not lighting?
Insufficient airflow is the usual issue. Ensure vents are open and not blocked, and avoid overcrowding the grill with too many briquettes.
What is the maximum temperature for a charcoal grill?
The maximum temperature is around 1200 °F. Perform a trial run without food before the first use.
Which charcoal is best for grilling?
Lump charcoal is preferred for its high heat and clean-burning properties. It’s ideal for ceramic kamado grills and other charcoal grills.
How do I know if my grill is working?
For gas or propane grills, listen for the ignition click and look for a steady blue flame with yellow tips distributed across all burner spaces.

 A M6X12 mm Screw
 A M6X12 mm Screw
 B M6X35 mm Screw
  A M6X12 mm Screw
 B M6X35 mm Screw
 E Hinge Pin
 Hang the Side Shelf Brackets onto the protruding bolt heads, and then fully tighten screws as shown.
 Insert M6 Shoulder Screw (C) into the lower holes of side shelf bracket and fully tighten screws as shown below.
 C M6 shoulder screw