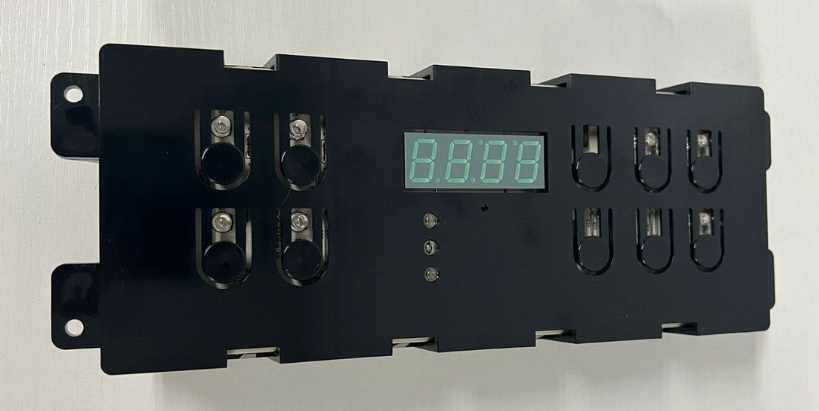
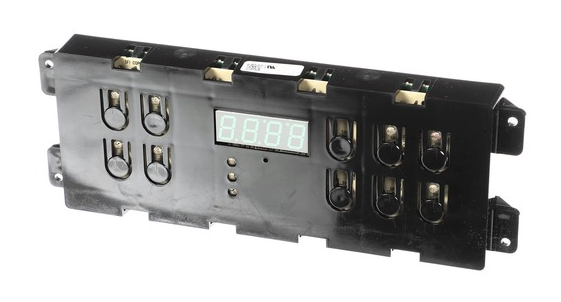
Frigidaire Electric Range ES300 Controls
Important Safety Instructions
- Do Not Leave Children Alone—Children should not be left alone or unattended in the area where the appliance is in use. They should never be allowed to sit or stand on any part of the appliance.
- DO NOT TOUCH SURFACE BURNERS, AREAS NEAR THESE BURNERS, OVEN BURNERS, OR INTERIOR SURFACES OF THE OVEN. Both surface and oven burners may be hot even though flames are not visible. Areas near surface burners may become hot enough to cause burns. During and after use, do not touch or let clothing or other flammable materials touch these areas until they have had sufficient time to cool. Among these areas are the cook top, surfaces facing the cook top, the oven vent openings and surfaces near these openings, the oven door, and
window. - Wear Proper Apparel—Loose-fitting or hanging garments should never be worn while using the appliance. Do not let clothing or other flammable materials contact hot surfaces.
- Do Not Use Water or Flour on Grease Fires—Smother the fire with a pan lid, or use baking soda, a dry chemical or a foam-type extinguisher.
- When heating fat or grease, watch it closely. Fat or grease may catch fire if it becomes too hot.
- Use Only Dry Potholders—Moist or damp potholders on hot surfaces may result in burns from steam. Do not let potholders touch hot heating burners. Do not use a towel or other bulky cloth instead of a potholder.
- Do Not Heat Unopened Food Containers—Buildup of pressure may cause the container to burst and result in injury.
- Remove the oven door from any unused range if it is to be stored or discarded.
IMPORTANT—ELECTRIC IGNITION MODELS ONLY: Do not attempt to operate the oven during a power failure. If the power fails, always turn off the oven. If the oven is not turned off and power is restored, the oven will resume operation. Once the power resumes, reset the clock and oven function.
Features At A Glance

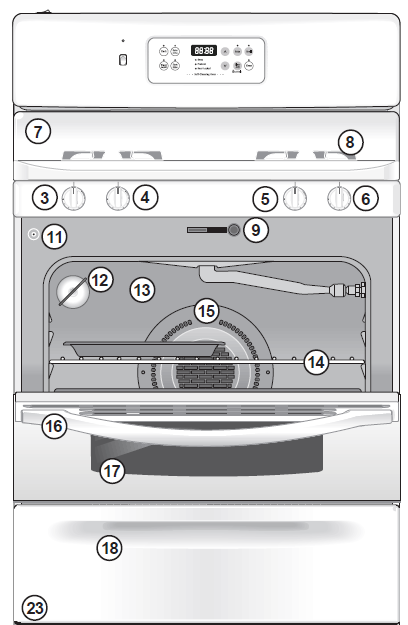
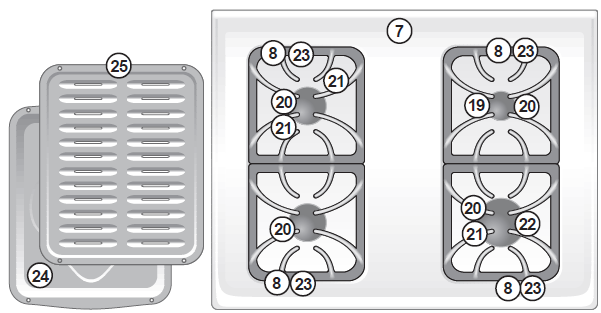
Your Gas Range Features Include:
- Electronic Oven Control with Kitchen Timer.
- Speed Bake™ Cooking System Control Switch & Indicator Light (some models).
- Left Front Burner Valve & Knob.
- Left Rear Burner Valve & Knob.
- Right Rear Burner Valve & Knob.
- Right Front Burner Valve & Knob.
- Easy to clean Upswept Cooktop
- Dishwasher safe Burner Grates (colors vary).
- Self-Clean Oven Door Latch.
- Manual Oven Light Switch (some models).
- Automatic Oven Door Light Switch (some models).
- Oven Interior Light with Shield (some models).
- Self-Cleaning Oven interior.
- Adjustable Oven Rack(s).
- Speed Bake™ Cooking System Fan (some models).
- Large 1-piece Oven Door Handle.
- Full-width Oven Door (styles vary with model).
- Storage Drawer with integrated Handle (some models) or lower cover panel (some models).
- 5,000 BTU Simmer Burner (some models).
- 9,500 BTU Burner (some models).
- 12,000 BTU Power Plus Burner (some models).
- 14,000 BTU Power Plus Burner (some models).
- Burner Drip pans (some models).
- Broil Pan (some models).
- Broil Pan Insert (some models).
- Leveling Legs and Anti-tip Bracket (included).
NOTE: The features of your range may vary according to model type & color.
Before Setting Oven Controls
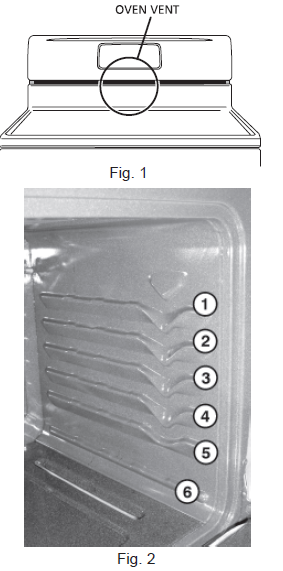
Oven Vent Location
The oven vent is located below the backguard (See Fig. 1). When the oven is on, warm air is released through this vent. This venting is necessary for proper air circulation in the oven and good baking results. DO NOT BLOCK THE VENT.
Arranging Oven Racks
ALWAYS ARRANGE OVEN RACKS WHEN THE OVEN IS COOL (PRIOR TO OPERATING THE OVEN). Always use oven mitts when using the oven.
Removing & Replacing Oven Racks
To remove, pull the rack forward until it stops. Lift up the front of the rack and slide it out. To replace, fit the rack onto the guides on the oven walls. Tilt the front of the rack upward and slide the rack back into place.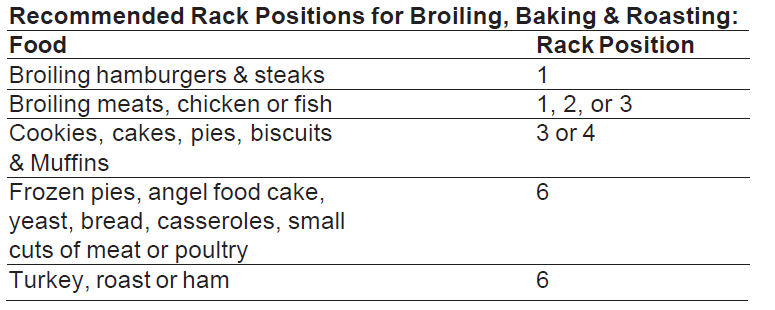
Oven Racks
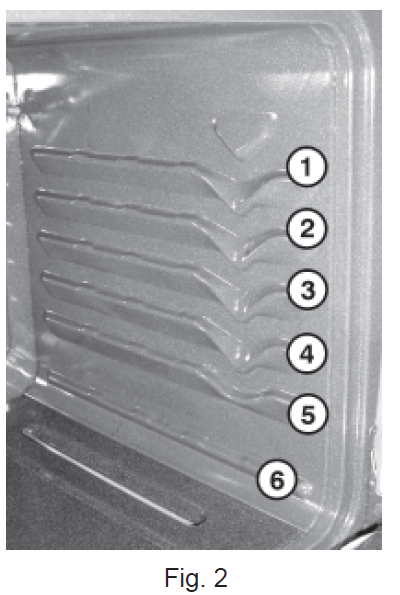
Your range is equipped with one or more Flat Oven Rack(s). Place the rack(s) into the positions shown in Fig. 2. See the Recommended Rack Positions in the chart above.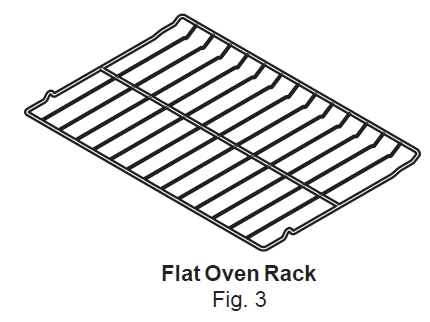
Baking Layer Cakes with 1 or 2 Oven Racks
For best results when baking cakes using 2 oven racks, place cookware on rack positions 3 & 6 (See Figs. 2 & 4). For best results when using a single oven Flat Rack, place cookware on rack position 4 (See Figs. 2 & 5).
Air Circulation in the Oven
For best air circulation and baking results, allow 2-4″ (5-10 cm) around the cookware for proper air circulation, and be sure pans and cookware do not
touch each other, the oven door, sides, or back of the oven cavity. The hot air must be able to circulate around the pans and cookware in the oven for even heat to reach around the food.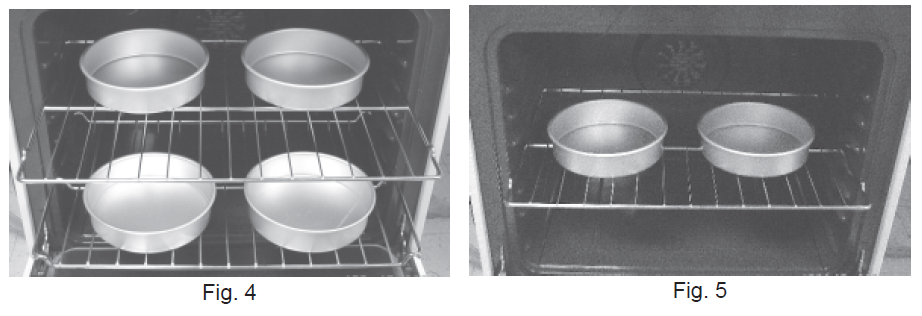
Setting Surface Controls
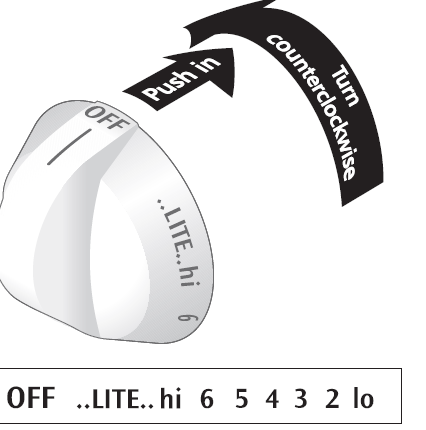
Caution: Do not place plastic items such as salt and pepper shakers, spoon holders or plastic wrappings on top of the range when it is in use. These items could melt or ignite. Potholders, towels, or wooden spoons could catch fire if placed too close to a flame. In the event of an electrical power outage, the surface burners can be lit manually. To light a surface burner, hold a lit match to the burner head, then slowly turn the surface control knob to LITE. After burner lights push in and turn the knob to the desired setting. Use caution when lighting surface burners manually.
Setting Surface Controls
Your range may be equipped with different-sized surface burners. The ability to heat food quickly and in larger volumes increases as the burner size increases. The SIMMER burner (some models) is best used for simmering delicate sauces, etc. The standard burners can be used for most surface cooking needs. The POWER PLUS burner(s) (some models) are best used for bringing large quantities of liquid to temperature and when preparing larger quantities of food. Regardless of size, always select cookware that is suitable for the amount and type of food being prepared. Select a burner and flame size appropriate to the pan. Never allow flames to extend beyond the outer edge of the pan.
Operating the Gas Surface Burners:
- Place the cooking utensil on the surface burner.
- Push the surface control knob in and turn counterclockwise out of the OFF position.
- Release the knob and rotate to the LITE position. Note: All four electronic surface ignitors will spark at the same time. However, only the burner you are turning on will ignite.
- Visually check that the burner has lit.
- Push the control knob in and turn counterclockwise to the desired flame size. The control knobs do not have to be set at a particular setting. Use the guides and adjust the flame as needed. DO NOT cook with the surface control knob in the LITE position. (The electronic ignitor will continue to spark if the knob is left in the LITE position.)

Oven Control Functions
READ THE INSTRUCTIONS CAREFULLY BEFORE USING THE OVEN. For satisfactory use of your oven, become familiar with the various pad functions of the oven as described below.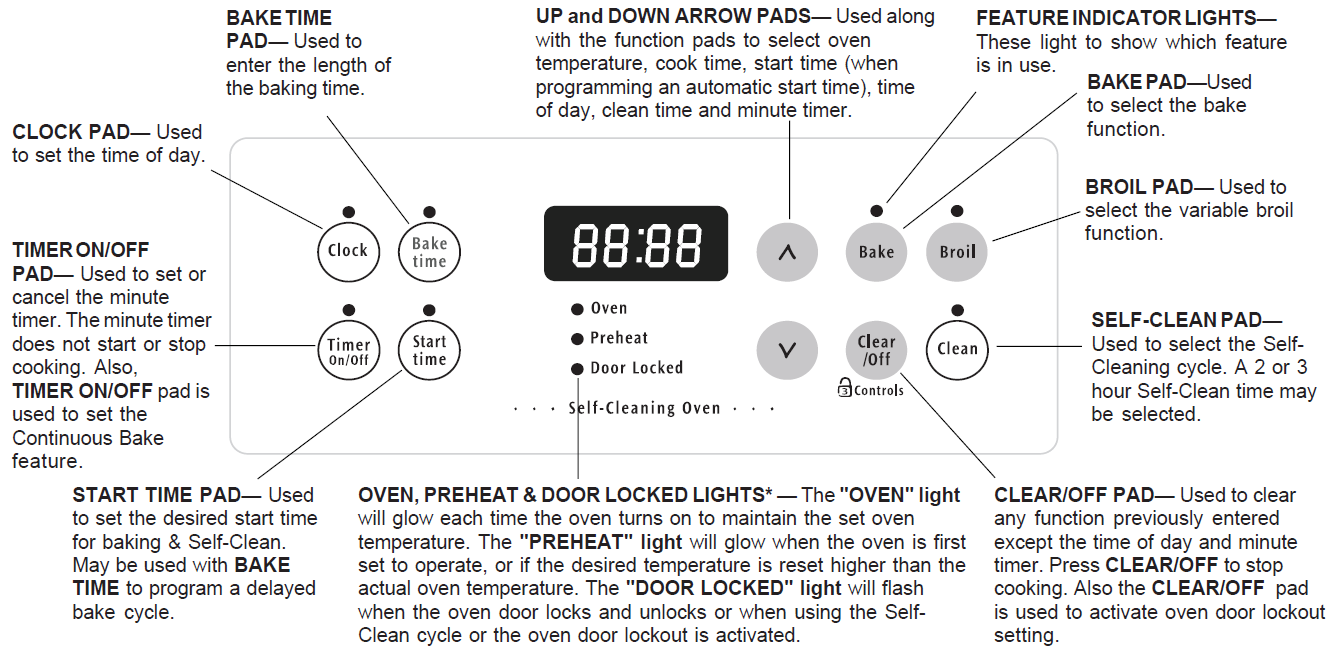
*Note: The OVEN indicator light on the electronic display will turn ON and OFF when using the Bake feature and during preheat. This is normal and indicates that the oven is cycling to maintain the selected baking temperature. When the preheat indicator light turns OFF, your oven is ready.
For a silent control panel
When choosing a function, a beep will be heard each time a pad is pressed. If desired, the control can be programmed for silent operation. Press and![]() hold . After 7 seconds, the control will beep once. This will block the controls from sounding when a pad is pressed. To return the sound, press and
hold . After 7 seconds, the control will beep once. This will block the controls from sounding when a pad is pressed. To return the sound, press and![]() hold again for 7 seconds until the control beeps once.
hold again for 7 seconds until the control beeps once.
Temperature conversion
The electronic oven control is set to operate in °F (Fahrenheit) when shipped from the factory. The oven can be programmed for any temperature from 170°F to 550°F (77°C to 287°C).
To change the temperature to °C (Celsius) or from °C to °F (control should not be in a Bake or Clean mode):
- Press
 . “— —” appears in the display.
 - Press and hold the
 until “HI” appears in the display.
 - Press and hold until °F or °C appears in the display.
- Press the
 to change °F to °C or °C to °F.
 - Press any control pad to return to normal operating mode.
Setting Oven Controls
Note: The time of day must first be set in order to operate the oven.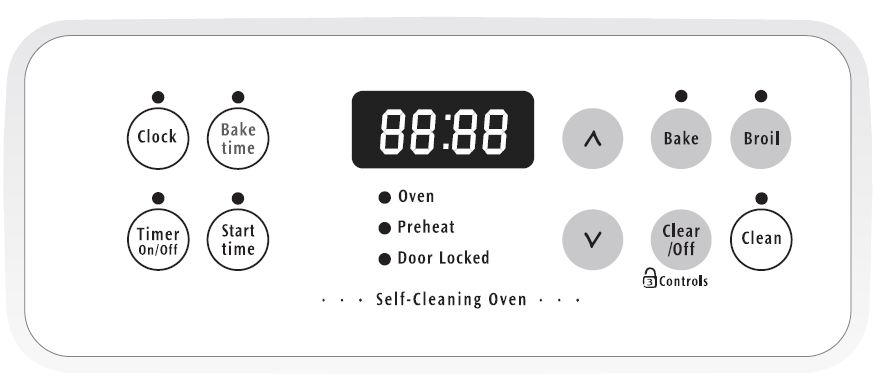
To Set the Clock
When the range is first plugged in, or when the power supply to the range has been interrupted, the display will flash “12:00”.
- Press
 once (do not hold the pad down).
 - Within 5 seconds, press and hold the
 until the correct time of day appears in the display.
Note: The clock cannot be changed during any timed bake or Self-Clean cycle.
To Set the Minute Timer:
- Press
 .
. - Press the
 to increase the time in one-minute increments. Press and hold the
 to increase the time in 10-minute increments. The timer can be set for any amount of time from 1 minute to 11 hours and 59 minutes.
Note: If the pad is pressed first, the timer will advance to 11 hours and 59 minutes.
 - The display shows the timer countdown in minutes until 1 minute remains. Then the display will count down in seconds.
- When the set time has run out, the timer will beep 3 times. it will then continue to beep 3 times every 60 seconds until
 is pressed.
Note: The indicator light located above the pad will glow while the minute timer is active.
Note: The minute timer does not start or stop cooking. It serves as an extra timer in the kitchen that will beep when the set time has run out. The minute timer can be used alone or during any of the other oven functions. When the minute timer is in use with any other function, the minute timer will be shown in the display. To view other functions, press the pad for that function.
To Change the Minute Timer while it is in use:
While the timer is active and shows in the display, press and hold the![]() to increase or decrease the time.
to increase or decrease the time.
To cancel the Minute Timer before the set time has run out: Press![]() .
.
Note: To turn the time of day display OFF or ON in the display, press![]() and hold for 15 seconds (the control will beep once) and then release. This feature does not remove the set time of day from the memory of the control. When the display is turned OFF, the time of day will reappear for a few seconds any time the
and hold for 15 seconds (the control will beep once) and then release. This feature does not remove the set time of day from the memory of the control. When the display is turned OFF, the time of day will reappear for a few seconds any time the![]() pad is touched.
pad is touched.
Speed Bake™ Cooking System
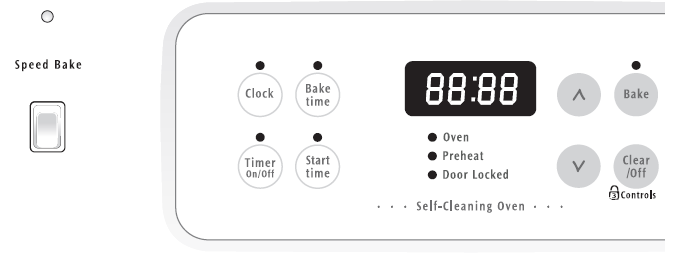
Benefits of Speed Bake™ Cooking System:
- Foods cook up to 25 to 30% faster, saving time and energy.
- Multiple rack baking.
- No special pans or bakeware needed.
How the Speed Bake™ Cooking System works (some models)
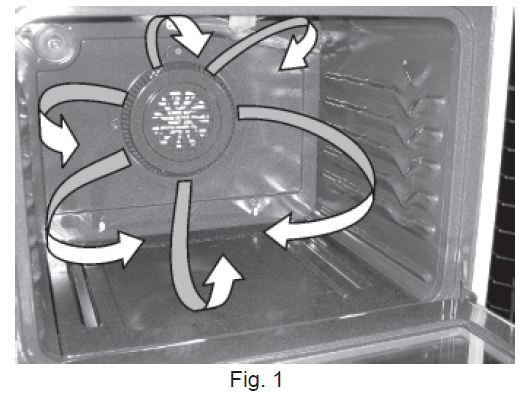
Speed Bake™ Cooking System uses a fan to circulate the oven’s heat uniformly and continuously around the oven. This improved heat distribution allows for fast, even cooking and browning results. It also gives better baking results when using two racks at the same time (See Fig. 1). Heated air flows around the food from all sides, sealing in juices and flavors. Meats cooked with the Speed Bake™ Cooking System are juicier. Poultry is crisp on the outside while staying tender and moist on the inside. Breads and pastry brown more evenly. Most foods baked in a standard oven can be cooked faster and more evenly with the Speed Bake™ Cooking System.
General Cooking Instructions:
For Baking:
- For optimum cooking results, it is recommended to preheat the oven when baking foods such as cookies, biscuits, and breads.
- Reduce oven temperature 25° F from the recipe’s recommended oven temperature. Follow the remainder of the recipe’s instructions using the minimum recommended cook time.
- When using 2 oven racks at the same time, place in positions 2 & 5 for best results (See Fig. 2)
Note: Layer cakes will have better results using the normal Bake feature.
For Roasting:
- Preheating is not necessary when roasting foods with the Speed Bake™ Cooking System.
- Since Speed Bake cooks food faster, reduce the cook time by 25% from the recommended cook time of your recipe. Increase the time until the desired doneness is obtained.
Note: Cook time reductions will vary depending on the amount and type of food being cooked.
To Set Speed Bake™ Cooking System:
- Program the oven as you normally would to bake. Speed Bake may be used with Bake, Timed Bake, and Delayed Time Bake features.
- Press and release the Speed Bake switch. The indicator light located above the Speed Bake switch will glow, and the fan will come on. The fan stays on when the oven door is closed and shuts off while the oven door is opened. The fan will continue to operate until cooking is complete.
- To cancel Speed Bake, press on the oven control as you would to stop any baking function.
NOTE: The Speed Bake feature will not work during a Self-Cleaning cycle.
Self-Cleaning
Cautions:
- During the Self-Cleaning cycle, the outside of the range can become very hot to the touch. DO NOT leave small children unattended near the appliance.
- The health of some birds is extremely sensitive to the fumes given off during the Self-Cleaning cycle of any range. Move birds to another well-ventilated room.
- DO NOT line the oven walls, racks, bottom or any other part of the range with aluminum foil. Doing so will destroy heat distribution, produce
poor baking results and cause permanent damage to the oven interior(aluminum foil will melt to the interior surface of the oven). - DO NOT force the oven door open. This can damage the automatic door locking system. Use caution when opening the door after the Self-Cleaning cycle is completed. The oven may still be VERY HOT.
Note: See additional cleaning information for the oven door in the General Care & Cleaning section.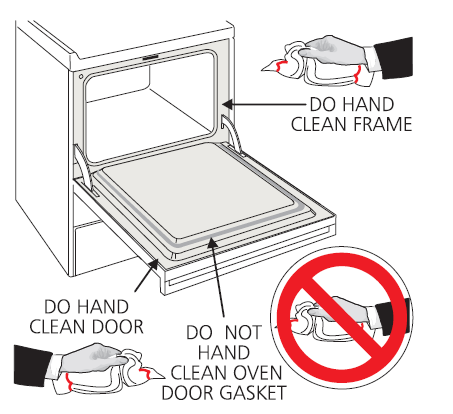
Self-Cleaning Oven
A Self-Cleaning oven cleans itself with high temperatures (well above cooking temperatures), which eliminates soils completely or reduces them to a fine powdered ash you can wipe away with a damp cloth.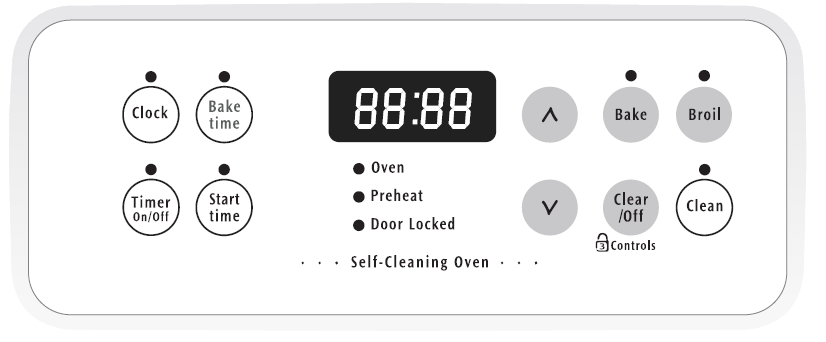
Adhere to the following cleaning precautions:
- DO NOT use oven cleaners or oven protective coatings in or around any part of the Self-Cleaning oven.
- DO NOT clean the oven door gasket. The woven material of the oven door gasket is essential for a good seal. Care should be taken not to rub, damage or remove the gasket.
- DO NOT use any cleaning materials on the oven door gasket. Doing so could cause damage.
- Remove the broiler pan and insert all utensils and any aluminum foil. These items cannot withstand high cleaning temperatures.
- Oven racks do not have to be removed. If they are not removed during the Self-Clean cycle, their color will turn slightly blue and the finish will be dull. After the cycle is complete and the oven has cooled, rub the sides of the oven racks with wax paper or a cloth containing a small amount of salad oil (This will make the racks glide more easily into the rack position.)
- Remove any excessive spillovers in the oven cavity before starting the Self-Cleaning cycle. To clean, use hot, soapy water and a cloth. Large spillovers can cause heavy smoke or fire when subjected to high temperatures. DO NOT allow food spills with a high sugar or acid content (such as milk, tomatoes, sauerkraut, fruit juices, or pie filling) to remain on the surface, as they may leave a dull spot even after cleaning.
- Clean any soil from the oven frame, the door liner outside the oven door gasket, and the small area at the front center of the oven bottom. These areas heat sufficiently to burn the soil. Clean with soap and water.
NOTE: Prior to setting the Self-Clean cycle, any spills remaining on the oven bottom should be removed.
Starting the Self-Clean Cycle or a Delayed Start Self-Clean Cycle
For satisfactory results, use a 2-hour Self-Clean cycle for light soils and a 3-hour cycle for heavier soils.
NOTE: The kitchen area should be well ventilated using an open window, ventilation fan, or exhaust hood during the 1st Self-Clean cycle. This will help eliminate the normal odors associated with the 1st Self-Clean cycle.
Care & Cleaning
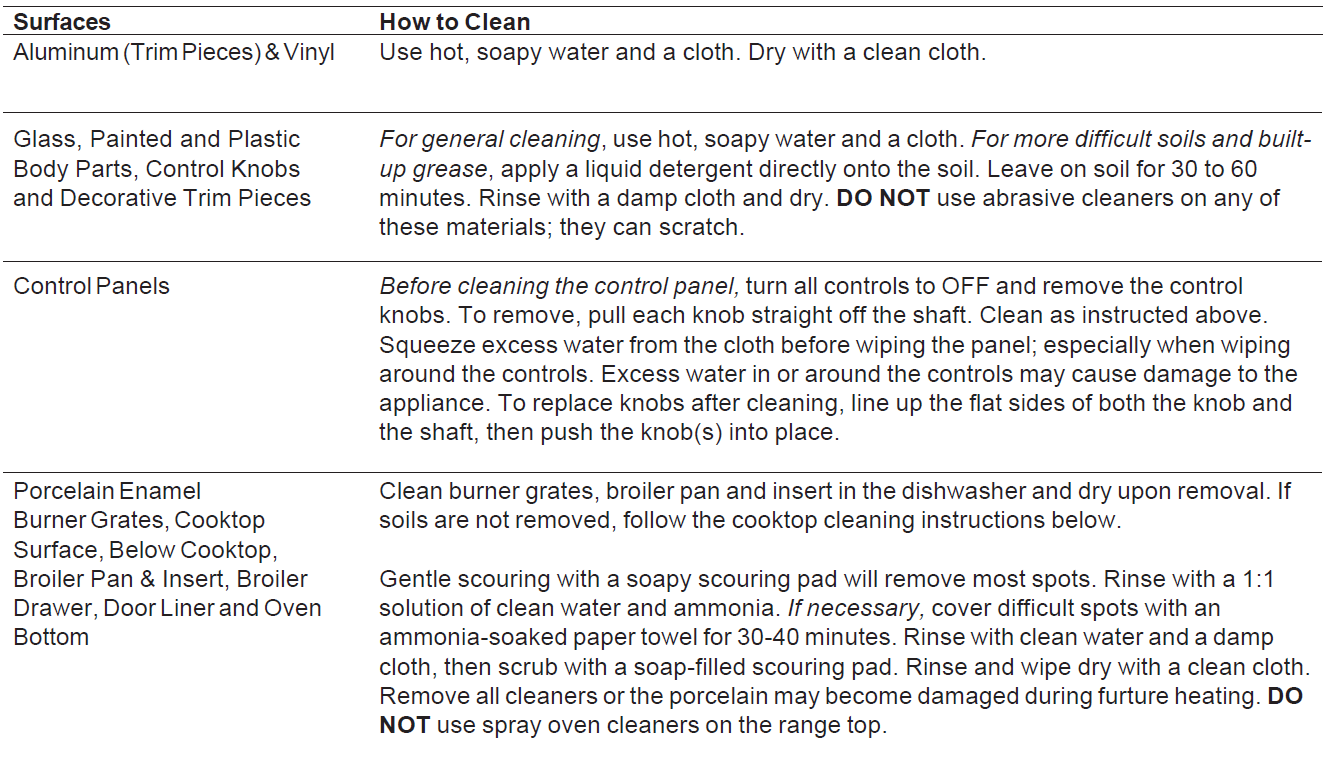
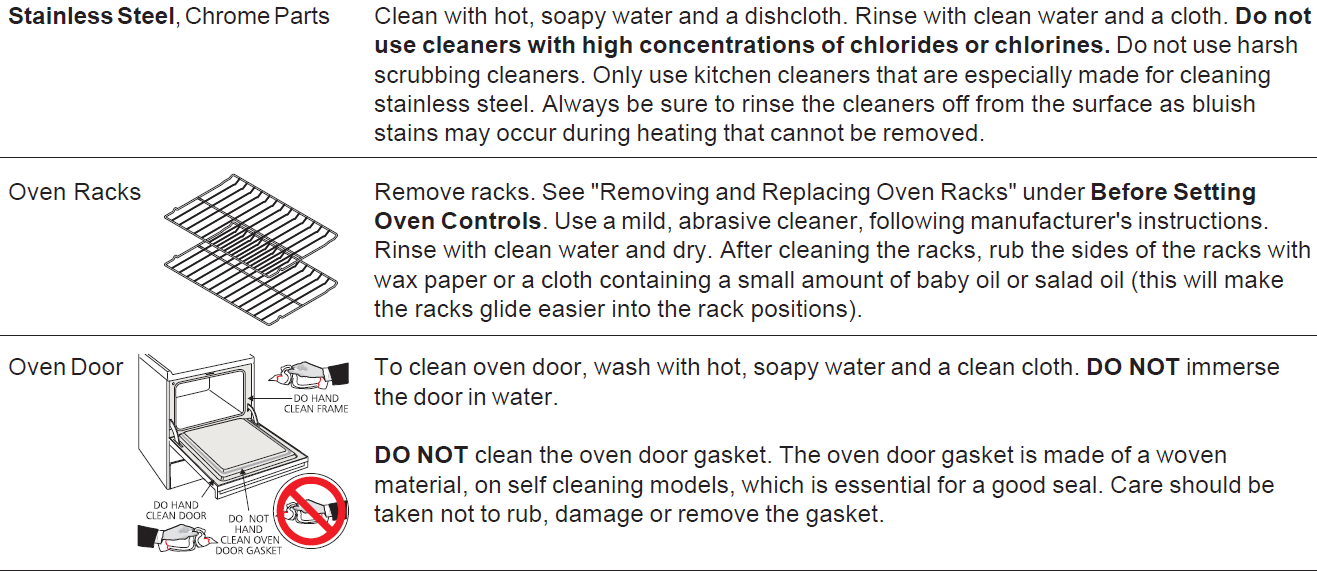
Cleaning the Cooktop
The cooktop is designed to make cleaning easier. Because the four burners are sealed, cleanups are easy when spills are cleaned up immediately. To clean, wipe with a clean, damp cloth and wipe dry.
Removing and Replacing the Lift-Off Oven Door
The door is heavy. For safe, temporary storage, lay the door flat with the inside of the door facing down.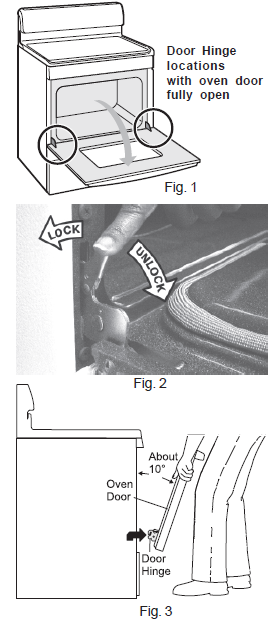
To Remove Oven Door:
- Open oven door completely (horizontal with floor – See Fig. 1).
- Pull the door hinge locks on both left and right door hinges down from the oven frame completely towards the oven door (See Fig. 2). A tool such as a small flat-blade screwdriver may be required.
- Firmly grasp both sides of the oven door along the door sides (Do not use the oven door handle – See Fig. 3).
- Close the door to the broil stop position (the oven door will stop in this position just before fully closing.
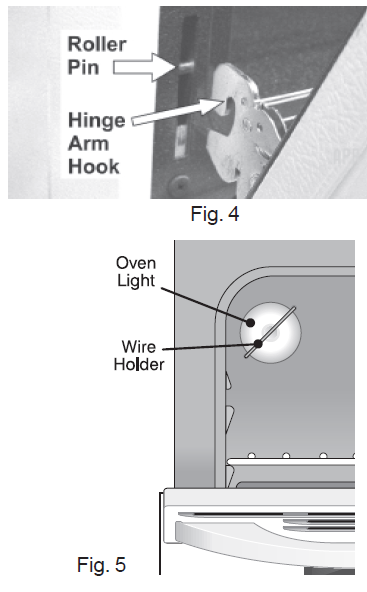
- With the oven door in the broil stop position, lift the oven door hinge arms over the roller pins located on each side of the oven frame (See Fig. 4).
To Replace Oven Door:
- Firmly grasp both sides of the oven door along the door sides (Do not use the oven door handle – See Fig. 3).
- Holding the oven door at the same angle as the removal position, seat the hook of the hinge arm over the roller pins located on each side of the oven door frame (See Fig. 4). The hook of the hinge arm must be fully seated onto the roller pins.
- Fully open the oven door (horizontal with floor – See Fig. 1).
- Push the door hinge locks up towards and into the oven frame on both left and right oven door hinges (See Fig. 2) to the locked position.
- Close the oven door.
Special Door Care Instructions – Most oven doors contain glass that can break. Read the following recommendations:
- Do not close the oven door until all the oven racks are fully in place.
- Do not hit the glass with pots, pans, or any other object.
- Scratching, hitting, jarring, or stressing the glass may weaken its structure, causing an increased risk of breakage at a later time.
Changing the Oven Light (some models)
For models equipped with the interior oven light, the light bulb is located at the rear of the oven and is covered with a glass shield held by a wire holder (See Fig. 5). The glass shield must be in place whenever the oven is in use.
Before You Call
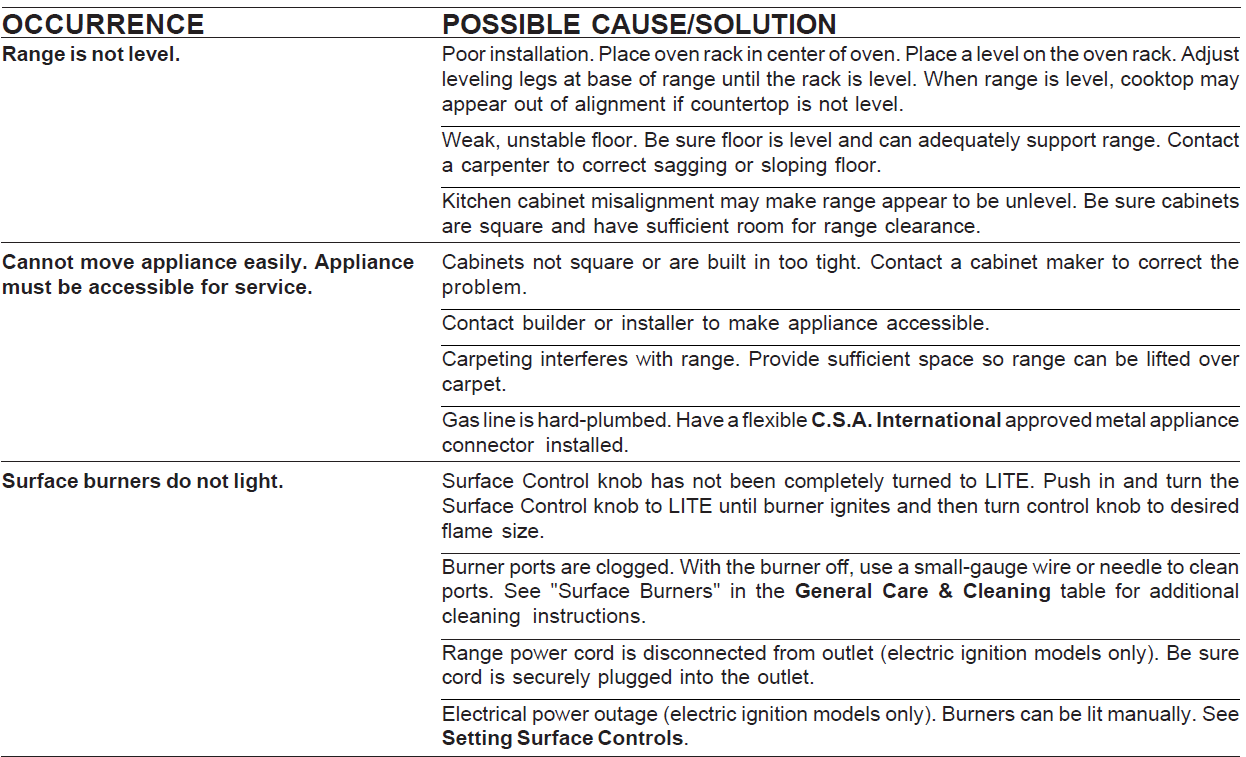
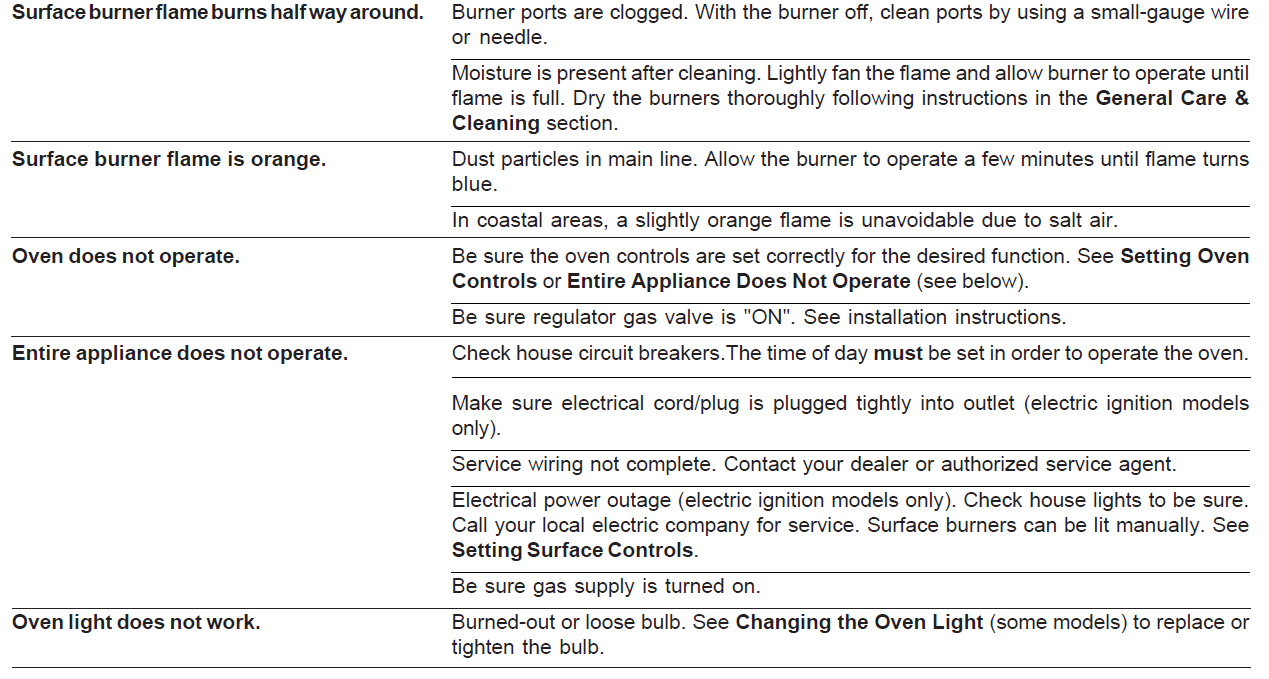
For more manuals by Frigidaire, visit ManualsLibraryy
Frigidaire Electric Range ES300 Controls-FAQs
Q1. How do the controls on a Frigidaire electric stove work?
Frigidaire stove controls regulate power to the heating elements. Turning the knob or using the touchpad adjusts the temperature by increasing or decreasing electrical flow to the burner or oven.
Q2. How do I reset a Frigidaire electric range?
Perform a hard reset by unplugging the oven for a few minutes, then plugging it back in. This can clear minor control board errors.
Q3. How do I reset the Frigidaire oven control board?
Unplug the oven, hold the Clear/Off button on the control panel for about 5 seconds, release it, then reconnect the power.
Q4. Why is my Frigidaire oven not turning on?
First, flip the circuit breaker off and on. If the oven still won’t power up, check the power cord and connection at the back of the unit.
Q5. How can I troubleshoot an oven that won’t start?
Common causes include a blown fuse, faulty heating element, defective igniter, control board issues, or a weak power supply.
Q6. Why does my Frigidaire oven take so long to heat?
A worn or damaged door seal often causes heat loss, making the oven take longer to preheat.
Q7. How do I know when my Frigidaire oven is preheated?
Many models have a preheat indicator light that turns off once the set temperature is reached. Always check your control panel or manual for details.
Q8. How do I check if my electric oven is working properly?
Use an oven thermometer to compare the set temperature with the actual one. If there’s a large difference, recalibration may be needed.
Q9. How can I reset the electronic controls on the range?
Turn off the circuit breaker or remove the fuse for one minute, then restore power. This resets the oven’s electronic controls.
Q10. How do I calibrate a Frigidaire oven?
Place an oven thermometer inside, check the actual temperature against the set one, and adjust calibration through the settings menu if needed.

