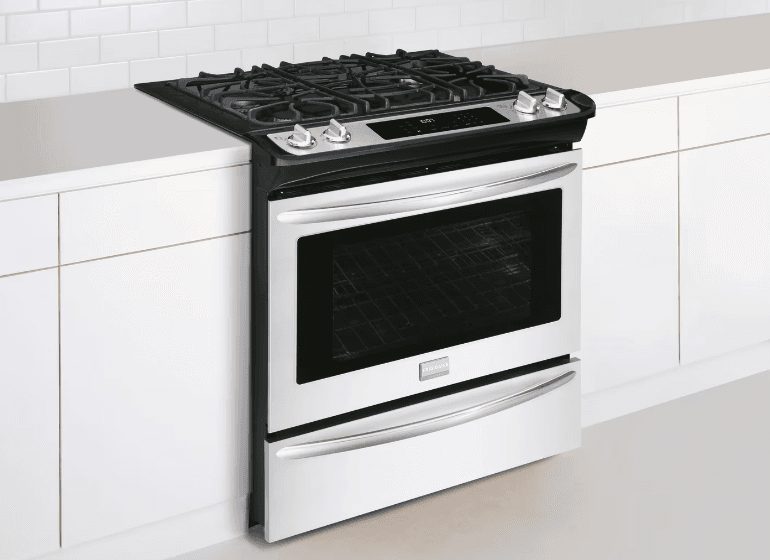
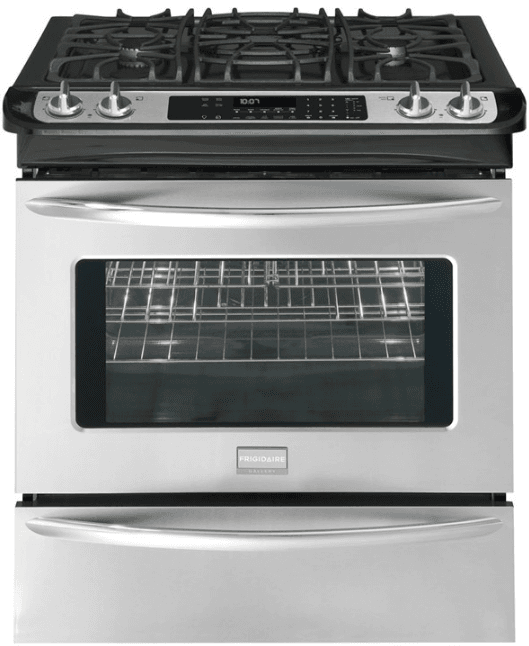
Frigidaire Gallery FGDS3065K Slide In Dual Fuel Range
Important Safety Instructions
Read all instructions before using this appliance. Save these instructions for future reference.
FOR YOUR SAFETY
- Do not store or use gasoline or other flammable vapors and liquids in the vicinity of this or any other appliance.
- WHAT TO DO IF YOU SMELL GAS:
- Do not try to light any appliance.
- Do not touch any electrical switch; do not use any phone in your building.
- Immediately call your gas supplier from a neighbor’s phone. Follow the gas supplier’s instructions.
- If you cannot reach your gas supplier, call the fire department.
- Installation and service must be performed by a qualified installer, servicer, or the gas supplier.
- Remove all tape and packaging wrap before using the appliance. Destroy the carton and plastic bags after unpacking the appliance. Never allow children to play with packaging material. Do not remove the wiring label and other literature attached to the appliance. Do not remove the model/serial number plate.
- Proper Installation. Be sure your appliance is properly installed and grounded by a qualified technician by the National Fuel Gas Code ANSI Z223.1, latest edition, and National Electrical Code ANSI/NFPA No. 70, latest edition, and local code requirements. Install only per the installation instructions provided in the literature package for this range. Ask your dealer to recommend a qualified technician and an authorized repair service. Know how to disconnect the electrical power to the appliance at the circuit breaker or fuse box in case of an emergency.
- User Servicing. Do not repair or replace any part of the appliance unless specifically recommended in the manuals. All other servicing should be done only by a qualified technician to reduce the risk of personal injury and damage to the appliance.
- Never modify or alter the construction of an appliance by removing leveling legs, panels, wire covers, anti-tip brackets/screws, or any other part of the product.
- Storage in or on the Appliance. Flammable materials should not be stored in an oven, near surface burners or in the warm & serve drawer (if equipped). This includes paper, plastic and cloth items, such as cookbooks, plastic ware and towels, as well as flammable liquids. Do not store explosives, such as aerosol cans, on or near the appliance. Flammable materials may explode and result in fire or property damage.
- Do not leave children alone. Children should not be left alone or unattended in the area where an appliance is in use. They should never be allowed to sit or stand on any part of the appliance.
- DO NOT TOUCH SURFACE BURNERS, AREAS NEAR THESE BURNERS, OVEN BURNERS OR INTERIOR SURFACES OF THE OVEN. Both surface burners and oven burners may be hot even though flames are not visible. Areas near surface burners may become hot enough to cause burns. During and after use, do not touch or let clothing or other flammable materials touch these areas until they have had sufficient time to cool. Among these areas are the cooktop, surfaces facing the cooktop, the oven vent openings and the surfaces near these openings, oven door, and the window.
- Wear Proper Apparel. Loose-fitting or hanging garments should never be worn while using the appliance. Do not let clothing or other flammable materials contact hot surfaces.
- Do Not Use Water or Flour on Grease Fires. Smother the fire with a pan lid, or use baking soda, a dry chemical, or a foam-type extinguisher.
- When heating fat or grease, watch it closely. Fat or grease may catch fire if allowed to become too hot.
FEATURES AT A GLANCE – MODEL A

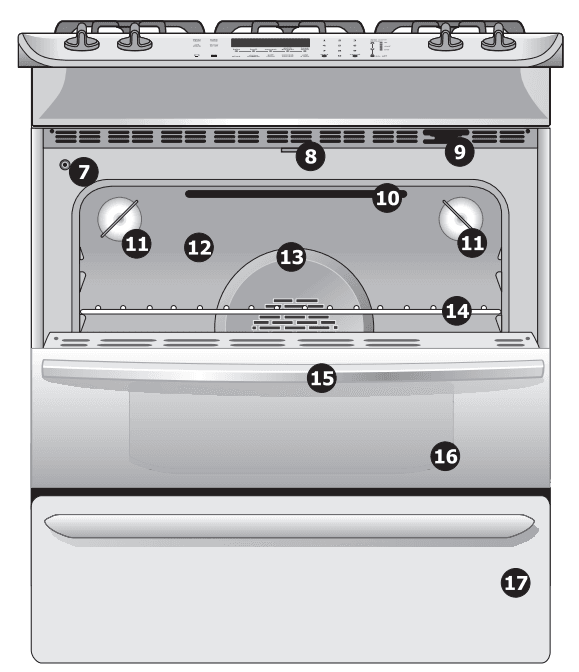
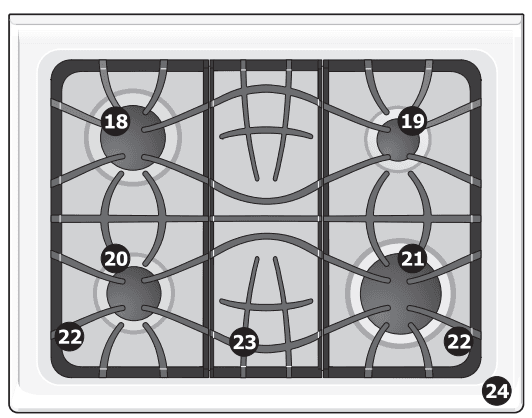
Your built-in range Features:
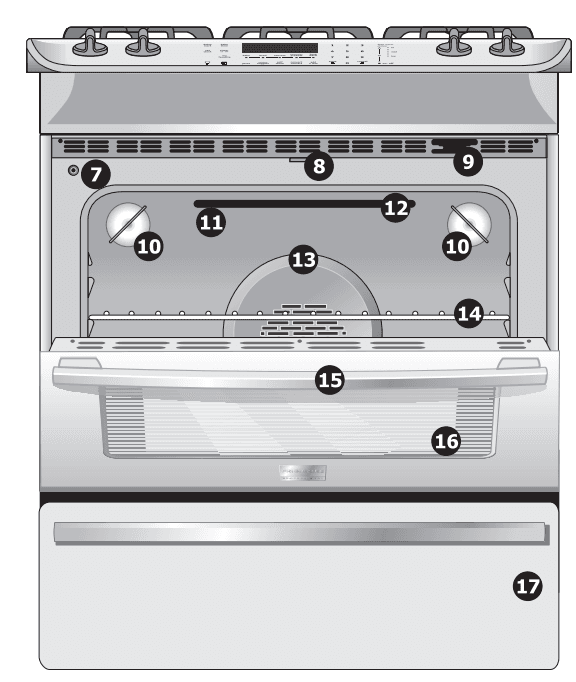
- Electronic oven control with kitchen timer.
- Left rear burner control.
- Left front burner control.
- Right front burner control.
- Right rear burner control.
- Warm & serve drawer control.
- Automatic oven door light switch.
- Self-cleaning door latch.
- Oven vent.
- Broil element.
- 1 or 2 Oven interior lights with removable covers.
- Self-cleaning oven interior.
- Convection bake cooking system fan.
- Adjustable interior oven rack(s).
- Large 1-piece oven door handle.
- Full-width oven door with window.
- Warm & serve drawer.
- 15000 BTU surface burner.
- 5000 BTU surface burner.
- 9500 BTU surface burner.
- 17000 BTU surface burner.
- Cast iron side grate.
- Cast iron center grate.
- Easy-to-clean porcelain cooktop.
NOTE
The features shown for your appliance may vary according to model type & color.
FEATURES AT A GLANCE – MODEL B

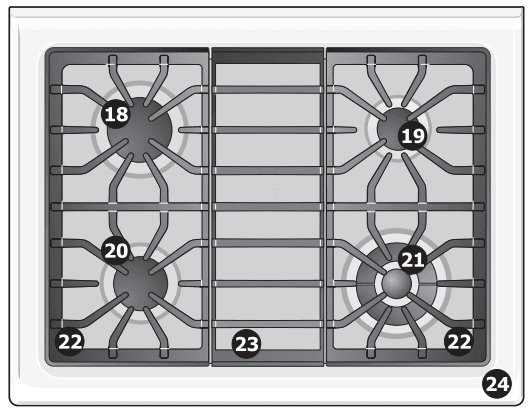
Your built-in range Features:
- Electronic oven control with kitchen timer.
- Left rear burner control.
- Left front burner control.
- Right front dual burner control.
- Right rear burner control.
- Warm & serve drawer control.
- Automatic oven door light switch.
- Self-cleaning door latch.
- Oven vent
- 2 Oven interior light with removable cover.
- Self-cleaning oven interior.
- Broil element.
- Convection bake cooking system fan.
- Adjustable interior oven rack(s).
- Large 3-piece oven door handle.
- Stainless steel oven door with window.
- Warm & serve drawer.
- 15000 BTU surface burner.
- 5000 BTU surface burner.
- 9500 BTU surface burner.
- 17000 BTU Dual surface burner.
- Cast iron side grate.
- Cast iron center grate.
- Easy to clean porcelain cooktop.
Before setting surface controls
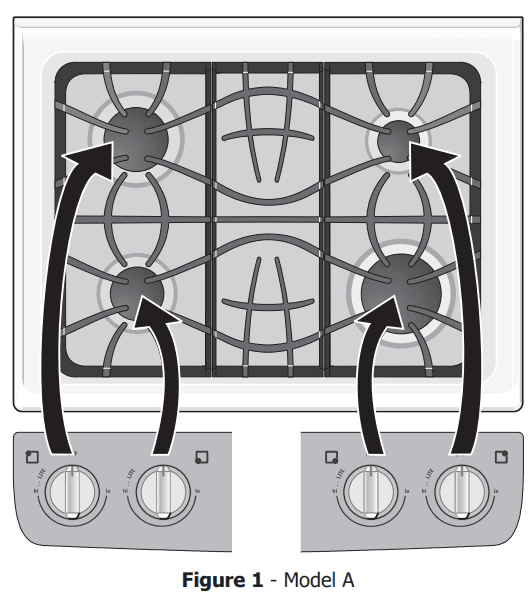
Control the locations of the gas surface burners
Your built-in range is equipped with gas surface burners with different BTU ratings. The ability to heat food quicker and in larger volumes increases as the burner size increases. The small simmer burner is best used for simmering delicate sauces, etc. This burner is located at the right rear burner position on the cooktop (see Figures 1 & 2). The standard burner can be used for most surface cooking needs. The standard burners are located at the left front position on the cooktop (see Figures 1 & 2). The power burners are best used for bringing large quantities of liquid rapidly up to temperature or when preparing larger quantities of food. The POWER burners are located at the right front and left rear burner positions on the cooktop (see Figures 1 & 2). Regardless of size, always select cookware that is suitable for the amount and type of food being prepared. Select a burner and flame size appropriate to the pan. Never allow flames to extend beyond the outer edge of the pan.
Assembly of the surface burner caps and burner grates
It is very important to make sure that all of the Surface Burner Caps and Surface Burner Grates are installed correctly and at the correct locations.
- Remove all packing material from the cooktop area.
- Discard all packing material (if applicable).
- Unpack Burner Grates and position on the cooktop.
REMEMBER — DO NOT ALLOW SPILLS, FOOD, CLEANING AGENTS, OR ANY OTHER MATERIAL TO ENTER THE GAS ORIFICE HOLDER OPENING. Always keep the Burner Caps and Burner Heads in place whenever the surface burners are in use.
Setting surface controls
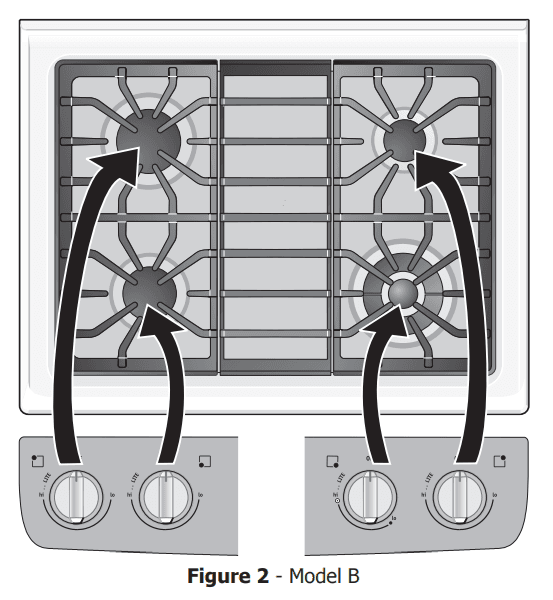
Operating the gas surface controls
- Place the cooking utensil on the surface burner.
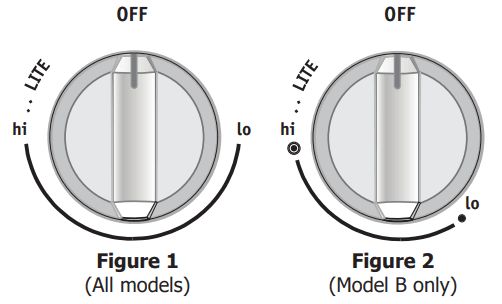
- Push the surface control knob down and turn counterclockwise out of the OFF position.
- Release the knob and rotate to the LITE position (see figures 1 & 2). Note: All four electronic surface ignitors will spark at the same time. However, only the burner you are turning on will ignite.
- Visually check that the burner has a flame.
- Turn the control knob counterclockwise to the desired flame size. The control knobs do not have to be set at a particular setting. Use the knob indicator settings to adjust the flame as needed. DO NOT cook with the surface control knob in the LITE position. (The electronic ignitor will continue to spark if the knob is left in the LITE position.)

Setting the proper surface burner flame size
For most cooking, start on the highest control setting and then turn to a lower one to complete the process. Use the recommendations below as a guide for determining the proper flame size for various types of cooking. The size and type of utensil used and the amount of food being cooked will influence the setting needed.
| *Flame Size | Type of Cooking |
| High Flame | Start most foods, bring water to a boil, and pan broil. |
| Medium Flame | Maintain a slow boil; thicken sauces, gravies, and steaming. |
| Low Flame | Keep foods cooking, poaching, and stewing. |
IMPORTANT
Never extend the flame beyond the outer edge of the utensil. A higher flame simply wastes heat and energy, and increases the risk of being burned by the gas flame.
NOTE
*Note: Settings are based on using mediumweight metal or aluminum pans. Settings may vary when using other types of pans. The color of the flame is the key to proper burner adjustment. A good flame is clear, blue, and hardly visible in a well-lighted room. Each cone of flame should be steady and sharp. Clean the burner if the flame is yellow-orange.
BEFORE SETTING OVEN CONTROLS
Oven vent location
The oven is vented at the center rear of the cooktop. When the oven is on, warm air is released through the vent. This venting is necessary for proper air circulation in the oven and good baking results. DO NOT BLOCK OVEN VENT. Never close off the openings with aluminium foil or any other material.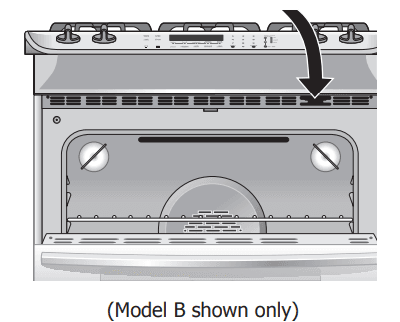
CAUTION
Some models are equipped with a blower that runs in baking and self-cleaning mode to keep all internal components at a cool temperature. The blower may keep running even if the oven has been turned off, until the components have cooled down.
Air circulation in the oven
If using 1 rack, place it in the center of the oven. If using multiple racks, stagger cookware as shown. For best air circulation and baking results, allow 2-4″ (5-10 cm) around the cookware for proper air circulation and be sure pans and cookware do not touch each other, the oven door, sides or back of the oven cavity. The hot air must circulate the pans and cookware in the oven for even heat to reach around the food.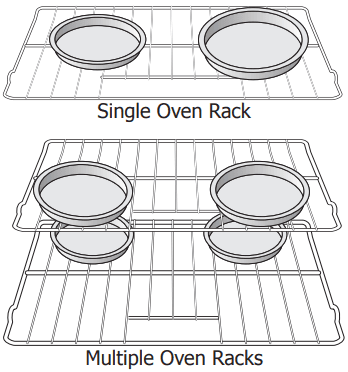
Arranging oven racks
Always arrange oven racks when THE oven is cool (Before operating the oven). Always use oven mittens when using the oven. To remove an oven rack, pull the rack forward until it stops. Lift up the front of the rack and slide out. To replace an oven rack, fit the rack onto the guides on the oven walls. Tilt the front of the rack upward and slide the rack back into place.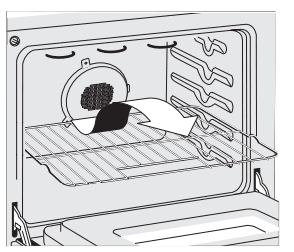
Recommended rack positions
| Food | Rack Position |
| Broiling meats, chicken, or fish | 2 or 4 |
| Cookies, cakes, pies, biscuits & muffins Using a single rack, using multiple racks | |
| 2 or 3 | |
| 2, 3, and 4 | |
| Frozen pies, angel food cake, yeast, bread, 1 or 2 casseroles, small cuts of meat or poultry | 1 or 2 |
| Turkey, roast or ham | 1 |
Types of oven racks
Your built-in range may be equipped with one or more of the oven rack styles shown.
- Flat handle oven rack (Figure 1).
- Flat oven half rack (Figure 2 & 3 – Some models).
- EffortlessTM oven rack (Figure 4 – Some models).
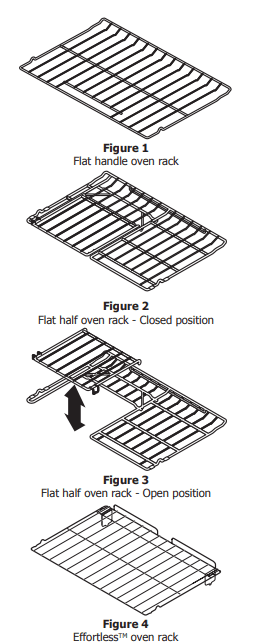
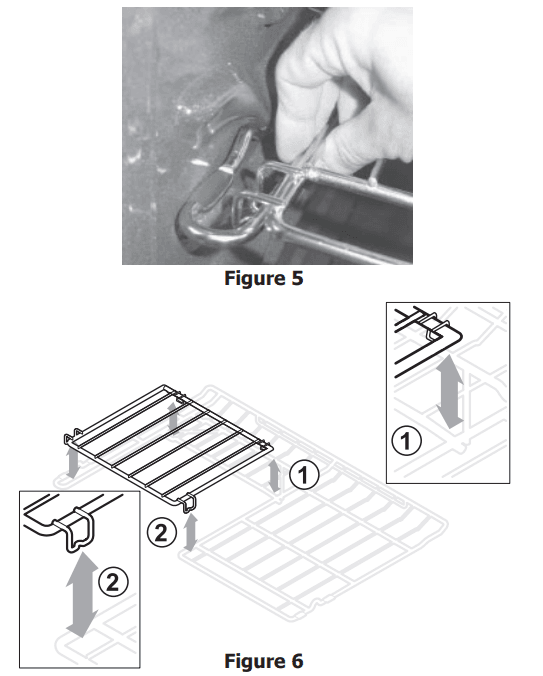
The Flat Oven Handle Rack has a handle to facilitate the sliding of the rack when a large amount of food is placed on it. The Flat Oven Half Rack has a removable insert that can provide extra space for larger food items. The right half rack portion may still be used for other food items like a casserole dish (See Figures 2 & 3). To remove the insert, squeeze on the left front insert side (See Figure 5) of the rack and tilt out clockwise. To reinstall, insert rear hooks at the back of the insert (See figure 5) and lay the insert
down. Make sure both insert front hooks snap into the rack (See figure 6). Do not use cookware that extends beyond the edge of the Flat Half Rack. For best results, allow 2 inches between the pan placed on the rack and the oven side or rear walls.
The Effortless™ oven rack system
Some models are equipped with a special oven rack system that automatically partially extends the oven rack from the interior oven glides to assist in easier access to your food items. This feature works whenever the oven door is opened or closed.
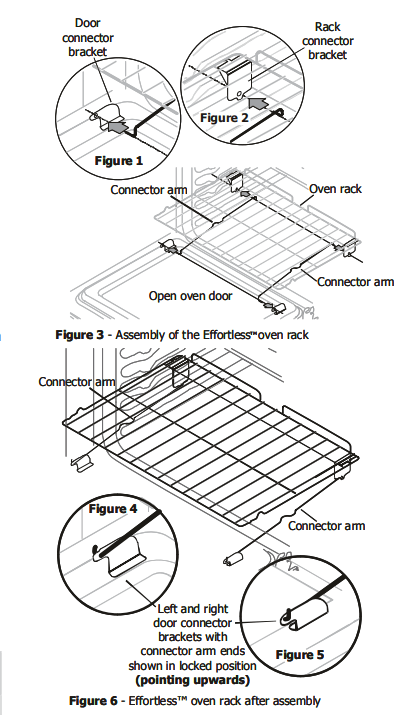
To assemble the Effortless™ Oven Rack system:
- Locate all required parts. You will need the supplied oven rack (Effortless™ Oven Rack is a flat rack with a special dark coating on the left and right rack sides) and the 2 supplied chrome connector arms.
- Open the oven door. Be sure the oven is completely cool before proceeding.
- Place the oven rack in positions 1, 2 or 3 only (see previous page to verify positions). Be sure the rack connector brackets are at the rear of the range and pointing towards oven bottom (See Figure 2).
- Assemble one connector arm at a time. With the oven door open and the oven rack in place, install one end of the connector arm to the hole in the door connector bracket (Figure 1) and the other end in the hole in the rack connector bracket (Figure 2 and as in Figure 3). The oven rack may need to be adjusted in or out in the rack position to match the length of the connector arm.
- While holding the connector arm in place, twist the connector arm so the ends of the connector arm point upwards (See Figures 4 & 5). The connector arm should now be locked into position.
- Repeat steps 4 and 5 for the other connector arm.
- Once both connector arms are properly in place, be sure to test the oven rack operation by gently closing the oven door. The oven rack should move in and out of the oven freely when the door is opened or closed.
CAUTION
REMOVE ALL OVEN RACKS and parts before starting a self-clean cycle. If the oven racks are left in the oven during the self-clean cycle, the glide ability of the Effortless Oven Rack system will be damaged and will cause all oven racks to lose their shiny finish and or turn blue. Remove ALL oven racks and clean according to instructions provided in the Care & Cleaning section of this manual. Make sure the oven and oven racks are COMPLETELY cooled and safe to touch before attempting to assemble or disassemble the Effortless™ Oven Rack system. Never pick up hot oven rack parts.
Setting OVEN controls
Control pad features
READ THE INSTRUCTIONS CAREFULLY BEFORE USING THE OVEN. For satisfactory use of your oven, become familiar with the various features and functions of the oven as described below. Detailed instructions for each feature and function follow later in this Use & Care Guide.
- Delay start pad—Use to program a Delayed Timed Bake or Delay Self-Cleaning cycle start time.
- Bake time pad—Use to enter the length of the baking time.
- Set clock pad—Use to set the time of day.
- Timer on-off pad—Use to set or cancel the Timer. The Timer does not start or stop cooking.
- My favorite pad (some models)—Use to record a temperature setting for a cooking feature.
- Oven light pad—Use to turn the oven light ON and OFF.
- Oven lockout pad—Use to lock the oven door and the control panel pads.
- Bake pad—Use to select the bake cooking feature.
- Broil pad—Use to select the broil cooking feature.
- Convection pad—Use to select between the Convection Bake, Convection Roast and Convection Broil cooking features.
- Quick preheat or power plus preheat pad—Use to quickly raise oven to cooking temperature.
- Keep warm pad—Use to keep the dishes and food warm until served.
- Pizza Pad—Use to select the pizza cooking feature.
- Chicken nuggets pad—Use to select the chicken nuggets cooking feature.
- Self-Clean pad—Use to select the self-cleaning feature.
- Convection convert pad—Use to convert a regular recipe temperature to a convection temperature.
- Add a minute pad—Use to add a minute to the timer feature.
- Numeric pad—Use to enter temperatures and times.
- Start pad—Use to start all oven features (not used with Oven Light).
- Cancel pad—Use to cancel any oven feature previously entered, except the time of day and minute timer.
Minimum and Maximum Control Pad Settings
All of the features listed below have minimum and maximum time or temperature settings that may be entered into the control. An ENTRY acceptance beep will sound each time a control pad is touched (the acceptance beep on the Oven Lockout pad is delayed 3 seconds). An ENTRY ERROR tone (3 short beeps) will sound if the entry of the temperature or time is below the minimum or above the maximum settings for the feature.
| Feature | minimum temP. /time | maximum temP. /time | |||
| PREHEAT | 170°F/77°C | 550°F/288°C | |||
| BAKE | 170°F/77°C | 550°F/288°C | |||
| BROIL | 400°F/205°C | 550°F/288°C | |||
| CONVECTION BAKE | 170°F/77°C | 550°F/288°C | |||
| CONVECTION ROAST | 170°F/77°C | 550°F/288°C | |||
| CONVECTION BROIL | 400°F/205°C | 550°F/288°C | |||
| PIZZA | 170°F/77°C | 550°F/288°C | |||
| CHICKEN NUGGETS | 170°F/77°C | 550°F/288°C | |||
| TIMER | 12 | Hr. | Mode | 0:01 Min. | 11:59 Hr./Min. |
| 24 | Hr. | Mode | 0:01 Min. | 11:59 Hr./Min. | |
| CLOCK TIME | 12 | Hr. | Mode | 1:00 Hr./Min. | 12:59 Hr./Min. |
| 24 | Hr. | Mode | 0:00 Hr./Min. | 23:59 Hr./Min. | |
| DELAY START | 12 | Hr. | Mode | 1:00 Hr./Min. | 12:59 Hr./Min. |
| 24 | Hr. | Mode | 0:00 Hr./Min. | 23:59 Hr./Min. | |
| BAKE TIME | 12 | Hr. | Mode | 0:01 Min. | 5:59 Hr./Min. |
| 24 | Hr. | Mode | 0:01 Min. | 5:59 Hr./Min. | |
| SELF-CLEANING TIME | 2 hours | 4 hours |
Before you call (Solutions to Common Problems)
Oven baking
For best cooking results, heat the oven before baking cookies, breads, cakes, pies or pastries, etc. There is no need to preheat the oven for roasting meat or baking casseroles. The cooking times and temperatures needed to bake a product may vary slightly from your previously owned appliance.
| Baking Problems and Solutions Chart | ||
| Baking Problems | causes | corrections |
| Cookies and biscuits burn on the bottom. | • Cookies and biscuits are put into the oven before the preheating time is completed. • Oven rack overcrowded.
• Dark pan absorbs heat too fast. | • Allow the oven to preheat to the selected temperature before placing food in the oven.
• Choose pan sizes that will permit 5.1cm to 10.2cm (2” to 4”) of air space on all sides when placed in the oven. • Use a medium-weight aluminum baking sheet. |
| cakes are too dark on top or bottom. | • Cakes are put into the oven before the preheating time is completed. • Rack position is too high or too low. • The oven is too hot. | • Allow the oven to preheat to the selected temperature before placing food in the oven. • Use proper rack position for baking needs. • Set oven temperature 25°F/12°C lower than recommended. |
| Cakes are not done in the center. | • The oven is too hot.
• Incorrect pan size. • The pan is not centered in the oven. | • Set oven temperature 25°F/12°C lower than recommended. • Use the pan size suggested in the recipe. • Use proper rack position and place pan so there is 5.1cm to 10.2cm (2” to 4”) of space on all sides of pan. |
| Cakes are not level.
| • Range, not level.
• Pan too close to the oven wall or rack overcrowded. • Pan warped. | • Place a marked glass measuring cup filled with water on the center of the oven rack. If the water level is uneven, refer to the installation instructions for leveling the range. • Be sure to allow 5.1cm to 10.2cm (2” to 4”) of clearance on all sides of each pan in the oven. • Do not use pans that are dented or warped. |
| Foods are not done when the cooking time is up. | • Oven is too cool.
• Oven overcrowded.
• Oven door opened too frequently. | • Set oven temperature 25°F/12°C higher than suggested and bake for the recommended time. • Be sure to remove all pans from the oven except the ones to be used for baking. • Open oven door only after the shortest recommended baking time. |
| occurrence POSSIBLE CAUSE/SOLUTION | |
| Range is not level. | Poor installation. Place the oven rack in the center of the oven. Place a level on the oven rack. Adjust leveling legs at the base of the range until the rack is level. When the range is level, the cooktop may appear out of alignment if the countertop is not level. |
| Weak, unstable floor. Be sure the floor is level and can adequately support the range. If the floor is sagging or sloping, contact a carpenter to correct the situation. | |
| Kitchen cabinet misalignment may make the range appear to be unlevel. Be sure cabinets are square and have sufficient room for range clearance. | |
| Cannot move the appliance easily. The appliance must be accessible for service. | Cabinets are not square or are built in too tightly. Contact a cabinet maker to correct the problem. |
| Contact the builder or installer to make the appliance accessible. | |
| The carpet interferes with the range. Provide sufficient space so the range can be lifted over the carpet. | |
| The gas line is hard-plumbed. Have a flexible C.S.A international approved metal appliance connector installed. | |
| The entire range of the oven does not operate. | Make sure the cord/plug is plugged tightly into the outlet. |
| Service wiring is not complete. Call an authorized servicer. | |
| Electrical power outage. Check the house lights to be sure. Call your local electric company for service. Surface burners can be lit manually. | |
| *Oven control beeps. Electronic control has detected a fault condition. Press cancel to clear the display and display any Fstop beeping. Reprogram oven. If the fault recurs, record the fault number. Press cancel and call the code error (ex., F11) an authorized servicer for assistance. | |
| Oven light does not work. | Replace or tighten the bulb. See the Changing Oven Light section in this Use & Care Guide. |
| Electrical power outage. Check the house lights to be sure. Call your local electric company for service. | |
| Surface burners do not light. | Surface control knob has not been completely turned to LITE. Push in and turn the surface control knob to LITE until burner ignites and then turn the surface control knob to the desired flame size. |
| Burner ports are clogged. Clean burners. See “Cleaning the Burner Grates, Burner Caps, and Burner Heads” under General Cleaning. | |
| The range power is disconnected from the outlet. Be sure the cord is securely plugged into the outlet. | |
| Electrical power outage. | |
| Be sure the gas supply to the range is turned “ON”. | |
| Surface burner flame burns halfway around. | Burner ports or slots are clogged. With the burner off, use a small-gauge wire or needle to clean ports or slots. |
| Moisture is present after cleaning. Lightly fan the flame and allow the burner to operate until the flame is full. Dry the burners thoroughly following instructions under General Cleaning. | |
| Surface burner flame is orange. | Dust particles in the main line. Allow the burner to operate for a few minutes until the flame turns blue. |
| Salt air in coastal areas. A slightly orange flame is unavoidable. | |
| Poor baking results. Many factors affect baking results. Make sure the proper rack position is used. Center food in the oven and space pans to allow air to circulate. Allow the oven to preheat to the set temperature before placing food in the oven. Try adjusting the recipes’ recommended temperature or baking time. If you feel the oven is too hot or cool, see the “Adjusting Your Oven Temperature” section in the Electronic Oven Control Guide. | |
| occurrence POSSIBLE CAUSE/SOLUTION | |
| Fan noise during: A cooling fan may automatically turn on and off to cool internal parts. It is normal, and the cooking operation: The fan may continue to run even after the oven is turned off. | |
| Flames inside the oven or smoking from the vent. | Excessive spillovers in the oven. Set the self-clean cycle for a longer cleaning time. |
| Excessive spillovers in the oven. This is normal, especially for pie spillovers or large amounts of grease on the oven bottom. Wipe up excessive spills before starting the self-clean cycle. If flames or excessive smoke are present, stop the self-clean cycle and follow the steps under «Stopping or Interrupting the Self-Cleaning Cycle» in the Electronic Oven Control Guide. | |
| The oven smokes excessively during broiling. | Meat is too close to the element. Reposition the rack to provide proper clearance between the meat and the oven’s boil element. |
| The meat is not properly prepared. Remove excess fat from meat. Remove remaining fatty edges to prevent the meat from curling, but do not cut into the lean of the meat. | |
| A broiler pan used without the Broiler Pan Insert or insert is covered with foil. DO NOT use a Broiler Pan without the Broiler Pan Insert or cover the insert with foil. | |
| Broiler Pan or Broiler Pan Insert needs to be cleaned. Excessive smoking is caused by a buildup of grease or food spatters. Clean the Broiler Pan and insert on a regular basis. | |
| The oven door is open. The oven door should be closed when broiling. | |
| The self-cleaning cycle does not work. | Control(s) not set properly. Follow instructions under “Oven Cleaning” in the Electronic Oven Control Guide. |
| The self-cleaning cycle was interrupted. Stop time must be 2 to 4 hours past the start time. Follow the steps under «Stopping or Interrupting the Self-Cleaning Cycle» in the Electronic Oven Control Guide. | |
| Soil is not completely removed after the self-cleaning cycle. | Set the Self-Clean cycle for a longer cleaning time. |
| Failure to clean the bottom front, top of oven, or door areas outside the oven seal. These areas are not in the Self-Cleaning area, but get hot enough to burn off food residue. Clean these areas before starting the Self-Clean cycle. Burned-on residue may be cleaned with a stiff nylon brush and water or a nylon scrubber. Be careful not to damage the oven gasket. | |
| Excessive smoking, Excessive spillovers in the oven, especially for pie spillovers or large amounts of grease on the oven vent. Oven bottom. Wipe up excessive spills before starting the Self-Clean cycle. If flames or excessive smoke is present, stop the Self-Clean cycle and follow the steps under «Stopping or Interrupting the Self-Cleaning Cycle» in the Electronic Oven Control Guide. | |
For more manuals by Frigidaire, visit ManualsLibraryy
Frigidaire Gallery FGDS3065K Slide In Dual Fuel Range-FAQs
How do I unlock my Frigidaire Gallery oven?
To unlock the oven door, press and hold the OFF or CLEAR/OFF button for 3–6 seconds. This will cancel the lockout feature and restore normal operation.
How do I adjust the temperature on my Frigidaire Gallery oven?
Press the Temp (Darkness) button, turn the Temp/Timer knob to your desired temperature, and press Set. For time, press the Time (Slices/Size) button, adjust using the same knob, then press Set again. Press Start/Cancel to begin baking.
How do I set the clock on a Frigidaire Gallery gas range?
Press the CLO (Clock) button, enter the current time using the number pad, and press START. To switch between 12-hour and 24-hour formats, hold the CLO button for 7 seconds.
How do I start the oven or resume cooking?
To start or resume a cooking cycle, press the START button and immediately close the door. If the door stays open for more than 4 seconds, press START again and close it right away.
What is the Simmer to Boil feature and how do I use it?
The Simmer to Boil element helps quickly heat large pots. Turn the knob from low to high in one direction to activate. Remember, burners may stay hot even if they look cool.
How do I set or cancel the timer on the oven?
Press the Menu button to stop the alarm and view the time. Press Menu again to return to manual mode. To set a timer, adjust using the plus (+) or minus (−) buttons. Setting the timer to 0:00 will cancel the countdown.
How do I use the Delay Start function?
Press the DELAY START button repeatedly until your desired delay time appears on the display. Then press START to activate the delayed start feature.
How do I enable or disable the child lock on the oven?
Hold the Lock button for 3 seconds to activate the child lock, which locks the oven door and disables the control panel. The display will show “door lock” and control buttons will appear inactive.
Why does my microwave display say “Lock”?
The Child Lock feature is on, preventing button presses. To turn it off, press the Stop/Cancel button three times in a row.

