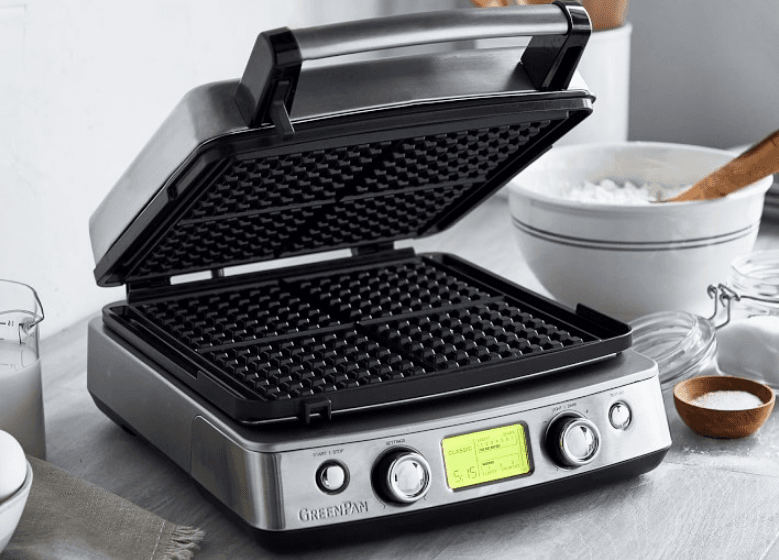
GreenPan 2-Square Waffle Maker Iron
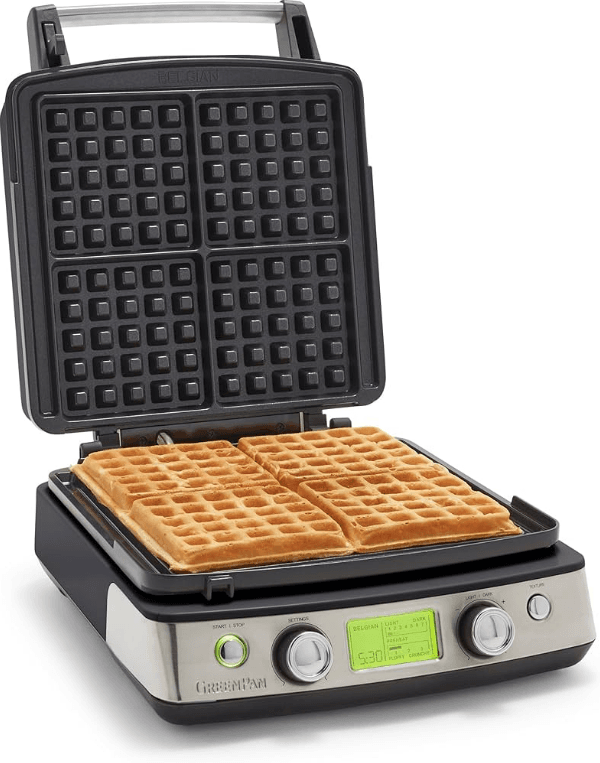
IMPORTANT SAFEGUARDS
When using electrical appliances, basic safety precautions should always be followed, including the following:
- READ ALL INSTRUCTIONS.
- Do not touch hot surfaces. Use handles and knobs.
- To protect against fire, electrical shock, and injury to persons, DO NOT IMMERSE
CORD, PLUG, OR UNIT in water or other liquids. - Close supervision is necessary when any appliance is used by or near children.
- Unplug from the outlet when not in use and before cleaning. Allow the appliance to cool before putting on or taking off parts, and before cleaning it.
- Do not operate any appliance with a damaged cord or plug, or after the appliance
malfunctions or has been damaged in any manner. Return the appliance to the nearest
GreenPan Authorized Service Facility for examination, repair, or adjustment. - The use of accessory attachments not recommended by GreenPan may result in fire, electrical shock, or injury to persons.
- Do not use outdoors.
- Do not let the power cord hang over the edge of the table or counter, or touch hot surfaces.
- Do not place on or near a hot gas or electric burner, or in a heated oven.
- Unplug the unit when finished cooking.
- Do not use the appliance for anything other than its intended use.
- Extreme caution must be used when moving an appliance containing hot oil or other hot liquids.
- Always attach the plug to the appliance first, then plug the cord into the wall outlet. To disconnect, plug from the wall outlet.
- WARNING: TO REDUCE THE RISK OF FIRE OR ELECTRIC SHOCK, REPAIRS SHOULD BE DONE ONLY BY AUTHORIZED PERSONNEL. DO NOT REMOVE THE BASE PANEL. NO USER SERVICEABLE PARTS ARE INSIDE.
PARTS
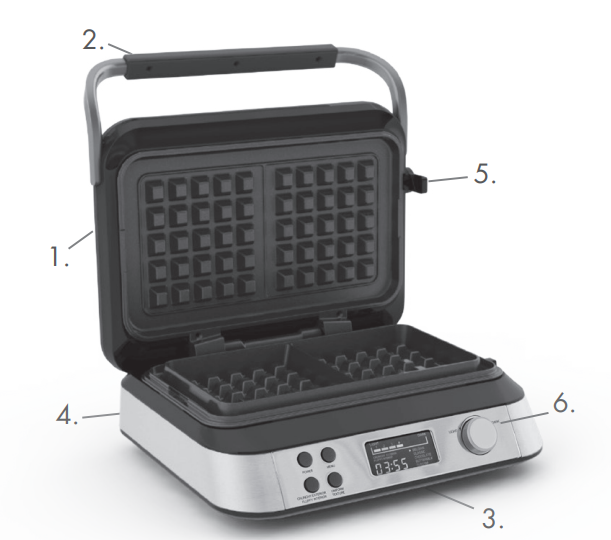
- Upper Body
- Handle
- LCD Display
- Lower Body
- Release Knob
- Control Knob
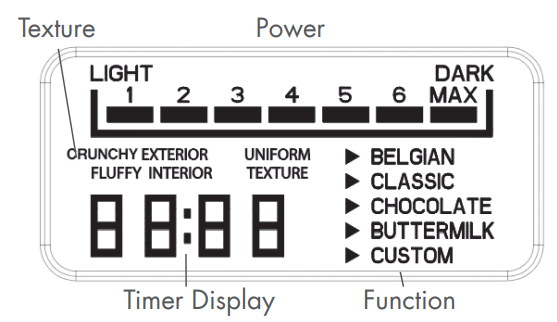
KNOW YOUR CONTROL PANEL
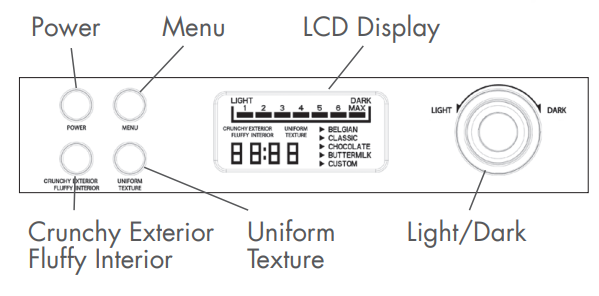
LCD DISPLAY
BEFORE FIRST USE
Before using this electrical appliance, carefully read the instructions below and keep the instructions for use for future use:
- a. Before plugging the appliance into the wall socket, check that the local electric current corresponds to the current specified on the appliance’s rating plate. Always plug your appliance into a grounded wall socket.
- b. Unplug the power cable as soon as you stop using the appliance and before any cleaning, maintenance, or accessory assembly work.
- c. Never place the appliance, the power cord, or the plug in water or any other liquids.
- d. The exterior temperature may be higher when the appliance is running.
- e. This appliance is not intended to be operated using an exterior timer or by a
separate remote control system. - f. If the supply cord is damaged, it must be replaced by the manufacturer, its service agent, or similarly qualified persons to avoid a hazard.
- g. This appliance can be used by children aged 8 years and above and by persons with reduced physical, sensory, or mental capabilities or lack of experience
and knowledge if they have been given supervision or instruction concerning he use of the appliance in a safe way and understand the hazards involved.
OPERATION
Wipe plates with a damp cloth before first use
- Prepare waffle mix
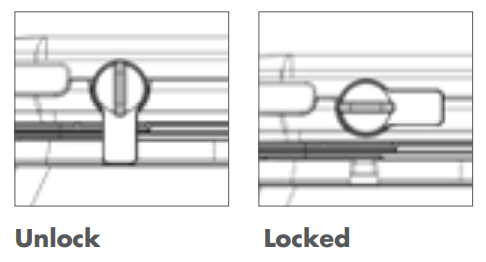
- Unlock the unit as indicated in the image on page 6.
- Plug the unit into the outlet
- Press the “Power” button – the LCD Display will illuminate
- Press the “Menu” button to select (BELGIAN, CLASSIC, CHOCOLATE, BUTTERMILK, or CUSTOM)
- Press the Crunchy Exterior Fluffy Interior button or the Uniform Texture button
- Turn the knob to select waffle shade from 1 to 7; (7 is the darkest)
- Once shade has been chosen, the appliance will start preheating, and the shade indicator light will blink
- Once the blinking stops, preheating is complete
- Pour waffle mixture onto waffle plate and cover the unit
- Once the unit cover is closed, the timer begins to count down, and the shadee
indicator light blinks - Cooking times will range between 2-10 minutes, depending on the chosen function
and shade - Once the time has been reached, the unit will beep 6 times and the unit will go into preheating mode.
- Open the cover and remove the waffle with a nylon or wooden tool
- Unplug and let cool before cleaning
The “CUSTOM” FUNCTION
- When selecting the “CUSTOM” function, the unit will enter the preheating mode
- Once the selected temperature is reached, pour waffle mixture onto waffle plate and cover the unit
- The unit display timer will start from 00:00 to the desired baking time
- Press the “power” button once the desired time is reached
FEATURES AND BENEFITS
- – PFAS-free ceramic nonstick
- – Extra deep plates
- – Mess-free overflow moat prevents batter from spilling over
- – Fast and even heating
- – 5 presets: choose between classic, Belgian, Buttermilk, chocolate, and custom
- – 2 selectable textures: From light and fluffy to dark and crunchy
- – 7 shade settings
- – Fast & even heating
- – Easy cleanup
RECIPE SUGGESTION
QUICK AND EASY WAFFLE BATTER
- 2 cups all-purpose flour
- 2 tablespoons sugar
- 1 tablespoon baking powder
- ½ teaspoon salt
- 1 ¾ cups reduced-fat milk
- ¹³ cup vegetable oil
- 2 eggs
- Makes 4-6 Belgian and 6-8 Classic waffles
QUICK TIPS FOR BEST RESULTS
Keep theaffle Maker closed while preheating and wait until preheat mode is complete.
Allow Waffle Batter to rest for a few minutes before pouring onto hot Waffle Plates. Add a light coating of cooking oil to the plates before the first waffle. Do not use cooking spray or low-smoke-point oil. Waffles are best when made fresh, but can also be frozen for later use (wrap separately) and reheated in a toaster or oven. For evenly sized waffles, pour batter into the center of the waffle plate and spread out to the edges of the plate. Be careful not to overfill the waffle plates. Always clean your waffle plates after each use.
CLEANING AND MAINTENANCE
- Unplug the unit when not in use and allow it to cool
- Plates are fixed and cannot be removed
- Do not immerse the unit in water
- Clean plates with a damp cloth – do not use abrasive cleaners or metal tools. It is recommended to clean the waffle plates after every use to maintain optimal nonstick performance.
STORAGE
- Lock release knob to vertical position as shown below
- When not in use, wrap the cord under the base of the unit
- The unit can be stored in an upright position
Release Knob:
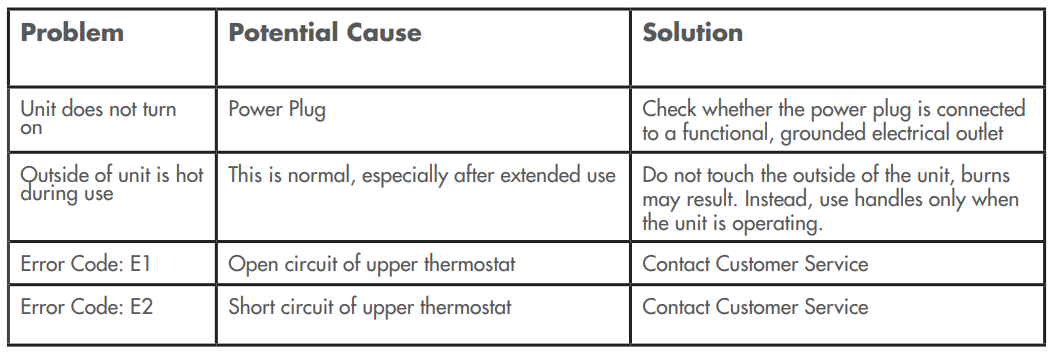
TROUBLESHOOTING
FOR MORE MANUALS BY GREENPAN, VISIT MANUALSLIBRARYY
GreenPan 2-Square Waffle Maker Iron- FAQs
What temperature should I cook waffles on a GreenPan waffle maker?
Preheat to 200°C (Classic setting). Adjust the light/dark dial for preferred browning and the texture button for fluffy or crispy waffles.
Can I wash my GreenPan waffle maker in the sink?
No, do not submerge the waffle maker in water. Instead:
Wipe the base unit with a damp cloth.
Removable plates can be hand-washed or placed in the dishwasher (if marked safe).
Are the waffle plates dishwasher-safe?
Yes, the removable ceramic nonstick plates are dishwasher-safe for easy cleaning.
Why do my waffles stick to the iron?
Possible reasons:
Too much or too little oil in the batter.
No egg yolk or fat in the batter (helps with non-stick).
Not preheating the waffle maker properly.
Using nonstick spray (can cause buildup over time).
Solution: Lightly brush plates with oil or melted butter before each use.
Can GreenPan waffle makers handle high heat?
Yes! The ceramic nonstick coating can withstand up to 450°C/850°F without releasing toxic fumes.
How do I know when waffles are done?
Steam stops (usually after 3–5 minutes).
Indicator light turns off (if your model has one).
Golden brown color (adjust browning dial if needed).
How long should I cook waffles?
Typically 3–5 minutes, depending on thickness and desired crispiness.
Do I need to season my GreenPan waffle maker?
No! The ceramic nonstick coating doesn’t require seasoning. Just lightly oil before first use.
Is the GreenPan waffle maker non-toxic?
Yes! It’s free from PFAS, PFOA, lead, and cadmium—safe for healthy cooking.
What’s the best way to prevent soggy waffles?
Let steam escape after cooking (toss waffles between hands briefly).
Use cornstarch in batter for crispiness.
Avoid overfilling with batter.

