Hamilton Beach 25410 Sandwich Maker
IMPORTANT SAFEGUARDS
- Read all instructions.
- This appliance is not intended for use by persons (including children) with reduced physical, sensory, or mental capabilities, or lack of experience and knowledge unless they are closely supervised and instructed concerning the use of the appliance by a person responsible for their safety.
- Close supervision is necessary when any appliance is used by or near children. Children should be supervised to ensure that they do not play with the appliance.
- Do not touch hot surfaces. Use handles or knobs.
- To protect against the risk of electrical shock, do not immerse the appliance, cord, or plug in water or other liquid.
- Unplug from the outlet when not in use and before cleaning. Allow to cool before putting on or taking off parts, and before cleaning the appliance.
SAVE THESE INSTRUCTIONS
Other Consumer Safety Information
- This appliance is intended for household use only.
- WARNING Electrical Shock Hazard: This appliance is provided with either a polarized (one wide blade) or grounded (3-prong) plug to reduce the risk of electric shock. The plug fits only one way into a polarized or grounded outlet. Do not defeat the safety purpose of the plug by modifying the plug in any way or by using an adapter.
- If the plug does not fit fully into the outlet, reverse the plug. If it still does not fit, have an electrician replace the outlet. The length of the cord used on this appliance was selected to reduce the hazards of becoming tangled in or tripping over a longer cord. If a longer cord is necessary, an approved extension
cord may be used. The electrical rating of the extension cord must be equal to or greater than the rating of the appliance. If the appliance is of the grounding type, the extension cord should be a grounding-type, 3-wire cord. Care must be taken to arrange the extension cord so that it will not drape over the countertop
or tabletop where it can be pulled on by children or accidentally tripped over.
Parts and Features
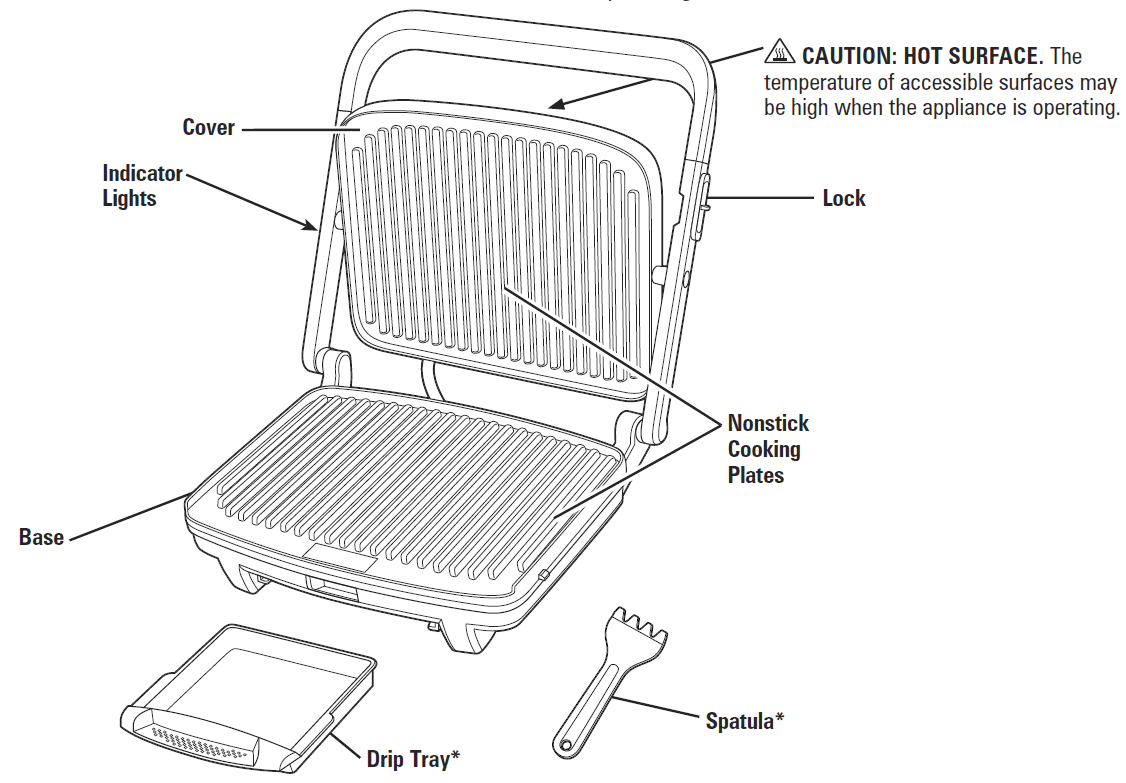
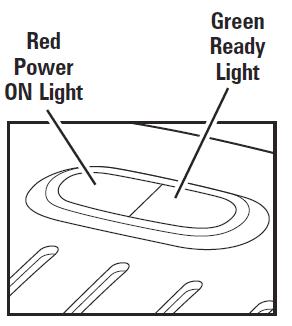
- Indicator Lights
- Red indicates that the power is on. Green indicates that the unit is preheated and ready to use
How to Use
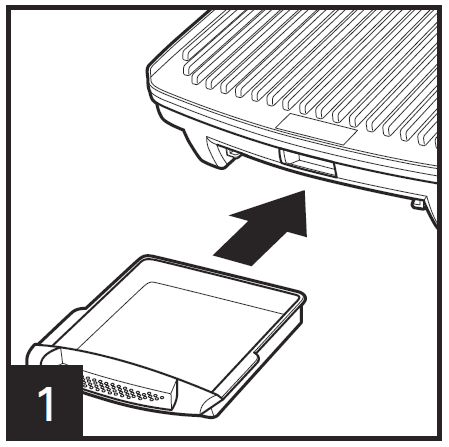
- Slide the drip tray into place under the front of the grill.

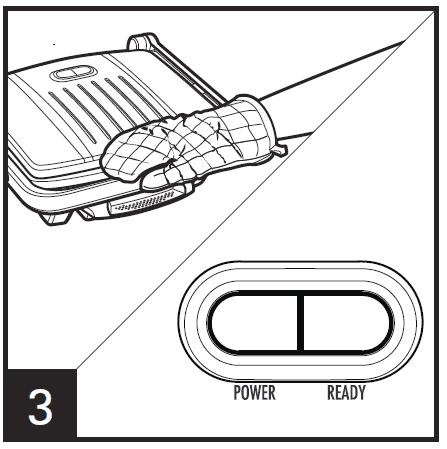
- Plug into an outlet. The red POWER light will come on.
- Preheat with the cover closed. Once the grill has reached the proper temperature, the green READY light will come on

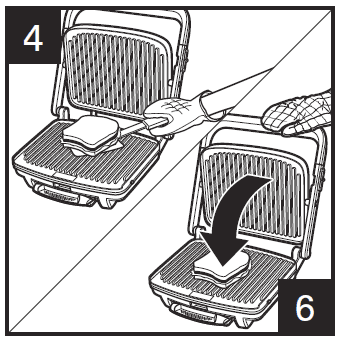
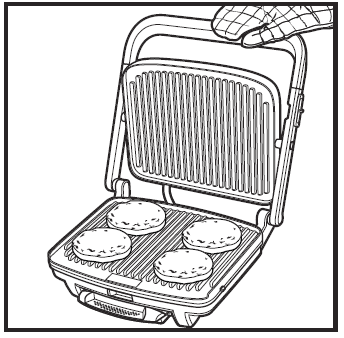
- When preheated, use an oven mitt to raise the cover. Place panini or other food to be cooked onto cooking plates. Only use wooden or plastic cooking utensils to prolong the life of the nonstick coating.

- Lower grill cover.
- Lift the oven and check the food. If additional cooking time is needed, lower the cover.
- When finished cooking, remove food and unplug.

- NOTE: When cooking meat or poultry, carefully check the drip tray and empty it when necessary.
Cooking Chart
Preheat with the cover closed. Once the grill has reached the proper temperature, the green light will come on. The following times are guidelines. Always cook with the cover closed. Visit www.foodsafety.gov for more information on safe internal cooking temperatures![]()
| Beef Strip Steak, boneless, fresh (8 oz./225 g) | 5 minutes | Slightly pink in the center; brown on the outside |
| Chicken Breast, boneless, fresh (4–6 oz./120–180 g) | 5 to 8 minutes | No longer pink in the center |
| Chicken Breast, boneless, frozen (4 oz./120 g) | 10 to 12 minutes | No longer pink in the center |
| Chicken Tenderloins, boneless, skinless, fresh (2 lbs./907 g) | 5 minutes | No longer pink in center |
| Fish Fillet, frozen (about 2 oz./60 g) | 6 to 8 minutes | Fish flakes with a fork |
| Fish, fresh, 1/2-in. thick (4 oz./120 g) | 5 minutes | Fish flakes with a fork |
| Salmon, fresh, 1-inch thick (6 oz./180 g) | 9 to 11 minutes | Fish flakes with a fork |
| Hamburger, fresh (4 oz./120 g) | 5 to 7 minutes | No longer pink in the center |
| Hamburger, frozen (4 oz./120 g) | 10 to 12 minutes | No longer pink in the center |
| Hot Dog | 5 minutes | Heated through |
| Pork Chops, boneless, fresh (4 oz./120 g, 3/4-in./1.9-cm thick) | 6 to 8 minutes | No longer pink in the center |
| Pork Chops, boneless, frozen (4 oz./120 g) | 10 to 12 minutes | No longer pink in the center |
| Sausage | 15 minutes | No longer pink in the center |
| Turkey Burgers (4 oz./120 g) | 10 to 15 minutes | No longer pink in the center; brown on the outside |
| Bacon | 10 to 15 minutes | Crispy |
| VEGETABLES | COOK TIME | DONENESS |
| Green or Red Bell Pepper Strips, fresh | 5 minutes | Tender-crisp |
| Mushrooms, sliced, fresh | 6 minutes | Tender-crisp |
| Onions, sliced, fresh | 4 minutes | Soft |
| Zucchini or Summer Squash, sliced, fresh | 4 minutes | Tender-crisp |
Helpful Tips
ALWAYS PREHEAT BEFORE USING.
- Read the Use and Care Guide before using.
- Use a cooking spray for convenient, stick-free cooking. Or if you prefer, brush cooking plates with vegetable oil before preheating.
- Use plastic utensils on nonstick cooking plates. Do not use metal utensils since they will damage nonstick surfaces.
- Thicker sandwiches may shift when the lid is closed. Use a plastic spatula to reposition. There is no need to press down on the handle. The weight of the cover will grill the top of the sandwich.
- Cleanup is easy! Let the grill cool down; then loosen any stuck-on food with a spatula and wipe cooking plates with a damp paper towel
Care and Cleaning
- Unplug and allow to cool.
- Use a spatula to remove any stuck-on food. Wipe cooking plates with a paper towel to remove drippings.
- Slide out the drip tray; wash the drip tray and spatula in a dishwasher or hot, soapy water.
- Use a damp sponge with a small amount of dishwashing detergent to scrub cooking surfaces. Rinse out the sponge and wipe surfaces clean. Use a clean, damp cloth to wipe surfaces again.
NOTE: Do not use steel wool, scouring pads, or abrasive cleansers on any part of the unit. Never use sharp or pointed objects for cleaning. - DO NOT use the “SANI” setting when washing in the dishwasher. “SANI” cycle temperatures could damage your product. Wipe the outside of the unit with a damp, soapy cloth.
- For easy storage, add a spatula to the drip tray and slide the tray into place. On the right side, slide the locking tab to lock the panini press. Store upright
Limited Warranty
- This product is warranted to be free from defects in material and workmanship for a period of five (5) years from the date of the original purchase in Canada and one (1) year from the date of original purchase in the U.S. During this period, your exclusive remedy is repair or replacement of this product or any component found to be defective, at our option; however, you are responsible for all costs associated with returning the product to us and our returning a product or component under this warranty to you. If the product or the component is no longer available, we will replace it with a similar one of equal or greater value.
- This warranty does not cover glass, filters, wear from normal use, use not in conformity with the printed directions, or damage to the product resulting from accident, alteration, abuse, or misuse. This warranty extends only to the original consumer purchaser or gift recipient. Keep the original sales receipt, as proof of purchase is required to make a warranty claim. This warranty is void if the product is used for other than single-family household use or subjected to any voltage and waveform other than as specified on the rating label (e.g., 120 V ~ 60 Hz).
For more manuals by Hamilton Beach visit, ManaulsLibraryy
Hamilton Beach 25410 Sandwich Maker-FAQs
How do I clean my Hamilton Beach sandwich maker?
Unplug the appliance and let it cool. Wipe the cooking surfaces with a paper towel to remove drippings. For stubborn residue, use a plastic spatula or a damp sponge with dish soap to clean the nonstick plates.
How long does it take to cook a sandwich?
Most sandwiches cook in 10 minutes or less. The 99-square-inch cooking surface can fit two thick sandwiches or one long sandwich.
How does a sandwich maker work?
The appliance has two heated plates—one on the top and one on the bottom. When the sandwich is placed inside and the lid is pressed down, it cooks and seals the sandwich, making it crispy on the outside.
Is the Hamilton Beach sandwich maker dishwasher safe?
Yes, all removable parts are dishwasher safe, and the nonstick cooking surface is PFAS-free for easy cleanup.
How long does it take to preheat?
For gas sandwich makers, heat for 5 minutes on medium flame. For electric models, plug in and preheat for about 5 minutes before use.
What type of bread works best?
Sturdier breads like focaccia, ciabatta, and baguettes hold up better to grilling compared to softer breads like sourdough.
Can I use the sandwich maker to hard-boil eggs?
No, but if you’re preparing eggs for sandwiches, hard-boil them separately by cooking for 10-12 minutes until fully set.
How do I preheat a Hamilton Beach Easy Reach toaster oven?
Plug in the toaster oven, set the temperature to 450°F (230°C), and let it heat for 10 minutes before first use.

