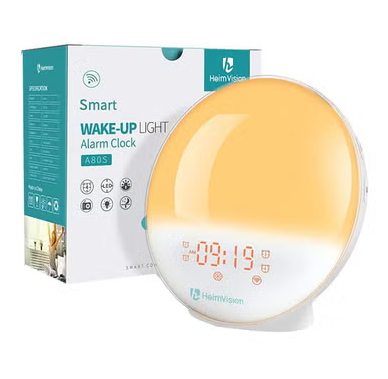
HeimVision Smart Wake-up Light Alarm Clock
WARNING
To reduce the risk of Fire, Electric Shock, or Injury to Persons:
- This appliance is only intended for household use, including similar use in hotels,
- Place this appliance on a stable, level, and non-slippery surface.
- Do not use this appliance in wet surroundings (e.g,. in the bathroom or near a shower or swimming pool.)
- Make sure the adapter does not get wet.
- Do not let water run into the appliance or spill water onto the appliance.
- Only use the original adapter. Do not use the other adapter if they are damaged.
- This appliance has no on/off switch. To disconnect the appliance from the power source, remove the plug from the wall outlet.
- Do not use this appliance as a means to reduce your hours of sleep. The purpose of this appliance is to help you wake up more easily. It does not diminish your need for sleep.
STORAGE
- Clean the appliance with a soft cloth.
- Do not use abrasive cleaning agents, pads, or cleaning solvents like alcohol, acetone, etc., as this might damage the surface of the appliance.
- If the appliance will not be used for an extended period of time, remove the power cord from the wall outlet and store the appliance in a safe, dry surroundings where it will not be crushed, banged, or subject to damage.
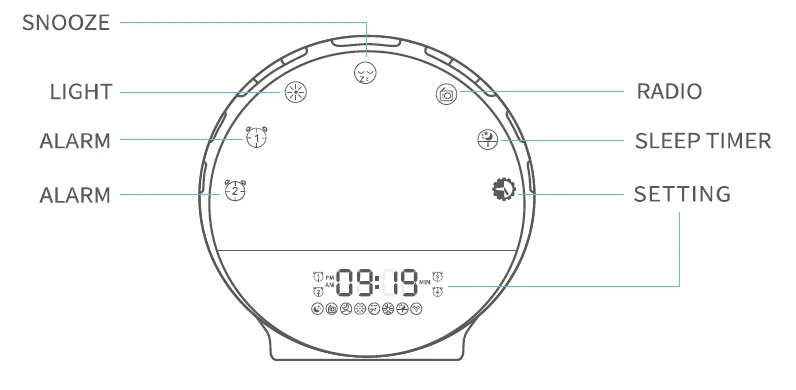
OVERVIEW
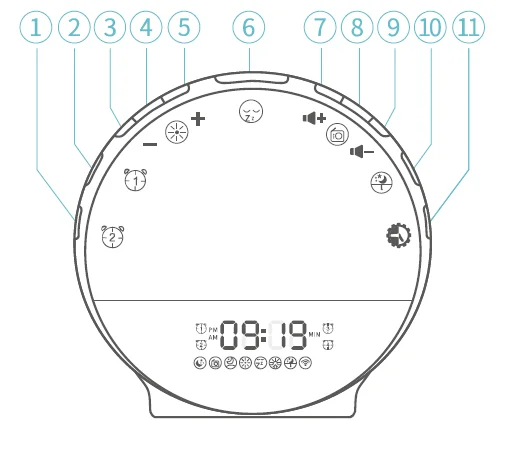
- Alarm Clock 2
- Alarm Clock 1
- Down Button
- LED Light
- Up Button
- Snooze Button
- volume +
- Radio
- Volume –
- Sleep Timer
- Setting Button
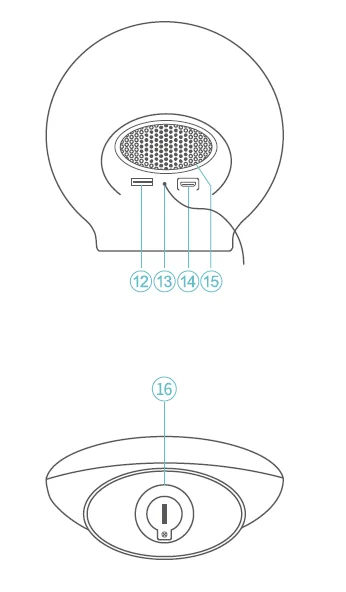
- USB Output
- FM Antenna
- Micro USB Input
- Speaker
- Button Battery
OPERATION GUIDE
First use- setting the clock time:
You have to set the clock time when you plug in the appliance for the first time.
Set the time
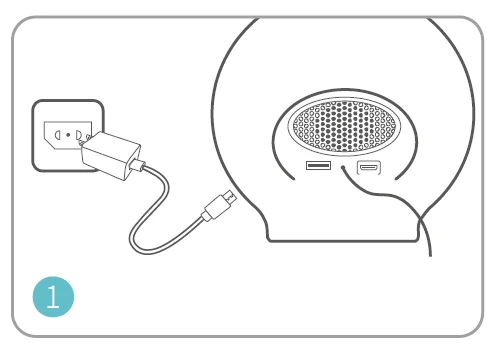
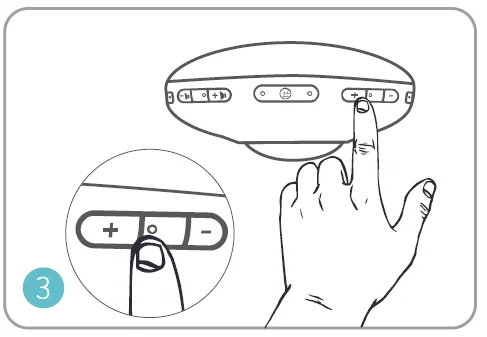
- Plug in the power and start setting.

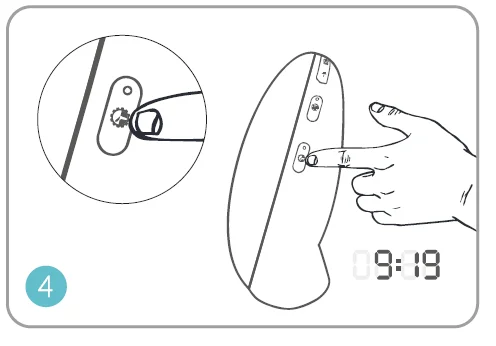
- Hold
 for 3 seconds until the hour time begins to blink.
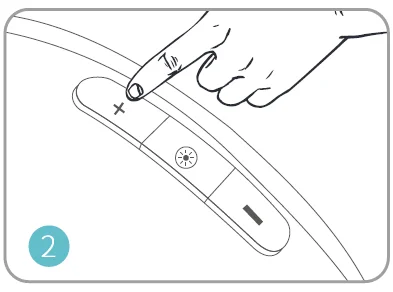
- Use
 to adjust the hour.
- Press the
 again to confirm the hour time and move to the minutes.
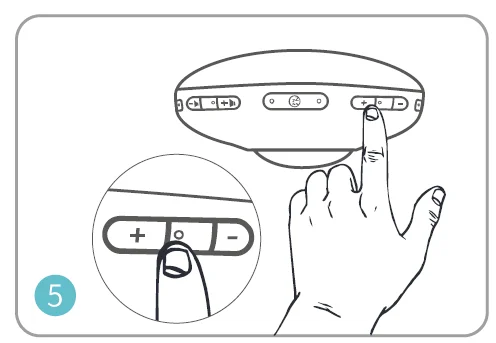
- Use
 to adjust the minutes.
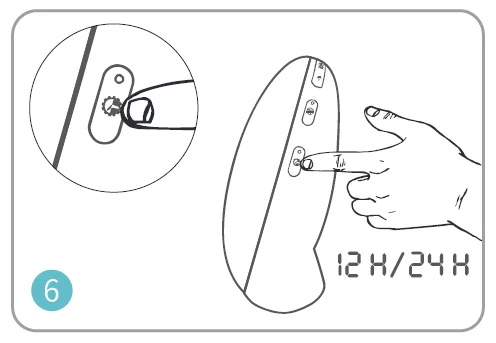
- Press the
 once more to confirm the minutes and move to choose the time format.
Note: When the 12-hour time format is selected, PM or AM will be displayed.
Setting an Alarm Clock
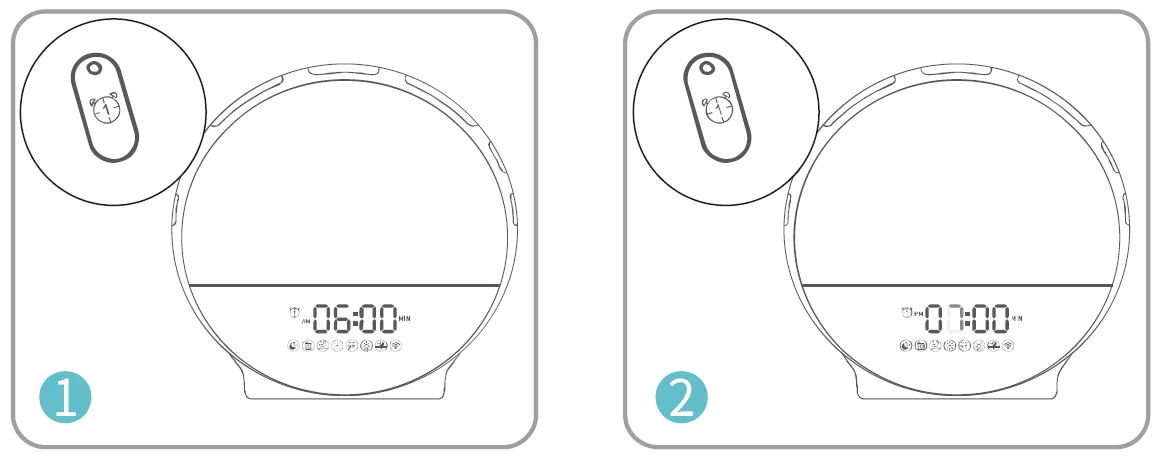
You can set four alarm clocks for this wake-up light. (Note: clock 3 & clock 4 can only be set on APP) Take clock 1 setting as an example:
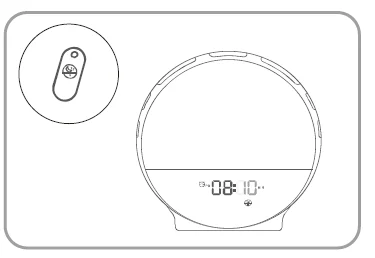
In the time state, press
 to turn on the alarm. The alarm symbol appears on the display when you turn on it, and disappears when you turn off the alarm.
Hold
 for 3 seconds until the hour time begins to blink, and use
 to adjust the hour time.
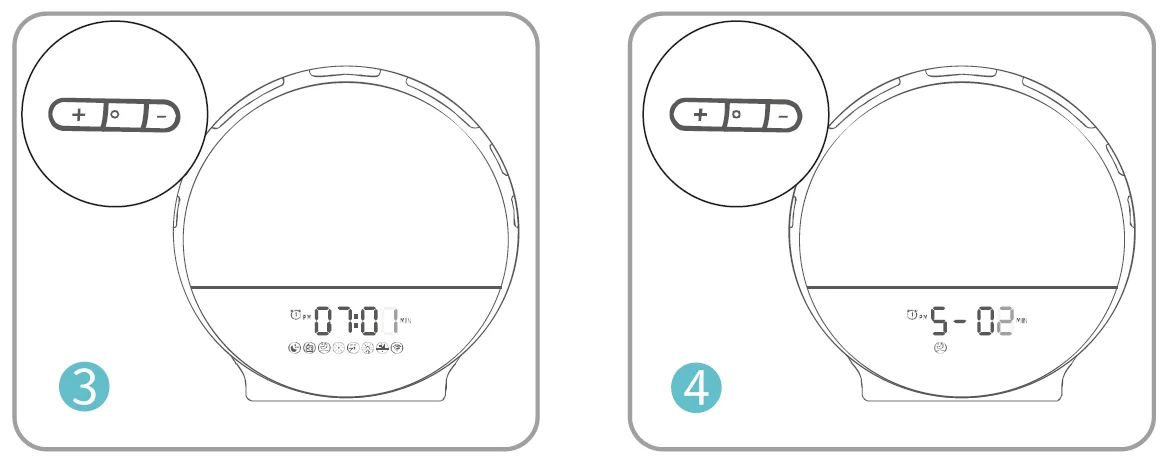
- Press
 second time to confirm the hour time and move to the minutes, and use
 to adjust the minutes.
 - Press
 third time to confirm the minutes and move to choose the alarm sound, and use
 to adjust your choices. (You can choose between 7 pre-set sounds or FM radio as a wake-up sound.)
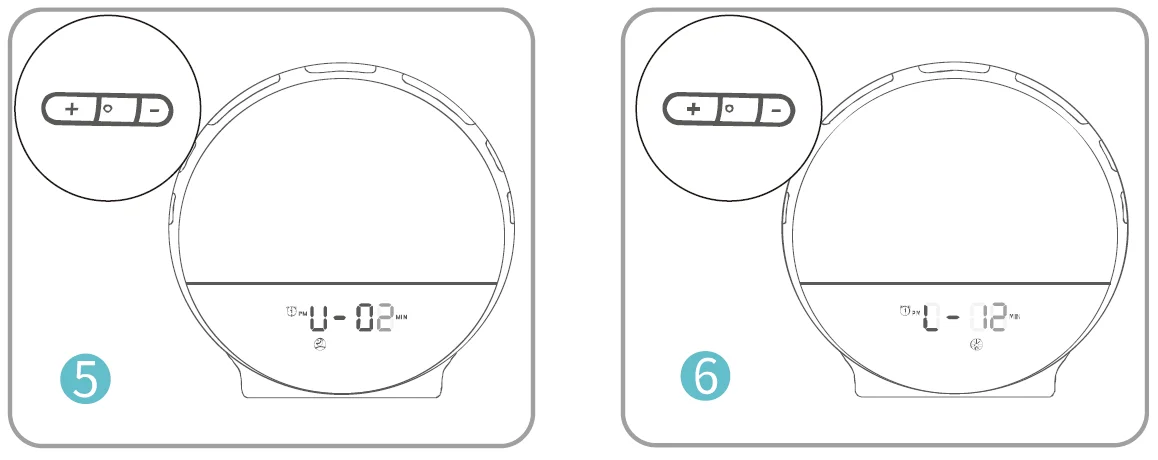
- Press
 fourth time to confirm the alarm sound and move to set the wake-up sound volume, and press
 to adjust the volume.
 - Press
 fifth time to confirm the volume and move to set the wake-up light. and press
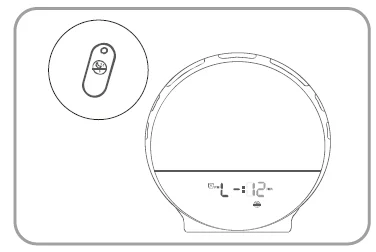
 to adjust the light intensity. (OFF, L-01~L-20)
 Note: When the set light time arrives, the light will slowly turn from dark to the preset brightness level. OFF means turning off the light. Set the light state to OFF when you do not need a light to wake up.
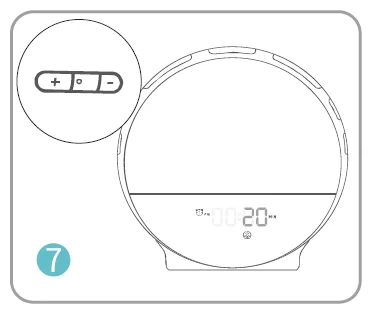
 - Press
 sixth time to confirm the light brightness and move to set the simulated sunrise time. and press
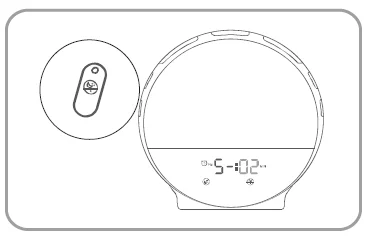
 to adjust from 10-60 minutes, then press the {33 to confirm, finish setting.
 (You can set the light to turn on 10-60 minutes before the alarm sounds. In the set sunrise simulation time, the light intensity of the lamp gradually increases to the set level, and the light color changes from deep morning red to bright daylight.) Leave for about 15 seconds to confirm the selected option.
SNOOZING
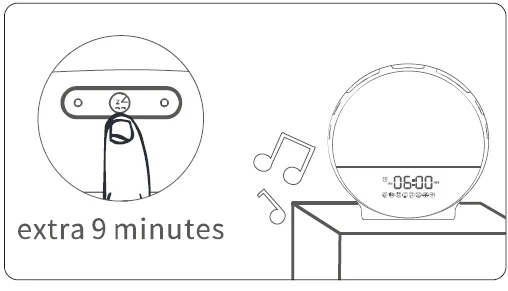
When the alarm clock goes off, press © to enter the snooze state. You can get an extra 9 minutes of sleep time. (Note: snooze up to 5 times.)
*When the alarm clock goes off (or snooze state), press the corresponding alarm clock button to turn off the light and sound.
*When the alarm clock goes off, if there aren’t any operations within 15 minutes, it will turn off the light and sound automatically.
SWITCHING THE LIGHT ON/OFF
You can adjust the display type: Sunrise Light OR Colorful Light
Sunrise Light:
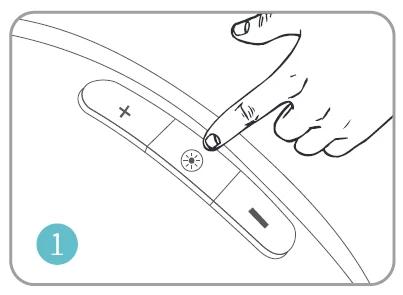
- Press
 to turn on/turn off sunrise light
- Press
 to adjust the light intensity
Colorful Lights:
Double-click![]() to turn on/turn off colorful lights, and enter automatic mode.
to turn on/turn off colorful lights, and enter automatic mode.
- Press
 to switch to manual mode.
 - Long-press
 to switch to automatic mode again.
SWITCHING THE FM RADIO ON/OFF
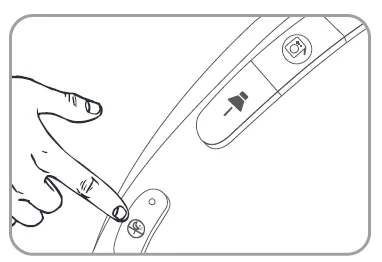
Press![]() for 3 seconds to turn on automatic search mode for your first use. The radio will automatically scan radio frequencies and save the frequency of P01, P02….
for 3 seconds to turn on automatic search mode for your first use. The radio will automatically scan radio frequencies and save the frequency of P01, P02….
Turn on the radio
In time state, press![]() to switch on/switch off FM radio, long-press
to switch on/switch off FM radio, long-press![]() for three seconds to set FM frequency. Short-press
for three seconds to set FM frequency. Short-press![]() to set radio volume.
to set radio volume.
Turn off the radio
In the radio-on state, press![]() to turn off the FM radio.
to turn off the FM radio.
Note: To get a good radio signal, fully unwind the antenna and move it around until you receive the best reception.
SETTING THE SLEEP TIMER
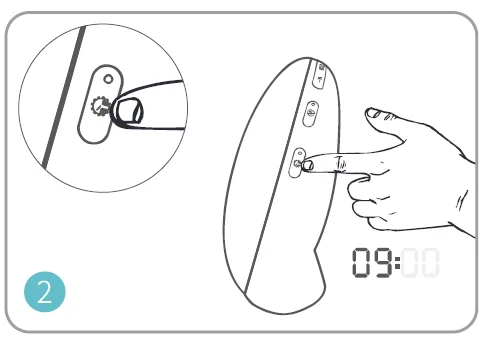
- Press
 to initiate sleep timer
- Long-press
 to set the simulated sunset time, and press
 to adjust the timer.
- Press
 second time to set the sleeping light. and press
 to adjust the light intensity.
- Press
 third time to set the sleeping music, and press
 to choose the sound. You can use the natural sounds or the FM radio as a sleeping sound; the wake-up light has three built-in natural sounds.
- Press
 fourth time to set the sleeping sound volume, and press
 to adjust the volume.
Note: After finishing setting, the light will slowly turn from the preset brightness level to dark, and the light will turn off at the end of the preset time.
Leave for about 15 seconds to confirm the selected option.
CONNECTING YOUR MOBILE DEVICE
- Download Smart Life to your mobile device from App Store/ Google Play or by scanning the QR code.
- Download ‘Smart Life’ / Scan for Video Instruction

- Download ‘Smart Life’ / Scan for Video Instruction
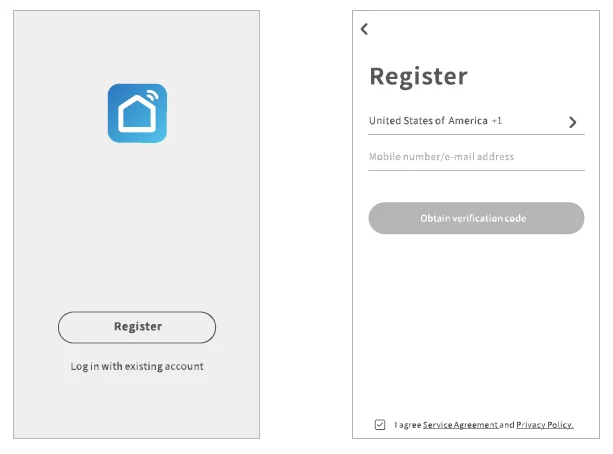
- Create an Account and Log in

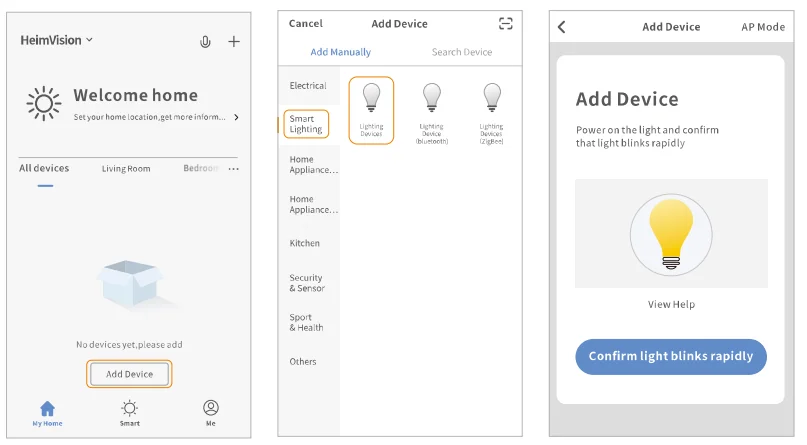
- Add Device & Connect WIFI

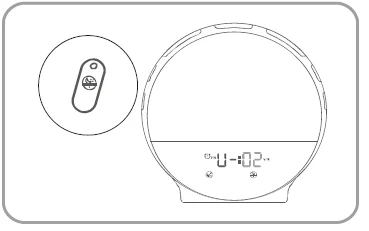
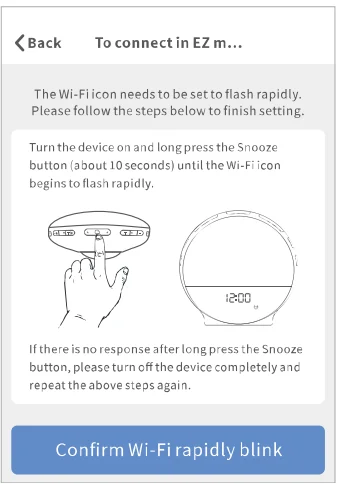
- Power on the light and confirm Wi-Fi blinks rapidly

- Turn the device on and long-press the Snooze button (about 10 seconds) until the Wi-Fi icon begins to flash rapidly.

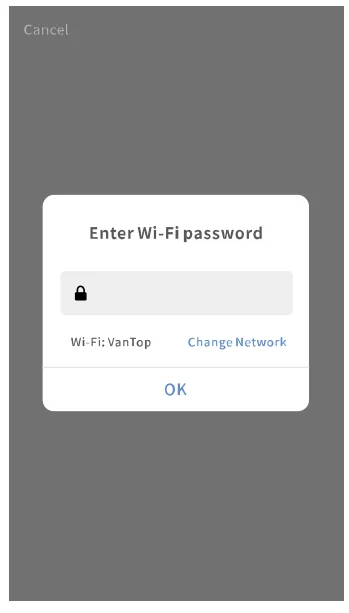
- Select your own Wi-Fi and enter the correct password

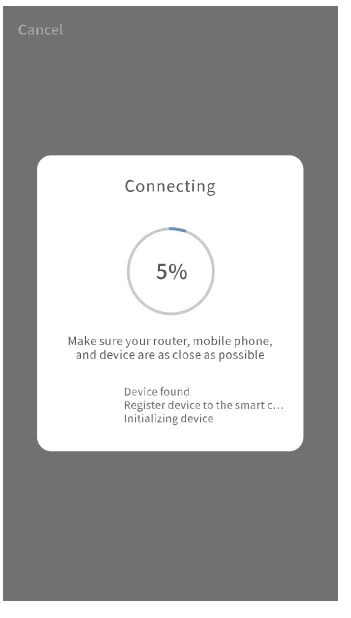
- Wait for connecting

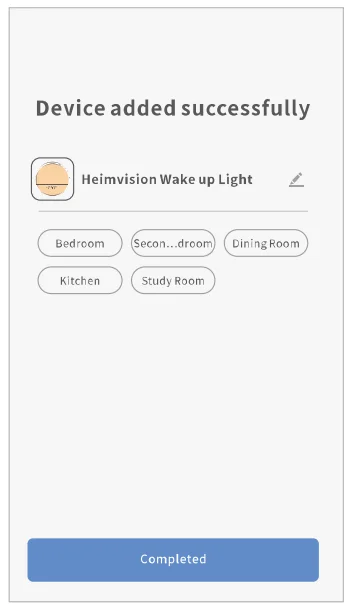
- Create a name for your wake-up light.
- Power on the light and confirm Wi-Fi blinks rapidly
- How to Operate the Light via Smart Life APP Operation Panel

- Click
 to set the time of the wake-up light and time display brightness.
 Please make sure you have chosen the Network auto-time; otherwise, alarm settings might not be accurate.
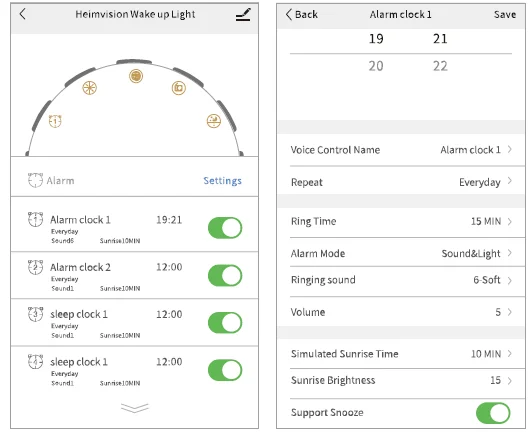
 - Click
 to set the four alarm clocks.
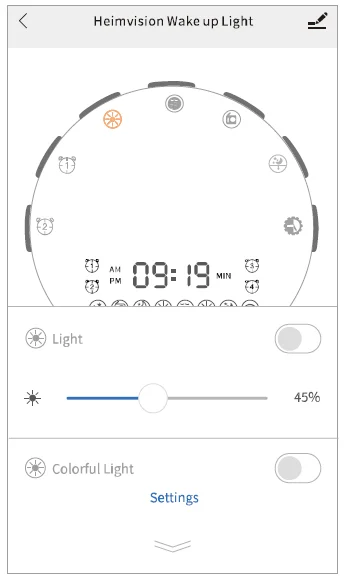
- Click
 to choose the light display type and adjust the light intensity.
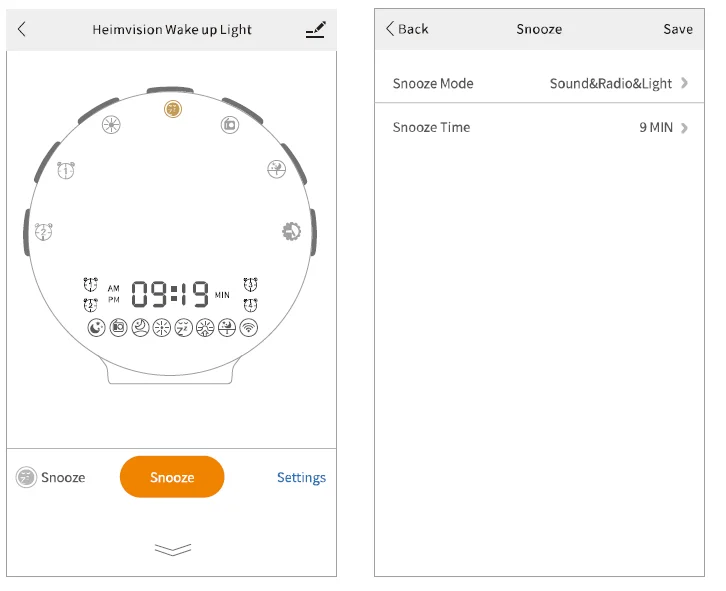
- Click
 to set the snoozing pattern.
- Click
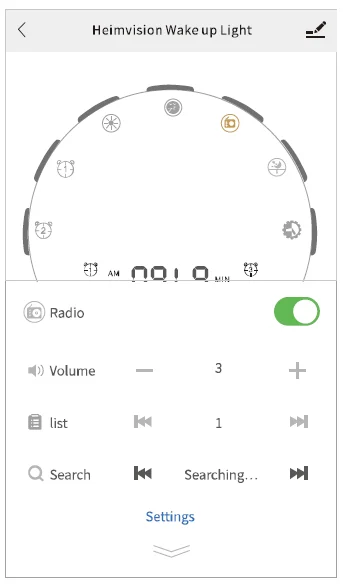
 to turn on/turn off the FM radio, and choose the frequency you want.
- Click
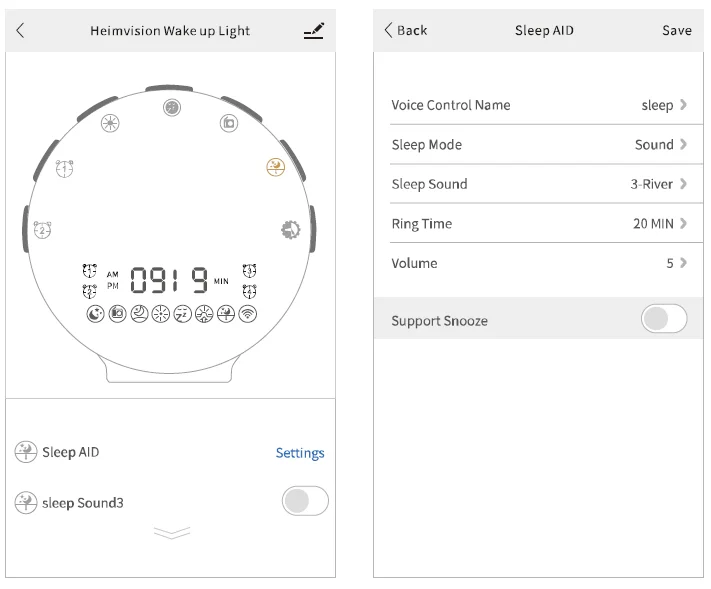
 to set the sleep timer and create your Sleep AID.
- Click
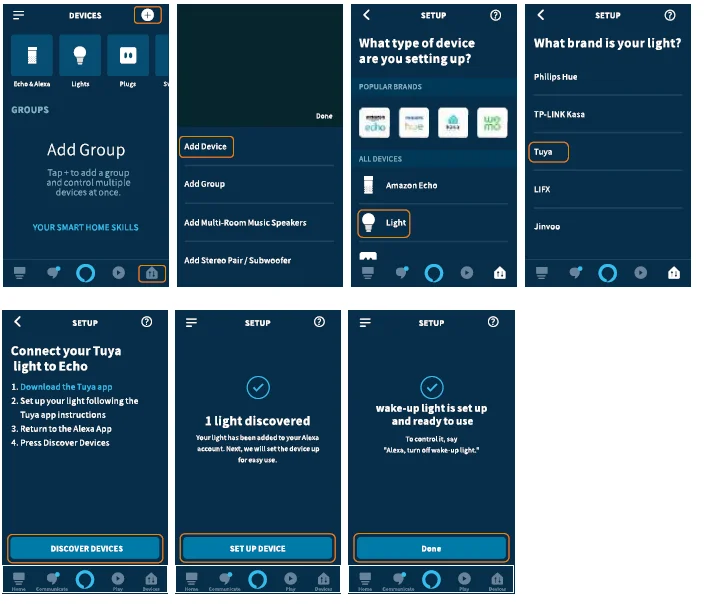
HOW TO CONNECT WITH AMAZON ALEXA
- Download the Amazon Alexa and sign in to your Amazon account.

- —Select Skills & Games, search Smart Life, and ENABLE TO USE it.
 ——Log in to your “Smart Life” account, then authorize and close the successfully linked page after it is connected successfully to enter Discover Devices page.
- Discover Devices
This wake-up light works with Alexa. Through this skill, Amazon Alexa will find and list devices you originally added in the Smart Life App. Note: If your Smart Life account is linked to Alexa, please add the devices by following the steps:
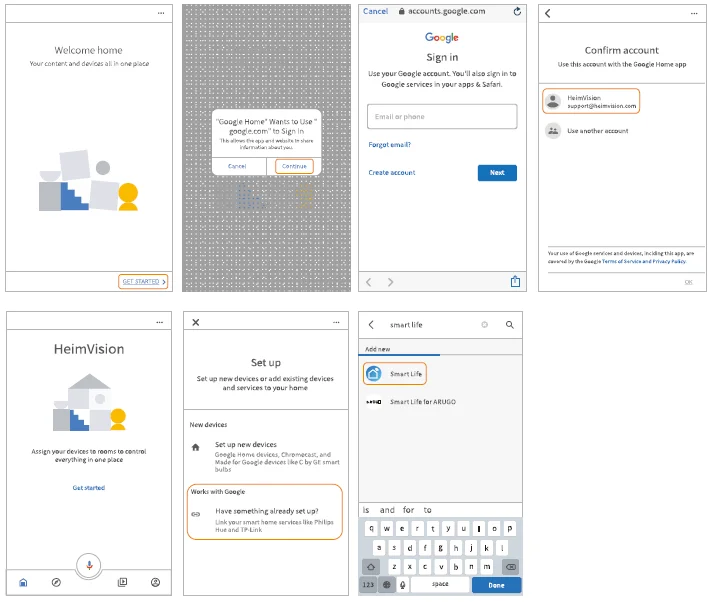
HOW TO CONNECT WITH GOOGLE HOME
- Download Google Home and sign in to your Google account.

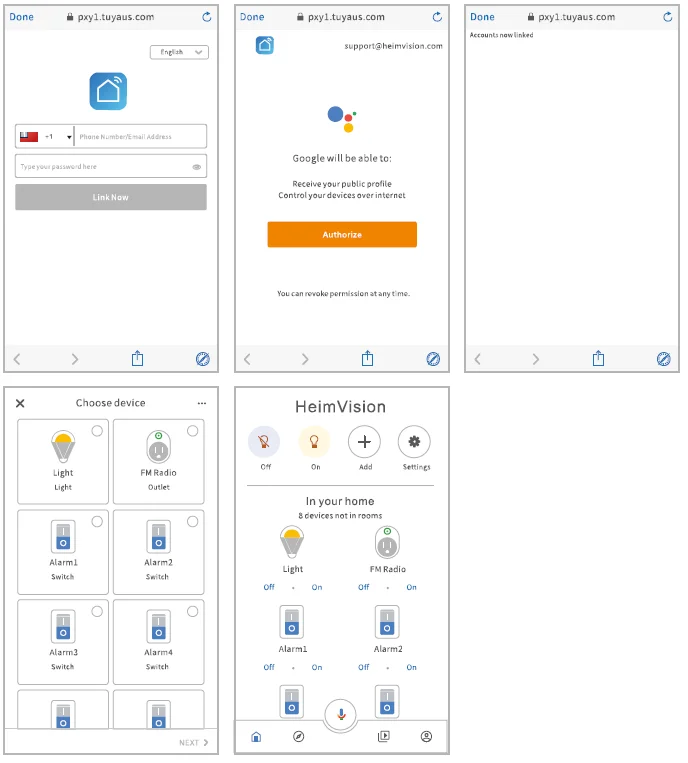
- Log in to your “Smart Life” account, then Authorize and close the Accounts now linked page after it is connected successfully to enter the Choose Device page. Then you can control the wake-up light via Google Home after completing the settings.

TROUBLE SHOOTING
This part summarizes the most common problems you could encounter with the Wake-Up Light. If you are unable to solve the problem with the information below, please feel free to contact [email protected] for assistance.
Q1. The appliance does not work at all.
- Perhaps the adapter is not inserted properly in the wall outlet. Plug the adapter properly in the wall outlet.
- Perhaps there is a power failure. Check if the power supply works by connecting another appliance.
Q2. What should I do when I cannot link the Wake-Up Light with the Smart Life App?
- Check if the Wake-Up Light is powered on.
- Make sure your mobile device is connected to the 2.4GHz Wi-Fi Network.
- Make sure the password of your Wi-Fi network is entered in the Smart Life App correctly when linking the Wake-Up Light.
- Make sure the Wake-Up Light is ready for linking: the Wi-Fi indicator flashes quickly. If not, please press the Snooze button (about 10 seconds) until the Wi-Fi indicator begins to flash rapidly.
Q3. Why did I fail to set the alarm clock to ring only on weekdays?
- Please turn on the Network auto-time in the settings interface of Smart Life App, then you can set the alarm clock according to your needs.
Q4. The radio produces a crackling sound.
- Perhaps the broadcast signal is weak. Please fully unwind the antenna and move it around until you receive the best reception.
Q5. How can I set the alarm 3 and alarm 47?
- Alarm 3 & Alarm 4 can only be set on the Smart Life App.
Q6. Could I completely turn off the time display?
- Yes, you could turn it off in the settings interface on Smart Life App.
Q7. The light wakes me up too early.
- Perhaps the light intensity level you set is not appropriate for you. You can try a lower light level.
- Move the Wake-Up Light further away from the bed.
Q8. The light wakes me up too late.
- You can try to set it at a higher light intensity level.
- Make sure the Wake-Up Light is located at a height at which the light is not blocked by your bed, comforter, pillow or any other things.
WARRANTY
30-Day Money-Back Guarantee for Any Reason
You may return your product within 30 days of purchase to receive a FULL REFUND for any reason. But if the reason for the return isn’t quality-related, the customer must pay for the return shipping. 24-Month Warranty for Quality-Related Issues HeimVision warrants its products to be free from defects in material and workmanship, under normal use, during the warranty period. Within 24 months, HeimVision will provide a replacement and cover any return shipping costs for products that fail in normal use.
FCC CAUTION
Any Changes or modifications not expressly approved by the party responsible for compliance could void the user’s authority to operate the equipment. This device complies with part 15 of the FCC Rules. Operation is subject to the following two conditions:
- This device may not cause harmful interference, and
- This device must accept any interference received, including interference that may cause undesired operation.
Note: This equipment has been tested and found to comply with the limits for a Class B digital device, as specified in Part 15 of the FCC Rules. These limits are designed to provide reasonable protection against harmful interference in a residential installation. This equipment generates, uses and can radiate radio frequency energy and, if not installed and used in accordance with the instructions, may cause harmful interference to radio communications. However, there is no guarantee that interference will not occur in a particular installation. Suppose this equipment does cause harmful interference to radio or television reception, which can be determined by turning the equipment off and on. In that case, the user is encouraged to try to correct the interference by one or more of the following measures:
- Reorient or relocate the receiving antenna.
- Increase the separation between the equipment and receiver.
- Connect the equipment into an outlet on a circuit different from that to which the receiver is connected.
- Consult the dealer or an experienced radio/TV technician for help.
This equipment complies with FCC radiation exposure limits set forth for an uncontrolled environment This equipment should be installed and operated with minimum distance 20cm between the radiator and your body. This transmitter must not be co-located or operating in conjunction with any other antenna or transmitter.
For more manuals by HeimVision, visit ManualsLibraryy
HeimVision Smart Wake-up Light Alarm Clock-FAQs
What app do I need for the HeimVision Smart Wake-Up Light Alarm Clock?
You can control your HeimVision wake-up light using the Smart Life app. It connects via a 2.4GHz Wi-Fi network and also works with Amazon Alexa for voice commands.
How do I connect my HeimVision Wake-Up Light to Wi-Fi?
Download the Smart Life app, turn on your device, and follow the on-screen instructions to add a new device. Make sure your phone is connected to a 2.4GHz Wi-Fi network, then complete the setup through the app.
How do I set the time on my HeimVision alarm clock?
Press and hold the SET button until the hour digits start blinking. Use the “+” and “–” buttons to adjust the hour and minute, then press SET again to confirm the time.
How do I set an alarm on the HeimVision Wake-Up Light?
Hold the alarm clock icon button until the time display starts flashing. Adjust the alarm time using the “+” and “–” buttons, then press the same button again to confirm your selection.
How does the wake-up light feature work?
The light gradually brightens before your set alarm time, mimicking a natural sunrise. This helps your body wake up more gently and improves your morning mood and energy.
Can I control the HeimVision alarm clock with Alexa?
Yes. Once connected to the Smart Life app, you can link it to Amazon Alexa and use simple voice commands to control the alarm, brightness, and light colors.
Does HeimVision have its own app?
Yes, HeimVision offers the HeimKits app for its NVR camera systems. However, for the Wake-Up Light Alarm Clock, use the Smart Life app for setup and control.
How can I improve waking up with the alarm the first time?
Place your HeimVision clock away from your bed so you must get up to turn it off. The sunrise simulation also helps your body wake naturally without feeling groggy.
How long should I use the wake-up light feature before the alarm?
The light usually starts 20–30 minutes before your set alarm time, but you can customize this duration in the app based on your preference.

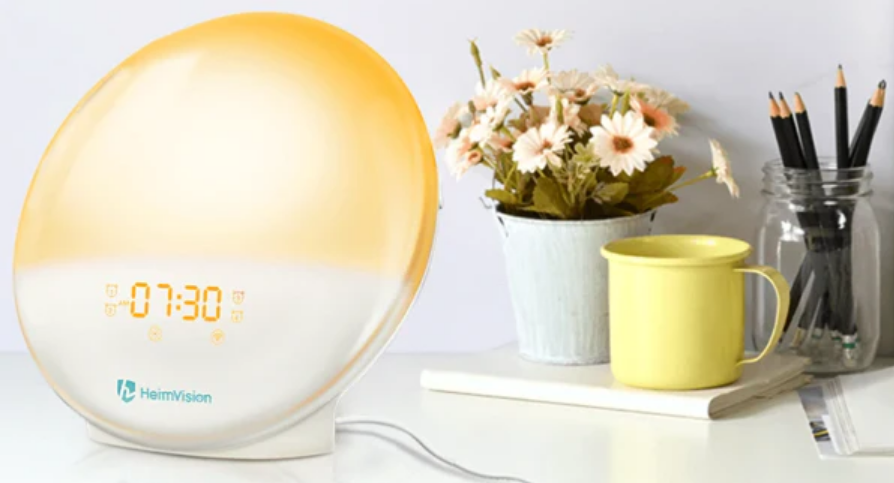
 Note: When the set light time arrives, the light will slowly turn from dark to the preset brightness level. OFF means turning off the light. Set the light state to OFF when you do not need a light to wake up.
 (You can set the light to turn on 10-60 minutes before the alarm sounds. In the set sunrise simulation time, the light intensity of the lamp gradually increases to the set level, and the light color changes from deep morning red to bright daylight.) Leave for about 15 seconds to confirm the selected option.

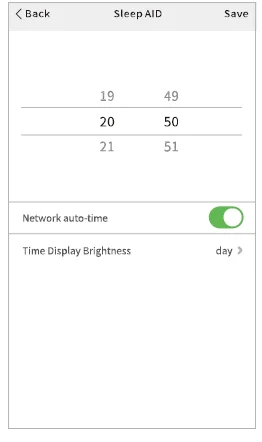 Please make sure you have chosen the Network auto-time; otherwise, alarm settings might not be accurate.

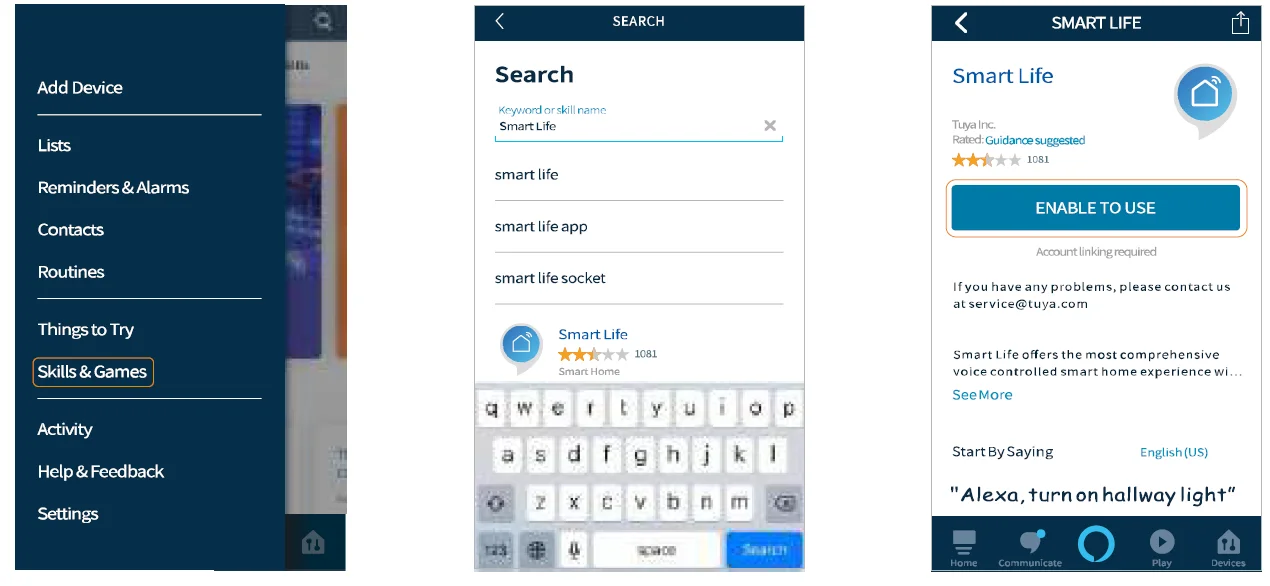 ——Log in to your “Smart Life” account, then authorize and close the successfully linked page after it is connected successfully to enter Discover Devices page.
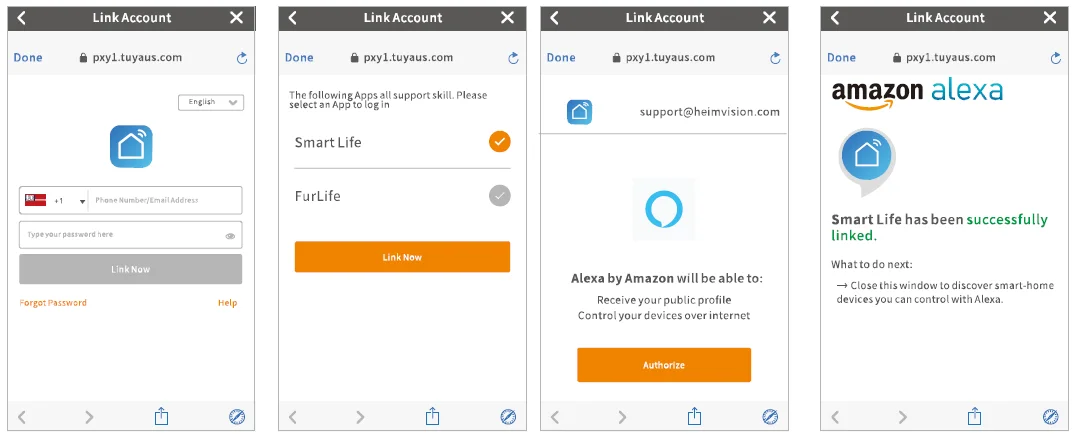
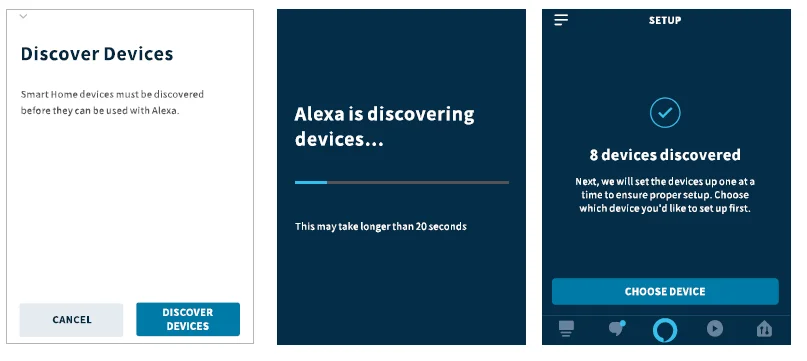 Note: If your Smart Life account is linked to Alexa, please add the devices by following the steps: