Hotpoint RGB790CEKCC 30 Inch Free Standing Gas Range

IMPORTANT SAFETY INFORMATION. READ ALL INSTRUCTIONS BEFORE USING.
SAFETY PRECAUTIONS
- Locate the range out of the kitchen traffic path and out of drafty locations to prevent poor air circulation.
- Be sure all packaging materials are removed from the range before operating it to prevent fire or smoke damage should the packaging material ignite.
- Be sure your range is correctly adjusted by a qualified service technician or installer for the type of gas (natural or LP) that is to be used. Your range can be converted for use with either type of gas. See the Installation of the range section.
WARNING: These adjustments must be made by a qualified service technician in accordance with the manufacturer’s instructions and all codes and requirements of the authority having jurisdiction. Failure to follow these instructions could result in serious injury or property damage. The qualified agency performing this work assumes responsibility for the conversion.
- After prolonged use of a range, high floor temperatures may result and many floor coverings will not withstand this kind of use. Never install the range over vinyl tile or linoleum that cannot withstand such type of use. Never install it directly over the interior kitchen carpeting.
- Do not leave children alone or unattended where a range is hot or in operation. They could be seriously burned.
- Do not allow anyone to climb, stand, or hang on the oven door, storage drawer, warming drawer, or cooktop. They could damage the range and even tip it over, causing severe personal injury.
CAUTION: Items of interest to children should not be stored in cabinets above a range or on the backsplash of a range—children climbing on the range to reach items could be seriously injured.
- Never wear loose-fitting or hanging garments while using the appliance. Be careful when reaching for items stored in cabinets over the range. Flammable material could be ignited if brought in contact with flame or hot oven surfaces and may cause severe burns.
- Do not store flammable materials in an oven, a range storage drawer, a warming drawer, or near a cooktop.
- Do not store or use combustible materials, gasoline, or other flammable vapors and liquids in the vicinity of this or any other appliance.
- Do not let cooking grease or other flammable materials accumulate in or near the range.
- Do not use water on grease fires. Never pick up a flaming pan. Turn the controls off. Smother a flaming pan on a surface burner by covering the pan completely with a well-fitting lid, cookie sheet or flat tray.
- Use a multi-purpose dry chemical or foam-type fire extinguisher.
- Flaming grease outside a pan can be put out by covering it with baking soda or, if available, by using a multi-purpose dry chemical or foam-type fire extinguisher.
- Flame in the oven can be smothered completely by closing the oven door and turning the control to off or by using a multi-purpose dry chemical or foam-type fire extinguisher.
- Let the burner grates and other surfaces cool before touching them or leaving them where children can reach them.
- Never block the vents (air openings) of the range. They provide the air inlet and outlet that are necessary for the range to operate properly with correct combustion. Air openings are located at the rear of the cooktop, at the top and bottom of the oven door, and at the bottom of the range under the kick panel or storage drawer.
- Large scratches or impacts to glass doors can lead to broken or shattered glass.
SURFACE BURNERS
- Use proper pan size—avoid pans that are unstable or easily tipped. Select cookware having flat bottoms large enough to cover burner grates. To avoid spillovers, make sure cookware is large enough to contain the food properly. This will both save cleaning time and prevent hazardous accumulations of food, since heavy spattering or spillovers left on range can ignite. Use pans with handles that can be easily grasped and remain cool.
COOK MEAT AND POULTRY THOROUGHLY
- Cook meat and poultry thoroughly—meat to at least an INTERNAL temperature of 160°F and poultry to at least an INTERNAL temperature of 180°F. Cooking to these temperatures usually protects against foodborne illness.
OVEN
- Stand away from the range when opening the door of a hot oven. The hot air and steam that escape can cause burns to hands, face, and eyes.
SELF-CLEANING OVEN
- Be sure to wipe off excess spillage before the self-cleaning operation.
- Before self-cleaning the oven, remove the shelves, broiler pan, grid, and other cookware.
- Do not clean the door gasket. The door gasket is essential for a good seal. Care should be taken not to rub, damage or move the gasket.
- Clean only parts listed in this Owner’s Manual.
- If the self-cleaning mode malfunctions, turn the oven off and disconnect the power supply. Have it serviced by a qualified technician.
- Do not use oven cleaners. No commercial oven cleaner or oven liner of any kind should be used in or around any part of the oven. Residue from oven cleaners will damage the inside of the oven when the self-clean cycle is used.
Operating Instructions
Using the gas surface burners.
- Throughout this manual, features and appearance may vary from your model.
Before Lighting a Gas Burner
- Drip pans are supplied with your range; they should be used at all times.
- Make sure all burners are in place.
- Make sure all grates on the range are properly placed before using any burner.
After Lighting a Gas Burner
- Do not operate the burner for an extended period of time without cookware on the grate. The finish on the grate may chip without cookware to absorb the heat.
- Be sure the burners and grates are cool before you place your hand, a pot holder, cleaning cloths or other materials on them.
How to Light a Gas Surface Burner
- Make sure all the surface burners are placed in their respective positions. Push the control knob in and turn it to the LITE position.
- You will hear a little clicking noise—the sound of the electric spark igniting the burner.
- Turn the knob to adjust the flame size. If the knob stays at LITE, it will continue to click.
- When one burner is turned to LITE, all the burners spark. Do not attempt to disassemble or clean around any burner while another burner is on. An electric shock may result, which could cause you to knock over hot cookware.
Sealed Gas Burners
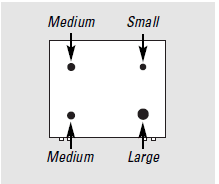
- Your gas range cooktop has four sealed gas burners. They offer convenience and flexibility to be used in a wide range of cooking applications.
- The smallest burner in the right rear position is the simmer burner. This burner can be turned down to a very low simmer setting. It provides precise cooking performance for delicate foods such as sauces or foods that require low heat for a long cooking time.
- The medium (left rear and, on some models, left front) and the large (right front and, on some models, left front) burners are the primary burners for most cooking. These general-purpose burners can be turned down from HI to LO to suit a wide range of cooking needs.
NOTE: On some models, the burners are all the same size and power.
On some models
On some models

How to Select Flame Size
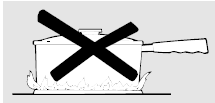
- For safe handling of cookware, never let the flames extend up the sides of the cookware. Watch the flame, not the knob, as you reduce heat.
- When fast heating is desired, the flame size on a gas burner should match the cookware you are using.
- Flames larger than the bottom of the cookware will not result in faster heating of the cookware and could be hazardous.

Stove Top Grills (on models with sealed burners)
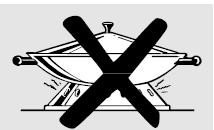
- Do not use stove-top grills on your sealed gas burners. If you use the stovetop grill on the sealed gas burner, it will cause incomplete combustion and can result in exposure to carbon monoxide levels above allowable current standards.
- This can be hazardous to your health.
Wok This Way (on models with sealed burners)
- We recommend that you use a 14″ or smaller flat-bottomed wok. Make sure the wok bottom sits flat on the grate. They are available at your local retail store.
- Only a flat-bottomed wok should be used.

- Do not use a flat-bottomed wok on a support ring. Placing the ring over the burner or grate may cause the burner to work improperly, resulting in carbon monoxide levels above allowable standards. This could be dangerous to your health.
Using the oven controls.
Using the oven.
- To avoid possible burns, place the shelves in the desired position before you turn the oven on.
Before you begin
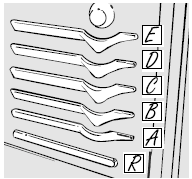
- The shelves have stop-locks, so that when placed correctly on the shelf supports (A through E), they will stop before coming completely out, and will not tilt.
- When placing and removing cookware, pull the shelf out to the bump on the shelf support.
- To remove a shelf, pull it toward you, tilt the front end up, and pull it out.
- To replace it, place the end of the shelf (stop-locks) on the support, tilt up the front,t and push the shelf in.
NOTE: The shelf is not designed to slide out at the special low shelf (R) position.
 The oven has 5 shelf positions. It also has a special low-shelf position (R) for extra-large items, such as a large turkey.
Oven Vent
- Your oven is vented through ducts at the rear of the range. Do not block these ducts when cooking in the oven—it is important that the flow of hot air from the oven and fresh air to the oven burner be uninterrupted. Avoid touching the vent openings or nearby surfaces during oven or broiler operation—they may become hot.
- Plastic items on the cooktop may melt if left too close to the vent. Vent appearance and location vary.
Aluminum Foil
- Never cover the oven bottom with aluminum foil. You can use aluminum foil to line the broiler pan and broiler grid. However, you must mold the foil tightly to the grid and cut slits in it just like the grid.
- Aluminum foil may also be used to catch a spillover. To do so, place a small sheet of foil on a lower shelf several inches below the food. Never entirely cover a shelf with aluminum foil. This will disturb the heat circulation and result in poor baking.
Using the clock and timer.
- Not all features are on all models.
To Set the Clock
The clock must be set to the correct time of day for the automatic oven timing functions to work properly. The time of day cannot be changed during a delayed cooking or a delayed self-cleaning cycle.
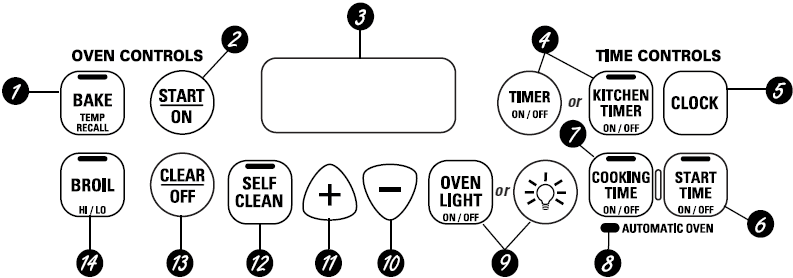
- Touch the CLOCK pad twice.
- Touch the + or – pads.
- Touch the START/ON pad until the time of day shows in the display. This enters the time and starts the clock.
To check the time of day when the display is showing other information, simply touch the CLOCK pad. The time of day shows until another pad is touched.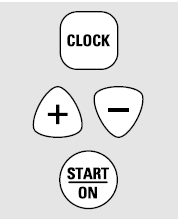
To Set the Timer
The timer does not control oven operations. The maximum setting on the timer is 9 hours and 59 minutes.
- Touch the KITCHEN TIMER ON/OFF or TIMER ON/OFF pad.
- Touch the + or – pads until the amount of time you want shows in the display. The maximum time that can be entered in minutes is 59. Times more than 59 minutes should be changed to hours and minutes.
- Touch the START/ON pad. The time will start counting down, although the display does not change until one minute has passed.
- When the timer reaches: 00, the control will beep 3 times followed by one beep every 6 seconds until the KITCHEN TIMER ON/OFF or TIMER ON/OFF pad is touched.
If you make a mistake, touch the KITCHEN TIMER ON/OFF or TIMER ON/OFF pad and begin again.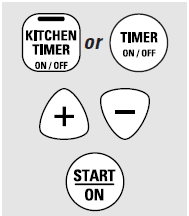
- The timer is a minute timer only.
- The CLEAR/OFF pad does not affect the timer.
To Reset the Timer
- If the display is still showing the time remaining, you may change it by touching the KITCHEN TIMER ON/OFF or TIMER ON/OFF pad, then touch the + or – pads until the time you want appears in the display.
- If the remaining time is not in the display (clock, start time or cooking time are in the display), recall the remaining time by touching the KITCHEN TIMER ON/OFF or TIMER ON/OFF pad and then touching the + or – pads to enter the new time you want.
To Cancel the Timer
- Touch the KITCHEN TIMER ON/OFF or TIMER ON/OFF pad twice.
End of Cycle Tones (on some models)
- Clear the tones by pressing the pad of the function you are using.
Using the self-cleaning oven.
- Never force the latch handle. Forcing the handle will damage the door lock mechanism. The oven door must be closed and all controls set correctly for the cycle to work properly.
Before a Clean Cycle
- For the first self-clean cycle, we recommend venting your kitchen with an open window or using a ventilation fan or hood. Remove the shelves, broiler pan, broiler grid, all cookware, and any aluminum foil from the oven. The oven shelves can be self-cleaned, but they will darken, lose their luster, and become hard to slide.
- Do not use commercial oven cleaners or oven protectors in or near the self-cleaning oven. A combination of any of these products plus the high clean cycle temperatures may damage the porcelain finish of the oven. Soil on the front frame of the range and outside the gasket on the door will need to be cleaned by hand. Clean these areas with hot water, soap-filled scouring pads, or cleansers such as Soft Scrub.®
- Rinse well with clean water and dry.
- Do not clean the gasket. The fiberglass material of the oven door gasket cannot withstand abrasion. It is essential for the gasket to remain intact. If you notice it becoming worn or frayed, replace it. Wipe up any heavy spillovers on the oven bottom. Make sure the oven light bulb cover is in place and the oven light is off.
CAUTION: The grates and drip pans (if so equipped) should never be cleaned in the self-cleaning oven.

How to Set the Oven for Cleaning
- Follow the directions in the Before a Clean Cycle section.
- Latch the door.
NOTE: Never force the latch. If the oven is too hot, you will not be able to slide the latch. Allow the oven to cool.
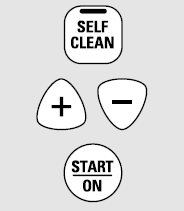
- Touch the SELF CLEAN pad.
- Touch the + or – pads until the desired Clean Time is displayed.
- Touch the START/ON pad.
The self-clean cycle will automatically begin after CLEAN is displayed and the time countdown appears in the display. While the oven is self-cleaning, you can touch the CLOCK pad to display the time of day. To return to the clean countdown, touch the SELF CLEAN pad. The oven shuts off automatically when the clean cycle is complete, and 0:00 will flash in the display.
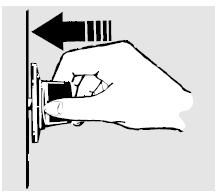
- Slide the latch handle to the left as far as it will go and open the door.

Care and cleaning of the range.
- Be sure the electrical power is off and all surfaces are cool before cleaning any part of the range.
- If your range is removed for cleaning, servicing or any reason, be sure the anti-tip device is re-engaged properly when the range is replaced. Failure to take this precaution could result in tipping of the range and cause injury.
Standard Twin Burner Assemblies (on some models)
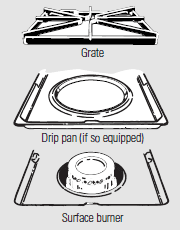
- On models with standard twin burners, the cooktop lifts up for easy access.
- Turn all controls OFF before removing burner parts and drip pans (if so equipped).
- The burner grates and drip pans (if so equipped) can be lifted off, making them easy to clean.
- The holes in the surface burners of your range must be kept clean at all times for proper ignition and an even, unhampered flame.
- You should clean the surface burners routinely, especially after bad spillovers, which could clog these holes.
- Wipe off surface burners. If heavy spillover occurs, remove the surface burners from the range. Burners lift out for cleaning. Lift up the cooktop and then lift out the surface burners.
- To remove burned-on food, soak the surface burner in a solution of mild liquid detergent and hot water. Soak the surface burner for 20 to 30 minutes.
- For more stubborn stains, use a cleanser like Soft Scrub® brand or Bon Ami® brand. Rinse well to remove any traces of the cleanser that might clog the surface burner openings.
- Do not use steel wool because it will clog the surface burner openings and scratch the surface burners. If the holes become clogged, clean them with a sewing needle or twist-tie.
- Before putting the surface burner back, shake out excess water and then dry it thoroughly by setting it in a warm oven for 30 minutes. Then place it back in the range, making sure it is properly seated and level.
- Check the flame pattern of each burner. If the flames are “jumpy” (not steady), clean the holes again with a sewing needle or twist-tie.

CAUTION: Do not operate the cooktop without all burner parts, drip pans (if so equipped), and grates in place.
Clean these holes thoroughly on each burner.
Sealed Burner Assemblies (on some models)
- Turn all controls OFF before removing the burner parts and drip pans (if so equipped).
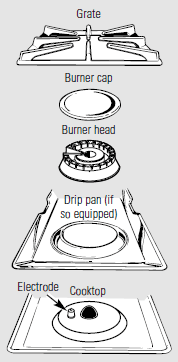
- The burner grates, caps, burner heads and drip pans (if so equipped) can be lifted off, making them easy to clean.

CAUTION: Do not operate the cooktop without all burner parts, drip pans (if so equipped), and grates in place.
NOTE: Do not lift the cooktop. Lifting the cooktop on sealed burner models can lead to damage and improper operation of the range.
The electrode of the spark igniter is exposed when the burner head is removed. When one burner is turned to LITE, all the burners spark. Do not attempt to disassemble or clean around any burner while another burner is on. An electric shock may result, which could cause you to knock over hot cookware.
Installation Instructions
- If you have questions, call 1.800.GE.CARES or visit our Website at: ge.com
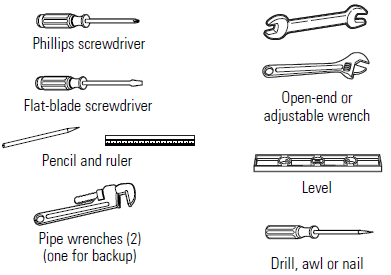
TOOLS YOU WILL NEED
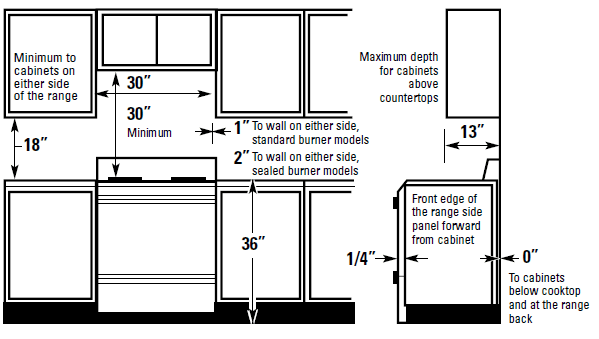
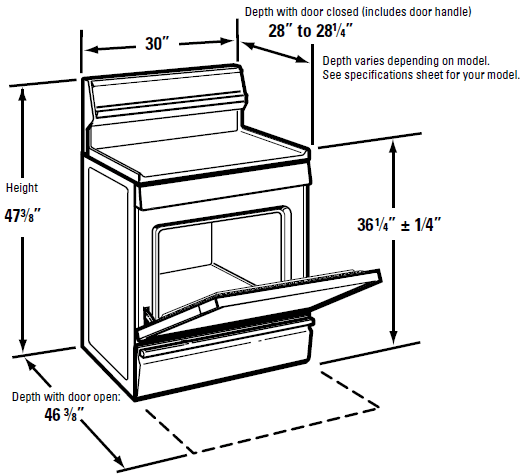
DIMENSIONS AND CLEARANCES
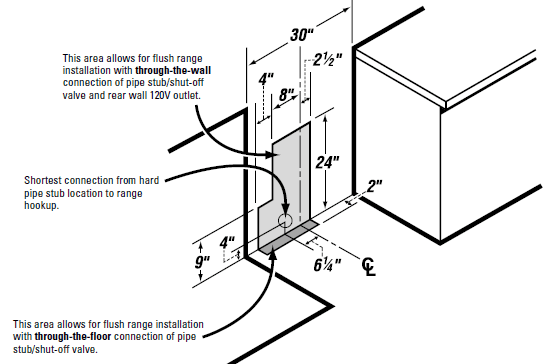
GAS PIPE AND ELECTRICAL OUTLET LOCATIONS (for models with Sealed Burners)
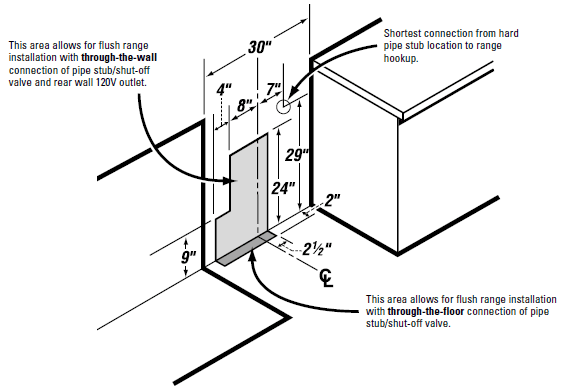
GAS PIPE AND ELECTRICAL OUTLET LOCATIONS (for models with Standard Twin Burners)
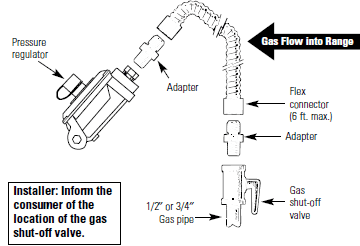
FLEXIBLE CONNECTOR HOOKUP (for models equipped with Sealed Burners)
RIGID PIPE HOOKUP OPTIONS (for models equipped with Sealed Burners)
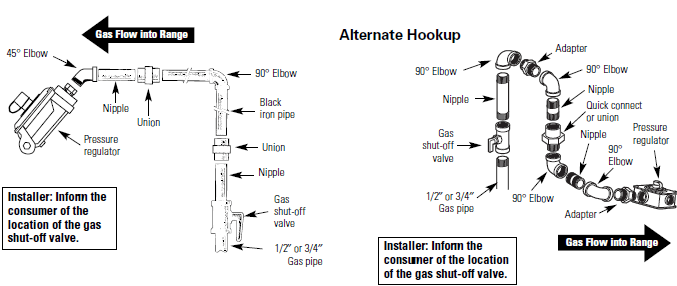
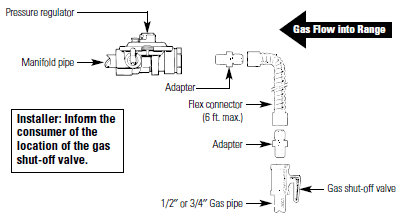
FLEXIBLE CONNECTOR HOOKUP (for models equipped with Standard Twin Burners)
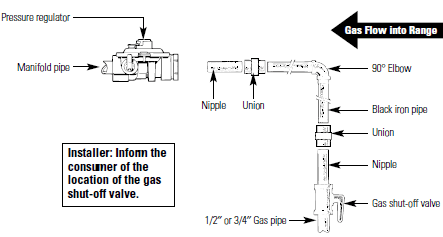
RIGID PIPE HOOKUP (for models equipped with Standard Twin Burners)
Before you call for service
Troubleshooting Tips
Save time and money! Review the charts on the following pages first and you may not need to call for service.
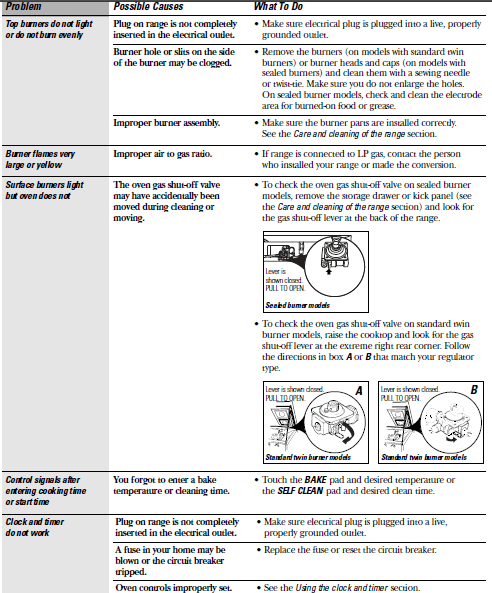
| Problem | Possible Causes | What To Do | ||
| Food does not bake or roast properly | Oven controls are improperly set. | • See the Using the Oven section. | ||
| The shelf position is incorrect. | • See the Using the Oven section. | |||
| Incorrect cookware or cookware of improper size being used. | • See the Using the oven section. | |||
| The oven thermostat needs adjustment. | • See the Adjust the oven thermostat—Do it yourself! Section. | |||
| The clock is not set correctly. | • See the Using the Clock and Timer section. | |||
| Aluminum foil is used improperly in the oven. | • See the Care and cleaning of the range section. | |||
| The oven bottom is not securely seated in position. | • See the Installation of the range section. | |||
| Food does not broil properly. | Oven controls are improperly set. | • Make sure you touch the BROIL HI/LO pad. | ||
| The oven door is not closed. | • See the Using the oven section. | |||
| Improper shelf position being used. | • See the Broiling Guide. | |||
| Food is cooked in a hot pan. | • Use the broiling pan and grid that came with your range. Make sure it is cool. | |||
| Cookware not suited for broiling. • Use the broiling pan and grid that came with your range. | ||||
| The aluminum foil used on the broiling pan and grid has not been fitted properly and slit as recommended. | • See the Using the oven section. | |||
| The oven bottom is not securely seated in position. | • See the Installation of the range section. | |||
| Oven temperature too hot or too cold | The oven thermostat needs adjustment. | • See the Adjust the oven thermostat—Do it yourself! Section. | ||
| The oven light does not work. | The light bulb is loose or defective. • Tighten or replace the bulb. | |||
| Plug-on range is not completely inserted in the electrical outlet. Make sure the electrical plug is plugged into a live, and properly grounded outlet. | ||||
| The oven will not self-clean | The oven temperature is too • Allow the range to cool to room temperature and high to set a self-clean operation. reset the controls. | |||
| Oven controls are improperly set. • See the Using the self-cleaning oven section. | ||||
On models with a door latch, the oven door is not in the locked position.
| ||||
| “Crackling” or “popping” sound | This is the sound of the metal heating and cooling during both the cooking and cleaning functions. | • This is normal. | ||
Accessories.
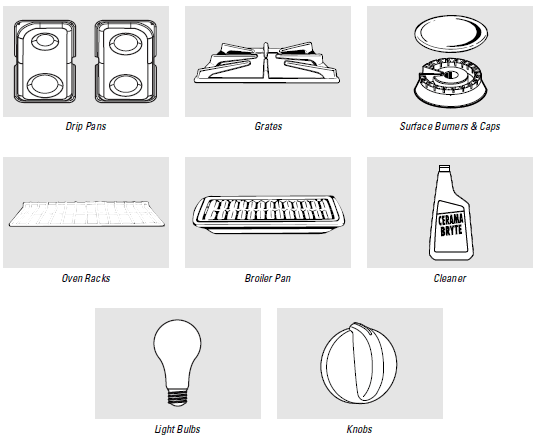
- You can find these accessories and many more at ge.com, or call 800.626.2002 (during normal business hours). Have your model number ready

For more Manuals by Hotpoint, visit ManualsLibraryy
Hotpoint RGB790CEKCC 30 Inch Free Standing Gas Range-FAQs
Why won’t my Hotpoint oven start?
Check the power supply, circuit breaker, and oven control board. A tripped breaker or a faulty relay on the control board could be the cause.
Why is my Hotpoint oven not heating up?
If the heating element is defective, the oven won’t heat. Turn the oven on and check if the element glows red. If not, it may need replacement.
How do I light my Hotpoint gas oven?
The pilot light is located at the back of the oven bottom, attached to the left side of the burner. Push in and hold the oven control knob while lighting the pilot, then continue holding for at least one minute.
What is the purpose of a battery in a gas stove?
The battery powers the ignition system, allowing the gas stove to ignite with a button press instead of using a match or lighter.
Why does my Hotpoint oven turn off by itself?
A tripped thermal fuse may be shutting off power if the oven overheats. Use a multimeter to test the fuse for continuity.
What should I do if my oven suddenly stops working?
First, check the power or gas supply. If they are functioning, the issue may be a faulty igniter in a gas oven or a broken heating element in an electric oven.
Where is the pilot light on a Hotpoint gas stove?
It’s located at the back of the oven bottom, attached to the left side of the oven burner.
How does a gas oven igniter work?
The igniter sparks and heats the gas to create a flame, allowing the oven to generate heat. Over time, igniters can wear out and may need replacement.

 The oven has 5 shelf positions. It also has a special low-shelf position (R) for extra-large items, such as a large turkey.