KBS MBF-011 17-in-1 Bread Maker Machine
IMPORTANT SAFEGUARDS
When using the electrical appliance, basic precautions should always be followed including the following:
Read all instructions.
- This appliance can be used by children aged from 8 years and above and persons with reduced physical, sensory or mental capabilities or lack of experience and knowledge if they have been given supervision or instruction concerning use of the appliance in a safe way and understand the hazards involved. Children shall not play with the appliance. Cleaning and user maintenance shall not be made by children unless they are older than 8 and supervised. Close supervision is necessary when any appliance is used by or near children.
- Keep the appliance and its cord out of reach of children less than 8 years old.
- Do not operate any appliance with a damaged cord or plug or after the appliance malfunctions or has been damaged in any manner. Return appliance to the nearest authorized service facility for examination, repair or electrical or mechanical adjustment. If the supply cord is damaged, it must be replaced by the manufacturer, its service agent or similarly qualified persons in order to avoid a hazard.
- CAUTION: Hot surfaces. Do not touch hot surfaces. Use handles or knobs. Do not let the cord hang over the edge of the table or counter or touch a hot surface.
- The appliances are not intended to be operated by means of an external timer or separate remote-control system.
- Clean surfaces in contact with food.
- Before use, check that the voltage of the wall outlet corresponds to the one shown on the rating plate.
- To protect against electric shock do not immerse the cord, plugs, or housing in water or other liquid.
- Unplug from the outlet when not in use and before cleaning. Allow to cool before putting on or taking off parts.
- Do not place on or near a hot gas or electric burner, or in a heated oven.
- Extreme caution must be used when moving an appliance containing hot oil or other hot liquids.
- Do not touch any moving or spinning parts of the machine when baking.
- Never switch on the appliance without properly placing bread pan-filled ingredients.
- Never beat the bread pan on the top or edge to remove the pan, this may damage the bread pan.
- Always attach plug to appliance first, then plug cord into the wall outlet. To disconnect, turn any control to OFF, then remove plug from wall outlet.
- The appliance is not intended to be operated by means of an external timer or a separate remote-control system.
- Do not operate the unit without a bread pan placed in the chamber to avoid damaging the appliance.
- The use of attachments not recommended by the manufacturer may cause fire, electric shock, or injury.
- Do not use it outdoors.
- Do not use the appliance for other than intended use.
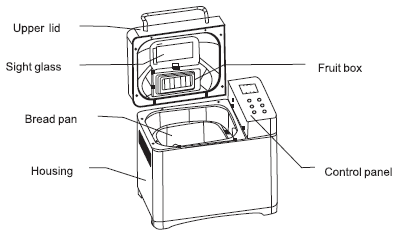
Components
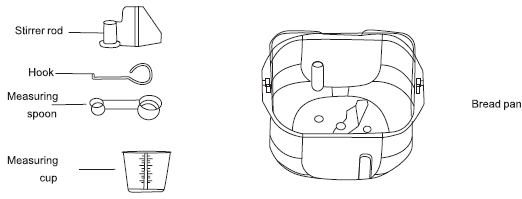
Quick start guides for bread-making
Making 1.5 LB medium-burning color light bread:
- Clean the bread pan, the stirrer rod, the measuring cup, and the measuring spoon.
- Aim the stirrer rod against the rotation axis in the bread pan and insert it into place.
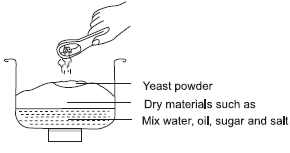
- As stated in the 1.5LB “Light Bread” on the recipe, put the ingredients into the bread pan and finally place yeast powder on the flour, take care to prevent it from soaking in water.
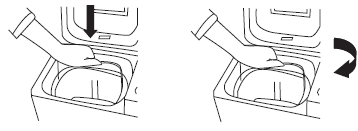
- Replace the bread pan back into the bread maker, insert it into the base slot at an angle of about 20°, rotate it clockwise by about 20°, and then put on the lid.
- After the bread maker is switched on, the default menu will be displayed on the screen: 1.5LB medium-baking color light bread.
- Press the “ON/OFF/PAUSE” button, the buzzer makes a sound, the indicator light is lit up and dough kneading is started.
- At the end of the countdown, the bread is ready and the bread maker is in a holding state.
- Press the “ON/OFF/PAUSE” button for about 2s, and the buzzer makes a sound, and the holding state is over.
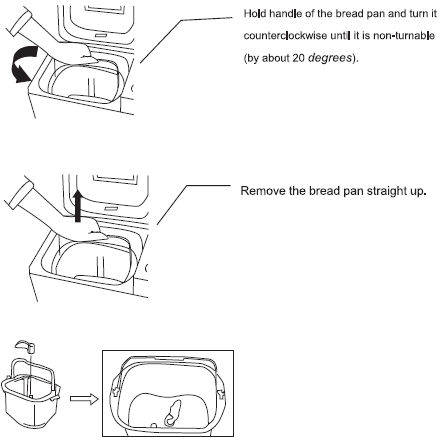
- After the bread is ready, put on gloves and turn the bread pan clockwise by about 20°, lift it out of the inner cavity, and pour out the bread.
Note: in the whole process of bread making, you do not need to select “Menu”, “Weight”, or “Baking Color”. See the Operation Manual for the detailed method of operation.
Operation manual
Considerations before use:
- Make sure that the wire, the socket, and the fuse box are as required for over 6A rated load current.
- As a bread maker is class-1 domestic appliance, it must be firmly earthed, earth wire must be distinguished from the zero line strictly, and lapping the zero line and the earth wire in three-plug connector is strictly forbidden.
The bread maker starts, pauses, and stops.
- Menus 1-2 and menu 16 of the bread maker are presettable. After presetting, press the “START/STOP/PAUSE” button, “: “will flash and presetting is completed and the countdown begins. Press the “START/STOP/PAUSE” button to undo the presetting, “: “flashes, and the bread maker starts operation.
- Menus 13, 14, 15 and 17 are not presettable, but time setting is available. After setting time, press “START/STOP/PAUSE” button, time display no longer flashes, indicating that time setting is completed, press “START/STOP/PAUSE” button once again, “: “flashes and the bread maker starts operation.
- In the process of either presetting or operating the bread maker, press the “START/STOP/PAUSE” button, the buzzer makes a sound, the time display flashes, and the bread maker stops operation; to undo the pause, just press “START/STOP/PAUSE” button once again. To stop the operation of the bread maker, long press the “START/STOP/PAUSE” button, the buzzer makes a sound, the LCD returns to default state and the bread maker stops operation.
The instruction manual of the “toasting” function
- Remove the bread pan from the inner cavity and place the stirrer rod into the bread pan.

- Put materials such as water, egg, and flour into the bread pan at the ratio you select, and then put yeast power into the bread pan.

- Place the bread pan containing raw materials into the inner cavity and then put on the upper lid.

- If you feel resistance when pressing down the bread pan, lift the bread pan and turn the driving lever at the bottom of the bread pan by a certain angle and then put the bread pan into the bread maker.
- Hold handle of the bread pan and turn it clockwise until it is non-turnable (by about 20 degrees).
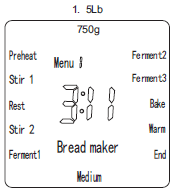
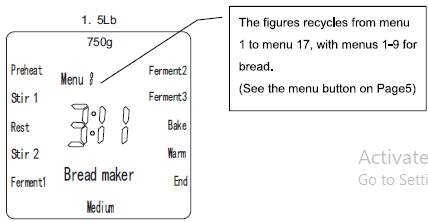
- Switch on the bread maker, the buzzer makes a sound and the following picture is displayed on the screen:

- Select the bread menu as you need

- Select the baking color and weight you need
Press the “Weight” button and the “Baking Color” button.
- Set “Preset” time
For making bread, just skip the step.
- Switch on the bread maker and start bread-making
Press”START/STOP/PAUSE”
When the bread maker is started, flour mixing is started; the first 5-7 minutes are for program-controlled intermittent stirring, and to prevent the flour from rising, continuous stirring will be started automatically after 7 minutes.
After resting, in a startup, *:* on the LCD flashes, and flour mixing will not start unit time for the operation.
Note:
In the beginning, there may be smoke or smell which will disappear slowly and have no impact.
- Breadmaking is completed
At time 0:00, the buzzer makes a sound to tell that the bread is ready and the bread maker will go into a “Warm” state.
- Take out bread for usin.g
Now, as the bread pan is very hot, put on gloves take it out,t and then pour out the bread gently. If the stirrer rod is in the bread, remove it using a hook.
Instruction for “Cake” making.
Make a cake using the bread maker following the same instructions for bread making. For making a cake, just select the ingredients for the cake and select “Cake” making function.
Select Menu 10, and the default time is 1 h and 33 m.
Instruction on “Raw Dough”
Prepare the dough by following the same instructions for bread making. For Raw Dough, just select the ingredients for the dough and select the “Raw Dough” function,
Select Mow 11, and the default time is 23 m.
There is no need to select the baking color and weight, and the buzzer wil make a Sound after dough is ready.
Instruction on “Leaven Dough”
The bread maker can be a dough fermenting machine. You can start “Leaven Dough” as instructed in the operating manual for Leaven Dough or at your discretion without using salt, sugar, or milk.
Select Menu 12, and the default time is 1 h and 24 m.
There is no need to select the baking color and weight, and the buzzer will make a sound after Leaven Dough is completed. Of course, you can also stop the fermenting process considering the fermentation degree as you need.
Instruction for “Bake”
The function is very practical. After you learn bread making, you can select “Raw Dough at low speed”, “Knead dough at high speed” and “Ferment” and set stirring time and fermenting time and then start “Bake”, and you are at liberty to select a baking time. Combining the functions and following instructions from other bakery-making books, you can make various delicious breads.
Select Menu 14, default time is 10 m which is adjustable between 10 m and 70 m, and you can press “START/STOP/PAUSE” button at any time to undo the selection.
Instruction for “Yogurt” making.
The function is a separate one and can be for fermented dough, yogurt, and sweet wine as you need.
Select Menu 15, the default time is 8 h which is adjustable between 5 h and 13 h.
Instruction for “Ferment”
The function is a unique design. It is solely for fermenting and designed for “Raw Dough” followed by “Ferment” and “Bake” as needed by the users.
Select Menu 17, the default time is 30 m which is adjustable between 10 m and 14 h.
Recipes
Note: 1 LB=500g, 1.5LB=750g, 2LB=1 000g
Precautions
- You can feed fruits such as currant and walnut seeds into the fruit box.
- Use of butter slices is preferred, and vegetable oil can also be used as an alternative.
- Use strong flour for making bread, use low-gluten flour for making cake and biscuits, and be sure to use proper flour for making delicious bread.
- In the summer when excessive fermentation may occur, use less yeast powder.
SOFT BREAD
| Material | 1LB | 1.5LB | 2.0LB |
| Water | 2/3 cup/ 160ml | 1 cup/ 240ml | 1+1/4 cups/ 290ml |
| Butter | 2 tablespoons | 2 tablespoons | 3 tablespoons |
| Salt | 1 teaspoon | 1/2 teaspoon | 1 teaspoon |
| Sugar | 1 tablespoon | 2 tablespoons | 3 tablespoons |
| Milk powder | 2 tablespoons | 3 tablespoons | 5 tablespoons |
| Strong flour | 1+7/8 cup/ 300g | 2+1/2 cup/ 400g | 3 cup/ 475g |
| Yeast powder | 1 teaspoon | 1 teaspoon | 1 teaspoon |
SWEET BREAD
| Material | 1LB | 1.5LB | 2.0LB |
| Water | 2/3 cup/ 160ml | 1 cup/ 240ml | 1+1/3 cups/ 310ml |
| Butter | 2 tablespoons | 2 tablespoons | 3 tablespoons |
| Salt | 1/2 teaspoon | 1/2 teaspoon | 1/2 teaspoon |
| Sugar | 4 tablespoons | 6 tablespoons | 6 tablespoons |
| Milk powder | 2 tablespoons | 3 tablespoons | 4 tablespoons |
| Strong flour | 1+1/2 cups/ 250g | 2+1/4 cups 375g | 3+ 1/8 cups/500g |
| Yeast powder | 1 teaspoon | 1 teaspoon | 1 teaspoon |
MILKY LOAF
| Material | 1LB | 1. SLB | 2.0LB |
| Butter | 2 tablespoons | 2 tablespoons | 3 tablespoons |
| Sugar | 2 tablespoons | 3 tablespoons | 4 tablespoons |
| Milk powder | 2 tablespoons | 3 tablespoons | 5 tablespoons |
| Strong flour | 1+3/4 cup/ 280g | 2+1/3 cup/ 375g | 2+7/8 cup/ 450g |
| Egg | 1pieces | 1pieces | 1pieces |
| Pure milk | 1/2 cup/ 120ml | 3/4 cup / 180ml | 1 cup/ 240ml |
| Yeast powder | 1 teaspoon | 1+1/4 teaspoons | 1+1/2 teaspoons |
CAKE
| Material | 1. SLB |
| Butter | 3.5oz I 100g |
| Salt | 1 teaspoon |
| Sugar | 5.3oz I 150g |
| Low-gluten flour | 2+1/3 cups/ 13.4oz / 380g |
| Egg | 4 pieces |
| Soda ash | 2/3 tsp/ 3.Sg |
RAW DOUGH
| Water | 1+1/6 cups/ 280ml |
| Vegetable oil | 2 tablespoons |
| Egg | 2 pieces |
| Salt | 1+1/3 teaspoons |
| sugar | 1 tablespoon |
| Flour | 4 cups |
Note: the ingredients with “_” marking are optional. |
LEAVEN DOUGH
| Water | 1 cup/ 240ml |
| Vegetable oil | 2 tablespoons |
| Salt | 1+1/2 teaspoons |
| Sugar | 1 tablespoon |
| Flour | 3 cups |
| Yeast powder | 1+1/2 teaspoons |
JAM
| Material | 2.0 LB |
| Orange (diced) | 21oz / 600g |
| Sugar | 1+7/8 cups/ 300g |
| Glutin or pudding powder | 1.5oz I 50g |
Water-flour ratio
As different flours have different water absorption, you may need to adjust the volume of water, and please remember the appropriate volume of water for every new flour.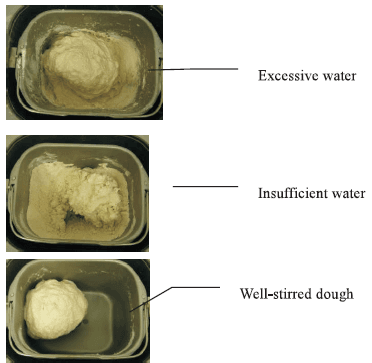
- When excessive water is used, the dough will be too soft to maintain sphericality and will stick to your hand or even be pasty, and the bread made with such dough will have large air holes, hard texture and low resilience, flat surface or even pits as compared with well-made bread that has a hemispheric top surface. If the use of excessive water is indicated after stirring for 5 m, add 1 or 2 tablespoons of flour as required, and after the additional flour is integrated into the dough, make a judgment.
- When inadequate water is used, there may be dry flour at the bottom after stirring for 5 m, and the dough may be too hard and non-resilient and have a rough surface. Such dough will be poorly fermented, and bread made with such dough will have large air holes and hard surface. If the dough is too dry after stirring for 5 m, additional water must be used, and every time a tablespoon of water is added, check the state of the dough.
Cleaning and maintenance
Keep the surface clean.
- Before cleaning the bread maker, pull off the plug and turn off the power supply.
- Gently wipe it with a soft cloth containing neutral detergent, and then wipe it dry with a dry cloth, use of gasoline or other solution is not allowed.
Keep the accessories clean.
- After use, accessories must be cleaned to prevent scale deposit.
- If the stirrer rod stays in the bread pan, fill an appropriate volume of water for soaking.
- To keep the bread maker idle for a long time, clean and dry the accessories and place them into the bread pan.
FAQ
The FAQ is for reference in the use of the bread maker. If damage is suspected, to avoid risk and heavier loss, bring the bread maker to the maintenance station or make a phone call for consultation.
| Phenomenon | Possible causes | Solution |
| The bread maker does not work. | Check if the power is switched on | Press the “Start” button, and the bread maker will start operation |
| Check if there is time delay | “:” flashing on the screen indicates start of countdown | |
| Components damage | Bring the bread maker to maintenance station for troubleshooting | |
| Presence of abnormal sound | Check if it is hard object in the bread pan | Remove the object and then start the bread maker |
| Check if the bread pan is in place | Reinstall the bread pan into place. | |
| The presence of a peculiar smell | Check the power line for damage | Keep the power line away from heating object |
| Check the heating tube for the presence of sundries | Remove sundries from the heating tube | |
| “E00” displayed in LCD | Inner temperature below 14°F | Use the bread maker at -14°F-104°Ftemperature |
| “E01” displayed in LCD | Inner temperature above 122°F | Cool it down to room temperature using an electric fan or by natural cooling |
| “EEE” or “HHH” is displayed on LCD | Temperature detector fault | Bring the bread maker to maintenance station for troubleshooting |
| Bread made is underdone | Bread is half-baked | Inadequate water is used or the temperature of water is excessively high |
| Incorrect ratio of raw materials | Please refer to “Recipe” for rational proportioning… |
WARRANTY
One-year limited warranty
This product is warranted to be free from defects in materials or workmanship for a period of one year from the original purchase date. This product warranty is extended only to the original consumer purchaser of the product and is not transferable.
Please contact our Customer Service Email: [email protected] for instructions on the repair and/or replacement of the appliance if a covered defect occurs within the one-year warranty period.
For more Manuals by KBS, Visit ManualsLibraryy
KBS MBF-011 17-in-1 Bread Maker Machine-FAQs
What is the best KBS bread maker model?
The KBS Pro is highly rated for its excellent features at a great price. It offers multiple loaf sizes (1, 1.5, and 2 lbs), a wide range of baking programs, and even an automatic fruit and nut dispenser—all for less than many premium models.
How do I stop or reset the KBS MBF-011?
To stop or reset the bread maker, press and hold the Start/Stop button for at least 2 seconds. This cancels the current cycle and lets you select a new program.
What does the basic setting on a bread machine do?
The Basic (or Standard/White) setting is the most commonly used cycle. It’s perfect for everyday white bread and works well with most traditional bread recipes.
Why does the machine rest before kneading?
The resting period allows the ingredients to come to room temperature—especially helpful if your flour or yeast is cold. This helps with better dough mixing and rising.
What type of flour works best in the KBS bread maker?
Use high-protein or high-gluten flour, such as King Arthur Unbleached All-Purpose Flour, for the best bread texture and rise in your machine.
What is the “Raw Dough” setting for?
The Raw Dough setting mixes the dough without proofing or baking it. It’s ideal if you want to shape and bake recipes like cinnamon rolls or pizza dough manually.
When should I remove the mixing paddle?
Remove the paddle after the kneading is complete but before the baking begins. This prevents it from being baked into the loaf.
Why is my bread coming out dense or heavy?
Dense bread can result from insufficient kneading, yeast and salt mixing too early, or not shaping the dough properly before baking. Patience and precise technique help improve results.

