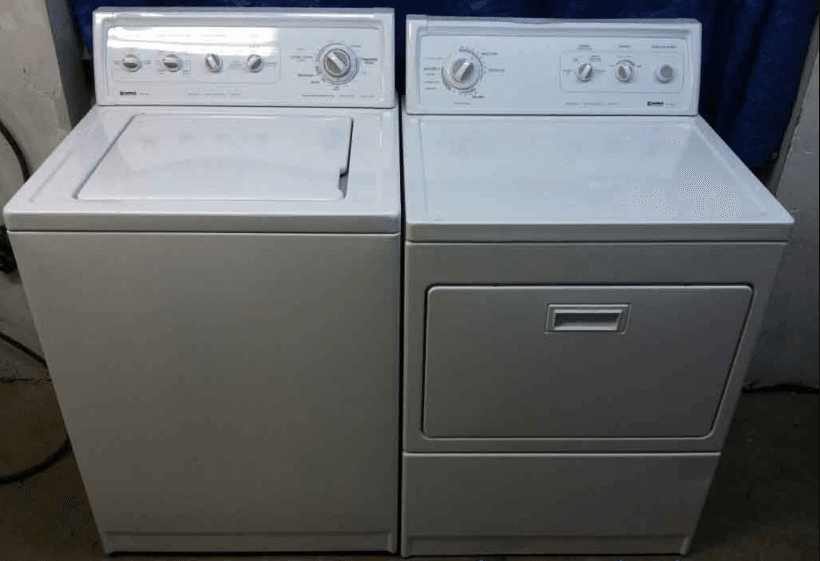
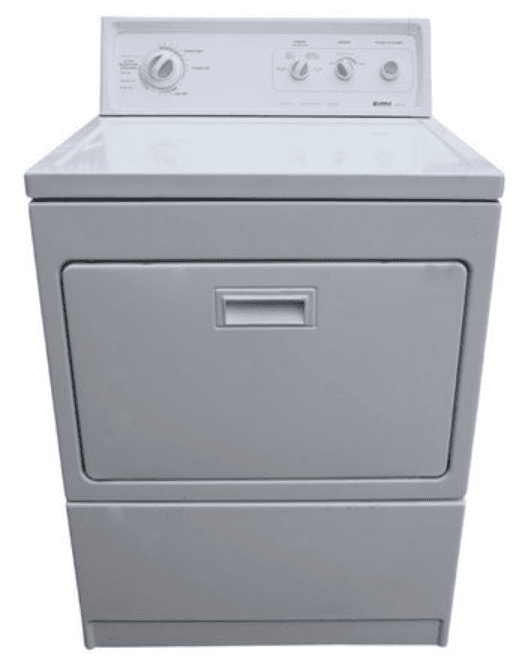
Kenmore 90 Series Electric Dryer
IMPORTANT SAFETY INSTRUCTIONS
WARNING : To reduce the risk of fire, electric shock, or injury to persons when using the dryer, follow basic precautions, including the following:
- Read all instructions before using the dryer.
- Do not place items exposed to cooking oils in your dryer. Items contaminated with cooking oils may contribute to a chemical reaction that could cause a load to catch fire.
- Do not dry articles that have been previously cleaned in, washed in, soaked in, or spotted with gasoline, dry cleaning solvents, or other flammable, or explosive substances as they give off vapors that could ignite or explode.
- Do not allow children to play on or in the dryer. Close supervision of children is necessary when the dryer is used near children.
- Before the dryer is removed from service or discarded, remove the door to the drying compartment.
- Do not reach into the dryer if the drum is moving.
- Do not install or store the dryer where it will be exposed to the weather.
- Do not tamper with controls.
- Do not repair or replace any part of the dryer or attempt any servicing unless specifically recommended in this Owner _ Manual or in published user-repair instructions that you understand and have the skills to carry out.
- Do not use fabric softeners or products to eliminate static unless recommended by the manufacturer of the fabric softener or product.
- Do not use heat to dry articles containing foam rubber or similarly textured rubber-like materials.
- Clean the lint screen before or after each load.
- Keep the area around the exhaust opening and adjacent surrounding areas free from the accumulation of lint, dust, and dirt.
- The interior of the dryer and exhaust vent should be cleaned periodically by qualified service personnel.
- See the “INSTALLATION INSTRUCTIONS” section for grounding requirements.
SAVE THESE INSTRUCTIONS
INSTALLATION INSTRUCTIONS
Tools and Parts
Check that you have everything necessary for the correct installation. Proper installation is your responsibility.
- flat-blade screwdriver
- adjustable wrench that opens to 1 in. or hex-head socket wrench (for adjusting dryer feet)
- level
- wire stripper (direct wire installations)
- #2 Phillips screwdriver
- safety glasses
- duct tape
- caulking gun and compound (for installing new exhaust vent)
- gloves
- tin snips (new vent installations)
Parts supplied:
Remove the parts package from the dryer drum. Check that all parts were included.
Parts needed:
Check local codes, check existing electrical supply and venting, and see “Electrical Requirements” and “Venting Requirements” before purchasing parts.
Mobile home installations require:
- Metal exhaust system hardware is available for purchase from your local Sears store or Sears Service Center.
Location Requirements
You will need
- A location that allows for proper exhaust installation. See “Venting Requirements.”
- A separate 30 amp circuit.
- A grounded electrical outlet is located within 2 ft (61 cm) of either side of the dryer. See “Electrical Requirements.”
- A sturdy floor to support the total dryer weight of 200 Ibs (90.7 kg).
- A level floor with a maximum slope of 1 in. (2.5 cm) under the entire dryer. (If the slope is greater than 1 in. [2.5 cm], install Extended Dryer Feet kit, Part No. 279810.) Clothes may not tumble properly and dryers with automatic sensor cycles may not operate correctly if the dryer is not level.
Do not operate or store your dryer in a location with year-round temperatures below 45°F (7°C). At lower temperatures, the dryer might not shut off at the end of an automatic cycle. Drying times can be extended. Install the dryer where it is protected from water and/or weather. Check code requirements. Some codes limit or do not permit, the installation of the dryer in garages, closets, mobile homes, or sleeping quarters. Contact your local building inspector.
Installation Clearances
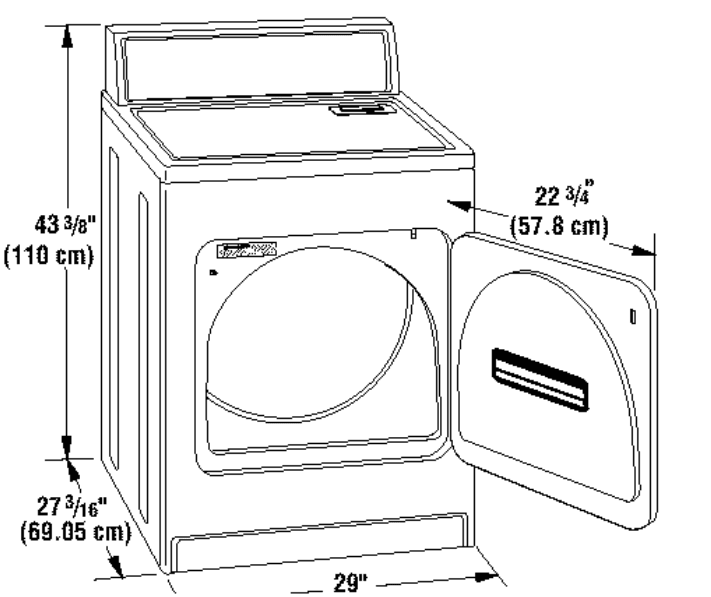
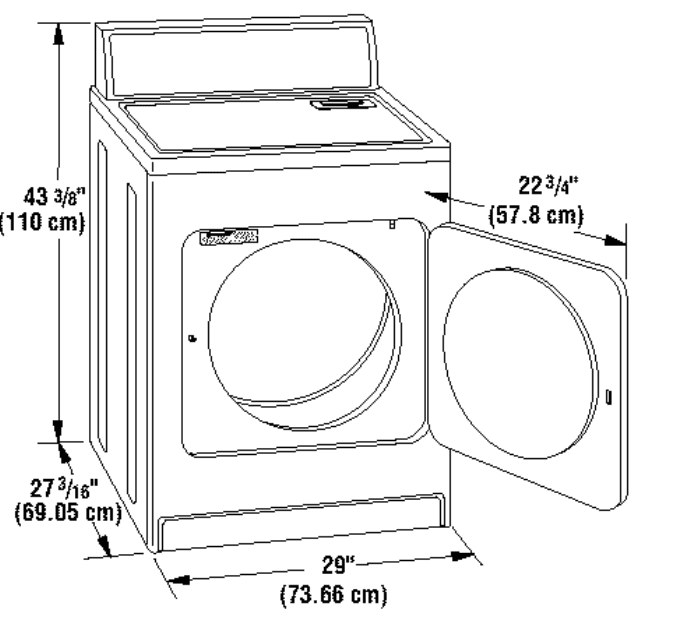
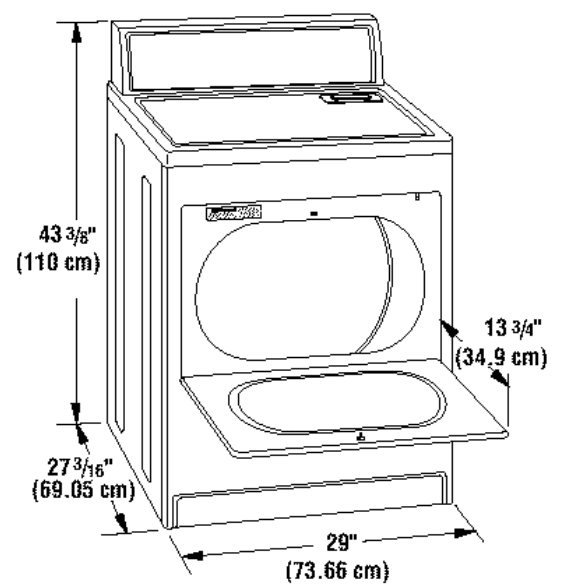
The location must be large enough to fully open the dryer door.
Dryer Dimensions
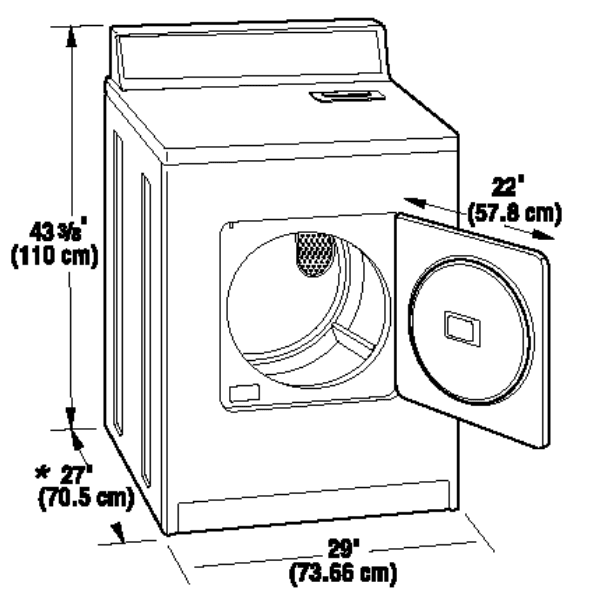
- Small Opening Side-Swing Doer

- Wide Opening Side-Swing Doer

- Large Opening Side-Swing Door

- Wide Opening Hamper Door
*Most installations require a minimum 51/2 in. (14 cm) clearance behind the dryer for the exhaust vent with an elbow. See “Venting Requirements.”
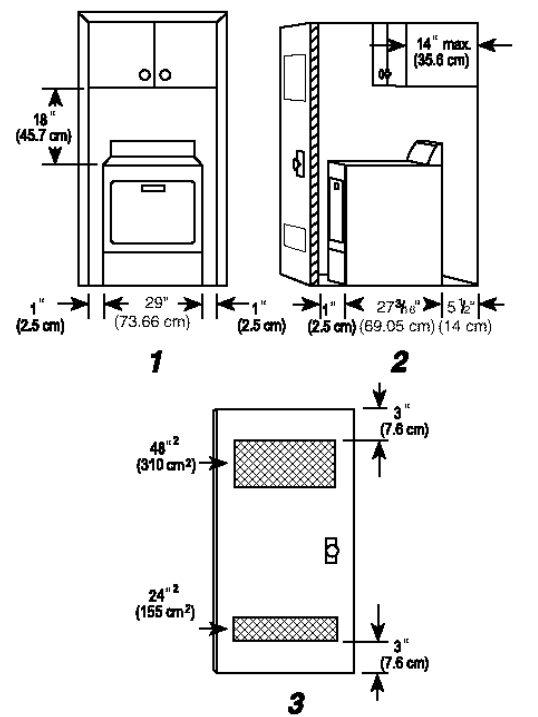
Minimum installation spacing for a recessed area or closet installation
The dimensions shown following are for the minimum spacing allowed.
- Additional spacing should be considered for ease of installation and servicing.
- Additional clearances might be required for wall, door, and floor moldings.
- Additional spacing of 1 in. (2.5 cm) on all sides of the dryer is recommended to reduce noise transfer.
- For closet installation, with a door, minimum ventilation openings in the top and bottom of the door are required. Louvered doors with equivalent ventilation openings are acceptable.
- Companion appliance spacing should also be considered.
Mobile home installations require:
- Metal exhaust system hardware is available for purchase from your local Sears store or Sears Service Center.
- Special provisions must be made in mobile homes to introduce outside air into the dryer. The opening (such as a nearby window) should be at least twice as large as the dryer exhaust opening.
Electrical Requirements
It is your responsibility:
- To contact a qualified electrical installer.
• To be sure that the electrical connection is adequate and in conformance with the National Electrical Code, ANSI/NFPA 70-latest edition, and all local codes and ordinances. A copy of the above code standards can be obtained from: the National Fire Protection Association, Batterymamh Park, Quincy, MA 02269. - To supply the required 3 or 4-wire, single phase, 120/240-volt, 60-Hz., AConly electrical supply (or 3 or 4-wire, 120/208-volt electrical supply, if specified on the serial/rating plate) on a separate 30-amp circuit, fused on both sides of the line. A time-delay fuse or circuit breaker is recommended.
Connect to an individual branch circuit. Do not have a fuse in the neutral or grounding circuit. - Do not use an extension cord.
- If codes permit and a separate ground wire is used, it is recommended that a qualified electrician determine that the ground path is adequate.
Electrical Connection
To properly install your dryer, you must determine the type of electrical connection you will be using and follow the instructions provided for it here.
- If local codes do not permit the connection of a cabinet ground connector to the neutral wire, see the “Optional 3-wire connection” section.
- This dryer is manufactured with a 3-wire, cabinet-ground conductor connected to the NEUTRAL (white or center wire) of the wiring harness at the terminal block.
- Use a 4-wire conductor cord when the dryer is installed in a mobile home or an area where local codes do not permit grounding through the neutral.
If using a power supply cord:
Use a UL-approved power supply cord kit marked for use with clothes dryers, the kit should contain:
- A UL-approved 30 amp power supply cord, rated 120/240 volt minimum. The cord should be type SRD or SRDT and be at least 4 ft (1.22 m) long. The wires that connect to the dryer must end in
ring terminals or spade terminals with upturned ends. - A UL-approved strain relief.
If your outlet looks like this: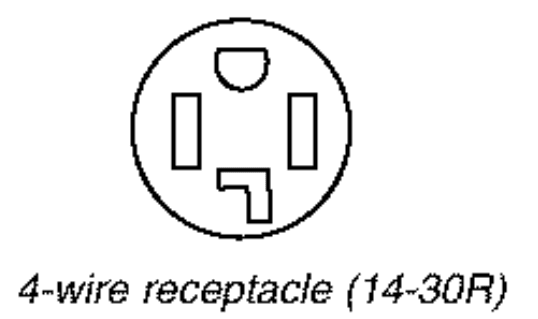
Then choose a 4-wire power supply cord with ring or spade terminals and UL-approved strain relief. The 4-wire power supply cord, at least 4 ft (1.22 m) long, must have 4, 10 gauge solid copper wires and match a 4-wire receptacle of NEMA Type 14-30R. The ground wire (ground conductor) may be either green
or bare. The neutral conductor must be identified by a white cover.
If your outlet looks like this:
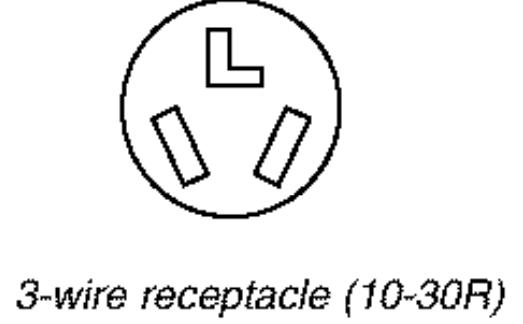
Then choose a 3-wire power supply cord with ring or spade terminals and UL-approved strain relief. The 3-wire power supply cord, at least 4 ft (1.22 m) long, must have 3, No.-10 copper wires and match a 3-wire receptacle of NEMA Type 10-30R.
If connecting by direct wire:
The power supply cable must match the power supply (4-wire or 3-wire) and be:
- Flexible armored or non-metallic sheathed copper cable (with ground wire). All current-carrying wires must be insulated.
- 10 gauge solid copper wire (Do not use aluminum.)
- At least 4 ft (1.22 m) long
Electrical Connection
Power Supply Cord
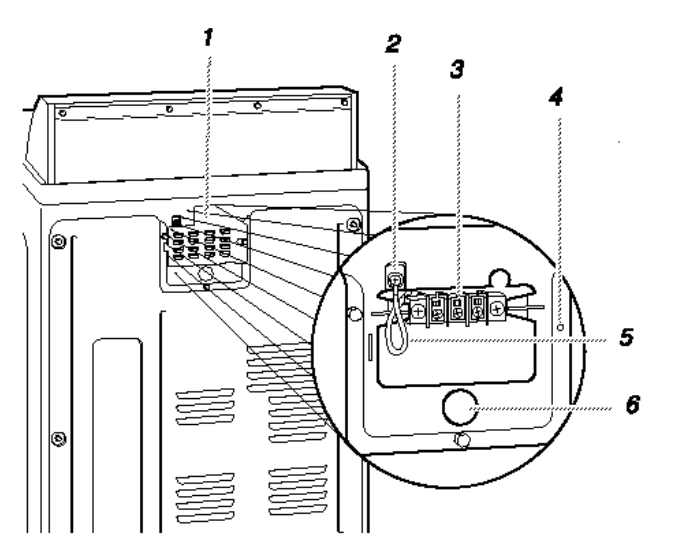
- Disconnect power.
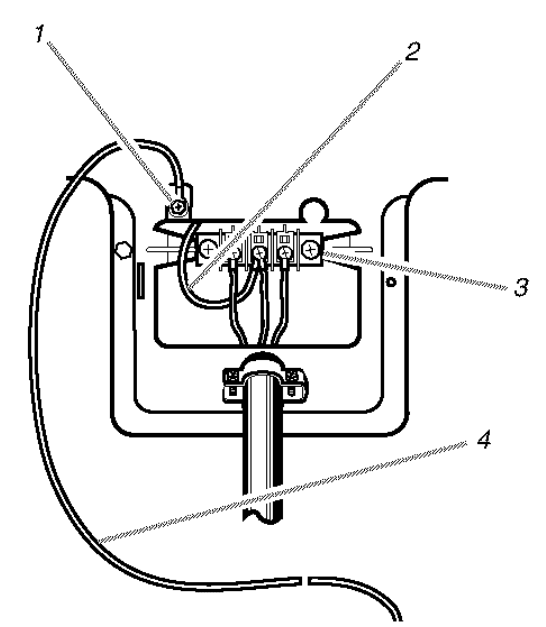
- Remove the hold-down screw and terminal block cover.

- Terminal block cover
- External ground connector
- Center, silver-colored terminal_block screw
- Hold_down screw location
- Neutral grounding wire (green/yellow)
- The hole below the terminal block opening
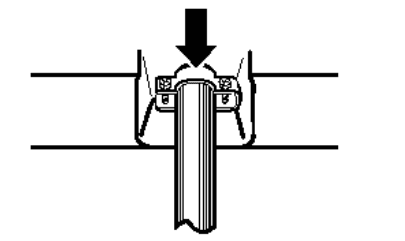
- Assemble a 3/4in. (1.9 cm) UL-approved strain relief (UL marking on strain relief) into the hole below the terminal block opening. Tighten strain relief screws just enough to hold the two clamp sections together. Put the power supply cord through the strain relief. The strain relief should have a tight fit with the dryer cabinet and be in a horizontal position.

- Now complete the installation following instructions for your type of electrical connection:
- 4-wire (recommended)
- 3-wire (if 4-wire is not available)
Electric connection options
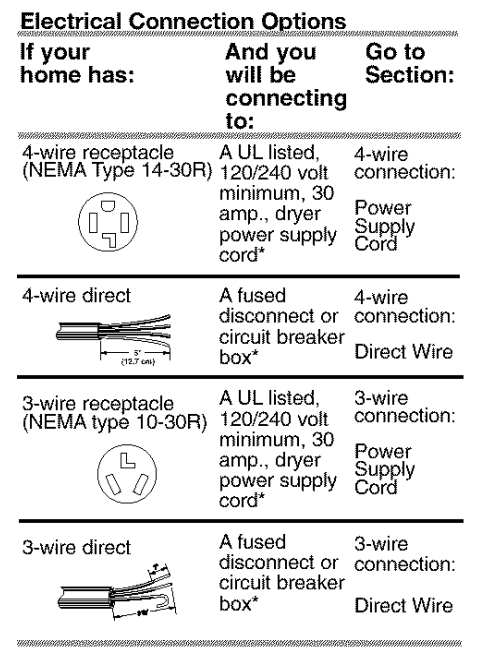
*If local codes do not permit the connection of a frame-grounding conductor to the neutral wire, go to the “Optional 3-wire connection” section.
4-wire connection: Power Supply Cord
IMPORTANT: A 4-wire connection is required for mobile homes and where local codes do not permit the use of 3-wire connections.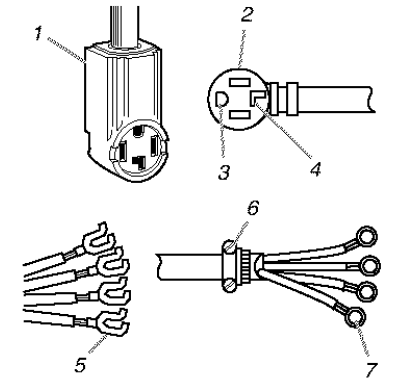
- 4-wire receptacle (NEMA type 14_30R)
- 4-prong plug
- Ground prong
- Neutral prong
- Spade terminals with upturned ends
- 3/_in. (1.9 cm) UL-approved strain relief
- Ring terminals
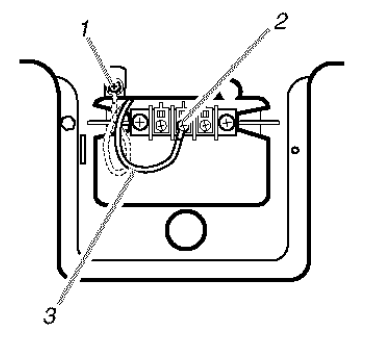
- Remove the center terminal block screw.
- Remove the appliance ground wire (green with yellow stripes) from the external ground connector screw. Fasten it under the center, silver-colored terminal block screw.
- External ground connector – The dotted line shows the position of the NEUTRAL ground wire before being moved to the center terminal block screw
- Center silver-colored terminal block screw & Green/yellow wire of the harness
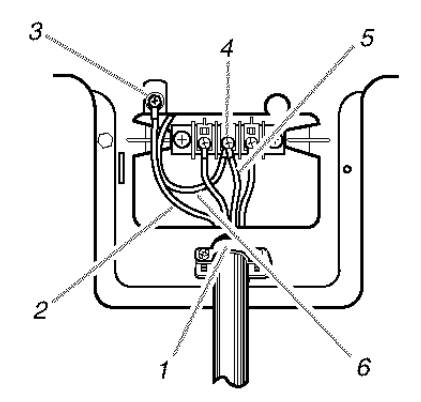
- Connect the ground wire (green or bare) of the power supply cord to the external ground conductor screw. Tighten screw.
- Connect the neutral wire (white or center wire) of the power supply cord under the center screw of the terminal block.

- 3j_ in. (1.9 cm), ULqisted strain relief
- Green wire of power supply cord or bare copper wire
- External ground connector
- Center silver-colored terminal block screw
- Neutral wire (white)
- Neutral grounding wire (green/yellow)
- Connect the other wires to the outer terminal block screws. Tighten screws.
- Tighten strain relief screws.
- Insert tab of terminal block cover into slot of dryer rear panel. Secure the cover with a hold-down screw.
Optional 3-wire connection
Use for direct wire or power supply cord where local codes do not permit connecting cabinet-ground conductor to neutral wire.
- Remove the center terminal block screw.
- Remove the appliance ground wire (green with yellow stripes) from the external ground connector screw. Connect appliance ground wire and the neutral wire (white or center wire) of power
supply cord/cable under center, silver colored terminal block screw. Tighten screw. - Connect the other wires to the outer terminal block screws. Tighten screws.

- Tighten strain relief screws.
- Insert tab of terminal block cover into slot of dryer rear panel. Secure the cover with a hold-down screw.
- Connect a separate copper ground wire from the external ground connector screw to an adequate ground.

- External ground connector
- Neutral grounding wire (green/yellow)
- Neutral wire (white)
- Grounding path determined by a qualified electrician
Venting Requirements
WARNING: To reduce the risk of fire, this dryer MUST BE EXHAUSTED OUTDOORS.
4 in. (10.2 cm) heavy metal exhaust vent and clamps must be used. DURASAFE TM venting products are recommended and are available from your local Sears store or Sears Service Center. DURASAFE vent products can be purchased from your dealer. Please reference the service numbers located on the back of the manual or visit our Internet site at: www.sears.com.
- Do not exhaust the dryer into any gas vent, chimney, wall, ceiling, or concealed space of a building.
- Do not use an exhaust hood with a magnetic latch.
- Do not install flexible metal vents in enclosed walls, ceilings, or floors.
- Do not use screws or other fastening devices that extend into the interior of the vent to secure the vent.
IMPORTANT: Observe all governing codes and ordinances.
The rigid metal vent is recommended to prevent crushing and kinking. A flexible metal vent must be fully extended and supported when the dryer is in its final position. Remove excess flexible metal vents to avoid sagging and kinking that may result in reduced airflow. An exhaust hood should cap the vent to
prevent rodents and insects from entering the home. The exhaust hood must be at least 12 in. (30.5 cm) from the ground or any object that may be in the path of the exhaust (such as flowers, rocks or bushes, etc.). If using an existing vent system, clean lint from the entire length of the system and make sure the exhaust hood is not plugged with lint. Replace any plastic or metal foil vent with a rigid metal or flexible
metal vent. Use duct tape to seal all joints.
CHOOSING LOAD SIZES
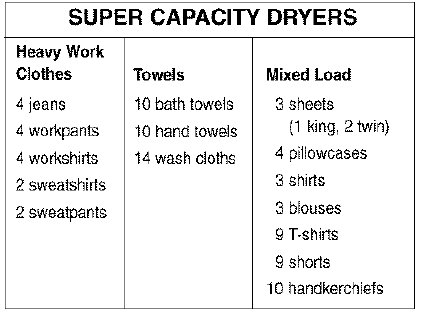
- Mix large items with small items. Load the dryer by the amount of space items take up, not by their weight. Do not overload the dryer. Overcrowding causes uneven drying and wrinkling and can cause items to wear out faster (because of pilling).
- You may need to rearrange large items (sheets, blankets, tablecloths) during a cycle to reduce bailing or rolling up.
- For better-tumbling action, when drying only a few small items, add one or two lint-free towels. This also prevents small lightweight items from blocking airflow.

USING DRYER FABRIC SOFTENERS
Dryer fabric softeners are recommended for reducing static cling. Always follow package instructions carefully.
- Put one fabric softener sheet on top of the load before starting the dryer. Do not add a fabric softener sheet after the drying cycle has started. Instant heat can cause the fabric softener to spot
fabrics. - Remove fabric softener stains by wetting the stains and rubbing them with liquid detergent or bar soap and rewash.
- Some fabric softeners can clog the lint screen and slow drying. Use fabric softeners labeled as dryer safe.
SAVING ENERGY
- Sort load by fabric weight and type.
- Use the preset cycle settings to dry most loads.
- Dry full loads when possible. Do not overdry.
- Avoid overloading the dryer, adding wet items to a partly dried load, or opening the door unnecessarily.
- Shorten drying times by exhausting the dryer properly and cleaning the exhaust vent and outside exhaust hood as needed.
- Keep the lint screen clean.
- Use a dryer where room air temperature is above 45°F (7°C).
DRAYER CARE
CLEANING YOUR DRYER
Proper care of your dryer can extend its life and help you avoid costly service calls.
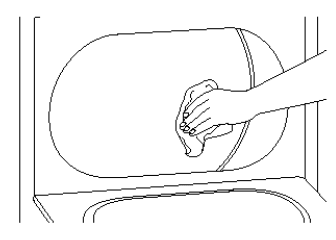
To clean the dryer drum:
- Make a paste with detergent and very warm water and apply to a soft cloth.
- Scrub the area until all excess dye is removed.
- Wipe thoroughly with a damp cloth.
- Tumble a load of clean towels for 20 minutes to dry.

NOTE: Garments that contain unstable dyes, such as denim blue jeans or brightly colored cotton items may discolor the drum interior. These stains are not harmful to your dryer and will not stain future loads of clothes. It is helpful to dry unstable dye items inside out to prevent dye transfer.
CLEANING THE LINT SCREEN
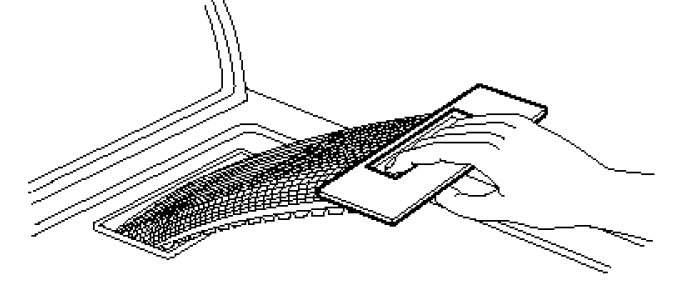
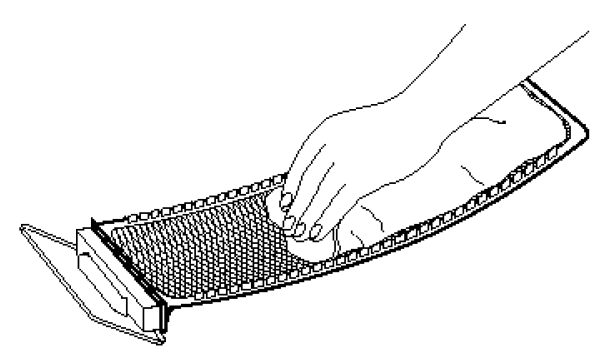
Remove Lint Before Every Load The lint screen is located on top of your dryer. Remove lint before starting every load. A screen blocked by lint can increase drying time.
To clean:
- Pull out the lint screen.

- Roll lint off the screen with your fingers. Do not rinse or wash the screen to remove lint. Wet lint is hard to remove.

- Push the lint screen firmly back into place.
IMPORTANT:
- Do not run the dryer with the lint screen loose, damaged, blocked, or missing. Doing so can cause overheating and damage to both the dryer and fabrics.
- Some towels made of synthetic fibers and natural fibers (polyester and cotton blends) may shed more lint than other towels, causing your dryer’s lint screen to fill up faster. Be sure to remove lint
from the lint screen before and after drying new towels.
Wash Lint Screen As Needed
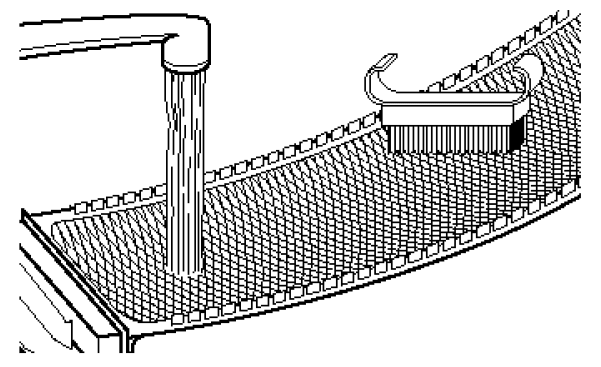
Laundry detergents and fabric softeners can cause a residue buildup on the lint screen. Wash the lint screen with a nylon brush if it becomes clogged due to a residue buildup.
To wash:
- Wet both sides of the lint screen with hot water.
- Wet a nylon brush with hot water and liquid detergent; scrub the lint screen with the brush to remove residue buildup.

- Rinse the lint screen with hot water.
- Thoroughly dry the lint screen with a clean towel; replace it in a dryer.
REMOVING ACCUMULATED LINT
From Inside the Dryer Cabinet
Lint should be removed every 2 years, or more often, depending on dryer usage. Cleaning should be done by a qualified person.
From the Exhaust Vent
Lint should be removed every 2 years, or more often, depending on dryer usage.
MOVING CARE
- Disconnect power.
- Make sure the leveling legs are secure in the dryer base.
- Use masking tape to secure the dryer door.
VACATION CARE
- Disconnect power.
- Wash the lint screen.
TO CHANGE DRUM LIGHT
The dryer light automatically turns on inside the dryer drum when you open the door.
- Unplug the dryer or disconnect the power.
- Open the dryer door. Locate the light bulb cover on the back wall of the dryer. Remove the screw located in the lower right corner of the cover. Remove the cover.
- Tum bulb counterclockwise. Replace the bulb with a 10-watt appliance bulb only. Replace the cover and secure with the screw.
- Plug in the dryer or reconnect power.
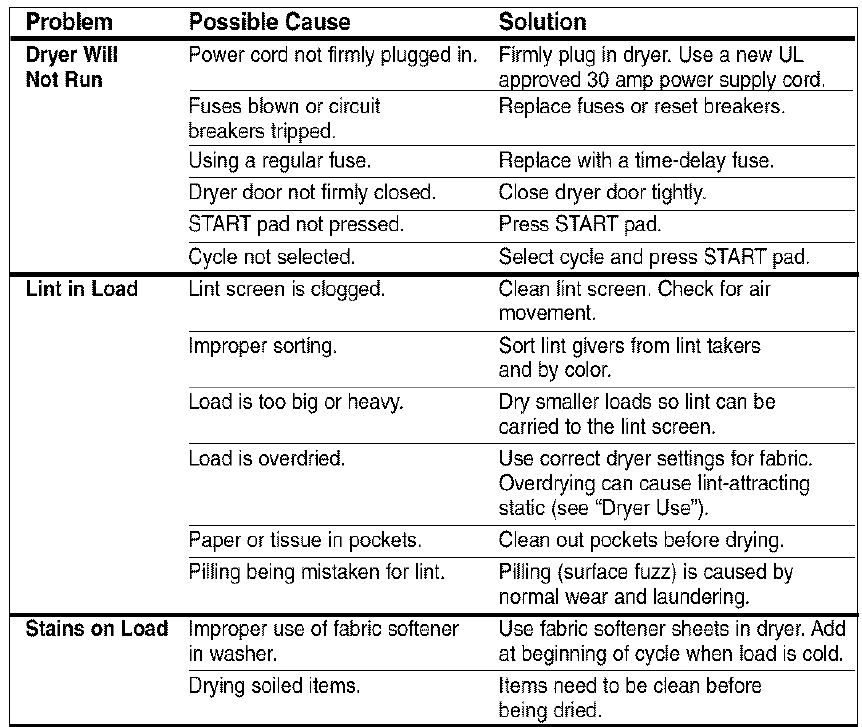
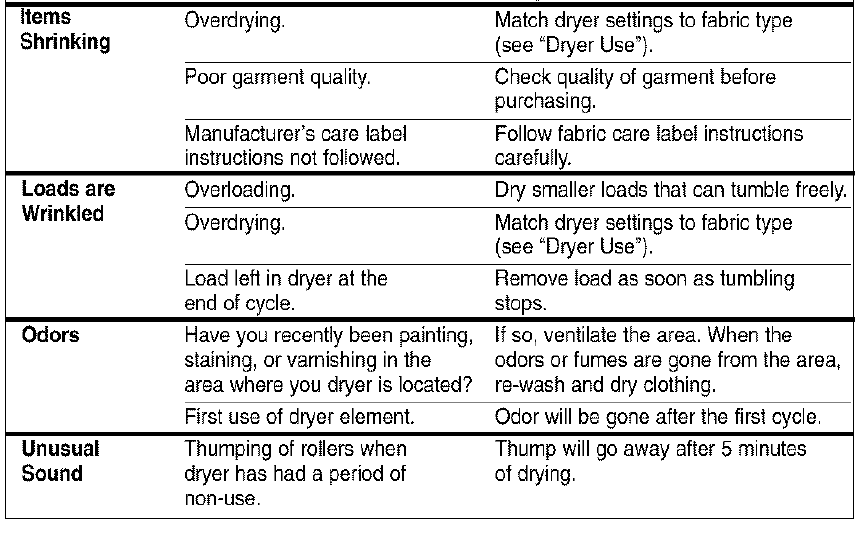
TROUBLESHOOTING
Most laundering problems are easily solved if you understand the cause. Using the tables below will save you time and money by helping you avoid unnecessary service calls.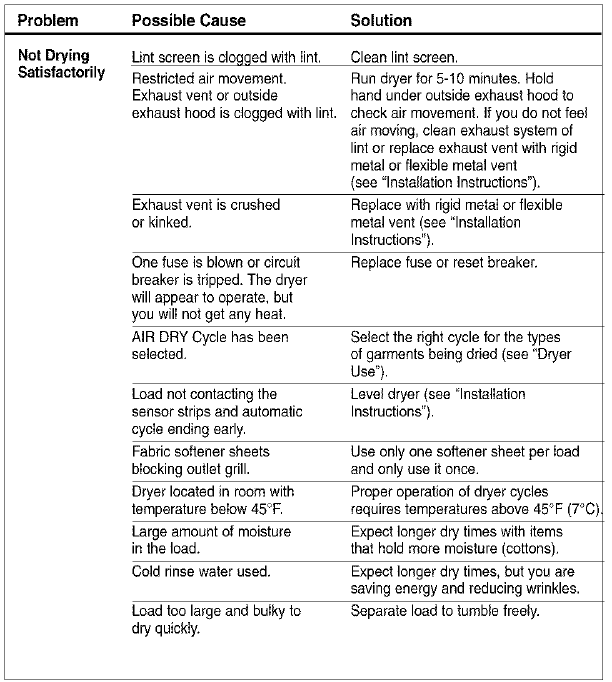
WE SERVICE WHAT WE SELL
Your purchase has added value because you can depend on Sears HomeCentral ® for service. With over 12,000 trained repair specialists and access to over 4.2 million parts and accessories, we have the tools, parts, knowledge and skills te ensure our pledge: We Service What We Sell.
Sears Maintenance Agreements
Your Kenmore appliance is designed, manufactured and tested te provide years of dependable operation. Yet any major appliance may require service from time te time. The Sears Maintenance Agreement offers you an outstanding service program, affordably priced.
Sears Maintenance Agreements
- Is your way te buy tomorrow’s service at today’s prices.
- Eliminates repair bills resulting from nermal wear and tear.
- Provides fer nen-technical and instructional assistance.
- Even if you don’t need repairs, provides an annual Preventive Maintenance Check, at your request, to ensure that your appliance is in proper running condition.
Some limitations apply. For more information, call 1-800-827-6655.
For more manuals by Kenmore, visit ManualsLibraryy
Kenmore 90 Series Electric Dryer-FAQs
How long does a Kenmore dryer last?
Kenmore appliances typically last 10-20 years with proper maintenance. However, frequent repairs within the same year may indicate it’s time for a replacement.
Why won’t my dryer start?
A dryer may not start due to various issues, including a blown thermal fuse, clogged vent, faulty motor, worn-out belt, tripped circuit breaker, defective door latch, or an overloaded unit. Checking these components can help diagnose the problem.
What is the best dryer setting?
The permanent press or wrinkle-resistant setting is ideal for most everyday clothing. It uses medium heat, helping to dry clothes efficiently without causing damage from excessive heat.
How many fuses does a dryer have?
Most dryers have three fuses:
1. High-temperature fuse (most likely to blow)
2. Cycle timer fuse
3. Low-temperature fuse
If your dryer isn’t heating, the high-temperature fuse should be checked first.
Is Kenmore a reliable brand?
Yes, Kenmore is known for its quality, durability, and reliability. It offers long warranties and excellent customer support through authorized service providers.
Who makes Kenmore dryers?
Most top-load washers and matching dryers are manufactured by Whirlpool Corp., while front-load washers and stackable dryers are produced by LG.
Is Kenmore owned by LG?
Kenmore is a brand owned by Transformco, previously acquired by Sears. While LG manufactures some Kenmore appliances, other products are made by Whirlpool and Electrolux.
Why won’t my Kenmore washer drain?
A Kenmore washer may not drain due to a faulty drain pump, broken motor, cracked drain hose, or a jammed door lock assembly. Checking these components can help resolve drainage issues.

