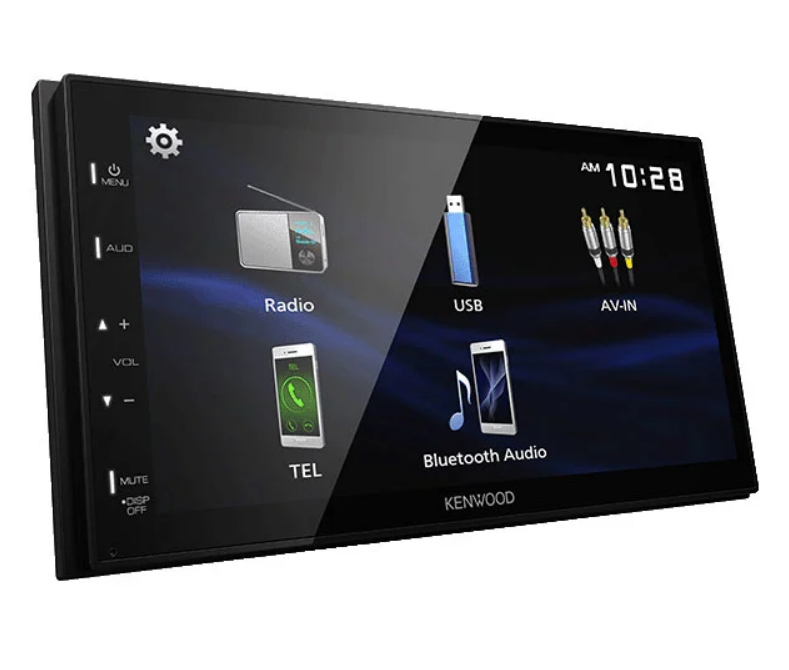
Kenwood DMX129BT Monitor Receiver
Getting Started
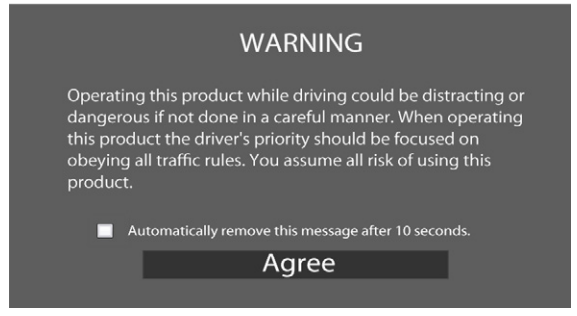
- Turn the ignition key of your car to ACC. The unit is turned on. Please read the warning and press “Agree to enter the screen.

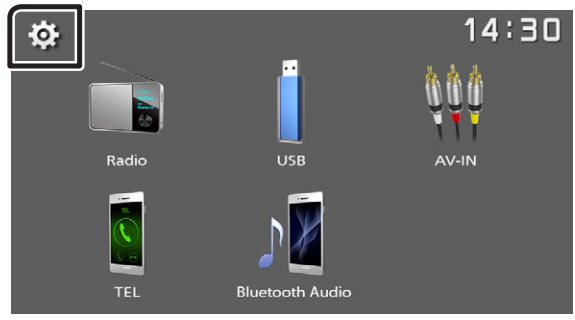
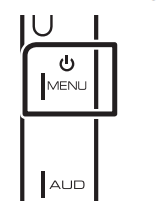
- Press the <
 MENU> button.
 - Touch


- Touch the corresponding key and set the value.

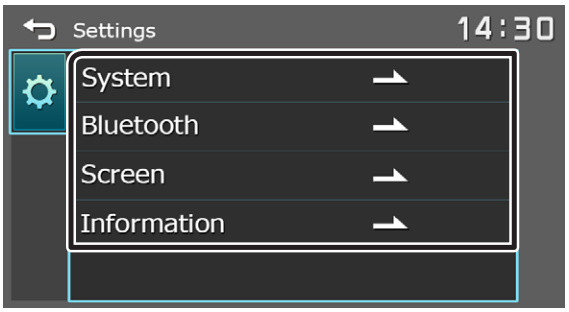
System
- Beep Tone activates or deactivates the key-touch tone. “ON” (Default), “OFF”
- LanguageSelect the language used for the control screen and setting items. Default is “English”.
- Time/DateAdjust the clock time. (P.3)
- Clock Mode] Select the time display format. [12hr] (Default) [24hr]
- Steering Remote Sets the desired function in the steering remote controller. See Learning function of steering remote (P.8)
- Parking Guidelines: You can display parking guidelines to enable easier parking when you shift the gear to the reverse (R) position. Default is “ON”.
- Guidelines SETUP If you select [ON] for [Parking Guidelines], you can adjust the parking guidelines.
- Reverse with ATT (-20dB). When the gear is shifted to the reverse (R) position, the volume of the device is adjusted. Default is “ON”. See To adjust the Reverse with ATT (P.8)
- System Reset Touch [System Reset] and then touch [YES] to set all the settings to the initial default settings.
- Bluetooth Displays the Bluetooth Settings screen (P.9)
- Screen]
- Dimmer Select the dimmer mode. “High” (Default) “Mid” “Low”
- Demo: Select the demonstration mode. Default is “ON”.
- Information displays the software version and model number of this unit.
- Touch

Clock settings
Synchronizing the clock time with FM RBDS
Activate [RBDS Clock Sync]. See Radio Setup (P.5).
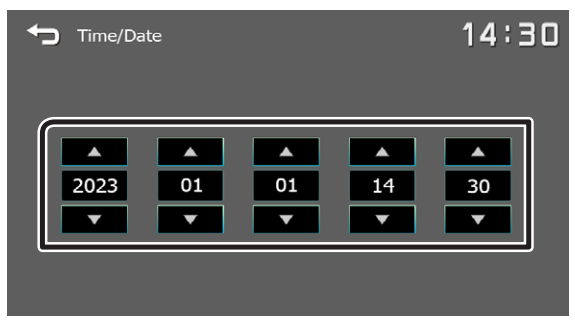
Adjusting the clock manually
![]() NOTE: Deactivate [RBDS Clock Sync] before adjusting the clock.
NOTE: Deactivate [RBDS Clock Sync] before adjusting the clock.
- Press the < MENU > button.
- Touch
 .
. - Touch System.
- Touch [Time/Date]. Clock screen appears.
- Touch
 or
or set the clock time.
- Touch

Basics
Functions of the Buttons on the Front Panel
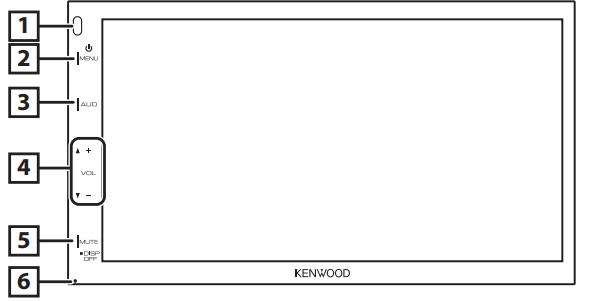
Remote Sensor
- Receives the remote control signal.
![]() MENU
MENU
- Displays the HOME screen. (P.4)
- Press and hold the second turn the power off.
- When the power is off, turn the power on.
AUD
- Displays the Audio screen. (P.10)
- The Audio screen is not displayed during the SETUP screen or on the list screen, etc.
+, – (Volume)
- Adjusts volume. The volume will go up to 15 when you keep pressing [+].
MUTE/DISP OFF (Display off)
- Mutes/restores the sound.
- Press and hold turns the screen off. When the screen is off, touch the display to turn it on the screen.
Reset
- If the unit or the connected unit fails to operate properly, the unit returns to factory settings when this button is pressed.
Common operations
Turning on the power
- Press the <
 MENU > button.
Turning off the power
- Press and hold the <
 MENU> button.
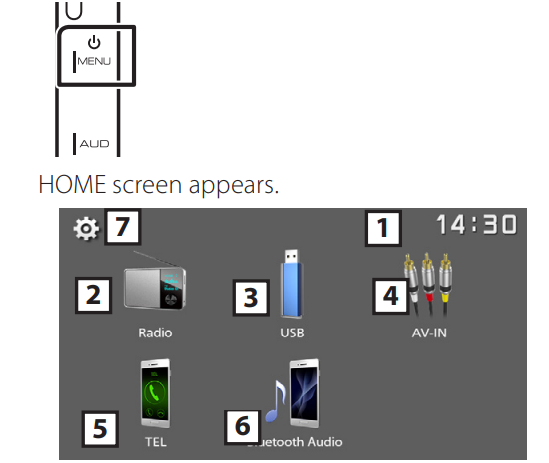
HOME screen descriptions
- Press the <
 MENU > button.
- Clock display: Touch to display the Clock screen.
- Switches to the radio broadcast. (P.5)
- USB
 Plays files on a USB device. (P.6)
 - iPhone
 Plays an iPhone. (P.7)
 - When the iPhone is connected.
- Mirroring
 displays the Mirroring screen.
 - When an Android device with the “Mirroring OB for KENWOOD” application installed is connected.
- Switches to an external component connected to the AV-IN input terminal. (P.8)
- Displays the Hands Free screen. (P.9)
- Plays a Bluetooth audio player. (P.10)
- Displays the SETUP screen. (P.3)
Source control screen

 Returns to the previous screen.
 Displays the Audio screen. (P.10)
Radio
Radio Basic Operation
- Press the <
 MENU> button.
 - Touch [Radio].
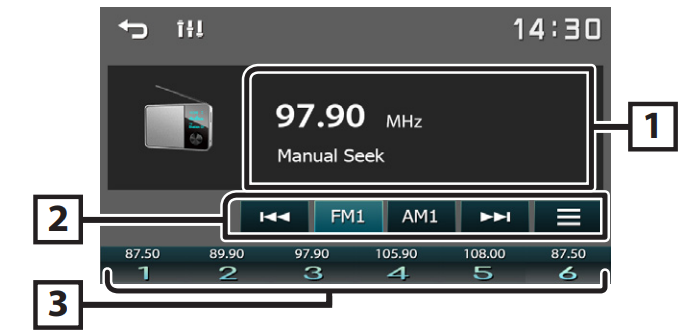
Source control screen
- Displays the information of the current station: PS name, Frequency, PTY Genre, Indicator Items.

- [FM]: Switches the FM band. “FM1”, “FM2”, “FM3”
- [AM]: Switches the AM band. “AM1”, “AM2”
 : Tunes in a station with good reception automatically. Touch and hold to switch to the next frequency manually.
 : Displays the Radio Setup screen. (P.5)
- Recalls the memorized station. When touched for 2 seconds, it stores the current receiving station in memory.
Presetting stations
Auto memory
You can preset 6 stations for the current band (FM1/FM2/FM3/AM1/AM2).
- Touch [FM] or[AM] to select the band.
- Touch

- Touch [Auto Store]. The local stations with the strongest signals are found and stored automatically.
Manual memory
You can store the current receiving station in memory.
- Tune in to a station you want to preset.
- Touch and hold [#] (#:1-6) in which you want to store the station.
Recalling the preset station
- Touch [#] (#:1-6).
Radio Setup
- Touch
 .
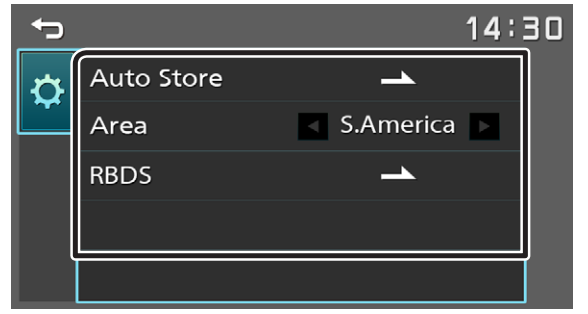
. - Set each item as follows.

- [Auto Store] Automatically searches and stores the 6 stations with the strongest signals for the selected band. “Auto Store” appears.
- [Area] “S.America”: AM/FM intervals: 10 kHz/50 kHz.
- [RBDS] 1 Displays the RBDS Settings screen.
- [TA] Switches to the traffic information automatically when the traffic bulletin starts. (TI indicator lights up.) “ON”, “OFF” (Default)
- [RBDS Clock Sync] Synchronizing the Radio Broadcast Data System station time data and this unit’s clock. “ON” (Default), “OFF”
- [PTY] Select a program type.
- [PTY Seek] Searches for a program by program type.
- 1 FM only
- Touch
 .
.
USB
Preparation
Connecting a USB device
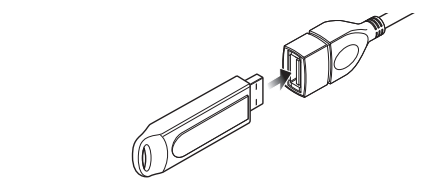
- Remove the cap of the USB terminal.
- Connect the USB device with the USB cable.

To disconnect the USB device:
- Press the <
 MENU > button.
 - Touch a source other than [USB].
- Detach the USB device.
Usable USB device
This unit can play MPEG1/MPEG2/MPEG4/H.264/MKV/MP3/WMA/AAC/WAV/FLAC/OGG files stored in a USB mass storage class device. (P.16)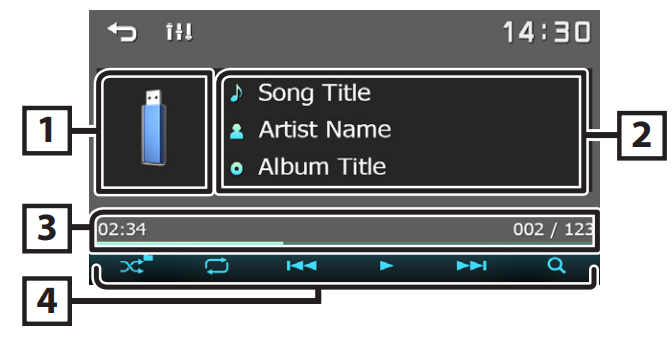
Playback operations
Control the music you are listening to on the source control screen.
- The jacket of the currently playing file is displayed.
- Displays the information of the current file.
- Playing time/File number. Play time bar: For confirmation of the current playing position.
 : selects Random playback mode.
 : Selects Repeat playback mode.
 : Plays or pauses.
 : Searches the previous/next content. Touch and hold to fast forward or fast backward.
 : Searches file. (P.6)
For Video playback
When the operation buttons are not displayed on the screen, touch the display.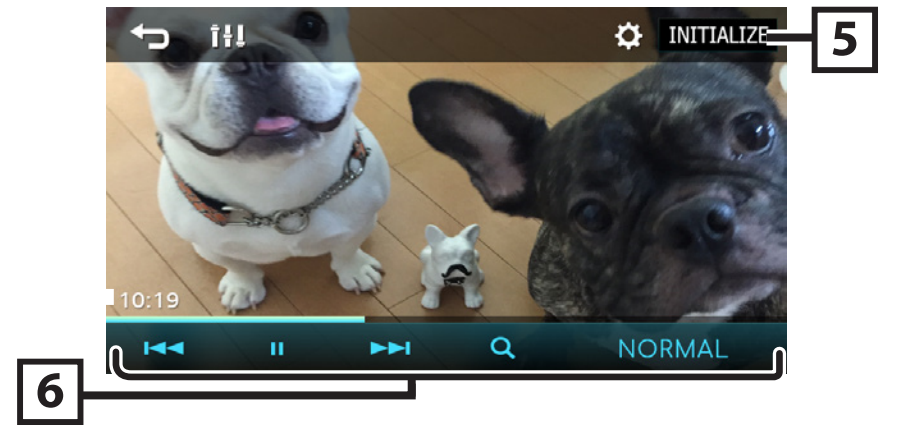
 : You can adjust image quality in the video screen.
- [INITIALIZE]: To clear the adjustment.
 : Plays or pauses.
 : Searches the previous/next content. Touch and hold to fast forward or fast backward.
 : Searches file. (P.6)
- [NORMAL][16:9][4:3]: Select a screen mode.
Selecting a track in a list (Searches file)
- Touch
 .
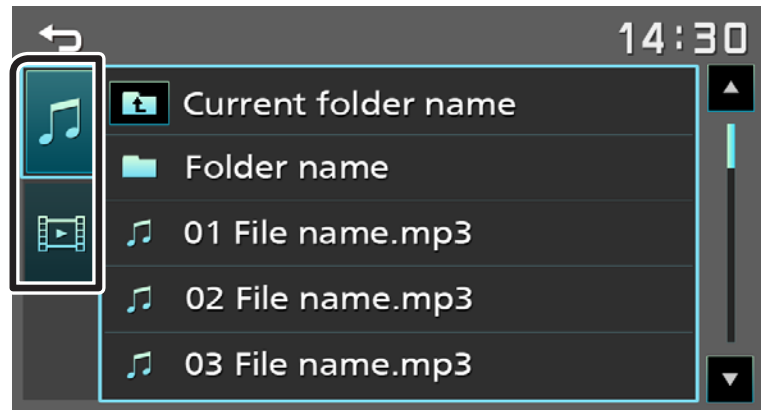
. - Select whether you search by audio files
 or video files
  .
.
- Touch
 to move to the upper hierarchy.
 - Touch the desired folder. When you touch a folder, its contents are displayed.
- Touch
 to move to the top hierarchy.
 - Touch the desired item from the content list. Playback starts.
![]() NOTE
NOTE
- The source control screen appears when you touch
 the top hierarchy.
iPhone
Preparation
Connecting iPhone
For details about connecting an iPhone, see page 15.
- Remove the cap of the USB terminal.
- Connect the iPhone.
- The unit reads the device, and playback starts.
To disconnect the iPhone
- Press the <
 MENU> button.
 - Touch a source other than [iPhone].
- Detach the iPhone.
Connectable iPhone
The following models can be connected to this unit:
- iPhone 14 Pro Max
- iPhone 14 Pro
- iPhone 14 Plus
- iPhone 14
- iPhone 13 Pro Max
- iPhone 13 Pro
- iPhone 13
- iPhone 13 mini
- iPhone 12 Pro Max
- iPhone 12 Pro
- iPhone 12
- iPhone 12 mini
- iPhone SE (2nd generation)
- iPhone 11 Pro Max
- iPhone 11 Pro
- iPhone 11
- iPhone XS Max
- iPhone XS
- iPhone XR
- iPhone X
- iPhone 8 Plus
- iPhone 8
- iPhone 7 Plus
- iPhone 7
- iPhone SE
- iPhone 6s Plus
- iPhone 6s
Playback operations
Control the music you are listening to on the source control screen.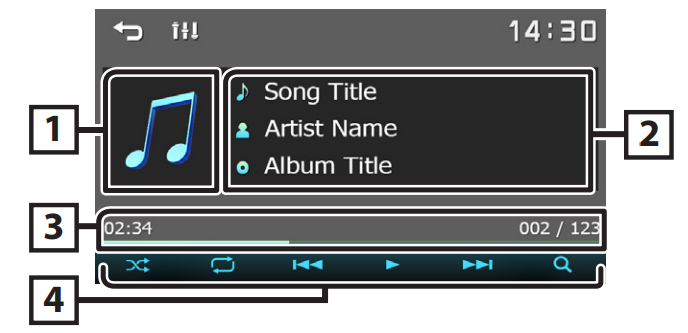
- Artwork (Shown if the track contains artwork)
- Displays the information of the current file.
- Playing time/File number. Play time bar: For confirmation of the current playing position.
 : Selects Random playback mode.
 : Selects Repeat playback mode.
 : Plays or pauses.
 : Searches the previous/next content. Touch and hold to fast forward or fast backward.
 : Searches content. (P.7)
Selecting content in a list
- Touch
 .
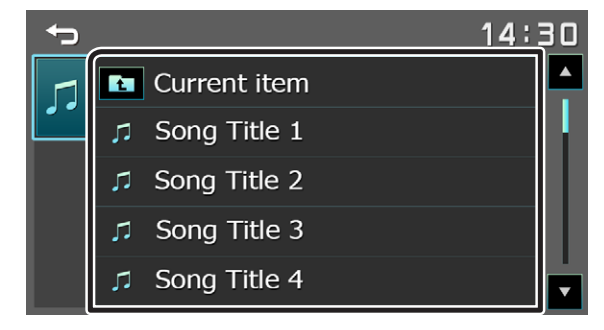
. - Touch the desired item. When you touch a category, its contents are displayed.

- Touch the desired item from the content list. Playback starts.
- Touch
 to move to the upper hierarchy.
![]() NOTE
NOTE
- The source control screen appears when you touch
 the top hierarchy.
External Components
Using external audio/video players
Starting playback
- Connect an external component to the AV-IN input terminal. (P.14)
- Press the <
 MENU> button.
 - Touch [AV-IN].
- Turn on the connected component and start playing the source.
For Video playback
When the operation buttons are not displayed on the screen, touch the display.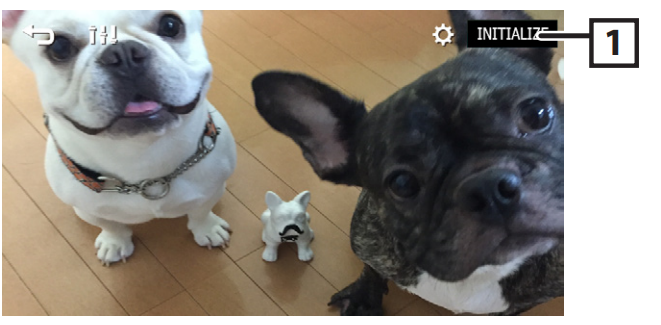
 : You can adjust image quality in the video screen.
- [INITIALIZE]: To clear the adjustment.
![]() NOTE
NOTE
- When the picture from the rear view camera is displayed on the AV-IN screen, the picture output from the Visual Output terminal disappears.
Rear view camera
To use a rear-view camera, the REVERSE lead connection is required. For connecting a rear-view camera, see (P.14).
Displaying the picture from the rear view camera
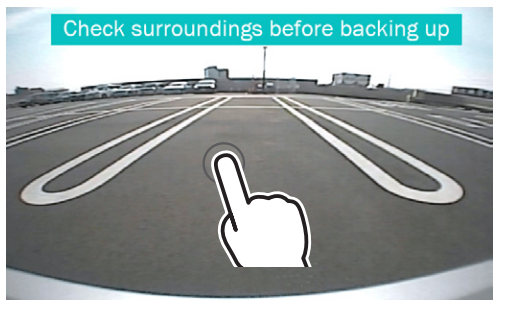
- The rear view screen is displayed when you shift the gear to the reverse (R) position.

- The first touch removes the Caution, and the second touch closes the Camera Screen.
Learning function of steering remote
This function is available only when your vehicle is equipped with the electrical steering remote controller.
- Press the <
 MENU> button.
 - Touch

- Touch [System].
- Touch [Steering Remote].
- Touch the function you want to set.
- Press and hold the steering remote controller button.
- NOTE: You can have the unit learned all buttons at a time. In that case, press all the buttons one at a time, and after pressing all of them, touch
 the Steering Remote Controller Setting screen.
 - Repeat steps 5 and 6 as necessary.
- Touch
 .
.
![]() NOTE
NOTE
- Touch [Initialize] and then touch [Yes] to set all the settings to the initial default settings.
Reverse with ATT (-20dB)
When the gear is shifted to the reverse (R) position, the volume of the device is adjusted.
- Press the <
 MENU> button.
 - Touch
 .
. - Touch [System].
- Touch [Reverse with ATT].
- Touch
 to set to [ON] [OFF].
NOTE
- The setting value is ON (default).
Installation
Before Installation
Before installation of this unit, please note the following precautions.
WARNINGS
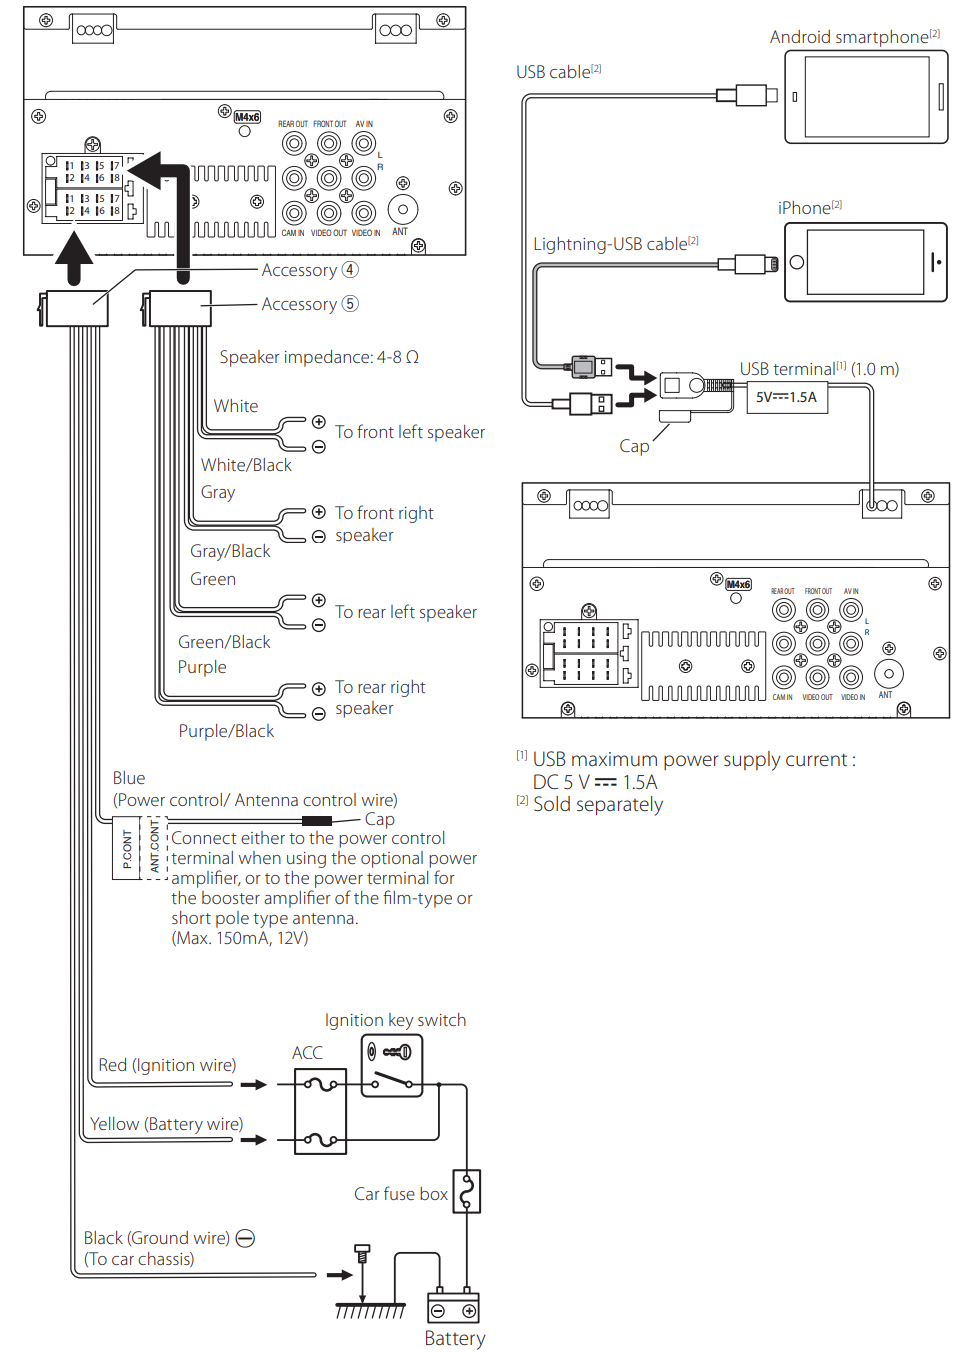
- If you connect the ignition wire (red) and the battery wire (yellow) to the car chassis (ground), you may cause a short circuit, which in turn may start a fire. Always connect those wires to the power source running through the fuse box.
- Do not cut out the fuse from the ignition wire (red) and the battery wire (yellow). The power supply must be connected to the wires via the fuse.
CAUTION
- Install this unit in the console of your vehicle. Do not touch the metal part of this unit during and shortly after use of the unit. Metal parts such as the heat sink and enclosure become hot.
NOTE
- Mounting and wiring this product requires skills and experience. For the best safety, leave the mounting and wiring work to professionals.
- Make sure to ground the unit to a negative 12V DC power supply.
- Do not install the unit in a spot exposed to direct sunlight or excessive heat, or humidity. Also, avoid places with too much dust or the possibility of water splashing.
- Do not use your own screws. Use only the screws provided. If you use the wrong screws, you could damage the unit.
- If your car’s ignition does not have an ACC position, connect the ignition wires to a power source that can be turned on and off with the ignition key. If you connect the ignition wire to a power source with a constant voltage supply, such as with battery wires, the battery may be drained.
- If the console has a lid, make sure to install the unit so that the front panel will not hit the lid when closing and opening.
- If the fuse blows, first make sure the wires aren’t touching to cause a short circuit, then replace the old fuse with one with the same rating.
- Insulate unconnected wires with vinyl tape or other similar material. To prevent a short circuit, do not remove the caps on the ends of the unconnected wires or the terminals.
- Secure the wires with cable clamps and wrap vinyl tape around the wires that come into contact with metal parts to protect the wires and prevent a short circuit.
- Connect the speaker wires correctly to the terminals to which they correspond. The unit may be damaged or fail to work if you share the
 wires or ground them to any metal part in the car.
 - When only two speakers are being connected to the system, connect the connectors either to both the front output terminals or to both the rear output terminals (do not mix front and rear). For example, if you connect the
 connector of the left speaker to a front output terminal, do not connect the
  connector to a rear output terminal.
 - After the unit is installed, check whether the brake lamps, blinkers, wipers, etc., on the car are working properly.
- Mount the unit so that the mounting angle is 30° or less.
- Do not press hard on the panel surface when installing the unit in the vehicle. Otherwise, scars, damage, or failure may result.
- Reception may drop if there are metal objects near the Bluetooth antenna.

Supplied accessories for installation
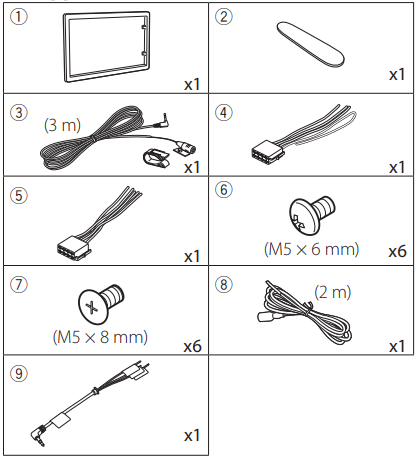
Installation procedure
- To prevent a short circuit, remove the key from the ignition and disconnect the
 terminal of the battery.
 - Make the proper input and output wire connections for each unit.
- Connect the wire on the wiring harness.
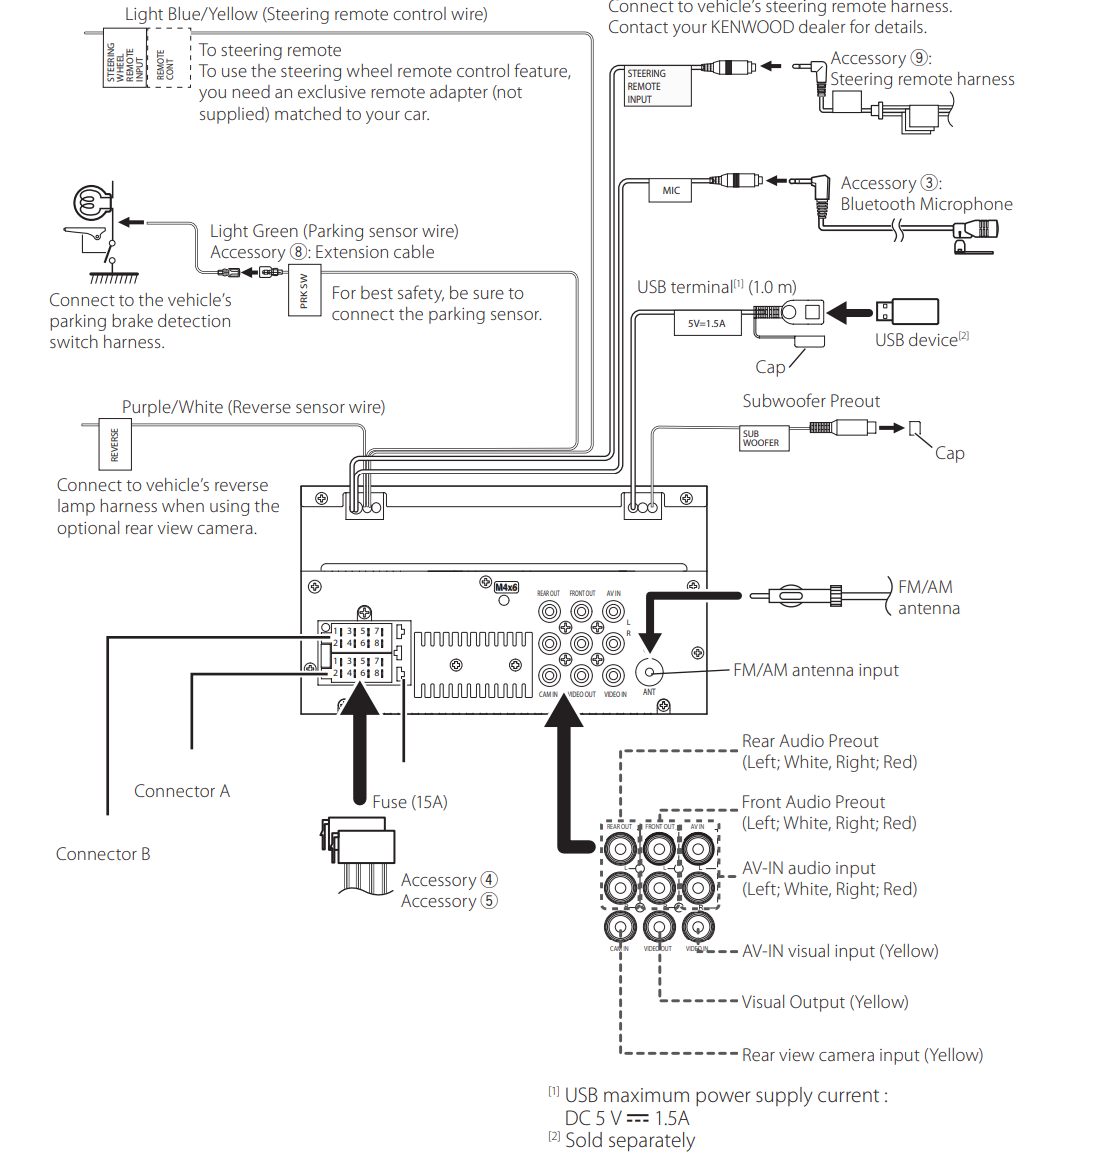
- Take Connector B on the wiring harness and connect it to the speaker connector in your vehicle.
- Take Connector A on the wiring harness and connect it to the external power connector on your vehicle.
- Connect the wiring harness connector to the unit.
- Install the unit in your car.
- Reconnect the
 terminal of the battery.
 - Press the reset button.
Installing the unit
Japanese cars (North America, South America sales area only)
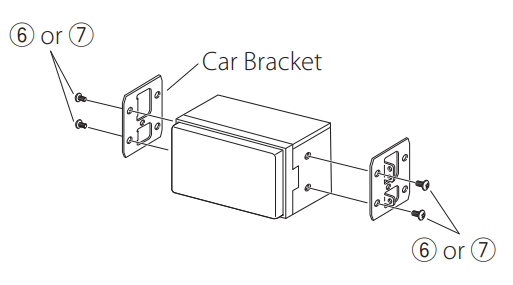
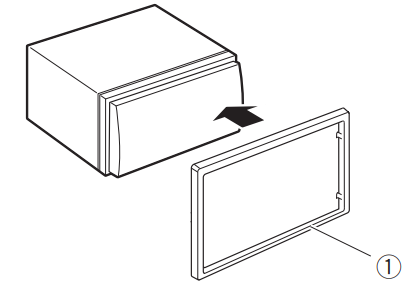
Trim plate
- Attach the accessory to the unit.

Microphone unit
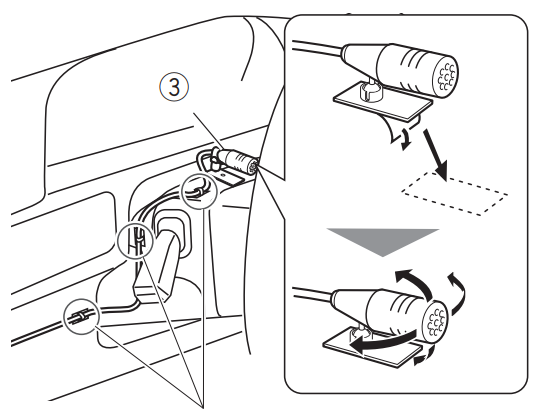
- Check the installation position of the microphone (accessory (3)).
- Clean the installation surface.
- Remove the separator of the microphone (accessory (3)), and stick the microphone to the place shown below.
- Wire the microphone cable up to the unit, with it secured at several positions using tape or another desired method.
- Adjust the direction of the microphone (accessory (3)) to the driver. Fix a cable with a commercial item of tape.

![]() NOTE
NOTE
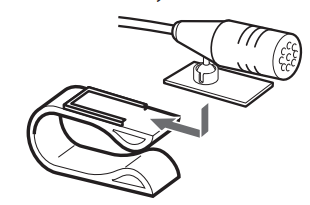
- Swap the clips if necessary.

Removing the trim plate
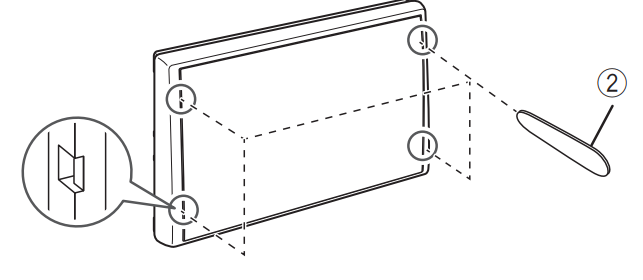
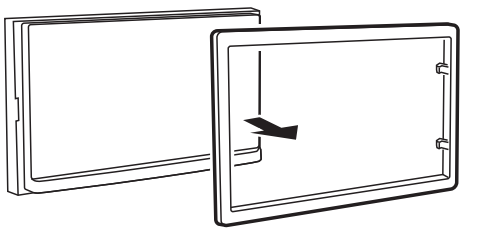
- Use the extraction key (accessory (2)) to lever out the four tabs (two on the left part, two on the right part).

- Pull the trim plate forward.

Connecting wires to terminals
Connecting an iPhone/Android
Copyrights
- The Bluetooth® word mark and logos are registered trademarks owned by the Bluetooth SIG, Inc., and any use of such marks by JVCKENWOOD Corporation is under license. Other trademarks and trade names are those of their respective owners.
- Use of the Made for Apple badge means that an accessory has been designed to connect specifically to the Apple product(s) identified in the badge and has been certified by the developer to meet Apple performance standards. Apple is not responsible for the operation of this device or its compliance with safety and regulatory standards. Please note that the use of this accessory with an Apple product may affect wireless performance.
- Apple, iPhone, and Lightning are trademarks of Apple Inc., registered in the U.S. and other countries.
- Android is a trademark of Google LLC.
- Microsoft and Windows Media are either registered trademarks or trademarks of Microsoft Corporation in the United States and/or other countries.
- THIS PRODUCT IS LICENSED UNDER THE MPEG-4 VISUAL PATENT PORTFOLIO LICENSE FOR THE PERSONAL AND NON-COMMERCIAL USE OF A CONSUMER FOR (i) ENCODING VIDEO IN COMPLIANCE WITH THE MPEG-4 VISUAL STANDARD (“MPEG-4 VIDEO”) AND/OR (ii) DECODING MPEG-4 VIDEO THAT WAS ENCODED BY A CONSUMER ENGAGED IN A PERSONAL AND NON-COMMERCIAL ACTIVITY AND/OR WAS OBTAINED FROM A VIDEO PROVIDER LICENSED BY MPEG LA TO PROVIDE MPEG-4 VIDEO. NO LICENSE IS GRANTED OR SHALL BE IMPLIED FOR ANY OTHER USE. ADDITIONAL INFORMATION, INCLUDING THAT RELATING TO PROMOTIONAL, INTERNAL, AND COMMERCIAL USES AND LICENSING, MAY BE OBTAINED FROM MPEG LA, LLC. SEE HTTP://WWW.MPEGLA.COM.
- THIS PRODUCT IS LICENSED UNDER THE AVC PATENT PORTFOLIO LICENSE FOR THE PERSONAL USE OF A CONSUMER OR OTHER USES IN WHICH IT DOES NOT RECEIVE REMUNERATION TO (i) ENCODE VIDEO IN COMPLIANCE WITH THE AVC STANDARD (“AVC VIDEO”) AND/OR (ii) DECODE AVC VIDEO THAT WAS ENCODED BY A CONSUMER ENGAGED IN A PERSONAL ACTIVITY AND/OR WAS OBTAINED FROM A VIDEO PROVIDER LICENSED TO PROVIDE AVC VIDEO. NO LICENSE IS GRANTED OR SHALL BE IMPLIED FOR ANY OTHER USE. ADDITIONAL INFORMATION MAY BE OBTAINED FROM MPEG LA, L.L.C. SEE HTTP://WWW.MPEGLA.COM.
- libFLAC Copyright (C) 2000-2009 Josh Coalson Copyright (C) 2011-2013 Xiph.Org Foundation
- Redistribution and use in source and binary forms, with or without modification, are permitted provided that the following conditions are met:
- Redistributions of source code must retain the above copyright notice, this list of conditions, and the following disclaimer.
- Redistributions in binary form must reproduce the above copyright notice, this list of conditions, and the following disclaimer in the documentation and/or other materials provided with the distribution.
- Neither the name of the Xiph.org Foundation nor the names of its contributors may be used to endorse or promote products derived from this software without specific prior written permission.
THIS SOFTWARE IS PROVIDED BY THE COPYRIGHT HOLDERS AND CONTRIBUTORS “AS IS” AND ANY EXPRESS OR IMPLIED WARRANTIES, INCLUDING, BUT NOT LIMITED TO, THE IMPLIED WARRANTIES OF MERCHANTABILITY AND FITNESS FOR A PARTICULAR PURPOSE ARE DISCLAIMED. IN NO EVENT SHALL THE FOUNDATION OR CONTRIBUTORS BE LIABLE FOR ANY DIRECT, INDIRECT, INCIDENTAL, SPECIAL, EXEMPLARY, OR CONSEQUENTIAL DAMAGES (INCLUDING, BUT NOT LIMITED TO, PROCUREMENT OF SUBSTITUTE GOODS OR SERVICES; LOSS OF USE, DATA, OR PROFITS; OR BUSINESS INTERRUPTION) HOWEVER CAUSED AND ON ANY THEORY OF LIABILITY, WHETHER IN CONTRACT, STRICT LIABILITY, OR TORT (INCLUDING NEGLIGENCE OR OTHERWISE) ARISING IN ANY WAY OUT OF THE USE OF THIS SOFTWARE EVEN IF ADVISED OF THE POSSIBILITY OF SUCH DAMAGE.
libogg
Copyright (c) 2002, Xiph.org Foundation. Redistribution and use in source and binary forms, with or without modification, are permitted provided that the following conditions are met:
- Redistributions of source code must retain the above copyright notice, this list of conditions, and the following disclaimer.
- Redistributions in binary form must reproduce the above copyright notice, this list of conditions, and the following disclaimer in the documentation and/or other materials provided with the distribution.
- Neither the name of the Xiph.org Foundation nor the names of its contributors may be used to endorse or promote products derived from this software without specific prior written permission.
For More Manuals By Kenwood Visit ManualsLibraryy.
Kenwood DMX129BT Monitor Receiver-FAQs
Q1. Does the Kenwood DMX129BT support Apple CarPlay or Android Auto?
No, the DMX129BT does not support Apple CarPlay or Android Auto.
Q2. How do I connect my phone to the Kenwood DMX129BT?
You can connect your phone via Bluetooth for hands-free calling and audio streaming. For USB media playback, simply plug your device into the USB port.
Q3. How do I change the display or illumination settings on my Kenwood radio?
Press and hold the [AUDIO] button to enter Function mode. Then use the control knob to go to SETTINGS > DISP & KEY and select your preferred display or illumination option.
Q4. Why is my Kenwood radio display dim?
The dimmer setting may be enabled. Check and adjust brightness in the display settings. If the issue continues, ensure that the connectors between the receiver and the panel are clean.
Q5. Can I mirror my phone screen on the DMX129BT?
No, this model does not support direct phone screen mirroring. For this feature, you’ll need a higher-end Kenwood receiver.
Q6. How do I turn on the Kenwood DMX129BT touch screen?
Press and hold the DISP OFF button or simply tap the screen. If the unit is unresponsive, press the reset button.
Q7. How do I update the Kenwood head unit?
Download the latest firmware from the official Kenwood website, copy it to a USB drive, and insert it into the unit. Follow the on-screen prompts to complete the update.
Q8. Can I control my Kenwood stereo with my smartphone?
Yes, using the Kenwood Smartphone Control app on Android. Connect your phone via USB or MHL/HDMI and follow the in-app setup instructions.
Q9. Can I install custom backgrounds on my Kenwood DMX129BT?
No, this model does not support custom wallpapers. Only preset themes and colors can be selected.
Q10. Is Kenwood a Japanese brand?
Yes, Kenwood is part of JVCKenwood Corporation, a Japanese multinational electronics company headquartered in Yokohama, Japan.

