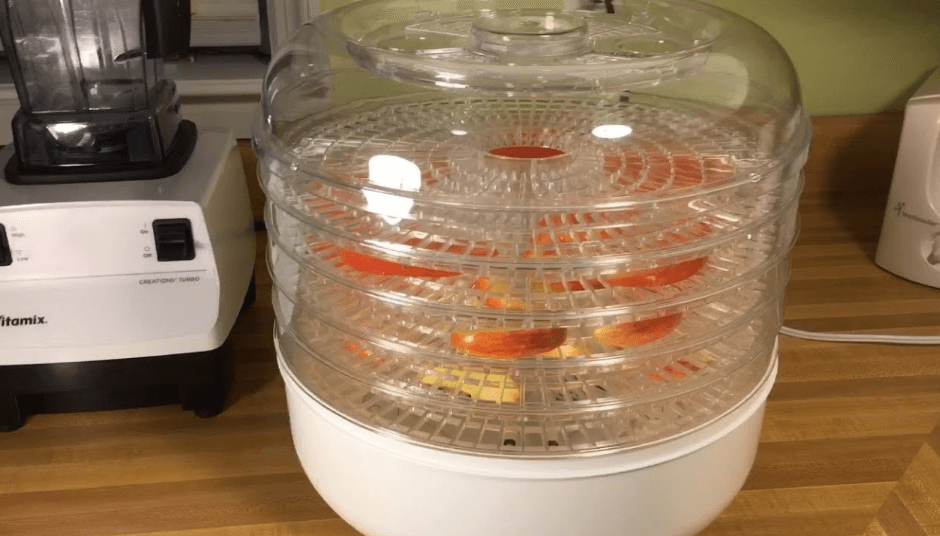
Kitchen Living FD550 Food Dehydrator
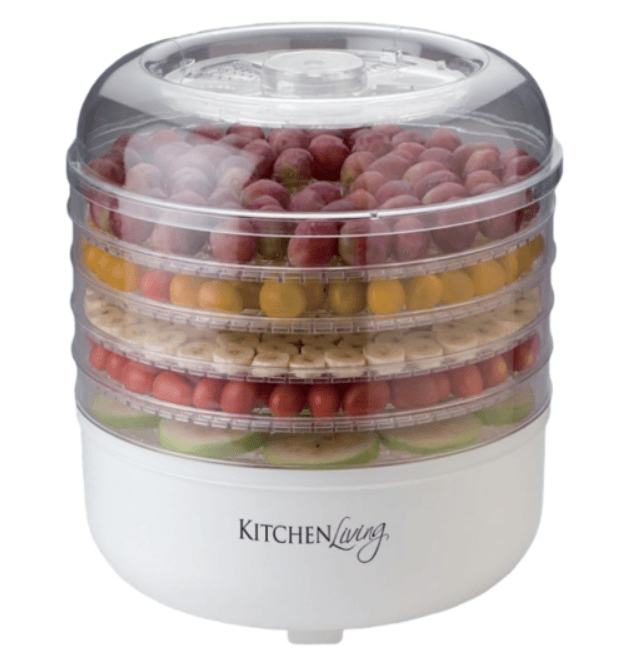
General Information and Safety Instructions
When using electrical appliances, basic safety precautions should always be followed.
Please read and save all instructions.
- DANGER! Avoid touching the heating coil area or other hot surfaces.
- DO NOT immerse the cord, plugs, or the base assembly in water or other liquids. Protect yourself from electrical hazards.
- Do not use outdoors or while standing in a damp area. For household use only.
- Close supervision is necessary when any appliance is being used by or near children. This Food Dehydrator is not intended for use by persons (including children) with reduced physical, sensory, or mental capabilities, or lack of experience and knowledge, unless they have been given supervision or instruction concerning use of the appliance by a person responsible for their safety.
- DO NOT operate the Food Dehydrator with a damaged power cord or plug, or after it has malfunctioned, been dropped, or damaged in any manner. Return the Food Dehydrator to the warranty center for examination, repair, or electrical or mechanical adjustment.
- When not in use (and before cleaning), the Food Dehydrator should be unplugged from the outlet. Allow to cool thoroughly before removing or replacing parts.
- Do not let the power cord hang over the edge of a table or counter or touch any hot surface.
- Do not use the Food Dehydrator for anything other than its intended use.
- Do not place the Food Dehydrator on or near hot gas or electric burners, or in a heated oven.
- Do not plug in the Food Dehydrator while the lid is inverted (storage position), and do not invert the top into the bottom for storage until the Food Dehydrator has completely cooled.
- A hazard may be caused by the use of accessory attachments NOT recommended by the manufacturer.
- A short cord is provided to reduce the hazards resulting from becoming entangled in or tripping over a longer cord.
- To clean the bottom, unplug the unit from the outlet, allow it to cool completely, and then wipe with a damp cloth. DO NOT REMOVE THE HEATING ELEMENT FOR CLEANING. To clean trays or lids, use a sponge and mild soap.
- Do not pour liquids into the Food Dehydrator.
SAVE ALL INSTRUCTIONS!
Assembly and Parts List
LIST OF MAIN PARTS
- Top cover
- 5 removable interchangeable trays
- Base
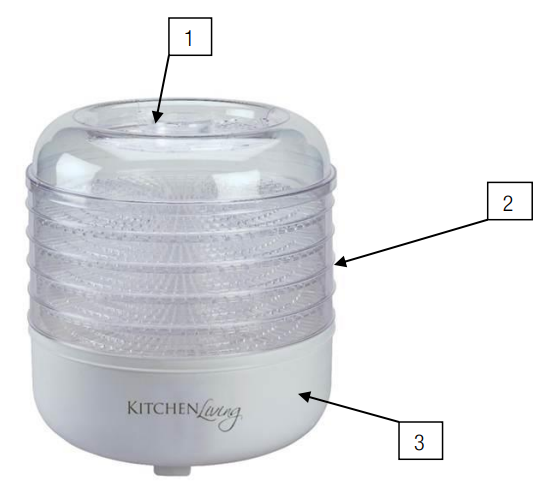
CONTENTS OF PACKAGING
- Top cover with vents. Please note: the top cover is packed upside down in the base. Please remove before using.
- 5 trays. Please note: the trays are packed upside down and need to be removed and turned over with the right side up before using.
- Base
- Instruction Manual
If any of the above items are missing, please contact our service department at 1-888-367-7373 or email us at [email protected] for replacement. Our business hours are Monday through Friday, 10:00 am to 5:00 pm EST.
Getting Started
Why Dehydrate Food?
Dehydration of Food is one of the oldest methods of preserving food for later use. Dehydrating is a method of heating the food to evaporate the moisture present and then removing the water vapor formed.
Dried food is great in traditional cooking recipes and can save you a lot of time in the kitchen during meal preparation. Dried foods are also ideal for camping and backpacking as they take up little weight or space and do not require refrigeration. They are also great, healthy, tasty children’s snacks.
Dehydrator Use & Care
Before using your dehydrator for the first time, wash the trays and top covers in warm, soapy water or the dishwasher on the top rack (remove before drying cycle). Caution: Do not put the power unit in water or the dishwasher. Wipe with a damp cloth.
- Set the base tray on a sturdy, level surface, away from any source of water.
- Stack additional trays on the base tray with the rim up.
- Place the top cover on the top tray and adjust vents.
- Plug the cord into a power outlet. The Food Dehydrator will automatically turn on.
Instructions
HOW TO DEHYDRATE FOOD
Five Steps to Dehydrate Food
- Slice most foods thin – about ¼”
- Do not overlap your food on trays
- Rotate and turn trays every few hours
- Remove food when it looks and feels dry
- Place food in air-tight containers, jars, or sealed plastic bags.
Procedure
Fruits and vegetables selected for drying should be of the highest quality obtainable, both fresh and fully ripe. Wilted or inferior produce will not make a satisfactory dried product. Immature produce lacks flavor and color that won’t be enhanced by drying. Over-ripe produce may be tough and fibrous or soft and mushy.
Prepare produce while fresh and begin drying at once. Wash or clean all fresh food thoroughly to remove any dirt or chemicals. Sort and discard food with decay, bruises, or mold, which may affect an entire batch.
It is advisable to peel, pit, or core some fruits and vegetables. Smaller pieces tend to dry faster and more evenly.
The vents on the Top Cover are to allow heat and moisture to escape. “0” allows the most heat and moisture to escape. “4” will keep more heat in and allow moisture to escape. For general use, it is recommended that you use setting “2,” although it can be adjusted per recipe and your preference.
Pre-treating
Enzymes in fruit and vegetables are responsible for color and flavor changes during ripening. These changes will continue during the drying process and storage unless the produce is pretreated to slow down enzyme activity. Many light-colored fruits (especially apples, apricots, bananas, peaches, nectarines, and pears) tend to darken during drying and storage. To prevent this darkening, the fruit may be pretreated by blanching or dipping in a suitable dip. The pretreatment of vegetables and fruit before drying helps set color and hastens drying by relaxing tissues. It can also help keep flavor during storage and improve reconstitution during cooking.
Fruits and Vegetables may be dipped in the following:
- Lemon or Pineapple Juice is a natural alternative (in place of other pretreatments) to reduce unwanted color or browning. Fruit may be sliced right into the juice; remove after a couple of minutes and arrange in trays. For variety, you may dip fruits in Jell-O powders, lime or orange juice, spices, or honey. For another tasty flavor, sprinkle with cinnamon or coconut. Combine any of the above for your special taste treats.
- Table Salt can be used as a solution for dipping.
- Water or Stem Blanching works; however, blanched fruits may turn soft and become difficult to handle. Fruits with tough skins (grapes, prunes and small dark plums, cherries, figs, and some berries) may be water-blanched to crack the skins. This will allow moisture inside to escape more readily during drying.
- Syrup Blanching may help retain the color of apples, apricots, figs, nectarines, peaches, pears, and plums. Syrup blanching makes a sweetened, candied food. Before drying pretreated food, remove any excess moisture by placing the food on paper towels or clean cloths. Trays should be loaded with a thin layer of food as directed. The food being dried should be about ¼” thick and should not exceed roughly ¾” of each tray’s surface area.
Drying
Drying time varies depending on the type and amount of food, thickness and evenness of the slices, percentage of water in the food, humidity, temperature of the,, and the altitude. Drying times may also vary from one area of the country to another, from day to day, depending on the climatic conditions. Record keeping helps you predict future drying times for specific foods.
Testing for Dryness
To test for dryness, remove a piece of food, allow it to cool, and feel with your fingers to determine dryness:
- Fruits should be pliable and leathery with no pockets of moisture. To check if fruit is dry, tear a piece in half and if you do not see any moisture beads, the fruit is dry enough for storage.
- Jerky should be tough but not brittle.
- Dried fish should be tough. If the fish is high in fat, it may appear moist due to the high oil content.
- Vegetables should be tough or crisp.
Helpful Hints
- Always use fresh, quality food and wash everything before starting to dehydrate.
- Best results are achieved when the quality of the food is high. Select ripe produce in good condition. Bad food may give off a flavor to the entire lot.
- Clean produce is important. Wash thoroughly, remove soft or spoiled areas, slice, and pre-treat if necessary. Be certain that your hands, cutting utensils, and food preparation areas are also clean.
- Produce may be shredded, sliced, or diced. Slices ¼” thick are usually a good size for efficient drying.
- Drying times are affected by the size of the load, the thickness of the sliced produce, the humidity of the air, and the moisture content of the food itself. You can expect a variation in the drying times.
- Be sure to let the produce cool before testing for dryness. To test for dryness, cut a piece open – there should be no visible moisture inside. Fruits tend to dry leathery, and vegetables dry brittle.
- Trays may be loaded with foods barely touching but not overlapping.
- About 6% to 10% of the moisture may remain in food without danger of spoilage. Many dried foods will have a leathery consistency, rather like licorice.
- Blanching or steaming is advisable for vegetables to inactivate the natural enzymes responsible for undesirable color changes. Also, it facilitates quick dehydration and reconstitution. In some cases, blanching is necessary to crack the skins of fruits like plums to allow moisture to escape during dehydration. Otherwise, the skins may harden while the fruits remain too moist in the center.
- It is necessary to rotate the trays every few hours. Move the bottom trays up and the top ones down, and turn to the right or left.
- When correctly dried, the majority of your fruits and vegetables will be soft and pliable after dehydration without any damp spots. Peaches, pears, figs, and dates will be pliable and leathery.
- To remove seeds or pits from prunes, grapes, cherries, etc., dehydrate about halfway, then pop seeds out. This prevents juice from dripping out.
Packing and Storage
- Fruits cut into a wide range of sizes should be allowed to condition for a week after drying to equalize the moisture among the pieces before placing them in long-term storage. Place fruit in a non-aluminum, non-plastic container and put it in a dry, well-ventilated, and protected area. Keep away from moisture.
- Dried foods should be thoroughly cooled before packing. Package in small amounts so that food can be used soon after containers have been opened.
- Pack food without crushing into clean, dry, insect-proof containers. Glass jars or sealed plastic freezer bags make good containers. Metal cans with fitted lids can be used if the dried food is first placed in a plastic bag.
- Your dehydrated food should be checked about once a month. Should you find mold growing on a piece of dried food, scrape it off and then pasteurize the contents.
- To pasteurize the contents, spread food on a cookie sheet and bake in an oven for 15 minutes at 175° Fahrenheit. Repack in a clean, air-tight container.
Guidelines
DRYING GUIDELINES FOR FRUITS AND VEGETABLES
The times given are approximate. Your drying time will vary with room temperature, humidity, moisture content of the food, how thinly the food is sliced, and how many trays you are using. The presence of natural juices in the food may vary. The top cover vents can be adjusted. Keeping the vents open will allow for a faster drying time.
NOTE: It is important to rotate and turn the trays every few hours.
Fruit – Spread fruit in a single layer.
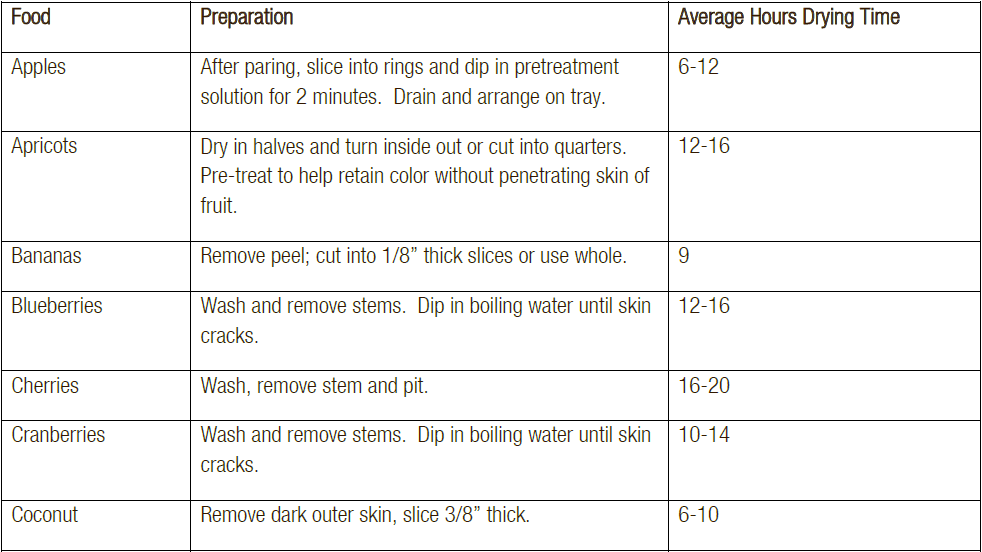


Vegetables – Spread vegetables in a single layer.
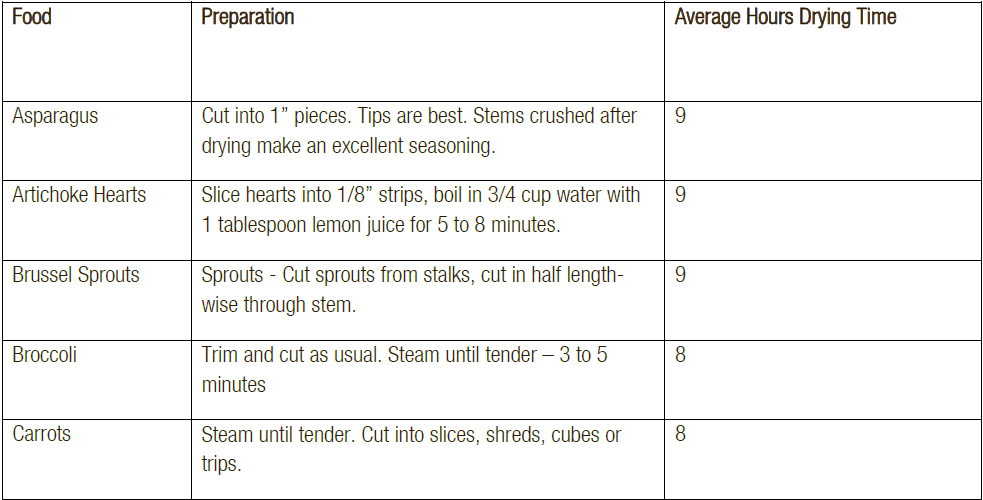
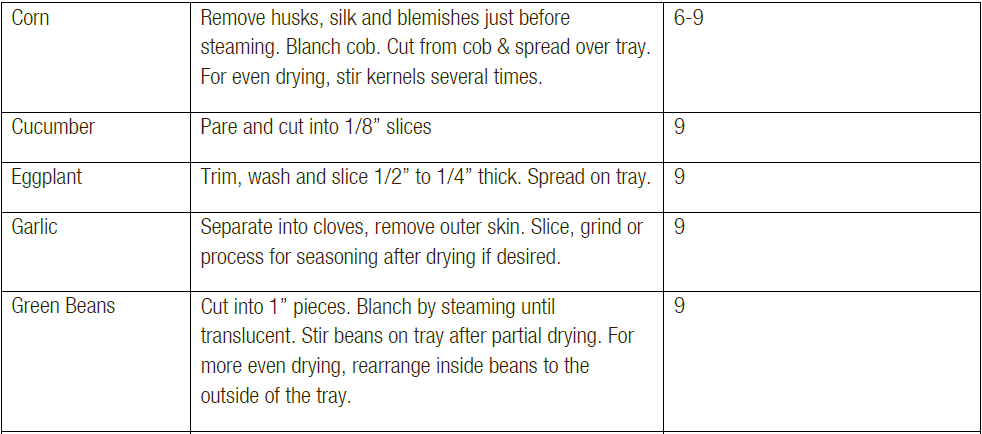
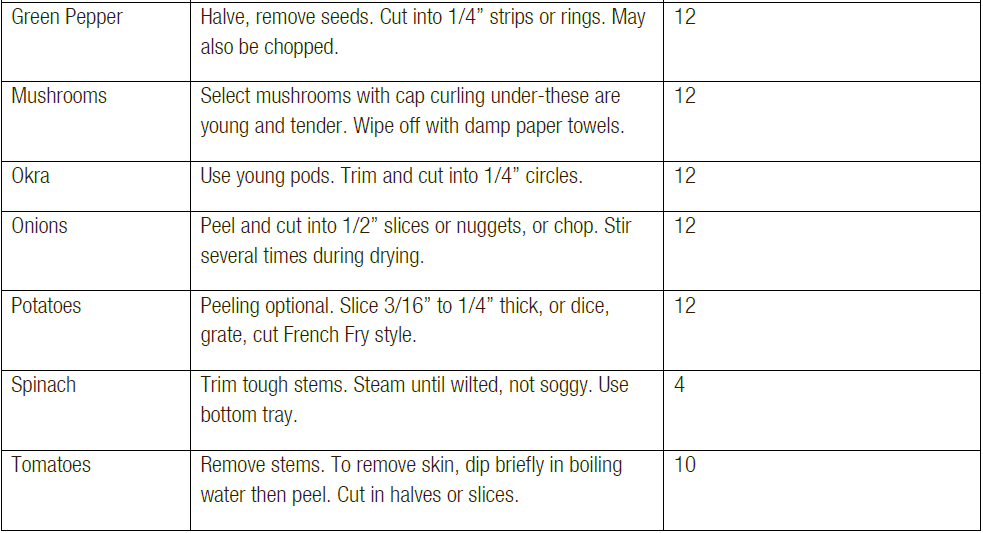
Vegetables will vary in their drying times. Blanching decreases drying times, but not all vegetables are blanched. The average drying times below are general and depend on different vegetables. The top cover vents can be adjusted. Keeping the vents open will allow for a faster drying time.

DRYING JERKY
Jerky is a favorite snack for school lunch, camping, or just about any time. It is made by seasoning the meat and then drying it without cooking. Jerky may be made from a variety of different meats. When purchasing meat for jerky, choose lean meats with minimum fat. A lean cut of flank steak or round steak is perfect for jerky.
Preparation
Normally, raw meat is used for jerky. However, cooked meat as well as raw meat may be dehydrated for later reconstitution. Cut or grind meat to size for recipes before dehydration. You’ll find that meat is much easier to work with when it is cut to size before it is dehydrated and becomes crispy.
Be extra careful when making jerky from raw chicken or turkey because Salmonella bacteria may be present in the poultry when you purchase it. It is extremely important that both raw chicken and turkey not exceed 1/4” thickness. Marinade must thoroughly permeate the meat (soak for 10 minutes). Do not pat dry or remove any of the marinade sauce. Make absolutely sure that you follow all instructions precisely. Do not consume any food that tastes, smells, or looks improper, especially jerky. Wash hands and utensils well.
Raw Meat for Beef Jerky
Any kind of beef is good for making beef jerky. The secret is to trim off all the fat before slicing. In many cases, your local supermarket butcher will slice the selected meat for you free of charge. We suggest meat be sliced about 1/8” – 1/4” thick. If the meat is slightly thicker, you will need to increase the marinating time. Marinate in a combination of soy sauce, sweetened to taste with brown sugar, and liquid smoke (optional). Add crushed chili pepper if you like it hot. Marinate the meat for 5- 10 minutes. Thicker cuts of meat will need to marinate considerably longer. It is important that the marinade permeate the meat thoroughly. Place one layer of meat on each tray. If you like slightly thicker slices, then increase the drying time accordingly. Store in a clean jar with a tight lid or use plastic storage bags.
DRYING FRUIT LEATHERS
Fruit leather is made by drying thin layers of pureed fruit in the dehydrator. Sometimes called fruit rolls, fruit leathers make delicious, wholesome, and nutritious high-energy snacks for backpackers, campers, and children. Most fruit or combinations of fruits can be used. Apricots, apples, grapes, berries, bananas, pineapples, oranges, pears, peaches, plums, melons, and most tropical fruits can be blended and dried to make fruit leathers. Grapefruit and lemons are not recommended because they turn bitter when dried.
Fruit Leather Preparation
- Select ripe or slightly over-ripe fruit. Sort and thoroughly rinse or scrub the fruit under running water. Remove and discard blemishes or defective parts. Peel tough-skinned fruits such as winter apples, oranges, peaches, and pears. Pit and core he fruit as needed. Remove seeds from grapes. Hull strawberries.
- Cut fruit into chunks and place in the top of a double boiler. Place water in the bottom of the double boiler and bring to a boil. Cover and steam for 15 to 20 minutes or until the fruit is soft.
- Place cooked fruit in a blender. Add 2 tablespoons of lemon juice per 2 cups of fruit to protect the color and help destroy bacteria during drying. If desired, add 1 to 2 tablespoons of sugar, corn syrup, or honey per 2 cups of fruit. A small amount of spice (1/4 teaspoon cinnamon or a dash of nutmeg) may also be added per 2 cups puree, for taste variety.
- Canned fruits, such as applesauce, can be mixed with more expensive fresh fruits to help stretch the fruit concentrate and soften the flavor of sharp-tasting fruits, such as cranberries. The addition of applesauce to juicy fruits also eases drying.
Leather Drying
Dehydrating Process: Once the fruit puree has been prepared to your taste, spread the mixture onto parchment/waxed paper or fruit roll sheets (sold separately at your local Houseware store). Make sure the puree is no more than 1/4” thick along the edges and no more than 1/8” thick in the center. Some dehydrators dry faster on the edges than they do in the middle. Dry the leather in a 135-degree dehydrator for 4 to 6 hours. Check the leather after 4 hours to see if it is slightly shiny and no longer sticky.
Test for dryness: Properly dried fruit leather will be translucent and slightly tacky to the touch, but easily peeled from the pan or plastic wrap. Test for dryness by touching the leather in several places; no indentations should be evident. Lift the edge of the leather, which will adhere tightly to the surface, and peel it back about an inch. If it peels readily, it is properly dried. If the leather has cooled, it may need to be warmed in an oven at 150°F for a few minutes to help it peel away more easily. If the leather cracks or chips, it has dried for too long, but it is still edible.
Storage: After loosening the edge of the leather from the plastic wrap or pan, loosely roll the leather in plastic wrap or waxed paper in one piece. Store the roll in one piece or cut into 1-inch strips. Place the strips or rolls of leather in a plastic bag, glass container, paper bag, or other container. Until the leather is completely dry, the container lid should not be securely fastened.
DRYING HERBS
Most herbs dry overnight. You will have one pound of dry herbs for every eight pounds of fresh herbs. Dried herbs retain their flavor best if they are crushed just before using. Home dehydration saves a lot of money. Dry chives, oregano, basil, dill, rosemary, thyme, parsley, mint, peppers, and almost any herb you can find.
Recipes
(Please note: for additional information and recipes, please visit your local library, bookstore, or the internet.)
DRIED CANDIED FRUIT
Rinse fruits or fruit rinds and cut into thin strips. Simmer in a solution of approximately 2 cups of water and 2 cups of sugar for 1-½ hours. Test for tenderness. Place on trays and dry until pliable (8-10 hours). Cool and store in an airtight container. Use for snacks or in cooking.
CHERRY PINEAPPLES
Drain canned sliced pineapples and maraschino cherries on paper towels. Place pineapples on trays with cherries in the center of each. Dry in the dehydrator for 8-10 hours.
ORANGE CRISPS
Slice unpeeled oranges into 1/8 to 1/4 inch slices. Dry in the dehydrator for 6-15 hours until crisp. The rind easily separates from the orange meat for snacking. Powder rind or meat for natural sugar or spice flavoring.
HONEY AND BANANA CHIPS
Slice bananas 1/8” to ¼” thick. Place on trays and dry 8-20 hours at 135° until chewy. The greener the banana, the crisper the chip: the riper the sweeter. They’re delicious plain and natural. (Option: Dip slices into 1/4 cup honey mixed with 1/4 cup lemon juice. Pat dry with paper towels. Sprinkle lightly with nutmeg. This option will double the drying time.
DATE-FIG BALLS
- 1 cup dried dates
- 1/2 cup dried figs
- 1/2 cup prunes
- 1/2 cup raisins
- 1 cup crushed walnuts
- 1/2 cup sunflower seeds
- 3 tbsp. lemon juice
- 1 cup coconut
In a food processor or food grinder, finely grind dates, figs, prunes, and raisins. In a medium bowl, mix ground fruit with nuts and seeds. Stir in lemon juice. Shape into 1/2-1″ balls. Roll in coconut. Dry in the dehydrator for 4 to 6 hours, or until crisp on the outside. Makes about 30 date-fig balls.
PEANUT BUTTER BALLS
- 2 cups of coconut
- 2 cups dried apples, peeled, cored, and chopped
- 2/3 cup peanut butter
- 1 1/2 tbsp. vanilla
In a large bowl, combine all ingredients; mix well. Shape into 1/2-1″ balls. Dry in your dehydrator for 4 to 5 hours, or until firm and crisp on the outside. Makes about 3 dozen.
Other Useful Information
SERVICE CENTER
If you have any questions in regards to the operation of this appliance or need a spare part, please contact our service center at:
Wachsmuth & Krogmann, Inc.
Tel: 1-888-367-7373
Business Hours: Mon-Fri 10:00 am – 5:00 pm EST
Email: [email protected]
TECHNICAL INFORMATION
- Model Number: FD550
- Rating Voltage: 120V, 60Hz
- Nominal Power: 125 watts
MAINTENANCE
CAUTION:
Always be sure that the Food Dehydrator is unplugged and completely cooled before cleaning or attempting to store the item. NEVER IMMERSE the base in water or any other liquid.
It is important to clean your Food Dehydrator thoroughly after each use to prevent sticky build-ups that are difficult to clean later. Proper cleaning of the Food Dehydrator trays can lead to cleaner, better-tasting dehydrated food.
- Remove the trays from the Food Dehydrator.
- Fill the sink with warm water and add 2 or 3 tbsp. Of dish soap.
- Set the trays in the sink and allow them to soak for at least 15 minutes.
- Wash the trays using warm, soapy water and a sponge or clean cloth, and rinse them well in clear warm water. Use the scrubbing part of the sponge to remove any stubborn sticky spots.
STORING
- Allow the Food Dehydrator to cool completely before storing.
- Store the Food Dehydrator in a dry location in the original box if possible.
- Do not place any heavy items on top of the Food Dehydrator during storage, as this may result in possible damage.
- Store the cord in a clean, dry location away from metal objects. Always check the plug before use to ensure metal items have not become attached.
ENVIRONMENTAL PROTECTION
If the Food Dehydrator should no longer work at all, please make sure that it is disposed of in an environmentally friendly way.
For more manuals by Blogs, visit ManualsLibraryy
Kitchen Living FD550 Food Dehydrator- FAQs
What does a food dehydrator do?
A food dehydrator removes moisture from food using low heat and consistent airflow, helping preserve fruits, vegetables, herbs, and meats without cooking them.
How does a dehydrator work?
It uses heating elements to warm the air, and a built-in fan circulates this warm air evenly across trays, drawing out moisture from the food.
What temperature range does the Kitchen Living FD550 operate at?
Most food dehydrators, including the FD550, run between 85°F to 160°F, suitable for drying a wide variety of foods without cooking them.
How long does it take to dehydrate food?
Drying time can range from 5 to 14 hours, depending on the food type, slice thickness, moisture content, and the dehydrator’s capacity.
What are the downsides of using a dehydrator?
The primary drawback is limited space—a single unit may only handle a small quantity of food at once, making large batches time-consuming.
Do dehydrators need proper ventilation?
Yes, air vents are essential to allow hot air and moisture to escape, ensuring even drying and preventing spoilage.
Do food dehydrators use heat to dry food?
Yes, they use low levels of heat combined with airflow to gradually reduce moisture, preserving nutrients while avoiding overcooking.
What are the benefits of using a food dehydrator?
Dehydrating helps reduce food waste, save money, and create healthy, portable snacks. You can also customize flavors by adding spices during drying.

