


KitchenAid Bottom Mount Refrigerator

IMPORTANT SAFETY INSTRUCTIONS
WARNING: To reduce the risk of fire, electric shock, or injury to persons when using your appliance, follow basic precautions, including the following:
- Children should be supervised to ensure that they do not play with the appliance.
- This appliance is not intended for use by persons (including children) with reduced physical, sensory, or mental capabilities, or lack of experience and knowledge, unless they have been given supervision or instruction concerning use of the appliance by a person responsible for their safety.
- Do not use an extension cord.
- If the power supply cord is damaged, it must be replaced by the manufacturer, its service agent, or a similarly qualified person to avoid a hazard.
- Connect to a potable water supply only.
- This appliance is intended to be used in household and similar applications such as: staff kitchen areas in shops, offices, and other working environments; farm houses and by clients in hotels, motels, and other residential-type environments; bed and breakfast-type environments; and catering and similar non-retail applications.
- Do not store explosive substances such as aerosol cans with a flammable propellant in this appliance.
- Use the new hose-sets supplied with the appliance, and the old hose-sets should not be reused.
- Do not use replacement parts that have not been recommended by the manufacturer (e.g., parts made at home using a 3D printer).
- Keep ventilation openings in the appliance enclosure or in the built-in structure, clear of obstruction.
- Do not use mechanical devices or other means to accelerate the defrosting process, other than those recommended by the manufacturer.
- Do not damage the refrigerant circuit.
- Do not use electrical appliances inside the food storage compartments of the appliance, unless they are of the type recommended by the manufacturer.
- An ice maker kit can be added to some models. See the serial tag inside the food compartment of the appliance for ice maker kit model information.
- A qualified service technician must install the water line and ice maker. See installation instructions supplied with ice maker kit for complete details.
- Do not locate multiple portable socket-outlets or portable power supplies at the rear of the appliance.
- This appliance can be used at a maximum altitude of 2000 m (6561.7 ft) above sea level.
- When positioning the appliance, ensure the supply cord is not trapped or damaged.
- Do not locate multiple portable socket-outlets or portable power supplies at the rear of the appliance.
- To avoid a hazard due to the instability of the appliance, it must be fixed in accordance with the instructions provided in the installation instructions.
SAVE THESE INSTRUCTIONS
GETTING STARTED
Models
Stainless Steel Series Bottom Mount Refrigerators
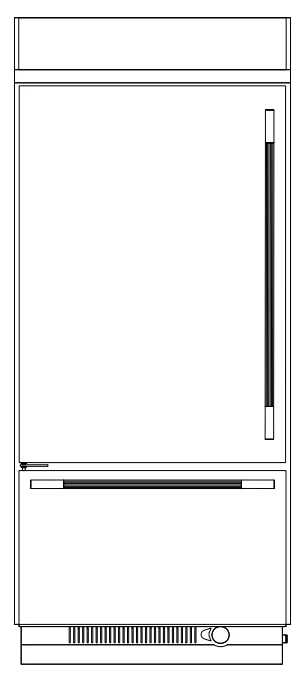
Stainless Series
Features wraparound styling that complements the contoured door handles. This series provides a commercial-looking built-in refrigerator. KBBL336SPS; KBBR336SPS
Stainless Steel Series French Door Bottom Mount Refrigerators

Stainless Series
Features wraparound styling that complements the contoured door handles. This series provides a commercial-looking built-in refrigerator. KBFN536SPS; KBFN536SBE; KBFN536SJP; KBFN542SPS; KBFN542SJP; KBFN542SBE
Overlay Series French Door Bottom Mount Refrigerators

Overlay Series
Features factory-installed overlay-style trim for a “frameless” look. This series requires the installation of custom panels, handles, and standoffs. KBFN536TPA; KBFN542TPA
Unpack the Refrigerator
Refrigerator Delivery
- A minimum door opening of 33″ (838 mm) is required. If the door opening is 36″ (914 mm) or less, then removal of doors, drawer, and hinges is required.
- Cart the refrigerator from the side for all door openings.
When Moving Your Refrigerator:
Your refrigerator is heavy. When moving the refrigerator for cleaning or service, be sure to cover the floor with cardboard or hardboard to avoid floor damage. Always pull the refrigerator straight out when moving it. Do not wiggle or “walk” the refrigerator when trying to move it, as floor damage could occur.
Remove the Packaging
- Remove tape and glue residue from surfaces before turning on the refrigerator. Rub a small amount of liquid dish soap over the adhesive with your fingers. Wipe with warm water and dry.
- Do not use sharp instruments, rubbing alcohol, flammable fluids, or abrasive cleaners to remove tape or glue. These products can damage the surface of your refrigerator. ForFor
more information, see “Refrigerator Safety.” - Dispose of/recycle all packaging materials.
Clean Before Using
After removing all packaging materials, clean the inside of your refrigerator before using it. See the cleaning instructions in “Refrigerator Care.”
Important information to know about glass shelves and covers:
Do not clean glass shelves or covers with warm water when they are cold. Shelves and covers may break if exposed to sudden temperature changes or impact, such as bumping. Tempered glass is designed to shatter into many small, pebble-size pieces. This is normal. Glass shelves and covers are heavy. Use both hands when removing them to avoid dropping.
Power On/Off
To turn the refrigerator power ON or OFF, you must remove the top grille assembly to access the power switch. Turn the refrigerator power OFF when you clean it.
- Open the refrigerator door(s).
- Put your hands under the top grille panel. Hold the bottom edge with your fingers and thumbs.
- Pull the grille panel straight out until the grille stops. Then, lift up on the grille panel to remove.

- Press the Power switch to the ON or OFF position.
NOTE: While turning off the refrigerator for extended periods of time, remove the food and empty the ice bin.


To Replace Top Grille:
- Insert top grille hooks (located on the back of the top grille) onto mounting bolts on the side trim.
- Pull the grille down slightly and push the bottom in to lock it into place.
IMPORTANT: Make sure the power switch is ON after you clean or repair the refrigerator.
Water Supply Requirements
Read all directions before you begin.
IMPORTANT:
- Read “Connect the Water Supply” in the installation instructions. For questions, refer the “Troubleshooting” section or contact a licensed plumber.
- If you turn on the refrigerator before you connect the water line, turn the ice maker OFF. Refer the “Ice Maker and Storage Bin” section.
- All installations must meet local plumbing code requirements.
- Connect to a potable water supply only.
Do not use with water that is microbiologically unsafe or of unknown quality without adequate disinfection before or after the system. Systems certified for cyst reduction may be used on disinfected waters that may contain filterable cysts. - When using the ice maker or water dispenser, a banging noise might occur due to rapid changes in water pressure within your home’s pipes. To fix this, a water hammer arrestor should be installed where the refrigerator water line connects to the household water supply. This device absorbs the pressure shock, stopping the banging. For proper installation of the water hammer arrestor, please contact a licensed plumber.
Water Pressure
A cold water supply with water pressure between 30 psi and 120 psi (207 kPa and 827 kPa) is required to operate the water dispenser and ice maker. If you have questions about your water
pressure, call a licensed, qualified plumber.
NOTE: If the water pressure is less than what is required, the flow of water from the water dispenser could decrease or ice cubes could be hollow or irregularly shaped. If you have questions about your water pressure, call a licensed, qualified plumber.
Reverse Osmosis Water Supply
IMPORTANT: The pressure of the water supply coming out of a reverse osmosis system going to the water inlet valve of the refrigerator needs to be between 30 psi and 120 psi (207 kPa and 827 kPa).
If a reverse osmosis water filtration system is connected to your cold water supply, the water pressure to the reverse osmosis system needs to be a minimum of 40 psi to 60 psi (276 kPa to
414 kPa). If the water pressure to the reverse osmosis system is less than 40 psi to 60 psi (276 kPa to 414 kPa):
- Check to see whether the sediment filter in the reverse osmosis system is blocked. Replace the filter if necessary.
- Allow the storage tank on the reverse osmosis system to refill after heavy usage.
- If your refrigerator has a water filter, it may further reduce the water pressure when used in conjunction with a reverse osmosis system. Remove the water filter cartridge.
If you have questions about your water pressure, call a licensed, qualified plumber.
Water System Preparation
Please read before using the water system. Follow the instructions specific to your refrigerator model.
- Connect to a potable water supply only.
- Make sure the water valve is ON before you call for service.
- Do not use with water that is microbiologically unsafe or of unknown quality without adequate disinfection before or after the system. Systems certified for cyst reduction may be used on disinfected waters that may contain filterable cysts.
NOTE:
- After installing/replacing the water filter, allow 24 hours for the first ice production.
- Discard the first full bin of ice.
- The ice container will then fill in around 3 days of time, depending on the ice and freezer usage.
- Make sure the base grille filter is properly installed, and the filter cap is in the horizontal position.
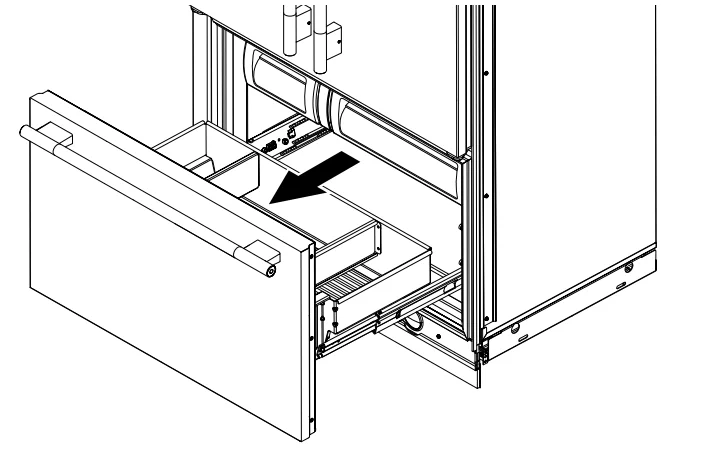
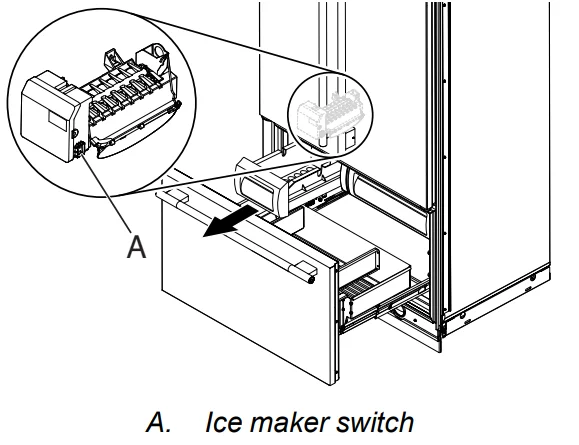
To turn ON or OFF the ice maker:
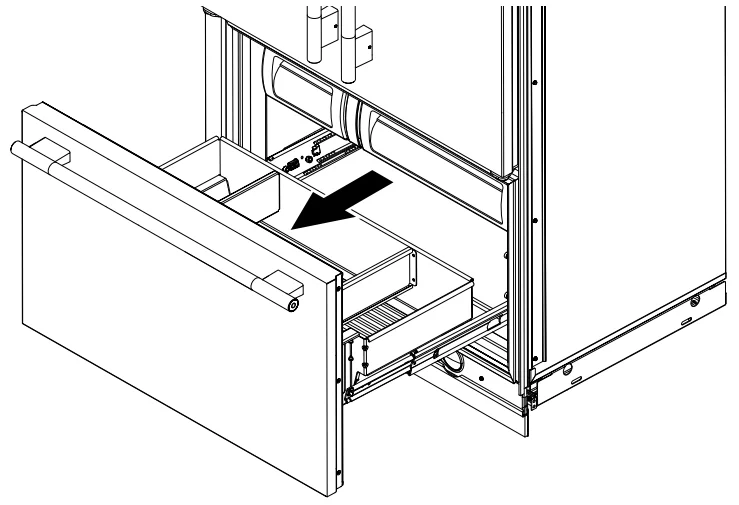
- Open the freezer drawer.

- Slide the ice bin from the freezer drawer.

- Use the switch to turn ON or OFF the ice maker.

- Slide back the ice bin and close the freezer drawer.



Odor Absorber (FreshFlow Air Filter)
An air filter is 15 times more powerful than baking soda at reducing common food odors inside the refrigerator. Your refrigerator’s accessory packet includes a FreshFlow Air Filter, which must be installed before use. Please refer to the installation instructions for more information.
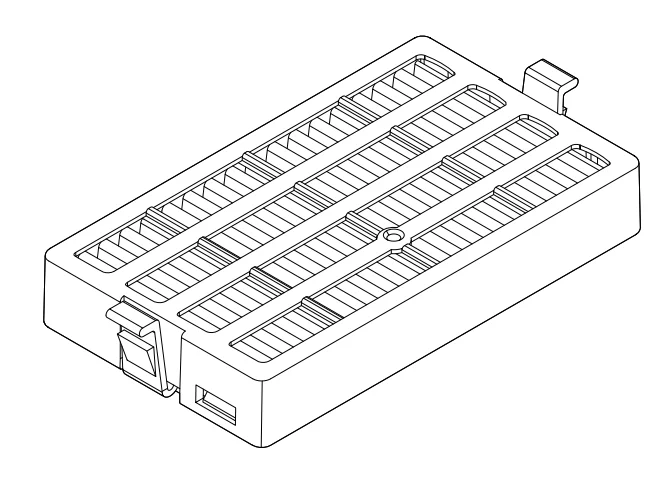
The odor absorber reduces the buildup of odors. This helps to maintain a cleaner environment inside the refrigerator.
Installing the Odor Absorber
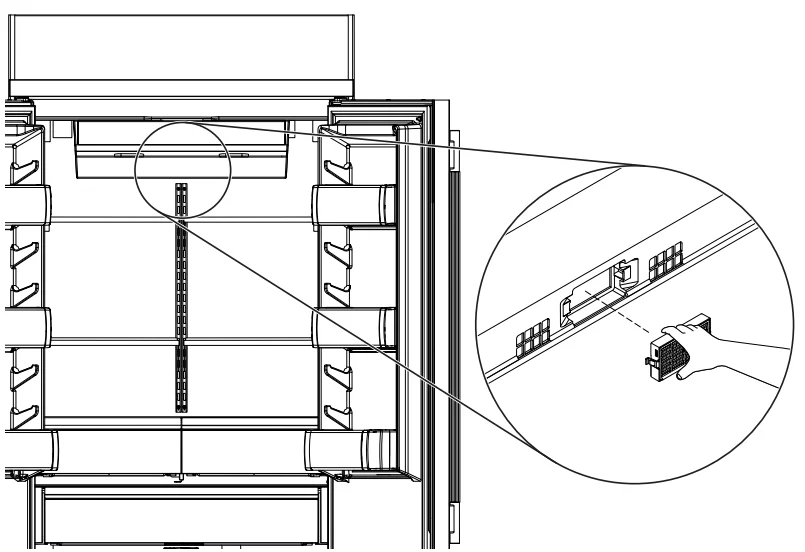
The absorber should be installed behind the vented door, which is located (depending on your model) along either the rear or left interior wall near the top of the refrigerator compartment.
- Remove the odor absorber from its packaging.
- Snap the absorber into place.
Replacing the Odor Absorber
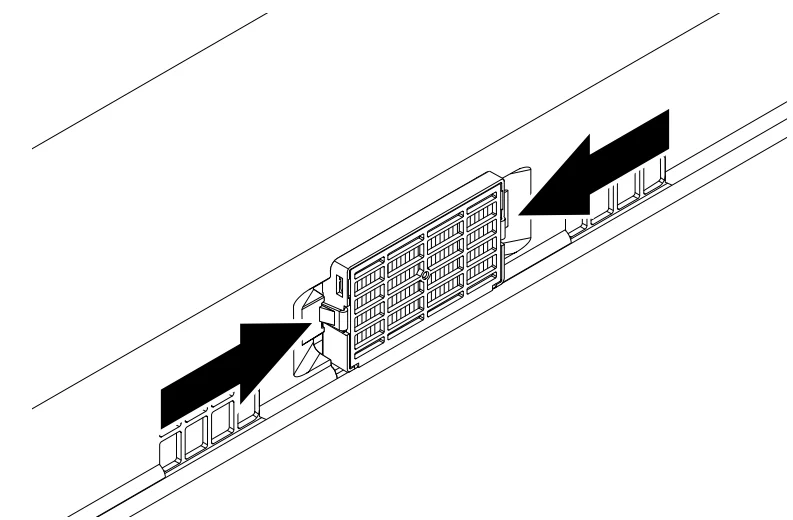
The disposable odor absorber should be replaced every 6 months when the status indicator has completely changed from white to red. To replace the odor absorber, order replacement part W10311524 online.
- Remove the old odor absorber by squeezing in on the side tabs.
- Install the new air filter by snapping it into place.
Install Produce Preserver
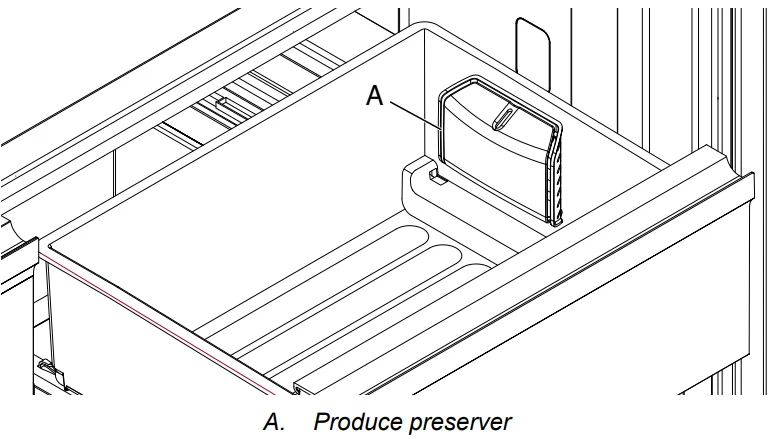
The produce preserver absorbs ethylene to slow the ripening process of many produce items. As a result, certain produce items will stay fresh longer.
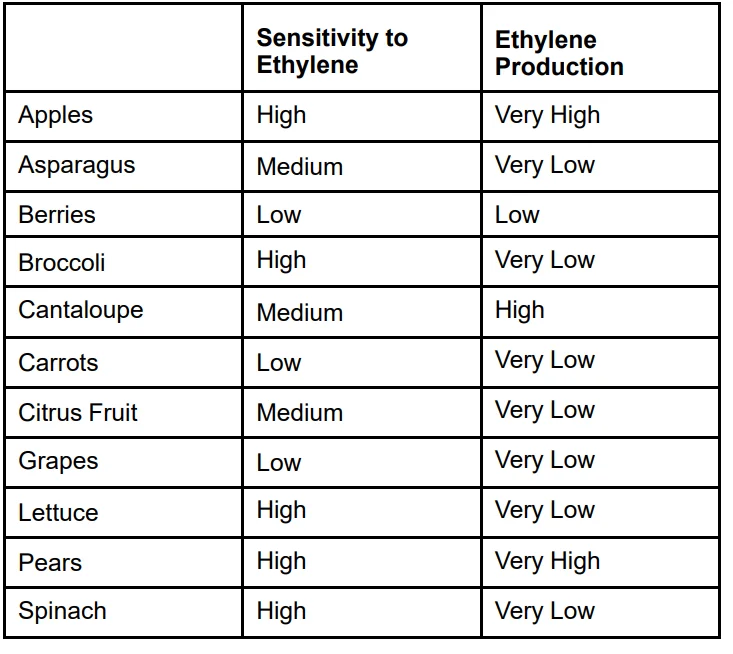
Ethylene production and sensitivity vary, depending on the type of fruit or vegetable. To preserve freshness, it is best to separate produce with sensitivity to ethylene from fruits that produce moderate-to-high amounts of ethylene.
Installing the Produce Preserver
CAUTION: IRRITANT
MAY IRRITATE EYES AND SKIN. DANGEROUS FUMES FORM WHEN MIXED WITH OTHER PRODUCTS. Do not mix with cleaning products containing ammonia, bleach, or acids. Do not get in the eyes, on the skin or on the clothing. Do not breathe dust. Keep out of reach of children.
FIRST AID TREATMENT: Contains potassium permanganate. If swallowed, call a Poison Control Center or doctor immediately. Do not induce vomiting. If in the eyes, rinse with water for 15 minutes. If on skin, rinse with water.
- Wash the interior of a drawer with a solution of mild dish soap and warm water and dry thoroughly.
- Find the package containing the Produce Preserver inside the refrigerator and install the Produce Preserver into the drawer according to the instructions provided in the package.
Replacing the Produce Preserver
The disposable packets should be replaced every 6 months or when the status indicator changes completely from white to red. To order replacements, contact us. See online ordering
information in the “Quick Start Guide.”
- Remove the used packets from the produce preserver housing.
- Remove the used status indicator.
- Install the replacement packets and status indicator using the instructions included in the package.
REFRIGERATOR USE
Using the Controls
User interface (UI) Controls are located on the ceiling of the refrigerator compartment.

For your convenience, your refrigerator and freezer controls are preset at the factory. When you first install your refrigerator, make sure that the controls are still set to the recommended set points. The factory-recommended set points are 37°F (3°C) for the refrigerator and 0°F (-18°C) for the freezer.
IMPORTANT:
- Wait 24 hours before you put food into the refrigerator. If you add food before the refrigerator has cooled completely, your food may spoil.
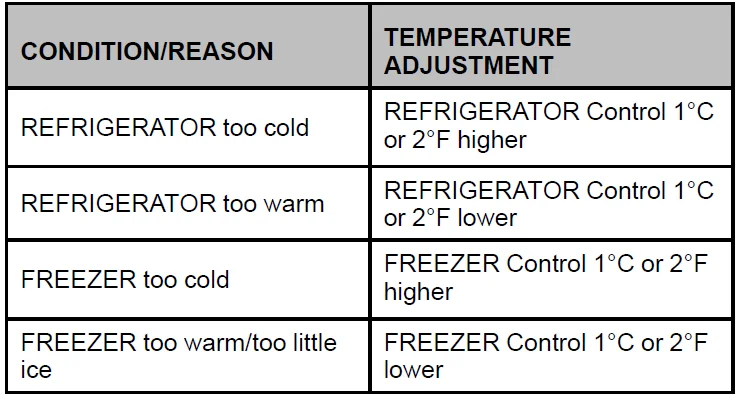
NOTE: Adjusting the set points to a colder-than-recommended setting will not cool compartments any faster. - If the temperature is too warm or too cold in the refrigerator or freezer, first check the air vents to be sure they are not blocked before adjusting the controls.
- The recommended settings should be correct for normal household use. The controls are set correctly when milk or juice is as cold as you like and when ice cream is firm.
NOTE: Areas such as a garage, basement or porch may have higher humidity or extreme temperatures. You may need to adjust the temperature away from the recommended settings
to accommodate for these conditions. - Wait at least 24 hours between adjustments. Recheck the temperatures before other adjustments are made.
Cooling On/Off
Your refrigerator and freezer will not cool when the cooling is turned off.
- Press and hold the Cooling Off button for 3 seconds. The display will show a countdown timer and enter into cooling on or off mode.
Temperature
Viewing the Temperature in Degrees Celsius
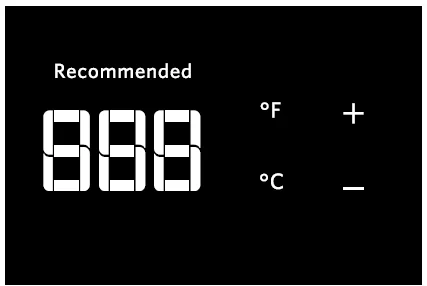
- Press the C touch pad to display degrees Celsius, press the F touch pad to display degrees Fahrenheit.
NOTE: If the freezer temperature is below zero, the negative sign next to the freezer display will light up. This is normal.
Adjusting Temperature
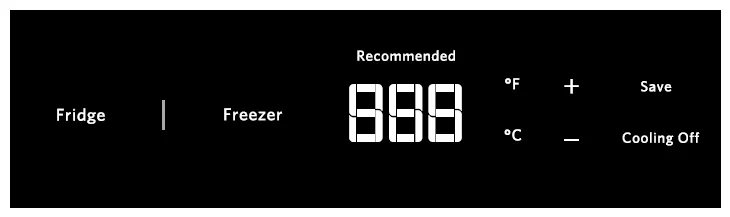
The following applies to both the fridge temperature button and freezer temperature button.
Pressing the Freezer or Fridge picture button once will display the compartment temperature. Press + or – to adjust temperature. Press Save to set the temperature. The Refrigerator temperature range will be from 33°F to 43°F (1°C to 6°C), with the factory default temperature being 37°F (3°C). The Freezer temperature range will be from -8°F to 5°F (-22°C to -15°C), with the factory default temperature being 0°F (-18°C).
Water Filter Indicator and Reset
The water filter indicator, located on the control panel, will help you know when to change the water filter. A replacement water filter should be ordered when “Order” is displayed. It is recommended that you replace the filter when “Replace” is displayed or when water flow to your water dispenser and/or ice maker decreases noticeably. See “Changing the Water Filter” later in this section. After changing the water filter, press and hold FILTER RESET for 3 seconds until the “Order Filter” or “Replace Filter” indicator light disappears.
Filter Reset
After changing the filter, press and hold the Filter Reset button for 3 seconds. The display will count down 3,2,1, the filter reset will flash, and return to the original display. See the “Water Filtration System” section for steps to remove and replace the filter.
Max Cool/Max Ice
Max Cool
The Max Cool feature assists with full grocery loads, temporarily warm room temperatures, or during heavy door opening use.
- Press OPTIONS, and then press Max Cool to turn on the Max Cool feature. Max Cool will remain activated for 24 hours unless manually turned off.
NOTE: The temperature display for the refrigerator compartment will remain at the user’s set point, but the actual temperature of the refrigerator compartment will drop to 34°F (1°C), while the Max Cool feature is enabled. After 24 hours, the refrigerator returns to the previous temperature set points.
Max Ice
The Max Ice feature speeds up the ice production rate to assist with periods of heavy ice usage.
- Press OPTIONS, and then press Max Ice to turn on the Max Ice feature. Max Ice will remain activated for 24 hours unless manually turned off.
NOTE: The temperature display for the refrigerator and freezer compartments will remain at the user’s set points, but the actual temperature of the freezer compartment will drop to -5°F (-21°C), while the Max Ice feature is enabled. After 24 hours, the freezer will return to the previous temperature set point. - Changing the refrigerator temperature or activating Vacation Mode will deactivate Max Cool/Max Ice.
Sabbath Mode
- Press and hold the Sabbath button for 3 seconds to activate or deactivate sabbath mode.
NOTE: The refrigerator will remain in Sabbath Mode after a power outage.
Alarm Functions
Door Open
An alarm will sound when a door has been open for longer than 5 minutes. Closing the door or drawer, or pressing any Home Screen touch pad (Fridge, Freezer or Options) will reset the Door Open feature and turn off the audio alarm.
NOTE: If the door(s) or drawer are left open for 10 minutes, the interior lights will go out. Closing the open door(s) or drawer will reset the lights.
Power Outage
When a power outage occurs, a Power Outage indicator light will be displayed. Press any Home Screen touch pad (Fridge, Freezer or Options) to turn off the indicator light. The power outage indicator light will not display when either Cooling Off or Sabbath mode is active, but will appear after exiting Sabbath mode if a power outage occurred.
Over Temperature
IMPORTANT: If the Over Temperature Alarm activates, your food may spoil. See “Power Interruptions.” Minimize door openings until temperatures return to normal. The Over Temperature feature is designed to let you know when either the refrigerator temperature rises above 48°F (9°C) or the freezer temperature rises above 15°F (-9°C) for longer than 1½ hours. The audio alarm will shut off automatically when the temperature returns to normal, but the indicator light will continue to flash to let you know that an Over Temperature condition occurred until an Over Temperature reset has been performed. Press any Home Screen touch pad (Fridge, Freezer or Options) to turn off the indicator light. If the over-temperature condition is still present when an Over Temperature reset is performed, the indicator light will continue to reactivate every 1½ hours until refrigerator and freezer temperatures are below 48°F (9°C) and 15°F (-9°C), respectively.
Miscellaneous
Showroom
ModeDemo mode for the sales floor. Press and hold the Fridge and Freezer buttons for 5 seconds, the showroom indicator will blink twice to remain on/off.
Ice Maker and Storage Bin
IMPORTANT: Flush the water system before turning on the ice maker. See “Water and Ice Dispensers.” Allow 24 hours to produce the first batch of ice. Discard the first three batches of ice produced. Allow 3 days to fill the ice container.
Turn the Ice Maker On/Off
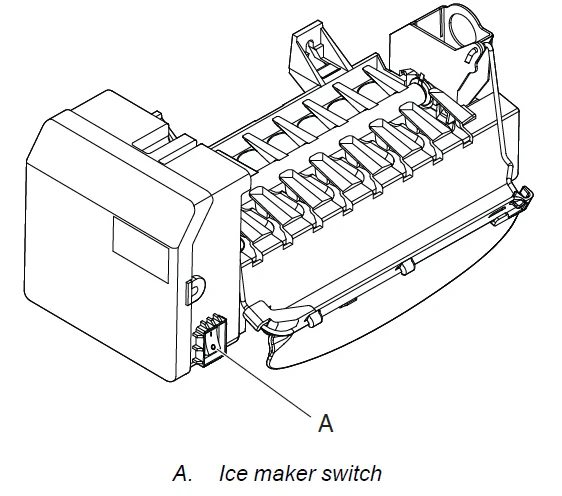
NOTE: The ice maker has an automatic shut-off feature. Do not force the wire shut-off arm up or down.
- Use the switch to turn ON or OFF the ice maker.
Clean the Ice Storage Bin
NOTE: It is normal for ice to stick together in the ice bin. Ice may be dispensed or used more frequently, which will break up the ice. It is recommended that the ice container be emptied and cleaned as needed.
To clean the ice storage bin:
- Slide the ice bin out of the freezer, and then lift up and out.

- Empty the ice bin. Use warm water to melt the ice if necessary.
NOTE: Do not use anything sharp to break up the ice in the bin. This can cause damage to the ice bin and the ice maker mechanism. - Wash the ice bin with warm water and a mild detergent, rinse well and dry thoroughly. Do not use harsh or abrasive cleaners or solvents.
Remember
- Allow 24 hours to produce the first batch of ice. Allow 3 days to fill the ice container.
- Discard the first three batches of ice produced to avoid impurities that may be flushed out of the system.
- The quality of your ice will be only as good as the quality of the water supplied to your ice maker.
- Avoid connecting the ice maker to a softened water supply.
- Water softener chemicals (such as salt) can damage parts of the ice maker and lead to poor-quality ice. If a softened water supply cannot be avoided, make sure the water softener is operating properly and is well-maintained.
- It is normal for the ice cubes to be attached to the corners. They will break apart easily.
- Do not store anything on top of the ice maker or in the ice storage bin/bucket.
For more manuals by KitchenAid, visit ManualsLibraryy
KitchenAid Bottom Mount Refrigerator-FAQs
Are bottom mount refrigerators a good choice?
Yes, bottom mount refrigerators are popular because they place fresh food at eye level, making daily access easier. They also offer organized freezer drawers and a modern design that suits many kitchens.
What are the advantages of a KitchenAid bottom mount refrigerator?
KitchenAid bottom mount refrigerators provide convenient storage, advanced cooling systems, stylish finishes, and flexible shelving options. They are designed to keep fresh food easily accessible while offering spacious freezer storage below.
Why is water leaking from my refrigerator?
Water leaks are often caused by a clogged defrost drain or loose water line connections. Cleaning the drain and checking tubing connections can usually solve the problem.
How often should I clean the condenser coils?
It is recommended to clean the condenser coils every six months. Removing dust and debris helps the refrigerator run efficiently and prevents overheating.
Why is my KitchenAid refrigerator making noise?
Some noise is normal during operation, including humming or clicking sounds. Loud or unusual noises may result from the compressor, fan motor, or items vibrating inside the refrigerator.
Why is my KitchenAid refrigerator not cooling properly?
Improper cooling may happen due to blocked vents, dirty coils, incorrect temperature settings, or a malfunctioning evaporator fan. Ensure the refrigerator has enough airflow and clean the coils regularly.
What is the most common problem with KitchenAid refrigerators?
One common issue is cooling problems caused by dirty condenser coils, blocked airflow, or faulty fans. Cleaning the coils and checking air vents often helps improve performance.
How long does a KitchenAid refrigerator typically last?
With proper maintenance, a KitchenAid refrigerator can last around 10 to 15 years or even longer. Regular cleaning and replacing filters on time can help extend its lifespan.
Why are bottom mount refrigerators more expensive?
Bottom mount refrigerators usually include premium features such as pull-out freezer drawers, advanced temperature controls, and modern designs. These added features can increase the overall cost.