![]()
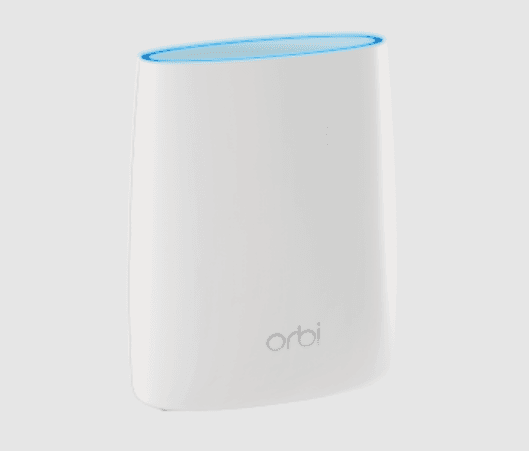
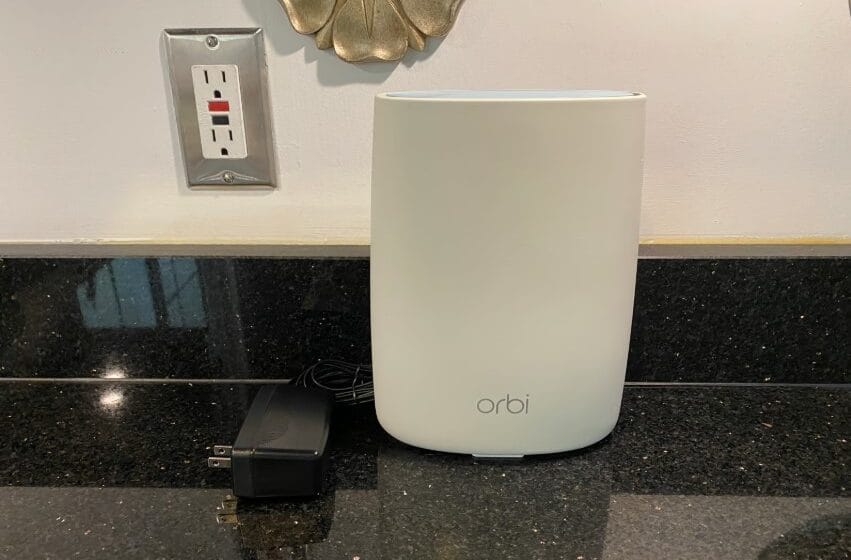
NETGEAR Orbi RBR50 WiFi Router
Overview
The Orbi™ WiFi System creates dedicated high-speed WiFi connections to your Internet service. The Orbi router connects to your modem or gateway. The Orbi satellite extends the WiFi signal throughout your home. This manual describes how to manage your Orbi WiFi System from your Orbi router
web interface. You can manage any add-on Orbi satellite from the Orbi router web
interface.
If you own one of the following add-on Orbi satellites, you can find more information about your satellite from its user manual, which is available at https://www.netgear.com/support/:
- Orbi Outdoor Universal Satellite (model RBS50Y)
- Orbi Voice (model RBS40V). This chapter contains the following sections:
- Orbi Router and Satellite Hardware Overviews
- LED Behavior
- Connect Your Router
- Place Your Satellite
- Sync Your Orbi Satellite
- Set Up an Ethernet Backhaul Connection
- Download the NETGEAR Orbi App
For more information about the topics covered in this manual, visit the support website at https://www.netgear.com/support/
Note: This manual refers to all Orbi router models as the router and refers to all Orbi satellite models (including the Orbi wall plug satellite) as the satellite.
Orbi Router and Satellite Hardware Overviews
Different types of Orbi routers and satellites are available. To determine which Orbi model you own, look on the router or satellite label for the model number. For more information about what the label might look like, see Labels on page 30. The following sections display the hardware features available for different Orbi routers and satellites.
Orbi Router Model RBR50 Hardware Overview
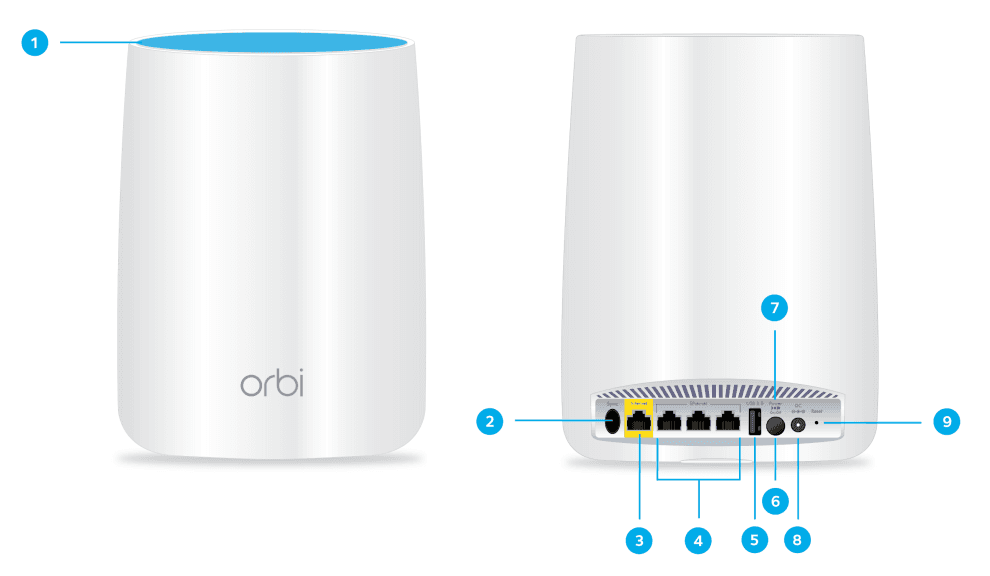
- Ring LED (not shown in image)
- Sync button (also used for WPS connection)
- Internet port
- Ethernet ports
- USB port
- Power On/Off button
- Power LED
- DC Power connector
- Reset button
Orbi Satellite Model RBS50 Hardware Overview
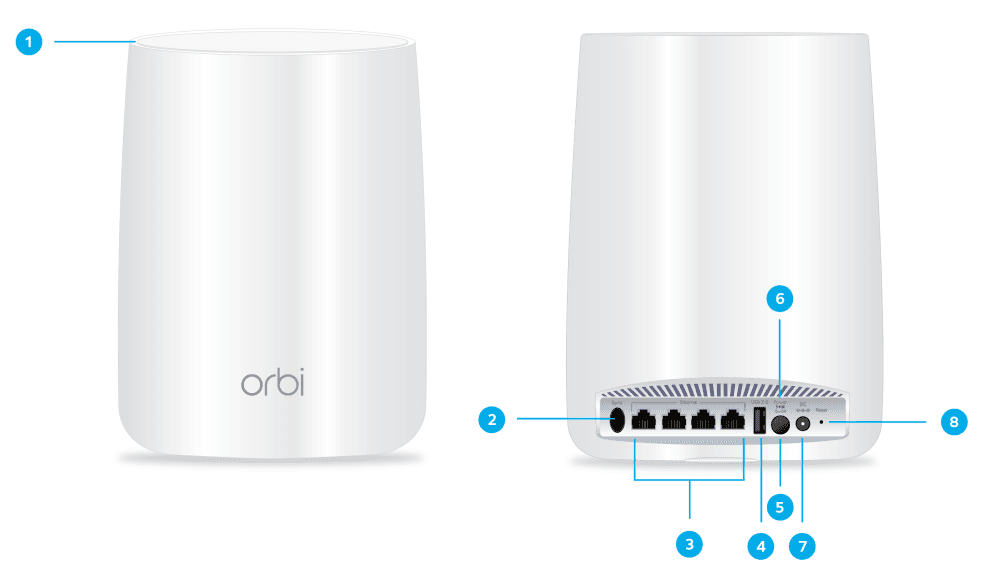
- Ring LED (not shown in image)
- Sync button (also used for WPS connection)
- Ethernet ports
- USB port
- Power On/Off button
- Power LED
- DC Power connector
- Reset button
Orbi Router Model RBR40 Hardware Overview
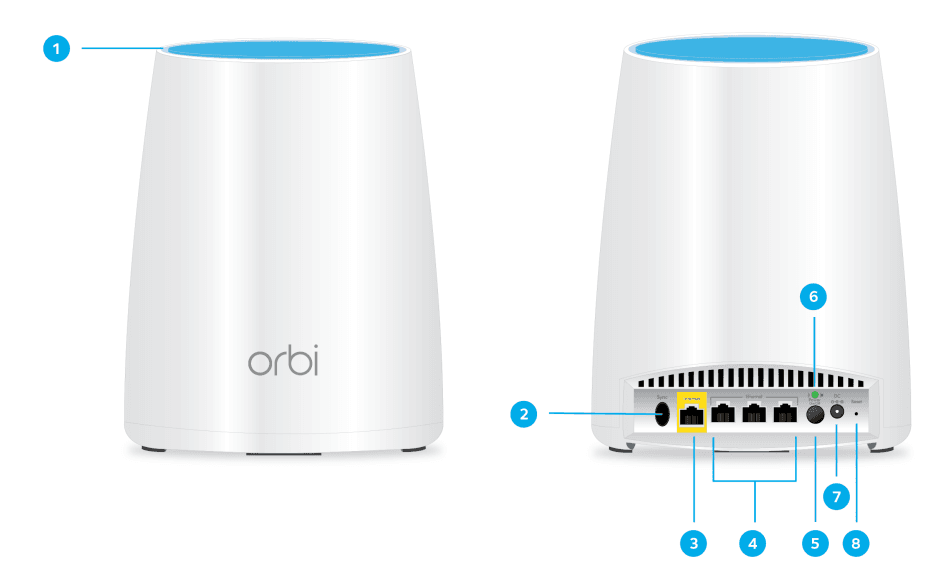
- Ring LED (not shown in image)
- Sync button (also used for WPS connection)
- Internet port
- Ethernet ports
- Power On/Off button
- Power LED
- DC Power connector
- Reset button
Orbi Satellite Model RBS40 Hardware Overview
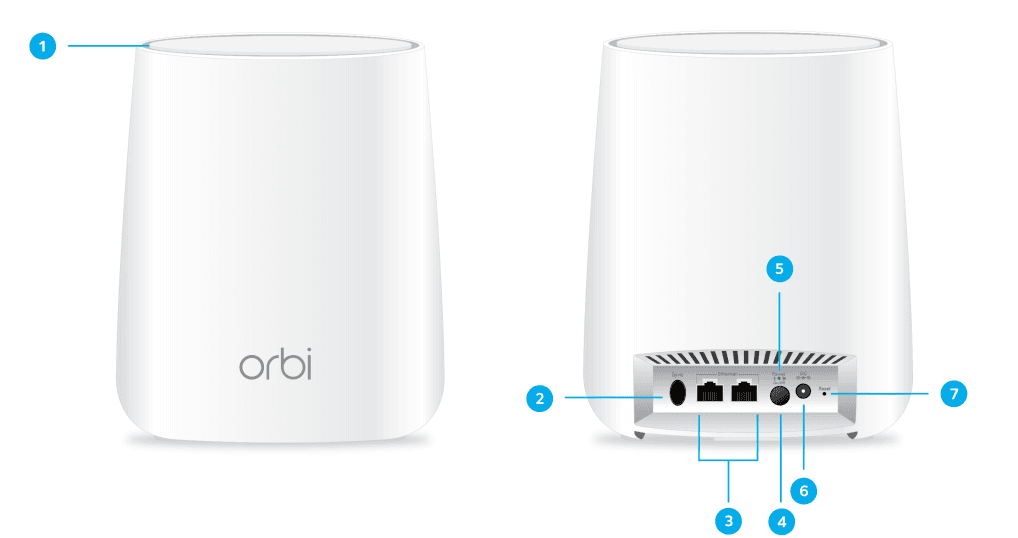
- Ring LED (not shown in image)
- Sync button (also used for WPS connection)
- Ethernet ports
- Power On/Off button
- Power LED
- DC Power connector
- Reset button
Orbi Router Model RBR20 Hardware Overview
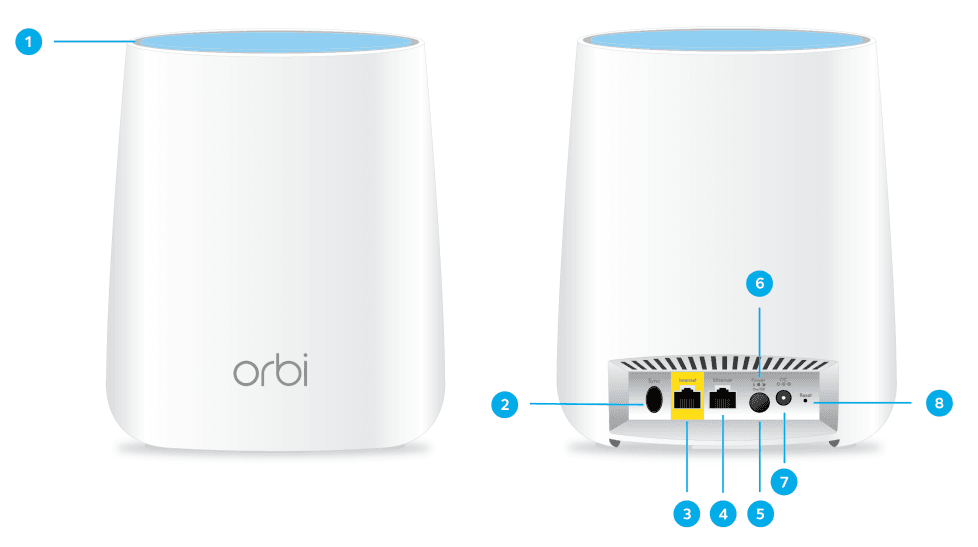
- Ring LED (not shown in image)
- Sync button (also used for WPS connection)
- Internet port
- Ethernet port
- Power On/Off button
- Power LED
- DC Power connector
- Reset button
Orbi Satellite Model RBS20 Hardware Overview
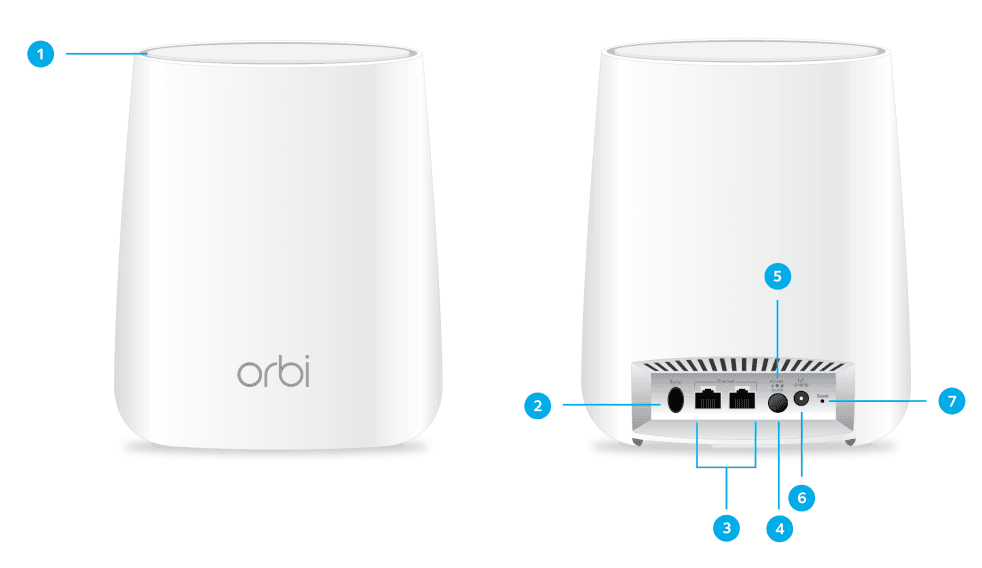
- Ring LED (not shown in image)
- Sync button (also used for WPS connection)
- Ethernet ports
- Power On/Off button
- Power LED
- DC Power connector
- Reset button
Orbi Wall Plug Satellite Model RBW30 Hardware Overview
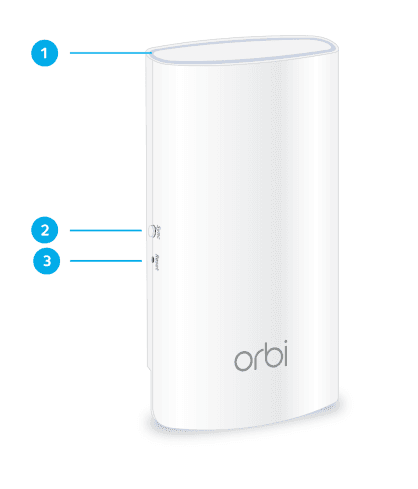
- Ring LED (not shown in image)
- Sync button (also used for WPS connection)
- Reset button
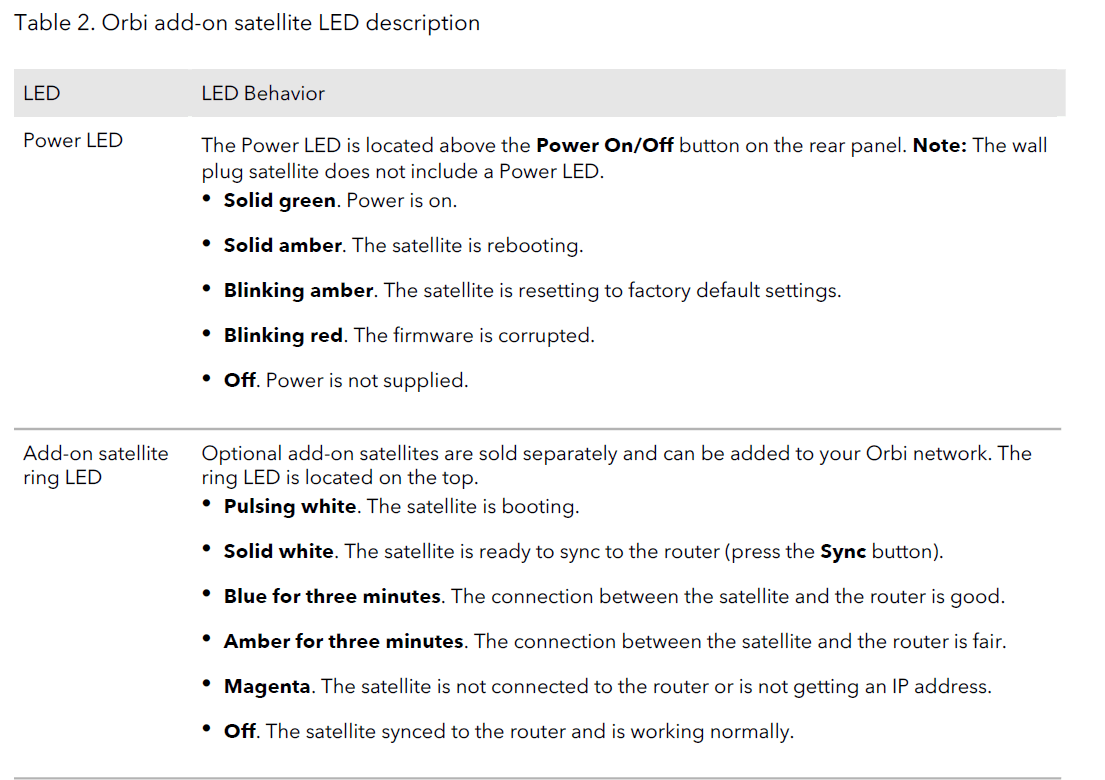
LED Behavior
When you sync a satellite to the router, the LED behavior for a satellite that comes in a WiFi system is different from the LED behavior for add-on satellites.
Orbi WiFi System LEDs
The following table describes the LED behavior for an Orbi router and Orbi satellites that are purchased together and come in the same package.

Connect Your Router
To cable your router:
- Unplug your modem’s power, leaving the modem connected to the wall jack for your Internet service. If your modem uses a battery backup, remove the battery.
- Plug in and turn on your modem. If your modem uses a battery backup, put the battery back in.
- Connect your modem to the Internet port of your router with the yellow Ethernet cable that came with your router.
 The router shown in this is the Orbi router (model RBR50). The same setup applies to all Orbi routers.
 - Connect the power adapter to your router and plug the power adapter into an outlet.
- If the Power LED does not light, press the Power On/Off button on the rear panel of the router.
Place Your Satellite
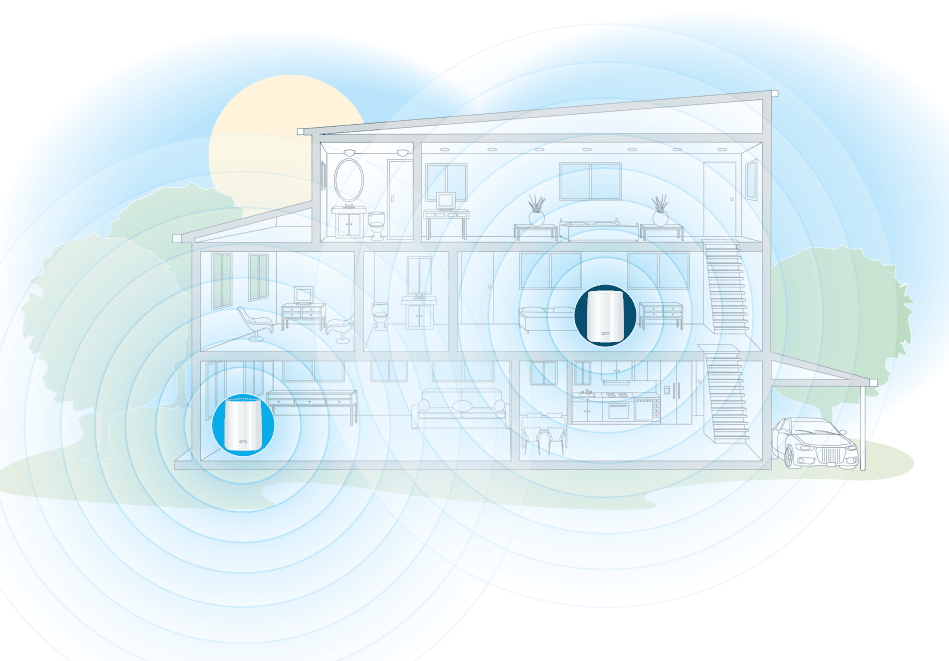
If your satellite comes with your Orbi WiFi System, the satellite attempts to sync with your router. If you bought an add-on satellite, you must manually sync your satellite. For more information, see Sync Your Orbi Satellite on page 22. Note that your satellites must be within range of your router’s WiFi signal in order for it to sync with the router. Use each satellite’s ring LED to help you determine where to
place your satellite.
Examples of Placement for One Satellite
The following images are examples of where to place your router and satellite. The router shown in the following images is the Orbi router model RBR50 and the satellite shown in the images is the Orbi satellite model RBS50.

Examples of Placement for Multiple Satellites
If you own more than one Orbi satellite, we recommend that you place your router in the middle of your home with the satellites placed on opposite sides of your home. The router shown in the following images is the Orbi router model RBR50 and the satellites shown in the images are the Orbi satellites model RBS50.
If you own multiple Orbi wall plug satellites model RBW30, you might need to place the satellites closer to the router. Use the satellite ring LED to determine the best placement for your satellites.
Sync an Add-On Satellite
If you already set up an Orbi router and satellite are adding an optional add-on satellite (sold separately), follow these steps.
To sync your add-on satellite:
- Place your satellite. For more information, see Examples of Placement for Multiple Satellites on page 20.
- Connect the satellite to a power source.
- If the Power LED on the back of the satellite does not light, press the Power On/Off button.
- Wait about two minutes for the satellite ring LED to light solid white.
- Press the Sync button on the back of the satellite and within two minutes, press the Sync button on the back of your Orbi router. The satellite ring LED pulses white, then lights one of the following colors for about three minutes, and then turns off:
- Blue. The Orbi router and satellite successfully synced, and the connection between the router and satellite is good.
- Amber. The Orbi router and satellite successfully synced, and the connection between the router and satellite is fair. Consider moving the Orbi satellite closer to the Orbi router.
- Magenta. The Orbi router and satellite failed to sync. Move the satellite closer
to the router and try again.
Log In to Your Router and Add Satellites to Your Network
You can use the router web interface to add a satellite to your Orbi network. To add a satellite to your Orbi network using the router web interface:
- Launch a web browser from a computer or mobile device that is connected to your Orbi network.
- Enter orbilogin.com. A login window opens.
- Enter the router admin username and password. The user name is admin. The default password is password. The username and password are case-sensitive.The BASIC Home page displays.
- Select Add Orbi Satellite. The Place Your Satellite page displays.
- Follow the instructions about where to place your satellite in your house.
- Connect the satellite to a power source.
- If the Power LED on the back of the satellite does not light, press the Power On/Off button.
- Click the NEXT button.
- Wait about two minutes for the satellite’s ring LED to light solid white.
- Press the Sync button on the satellite. The satellite’s ring LED pulses white.
- Click the SYNC button in the router web interface. The router attempts to sync with the satellite.
The satellite’s ring LED lights one of the following colors for about three minutes and then turns off:- Blue. The Orbi router and satellite successfully synced, and the connection between the router and satellite is good.
- Amber. The Orbi router and satellite successfully synced, and the connection between the router and satellite is fair. Consider moving the Orbi satellite closer to the Orbi router.
- Magenta. The Orbi router and satellite failed to sync. Move the satellite closer to the router and try again.
Connect to the Network and Access the Router
Connect to the Network
You can connect to the Orbi network through a wired or WiFi connection. If you set up your computer to use a static IP address, change the settings so that it uses Dynamic Host Configuration Protocol (DHCP).
Wired Connection
You can connect your computer to the router using an Ethernet cable and join the router’s local area network (LAN). To connect your computer to the router with an Ethernet cable:
- Make sure that the router is receiving power (its Power LED is lit).
- Connect an Ethernet cable to an Ethernet port on your computer.
- Connect the other end of the Ethernet cable to one of the router’s Ethernet ports. Your computer connects to the local area network (LAN). A message might display on your computer screen to notify you that an Ethernet cable is connected.
WiFi Connection
To find and select the WiFi network:
- Make sure that the router or satellite is receiving power (its Power LED is lit).
- On your WiFi-enabled computer or mobile device, find and select the WiFi network. The WiFi network name is on the router label. The WiFi network name is the same for the router and the satellite in the Orbi WiFi System.
Note: If you bought the router and the satellite separately, their default WiFi network names are different. - Join the WiFi network and enter the WiFi password. The password is on the router label. Your WiFi-enabled computer or mobile device connects to the WiFi network.
WiFi Connection Using WPS
You can connect to the router’s WiFi network with Wi-Fi Protected Setup (WPS) or you can find and select the WiFi network.
To use WPS to connect to the WiFi network:
- Make sure that the router is receiving power (its Power LED is lit).
- Check the WPS instructions for your computer or WiFi device.
- Press the Sync button on the router.
- Within two minutes, on your WiFi-enabled computer or mobile device, press its WPS button or follow its instructions for WPS connections. Your computer or mobile device connects to the WiFi network.
Labels
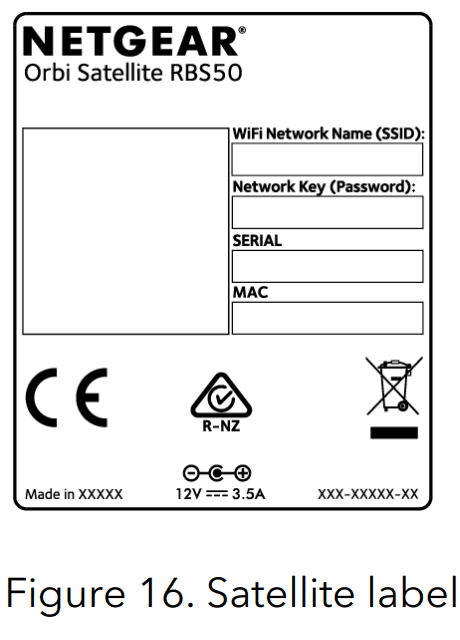
The router label shows the login information, the WiFi network name and password, the router’s MAC address, and the router’s serial number. The following is an example of what the router label might look like: The satellite label shows the WiFi network name and password, the satellite’s MAC address, and the satellite’s serial number. The following is an example of what the satellite label might look like:
Types of Logins
Separate types of logins serve different purposes. It is important that you understand the difference so that you know which login to use when.
Types of logins:
- Internet service login. The login that your Internet service provider (ISP) gave you logs you into your Internet service. Your service provider gave you this login information in a letter or some other way. If you cannot find this login information, contact your service provider.
- WiFi network key or password. Your router and satellite are preset with the same WiFi network name (SSID) and password for WiFi access. This information is on the router label and the satellite label.
- Router login. This logs you into the router interface from a web browser as admin.
Change the Language
By default, the language is set as Auto. To change the language:
- Launch a web browser from a computer or mobile device that is connected to your Orbi network.
- Enter orbilogin.com. A login window opens.
- Enter the router admin user name and password. The user name is admin. The password is the one that you specified the first time that you logged in. The user name and password are case-sensitive.
The BASIC Home page displays. - In the upper right corner, select a language from the menu.
- When prompted, click the OK button to confirm this change. The page refreshes with the language that you selected.
Access the Orbi Router With NETGEAR genie App
The Genie app is an easy dashboard for managing, monitoring, and repairing your home network. The genie app can help you with the following:
- Automatically repair common WiFi network problems.
- Easily manage router features like Live Parental Controls, Internet traffic meter, speed test, and more.
To use the Genie app to access the router:
- Visit the NETGEAR genie web page at NETGEAR.com/genie.
- Follow the onscreen instructions to install the app on your smartphone, tablet, or computer. The genie app dashboard page displays.https://manualslibraryy.com/frigidaire-freestanding-gas-range-installation-instructions/
- Launch the genie app.
Specify Your Internet Settings
Use the Internet Setup Wizard
You can use the Setup Wizard to detect your Internet settings and automatically set up your router. To use the Setup Wizard:
- Launch a web browser from a computer or mobile device that is connected to your Orbi network.
- Enter orbilogin.com. A login window opens.
- Enter the admin user name and password. The user name is admin. The password is the one that you specified the first time that you logged in. The user name and password are case-sensitive. The BASIC Home page displays.
- Select ADVANCED > Setup Wizard. The Setup Wizard page displays.
- Select the Yes radio button. If you select No, you are taken to the Internet Setup page (see Manually Set Up the Internet Connection on page 36).
- Click the Next button. The Setup Wizard searches your Internet connection for servers and protocols to determine your ISP configuration and checks your operation mode.
Manually Set Up the Internet Connection
You can view or change the router’s Internet connection settings. Specify an Internet Connection Without a Login. To specify the Internet connection settings:
- Launch a web browser from a computer or mobile device that is connected to your Orbi network.
- Enter orbilogin.com. A login window opens.
- Enter the admin user name and password. The user name is admin. The password is the one that you specified the first time that you logged in. The user name and password are case-sensitive. The BASIC Home page displays.
- Select Internet. The Internet Setup page.
- Leave the Does your Internet connection require a login No radio button selected.
- If your Internet connection requires an account name or host name, type it in the Account Name (If Required) field.
- If your Internet connection requires a domain name, type it in the Domain Name (If Required) field. For the other sections in this page, the default settings usually work, but you can
change them. - Select an Internet IP Address radio button:
- Get Dynamically from ISP. Your ISP uses DHCP to assign your IP address. Your ISP automatically assigns these addresses.
- Use Static IP Address. Enter the IP address, IP subnet mask, and the gateway IP address that your ISP assigned. The gateway is the ISP router to which your router connects.
- Select a Domain Name Server (DNS) Address radio button:
- Get Automatically from ISP. Your ISP uses DHCP to assign your DNS servers. Your ISP automatically assigns this address.
- Use These DNS Servers. If you know that your ISP requires specific servers, select this option. Enter the IP address of your ISP’s primary DNS server. If a secondary DNS server address is available, enter it also.
- Select a Router MAC Address radio button:
- Use Default Address. Use the default MAC address.
- Use Computer MAC Address. The router captures and uses the MAC address of the computer that you are now using. You must use the one computer that the ISP allows.
- Use This MAC Address. Enter the MAC address that you want to use.
- Click the Apply button.
- Click the Test button to test your Internet connection. If the NETGEAR website does not display within one minute, see Troubleshooting on page 139.
Requirements for Entering IPv6 Addresses
IPv6 addresses are denoted by eight groups of hexadecimal quartets that are separated by colons. You can reduce any four-digit group of zeros within an IPv6 address to a single zero or omit it. The following errors invalidate an IPv6 address:
- More than eight groups of hexadecimal quartets
- More than four hexadecimal characters in a quartet
- More than two colons in a row
Use Auto Detect for an IPv6 Internet Connection
To set up an IPv6 Internet connection through auto-detection:
- Launch a web browser from a computer or mobile device that is connected to your Orbi network.
- Enter orbilogin.com. A login window opens.
- Enter the admin username and password. The user name is admin. The password is the one that you specified the first time that you logged in. The username and password are case-sensitive. The BASIC Home page displays.
- Select ADVANCED > Advanced Setup > IPv6. The IPv6 page displays.
- From the Internet Connection Type menu, select Auto Detect. The page adjusts. The router automatically detects the information in the following fields:
- Connection Type. This field indicates the connection type that is detected.
- Router’s IPv6 Address on WAN. This field shows the IPv6 address that is acquired for the router’s WAN (or Internet) interface. The number after the slash (/) is the length of the prefix, which is also indicated by the underline (_) under the IPv6 address. If no address is acquired, the field displays Not Available.
- Router’s IPv6 Address on LAN. This field shows the IPv6 address that is acquired for the router’s LAN interface. The number after the slash (/) is the length of the prefix, which is also indicated by the underline (_) under the IPv6 address. If no address is acquired, the field displays Not Available.
- Select an IP Address Assignment radio button:
- Use DHCP Server. This method passes more information to LAN devices, but some IPv6 systems might not support the DHCv6 client function.
- Auto Config. This is the default setting. This setting specifies how the router assigns IPv6 addresses to the devices on your home network (the LAN).
- (Optional) Select the Use This Interface ID check box and specify the interface ID to be used for the IPv6 address of the router’s LAN interface. If you do not specify an ID here, the router generates one automatically from its MAC address.
- Click the Apply button. Your settings are saved.
Control Access to the Internet
Set Up Parental Controls
To set up Parental Controls, you must download the NETGEAR genie app on your mobile device. For more information about the NETGEAR genie app, visit NETGEAR.com/genie. After you set up and enable Parental Controls, you can change the web filtering level for each device on the network through the network map page on the genie app. To set up Parental Controls:
- Connect your mobile device to your router’s WiFi network.
- Launch the app store on your mobile device and download the NETGEAR genie app.
- Launch the NETGEAR genie app. The dashboard displays.
- Tap Parental Controls. The Parental Controls page displays.
- To log in to your OpenDNS account, tap the LOGIN button, enter your OpenDNS user name, and tap the LOGIN button. Parental Controls is automatically enabled.
- To create an OpenDNS account, tap CREATE ACCOUNT, fill in the fields, tap the SIGN UP button.
Your account is created and Parental Controls is automatically enabled.
For more information about how to setup Parental Controls using the NETGEAR genie app, see the genie Mobile App User Manual, which is available at downloadcenter.netgear.com/.
Set Up Security Event Email Notifications
The router can email you its logs of router activity. The log records router activity and security events such as attempts to access blocked sites or services. To set up email notifications:
- Launch a web browser from a computer or mobile device that is connected to your Orbi network.
- Enter orbilogin.com. A login window opens.
- Enter the admin user name and password. The username is admin. The password is the one that you specified the first time that you logged in. The user name and password are case-sensitive. The BASIC Home page displays.
- Select ADVANCED > Security > E-mail. The E-mail page displays.
- Select the Turn Email Notification On check box.
- In the Primary E-mail Address field, enter the email address to which logs and alerts are sent.This email address is also used for the From address. If this field is blank, log and alert messages are not sent.
- In the Your Outgoing Mail Server field, enter the name of your ISP outgoing (SMTP) mail server (such as mail.myISP.com). You might be able to find this information in the configuration window of your email program. If you leave this field blank, log and alert messages are not sent.
- In the Outgoing Mail Server Port Number field, enter your mail server’s port number. You might be able to find this information in the configuration window of your email program.
- If your outgoing email server requires authentication, select the My Mail Server requires authentication check box and do the following:
- In the User Name field, type the user name for the outgoing email server.
- In the Password field, type the password for the outgoing email server.
- To send alerts immediately, select the Send Alerts Immediately check box. Email alerts are sent immediately when someone attempts to visit a blocked site.
- To send logs based on a schedule, specify these settings:
- From Send logs according to this schedule menu, select the schedule type.
- From the Day menu, select the day.
- From the Time menu, select the time, and select the am or pm radio button.
- Click the Apply button. Your settings are saved.
Logs are sent automatically. If the log fills before the specified time, it is sent. After the log is sent, it is cleared from the router memory. If the router cannot email the log and the log buffer fills, the router overwrites the log.
Optimize Performance
WiFi Multimedia Quality of Service
Wi-Fi Multimedia Quality of Service (WMM QoS) prioritizes WiFi voice and video traffic over the WiFi link. WMM QoS is automatically enabled for the router. WMM QoS prioritizes WiFi data packets from different applications based on four access categories: voice, video, best effort, and background. For an application to receive the benefits of WMM QoS, WMM must be enabled for both it and the client running that application. Legacy applications that do not support WMM and applications that do not require QoS are assigned to the best-effort category, which receives a lower priority than voice and video.
To disable WMM QoS:
- Launch a web browser from a computer or mobile device that is connected to your Orbi network.
- Enter orbilogin.com. A login window opens.
- Enter the admin username and password. The user name is admin. The password is the one that you specified the first time that you logged in. The username and password are case-sensitive. The BASIC Home page displays.
- Select ADVANCED > Setup > QoS Setup > WMM. The WMM page displays.
- Clear the Enable WMM (Wi-Fi multimedia) settings (2.4 GHz b/g/n) check box.
- Clear the Enable WMM (Wi-Fi multimedia) settings (5 GHz a/n/ac) check box.
- Click the Apply button. Your settings are saved.
Improve Network Connections With Universal Plug N Play
Universal Plug N Play (UPnP) helps devices, such as Internet appliances and computers, access the network and connect to other devices as needed. UPnP devices can automatically discover the services from other registered UPnP devices on the network.
If you use applications such as multiplayer gaming, peer-to-peer connections, or real-time communications such as instant messaging or remote assistance (a feature in Windows XP), enable UPnP.
To enable Universal Plug and Play:
- Launch a web browser from a computer or mobile device that is connected to your Orbi network.
- Enter orbilogin.com. A login window opens.
- Enter the admin user name and password. The user name is admin. The password is the one that you specified the first time that you logged in. The user name and password are case-sensitive. The BASIC Home page displays.
- Select ADVANCED > Advanced Setup > UPnP. The UPnP page displays.
- Select the Turn UPnP On check box. By default, this check box is selected. UPnP for automatic device configuration can be enabled or disabled. If the Turn UPnP On check box is cleared, the router does not allow any device to automatically control router resources, such as port forwarding.
- Type the advertisement period in minutes. The advertisement period specifies how often the router broadcasts its UPnP information. This value can range from 1 to 1440 minutes. The default period is 30 minutes. Shorter durations ensure that control points receive current device status at the expense of more network traffic. Longer durations can compromise the freshness of the device status but can significantly reduce network traffic.
- Type the advertisement time to live in hops. The time to live for the advertisement is measured in hops (steps) for each UPnP packet sent. Hops are the steps a packet takes between routers. The number of hops can range from 1 to 255. The default value for the advertisement time to live is 4 hops, which should be fine for most home networks. If you notice that some devices are not being updated or reached correctly, it might be necessary to increase this value.
- Click the Apply button. The UPnP Portmap Table displays the IP address of each UPnP device that is accessing the router and which ports (internal and external) that device opened. The UPnP Portmap Table also displays what type of port is open and whether that port is still active for each IP address.
- To refresh the information in the UPnP Portmap Table, click the Refresh button.
Troubleshooting
Quick Tips
This section describes tips for troubleshooting some common problems. Sequence to Restart Your Network When you restart your network, follow this sequence:
- Turn off and unplug the modem.
- Turn off the router.
- Plug in the modem and turn it on. Wait two minutes.
- Turn on the router and wait two minutes.
WiFi Settings
Make sure that the WiFi settings in the WiFi-enabled computer or mobile device and the router match.
The WiFi network name (SSID) and WiFi security settings must match exactly. If you set up an access list, you must add each WiFi-enabled computer or mobile device’s MAC address to the router’s access list.
Network Settings
Make sure that the network settings of the computer are correct. Wired and wirelessly connected computers must use network (IP) addresses on the same network as the router. The simplest way to do this is to configure each computer to obtain an IP address automatically using DHCP.
Some cable modem service providers require you to use the MAC address of the computer initially registered on the account. You can view the MAC address on the Attached Devices page.
The Router and Satellite Do Not Sync
If you are experiencing difficulty syncing the router and the satellite, we recommend that you move the satellite into the same room as the router during the sync. Then move the satellite to a different location.
To sync the router and the satellite:
- Place the satellite in the same room as the Orbi router. Use this satellite location only during the sync process.
- Connect the satellite to a power source.
- If the Power LED on the back of the satellite does not light, press the Power On/Off button.
- Wait for the satellite’s ring LED to light solid white or magenta.
- Press the Sync button on the router and then within two minutes, press the Sync button on the satellite.The satellite’s ring LED pulses white, then lights one of the following colors for about three minutes and then turns off:
- Blue. The Orbi router and satellite successfully synced, and the connection between the router and satellite is good.
- Amber. The Orbi router and satellite successfully synced, and the connection between the router and satellite is fair. Consider moving the Orbi satellite closer to the Orbi router.
- Move the satellite to a location closer to the middle of your home.
- Connect the satellite to a power source.
- If the Power LED on the back of the satellite does not light, press the Power On/Off button. The satellite’s ring LED pulses white, then lights one of the following colors for about three minutes and then turns off:
- Blue. The Orbi router and satellite successfully synced, and the connection between the router and satellite is good.
- Amber. The Orbi router and satellite successfully synced, and the connection between the router and satellite is fair. Consider moving the Orbi satellite closer to the Orbi router
- Magenta. The Orbi router and satellite failed to sync. Move the satellite closer to the router and try again.
Supplemental Information
Factory Settings for Orbi Routers
You can return the router to its factory settings. Use the end of a paper clip or a similar object to press and hold the Reset button on the back of the router for at least seven seconds. The router resets, and returns to the factory settings.
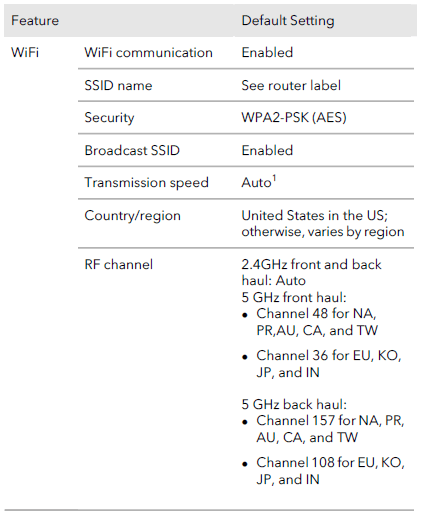
Factory Settings for Orbi Router Model RBR50
The following table shows the factory default settings for the router.

For more manuals by NETGEAR,visit ManualsLibraryy
NETGEAR Orbi RBR50 WiFi Router-FAQs
How many devices can connect to the Orbi RBR50?
The Orbi RBR50 can support up to 250 devices, but for better performance, especially during high-bandwidth activities like HD streaming or online gaming, it is recommended to limit connections to around 50 devices.
What is the default password for the Orbi RBR50?
The default username is “admin” and the default password is “password”. You will be prompted to follow onscreen instructions for setup, after which the Orbi router’s ring LED will turn off.
Is the Orbi RBR50 still supported?
The Orbi RBR50 model is now End of Service, meaning there will be no more firmware updates for this device.
How do I access the Orbi network settings?
You can access the settings by visiting www.orbilogin.com. You can also update your IP address in the “Internet” settings screen and download the Orbi App for additional functionalities.
What is the range of the Orbi RBR50 WiFi?
The Orbi RBR50 provides WiFi coverage of up to 2,000 sq. ft. with high-performance AC3000 WiFi.
Can I use the Orbi RBR50 with another router?
Yes, you can use the Orbi RBR50 with another router. Simply configure the Orbi base as a WiFi access point (AP), disable DHCP, and connect it via Ethernet to your current router.
What is the default IP address for the Orbi RBR50?
The default Gateway IP address for the Orbi RBR50 is 192.168.1.1.
Which satellites are compatible with the Orbi RBR50?
The Orbi RBR50 is compatible with the following satellites: RBS10, RBS20, and RBW30.

 The router shown in this is the Orbi router (model RBR50). The same setup applies to all Orbi routers.