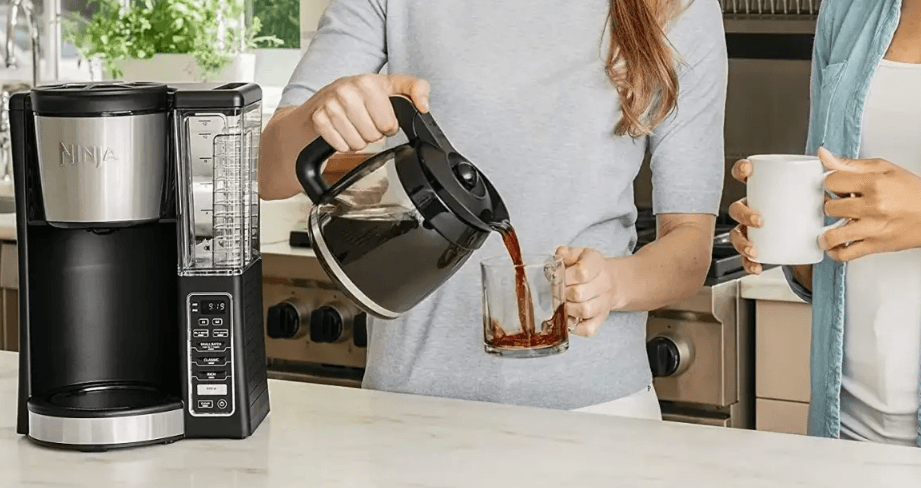
Ninja DCM201CP Programmable XL Coffee Maker PRO
IMPORTANT SAFEGUARDS
General Precautions
- This appliance can be used by persons with reduced physical, sensory, or mental capabilities or lack of experience and knowledge if they have been given supervision or instruction concerning use of the appliance in a safe way and understand the hazards involved.
- To reduce the risk of electric shock, this appliance has a polarized plug (one blade is wider than the other). As a safety feature, this plug will fit into a polarized outlet only one way. If the plug does not fit fully into the outlet, reverse the plug. If it still does not fit, contact a qualified electrician. DO NOT force into outlet or try to modify to fit.
- Keep the appliance and its cord out of reach of children. DO NOT allow the appliance to be used by children. Close supervision is necessary when used near children 4 To eliminate a choking hazard for young children, discard all packaging materials immediately upon unpacking.
- Children shall not play with the appliance.
- To protect against fire, electric shock, and injury to persons, DO NOT immerse the cord, plugs, or body of the machine in water or other liquid.
- NEVER carry the appliance by the power cord or pull it to disconnect from the electrical socket; instead, grasp the plug and pull to disconnect.
- DO NOT operate any appliance with a damaged cord or plug, or after the appliance malfunctions, or has been dropped or damaged in any manner. Contact SharkNinja Operating LLC for service.
- For household and work top use only. DO NOT let the power cord hang over the edge, or touch hot surfaces such as the stove.
- NEVER use a socket below the counter.
- To avoid the risk of fire, electrical shock, or damage to the unit, DO NOT store or use unit in an appliance garage or under a wall cabinet.
- Unplug from the outlet when either the appliance or the display clock is not in use and before cleaning. Allow to cool before putting on or taking off parts and before cleaning the appliance.
- Turn off and allow to cool before putting on or taking off parts, and before cleaning the appliance.
Operating Notice
To disconnect, turn any control to “off”, then remove the plug from the wall outlet.
- The use of an accessory not recommended by the manufacturer may create an overflow condition and scalding hazard, or result in fire, electric shock, or personal injury.
- ALWAYS use the appliance on a clean, dry, level surface.
- DO NOT place the appliance on or near a hot gas or electric burner or in a heated oven.
- DO NOT let the cord touch hot surfaces or hang over the edges of tables or counters.
- DO NOT use this appliance for anything other than its intended use.
- DO NOT use outdoors.
- DO NOT touch hot surfaces. Use handles or knobs.
- ALWAYS place a vessel beneath the brew basket to receive the brewed coffee.
- Scalding may occur if the brew basket is opened during a brew or clean cycle.
- DO NOT reach under or touch the drip stop during or upon completion of a brew as residual dripping hot coffee may cause scalding and burns to skin.
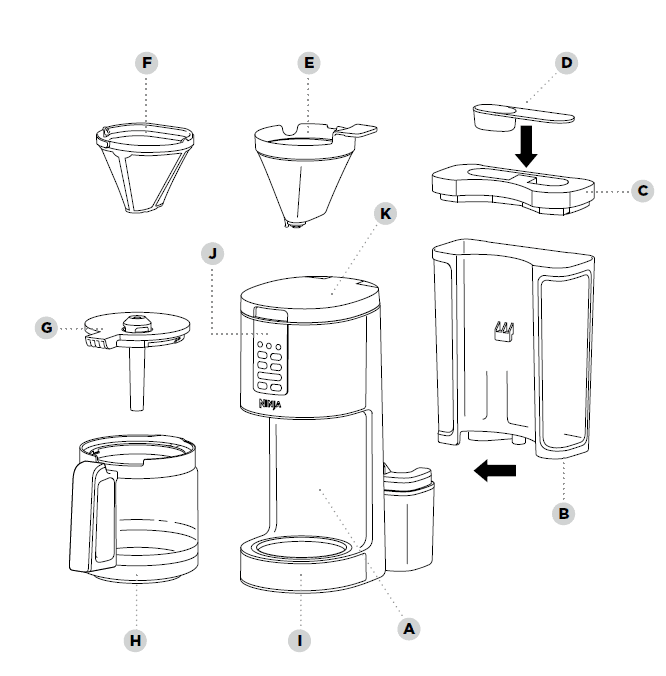
PARTS
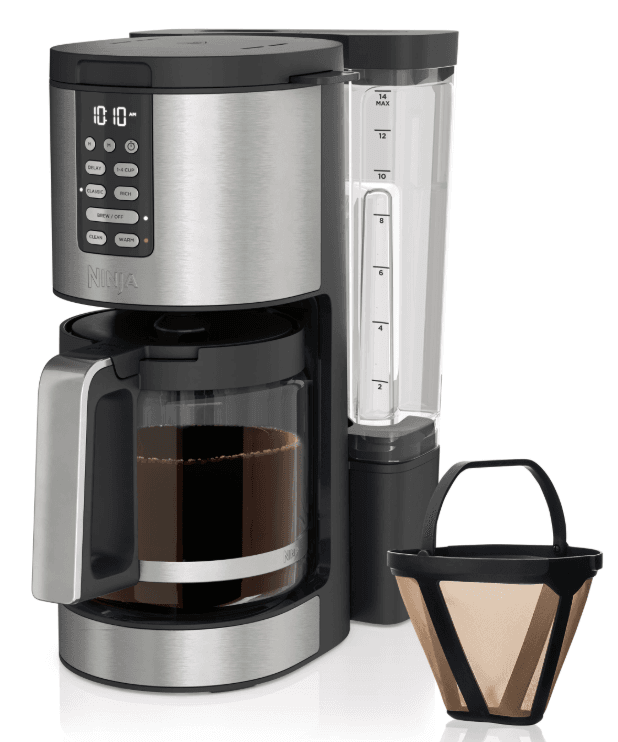
- A Coffee Maker (power cord & storage not shown)
- B Removable Water Reservoir
- C Water Reservoir Lid
- D Integrated Ninja® Scoop
- E Removable Brew Basket
- F Permanent Filter
- G Brew-Through Lid
- H Glass Carafe
- I Adjustable Warming Plate
- J Control Panel
- K Showerhead
USING THE CONTROL PANEL
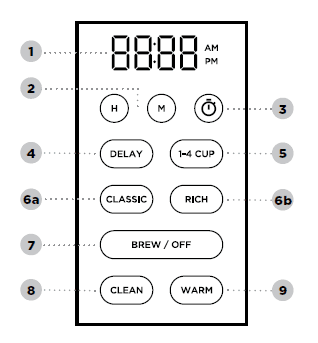
- Programmable Digital Clock
- Clock Hour and Minute Buttons
- Freshness Timer Button (not available on all models)
- Delay Brew Button
- 1-4 Cup Brew Button
- Brew Styles
- Classic Brew Button
- Rich Brew Button
- Start Brew/Off Button
- Clean Cycle Button
- Keep Warm Button
FEATURES OF THE NINJA PROGRAMMABLE COFFEE MAKER
- 1-4 CUP Brew Brewing 4 cups of coffee or fewer? When the 1-4 CUP button is selected, the coffee maker’s brew cycle will be optimized for brewing smaller batches, resulting in the most flavorful coffee.
IMPORTANT: DO NOT fill the reservoir higher than the 4 cup line, as the unit will use up the total amount of water in the reservoir regardless of the 1-4 CUP setting.
- CLASSIC Brew Smooth, well-balanced flavor.
- RICH Brew For a richer coffee but still smooth.
- Freshness Timer (Not available on all models) lets you know how long your coffee has been waiting for you. Press the freshness timer once to show the amount of time that has passed since brewing completed. The freshness timer counts up to a maximum of 4 hours.
- Auto-Off The unit will automatically shut off after 15 minutes of no interaction. To manually shut off the unit, press and hold BREW/OFF for 3 seconds.
- Keep Warm Keep your brew at the ideal temperature for up to 4 hours. The Adjustable Warming Plate will activate when a brew has started and is set to remain on for 2 hours. Press WARM to turn it off.
PREPARING FOR USE
BEFORE FIRST USE
- Remove all packaging material and stickers from the coffee maker.
- Wash the water reservoir, carafe, brew basket, and permanent filter in warm, soapy water with a soft cloth. Rinse parts and dry thoroughly.
- Plug in the power cord.
- Fill the reservoir to the 14 cup line with fresh water and place it on the base.
- Place the empty carafe on the base and prime the system by running a full carafe on Classic brew with water only. After the cycle is complete, discard the water.
NOTE: We recommend fresh, cool, filtered water. Well water is not recommended.
SETTING THE CLOCK
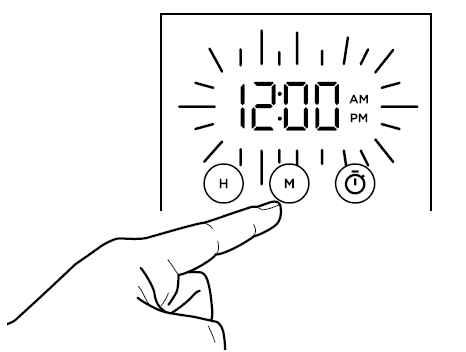
- Plug the power cord into an electrical outlet and the digital clock will begin to flash.
- Use the H and M buttons to set the clock to the current time. The AM or PM indicator will illuminate on the right side of the display as you are setting the time.
- When the desired time is reached, allow 5 seconds for it to set.
NOTE: If you unplug the brewer or experience a power loss, you will need to reset the clock the next time the brewer is powered on.
HOW TO BREW
- Place the brewer on a dry, clean, and level surface. Plug your brewer in to power it on.
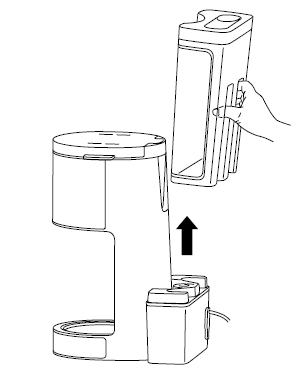
- Remove the water reservoir from the unit by lifting it straight up. Remove the lid entirely and fill the water reservoir to the desired level.

- Place the brew basket in the unit. Then place the permanent filter or a #4 paper cone filter in the brew basket.
 NOTE: If using a paper filter, fold the paper filter along the seams, open it fully, and firmly press it into the filter holder, making sure it is fully seated.
 - Add your desired amount of coffee grounds to the filter. Reference the Coffee Measurement Chart on page 9.
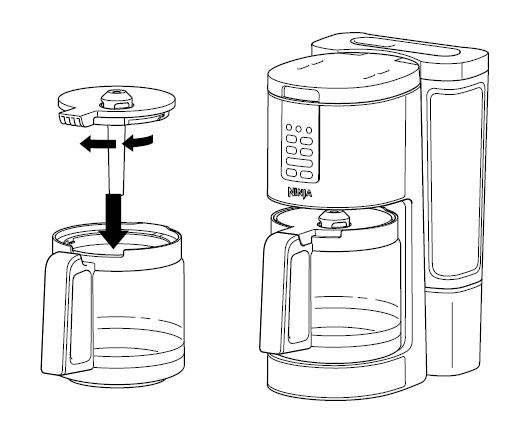
- Place the brew-through lid on the carafe and turn clockwise to lock into place. Then place carafe under the brew basket.

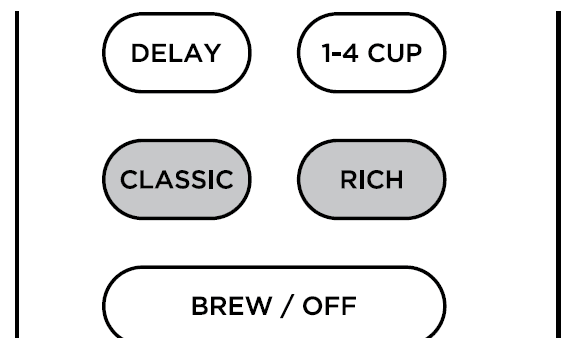
- Select either CLASSIC or RICH brew style. If you are brewing 4 cups or less, also select 1-4 CUP.

- Press BREW to start brewing. When the brewing is complete, the unit will beep, the clock will display “End”, and the warming plate will remain on for the set amount of time.
NOTE: Each brew has a pre-infusion cycle with varying times. The brew will begin, pause for a short period, and then continue brewing. This pre-infusion cycle is used to saturate the coffee grounds evenly.
NOTE: Do not add more cups of water than coffee you want to brew, as the unit will use up the total amount of water in the reservoir regardless of the 1-4 CUP setting.
PREPARING & USING YOUR NINJA® PROGRAMMABLE COFFEE MAKER
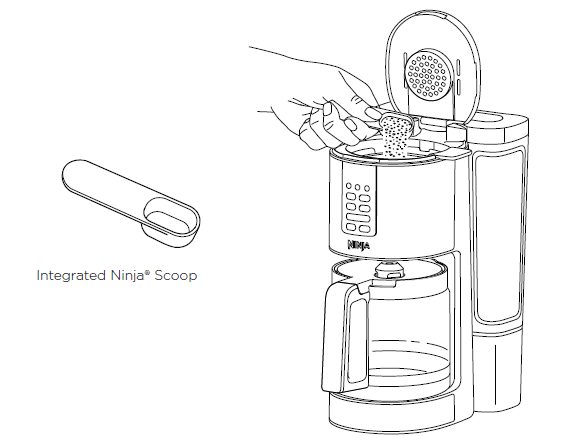
USING THE NINJA SCOOP
The Ninja Scoop is used to measure coffee grounds accurately. The scoop is equivalent to 2 tbsp. of coffee. Measurements are based on level scoops and may be adjusted to your preferred taste.
PREVENTING COFFEE OVERFLOW
Always measure with level scoops of a medium grind size. When using decaf coffee, use fewer scoops.
COFFEE MEASUREMENT CHART
| SERVING SIZE | CUPS OF COFFEE | GROUNDS | WATER | |
| 1-4 Cups (Select 1-4 CUP button) | 2 cups | 1 Ninja Scoops or 2 tbsp. | 2-cup line | |
| 4 cups | 2 Ninja Scoops or 4 tbsp. | 4-cup line | ||
|
6-14 Cups | 6 cups | 3 Ninja Scoops or 6 tbsp. | 6-cup line | |
| 8 cups | 4 Ninja Scoops or 8 tbsp. | 8-cup line | ||
| 10 cups | 5 Ninja Scoops or 10 tbsp. | 10-cup line | ||
| 12 cups | 6 Ninja Scoops or 12 tbsp. | 12-cup line | ||
| 14 cups | 7 Ninja Scoops or 14 tbsp. | 14-cup line | ||
COFFEE FRESHNESS TIMER (NOT AVAILABLE ON ALL MODELS)
The coffee freshness timer lets you know how long your coffee has been waiting for you since the end of your previous brew. At the end of every brew, the freshness timer will activate (as indicated by the LED next to the button when pressed), and it will begin counting. To view the freshness timer after a brew, press the Freshness Timer Button once and the clock time will change to show the amount of time that has passed since the previous brew cycle was completed. Press again at any time to display the clock time. The freshness timer runs for 4 hours. After 4 hours have passed, the timer will stop, the LED will turn off, and the display will automatically switch back to the clock.
NOTE: If you press the freshness timer button and the clock flashes “00:00”, then either a brew has not been completed or the timer has exceeded the 4-hour maximum.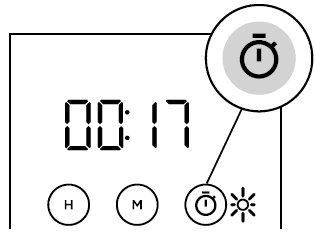
NOTE: The freshness timer can only be activated and viewed after a brew cycle has completed. The time and delay brew cannot be set when the freshness timer is displayed (indicated by the illuminated LED to the right of the button).
PROGRAMMING DELAY BREW
NOTE: The unit must remain on for the Delay Brew function to work. DO NOT unplug the unit after setting Delay Brew.
- Plug in the power cord.
- After filling the water reservoir and adding ground coffee to the filter, be sure the reservoir and brew basket are securely in place. Place the empty carafe under the brew basket.
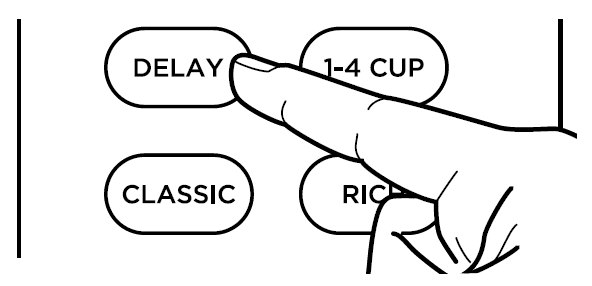
- Press DELAY. The clock will flash “12:00” or the last time that was set. Use the hour (H) and minute (M) buttons to set the time you would like the Delay Brew to begin. The AM or PM indicator will illuminate on the right side of the display as you are setting the time.

- Select the brew style, and your selection will illuminate. If brewing fewer than 4 cups, press 1-4 CUP.
- Once you have set the time and brew style, press DELAY or BREW to activate, or wait 5 seconds for Delay Brew to lock in. When activated, the unit will beep, and DELAY will remain illuminated.
- To cancel the program, press DELAY.
CARE & MAINTENANCE
ADJUSTABLE WARMING PLATE
The warming plate will turn on once the
brew has started. By default, the warming plate will remain on for 2 hours and will automatically turn off after the time has elapsed. To manually turn off the warming plate, press the WARM button after the brew has completed. You can turn the warming plate back on by pressing WARM again. Wait until the surface has cooled completely before touching.
NOTE: The unit will continue to brew if additional water is added to the reservoir. DO NOT add more water when using the WARM function.
KEEP WARM TIME & TEMPERATURE ADJUSTMENT
(TEMPERATURE ADJUSTMENT IS NOT AVAILABLE ON ALL MODELS.)
You can adjust how long the war remains on (up to 4 hours) and/or set the temperature to High, Medium, or Low. By default, the warming plate is set to remain on for 2 hours. To change the time/temperature settings of the warming plate, follow these instructions:
- Press and hold the WARM button until the clock flashes, displaying how long the warming plate is currently set to stay on.
- Quickly press the hour (H) or minute (M) button to adjust the time up to 4 hours or decrease the time to 0 hours. Press WARM to set the new time. Or wait 5 seconds, and the unit will beep, signifying the new time has been set.
- To change the temperature, press the hour (H) or minute (M) button, then press WARM, or wait 5 seconds for the temperature to lock in. To keep the same temperature, press WARM, or wait 5 seconds for the same temperature to lock in.
NOTE: If you set the warming time to 0 hours, it will skip the warming temperature menu. When set to 0 hours, the warming plate will not automatically activate during or after a brew cycle, but you can still manually turn it on by pressing WARM.
CLEANING AFTER A BREW
- After the unit has cooled, remove the brew basket and discard the grounds and paper filter, if used. If using the permanent filter, wash it thoroughly with soap and warm water or place on the top rack of the dishwasher.
- Empty the water reservoir and hand-wash or place in the dishwasher with the opening facing downwards. We recommend thoroughly washing the water reservoir weekly.
- We recommend cleaning your carafe with warm, soapy water and a soft brush, or placing it on the top rack of your dishwasher. DO NOT use a wire brush.
- After the coffee maker has cooled, wipe down the main unit, showerhead, and water reservoir shelf with a cloth and warm water. DO NOT immerse the coffee maker in water.
TO CLEAN AND DESCALE YOUR NINJA PROGRAMMABLE COFFEE MAKER
The clean function allows you to clean your unit whenever you would like. As a guideline, we recommend running a clean cycle if it is taking significantly more time to brew than normal.
NOTE: Make sure the 1-4 CUP button is not selected/illuminated before running a clean cycle.
- Set the empty carafe beneath the brew basket.
- Use a descaling solution specifically formulated for coffeemaker cleaning and follow the directions on the package. Fill the water reservoir up to, but not exceeding, the 14-Cup Line.
OR
Add 16 oz. of white vinegar to the water reservoir, then fill the rest of the reservoir with water up to, but not exceeding, the 14-Cup Line. - Once the water reservoir is filled with your cleaning solution or vinegar mixture, press the CLEAN button. The clean cycle will take up to an hour. To cancel the clean cycle, press the CLEAN button again.
- The unit will beep when the clean cycle successfully completes.
- Empty the contents of the carafe and place it back under the brew basket. Clean the water reservoir with warm, soapy water to remove any cleaning solution that could affect the flavor of your coffee.
- Refill the reservoir with fresh water up to, but not exceeding, the 14-Cup Line and set the empty carafe beneath the brew basket.
- Flush the system by running a 14-Cup Classic Brew cycle with water only. After the cycle is complete, discard the water and thoroughly clean the carafe.
NOTE: The clean cycle will take up to an hour. If you cancel the clean cycle, your machine will not be properly descaled.
NOTE: Running a water-only clean cycle will not descale the brewer properly.
TROUBLESHOOTING GUIDE
There is sediment in my coffee.
- If using a permanent filter, the sediment at the bottom of the brewed coffee may be due to using finely ground coffee.
- To reduce the amount of sediment in the brewed coffee, use a slightly coarser grind or use a paper filter.
NOTE: DO NOT use paper filter in conjunction with the permanent filter, as this could cause water and/or coffee to clog or back up in the filter basket. - Using too many grounds can cause the filter holder to overflow. Once cooled, clean out the filter holder and refill using the appropriate amount of coffee (1 scoop per 2 cups).
Paper filter is folding over.
- The unit is designed to take a #4 cone filter. Be sure you are using this size and shape, as larger sizes may fold over. Allow the filter holder to cool before handling. Be sure the paper filter is folded along its two seams and is pressed firmly into the filter holder. Alternatively, you can wet the sides of the paper filter to temporarily adhere it to the filter holder.
Coffee is too weak.
- For stronger coffee, use the Rich Brew setting. If you want an even bolder flavor, you can add more coffee grounds to the filter.
Coffee is too strong.
- For milder coffee, try the Classic Brew setting. If you want an even milder flavor, use fewer grounds in the filter.
Coffee is leaking.
- After removing the water reservoir, there may be a small amount of water in the reservoir valve. This can be easily removed with a dry cloth.
- If the leak is coming from the bottom of the brew basket, the removable filter holder valve may be clogged. Rinse the filter holder with water and press the valve repeatedly until the clog is cleared.
- If the leak is coming from the bottom of the coffee maker, call Customer Service at
1-877-646-5288.
Brew will not start.
NOTE: The brew will begin, pause, and then continue. This process is used to evenly saturate the coffee grounds.
- Ensure the unit is powered on and the display is illuminated. If there are no lights, the
machine is not getting power; try a different outlet. - Check to make sure there is water in the water reservoir.
- Make sure the carafe is in place. The brewer will not dispense coffee if the carafe is not under the brew basket. If it is not in place, the brew will remain in the brew basket, which could lead to overflow.
- If the brew still does not start, it may be time to run a clean cycle. Please refer to the To Clean and Descaling Your Ninja® Programmable Coffee Maker section.
For more manuals by Ninja, visit ManualsLibraryy
Ninja DCM201CP Programmable XL Coffee Maker PRO-FAQs
Can I use K-Cups with the Ninja coffee maker?
Yes, the Ninja Dual Brew is compatible with most K-Cup pods, especially Keurig-branded ones. You can also brew tea pods using the Ninja Pod Adapter.
Can I mute the beeping sound on my Ninja coffee maker?
No, the beeping sounds on Ninja coffee makers cannot be turned off or adjusted. Your feedback is appreciated and has been shared with the product team.
Can I use the Ninja coffee maker without a paper filter?
Yes, the machine includes a reusable filter and is designed to work best with it. Using paper filters may cause overflow if not used correctly.
What type of coffee grind should I use?
Use a medium grind for best results. Avoid fine grinds as they may cause overflow during brewing.
Is the Ninja coffee maker a drip coffee machine?
Yes, it’s a drip coffee maker that also supports espresso, cold brew, and hot water for tea. It even suggests grind sizes for different brew types.
What kind of filter does the Ninja coffee maker use?
It uses either a permanent filter (included) or a #4 cone-shaped paper filter. You can use either one depending on your preference.
How can I turn off the beeping sound on a Ninja appliance?
For some Ninja appliances (like air fryers), hold the “Temp” and “Time” buttons for 5 seconds to toggle the sound. This feature may not apply to all models, including the coffee maker.
What does the “Over Ice” setting do?
The “Over Ice” brew setting makes hot coffee that’s brewed directly over a full cup of ice for a smooth, flavorful iced coffee.
Is filtered coffee healthier than unfiltered coffee?
Filtered coffee may be healthier since unfiltered coffee contains diterpenes, which can raise cholesterol. A filtered cup has significantly fewer of these compounds.

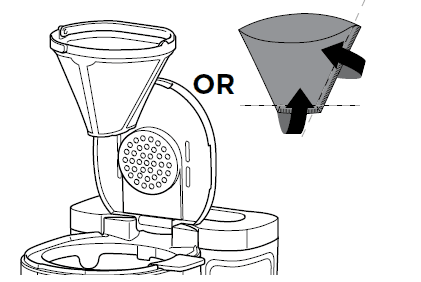 NOTE: If using a paper filter, fold the paper filter along the seams, open it fully, and firmly press it into the filter holder, making sure it is fully seated.