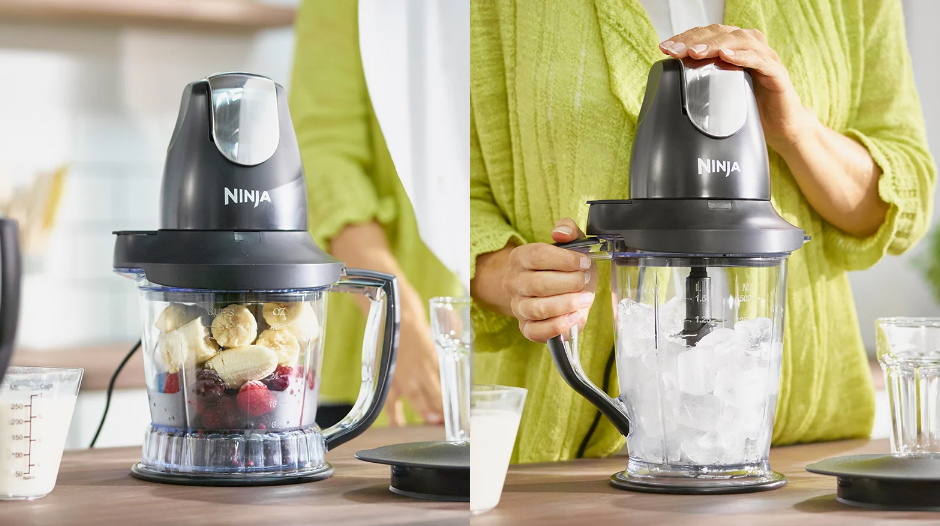
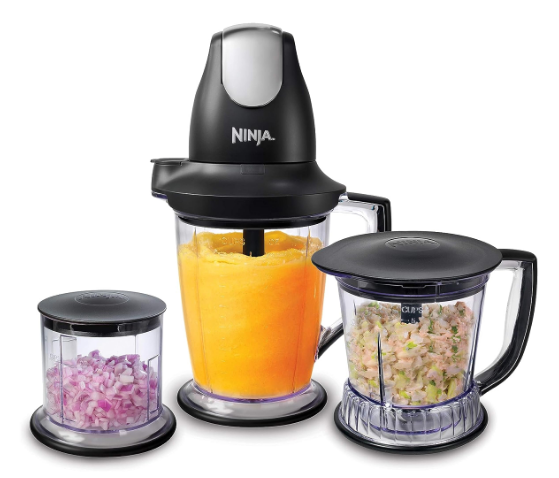
Ninja QB1004 Master Prep Professional Blender
IMPORTANT SAFETY INSTRUCTIONS
For Household Use Only
WHEN USING ELECTRICAL APPLIANCES, BASIC SAFETY PRECAUTIONS SHOULD ALWAYS BE FOLLOWED, INCLUDING THE FOLLOWING:
READ ALL INSTRUCTIONS BEFORE USING YOUR NINJA® MASTER PREP® PROFESSIONAL.
POLARIZED PLUG
WARNING: To reduce the risk of electric shock, this appliance has a polarized plug (one blade is wider than the other). This plug will fit into a polarized outlet only one way. If the plug does not fit fully into the outlet, reverse the plug. If it still does not fit, contact a qualified electrician to install the proper outlet. DO NOT modify the plug in any way.
WARNING: Extension cords are not recommended for use with this product.
TO REDUCE THE RISK OF FIRE, ELECTRIC SHOCK, OR INJURY:
- Remove utensils prior to processing. Failure to remove may cause the jar to be damaged or to shatter, which may cause personal injury.
- The Blade Assemblies are sharp, not locked in place, and removable. Handle with care. When handling the Blade Assemblies, always hold them by the shaft. Failure to do so will result in a risk of laceration.
- The Blade Assemblies are sharp and not locked in place. When pouring, carefully remove the Blade Assembly first, holding it by the shaft. Failure to do so will result in a risk of laceration.
- The Blade Assemblies are sharp and not locked in place. Make sure to carefully remove the splash guard and Blade Assembly, holding it by the shaft. Replace the splash guard before emptying the contents of the pitcher or Master Prep Professional Bowl. Failure to do so will result in a risk of laceration.
- DO NOT blend hot liquids; doing so may cause excessive pressure build-up, resulting in the risk of the user being burned.
- To protect against electrical shock, DO NOT submerge the appliance or allow the power cord to come into contact with water or any other liquid.
- DO NOT allow the appliance to be used by children. Close supervision is necessary when using near children. This is not a toy.
- Never leave an appliance unattended when in use.
- Appliance accessories are not intended to be used in the microwave, as it may result in damage to the accessories.
- Remove the Master Pod from the appliance and unplug the power cord from the electrical outlet when not in use, before assembling or disassembling parts, and before cleaning. To unplug, grasp the plug and pull from the electrical outlet. Never pull from the power cord.
- DO NOT abuse the power cord. Never carry the Master Pod by the power cord or yank it to disconnect from the electrical outlet; instead, grasp the plug and pull to disconnect.
- DO NOT operate any appliance with a damaged cord or plug, or after the appliance malfunctions, has been dropped or damaged in any manner. This appliance has no serviceable parts. Return the appliance to SharkNinja Operating LLC for examination, repair, or adjustment.
- DO NOT let the power cord hang over the edge of the table or counter or touch hot surfaces such as the stove.
- Always use the appliance on a dry, level surface.
- Keep hands, hair, clothing, as well as utensils, out of the container while processing to reduce the risk of severe injury to persons or damage to the appliance. A scraper may be used, but only when the appliance is not running.
- Avoid contact with moving parts.
- DO NOT attempt to sharpen blades.
- DO NOT use the appliance if the blade assemblies are bent or damaged.
- DO NOT expose the pitcher or the chopping bowl to extreme temperature changes.
- DO NOT use a pitcher or a chopping bowl if it is cracked or chipped.
- To reduce the risk of injury, NEVER operate the appliance without the splashguard in place.
- DO NOT operate this appliance on or near any hot surfaces (such as gas or electric burners or in a heated oven).
- The use of accessory attachments, including canning jars not recommended by the manufacturer, may cause fire, electrical shock, or risk of personal injury.
- DO NOT remove the Master Pod before the Blade Assemblies have stopped turning.
- DO NOT overfill.
- DO NOT operate the appliance empty.
- DO NOT try to defeat the interlock mechanism. Make sure that the 4-Blade Assemblies are properly inserted before operating the appliance.
- Immediately release the On/Off pulse button on the Master Pod in the event that the appliance malfunctions during use.
- DO NOT operate the appliance for more than 15 seconds.
- If the appliance overheats, a thermal switch will activate and shut off the motor. To reset, unplug the appliance and let it cool down for approximately 10 minutes before using it again.
- THIS PRODUCT IS INTENDED FOR HOUSEHOLD USE ONLY. Do not use this appliance for anything other than its intended use. DO NOT use outdoors.
SAVE THESE INSTRUCTIONS
Getting Started
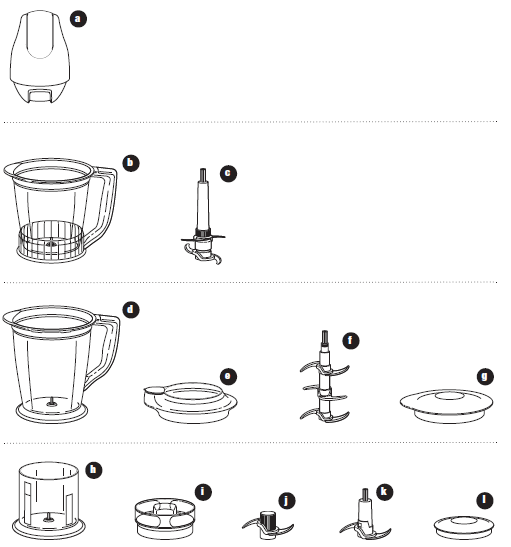
- Master Pod
- Master Prep® Professional 40 oz. Pitcher with Non-Slip Base
- Ninja® 4-Blade Assembly
- Master Prep® Professional 48 oz. Pitcher with Non-Slip Base
- Splashguard
- Ninja® 6-Blade Assembly
- Pitcher Storage Lid
- Master Prep Professional Bowl with Non-Slip Base
- Bowl Splashguard
- Upper Chopping Blade Assembly (bowl)
- Lower Chopping Blade Assembly (bowl)
- Bowl Storage Lid
- Power Cord (not shown)
NOTE: Attachments are not interchangeable.
Before First Use
WARNING: Blade Assemblies are sharp and not locked in place. If using the pour spout, ensure that the splash guard is fully on the pitcher. Failure to do so will result in a risk of laceration.
PLEASE KEEP THESE IMPORTANT SAFEGUARDS IN MIND WHEN USING THE APPLIANCE:
IMPORTANT:
- Make sure that the Master Pod is plugged in for use.
- Never add ingredients into the container before placing the Blade Assemblies in first.
- Attachments are not interchangeable.
- DO NOT attempt to operate the appliance without the splash guard on.
- Never run the appliance empty.
- Appliance accessories are not intended to be used in the microwave, as it may result in damage to the accessories.
WARNING: Blade Assemblies are sharp and not locked in place. Make sure to carefully remove the splash guard and Blade Assembly, holding it by the shaft. Replace the splash guard before emptying the contents of the pitcher. Failure to do so will result in a risk of laceration.
DO NOT try to place the Blade Assemblies onto the Master Pod and then into the Master Prep Professional pitchers. Always assemble the Ninja 6-Blade and Ninja 4-Blade Assembly inside the pitchers.
CAUTION: DO NOT immerse the Master Pod in water or any other liquid.
- Remove all packaging material and labels from the appliance. Separate/remove all parts from each other.
- Wash the lids, splashguards, bowl, pitchers, and blade assemblies in warm, soapy water. When washing the blade assemblies, use a dishwashing utensil with a handle to avoid direct hand contact with blades. WARNING: Handle the blade assemblies with care when washing, as the blades are sharp.
- Handle the blade assemblies with care to avoid contact with sharp edges. Rinse and air dry thoroughly.
- The pitchers, bowls, lids, splashguards, and Blade Assemblies are all dishwasher safe. It is recommended that the lids, splash guard, and blade assemblies be placed on the top rack. Ensure that the blade assemblies are removed from the pitcher and the bowl before placing them in the dishwasher.
- Wipe the motor base clean with a damp cloth.
Assembly and Use of the Pitchers
WARNING: Handle the Ninja 4-Blade and 6-Blade Assemblies with care, as the blades are sharp. Remove utensils prior to processing. Failure to remove may cause the pitcher to be damaged or to shatter, which may cause personal injury.
DO NOT try to place the Ninja 4-Blade or 6-Blade Assemblies onto the Master Pod and then into the pitcher. DO NOT attempt to operate the appliance without the safety splashguard in place.
Never leave the appliance unattended while in use.
CAUTION: DO NOT blend hot liquids; doing so may cause excessive pressure buildup, resulting in the risk of the user being burned.
IMPORTANT: Make sure that the Master Pod is plugged in for use.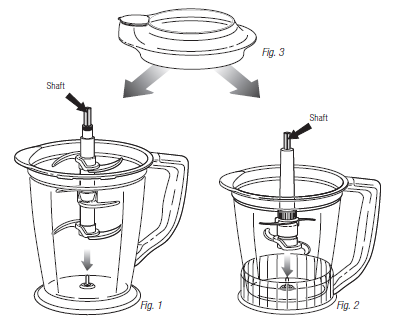
- Review the warning and caution statements above before proceeding to number 2.
- Place the pitcher on a clean, dry, level surface.
- Holding the Ninja® 4-Blade Assembly or Ninja 6-Blade Assembly by the shaft, place it onto the spindle pin inside the Master Prep® Professional pitcher. Use the Ninja 6-Blade Assembly in the 48 oz. Pitcher. (fig. 1) Use the Ninja 4-Blade Assembly in the 40 oz. Pitcher. (fig. 2) IMPORTANT: Place the Ninja Blade Assemblies inside the pitcher carefully, as blades are sharp.
- Add the ingredients to be processed into the Ninja Master Prep Professional pitcher.
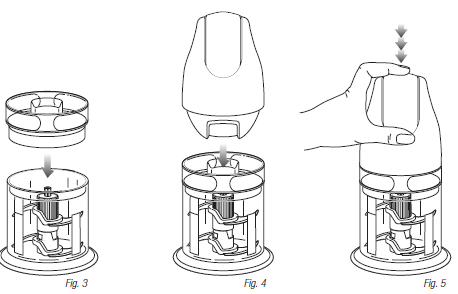
- Place the pitcher splash guard onto the top of the NinjanMaster Prep Professional pitcher. (fig. 3) IMPORTANT: Never add ingredients into the Ninja Master Prep Professional pitcher before placing the blade assembly in first.

- Review warning and caution statements on page 8 before proceeding to number 7.
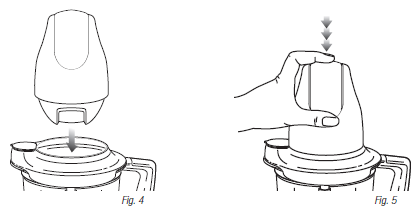
- Place the Master Pod on top of the pitcher splash guard, making sure that it is securely in place. (fig. 4) DO NOT attempt to operate the appliance without the safety splashguard in place.
- To start the appliance, plug the power cord into the electrical outlet, securely hold the Master Pod while operating, and press the On/Off pulse button located on the top of the power head. (fig. 5)
- Hold the Ninja® Master Prep® Professional pitcher firmly while depressing the On/Off pulse button to ensure the unit stays in place. NOTE: DO NOT operate the appliance continuously for more than 15 seconds at a time.
- To stop the appliance, remove your fingers from the On/ Off pulse button.
- In order to obtain a better quality of chopping, operate the appliance by using the “pulse” method.
- Make sure that the Blade Assembly has stopped completely before removing the Master Pod.
- If the ingredients stick to the side of the Master Prep Professional pitcher, stop the appliance, remove the Master Pod, and the splash guard. Use a spatula to dislodge the pieces and then replace the splash guard and the Master Pod. Continue processing.
- Depending on the consistency of the contents, use the pouring spout to empty the liquid contents.
- For thicker consistencies, first remove the pitcher’s splash guard. Then, carefully remove the Blade Assemblies from the top of the shaft. Place blade assemblies away from the work area to avoid accidental contact. Finally, empty the contents of the pitcher.
HINTS & TIPS FOR USING YOUR NINJA MASTER PREP PROFESSIONAL
To crush ice into snow, start by using short pulses to break up large chunks. Continue until snow is achieved.
Assembly and Use of the Master Prep® Bowl
- Review the warning and caution statements above before proceeding to number 2.
- Place the Master Prep Professional Bowl on a clean, dry, level surface.
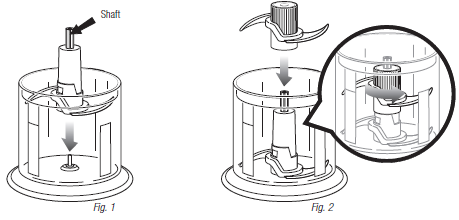
- Holding the Lower Chopping Blade Assembly by the shaft, place it over the spindle pin inside the Master Prep Professional Bowl. (fig. 1)
- Carefully insert the Upper Chopping Blade Assembly over the Lower Chopping Blade Assembly, rotating it until it locks onto the Lower Chopping Blade Assembly. (fig. 2) IMPORTANT: Always assemble the Chopping Blade Assembly inside the container. WARNING: DO NOT try to place the Upper and Lower Chopping Blade Assembly onto the Master Pod and then into the Master Prep Professional Bowl.

- Review warning and caution statements on page 10 before proceeding to number 6.
- Place the food that you want to process into the Master Prep Professional Bowl. IMPORTANT: Never add ingredients into the Master Prep Professional Bowl before placing the blade assembly in first.
- Place the splash guard on the bowl. (fig. 3)
- Place the Master Pod on top of the splash guard, making sure that it is securely in place. (fig. 4) DO NOT attempt to operate the appliance without the safety splash guard in place.
- To start the appliance, plug the power cord into the electrical outlet, securely hold the Master Pod while operating, and press the on/off pulse button located on the top of the Master Pod. (fig. 5)
- Hold the Master Prep® bowl firmly while depressing the On/Off pulse button to ensure the unit stays in place.
- To stop the appliance, remove your fingers from the On/ Off pulse button.
- In order to obtain a better quality of chopping, operate the appliance by using the “pulse” method.
- Make sure that the Chopping Blade Assembly has stopped completely before removing the Master Pod.
- If the ingredients stick to the side of the Master Prep® Professional bowl, stop the appliance, remove the Master Pod, and the splash guard. Use a spatula to dislodge the pieces and then replace the splash guard and the Master Pod. Continue processing.
- The blade assembly is loose and not locked in place. Remove the blade assembly from its shaft before you empty the contents of the Master Prep Professional Bowl.
Care & Maintenance
HOW TO CLEAN
CAUTION: Make sure that the Master Pod is unplugged from the power source before inserting or removing any attachments and before cleaning.
CAUTION: DO NOT immerse the Master Pod in water or any other liquid.
Separate/remove all parts from each other.
Hand Washing: Wash the lids, splashguards, pitchers, bowl, and Blade Assemblies in warm, soapy water. When washing the Blade Assemblies, use a dishwashing utensil with a handle to avoid direct hand contact with blades. Handle the Blade Assemblies with care to avoid contact with sharp edges. Rinse and air dry thoroughly.
Dishwasher: The pitchers, bowls, lids, splashguards, and Blade Assemblies are all dishwasher safe. It is recommended that the lids and blade assemblies be placed on the top rack. Ensure the blade assemblies are removed from the pitchers and the bowl before placing them in the dishwasher. WARNING: Handle the Blade Assemblies with care when washing, as the blades are sharp. Contact with the blades’ edges can result in laceration.
Wipe the motor base clean with a damp cloth.
Please call customer service if any servicing needs to be performed on the appliance at 1-877-646-5288.
HOW TO STORE
Store the Master Prep® upright with the blade assembly and splashguard inside the corresponding container. Loosely wrap the power cord around the Master Pod.
RESETTING THE MOTOR THERMOSTAT
The Ninja® Master Prep Professional features a unique safety system that prevents damage to the unit’s motor and drive system should you inadvertently overload your appliance. If the appliance is being overloaded, the motor will stop. To reset the appliance, follow the resetting procedure below:
- Unplug the appliance from the electrical outlet.
- Remove the Master Pod and splash guard, empty the container, and ensure that no food is jamming the blade assembly.
- Allow the appliance to cool for approximately 10 minutes.
- Replace the splash guard and Master Pod onto the container and re-plug the appliance into the electrical outlet.
- Proceed to use the appliance as before, making sure not to exceed the recommended maximum capacities.
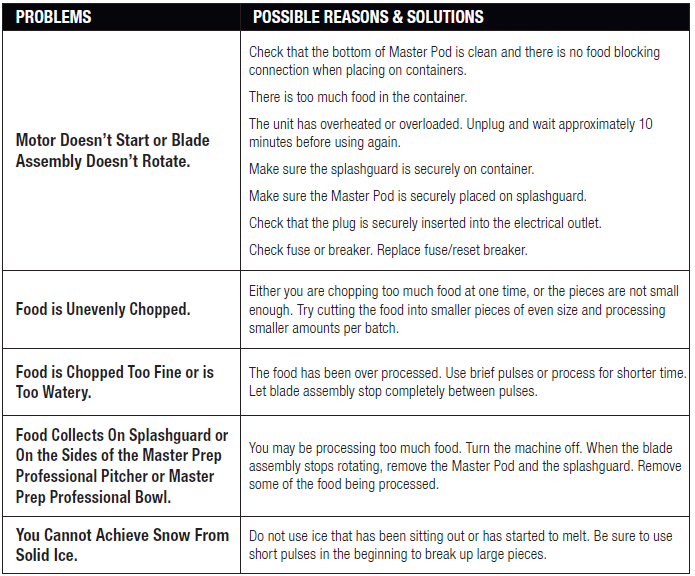
Troubleshooting Guide
Replacement Parts
ORDERING REPLACEMENT PARTS
To order additional parts and attachments, please visit our website: www.ninjakitchen.com, or feel free to contact customer service: 1-877-646-5288.
For more Manuals by Ninja, visit ManualsLibraryy
Ninja QB1004 Master Prep Professional Blender-FAQs
What can the Ninja Master Prep Professional Blender do?
The Ninja QB1004 Master Prep is a versatile kitchen tool that can:
✔ Blend smoothies (frozen fruits, yogurt, etc.)
✔ Crush ice into snow-like texture
✔ Chop vegetables, nuts, and herbs
✔ Puree sauces, dips, and baby food
✔ Mix batters and doughs (with proper technique)
What’s the wattage of the Ninja QB1004?
It has a 450-watt motor, powerful enough for most blending and chopping tasks.
Can it make hot soups?
❌ No, this model is not designed for heating liquids. Use a Ninja Foodi or soup maker for hot blending.
Can it blend frozen fruit?
✅ Yes! It easily blends frozen fruits into smoothies.
Can it crush ice?
✅ Yes, it crushes ice efficiently for slushies and frozen drinks.
Can it grind nuts into nut butter?
✅ Yes, but pulse in short bursts to avoid overheating.
Why is my Ninja blender not turning on?
Check if the lid is properly locked.
Ensure the base is plugged in.
If the motor overheats, wait 15 minutes before retrying.
Is the Ninja QB1004 dishwasher safe?
✅ Yes! The blades, cups, and lids are top-rack dishwasher safe.
How do I clean it manually?
Rinse immediately after use.
Add warm water + a drop of dish soap, then pulse 5-10 times.
Rinse thoroughly and air dry.
Why does my blender smell burnt?
Overheating from overloading or blending too long.
Food residue stuck in the blades (clean thoroughly).

